tow Ram 1500 2018 Owner's Manual
[x] Cancel search | Manufacturer: RAM, Model Year: 2018, Model line: 1500, Model: Ram 1500 2018Pages: 372, PDF Size: 7.1 MB
Page 127 of 372

make room for the child seat. You may also
move the front seat forward to allow more
room for the child seat.
3. Attach the lower hooks or connectors ofthe child restraint to the lower anchorages
in the selected seating position.
4. If the child restraint has a tether strap, connect it to the top tether anchorage.
See the section “Installing Child Re-
straints Using the Top Tether Anchorage”
for directions to attach a tether anchor.
5. Tighten all of the straps as you push the child restraint rearward and downward
into the seat. Remove slack in the straps
according to the child restraint manufac-
turer’s instructions.
6.
Test that the child restraint is installed tightly
by pulling back and forth on the child seat at
the belt path. It should not move more than
1 inch (25.4 mm) in any direction.
How To Stow An Unused Switchable-ALR
(ALR) Seat Belt:
When using the LATCH attaching system to
install a child restraint, stow all ALR seat
belts that are not being used by other occu- pants or being used to secure child restraints.
An unused belt could injure a child if they
play with it and accidentally lock the seat belt
retractor. Before installing a child restraint
using the LATCH system, buckle the seat belt
behind the child restraint and out of the
child’s reach. If the buckled seat belt inter-
feres with the child restraint installation, in-
stead of buckling it behind the child re-
straint, route the seat belt through the child
restraint belt path and then buckle it. Do not
lock the seat belt. Remind all children in the
vehicle that the seat belts are not toys and
that they should not play with them.
WARNING!
• Improper installation of a child restraint
to the LATCH anchorages can lead to
failure of the restraint. The child could
be badly injured or killed. Follow the
child restraint manufacturer’s directions
exactly when installing an infant or child
restraint.
• Child restraint anchorages are designed
to withstand only those loads imposed
by correctly-fitted child restraints. Un-
WARNING!
der no circumstances are they to be used
for adult seat belts, harnesses, or for
attaching other items or equipment to
the vehicle.
Installing Child Restraints Using The Ve-
hicle Seat Belt
Child restraint systems are designed to be
secured in vehicle seats by lap belts or the lap
belt portion of a lap/shoulder belt.
WARNING!
• Improper installation or failure to prop-erly secure a child restraint can lead to
failure of the restraint. The child could
be badly injured or killed.
• Follow the child restraint manufacturer’s
directions exactly when installing an in-
fant or child restraint.
The seat belts in the passenger seating posi-
tions are equipped with either a Switchable
Automatic Locking Retractor (ALR) or a
cinching latch plate or both. Both types of
125
Page 138 of 372
WARNING!
• ONLY use the driver’s side floor mat onthe driver’s side floor area. To check for
interference, with the vehicle properly
parked with the engine off, fully depress
the accelerator, the brake, and the
clutch pedal (if present) to check for
interference. If your floor mat interferes
with the operation of any pedal, or is not
secure to the floor, remove the floor mat
from the vehicle and place the floor mat
in your trunk.
• ONLY use the passenger’s side floor mat
on the passenger’s side floor area.
• ALWAYS make sure objects cannot fall or
slide into the driver’s side floor area
when the vehicle is moving. Objects can
become trapped under accelerator,
brake, or clutch pedals and could cause
a loss of vehicle control.
•
NEVER place any objects under the floor
mat (e.g., towels, keys, etc.). These ob-
jects could change the position of the
floor mat and may cause interference with
the accelerator, brake, or clutch pedals.
WARNING!
• If the vehicle carpet has been removed
and re-installed, always properly attach
carpet to the floor and check the floor
mat fasteners are secure to the vehicle
carpet. Fully depress each pedal to
check for interference with the accelera-
tor, brake, or clutch pedals then re-
install the floor mats.
• It is recommended to only use mild soap
and water to clean your floor mats. After
cleaning, always check your floor mat
has been properly installed and is se-
cured to your vehicle using the floor mat
fasteners by lightly pulling mat.
Periodic Safety Checks You
Should Make Outside The Vehicle
Tires
Examine tires for excessive tread wear and
uneven wear patterns. Check for stones,
nails, glass, or other objects lodged in the
tread or sidewall. Inspect the tread for cuts and cracks. Inspect sidewalls for cuts,
cracks, and bulges. Check the wheel bolts for
tightness. Check the tires (including spare)
for proper cold inflation pressure.
Lights
Have someone observe the operation of brake
lights and exterior lights while you work the
controls. Check turn signal and high beam
indicator lights on the instrument panel.
Door Latches
Check for proper closing, latching, and lock-
ing.
Fluid Leaks
Check area under the vehicle after overnight
parking for fuel, coolant, oil, or other fluid
leaks. Also, if gasoline fumes are detected or
if fuel, or brake fluid leaks are suspected. The
cause should be located and corrected imme-
diately.
SAFETY
136
Page 140 of 372

To Accelerate For Passing.........178
To Resume Speed .............178
To Deactivate ................178
PARKSENSE FRONT AND REAR PARK AS-
SIST — IF EQUIPPED ...........179
Cleaning The ParkSense System .....179
PARKVIEW REAR BACK UP CAMERA — IF
EQUIPPED................. .179
REFUELING THE VEHICLE —
GAS ENGINE ................ .181
Materials Added To Fuel ..........182
REFUELING THE VEHICLE— 1500 DIESEL
MODELS................... .182
Diesel Exhaust Fluid............183
Adding Diesel Exhaust Fluid........184
REFUELING THE VEHICLE — 2500/
3500 DIESEL MODELS ...........186
Diesel Exhaust Fluid............188
TRAILER TOWING.............191
Trailer Towing Weights (Maximum
Trailer Weight Ratings) ...........191
Towing Requirements ...........191
RECREATIONAL TOWING (BEHIND
MOTORHOME, ETC.)............196
Towing This Vehicle Behind Another
Vehicle....................196
Recreational Towing — Two-Wheel
Drive Models .................197
Recreational Towing — Four-Wheel
Drive Models .................197
STARTING AND OPERATING
138
Page 156 of 372
ENGINE BREAK-IN
RECOMMENDATIONS — 3.0L DIESEL
The diesel engine does not require a break-in
period due to its construction. Normal opera-
tion is allowed, providing the following rec-
ommendations are followed:
• Warm up the engine before placing it underload.
• Do not operate the engine at idle for pro- longed periods.
• Use the appropriate transmission gear to prevent engine lugging.
• Observe vehicle oil pressure and tempera- ture indicators.
• Check the coolant and oil levels frequently.
• Vary throttle position at highway speeds when carrying or towing significant weight.
NOTE:
Light duty operation such as light trailer
towing or no load operation will extend the
time before the engine is at full efficiency.
Reduced fuel economy and power may be
seen at this time. The engine oil installed in the engine at the
factory is a high-quality energy conserving
type lubricant. Oil changes should be consis-
tent with anticipated climate conditions un-
der which vehicle operations will occur. The
recommended viscosity and quality grades
are shown under “Fluids And Lubricants” in
"Technical Specifications” in this manual.
NON-DETERGENT OR STRAIGHT MINERAL
OILS MUST NEVER BE USED.
ENGINE BREAK-IN
RECOMMENDATIONS — 6.7L DIESEL
The Cummins turbocharged diesel engine
does not require a break-in period due to its
construction. Normal operation is allowed,
providing the following recommendations are
followed:
• Warm up the engine before placing it under
load.
• Do not operate the engine at idle for pro- longed periods.
• Use the appropriate transmission gear to prevent engine lugging. • Observe vehicle oil pressure and tempera-
ture indicators.
• Check the coolant and oil levels frequently.
• Vary throttle position at highway speeds when carrying or towing significant weight.
NOTE:
Light duty operation such as light trailer
towing or no load operation will extend the
time before the engine is at full efficiency.
Reduced fuel economy and power may be
seen at this time.
For additional vehicle break-in requirements,
refer to “Trailer Towing” in “Starting And
Operating” of the Owner’s Manual.
Because of the construction of the Cummins
turbocharged diesel engine, engine run-in is
enhanced by loaded operating conditions
which allow the engine parts to achieve final
finish and fit during the first 6,000 miles
(10 000 km).STARTING AND OPERATING
154
Page 160 of 372

Electronic Range Select (ERS) Operation —
Eight-Speed Transmission
The Electronic Range Select (ERS) shift con-
trol allows the driver to limit the highest
available gear when the transmission is in
DRIVE. For example, if you set the transmis-
sion gear limit to 4 (fourth gear), the trans-
mission will not shift above fourth gear (ex-
cept to prevent engine overspeed), but will
shift through the lower gears normally.
You can switch between DRIVE and ERS
mode at any vehicle speed. When the trans-
mission gear selector is in DRIVE, the trans-
mission will operate automatically, shifting
between all available gears. Tapping the
GEAR- switch (on the steering wheel) will
activate ERS mode, display the current gear
in the instrument cluster, and set that gear as
the top available gear. Once in ERS mode,
tapping the GEAR- or GEAR+ switch will
change the top available gear.To exit ERS mode, simply push and hold the
GEAR+ switch until the gear limit display
disappears from the instrument cluster.
WARNING!
Do not downshift for additional engine
braking on a slippery surface. The drive
wheels could lose their grip and the ve-
hicle could skid, causing a collision or
personal injury.
Six-Speed Automatic
Transmission — 1500 Models
Only (If Equipped)
The transmission gear position display (lo-
cated in the instrument cluster) indicates the
transmission gear range. The gear selector is
mounted either on the right side of the steer-
ing column (if equipped) or on the console (if
equipped). You must press the brake pedal to
move the gear selector out of PARK (refer to
“Brake/Transmission Shift Interlock System”
in this section). To drive, move the gear
selector from PARK or NEUTRAL to the
DRIVE position. Pull the gear selector toward
you when shifting into REVERSE or PARK, or
when shifting out of PARK (column shift
only).
The electronically-controlled transmission
provides a precise shift schedule. The trans-
mission electronics are self-calibrating;
therefore, the first few shifts on a new vehicle
may be somewhat abrupt. This is a normal
condition, and precision shifts will develop
within a few hundred miles (kilometers).
ERS ControlSTARTING AND OPERATING
158
Page 161 of 372
Only shift from DRIVE to PARK or REVERSE
when the accelerator pedal is released and
the vehicle is stopped. Be sure to keep your
foot on the brake pedal when shifting be-
tween these gears.
The transmission gear selector has only
PARK, REVERSE, NEUTRAL, and DRIVE
shift positions. Manual downshifts can be
made using the Electronic Range Select
(ERS) shift control. Pressing the ERS (-/+)
switches (column shift) or moving the gear
selector to the left or right (-/+) (console shift)
while in the DRIVE position will select the
highest available transmission gear, and will
display that gear limit in the instrument clus-
ter as 1, 2, 3, etc. Refer to "Electronic Range
Select (ERS) Operation" in this section for
further information. Some models will dis-
play both the selected gear limit, and the
actual current gear, while in ERS mode.Transmission Limp Home Mode
Transmission function is monitored electroni-
cally for abnormal conditions. If a condition is
detected that could result in transmission
damage, Transmission Limp Home Mode is
activated. In this mode, the transmission re-
mains in direct gear regardless of which for-
ward gear is selected. PARK, REVERSE, and
NEUTRAL will continue to operate. The Mal-
function Indicator Light (MIL) may be illumi-
nated. Limp Home Mode allows the vehicle to
be driven to an authorized dealer for service
without damaging the transmission.
In the event of a momentary problem, the
transmission can be reset to regain all for-
ward gears by performing the following steps:
1. Stop the vehicle.
2. Shift the transmission into PARK.
3. Turn the ignition OFF.
4. Wait approximately 10 seconds.
5. Restart the engine.
6. Shift into the desired gear range. If theproblem is no longer detected, the trans-
mission will return to normal operation. NOTE:
Even if the transmission can be reset, we
recommend that you visit your authorized
dealer at your earliest possible convenience.
Your authorized dealer has diagnostic equip-
ment to assess the condition of your trans-
mission.
If the transmission cannot be reset, autho-
rized dealer service is required.
Electronic Range Select (ERS) Operation —
Six-Speed Transmission (1500 Models
Only)
The Electronic Range Select (ERS) shift con-
trol allows the driver to limit the highest
available gear when the transmission is in
DRIVE. For example, if you set the transmis-
sion gear limit to 4 (fourth gear), the trans-
mission will not shift above fourth gear, but
will shift through the lower gears normally.
Use of ERS (or TOW/HAUL mode) also en-
ables an additional underdrive gear which is
not normally used during through-gear accel-
erations. This additional gear can improve
vehicle performance and cooling capability
when towing a trailer on certain grades. In
159
Page 163 of 372
drive, move the gear selector from PARK or
NEUTRAL to the DRIVE position. Pull the
gear selector toward you when shifting into
REVERSE or PARK, or when shifting out of
PARK.
The electronically-controlled transmission
provides a precise shift schedule. The trans-
mission electronics are self-calibrating;
therefore, the first few shifts on a new vehicle
may be somewhat abrupt. This is a normal
condition, and precision shifts will develop
within a few hundred miles (kilometers).
Only shift from DRIVE to PARK or REVERSE
when the accelerator pedal is released and
the vehicle is stopped. Be sure to keep your
foot on the brake pedal when shifting be-
tween these gears.
The transmission gear selector has only
PARK, REVERSE, NEUTRAL, and DRIVE
shift positions. Manual downshifts can be
made using the Electronic Range Select
(ERS) shift control. Pressing the ERS (-/+)
switches (on the gear selector) while in the
DRIVE position will select the highest avail-
able transmission gear, and will display that
gear limit in the instrument cluster as 1, 2, 3,etc. Refer to "Electronic Range Select (ERS)
Operation" in this section for further informa-
tion. Some models will display both the se-
lected gear limit, and the actual current gear,
while in ERS mode.
Transmission Limp Home Mode
Transmission function is monitored electroni-
cally for abnormal conditions. If a condition
is detected that could result in transmission
damage, Transmission Limp Home Mode is
activated. In this mode, the transmission
remains in fourth gear regardless of which
forward gear is selected. PARK, REVERSE,
and NEUTRAL will continue to operate. The
Malfunction Indicator Light (MIL) may be
illuminated. Limp Home Mode allows the
vehicle to be driven to an authorized dealer
for service without damaging the transmis-
sion.
In the event of a momentary problem, the
transmission can be reset to regain all for-
ward gears by performing the following steps:
1. Stop the vehicle.
2. Shift the transmission into PARK.
3. Turn the ignition OFF.4. Wait approximately 10 seconds.
5. Restart the engine.
6. Shift into the desired gear range. If the
problem is no longer detected, the trans-
mission will return to normal operation.
NOTE:
Even if the transmission can be reset, we
recommend that you visit your authorized
dealer at your earliest possible convenience.
Your authorized dealer has diagnostic equip-
ment to assess the condition of your trans-
mission.
If the transmission cannot be reset, autho-
rized dealer service is required.
Electronic Range Select (ERS) Operation
The Electronic Range Select (ERS) shift con-
trol allows the driver to limit the highest
available gear when the transmission is in
DRIVE. For example, if you set the transmis-
sion gear limit to 4 (fourth gear), the trans-
mission will not shift above fourth gear, but
will shift through the lower gears normally.
161
Page 165 of 372
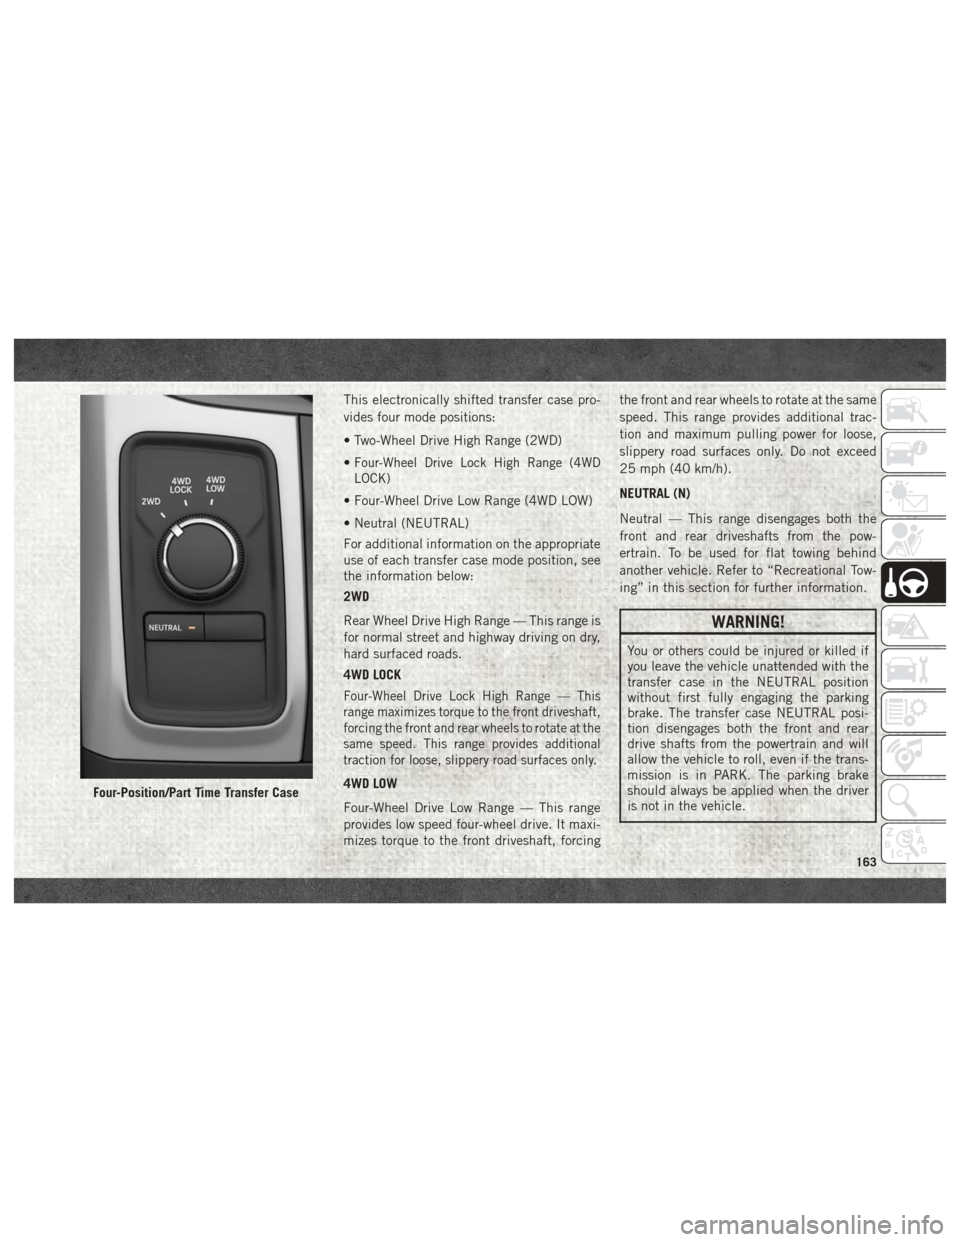
This electronically shifted transfer case pro-
vides four mode positions:
• Two-Wheel Drive High Range (2WD)
•
Four-Wheel Drive Lock High Range (4WD
LOCK)
• Four-Wheel Drive Low Range (4WD LOW)
• Neutral (NEUTRAL)
For additional information on the appropriate
use of each transfer case mode position, see
the information below:
2WD
Rear Wheel Drive High Range — This range is
for normal street and highway driving on dry,
hard surfaced roads.
4WD LOCK
Four-Wheel Drive Lock High Range — This
range maximizes torque to the front driveshaft,
forcing the front and rear wheels to rotate at the
same speed. This range provides additional
traction for loose, slippery road surfaces only.
4WD LOW
Four-Wheel Drive Low Range — This range
provides low speed four-wheel drive. It maxi-
mizes torque to the front driveshaft, forcingthe front and rear wheels to rotate at the same
speed. This range provides additional trac-
tion and maximum pulling power for loose,
slippery road surfaces only. Do not exceed
25 mph (40 km/h).
NEUTRAL (N)
Neutral — This range disengages both the
front and rear driveshafts from the pow-
ertrain. To be used for flat towing behind
another vehicle. Refer to “Recreational Tow-
ing” in this section for further information.
WARNING!
You or others could be injured or killed if
you leave the vehicle unattended with the
transfer case in the NEUTRAL position
without first fully engaging the parking
brake. The transfer case NEUTRAL posi-
tion disengages both the front and rear
drive shafts from the powertrain and will
allow the vehicle to roll, even if the trans-
mission is in PARK. The parking brake
should always be applied when the driver
is not in the vehicle.
Four-Position/Part Time Transfer Case
163
Page 167 of 372
4WD LOCK
Four-Wheel Drive Lock High Range — This
range maximizes torque to the front drive-
shaft, forcing the front and rear wheels to
rotate at the same speed. Additional traction
for loose, slippery road surfaces only.
4WD LOW
Four-Wheel Drive Low Range — This range
provides low speed four-wheel drive. It maxi-
mizes torque to the front driveshaft, forcing
the front and rear wheels to rotate at the same
speed. This range provides additional trac-
tion and maximum pulling power for loose,
slippery road surfaces only. Do not exceed
25 mph (40 km/h).
NEUTRAL (N)
Neutral — This range disengages both the
front and rear driveshafts from the pow-
ertrain. To be used for flat towing behind
another vehicle. Refer to “Recreational Tow-
ing” in this section for further information.This electronically shifted transfer case is
designed to be driven in the two-wheel drive
position (2WD) or four-wheel drive position
(4WD AUTO) for normal street and highway
conditions on dry hard surfaced roads). Driv-
ing the vehicle in 2WD will have greater fuel
economy benefits as the front axle is not
engaged in 2WD.
For variable driving conditions, the 4WD
AUTO mode can be used. In this mode, the
front axle is engaged, but the vehicle's power
is sent to the rear wheels. Four-wheel drive
will be automatically engaged when the ve-
hicle senses a loss of traction. Because the
front axle is engaged, this mode will result in
lower fuel economy than the 2WD mode.
When additional traction is required, the
transfer case 4WD LOCK and 4WD LOW po-
sitions can be used to maximize torque to the
front driveshaft, forcing the front and rear
wheels to rotate at the same speed. This is
accomplished by rotating the 4WD Control
Switch to the desired position.Refer to “Shifting Procedure” in the “Start-
ing And Operating” section of you Owner’s
Manual for specific shifting instructions.
WARNING!
You or others could be injured or killed if
you leave the vehicle unattended with the
transfer case in the NEUTRAL position
without first fully engaging the parking
brake. The transfer case NEUTRAL posi-
tion disengages both the front and rear
drive shafts from the powertrain and will
allow the vehicle to roll, even if the trans-
mission is in PARK. The parking brake
should always be applied when the driver
is not in the vehicle.
165
Page 169 of 372
4WD LOW
Four-Wheel Drive Low Range — This range
provides low speed four-wheel drive. It maxi-
mizes torque to the front driveshaft, forcing
the front and rear wheels to rotate at the same
speed. This range provides additional trac-
tion and maximum pulling power for loose,
slippery road surfaces only. Do not exceed
25 mph (40 km/h).
NEUTRAL (N)
Neutral — This range disengages both the
front and rear driveshafts from the pow-
ertrain. To be used for flat towing behind
another vehicle. Refer to “Recreational Tow-
ing” in this section for further information.
This electronically shifted transfer case is
designed to be driven in the two–wheel drive
position (2WD) for normal street and highway
conditions on dry hard surfaced roads). Driv-
ing the vehicle in 2WD will have greater fuel
economy benefits as the front axle is not
engaged in 2WD.When additional traction is required, the
transfer case 4WD LOCK and 4WD LOW po-
sitions can be used to maximize torque to the
front driveshaft, forcing the front and rear
wheels to rotate at the same speed. This is
accomplished by pushing the desired posi-
tion on the 4WD control switch.
Refer to “Shifting Procedure” in the “Start-
ing And Operating” section of your Owner’s
Manual for specific shifting instructions.
WARNING!
• You or others could be injured or killed if
you leave the vehicle unattended with
the transfer case in the NEUTRAL (N)
position without first fully engaging the
parking brake. The transfer case NEU-
TRAL (N) position disengages both the
front and rear drive shaft from the pow-
ertrain, and will allow the vehicle to roll,
even if the automatic transmission is in
PARK (or manual transmission is in
gear). The parking brake should always
be applied when the driver is not in the
vehicle.
WARNING!
• The transmission may not engage PARKif the vehicle is moving. Always bring the
vehicle to a complete stop before shift-
ing to PARK, and verify that the trans-
mission gear position indicator solidly
indicates PARK (P) without blinking. En-
sure that the vehicle is completely
stopped, and the PARK position is prop-
erly indicated, before exiting the ve-
hicle.
167