tow Ram 1500 2018 Workshop Manual
[x] Cancel search | Manufacturer: RAM, Model Year: 2018, Model line: 1500, Model: Ram 1500 2018Pages: 372, PDF Size: 7.1 MB
Page 212 of 372

NOTE:
Always stow the spare tire with the valve stem
facing the ground. It is recommended that
you stow the flat or spare to avoid tangling the
loose cable.NOTE:
The winch mechanism is designed for use
with the extension tube only. Use of an air
wrench or other power tools is not recom-
mended and can damage the winch.
Preparations For Jacking
1. Park the vehicle on a firm, level surface.
Avoid ice or slippery areas.
WARNING!
Do not attempt to change a tire on the side
of the vehicle close to moving traffic, pull
far enough off the road to avoid being hit
when operating the jack or changing the
wheel.
2. Place the gear selector into PARK. On four-wheel drive vehicles, shift the trans-
fer case to the 4L position.
3. Turn on the Hazard Warning flasher.
4. Apply the parking brake.
5. Turn the ignition OFF. 6. Block both the front and rear of the wheel
diagonally opposite the jacking position.
For example, if the right front wheel is
being changed, block the left rear wheel.
NOTE:
Passengers should not remain in the vehicle
when the vehicle is being jacked.
Lug Wrench/Spare Tire
1 — Lug Wrench 2 — Spare Tire
Wheel Blocked
IN CASE OF EMERGENCY
210
Page 215 of 372

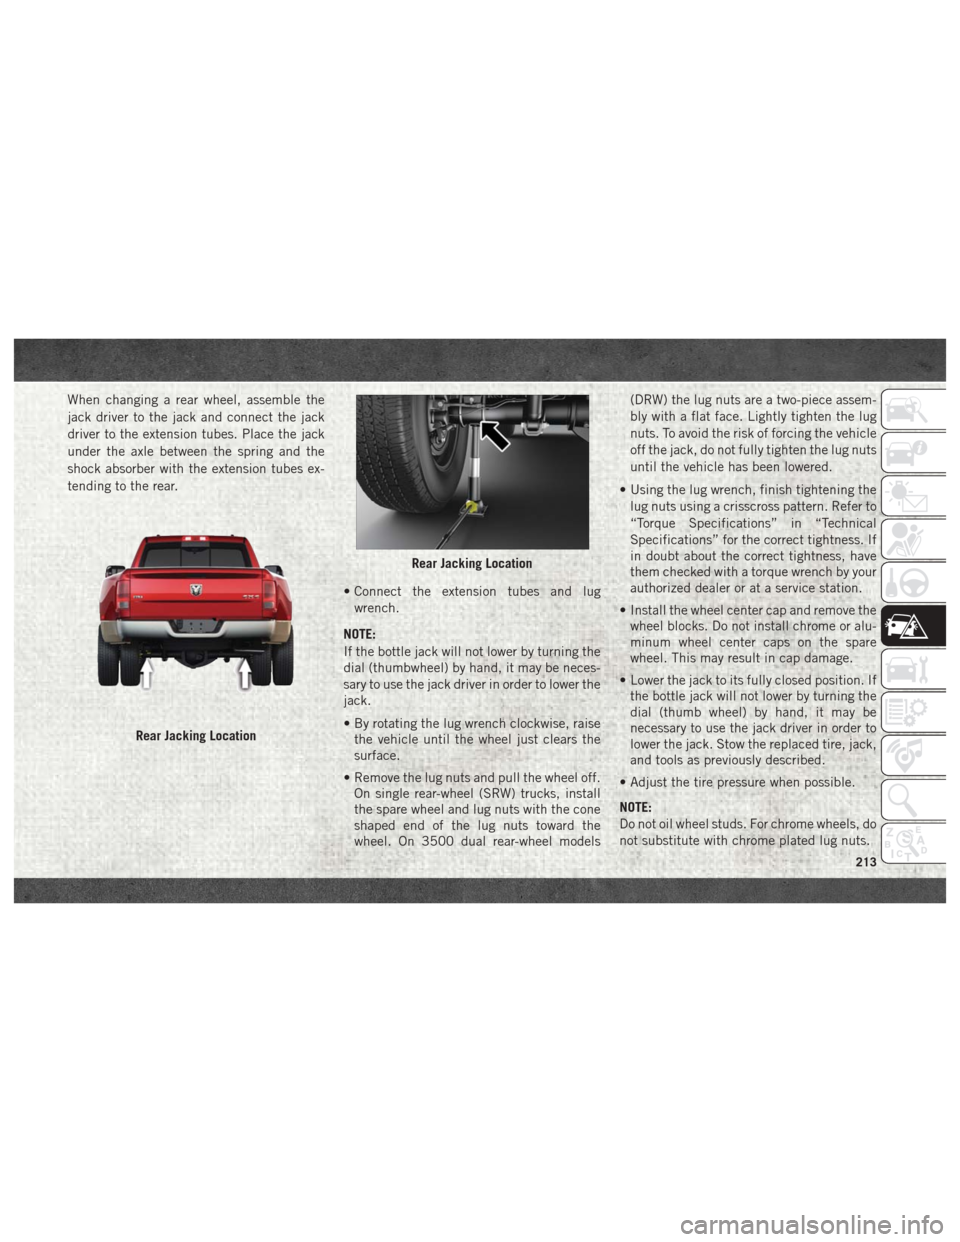
When changing a rear wheel, assemble the
jack driver to the jack and connect the jack
driver to the extension tubes. Place the jack
under the axle between the spring and the
shock absorber with the extension tubes ex-
tending to the rear.• Connect the extension tubes and lugwrench.
NOTE:
If the bottle jack will not lower by turning the
dial (thumbwheel) by hand, it may be neces-
sary to use the jack driver in order to lower the
jack.
• By rotating the lug wrench clockwise, raise the vehicle until the wheel just clears the
surface.
• Remove the lug nuts and pull the wheel off. On single rear-wheel (SRW) trucks, install
the spare wheel and lug nuts with the cone
shaped end of the lug nuts toward the
wheel. On 3500 dual rear-wheel models (DRW) the lug nuts are a two-piece assem-
bly with a flat face. Lightly tighten the lug
nuts. To avoid the risk of forcing the vehicle
off the jack, do not fully tighten the lug nuts
until the vehicle has been lowered.
• Using the lug wrench, finish tightening the lug nuts using a crisscross pattern. Refer to
“Torque Specifications” in “Technical
Specifications” for the correct tightness. If
in doubt about the correct tightness, have
them checked with a torque wrench by your
authorized dealer or at a service station.
• Install the wheel center cap and remove the wheel blocks. Do not install chrome or alu-
minum wheel center caps on the spare
wheel. This may result in cap damage.
• Lower the jack to its fully closed position. If the bottle jack will not lower by turning the
dial (thumb wheel) by hand, it may be
necessary to use the jack driver in order to
lower the jack. Stow the replaced tire, jack,
and tools as previously described.
• Adjust the tire pressure when possible.
NOTE:
Do not oil wheel studs. For chrome wheels, do
not substitute with chrome plated lug nuts.
Rear Jacking Location
Rear Jacking Location
213
Page 216 of 372

To Stow The Flat Or Spare
NOTE:
RAM 1500 vehicles equipped with alumi-
num wheels cannot be stored under the ve-
hicle because the wheel retainer will not fit
through the wheel pilot hole. Secure the flat
tire in the bed of the truck. Have the flat tire
repaired or replaced immediately.
1. Turn the wheel so that the valve stem isdown. Slide the wheel retainer through
the center of the wheel and position it
properly across the wheel opening.
2. For convenience in checking the spare tire inflation, stow with the valve stem toward
the rear of the vehicle.
3. Attach the lug wrench to the extension tubes with the curved angle facing away
from the vehicle. Rotate the lug wrench
handle clockwise until the wheel is drawn
into place against the underside of the
vehicle. Continue to rotate until you feel
the winch mechanism slip, or click three
or four times. It cannot be overtightened.
Push against the tire several times to be
sure it is firmly in place.
WARNING!
• Do not attempt to change a tire on theside of the vehicle close to moving traf-
fic. Pull far enough off the road to avoid
the danger of being hit when operating
the jack or changing the wheel.
• Being under a jacked-up vehicle is dan-
gerous. The vehicle could slip off the
jack and fall on you. You could be
crushed. Never put any part of your body
under a vehicle that is on a jack.
• Never start or run the engine while the
vehicle is on a jack. If you need to get
under a raised vehicle, take it to your
authorized dealer where it can be raised
on a lift.
• The jack is designed to be used as a tool
for changing tires only. The jack should
not be used to lift the vehicle for service
purposes. The vehicle should be jacked
on a firm level surface only. Avoid ice or
slippery areas.
• Do not attempt to change a tire on the
side of the vehicle close to moving traf-
fic, pull far enough off the road to avoid
WARNING!
the danger of being hit when operating
the jack or changing the wheel.
• Carefully follow these tire changing
warnings to help prevent personal injury
or damage to your vehicle:• Always park on a firm, level surface
as far from the edge of the roadway
as possible before raising the ve-
hicle.
• Turn on the Hazard Warning flash-
ers.
• Block the wheel diagonally opposite
the wheel to be raised.
• Set the parking brake firmly and set
an automatic transmission in
PARK; a manual transmission in
REVERSE.
• Do not let anyone sit in the vehicle
when it is on a jack.
• Do not get under the vehicle when it
is on a jack.
• Only use the jack in the positions
indicated and for lifting this vehicle
during a tire change.
IN CASE OF EMERGENCY
214
Page 217 of 372

WARNING!
• If working on or near a roadway, beextremely careful of motor traffic.
• To assure that spare tires, flat or
inflated, are securely stowed,
spares must be stowed with the
valve stem facing the ground.
• Raising the vehicle higher than nec-
essary can make the vehicle less
stable. It could slip off the jack and
hurt someone near it. Raise the ve-
hicle only enough to remove the
tire.
• To avoid the risk of forcing the ve-
hicle off the jack, do not fully
tighten the wheel bolts until the
vehicle has been lowered. Failure to
follow this warning may result in
personal injury.
• To avoid possible personal injury,
handle the wheel covers with care to
avoid contact with any sharp edges.
WARNING!
• A loose tire or jack thrown forward ina collision or hard stop could en-
danger the occupants of the ve-
hicle. Always stow the jack parts
and the spare tire in the places
provided.
• A loose tire thrown forward in a
collision or hard stop could injure
the occupants in the vehicle. Have
the deflated (flat) tire repaired or
replaced immediately.
CAUTION!
• Do not attempt to raise the vehicle byjacking on locations other than those
indicated in the Jacking Instructions for
this vehicle.
• Before raising the wheel off the ground,
make sure that the jack will not damage
surrounding truck parts and adjust the
jack position as required.
• Use a back and forth motion to remove
the hub cap. Do not use a twisting mo-
CAUTION!
tion when removing the hub cap, dam-
age to the hub cap; finish may occur.
• The rear hubcaps on the dual rear wheel
has two pry off notches. Make sure that
the hook of the jack handle driver is
located squarely in the cap notch before
attempting to pull off.
Reinstalling The Jack And Tools
1500 Series Trucks
1. Tighten the jack all the way down by turning the jack turn-screw clockwise un-
til the jack is snug.
215
Page 224 of 372

Center Console Gear Selector —
If Equipped
1. Turn the engine OFF.
2. Firmly apply the parking brake.
3. Using a small screwdriver or similar tool,remove the gear selector override access
cover (located to the right of the gear
selector).
4. Press and maintain firm pressure on the brake pedal.
5. Insert the screwdriver or similar tool into the access hole, and push and hold the
override release lever down. 6. Move the gear selector to the NEUTRALposition.
7. The vehicle may then be started in NEUTRAL.
8. Reinstall the gear selector override access cover.
MANUAL PARK RELEASE — 8 SPEED
TRANSMISSION
WARNING!
Always secure your vehicle by fully apply-
ing the parking brake before activating the
Manual Park Release. In addition, you
should be seated in the driver’s seat with
your foot firmly on the brake pedal when
activating the Manual Park Release. Acti-
vating the Manual Park Release will allow
your vehicle to roll away if it is not secured
by the parking brake, or by proper connec-
tion to a tow vehicle. Activating the
Manual Park Release on an unsecured
vehicle could lead to serious injury or
death for those in or around the vehicle.
In order to push or tow the vehicle in cases
where the transmission will not shift out of
PARK (such as a dead battery), a Manual
Park Release is available.
Gear Selector Override Access Cover
IN CASE OF EMERGENCY
222
Page 225 of 372

Follow these steps to activate the Manual
Park Release:
1. Firmly apply the parking brake.
2. Using a small screwdriver or similar tool,remove the Manual Park Release access
cover, which is just above the parking
brake release handle, below and to the left
of the steering column.
3. Press and maintain firm pressure on the brake pedal. 4. Using the screwdriver or similar tool, push
the Manual Park Release lever locking tab
(just below the middle of the lever) to the
right.
5. While holding the locking tab in the disengaged position, pull the tether strap
to rotate the lever rearward, until it locks
in place pointing towards the driver's seat.
Release the locking tab and verify that the
Manual Park Release lever is locked in the
released position. 6. The vehicle is now out of PARK and can be
towed. Release the parking brake only
when the vehicle is securely connected to
a tow vehicle.
To Reset The Manual Park Release:
1. Push the locking tab to the right, to unlock the lever.
Manual Park Release Access Cover
Manual Park Release Lever Locking Tab
Manual Park Release Tether
223
Page 226 of 372

2. Rotate the Manual Park Release leverforward to its original position, until the
locking tab snaps into place to secure the
lever.
3. Pull gently on the tether strap to confirm that the lever is locked in its stowed
position.
4. Re-install the access cover.
FREEING A STUCK VEHICLE
If your vehicle becomes stuck in mud, sand,
or snow, it can often be moved using a rock-
ing motion. Turn the steering wheel right and
left to clear the area around the front wheels.
Then shift back and forth between DRIVE
and REVERSE (with automatic transmission)
or SECOND GEAR and REVERSE (with
manual transmission), while gently pressing
the accelerator. Use the least amount of ac-
celerator pedal pressure that will maintain
the rocking motion, without spinning the
wheels or racing the engine. NOTE:
For trucks equipped with 8-speed automatic
transmission: Shifts between DRIVE and RE-
VERSE can only be achieved at wheel speeds
of 5 mph (8 km/h) or less. Whenever the
transmission remains in NEUTRAL for more
than two seconds, you must press the brake
pedal to engage DRIVE or REVERSE.
NOTE:
Push the "ESC Off" switch, to place the Elec-
tronic Stability Control (ESC) system in "Par-
tial Off" mode, before rocking the vehicle.
Refer to “Electronic Brake Control” in
“Safety” in the Owner’s Manual for further
information. Once the vehicle has been
freed, push the "ESC Off" switch again to
restore "ESC On" mode.
WARNING!
Fast spinning tires can be dangerous.
Forces generated by excessive wheel
speeds may cause damage, or even failure,
of the axle and tires. A tire could explode
and injure someone. Do not spin your
vehicle's wheels faster than 30 mph
(48 km/h) or for longer than 30 seconds
continuously without stopping when you
WARNING!
are stuck and do not let anyone near a
spinning wheel, no matter what the speed.
CAUTION!
• Racing the engine or spinning the
wheels may lead to transmission over-
heating and failure. Allow the engine to
idle with the transmission in NEUTRAL
for at least one minute after every five
rocking-motion cycles. This will mini-
mize overheating and reduce the risk of
clutch or transmission failure during
prolonged efforts to free a stuck vehicle.
• When “rocking” a stuck vehicle by shift- ing between DRIVE/2nd gear and RE-
VERSE, do not spin the wheels faster
than 15 mph (24 km/h), or drivetrain
damage may result.
• Revving the engine or spinning the wheels too fast may lead to transmission
overheating and failure. It can also dam-
age the tires. Do not spin the wheels
above 30 mph (48 km/h) while in gear
(no transmission shifting occurring).
IN CASE OF EMERGENCY
224
Page 227 of 372

TOWING A DISABLED VEHICLE
This section describes procedures for towing
a disabled vehicle using a commercial towing
service. If the transmission and drivetrain are
operable, disabled vehicles may also be
towed as described under “Recreational Tow-
ing” in the “Starting And Operating” section.NOTE:
Vehicles equipped with air suspension must
be placed in Transport mode, before tying
them down (from the body) on a trailer or
flatbed truck. Refer to "Air Suspension" in
"Starting And Operating" for more informa-
tion. If the vehicle cannot be placed in Trans-
port mode (for example, engine will not run),
tie-downs must be fastened to the axles (not
to the body). Failure to follow these instruc-
tions may cause fault codes to be set and/or
cause loss of proper tie-down tension.
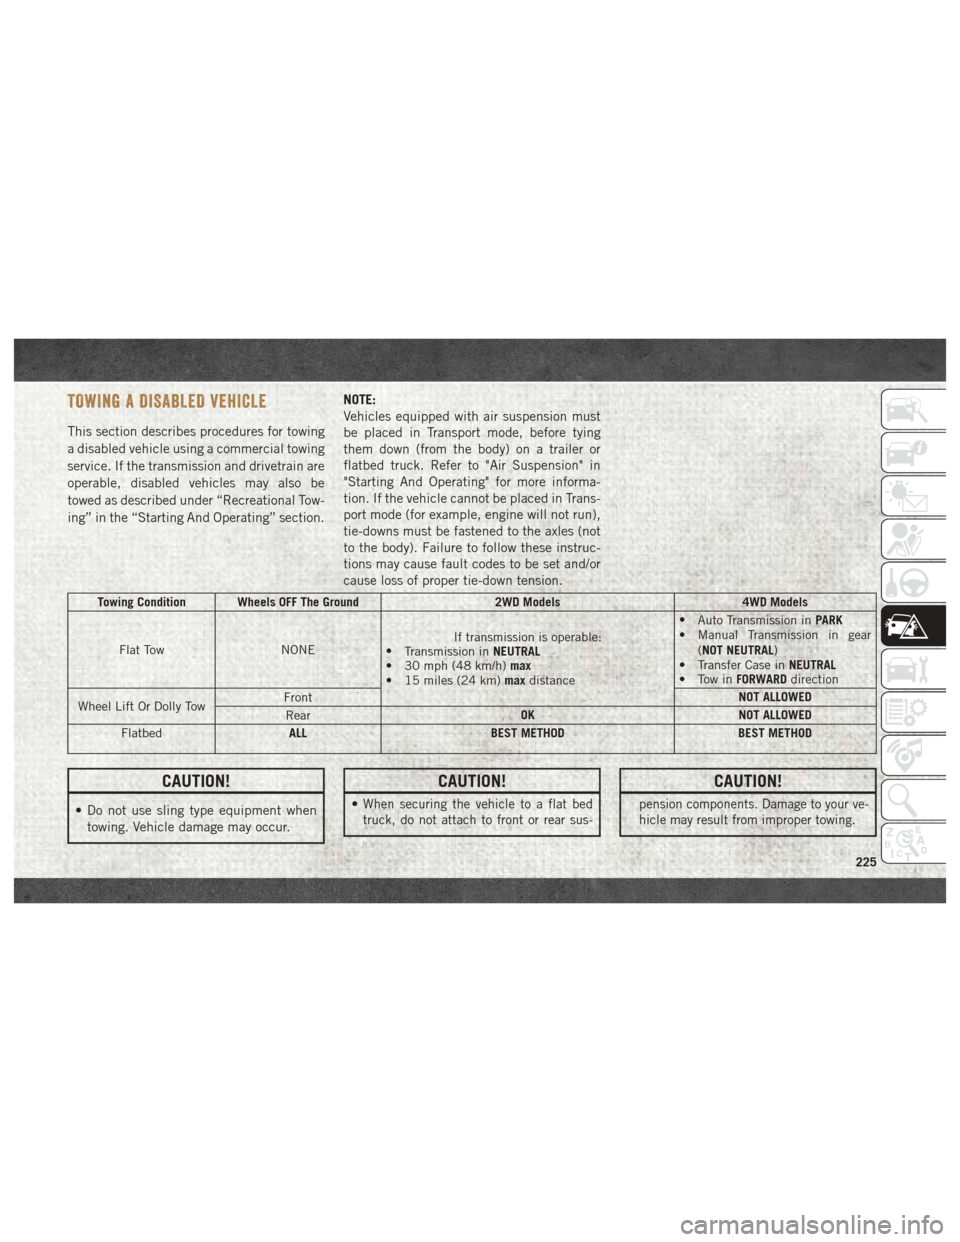
Towing Condition Wheels OFF The Ground
2WD Models4WD Models
Flat Tow NONE If transmission is operable:
• Transmission in NEUTRAL
• 30 mph (48 km/h) max
• 15 miles (24 km) maxdistance •
Auto Transmission in PARK
• Manual Transmission in gear
(NOT NEUTRAL)
• Transfer Case in NEUTRAL
• Tow in FORWARDdirection
Wheel Lift Or Dolly Tow Front
NOT ALLOWED
Rear OK
NOT ALLOWED
Flatbed ALL
BEST METHOD BEST METHOD
CAUTION!
• Do not use sling type equipment when
towing. Vehicle damage may occur.
CAUTION!
•When securing the vehicle to a flat bed
truck, do not attach to front or rear sus-
CAUTION!
pension components. Damage to your ve-
hicle may result from improper towing.
225
Page 228 of 372

Two-Wheel Drive Models
The manufacturer recommends towing your
vehicle with all four wheelsOFFthe ground
using a flatbed.
If flatbed equipment is not available, and the
transmission is operable, the vehicle may be
towed (with rear wheels on the ground) under
the following conditions:
• The transmission must be in NEUTRAL. Refer to "Manual Park Release" in this sec-
tion for instructions on shifting the
8–speed transmission to NEUTRAL when
the engine is OFF.
• The towing speed must not exceed 30 mph (48 km/h).
• The towing distance must not exceed 15 miles (24 km) for 6–speed transmis-
sion, or 30 miles (48 km) for 8–speed
transmission.
If the transmission is not operable, or the
vehicle must be towed faster than 30 mph
(48 km/h) or farther than 15 miles (24 km)
for 6–speed transmission, or 30 miles
(48 km) for 8–speed transmission, tow with
the rear wheels OFFthe ground. Acceptable methods are to tow the vehicle on a flatbed,
or with the front wheels raised and the rear
wheels on a towing dolly, or (when using a
suitable steering wheel stabilizer to hold the
front wheels in the straight position) with the
rear wheels raised and the front wheels on the
ground.
CAUTION!
Towing this vehicle in violation of the
above requirements can cause severe en-
gine and/or transmission damage. Damage
from improper towing is not covered under
the New Vehicle Limited Warranty.
Four-Wheel Drive Models
The manufacturer recommends towing with
all wheels
OFFthe ground. Acceptable meth-
ods are to tow the vehicle on a flatbed or with
one end of vehicle raised and the opposite
end on a towing dolly.
If flatbed equipment is not available, and the
transfer case is operable, the vehicle may be
towed (in the forward direction, with ALL
wheels on the ground), IFthe transfer case is
in NEUTRAL and the transmission is in PARK (for automatic transmissions) or in gear (NOT
in NEUTRAL, for manual transmissions). Re-
fer to “Recreational Towing” in “Starting And
Operating” for further information and de-
tailed instructions.
CAUTION!
• Front or rear wheel lifts must not be used
(if the remaining wheels are on the
ground). Internal damage to the trans-
mission or transfer case will occur if a
front or rear wheel lift is used when
towing.
• Towing this vehicle in violation of the
above requirements can cause severe
transmission and/or transfer case dam-
age. Damage from improper towing is
not covered under the New Vehicle Lim-
ited Warranty.
IN CASE OF EMERGENCY
226
Page 229 of 372

Emergency Tow Hooks — If
Equipped
Your vehicle may be equipped with emer-
gency tow hooks.
NOTE:
For off-road recovery, it is recommended to
use both of the front tow hooks to minimize
the risk of damage to the vehicle.
WARNING!
• Do not use a chain for freeing a stuckvehicle. Chains may break, causing seri-
ous injury or death.
• Stand clear of vehicles when pulling
with tow hooks. Tow straps may become
disengaged, causing serious injury.
CAUTION!
Tow hooks are for emergency use only, to
rescue a vehicle stranded off road. Do not
use tow hooks for tow truck hookup or
highway towing. You could damage your
vehicle.
ENHANCED ACCIDENT RESPONSE
SYSTEM (EARS)
This vehicle is equipped with an Enhanced
Accident Response System.
Please refer to “Occupant Restraint Sys-
tems” in “Safety” for further information on
the Enhanced Accident Response System
(EARS) function.
EVENT DATA RECORDER (EDR)
This vehicle is equipped with an Event Data
Recorder (EDR). The main purpose of an EDR
is to record data that will assist in under-
standing how a vehicle’s systems performed
under certain crash or near crash-like situa-
tions, such as an air bag deployment or hit-
ting a road obstacle.
Please refer to “Occupant Restraint Sys-
tems” in “Safety” for further information on
the Event Data Recorder (EDR).
227