transmission RAM 1500 2021 Repair Manual
[x] Cancel search | Manufacturer: RAM, Model Year: 2021, Model line: 1500, Model: RAM 1500 2021Pages: 496, PDF Size: 20.89 MB
Page 383 of 496

IN CASE OF EMERGENCY381
(Continued)
6. Lift the spare tire with one hand to give clearance to tilt the retainer at the end of
the cable.
Tilting The Retainer Through The Center Of The Wheel
7. Pull the retainer through the center of the wheel.
Pulling The Retainer Through The Center Of The Wheel
NOTE:
The winch mechanism is designed for use with
the extension tubes only. Use of an air wrench
or other power tools is not recommended and
can damage the winch.
JACKING INSTRUCTIONS
Jack Warning Label
WARNING!
Carefully follow these tire changing warnings
to help prevent personal injury or damage to
your vehicle:
Always park on a firm, level surface as far
from the edge of the roadway as possible
before raising the vehicle.
Turn on the Hazard Warning Flashers.
Apply the parking brake firmly and set the
transmission in PARK.
Block the wheel diagonally opposite the
wheel to be raised.
Never start or run the engine with the
vehicle on a jack.
Do not let anyone sit in the vehicle when it
is on a jack.
Do not get under the vehicle when it is on a
jack. If you need to get under a raised
vehicle, take it to a service center where it
can be raised on a lift.
Only use the jack in the positions indicated
and for lifting this vehicle during a tire
change.
If working on or near a roadway, be
extremely careful of motor traffic.
To assure that spare tires, flat or inflated,
are securely stowed, spares must be
stowed with the valve stem facing the
ground.
WARNING!
(Continued)
7
21_DT_OM_EN_USC_t.book Page 381
Page 389 of 496
IN CASE OF EMERGENCY387
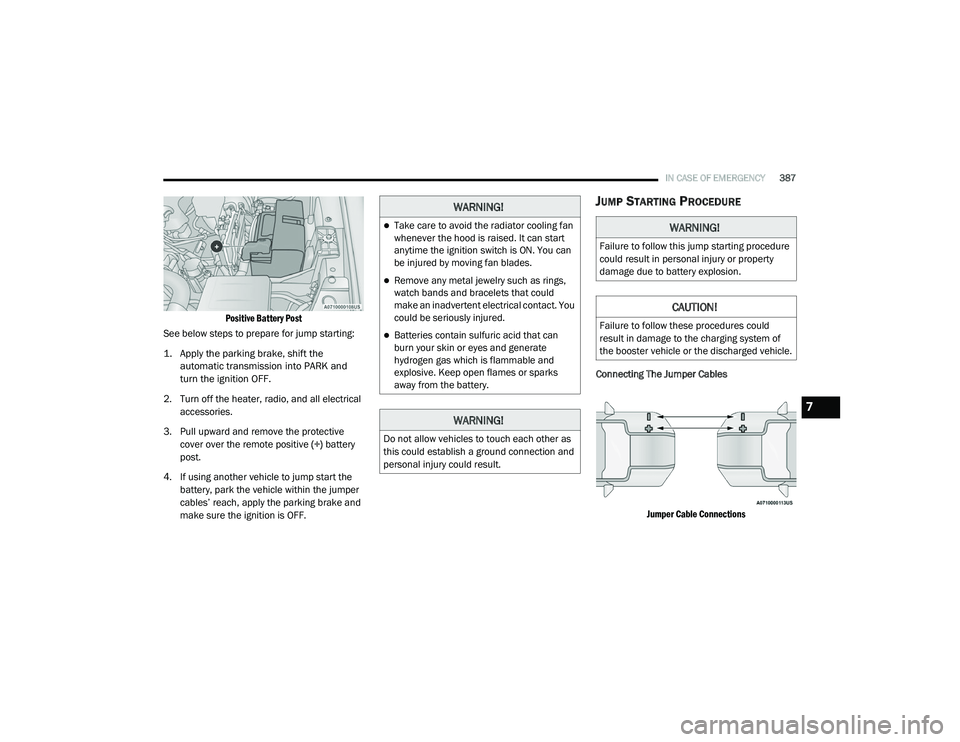
Positive Battery Post
See below steps to prepare for jump starting:
1. Apply the parking brake, shift the automatic transmission into PARK and
turn the ignition OFF.
2. Turn off the heater, radio, and all electrical accessories.
3. Pull upward and remove the protective cover over the remote positive (+) battery
post.
4. If using another vehicle to jump start the battery, park the vehicle within the jumper
cables’ reach, apply the parking brake and
make sure the ignition is OFF.
JUMP STARTING PROCEDURE
Connecting The Jumper Cables
Jumper Cable Connections
WARNING!
Take care to avoid the radiator cooling fan
whenever the hood is raised. It can start
anytime the ignition switch is ON. You can
be injured by moving fan blades.
Remove any metal jewelry such as rings,
watch bands and bracelets that could
make an inadvertent electrical contact. You
could be seriously injured.
Batteries contain sulfuric acid that can
burn your skin or eyes and generate
hydrogen gas which is flammable and
explosive. Keep open flames or sparks
away from the battery.
WARNING!
Do not allow vehicles to touch each other as
this could establish a ground connection and
personal injury could result.
WARNING!
Failure to follow this jump starting procedure
could result in personal injury or property
damage due to battery explosion.
CAUTION!
Failure to follow these procedures could
result in damage to the charging system of
the booster vehicle or the discharged vehicle.
7
21_DT_OM_EN_USC_t.book Page 387
Page 392 of 496
390IN CASE OF EMERGENCY
MANUAL PARK RELEASE
In order to move the vehicle in cases where the
transmission will not shift out of PARK (P) (such
as a depleted battery), a Manual Park Release
is available.
Follow these steps to activate the Manual Park
Release:
1. Apply firm pressure to the brake pedal
while seated in the driver’s seat.
2. Apply the parking brake if possible. 3. Using a small screwdriver or similar tool,
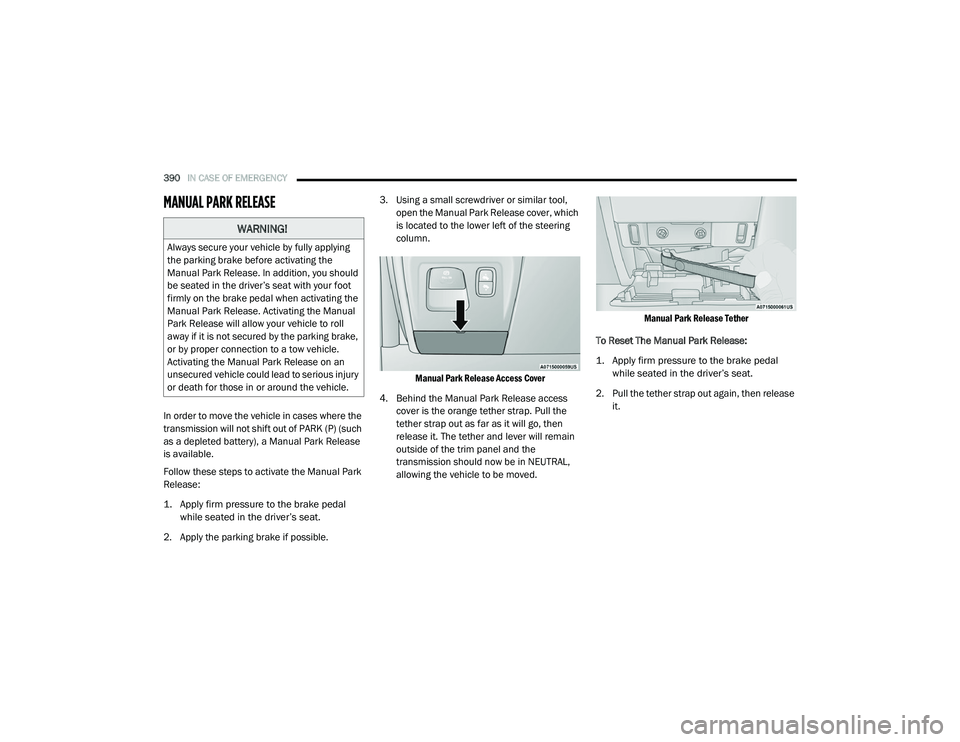
open the Manual Park Release cover, which
is located to the lower left of the steering
column.
Manual Park Release Access Cover
4. Behind the Manual Park Release access cover is the orange tether strap. Pull the
tether strap out as far as it will go, then
release it. The tether and lever will remain
outside of the trim panel and the
transmission should now be in NEUTRAL,
allowing the vehicle to be moved.
Manual Park Release Tether
To Reset The Manual Park Release:
1. Apply firm pressure to the brake pedal while seated in the driver’s seat.
2. Pull the tether strap out again, then release it.
WARNING!
Always secure your vehicle by fully applying
the parking brake before activating the
Manual Park Release. In addition, you should
be seated in the driver’s seat with your foot
firmly on the brake pedal when activating the
Manual Park Release. Activating the Manual
Park Release will allow your vehicle to roll
away if it is not secured by the parking brake,
or by proper connection to a tow vehicle.
Activating the Manual Park Release on an
unsecured vehicle could lead to serious injury
or death for those in or around the vehicle.
21_DT_OM_EN_USC_t.book Page 390
Page 393 of 496
IN CASE OF EMERGENCY391
(Continued)
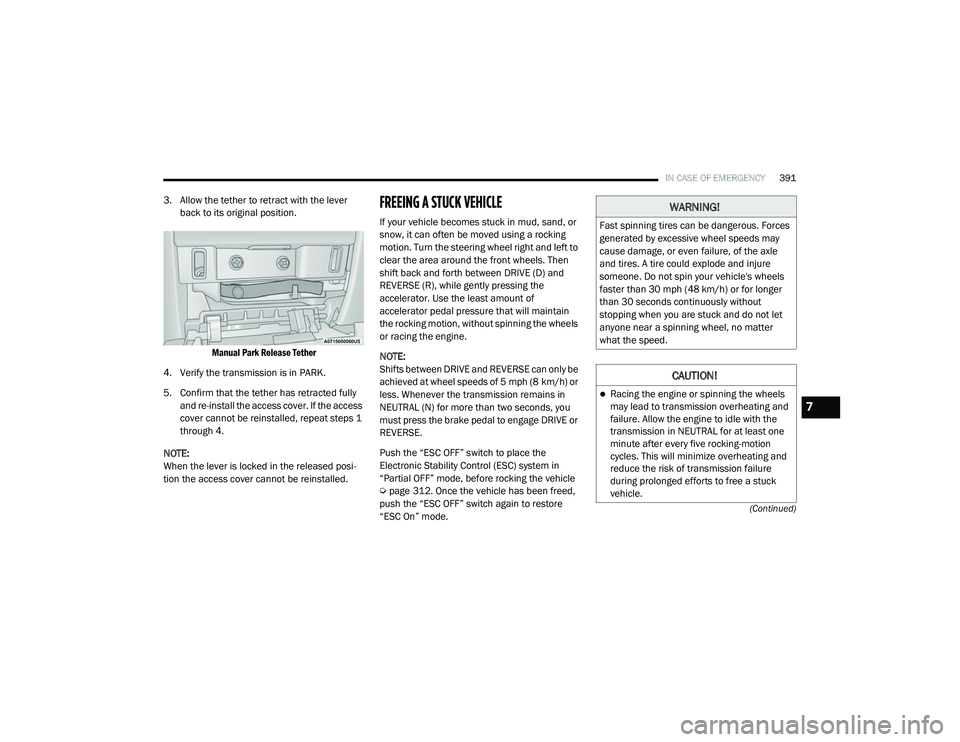
3. Allow the tether to retract with the lever back to its original position.
Manual Park Release Tether
4. Verify the transmission is in PARK.
5. Confirm that the tether has retracted fully and re-install the access cover. If the access
cover cannot be reinstalled, repeat steps 1
through 4.
NOTE:
When the lever is locked in the released posi -
tion the access cover cannot be reinstalled.FREEING A STUCK VEHICLE
If your vehicle becomes stuck in mud, sand, or
snow, it can often be moved using a rocking
motion. Turn the steering wheel right and left to
clear the area around the front wheels. Then
shift back and forth between DRIVE (D) and
REVERSE (R), while gently pressing the
accelerator. Use the least amount of
accelerator pedal pressure that will maintain
the rocking motion, without spinning the wheels
or racing the engine.
NOTE:
Shifts between DRIVE and REVERSE can only be
achieved at wheel speeds of 5 mph (8 km/h) or
less. Whenever the transmission remains in
NEUTRAL (N) for more than two seconds, you
must press the brake pedal to engage DRIVE or
REVERSE.
Push the “ESC OFF” switch to place the
Electronic Stability Control (ESC) system in
“Partial OFF” mode, before rocking the vehicle
Ú page 312. Once the vehicle has been freed,
push the “ESC OFF” switch again to restore
“ESC On” mode.
WARNING!
Fast spinning tires can be dangerous. Forces
generated by excessive wheel speeds may
cause damage, or even failure, of the axle
and tires. A tire could explode and injure
someone. Do not spin your vehicle's wheels
faster than 30 mph (48 km/h) or for longer than 30 seconds continuously without
stopping when you are stuck and do not let
anyone near a spinning wheel, no matter
what the speed.
CAUTION!
Racing the engine or spinning the wheels
may lead to transmission overheating and
failure. Allow the engine to idle with the
transmission in NEUTRAL for at least one
minute after every five rocking-motion
cycles. This will minimize overheating and
reduce the risk of transmission failure
during prolonged efforts to free a stuck
vehicle.
7
21_DT_OM_EN_USC_t.book Page 391
Page 394 of 496
392IN CASE OF EMERGENCY
TOWING A DISABLED VEHICLE
This section describes procedures for towing a
disabled vehicle using a commercial towing
service.
If the transmission and drivetrain are operable,
disabled vehicles may also be towed as
described on Úpage 230. NOTE:
Vehicles equipped with the Active-Level Four
Corner Air Suspension System must be placed
in Transport mode, before tying them down
(from the body) on a trailer or flatbed truck
Ú
page 165. If the vehicle cannot be placed in
Transport mode (for example, engine will not
run), tie-downs must be fastened to the axles
(not to the body). Failure to follow these instruc -
tions may cause fault codes to be set and/or
cause loss of proper tie-down tension.When “rocking” a stuck vehicle by shifting
between DRIVE and REVERSE, do not spin
the wheels faster than 15 mph (24 km/h), or drivetrain damage may result.
Revving the engine or spinning the wheels
too fast may lead to transmission over -
heating and failure. It can also damage the
tires. Do not spin the wheels above 30 mph
(48 km/h) while in gear (no transmission
shifting occurring).
CAUTION! (Continued)
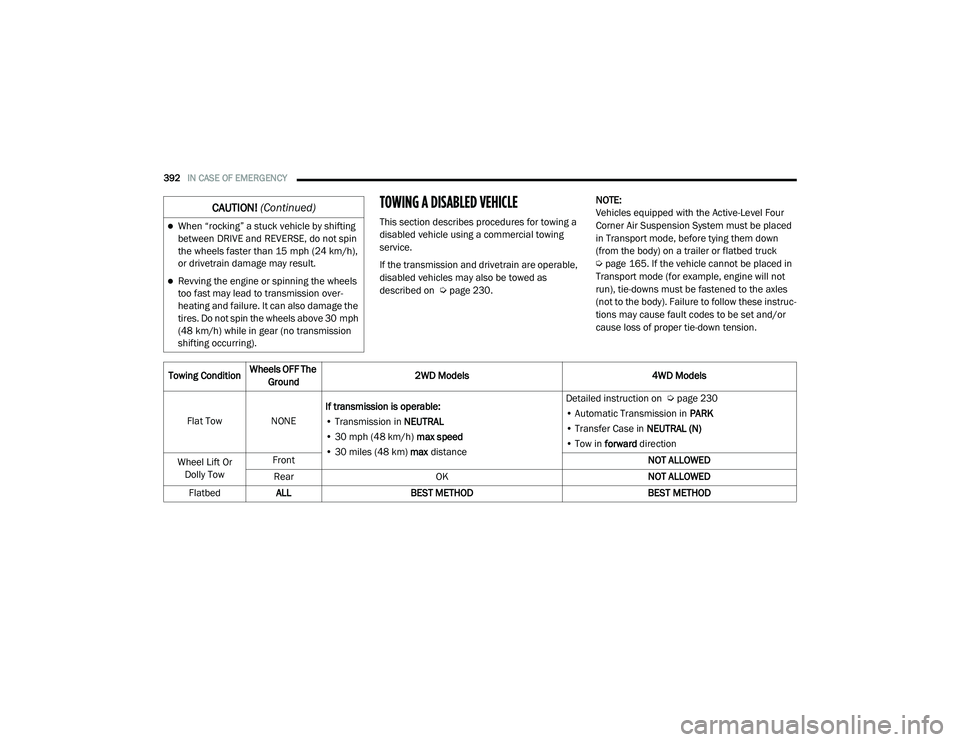
Towing Condition Wheels OFF The
Ground 2WD Models
4WD Models
Flat Tow NONE If transmission is operable:
• Transmission in NEUTRAL
• 30 mph (48 km/h) max speed
• 30 miles (48 km) max distance Detailed instruction on
Ú page 230
• Automatic Transmission in PARK
• Transfer Case in NEUTRAL (N)
• Tow in forward direction
Wheel Lift Or Dolly Tow Front
NOT ALLOWED
Rear OK NOT ALLOWED
Flatbed ALL BEST METHOD BEST METHOD
21_DT_OM_EN_USC_t.book Page 392
Page 395 of 496

IN CASE OF EMERGENCY393
(Continued)
Proper towing or lifting equipment is required to
prevent damage to your vehicle. Use only tow
bars and other equipment designed for this
purpose, following equipment FCA’s
instructions. Use of safety chains is mandatory.
Attach a tow bar or other towing device to main
structural members of the vehicle, not to
fascia/bumpers or associated brackets. State
and local laws regarding vehicles under tow
must be observed.
If you must use the accessories (wipers,
defrosters, etc.) while being towed, the ignition
must be in the ON/RUN mode, not the ACC
mode.
If the key fob is unavailable or the vehicle's
battery is discharged, find Instructions on
shifting the transmission out of PARK
Ú page 390.TWO-WHEEL DRIVE MODELS
FCA recommends towing your vehicle with all
four wheels OFF the ground using a flatbed.
If flatbed equipment is not available, and the
transmission is operable, the vehicle may be
towed (with rear wheels on the ground) under
the following conditions:
The transmission must be in NEUTRAL (N).
Instructions on shifting the transmission to
NEUTRAL (N) when the engine is off
Ú page 390.
The towing speed must not exceed 30 mph
(48 km/h).
The towing distance must not exceed
30 miles (48 km).
If the transmission is not operable, or the
vehicle must be towed faster than 30 mph
(48 km/h) and farther than 30 miles (48 km), tow with the rear wheels OFF the ground.
Acceptable methods to tow the vehicle on a
flatbed are as follows:
The front wheels raised and the rear wheels
on a towing dolly
Using a suitable steering wheel stabilizer to
hold the front wheels in the straight position
with the rear wheels raised when and the
front wheels ON the ground.
FOUR-WHEEL DRIVE MODELS
FCA recommends towing with all wheels OFF
the ground. Acceptable methods are to tow the
vehicle on a flatbed or with one end of vehicle
raised and the opposite end on a towing dolly.
CAUTION!
Do not use sling type equipment when
towing. Vehicle damage may occur.
When securing the vehicle to a flat bed
truck, do not attach to front or rear suspen -
sion components. Damage to your vehicle
may result from improper towing.
CAUTION!
Towing this vehicle in violation of the above
requirements can cause severe transmission
damage. Damage from improper towing is not
covered under the New Vehicle Limited
Warranty.
CAUTION!
Front or rear wheel lifts must not be used (if
the remaining wheels are on the ground).
Internal damage to the transmission or
transfer case will occur if a front or rear
wheel lift is used when towing.
7
21_DT_OM_EN_USC_t.book Page 393
Page 428 of 496
426SERVICING AND MAINTENANCE
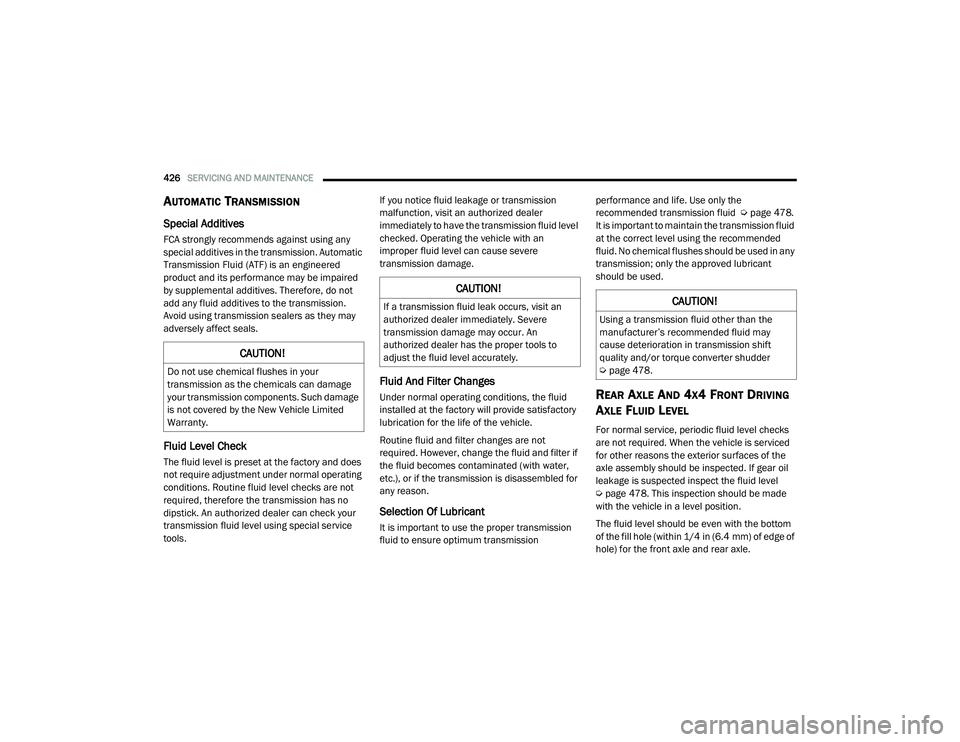
AUTOMATIC TRANSMISSION
Special Additives
FCA strongly recommends against using any
special additives in the transmission. Automatic
Transmission Fluid (ATF) is an engineered
product and its performance may be impaired
by supplemental additives. Therefore, do not
add any fluid additives to the transmission.
Avoid using transmission sealers as they may
adversely affect seals.
Fluid Level Check
The fluid level is preset at the factory and does
not require adjustment under normal operating
conditions. Routine fluid level checks are not
required, therefore the transmission has no
dipstick. An authorized dealer can check your
transmission fluid level using special service
tools. If you notice fluid leakage or transmission
malfunction, visit an authorized dealer
immediately to have the transmission fluid level
checked. Operating the vehicle with an
improper fluid level can cause severe
transmission damage.
Fluid And Filter Changes
Under normal operating conditions, the fluid
installed at the factory will provide satisfactory
lubrication for the life of the vehicle.
Routine fluid and filter changes are not
required. However, change the fluid and filter if
the fluid becomes contaminated (with water,
etc.), or if the transmission is disassembled for
any reason.
Selection Of Lubricant
It is important to use the proper transmission
fluid to ensure optimum transmission performance and life. Use only the
recommended transmission fluid
Úpage 478.
It is important to maintain the transmission fluid
at the correct level using the recommended
fluid. No chemical flushes should be used in any
transmission; only the approved lubricant
should be used.
REAR AXLE AND 4X4 FRONT DRIVING
A
XLE FLUID LEVEL
For normal service, periodic fluid level checks
are not required. When the vehicle is serviced
for other reasons the exterior surfaces of the
axle assembly should be inspected. If gear oil
leakage is suspected inspect the fluid level
Ú page 478. This inspection should be made
with the vehicle in a level position.
The fluid level should be even with the bottom
of the fill hole (within 1/4 in (6.4 mm) of edge of
hole) for the front axle and rear axle.
CAUTION!
Do not use chemical flushes in your
transmission as the chemicals can damage
your transmission components. Such damage
is not covered by the New Vehicle Limited
Warranty.
CAUTION!
If a transmission fluid leak occurs, visit an
authorized dealer immediately. Severe
transmission damage may occur. An
authorized dealer has the proper tools to
adjust the fluid level accurately.CAUTION!
Using a transmission fluid other than the
manufacturer’s recommended fluid may
cause deterioration in transmission shift
quality and/or torque converter shudder
Ú page 478.
21_DT_OM_EN_USC_t.book Page 426
Page 480 of 496

478TECHNICAL SPECIFICATIONS
CHASSIS FLUIDS AND LUBRICANTS
Component Fluid, Lubricant, or Genuine Part
Automatic TransmissionUse only Mopar ZF 8&9 Speed ATF Automatic Transmission Fluid, or equivalent. Failure to use
the correct fluid may affect the function or performance of your transmission.
Transfer Case – 48-11 Active On-Demand 2–speed
Transfer Case (With 4WD AUTO) We recommend you use Mobil Fluid LT.
Transfer Case – 48-12 Part Time 2–Speed Transfer
Case (Without 4WD AUTO) We recommend you use Shell Spirax S2 ATF A389.
Front Axle We recommend you use Mopar GL-5 Synthetic Axle Lubricant SAE 75W-85.
Rear Axle (3.21/3.55) We recommend you use Mopar Synthetic Gear Lubricant SAE 75W-90 (MS-A0160).
Limited-Slip Rear Axles require the addition of 5 oz. (148 ml) Mopar Limited Slip Additive
(MS-10111).
Rear Axle (3.92) We recommend you use Mopar Synthetic Gear Lubricant SAE 75W-140 (MS-8985).
Limited-Slip Rear Axles require the addition of 5 oz. (148 ml) Mopar Limited Slip Additive
(MS-10111).
Max Tow Rear Axle (3.92) We recommend You Use Dana SAE 80W90 Axle Lubricant.
Brake Master Cylinder We recommend you use Mopar DOT 3 Brake Fluid, SAE J1709.
21_DT_OM_EN_USC_t.book Page 478
Page 485 of 496

483
INDEX
A
Adaptive Cruise Control (ACC) (Cruise
Control)
................................................ 177, 179Adding Engine Coolant (Antifreeze)............... 422Adding Fuel.......................................... 208, 210Additives, Fuel............................................... 469AdjustDown........................................................... 36Forward....................................................... 36Rearward..................................................... 36Up................................................................ 36Adjustable Pedals............................................ 43Advance Phone Connectivity......................... 279Air BagAir Bag Operation...................................... 344Air Bag Warning Light...................... 342, 345Enhanced Accident Response......... 353, 394Event Data Recorder (EDR)....................... 394Front Air Bag............................................. 345If Deployment Occurs................................ 352Knee Impact Bolsters................................ 349Maintaining Your Air Bag System.............. 354Maintenance............................................. 354Redundant Air Bag Warning Light.............343Transporting Pets...................................... 369Air Bag Light............................... 126, 342, 369
Air Cleaner, Engine (Engine Air Cleaner
Filter)............................................................ 411Air Conditioner Maintenance........................ 415Air Conditioner Refrigerant........................... 415Air Conditioner System................................. 415Air Conditioning................................................ 63Air Conditioning Filter..............................67, 415Air Conditioning System................................... 65Air Conditioning, Operating Tips....................... 66Air Filter........................................................ 411Air PressureTires......................................................... 450Air Suspension..................................... 165, 169AlarmSecurity Alarm....................................26, 127Alterations/ModificationsVehicle......................................................... 11Antifreeze (Engine Coolant)................. 422, 474Disposal................................................... 423Anti-Lock Brake System (ABS)...................... 310Anti-Lock Warning Light................................ 132Assist, Hill Start............................................. 317Audio Settings............................................... 266Audio Systems (Radio).................................. 236Auto Down Power Windows............................. 78Automatic Door Locks...................................... 30
Automatic Headlights.......................................54Automatic High Beams.....................................53Automatic Tailgate Release.............................85Automatic Temperature Control (ATC)..............65Automatic Transmission....................... 156, 426Adding Fluid.............................................. 426Fluid And Filter Change............................. 426Fluid Change............................................. 426Fluid Level Check...................................... 426Fluid Type........................................ 426, 478Special Additives...................................... 426Automatic Transmission Limp Home Mode... 159AutoPark....................................................... 141AUX Camera......................................... 204, 208Auxiliary Driving Systems.............................. 318Axle Fluid.............................................. 426, 478Axle Lubrication............................................ 426
B
Back-Up......................................................... 202Back-Up Camera........................................... 202Battery................................................. 128, 409Charging System Light.............................. 128Keyless Key Fob Replacement....................18Battery Saver Feature......................................57Belts, Seat.................................................... 369
11
21_DT_OM_EN_USC_t.book Page 483
Page 486 of 496
484
Blind Spot Monitoring
.................................... 318Bluetooth Connecting To A Particular Mobile PhoneOr Audio Device After Pairing
................275Body Builders Guide........................................ 11Body Mechanism Lubrication........................ 418B-Pillar Location............................................. 447Brake Assist System...................................... 311Brake Control System.................................... 311Brake Fluid.......................................... 425, 478Brake System...................................... 425, 467Fluid Check............................................... 425Master Cylinder......................................... 425Parking...................................................... 151Warning Light............................................ 126Brake/Transmission Interlock....................... 155Bulb Replacement......................................... 437Bulbs, Light.......................................... 371, 437
C
Camera.......................................................... 202Camera, AUX........................................ 204, 208Camera, Rear...................................... 202, 204Camper............................................................ 97Capacities, Fuel............................................. 474Caps, FillerOil (Engine)................................................ 404Radiator (Coolant Pressure)...................... 423Car Washes................................................... 462
Carbon Monoxide Warning................... 371, 372Cargo Light....................................................... 56CD................................................................. 268Cellular Phone.............................................. 309Center High Mounted Stop Light................... 442Center Seat Storage Compartment.................. 68Charge Air Cooler.......................................... 424Chart, Tire Sizing........................................... 444Check Engine Light (Malfunction Indicator
Light)............................................................. 138Checking Your Vehicle For Safety................. 369Checks, Safety.............................................. 369Child Restraint.............................................. 355Child RestraintsBooster Seats........................................... 358Child Seat Installation..................... 364, 365How To Stow An unused ALR Seat Belt.... 363Infant And Child Restraints....................... 357Locating The LATCH Anchorages.............. 362Lower Anchors And Tethers For Children.. 360Older Children And Child Restraints......... 357Seating Positions...................................... 359Clean Air Gasoline......................................... 469CleaningWheels..................................................... 456Climate Control................................................ 60Automatic.................................................... 60Manual........................................................ 63Cold Weather Operation............................... 146
Compact Spare Tire...................................... 455Connected Services...................................... 282Connected Services FAQ............................... 301Connected Services Features....................... 286Connected Services, Getting Started............ 284Connected Services, Introduction................. 282Contract, Service........................................... 480Controls........................................................ 259Cooling Pressure Cap (Radiator Cap)............ 423Cooling System............................................. 421Adding Coolant (Antifreeze)...................... 422Coolant Level................................... 421, 423Cooling Capacity....................................... 474Disposal Of Used Coolant......................... 423Drain, Flush, And Refill............................. 422Inspection................................................. 423Points To Remember................................ 424Pressure Cap............................................ 423Radiator Cap............................................. 423Selection Of Coolant (Antifreeze)......................... 422, 474, 475Corrosion Protection..................................... 461Cruise ControlAccel/Decel.............................................. 178Cancel....................................................... 179Resume.................................................... 179Cruise Control (Speed Control)............. 177, 179Cruise Light................................................... 136Customer Assistance.................................... 479Cybersecurity................................................ 236
21_DT_OM_EN_USC_t.book Page 484