Door trim RAM 1500 2021 Owners Manual
[x] Cancel search | Manufacturer: RAM, Model Year: 2021, Model line: 1500, Model: RAM 1500 2021Pages: 496, PDF Size: 20.89 MB
Page 29 of 496
GETTING TO KNOW YOUR VEHICLE27
The Vehicle Security system is designed to
protect your vehicle. However, you can create
conditions where the system will give you a false
alarm. If one of the previously described arming
sequences has occurred, the Vehicle Security
system will arm regardless of whether you are in
the vehicle or not. If you remain in the vehicle
and open a door, the alarm will sound. If this
occurs, disarm the Vehicle Security system.
If the Vehicle Security system is armed and the
battery becomes disconnected, the Vehicle
Security system will remain armed when the
battery is reconnected; the exterior lights will
flash, and the horn will sound. If this occurs,
disarm the Vehicle Security system.
REARMING OF THE SYSTEM
If something triggers the alarm, and no action is
taken to disarm it, the Vehicle Security system
will turn the horn off after 29 seconds, five
seconds between cycles, and up to eight cycles
if the trigger remains active. The Vehicle
Security system will then rearm itself.
SECURITY SYSTEM MANUAL OVERRIDE
The Vehicle Security system will not arm if you
lock the doors using the manual door lock.
DOORS
MANUAL DOOR LOCKS
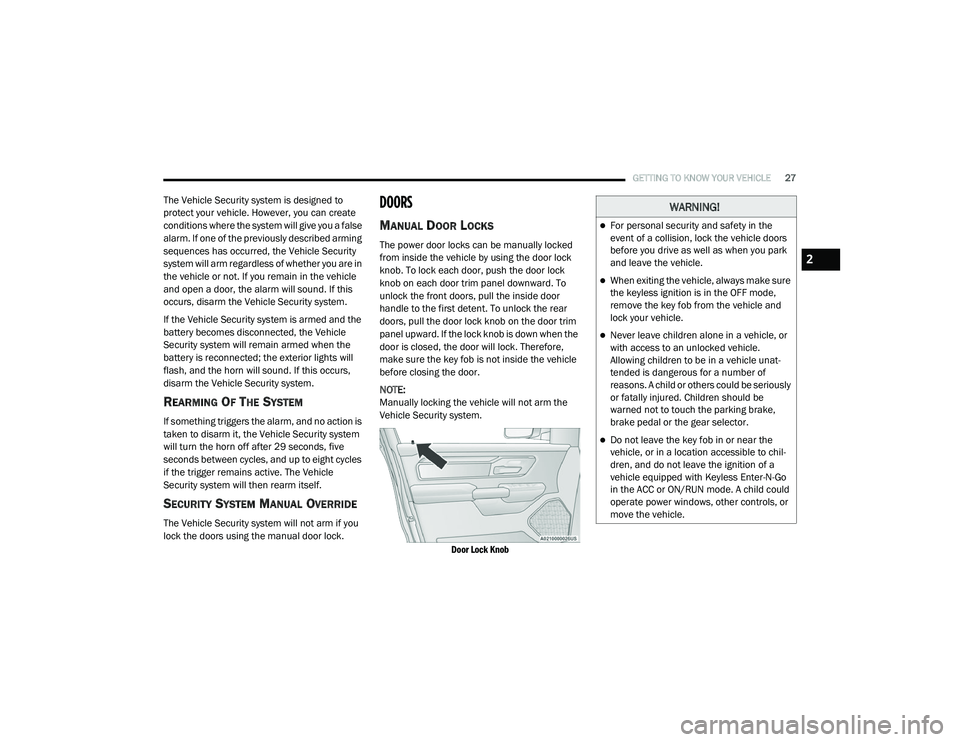
The power door locks can be manually locked
from inside the vehicle by using the door lock
knob. To lock each door, push the door lock
knob on each door trim panel downward. To
unlock the front doors, pull the inside door
handle to the first detent. To unlock the rear
doors, pull the door lock knob on the door trim
panel upward. If the lock knob is down when the
door is closed, the door will lock. Therefore,
make sure the key fob is not inside the vehicle
before closing the door.
NOTE:
Manually locking the vehicle will not arm the
Vehicle Security system.
Door Lock Knob
WARNING!
For personal security and safety in the
event of a collision, lock the vehicle doors
before you drive as well as when you park
and leave the vehicle.
When exiting the vehicle, always make sure
the keyless ignition is in the OFF mode,
remove the key fob from the vehicle and
lock your vehicle.
Never leave children alone in a vehicle, or
with access to an unlocked vehicle.
Allowing children to be in a vehicle unat -
tended is dangerous for a number of
reasons. A child or others could be seriously
or fatally injured. Children should be
warned not to touch the parking brake,
brake pedal or the gear selector.
Do not leave the key fob in or near the
vehicle, or in a location accessible to chil -
dren, and do not leave the ignition of a
vehicle equipped with Keyless Enter-N-Go
in the ACC or ON/RUN mode. A child could
operate power windows, other controls, or
move the vehicle.
2
21_DT_OM_EN_USC_t.book Page 27
Page 46 of 496

44GETTING TO KNOW YOUR VEHICLE
Adjustable Pedals Switch
The pedals can be adjusted with the ignition
placed in the OFF position.
The pedals cannot be adjusted when the
vehicle is in REVERSE or when the Cruise
Control system or Adaptive Cruise Control
system is on. The following messages will
appear in the instrument cluster display if the
pedals are attempted to be adjusted when
the system is locked out: “Adjustable Pedal
Disabled — Cruise Control Engaged” or
“Adjustable Pedal Disabled — Vehicle In
Reverse”.
NOTE:
Always adjust the pedals to a position that
allows full movement of the pedal.
Further small adjustments may be necessary
to find the best possible seat/pedal position.
For vehicles equipped with Driver Memory
Settings Úpage 32, you can use your key fob
or the memory switch on the driver’s door
trim panel to return the adjustable pedals to
pre-programmed positions.
MIRRORS
INSIDE REARVIEW MIRROR
Manual Mirror — If Equipped
The mirror head can be adjusted up, down, left,
and right. The mirror should be adjusted to
center on the view through the rear window.
Headlight glare from vehicles behind you can be
reduced by moving the small control under the
mirror to the night position (toward the rear of
the vehicle). The mirror should be adjusted
while set in the day position (toward the
windshield).
Adjusting Rearview Mirror
WARNING!
Do not adjust the pedals while the vehicle is
moving. You could lose control and have an
accident. Always adjust the pedals while the
vehicle is parked.
CAUTION!
Do not place any article under the adjustable
pedals or impede its ability to move, as it may
cause damage to the pedal controls. Pedal
travel may become limited if movement is
stopped by an obstruction in the adjustable
pedal's path.
21_DT_OM_EN_USC_t.book Page 44
Page 49 of 496
GETTING TO KNOW YOUR VEHICLE47
OUTSIDE AUTOMATIC DIMMING
M
IRRORS — IF EQUIPPED
The driver’s outside mirror and if equipped, the
passenger’s outside mirror, will automatically
dim for glare from vehicles behind you. This
feature is controlled by the inside automatic
dimming mirror. The mirrors will automatically
adjust for headlight glare when the inside mirror
adjusts.
POWER MIRRORS
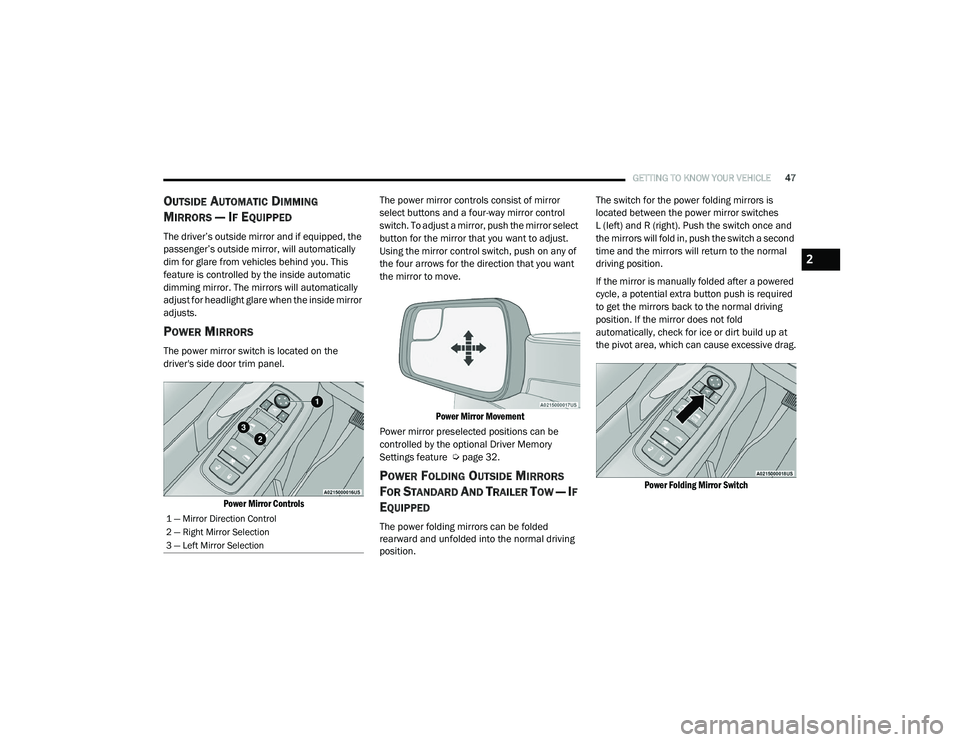
The power mirror switch is located on the
driver's side door trim panel.
Power Mirror Controls
The power mirror controls consist of mirror
select buttons and a four-way mirror control
switch. To adjust a mirror, push the mirror select
button for the mirror that you want to adjust.
Using the mirror control switch, push on any of
the four arrows for the direction that you want
the mirror to move.
Power Mirror Movement
Power mirror preselected positions can be
controlled by the optional Driver Memory
Settings feature Ú page 32.
POWER FOLDING OUTSIDE MIRRORS
F
OR STANDARD AND TRAILER TOW — IF
E
QUIPPED
The power folding mirrors can be folded
rearward and unfolded into the normal driving
position. The switch for the power folding mirrors is
located between the power mirror switches
L (left) and R (right). Push the switch once and
the mirrors will fold in, push the switch a second
time and the mirrors will return to the normal
driving position.
If the mirror is manually folded after a powered
cycle, a potential extra button push is required
to get the mirrors back to the normal driving
position. If the mirror does not fold
automatically, check for ice or dirt build up at
the pivot area, which can cause excessive drag.
Power Folding Mirror Switch
1 — Mirror Direction Control
2 — Right Mirror Selection
3 — Left Mirror Selection
2
21_DT_OM_EN_USC_t.book Page 47
Page 70 of 496
68GETTING TO KNOW YOUR VEHICLE
INTERIOR STORAGE AND EQUIPMENT
STORAGE
Glove Compartment
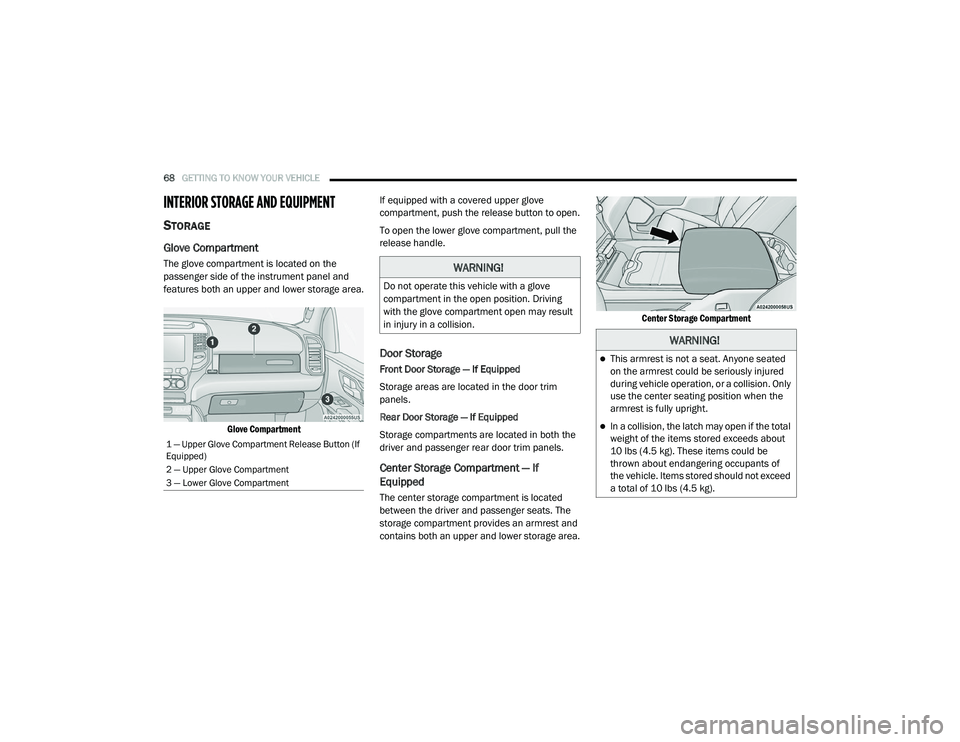
The glove compartment is located on the
passenger side of the instrument panel and
features both an upper and lower storage area.
Glove Compartment
If equipped with a covered upper glove
compartment, push the release button to open.
To open the lower glove compartment, pull the
release handle.
Door Storage
Front Door Storage — If Equipped
Storage areas are located in the door trim
panels.
Rear Door Storage — If Equipped
Storage compartments are located in both the
driver and passenger rear door trim panels.
Center Storage Compartment — If
Equipped
The center storage compartment is located
between the driver and passenger seats. The
storage compartment provides an armrest and
contains both an upper and lower storage area.
Center Storage Compartment
1 — Upper Glove Compartment Release Button (If
Equipped)
2 — Upper Glove Compartment
3 — Lower Glove Compartment
WARNING!
Do not operate this vehicle with a glove
compartment in the open position. Driving
with the glove compartment open may result
in injury in a collision.
WARNING!
This armrest is not a seat. Anyone seated
on the armrest could be seriously injured
during vehicle operation, or a collision. Only
use the center seating position when the
armrest is fully upright.
In a collision, the latch may open if the total
weight of the items stored exceeds about
10 lbs (4.5 kg). These items could be
thrown about endangering occupants of
the vehicle. Items stored should not exceed
a total of 10 lbs (4.5 kg).
21_DT_OM_EN_USC_t.book Page 68
Page 79 of 496
GETTING TO KNOW YOUR VEHICLE77
WIRELESS CHARGING PAD — IF
E
QUIPPED
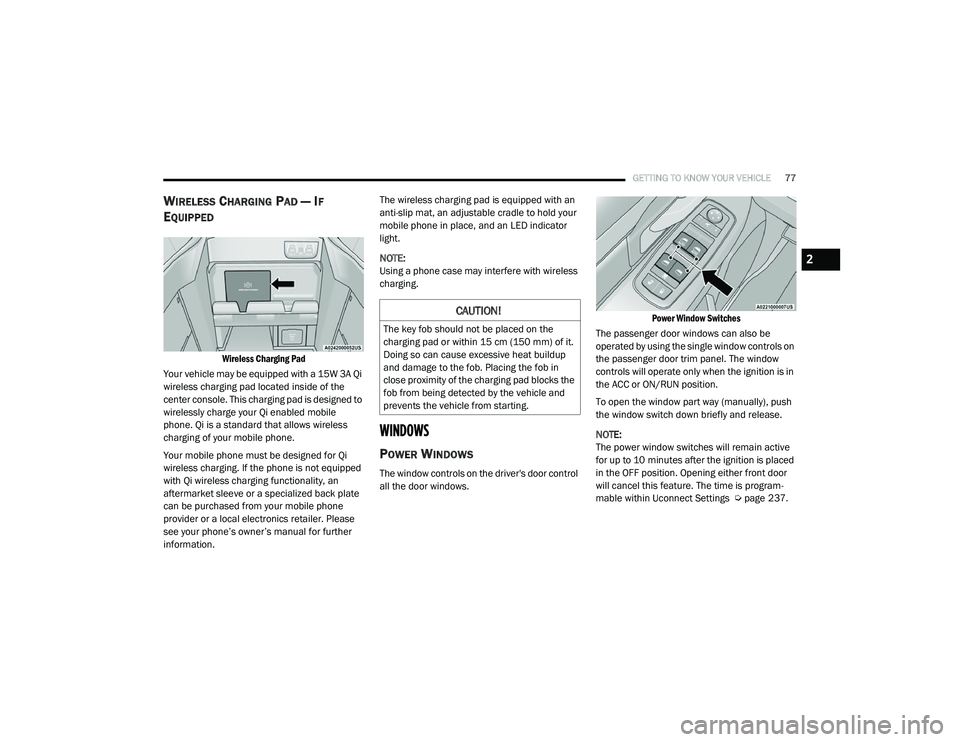
Wireless Charging Pad
Your vehicle may be equipped with a 15W 3A Qi
wireless charging pad located inside of the
center console. This charging pad is designed to
wirelessly charge your Qi enabled mobile
phone. Qi is a standard that allows wireless
charging of your mobile phone.
Your mobile phone must be designed for Qi
wireless charging. If the phone is not equipped
with Qi wireless charging functionality, an
aftermarket sleeve or a specialized back plate
can be purchased from your mobile phone
provider or a local electronics retailer. Please
see your phone’s owner’s manual for further
information. The wireless charging pad is equipped with an
anti-slip mat, an adjustable cradle to hold your
mobile phone in place, and an LED indicator
light.
NOTE:
Using a phone case may interfere with wireless
charging.
WINDOWS
POWER WINDOWS
The window controls on the driver's door control
all the door windows.
Power Window Switches
The passenger door windows can also be
operated by using the single window controls on
the passenger door trim panel. The window
controls will operate only when the ignition is in
the ACC or ON/RUN position.
To open the window part way (manually), push
the window switch down briefly and release.
NOTE:
The power window switches will remain active
for up to 10 minutes after the ignition is placed
in the OFF position. Opening either front door
will cancel this feature. The time is program -
mable within Uconnect Settings Ú page 237.
CAUTION!
The key fob should not be placed on the
charging pad or within 15 cm (150 mm) of it.
Doing so can cause excessive heat buildup
and damage to the fob. Placing the fob in
close proximity of the charging pad blocks the
fob from being detected by the vehicle and
prevents the vehicle from starting.
2
21_DT_OM_EN_USC_t.book Page 77
Page 81 of 496
GETTING TO KNOW YOUR VEHICLE79
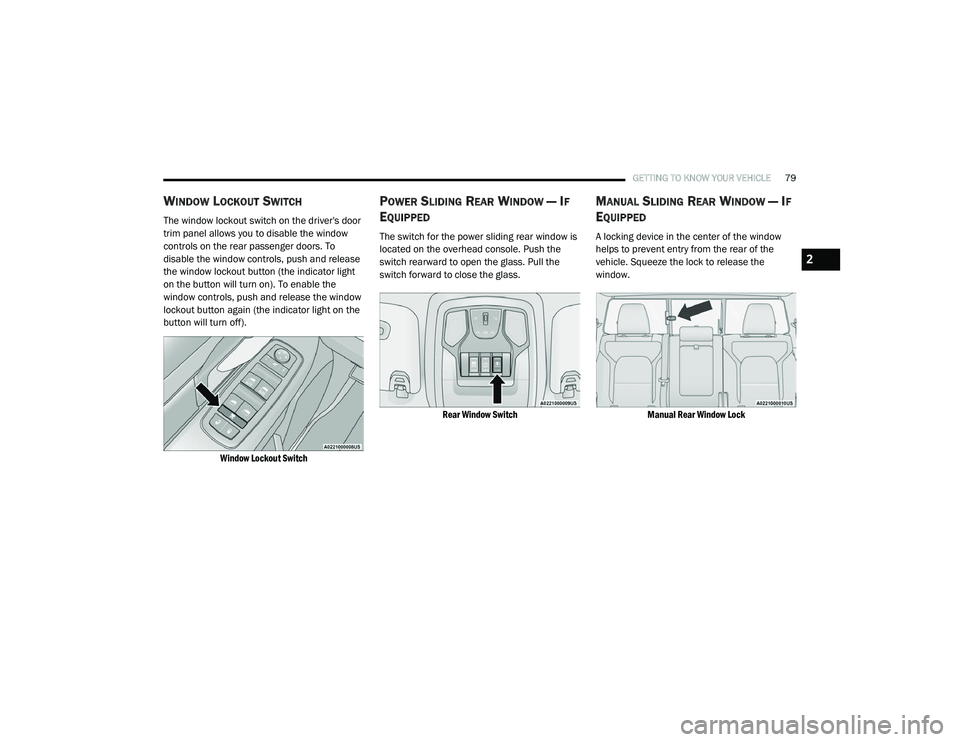
WINDOW LOCKOUT SWITCH
The window lockout switch on the driver's door
trim panel allows you to disable the window
controls on the rear passenger doors. To
disable the window controls, push and release
the window lockout button (the indicator light
on the button will turn on). To enable the
window controls, push and release the window
lockout button again (the indicator light on the
button will turn off).
Window Lockout Switch
POWER SLIDING REAR WINDOW — IF
E
QUIPPED
The switch for the power sliding rear window is
located on the overhead console. Push the
switch rearward to open the glass. Pull the
switch forward to close the glass.
Rear Window Switch
MANUAL SLIDING REAR WINDOW — IF
E
QUIPPED
A locking device in the center of the window
helps to prevent entry from the rear of the
vehicle. Squeeze the lock to release the
window.
Manual Rear Window Lock
2
21_DT_OM_EN_USC_t.book Page 79
Page 352 of 496
350SAFETY
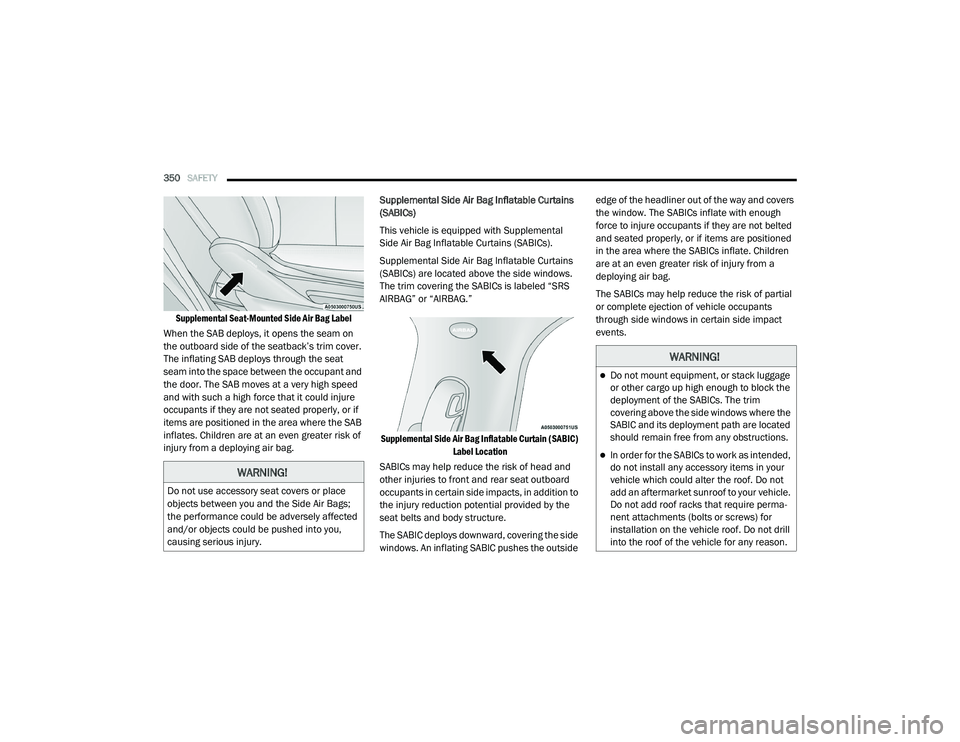
Supplemental Seat-Mounted Side Air Bag Label
When the SAB deploys, it opens the seam on
the outboard side of the seatback’s trim cover.
The inflating SAB deploys through the seat
seam into the space between the occupant and
the door. The SAB moves at a very high speed
and with such a high force that it could injure
occupants if they are not seated properly, or if
items are positioned in the area where the SAB
inflates. Children are at an even greater risk of
injury from a deploying air bag. Supplemental Side Air Bag Inflatable Curtains
(SABICs)
This vehicle is equipped with Supplemental
Side Air Bag Inflatable Curtains (SABICs).
Supplemental Side Air Bag Inflatable Curtains
(SABICs) are located above the side windows.
The trim covering the SABICs is labeled “SRS
AIRBAG” or “AIRBAG.”
Supplemental Side Air Bag Inflatable Curtain (SABIC) Label Location
SABICs may help reduce the risk of head and
other injuries to front and rear seat outboard
occupants in certain side impacts, in addition to
the injury reduction potential provided by the
seat belts and body structure.
The SABIC deploys downward, covering the side
windows. An inflating SABIC pushes the outside edge of the headliner out of the way and covers
the window. The SABICs inflate with enough
force to injure occupants if they are not belted
and seated properly, or if items are positioned
in the area where the SABICs inflate. Children
are at an even greater risk of injury from a
deploying air bag.
The SABICs may help reduce the risk of partial
or complete ejection of vehicle occupants
through side windows in certain side impact
events.
WARNING!
Do not use accessory seat covers or place
objects between you and the Side Air Bags;
the performance could be adversely affected
and/or objects could be pushed into you,
causing serious injury.
WARNING!
Do not mount equipment, or stack luggage
or other cargo up high enough to block the
deployment of the SABICs. The trim
covering above the side windows where the
SABIC and its deployment path are located
should remain free from any obstructions.
In order for the SABICs to work as intended,
do not install any accessory items in your
vehicle which could alter the roof. Do not
add an aftermarket sunroof to your vehicle.
Do not add roof racks that require perma
-
nent attachments (bolts or screws) for
installation on the vehicle roof. Do not drill
into the roof of the vehicle for any reason.
21_DT_OM_EN_USC_t.book Page 350
Page 353 of 496
SAFETY351
Side Impacts
The Side Air Bags are designed to activate in
certain side impacts. The Occupant Restraint
Controller (ORC) determines whether the
deployment of the Side Air Bags in a particular
impact event is appropriate, based on the
severity and type of collision. The side impact
sensors aid the ORC in determining the
appropriate response to impact events. The
system is calibrated to deploy the Side Air Bags
on the impact side of the vehicle during impacts
that require Side Air Bag occupant protection. In
side impacts, the Side Air Bags deploy
independently; a left side impact deploys the
left Side Air Bags only and a right-side impact
deploys the right Side Air Bags only. Vehicle
damage by itself is not a good indicator of
whether or not Side Air Bags should have
deployed.
The Side Air Bags will not deploy in all side
collisions, including some collisions at certain
angles, or some side collisions that do not
impact the area of the passenger compartment.
The Side Air Bags may deploy during angled or
offset frontal collisions where the front air bags
deploy. Side Air Bags are a supplement to the seat belt
restraint system. Side Air Bags deploy in less
time than it takes to blink your eyes.
NOTE:
Air bag covers may not be obvious in the interior
trim, but they will open during air bag deploy-
ment.
WARNING!
Occupants, including children, who are up
against or very close to Side Air Bags can be
seriously injured or killed. Occupants,
including children, should never lean on or
sleep against the door, side windows, or
area where the side air bags inflate, even if
they are in an infant or child restraint.
Seat belts (and child restraints where
appropriate) are necessary for your protec -
tion in all collisions. They also help keep
you in position, away from an inflating Side
Air Bag. To get the best protection from the
Side Air Bags, occupants must wear their
seat belts properly and sit upright with their
backs against the seats. Children must be
properly restrained in a child restraint or
booster seat that is appropriate for the size
of the child.
WARNING!
Side Air Bags need room to inflate. Do not
lean against the door or window. Sit upright
in the center of the seat.
Being too close to the Side Air Bags during
deployment could cause you to be severely
injured or killed.
Relying on the Side Air Bags alone could
lead to more severe injuries in a collision.
The Side Air Bags work with your seat belt
to restrain you properly. In some collisions,
Side Air Bags won’t deploy at all. Always
wear your seat belt even though you have
Side Air Bags.
6
21_DT_OM_EN_USC_t.book Page 351
Page 355 of 496

SAFETY353
eye irritation, rinse the area with cool water.
For nose or throat irritation, move to fresh air.
If the irritation continues, see your doctor. If
these particles settle on your clothing, follow
the garment manufacturer’s instructions for
cleaning.
Do not drive your vehicle after the air bags have
deployed. If you are involved in another
collision, the air bags will not be in place to
protect you.
NOTE:
Air bag covers may not be obvious in the inte -
rior trim, but they will open during air bag
deployment.
After any collision, the vehicle should be
taken to an authorized dealer immediately.
Enhanced Accident Response System
In the event of an impact, if the communication
network remains intact, and the power remains
intact, depending on the nature of the event,
the Occupant Restraint Controller (ORC) will
determine whether to have the Enhanced
Accident Response System perform the
following functions:
Cut off fuel to the engine (if equipped)
Cut off battery power to the electric motor (if
equipped)
Flash hazard lights as long as the battery has
power
Turn on the interior lights, which remain on
as long as the battery has power or for
15 minutes from the intervention of the
Enhanced Accident Response System
Unlock the power door locks
Your vehicle may also be designed to perform
any of these other functions in response to the
Enhanced Accident Response System:
Turn off the Fuel Filter Heater, Turn off the
HVAC Blower Motor, Close the HVAC Circula -
tion Door
Cut off battery power to the:
Engine
Electric Motor (if equipped)
Electric power steering
Brake booster
Electric park brake
Automatic transmission gear selector
Horn
Front wiper
Headlamp washer pump
NOTE:
After an accident, remember to cycle the igni -
tion to the STOP (OFF/LOCK) position and
remove the key from the ignition switch to avoid
draining the battery. Carefully check the vehicle
for fuel leaks in the engine compartment and on
the ground near the engine compartment and
fuel tank before resetting the system and
starting the engine. If there are no fuel leaks or
damage to the vehicle electrical devices (e.g.
headlights) after an accident, reset the system
by following the procedure described below. If
you have any doubt, contact an authorized
dealer.
WARNING!
Deployed air bags and seat belt
pretensioners cannot protect you in another
collision. Have the air bags, seat belt
pretensioners, and the seat belt retractor
assemblies replaced by an authorized dealer
immediately. Also, have the Occupant
Restraint Controller System serviced as well.
6
21_DT_OM_EN_USC_t.book Page 353
Page 458 of 496
456SERVICING AND MAINTENANCE
Inflate collapsible tire only after the wheel is
properly installed to the vehicle. Inflate the
collapsible tire using the electric air pump
before lowering the vehicle.
Do not install a wheel cover or attempt to mount
a conventional tire on the collapsible spare
wheel, since the wheel is designed specifically
for the collapsible spare tire.Full Size Spare — If Equipped
The full size spare is for temporary emergency
use only. This tire may look like the originally
equipped tire on the front or rear axle of your
vehicle, but it is not. This spare tire may have
limited tread life. When the tread is worn to the
tread wear indicators, the temporary use full
size spare tire needs to be replaced. Since it is
not the same as your original equipment tire,
replace (or repair) the original equipment tire
and reinstall on the vehicle at the first
opportunity.
Limited Use Spare — If Equipped
The limited use spare tire is for temporary
emergency use only. This tire is identified by a
label located on the limited use spare wheel.
This label contains the driving limitations for
this spare. This tire may look like the original
equipped tire on the front or rear axle of your
vehicle, but it is not. Installation of this limited
use spare tire affects vehicle handling. Since it
is not the same as your original equipment tire,
replace (or repair) the original equipment tire
and reinstall on the vehicle at the first
opportunity.
WHEEL AND WHEEL TRIM CARE
All wheels and wheel trim, especially aluminum
and chrome plated wheels, should be cleaned
regularly using mild (neutral Ph) soap and water
to maintain their luster and to prevent
corrosion. Wash wheels with the same soap
solution recommended for the body of the
vehicle and remember to always wash when the
surfaces are not hot to the touch.
WARNING!
Compact and Collapsible spares are for
temporary emergency use only. With these
spares, do not drive more than 50 mph
(80 km/h). Temporary use spares have
limited tread life. When the tread is worn to
the tread wear indicators, the temporary use
spare tire needs to be replaced. Be sure to
follow the warnings, which apply to your
spare. Failure to do so could result in spare
tire failure and loss of vehicle control.
WARNING!
Limited use spares are for emergency use
only. Installation of this limited use spare tire
affects vehicle handling. With this tire, do not
drive more than the speed listed on the
limited use spare wheel. Keep inflated to the
cold tire inflation pressures listed on your Tire
and Loading Information Placard located on
the driver’s side B-Pillar or the rear edge of
the driver’s side door. Replace (or repair) the
original equipment tire at the first opportunity
and reinstall it on your vehicle. Failure to do
so could result in loss of vehicle control.
21_DT_OM_EN_USC_t.book Page 456