gain RAM 1500 2022 Owner's Guide
[x] Cancel search | Manufacturer: RAM, Model Year: 2022, Model line: 1500, Model: RAM 1500 2022Pages: 496, PDF Size: 18.03 MB
Page 159 of 496

STARTING AND OPERATING157
(Continued) The following indicators should be used to ensure
that you have properly engaged the transmission
into the PARK position:
Look at the transmission gear position display
and verify that it indicates the PARK position (P),
and is not blinking.
With the brake pedal released, verify that the
gear selector will not move out of PARK. REVERSE (R)
This range is for moving the vehicle backward.
Shift into REVERSE only after the vehicle has come
to a complete stop.
NEUTRAL (N)
Use this range when the vehicle is standing for
prolonged periods with the engine running. Apply
the parking brake and shift the transmission into
PARK if you must exit the vehicle.
Unintended movement of a vehicle could
injure those in or near the vehicle. As with all
vehicles, you should never exit a vehicle while
the engine is running. Before exiting a vehicle,
always come to a complete stop, then apply
the parking brake, shift the transmission into
PARK, and turn the ignition OFF. When the
ignition is in the OFF position, the transmis
-
sion is locked in PARK, securing the vehicle
against unwanted movement.
When exiting the vehicle, always make sure
the ignition is in the OFF position, remove the
key fob from the vehicle, and lock the vehicle.
Never leave children alone in a vehicle, or with
access to an unlocked vehicle. Allowing chil -
dren to be in a vehicle unattended is
dangerous for a number of reasons. A child or
others could be seriously or fatally injured.
Children should be warned not to touch the
parking brake, brake pedal or the transmis -
sion gear selector.
WARNING!
Do not leave the key fob in or near the vehicle
(or in a location accessible to children), and do
not leave the ignition in the ACC or ON/RUN
position. A child could operate power
windows, other controls, or move the vehicle.
CAUTION!
DO NOT race the engine when shifting from
PARK or NEUTRAL into another gear range, as
this can damage the drivetrain.
Before moving the transmission gear selector
out of PARK, you must start the engine, and
also press the brake pedal. Otherwise,
damage to the gear selector could result.
WARNING!
WARNING!
Do not coast in NEUTRAL and never turn off the
ignition to coast down a hill. These are unsafe
practices that limit your response to changing
traffic or road conditions. You might lose control
of the vehicle and have a collision.
CAUTION!
Towing the vehicle, coasting, or driving for any
other reason with the transmission in NEUTRAL
can cause severe transmission damage.
For Recreational Towing Ú page 228.
For Towing A Disabled Vehicle Ú page 390.
4
22_DT_OM_EN_USC_t.book Page 157
Page 160 of 496

158STARTING AND OPERATING
DRIVE (D)
This range should be used for most city and
highway driving. It provides the smoothest upshifts
and downshifts, and the best fuel economy. The
transmission automatically upshifts through all
forward gears.
When frequent transmission shifting occurs (such
as when operating the vehicle under heavy loading
conditions, in hilly terrain, traveling into strong
head winds, or while towing a heavy trailer), select
TOW/HAUL mode or use the Electronic Range
Select (ERS) shift control to select a lower gear
range Úpage 158. Under these conditions, using
a lower gear range will improve performance and
extend transmission life by reducing excessive
shifting and heat buildup.
During extremely cold temperatures (-22°F
[-30°C] or below), transmission operation may be
modified depending on engine and transmission
temperature as well as vehicle speed. Normal
operation will resume once the transmission
temperature has risen to a suitable level.
Transmission Limp Home Mode
Transmission function is monitored electronically
for abnormal conditions. If a condition is detected
that could result in transmission damage,
Transmission Limp Home Mode is activated. In this
mode, the transmission may operate only in
certain gears, or may not shift at all. Vehicle performance may be severely degraded
and the engine may stall. In some situations, the
transmission may not re-engage if the engine is
turned off and restarted. The Malfunction Indicator
Light (MIL) may be illuminated. A message in the
instrument cluster will inform the driver of the
more serious conditions, and indicate what actions
may be necessary.
In the event of a momentary problem, the
transmission can be reset to regain all forward
gears by performing the following steps:
NOTE:In cases where the instrument cluster message
indicates the transmission may not re-engage after
engine shutdown, perform this procedure only in a
desired location (preferably, at an authorized
dealer).
1. Stop the vehicle.
2. Shift the transmission into PARK, if possible.
If not, shift the transmission to NEUTRAL.
3. Push and hold the ignition switch until the engine turns off.
4. Wait approximately 30 seconds.
5. Restart the engine.
6. Shift into the desired gear range. If the problem is no longer detected, the
transmission will return to normal operation.
NOTE:Even if the transmission can be reset, we
recommend that you visit an authorized dealer at
your earliest possible convenience. An authorized
dealer has diagnostic equipment to assess the
condition of your transmission. If the transmission
cannot be reset, an authorized dealer service is
required.
Electronic Range Select (ERS) Operation —
If Equipped
The ERS shift control allows the driver to limit the
highest available gear when the transmission is in
DRIVE and ERS mode is not active. For example, if
you set the transmission gear limit to FOURTH
gear, the transmission will hold that gear and not
shift above FOURTH gear, but will shift through the
lower gears normally.
NOTE:ERS will only upshift during a FIRST to SECOND
gear shift when in 4WD LOW. All other ranges will
hold the gear.
You can switch between DRIVE and ERS mode at
any vehicle speed. When the transmission gear
selector is in DRIVE, the transmission will operate
automatically, shifting between all available gears.
Tapping the “-” button (on the steering wheel) will
activate ERS mode, display the current gear in the
instrument cluster, and set that gear as the top
available gear. Once in ERS mode, tapping the “-”
or “+” button will change the top available gear.
22_DT_OM_EN_USC_t.book Page 158
Page 162 of 496
160STARTING AND OPERATING
Transmission shifting will be more noticeable
when AutoStick is enabled.
The system may revert to automatic shift mode
if a fault or overheat condition is detected.
NOTE:When Selec-Speed or Hill Descent Control is
enabled, AutoStick is not active.
To disengage AutoStick, return the gear selector to
the DRIVE position, or press and hold the “+”
paddle shifter (and the gear selector is already in
DRIVE) until "D" is once again indicated in the
instrument cluster. You can shift in or out of
AutoStick at any time without taking your foot off
the accelerator pedal.
When to Use TOW/HAUL Mode
Select TOW/HAUL mode when driving in conditions
such as: driving in hilly areas, towing a trailer,
carrying a heavy load, etc. This mode will improve
performance and reduce the potential for
transmission overheating or failure due to
excessive shifting.
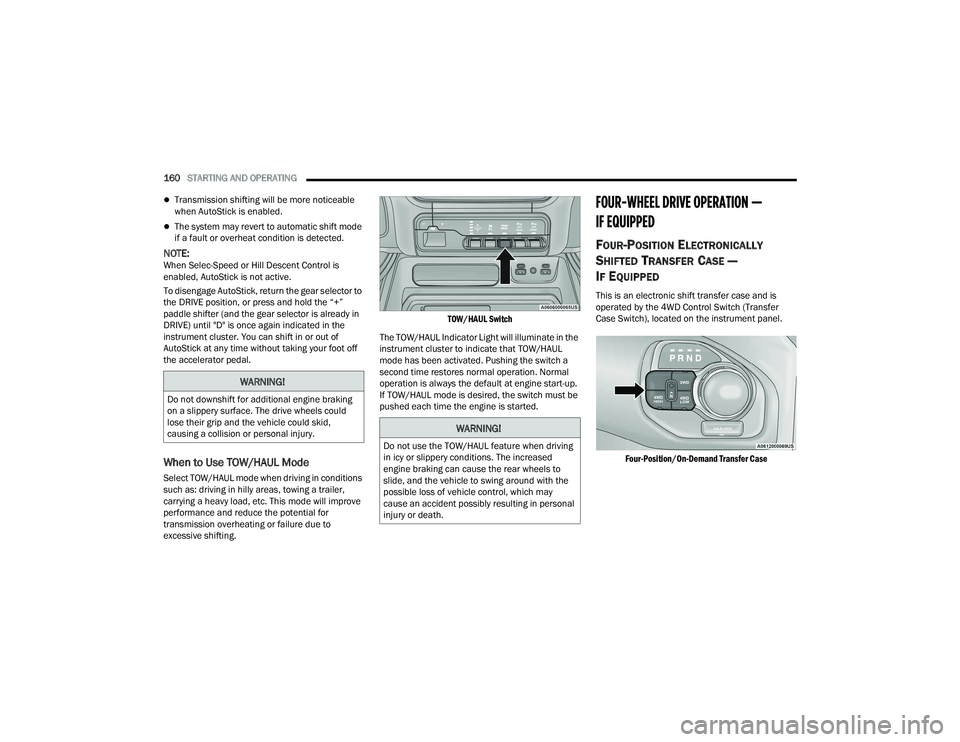
TOW/HAUL Switch
The TOW/HAUL Indicator Light will illuminate in the
instrument cluster to indicate that TOW/HAUL
mode has been activated. Pushing the switch a
second time restores normal operation. Normal
operation is always the default at engine start-up.
If TOW/HAUL mode is desired, the switch must be
pushed each time the engine is started.
FOUR-WHEEL DRIVE OPERATION —
IF EQUIPPED
FOUR-POSITION ELECTRONICALLY
S
HIFTED TRANSFER CASE —
I
F EQUIPPED
This is an electronic shift transfer case and is
operated by the 4WD Control Switch (Transfer
Case Switch), located on the instrument panel.
Four-Position/On-Demand Transfer Case
WARNING!
Do not downshift for additional engine braking
on a slippery surface. The drive wheels could
lose their grip and the vehicle could skid,
causing a collision or personal injury.
WARNING!
Do not use the TOW/HAUL feature when driving
in icy or slippery conditions. The increased
engine braking can cause the rear wheels to
slide, and the vehicle to swing around with the
possible loss of vehicle control, which may
cause an accident possibly resulting in personal
injury or death.
22_DT_OM_EN_USC_t.book Page 160
Page 175 of 496

STARTING AND OPERATING173
Operating the locker in 2WD, 4WD AUTO, and
4WD LOCK/HIGH, the locker can be engaged up to
20 mph (32 km/h). While driving with the locker
engaged, if speed exceeds 25 mph (40 km/h), the
locker will automatically disengage, but will
automatically re-engage at 20 mph (32 km/h).
NOTE:Left to right wheel speed difference may be
necessary to allow the rear axle to fully lock. If the
indicator light is flashing after selecting the rear
axle lock mode, drive the vehicle in a turn or on
loose gravel to expedite the locking action.
The axle locker could become torque locked due to
side to side loads on the rear axle. Driving slowly
while turning the steering wheel from a left hand
turn to a right hand turn or driving in REVERSE for
a short distance may be required to release the
torque lock and unlock the axles.
To unlock the rear axle, push the AXLE LOCK
button. The AXLE LOCK indicator light will go out
when the rear axle is unlocked.
LIMITED-SLIP DIFFERENTIAL —
IF EQUIPPED
The limited-slip differential provides additional
traction on snow, ice, mud, sand and gravel,
particularly when there is a difference between the
traction characteristics of the surface under the
right and left rear wheels. During normal driving and cornering, the limited-slip unit performs
similarly to a conventional differential. On slippery
surfaces, however, the differential delivers more of
the driving effort to the rear wheel having the
better traction.
The limited-slip differential is especially helpful
during slippery driving conditions. With both rear
wheels on a slippery surface, a slight application of
the accelerator will supply maximum traction.
When starting with only one rear wheel on an
excessively slippery surface, slight momentary
application of the parking brake may be necessary
to gain maximum traction.
Care should be taken to avoid sudden
accelerations when both rear wheels are on a
slippery surface. This could cause both rear wheels
to spin, and allow the vehicle to slide sideways on
the crowned surface of a road or in a turn.
POWER STEERING
ELECTRIC POWER STEERING
The electric power steering system will provide
increased vehicle response and ease of
maneuverability. The power steering system
adapts to different driving conditions.
If the steering icon is flashing, it indicates that the
vehicle needs to be taken to the dealer for service.
It is likely the vehicle has lost power steering
assistance.
If the steering icon is displayed and the “POWER
STEERING SYSTEM OVER TEMP” message is
displayed on the instrument cluster screen, this
indicates an over temperature condition in the
power steering system. Once driving conditions are
safe, pull over and let the vehicle idle for a few
moments until the icon and message turn off
Ú
page 114.
If the steering icon is displayed and the “SERVICE
POWER STEERING – ASSIST OFF” message is
displayed on the instrument cluster screen, this
indicates the vehicle needs to be taken to the
dealer for service Ú page 114.
WARNING!
When servicing vehicles equipped with a
limited-slip or locking differential, never run the
engine with one rear wheel off the ground as the
vehicle may drive through the rear wheel
remaining on the ground and result in
unintended movement.
4
22_DT_OM_EN_USC_t.book Page 173
Page 179 of 496
STARTING AND OPERATING177
To Set A Desired Speed
Turn the Cruise Control on.
When the vehicle has reached the desired speed,
push the SET (+) or SET (-) button and release.
Release the accelerator and the vehicle will
operate at the selected speed.
NOTE:The vehicle should be traveling at a steady speed
and on level ground before pushing the SET (+) or
SET (-) button.
To Vary The Speed Setting
To Increase Or Decrease The Set Speed
After setting a speed, you can increase the set
speed by pushing the SET (+) button, or decrease
speed by pushing the SET (-) button.
U.S. Speed (mph)
Pushing the SET (+) , or SET (-) button once will
result in a 1 mph speed adjustment. Each
subsequent tap of the button results in an
adjustment of 1 mph.
If the button is continually pushed, the set
speed will continue to adjust in 5 mph incre -
ments until the button is released. The new set
speed is reflected in the instrument cluster
display. Metric Speed (km/h)
Pushing the SET (+)
, or SET (-) button once will
result in a 1 km/h speed adjustment. Each
subsequent tap of the button results in an
adjustment of 1 km/h.
If the button is continually pushed, the set
speed will continue to adjust in 10 km/h incre -
ments until the button is released. The new set
speed is reflected in the instrument cluster
display.
NOTE:When you override and push the SET (+) or SET (-)
button, the new set speed will be the current speed
of the vehicle.
To Accelerate For Passing
While the Cruise Control is set, press the
accelerator to pass as you would normally. When
the pedal is released, the vehicle will return to the
set speed.
USING CRUISE CONTROL ON HILLS
The transmission may downshift on hills to
maintain the vehicle set speed.
The Cruise Control system maintains speed up and
down hills. A slight speed change on moderate hills
is normal. On steep hills, a greater speed loss or
gain may occur so it may be preferable to drive
without Cruise Control.
To Resume Speed
To resume a previously set speed, push the RES
button and release. Resume can be used at any
speed above 20 mph (32 km/h).
To Deactivate
A tap on the brake pedal, pushing the CANC
(cancel) button, or normal brake pressure while
slowing the vehicle will deactivate the Cruise
Control system without erasing the set speed from
memory.
The following conditions will also deactivate the
Cruise Control system without erasing the set
speed from memory:
Vehicle parking brake is applied
Stability event occurs
Gear selector is moved out of DRIVE
Engine overspeed occurs
WARNING!
Cruise Control can be dangerous where the
system cannot maintain a constant speed. Your
vehicle could go too fast for the conditions, and
you could lose control and have an accident. Do
not use Cruise Control in heavy traffic or on
roads that are winding, icy, snow-covered or
slippery.
4
22_DT_OM_EN_USC_t.book Page 177
Page 181 of 496

STARTING AND OPERATING179
Adaptive Cruise Control (ACC) Operation
The buttons on the right side of the steering wheel
operate the Adaptive Cruise Control system.
Adaptive Cruise Control Buttons
Adaptive Cruise Control (ACC) Menu
The instrument cluster display will show the
current ACC system settings. The information it
displays depends on ACC system status.
Push the Adaptive Cruise Control (ACC) on/off
button until one of the following appears in the
instrument cluster display: Adaptive Cruise Control Off
When ACC is deactivated, the display will read
“Adaptive Cruise Control Off.”
Adaptive Cruise Control Ready
When ACC is activated, but the vehicle speed
setting has not been selected, the display will read
“Adaptive Cruise Control Ready.”
Adaptive Cruise Control Set
When the SET (+) or the SET (-) button is pushed,
the display will read “ACC SET.”
When ACC is set, the set speed will show in the
instrument cluster display.
The ACC screen may display once again if any of
the following ACC activity occurs:
System Cancel
Driver Override
System Off
ACC Proximity Warning
ACC Unavailable Warning
The instrument cluster display will return to the last
display selected after five seconds of no ACC
display activity.
Activating Adaptive Cruise Control (ACC)
The minimum set speed for the ACC system is
20 mph (32 km/h).
When the system is turned on and in the ready
state, the instrument cluster display will read
“ACC Ready.”
When the system is off, the instrument cluster
display will read “Adaptive Cruise Control (ACC)
Off.”
NOTE:You cannot engage ACC under the following condi -
tions:
When in 4WD Low
When the brakes are applied
When the parking brake is applied
When the automatic transmission is in PARK,
REVERSE or NEUTRAL
When the vehicle speed is below the minimum
speed range
When the brakes are overheated
When the driver’s door is open at low speeds
When the driver’s seat belt is unbuckled at low
speeds
When there is a stationary vehicle in front of
your vehicle in close proximity
When Electronic Stability Control (ESC) Full Off
mode is active
1 — Distance Setting Increase
2 — Adaptive Cruise Control (ACC) On/Off
3 — Distance Setting Decrease
4
22_DT_OM_EN_USC_t.book Page 179
Page 182 of 496
180STARTING AND OPERATING
To Activate/Deactivate
Push and release the Adaptive Cruise Control
(ACC) on/off button. The ACC menu in the
instrument cluster displays “ACC Ready.”
To turn the system off, push and release the
Adaptive Cruise Control (ACC) on/off button again.
At this time, the system will turn off and the
instrument cluster display will show “Adaptive
Cruise Control (ACC) Off.”
To Set A Desired ACC Speed
When the vehicle reaches the speed desired, push
the SET (+) button or the SET (-) button and
release. The instrument cluster display will show
the set speed.
NOTE:Fixed Speed Cruise Control can be used without
ACC enabled. To change between the different
modes, push the ACC on/off button which turns
the ACC and the Fixed Speed Cruise Control off. Pushing the Fixed Speed Cruise Control on/off
button will result in turning on (changing to) Fixed
Speed Cruise Control mode.
If ACC is set when the vehicle speed is
below
20 mph (32 km/h), the set speed will default to
20 mph (32 km/h).
NOTE:Fixed Speed Cruise Control cannot be set below
20 mph (32 km/h).
If either system is set when the vehicle speed is
above 20 mph (32 km/h), the set speed shall be
the current speed of the vehicle.
NOTE:
Keeping your foot on the accelerator pedal can
cause the vehicle to continue to accelerate
beyond the set speed. If this occurs, the
message “ACC DRIVER OVERRIDE” will display
in the instrument cluster display.
If you continue to accelerate beyond the set
speed while ACC is enabled, the system will not
control the distance between your vehicle and
the vehicle ahead. The vehicle speed will only be
determined by the position of the accelerator
pedal.
To Cancel
The following conditions cancel the ACC or Fixed
Speed Cruise Control systems:
The brake pedal is applied
The CANC (cancel) button is pushed
The Anti-Lock Brake system (ABS) activates
The trailer brake is applied manually (if
equipped)
The gear selector is removed from the DRIVE
position
The Electronic Stability Control/Traction Control
System (ESC/TCS) activates
The vehicle parking brake is applied
The Trailer Sway Control (TSC) activates
WARNING!
Leaving the Adaptive Cruise Control (ACC)
system on when not in use is dangerous. You
could accidentally set the system or cause it to
go faster than you want. You could lose control
and have a collision. Always leave the system off
when you are not using it.
WARNING!
In the Fixed Speed Cruise Control mode, the
system will not react to vehicles ahead. In
addition, the proximity warning does not activate
and no alarm will sound even if you are too close
to the vehicle ahead since neither the presence
of the vehicle ahead nor the vehicle-to-vehicle
distance is detected. Be sure to maintain a safe
distance between your vehicle and the vehicle
ahead. Always be aware which mode is selected.
22_DT_OM_EN_USC_t.book Page 180
Page 186 of 496

184STARTING AND OPERATING
When the condition that deactivated the system is
no longer present, the system will return to the
“Adaptive Cruise Control Off” state and will resume
function by simply reactivating it.
NOTE:
If the “ACC/FCW Unavailable Wipe Front Radar
Sensor” message occurs frequently (e.g. more
than once on every trip) without any snow, rain,
mud, or other obstruction, have the radar
sensor realigned at an authorized dealer.
Installing a snow plow, front-end protector, an
aftermarket grille or modifying the grille is not
recommended. Doing so may block the sensor
and inhibit ACC/FCW operation.
“CLEAN FRONT WINDSHIELD” WARNING
The “ACC/FCW Limited Functionality Clean Front
Windshield” warning will display and a chime will
sound when conditions temporarily limit system
performance. This most often occurs at times of
poor visibility, such as in snow or heavy rain and
fog. The ACC system may also become temporarily
blinded due to obstructions, such as mud, dirt, or
ice on windshield, driving directly into the sun and
fog on the inside of glass. In these cases, the
instrument cluster display will show “ACC/FCW
Limited Functionality Clean Front Windshield” and
the system will have degraded performance. This message can sometimes be displayed while
driving in adverse weather conditions. The ACC/
FCW system will recover after the vehicle has left
these areas. Under rare conditions, when the
camera is not tracking any vehicles or objects in its
path this warning may temporarily occur.
If weather conditions are not a factor, the driver
should examine the windshield and the camera
located on the back side of the inside rear view
mirror. They may require cleaning or removal of an
obstruction.
When the condition that created limited
functionality is no longer present, the system will
return to full functionality.
NOTE:If the “ACC/FCW Limited Functionality Clean Front
Windshield” message occurs frequently (e.g. more
than once on every trip) without any snow, rain,
mud, or other obstruction, have the windshield and
forward facing camera inspected at an authorized
dealer.
SERVICE ACC/FCW WARNING
If the system turns off, and the instrument cluster
displays “ACC/FCW Unavailable Service Required”
or “Cruise/FCW Unavailable Service Required”,
there may be an internal system fault or a
temporary malfunction that limits ACC
functionality. Although the vehicle is still drivable under normal conditions, ACC will be temporarily
unavailable. If this occurs, try activating ACC again
later, following an ignition cycle. If the problem
persists, see an authorized dealer.
Precautions While Driving With ACC
NOTE:
Aftermarket add-ons such as snow plows, lift
kits, and brush/grille bars can hinder module
performance. Ensure the radar/camera has no
obstructions in the field of view.
Height modifications can limit module perfor
-
mance and functionality.
Do not put stickers or easy passes over the
camera/radar field of view.
Any modifications to the vehicle that may
obstruct the field of view of the radar/camera
are not recommended.
In certain driving situations, ACC may have
detection issues. In these cases, ACC may brake
late or unexpectedly. The driver needs to stay alert
and may need to intervene. The following are
examples of these types of situations:
22_DT_OM_EN_USC_t.book Page 184
Page 189 of 496

STARTING AND OPERATING187
ParkSense will retain its last known configura -
tion state for the automatic braking function
through ignition cycles.
Trailer hitch ball assembly may cause false
braking events if left attached after towing.
The automatic braking function is intended to
assist the driver in avoiding possible collisions with
detected obstacles when backing up in REVERSE
gear.
NOTE:
The system is provided to assist the driver and
not to substitute the driver.
The driver must stay in full control of the
vehicle's acceleration and braking and is
responsible for the vehicle's movements.
For limitations of this system and usage
precautions, see Ú page 191.
ParkSense will retain the last system state
(enabled or disabled) from the last ignition cycle
when the ignition is placed in the ON/RUN position.
ParkSense can be active only when the gear
selector is in REVERSE or DRIVE. If ParkSense is
enabled while in one of these gears, the system will
remain active until the vehicle speed is increased
to approximately 7 mph (11 km/h) or above. A
warning will appear in the instrument cluster
display indicating the vehicle speed is above ParkSense operating speed while in REVERSE. The
system will become active again if the vehicle
speed is decreased to speeds less than
approximately 6 mph (9 km/h).
PARKSENSE SENSORS
The four ParkSense sensors (six if equipped with
Active Parksense), located in the front fascia/
bumper, monitor the area in front of the vehicle
that is within the sensors’ field of view, and the four
ParkSense sensors, located in the rear fascia/
bumper, monitor the area behind the vehicle that
is within the sensors’ field of view. The front
sensors can detect obstacles from approximately
12 inches (30 cm) up to 47 inches (120 cm) from
the front fascia/bumper. The rear sensors can
detect obstacles from approximately 12 inches
(30 cm) up to 79 inches (200 cm). These distances
depend on the location, type and orientation of the
obstacle in the horizontal direction.
PARKSENSE WARNING DISPLAY
The ParkSense Warning screen is located within
the instrument cluster display Ú
page 114. It
provides visual warnings to indicate the distance
between the rear fascia/bumper and/or front
fascia/bumper and the detected obstacle.
PARKSENSE DISPLAY
The warning display will turn on indicating the
system status when the vehicle is in REVERSE or
when the vehicle is in DRIVE and an obstacle has
been detected.
The system will indicate a detected obstacle by
showing a single arc in the left, right, or center
regions based on the obstacle’s distance and
location relative to the vehicle.
If an obstacle is detected in the center front region,
the display will show a single solid arc in the center
front region with no chime. As the vehicle moves
closer to the obstacle, the display will show the
single arc moving closer to the vehicle and a fast
chime will be heard and will change from fast to
continuous.
If an obstacle is detected in the left and/or right
front region, the display will show a single flashing
arc in the left and/or right front region and will
produce a fast chime. As the vehicle moves closer
to the obstacle, the display will show the single arc
moving closer to the vehicle and the tone will
change from fast to continuous.
4
22_DT_OM_EN_USC_t.book Page 187
Page 193 of 496

STARTING AND OPERATING191
PARKSENSE SYSTEM USAGE
P
RECAUTIONS
NOTE:
Ensure that the front and rear fascias/bumpers
are free of snow, ice, mud, dirt and debris to
keep the ParkSense system operating properly.
Jackhammers, large trucks, and other vibra -
tions could affect the performance of Park -
Sense.
When you turn Front or Rear ParkSense off, the
instrument cluster display will show a vehicle
graphic of the Front or Rear ParkSense on/off
state for two seconds. Furthermore, once you
turn Front or Rear ParkSense off, it remains off
until you turn it on again, even if you cycle the
ignition.
When you move the gear selector to the
REVERSE position and Front or Rear ParkSense
is turned off, the instrument cluster display will
show a vehicle graphic with "OFF" in the corre -
sponding side. This vehicle graphic will be
displayed for as long as the vehicle is in
REVERSE.
ParkSense, when on, will reduce the volume of
the radio when it is sounding a tone.
Clean the ParkSense sensors regularly, taking
care not to scratch or damage them. The
sensors must not be covered with ice, snow,
slush, mud, dirt or debris. Failure to do so can
result in the system not working properly. The
ParkSense system might not detect an obstacle
behind or in front of the fascia/bumper, or it
could provide a false indication that an obstacle
is behind or in front of the fascia/bumper.
Use the ParkSense switch to turn the ParkSense
system off if obstacles such as bicycle carriers,
trailer hitches, etc. are placed near the rear
fascia/bumper. Failure to do so can result in the
system misinterpreting a close obstacle as a
sensor problem, causing the “PARKSENSE
UNAVAILABLE SERVICE REQUIRED” message to
be appear in the instrument cluster display.
ParkSense should be disabled when the tailgate
is in the lowered or open position. A lowered tail -
gate could provide a false indication that an
obstacle is behind the vehicle and could also
cause a false braking event.
The Rear ParkSense system will automatically
disable when the system detects that a trailer
with trailer brakes has been connected to the
Integrated Trailer Brake Module.
The Front ParkSense system will automatically
disable if a snow plow has been connected to
the vehicle.
WARNING!
Drivers must be careful when backing up even
when using ParkSense. Always check carefully
behind your vehicle, look behind you, and be
sure to check for pedestrians, animals, other
vehicles, obstructions, and blind spots before
backing up. You are responsible for safety and
must continue to pay attention to your
surroundings. Failure to do so can result in
serious injury or death.
Before using ParkSense, it is strongly recom -
mended that the ball mount and hitch ball
assembly be disconnected from the vehicle
when the vehicle is not used for towing.
Failure to do so can result in injury or damage
to vehicles or obstacles because the hitch ball
will be much closer to the obstacle than the
rear fascia/bumper when the vehicle sounds
the continuous tone. Also, the sensors could
detect the ball mount and hitch ball assembly,
depending on its size and shape, and give a
false indication that an obstacle is behind the
vehicle, and could cause false braking.
4
22_DT_OM_EN_USC_t.book Page 191