gain RAM 1500 2022 Service Manual
[x] Cancel search | Manufacturer: RAM, Model Year: 2022, Model line: 1500, Model: RAM 1500 2022Pages: 496, PDF Size: 18.03 MB
Page 198 of 496
196STARTING AND OPERATING
LANESENSE — IF EQUIPPED
LANESENSE OPERATION
The LaneSense system is operational at speeds
above 37 mph (60 km/h) and below 112 mph
(180 km/h). The LaneSense system uses a
forward looking camera to detect lane markings
and measure vehicle position within the lane
boundaries.
When both lane markings are detected and the
driver drifts out of the lane (no turn signal applied),
the LaneSense system provides a haptic warning
in the form of torque applied to the steering wheel,
as well as a visual warning in the instrument
cluster display, to prompt the driver to remain
within the lane boundaries.
The driver may manually override the haptic
warning by applying force into the steering wheel at
any time.
When only a single lane marking is detected and
the driver drifts across the lane marking (no turn
signal applied), the LaneSense system provides a
visual warning through the instrument cluster
display to prompt the driver to remain within the
lane.
When only a single lane marking is detected, a
haptic or a torque warning will not be provided.
NOTE:
When operating conditions have been met, the
LaneSense system will monitor if the driver’s
hands are on the steering wheel and provide an
audible and visual warning to the driver if
removed. The system will cancel if the driver
does not return their hands to the wheel.
LaneSense will disable when a snow plow is
connected to the vehicle.
TURNING LANESENSE ON OR OFF
The LaneSense button is located on the
switch panel below the Uconnect display.
NOTE:If your vehicle is equipped with a 12-inch Uconnect
Display screen, the LaneSense button is located
above the display.
To turn the LaneSense system on, push the
LaneSense button (LED turns off). A “LaneSense
On” message is shown in the instrument cluster
display.
To turn the LaneSense system off, push the
LaneSense button again (LED turns on).
NOTE:The LaneSense system will retain the last system
state on or off from the last ignition cycle when the
ignition is placed in the ON/RUN position.
WARNING!
Drivers must be careful when performing
parallel or perpendicular parking maneuvers
even when using the ParkSense Active Park
Assist system. Always check carefully behind
and in front of your vehicle, look behind and in
front of you, and be sure to check for
pedestrians, animals, other vehicles,
obstructions, and blind spots before backing up
and moving forward. You are responsible for
safety and must continue to pay attention to
your surroundings. Failure to do so can result in
serious injury or death.
CAUTION!
The ParkSense Active Park Assist system is
only a parking aid and it is unable to recognize
every obstacle, including small obstacles.
Parking curbs might be temporarily detected
or not detected at all. Obstacles located above
or below the sensors’ field of view will not be
detected when they are in close proximity.
The vehicle must be driven slowly when using
the ParkSense Active Park Assist system in
order to be able to stop in time when an
obstacle is detected. It is recommended that
the driver looks over his/her shoulders when
using the ParkSense Active Park Assist system.
22_DT_OM_EN_USC_t.book Page 196
Page 204 of 496

202STARTING AND OPERATING
NOTE:
If the Backup Camera was selected through the
Surround View Camera menu, exiting out of
screen display will return to the Surround View
menu. If the Backup Camera was manually acti -
vated through the Controls menu of the Ucon -
nect system, exiting out of the display screen
will return to the Controls menu.
When the Trailer Reverse Steering Control
(TRSC) feature (if equipped) is activated, the
following buttons on the touchscreen will be
unavailable:
Backup Camera
Front Facing Camera with Tire Lines
All Surround View Camera Views
Zoom View
When the Rear View Camera image is being
displayed, and the vehicle speed is below 8 mph
(13 km/h), Zoom View is available. By pressing the
“magnifying glass” icon in the upper left of the
display screen, the image will zoom in two times
the standard view. Pressing the icon a second time
will return the view to the standard Back Up
Camera display.
When Zoom View is selected while the vehicle is in
REVERSE, then shifted to DRIVE, the camera delay
view will display the standard Back Up Camera view. If the vehicle is then returned to REVERSE
gear from DRIVE, the Zoom View selection will
automatically resume.
Shifting to NEUTRAL from any gear will maintain
the selected view (Zoom or Standard) as long as
the vehicle is below 8 mph (13 km/h).
If the vehicle is in PARK, Zoom View is available
until the gear selector is placed in DRIVE or
REVERSE and speeds are at or above 8 mph
(13 km/h).
NOTE:
If the vehicle is in DRIVE, NEUTRAL, or REVERSE,
and speed is greater than or equal to 8 mph
(13 km/h), Zoom View is unavailable and the
icon will appear grey.
While in Zoom View, the guidelines will not be
visible.
Deactivation
The system is deactivated in the following
conditions if it was activated automatically:
When the vehicle is shifted out of REVERSE with
camera delay turned on, the camera image will
continue to be displayed for up to 10 seconds
after shifting out of REVERSE unless the vehicle
speed exceeds 8 mph (13 km/h), the vehicle is
shifted into PARK or the ignition is placed in the
OFF position. There is a touchscreen button X to
disable the display of the camera image.
When the vehicle is shifted out of REVERSE with
camera delay turned off, the Surround View
Camera mode is exited and the last known
screen appears again.
The system is deactivated in the following
conditions if it was activated manually from the
Uconnect controls menu via Surround View button
or Back Up Camera button:
The X button on the display is pressed
Vehicle is shifted into PARK
Ignition is placed in the OFF position
Vehicle speed is over 8 mph (13 km/h) for
10 seconds
NOTE:If the Surround View Camera is activated manually,
and the vehicle is shifted into REVERSE, deacti-
vation methods for automatic activation are
assumed.
The camera delay system is turned off manually
through the Uconnect settings menu Úpage 234.
NOTE:
If snow, ice, mud, or any foreign substance
builds up on the camera lenses, clean the
lenses, rinse with water, and dry with a soft
cloth. Do not cover the lenses.
If a malfunction with the system has occurred,
see an authorized dealer.
22_DT_OM_EN_USC_t.book Page 202
Page 207 of 496
STARTING AND OPERATING205
Top View
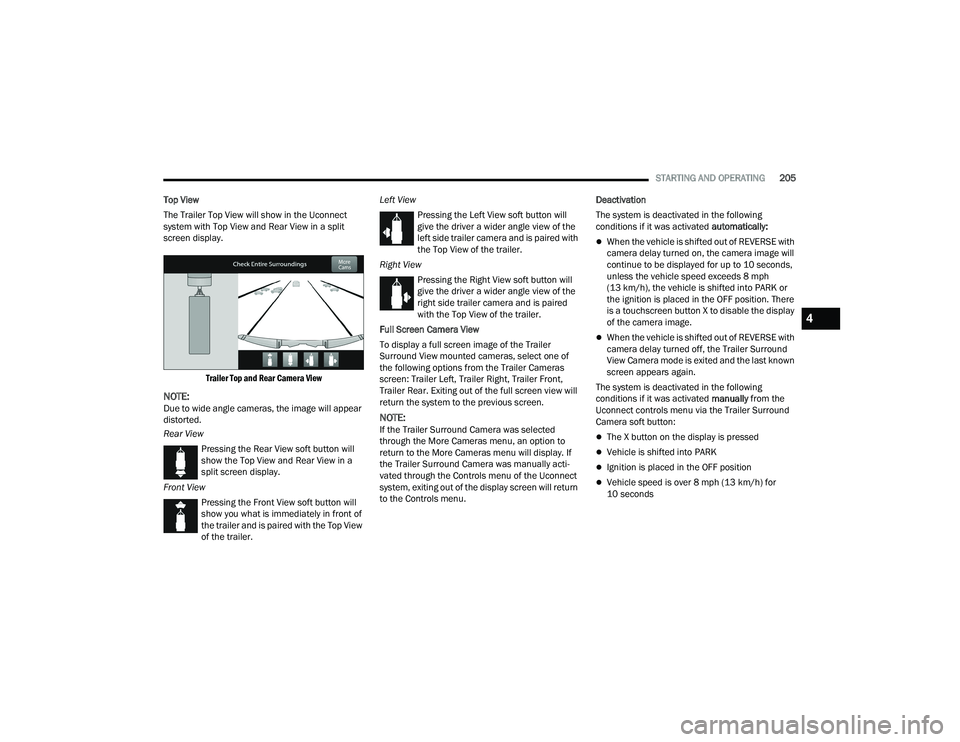
The Trailer Top View will show in the Uconnect
system with Top View and Rear View in a split
screen display.
Trailer Top and Rear Camera View
NOTE:Due to wide angle cameras, the image will appear
distorted.
Rear ViewPressing the Rear View soft button will
show the Top View and Rear View in a
split screen display.
Front View Pressing the Front View soft button will
show you what is immediately in front of
the trailer and is paired with the Top View
of the trailer. Left View
Pressing the Left View soft button will
give the driver a wider angle view of the
left side trailer camera and is paired with
the Top View of the trailer.
Right View Pressing the Right View soft button will
give the driver a wider angle view of the
right side trailer camera and is paired
with the Top View of the trailer.
Full Screen Camera View
To display a full screen image of the Trailer
Surround View mounted cameras, select one of
the following options from the Trailer Cameras
screen: Trailer Left, Trailer Right, Trailer Front,
Trailer Rear. Exiting out of the full screen view will
return the system to the previous screen.NOTE:If the Trailer Surround Camera was selected
through the More Cameras menu, an option to
return to the More Cameras menu will display. If
the Trailer Surround Camera was manually acti-
vated through the Controls menu of the Uconnect
system, exiting out of the display screen will return
to the Controls menu. Deactivation
The system is deactivated in the following
conditions if it was activated
automatically:
When the vehicle is shifted out of REVERSE with
camera delay turned on, the camera image will
continue to be displayed for up to 10 seconds,
unless the vehicle speed exceeds 8 mph
(13 km/h), the vehicle is shifted into PARK or
the ignition is placed in the OFF position. There
is a touchscreen button X to disable the display
of the camera image.
When the vehicle is shifted out of REVERSE with
camera delay turned off, the Trailer Surround
View Camera mode is exited and the last known
screen appears again.
The system is deactivated in the following
conditions if it was activated manually from the
Uconnect controls menu via the Trailer Surround
Camera soft button:
The X button on the display is pressed
Vehicle is shifted into PARK
Ignition is placed in the OFF position
Vehicle speed is over 8 mph (13 km/h) for
10 seconds
4
22_DT_OM_EN_USC_t.book Page 205
Page 223 of 496

STARTING AND OPERATING221
Trailer brakes are recommended for trailers
over 1,000 lb (453 kg) and required for trailers
in excess of 2,000 lb (907 kg).Integrated Trailer Brake Module (ITBM) —
If Equipped
Your vehicle may have an ITBM for electric and
Electric Over Hydraulic (EOH) trailer brakes.
NOTE:This module has been designed and verified with
electric trailer brakes and new EOH systems.
Some previous EOH systems may not be
compatible with ITBM.
Integrated Trailer Brake Module (ITBM)
The user interface consists of the following:
GAIN Adjustment Buttons (+/-)
Pushing these buttons will adjust the brake control
power output to the trailer brakes in
0.5 increments. The GAIN setting can be increased
to a maximum of 10 or decreased to a minimum of
0 (no trailer braking).
GAIN
The GAIN setting is used to set the trailer brake
control for the specific towing condition and should
be changed as towing conditions change. Changes
to towing conditions include trailer load, vehicle
load, road conditions and weather.
Manual Brake Control Lever
Slide the manual brake control lever to the left to
activate power to the trailer's electric brakes
independent of the tow vehicle's brakes. If the
manual brake control lever is activated while the
brake is also applied, the greater of the two inputs
determines the power sent to the trailer brakes.
The trailer and the vehicle’s stop lamps will come
on when braking normally with the vehicle brake
pedal. Only the trailer stop lamps will come on
when the manual brake control lever is applied.
WARNING!
Do not connect trailer brakes to your vehicle's
hydraulic brake lines. It can overload your
brake system and cause it to fail. You might
not have brakes when you need them and
could have an accident.
Towing any trailer will increase your stopping
distance. When towing, you should allow for
additional space between your vehicle and the
vehicle in front of you. Failure to do so could
result in an accident.
CAUTION!
If the trailer weighs more than 1,000 lb (453 kg)
loaded, it should have its own brakes and they
should be of adequate capacity. Failure to do
this could lead to accelerated brake lining wear,
higher brake pedal effort, and longer stopping
distances.
1 — GAIN (-) Adjustment Button
2 — GAIN (+) Adjustment Button
3 — Manual Brake Control Lever
4
22_DT_OM_EN_USC_t.book Page 221
Page 224 of 496

222STARTING AND OPERATING
Trailer Brake Status Indicator Light
This light indicates the trailer electrical connection
status.
If no electrical connection is detected after the
ignition is turned on, pushing the GAIN adjustment
button or sliding the manual brake control lever
will display the GAIN setting for 10 seconds and the
Trailer Brake Status Indicator Light will not be
displayed.
If a fault is detected in the trailer wiring or the
Integrated Trailer Brake Module (ITBM), the Trailer
Brake Status Indicator Light will flash.
Adjusting GAIN
NOTE:This should only be performed in a traffic free envi -
ronment at speeds of approximately 20–25 mph
(30–40 km/h).
1. Make sure the trailer brakes are in good
working condition, functioning normally and
properly adjusted. See your trailer dealer if
necessary.
2. Hook up the trailer and make the electrical connections according to the trailer
manufacturer's instructions.
3. When a trailer is plugged in with electric or EOH brakes, the trailer connected message
should appear in the instrument cluster
display (if the connection is not recognized by
the ITBM, braking functions will not be
available), the GAIN setting will illuminate and
the correct type of trailer must be selected
from the instrument cluster display options.
4. Push the UP or DOWN button on the steering wheel until “TRAILER TOW” appears on the
screen.
5. Push the RIGHT arrow on the steering wheel to enter “TRAILER TOW”. 6. Push the UP or DOWN buttons until the Trailer
Brake Type appears on the screen.
7. Push the RIGHT arrow and then push the UP or DOWN buttons until the proper Trailer Brake
Type appears on the screen.
8. In a traffic-free environment, tow the trailer on a dry, level surface at a speed of 20–25 mph
(30–40 km/h) and squeeze the manual brake
control lever completely.
9. If the trailer wheels lockup (indicated by squealing tires), reduce the GAIN setting;
if the trailer wheels turn freely, increase the
GAIN setting.
Repeat steps 8 and 9 until the GAIN setting is at a
point just below trailer wheel lockup. If towing a
heavier trailer, trailer wheel lockup may not be
attainable even with the maximum GAIN setting
of 10.
*The suggested selection may change depending on the customer preferences for braking performance. Condition of the trailer brakes, driving and road state
may also affect the selection.
Light Electric Heavy Electric Light EOHHeavy EOH
Type of Trailer Brakes Electric Trailer Brakes Electric Trailer Brakes Electric Over Hydraulic Trailer
BrakesElectric Over Hydraulic Trailer
Brakes
Load *Under 10,000 lb*Above 10,000 lb*Under 10,000 lb*Above 10,000 lb
22_DT_OM_EN_USC_t.book Page 222
Page 236 of 496
234MULTIMEDIA
NOTE:
FCA US LLC or your dealer may contact you
directly regarding software updates.
To help further improve vehicle security and
minimize the potential risk of a security breach,
vehicle owners should:
Routinely check www.driveuconnect.com
(US Residents) or www.driveuconnect.ca
(Canadian Residents) to learn about avail -
able Uconnect software updates.
Only connect and use trusted media
devices (e.g. personal mobile phones,
USBs, CDs).
Privacy of any wireless and wired communications
cannot be assured. Third parties may unlawfully
intercept information and private communications
without your consent Ú page 138.
UCONNECT SETTINGS
The Uconnect system uses a combination of
buttons on the touchscreen and buttons on the
faceplate located on the center of the instrument
panel. These buttons allow you to access and
change the Customer Programmable Features.
Many features can vary by vehicle.
Buttons on the faceplate are located below and/or
beside the Uconnect system in the center of the
instrument panel. In addition, there is a Scroll/
Enter control knob located on the right side. Turn
the control knob to scroll through menus and
change settings. Push the center of the control
knob one or more times to select or change a
setting. Your Uconnect system may also have Screen Off
and Mute buttons on the faceplate.
Push the Screen Off button on the faceplate to turn
off the Uconnect screen. Push the button again or
tap the screen to turn the screen on.
Press the Back Arrow button to exit out of a Menu
or certain option on the Uconnect system.
For the Uconnect 5 systems, push and hold the
Power button on the radio’s faceplate for a
minimum of 15 seconds to reset the radio.
22_DT_OM_EN_USC_t.book Page 234
Page 262 of 496
260MULTIMEDIA
Feature Description
Radio/MediaPress the Radio button or Media button to enter Radio Mode/Media Mode
and access the radio functions and external audio sources Ú page 262.
Phone Press the Phone button to enter Phone Mode and access the hands-free
phone system Úpage 272.
Settings Press the Settings button to access the Uconnect Settings Ú page 234.
Push the ENTER/BROWSE button on the faceplate to accept a highlighted selection on the screen. Rotate the TUNE/SCROLL rotary knob to scroll through a list or tune a radio station.
Push the SCREEN OFF button on the faceplate to turn the screen on or off.
Push the MUTE button on the faceplate to turn the audio of the radio system off. Push it again to turn the audio back on.
Rotate the rotary knob to adjust the volume. Push the VOLUME & On/Off button on the faceplate to turn the system on or off.
NOTE:Push and hold the Volume & On/Off button for approximately 10 seconds to
reset the radio manually. Doing this can also recover the radio screen from
freezing or being stuck.
Feature Description
CompassPush the Compass button to access the vehicle’s compass.
More Push the More button to access additional options.
22_DT_OM_EN_USC_t.book Page 260
Page 268 of 496

266MULTIMEDIA
REPLAY
Replay provides a means to store and replay up to 22 minutes of music audio and 48 minutes of talk radio. Once the channel is switched, content in replay
memory is lost.
Press the Replay button on the touchscreen. The Play/Pause, Rewind/Forward and Live buttons will display at the top of the screen, along with the replay time.
You can exit by pressing the Replay button on the touchscreen any time during the Replay Mode.
Play/Pause Press the Pause/Play button on the touchscreen to
pause the playing of live or rewound content at any
time. Play can be resumed by pressing the Pause/ Play button again on the touchscreen.
Rewind Press the Rewind button on the touchscreen to
rewind the content in steps of five seconds.
Pressing the Rewind button on the touchscreen for more than two seconds rewinds the content. The radio begins playing the content at the point at which the press is released.
Forward Each press of the Forward button on the
touchscreen forwards the content in steps of five seconds. Forwarding of the content can only be
done when the content is previously rewound, and therefore, cannot be done for live content. A
continuous press of the Forward button on the
touchscreen also forwards the content. The radio
begins playing the content at the point at which the press is release.
Live Press the Live button on the touchscreen to
resume the playing of live content.
22_DT_OM_EN_USC_t.book Page 266
Page 273 of 496

MULTIMEDIA271
AUX MODE
Overview
Auxiliary Mode (AUX) is entered by inserting an AUX
device using a cable with a 3.5 mm audio jack into
the AUX port, or by pushing the MEDIA button on
the faceplate, selecting the Source button and
then the AUX button.
To insert an Auxiliary device, gently insert the
Auxiliary device cable into the AUX port. If you
insert an Auxiliary device with the ignition and the
radio on, the unit will switch to AUX Mode and
begin to play.
Controlling The Auxiliary Device
The control of the Auxiliary device (e.g., selecting
playlists, play, fast forward, etc.) cannot be
provided by the radio; use the device controls
instead. Adjust the volume with the Volume button,
Volume/Mute rotary knob, or the On/Off rotary
knob, or with the volume of the attached device.
NOTE:The radio unit is acting as the amplifier for audio
output from the Auxiliary device. Therefore, if the
volume control on the Auxiliary device is set too
low, there will be insufficient audio signal for the
radio unit to play the music on the device. Seek Up
/Seek Down
In USB Mode, press the Seek Up button on the
touchscreen for the next selection on the USB
device. Press and release the Seek Down button
on the touchscreen to return to the beginning of
the current selection, or to return to the beginning
of the previous selection if the USB device is within
the first three seconds of the current selection.
In Bluetooth® Mode, press and release the Seek
Up button on the touchscreen for the next
selection on the Bluetooth® device. Press and
release the Seek Down button on the touchscreen
to return to the beginning of the current selection,
or return to the beginning of the previous selection
if the Bluetooth® device is within the first second
of the current selection.
Browse
In USB Mode, press the Browse button on the
touchscreen to display the browse window. In USB
Mode, the left side of the browse window displays
a list of ways you can browse through the contents
of the USB device. If supported by the device, you
can browse by Folder, Artist, Playlist, Album, Song,
etc. Press the desired button on the touchscreen
on the left side of the screen. The center of the
browse window shows items and their
sub-functions, which can be scrolled through by
pressing the Up and Down buttons to the right. The
TUNE/SCROLL knob can also be used to scroll. On the Uconnect 3 With 5-inch Display, select the
Browse button on the touchscreen to scroll
through and select a desired track on the device.
Press the Exit button on the touchscreen if you
wish to cancel the Browse function.
Media Mode
In USB Mode, press the Media button on the
touchscreen to select the desired audio source:
USB.
In Bluetooth® Mode, press the Media button on
the touchscreen to select the desired audio
source: Bluetooth®.
In AUX Mode, press the Media button on the
touchscreen to select the desired audio source:
AUX.
Repeat
In USB Mode, press the Repeat button on the
touchscreen to toggle the repeat functionality. The
Repeat button on the touchscreen is highlighted
when active. The Radio will continue to play the
current track, repeatedly, as long as the repeat is
active. Press the Repeat button again to enter
Repeat All. The radio will continue to play all the
current tracks, repeatedly, as long as the repeat
function is active. To cancel Repeat, press the
Repeat button a third time.
5
22_DT_OM_EN_USC_t.book Page 271
Page 300 of 496

298MULTIMEDIA
CONNECTED SERVICES SOS FAQS — IF
E
QUIPPED
1.
What happens if I accidentally push the SOS
Call button on the mirror or overhead console?
You have 10 seconds after pushing the SOS
Call button to cancel the call. To cancel the
call, either push the SOS Call button again, or
press the Cancel button on the in-vehicle
touchscreen.
2. What type of information is sent when I use the
SOS Call button from my vehicle? Certain
vehicle information, such as make and model,
is transmitted along with the last known GPS
location.
3. When could I use the SOS Call button? You can
use the SOS Call button to make a call if you or
someone else needs emergency assistance.
CONNECTED SERVICES REMOTE DOOR
L
OCK/UNLOCK FAQS
1.
How long does it take to unlock or lock the
door?
Depending on various conditions, it can
take up to three minutes or more for the
request to get to your vehicle.
2.
Which is faster, my key fob or the Mobile App?
Your key fob will lock/unlock the door more
quickly, however its range is limited and your
Mobile App comes in handy for these and
other situations.
3. Will my vehicle be safe if I lose my device?
People sometimes lose their mobile devices,
which is why security measures have been
engineered into the Mobile App. Asking for
your username, password and SiriusXM
Guardian™ Security PIN are required for the
activation of Remote services through your
mobile device. It is your responsibility to
protect your passwords and PINs.
4. Why can’t all mobile devices use the Mobile
App? The Mobile App is compatible with most
devices with the Apple® and Android™
operating systems. The capabilities of these
devices allow us to remotely command your
vehicle. Other operating systems may be
supported in the future.
5. Why is the Mobile App running slow? The
Mobile App relies on a mobile network
connection from your device to send
commands to your vehicle which must have an
operable LTE (voice/data) or 3G, 4G (data), or
5G (data) network connection. If either your
device or your vehicle is in an area with below
average coverage, it may take longer to log in
and send commands.
CONNECTED SERVICES ROADSIDE
A
SSISTANCE FAQS
1.
What is the phone number for roadside
assistance call? The phone number is:
US: 1-800-521-2779
Canada: 1-800-363-4869
2. If I am subscribed to SiriusXM Guardian™,
does it cover towing or other expenses
incurred by using roadside assistance? No,
however your new vehicle may include
Roadside Assistance Call services.
CONNECTED SERVICES SEND & GO
FAQ
S — IF EQUIPPED
1.
How long does it take to send the route and
destination to my vehicle?
Depending on
various conditions, it can take up to three
minutes for the request to get through to your
vehicle.
2. Can I cancel a route I sent to my vehicle? Yes,
once you enter your vehicle, and start the
engine, the pop-up message stating that you
have a new route will appear. There is an exit
button on the pop-up that will cancel the route
if selected.
22_DT_OM_EN_USC_t.book Page 298