key RAM 1500 2023 Owner's Manual
[x] Cancel search | Manufacturer: RAM, Model Year: 2023, Model line: 1500, Model: RAM 1500 2023Pages: 416, PDF Size: 20.59 MB
Page 40 of 416
38GETTING TO KNOW YOUR VEHICLE
DRIVER ADJUSTABLE PEDALS —
IF EQUIPPED
The adjustable pedals system is designed to allow a
greater range of driver comfort for steering wheel tilt and
seat position. This feature allows the brake and
accelerator pedals to move toward or away from the driver
to provide improved position with the steering wheel.
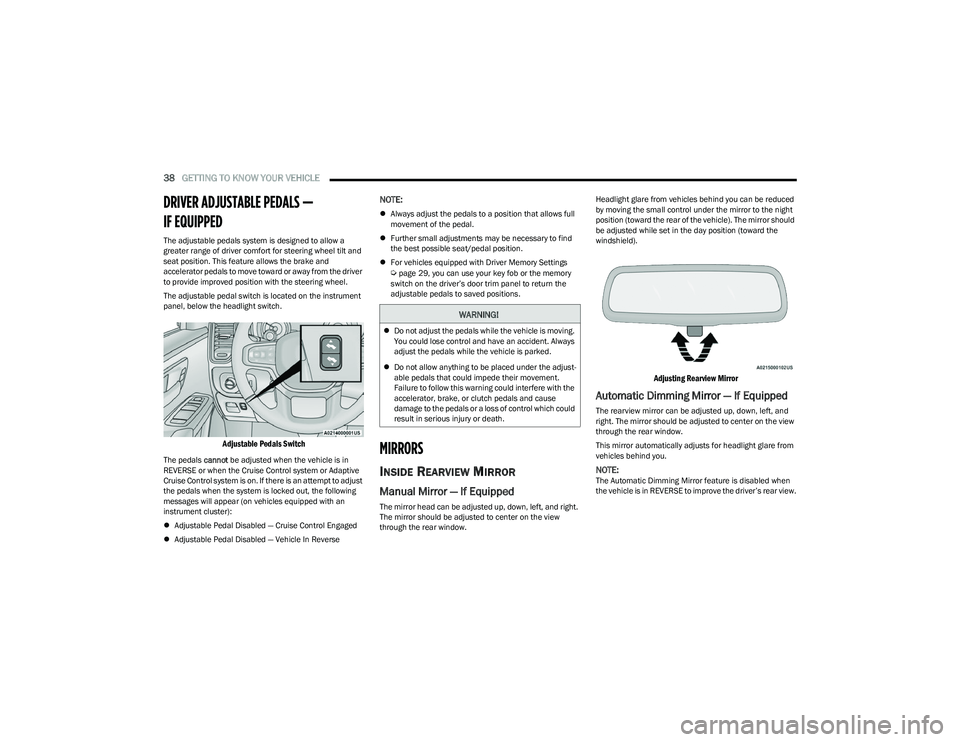
The adjustable pedal switch is located on the instrument
panel, below the headlight switch.
Adjustable Pedals Switch
The pedals cannot be adjusted when the vehicle is in
REVERSE or when the Cruise Control system or Adaptive
Cruise Control system is on. If there is an attempt to adjust
the pedals when the system is locked out, the following
messages will appear (on vehicles equipped with an
instrument cluster):
Adjustable Pedal Disabled — Cruise Control Engaged
Adjustable Pedal Disabled — Vehicle In Reverse
NOTE:
Always adjust the pedals to a position that allows full
movement of the pedal.
Further small adjustments may be necessary to find
the best possible seat/pedal position.
For vehicles equipped with Driver Memory Settings
Úpage 29, you can use your key fob or the memory
switch on the driver’s door trim panel to return the
adjustable pedals to saved positions.
MIRRORS
INSIDE REARVIEW MIRROR
Manual Mirror — If Equipped
The mirror head can be adjusted up, down, left, and right.
The mirror should be adjusted to center on the view
through the rear window. Headlight glare from vehicles behind you can be reduced
by moving the small control under the mirror to the night
position (toward the rear of the vehicle). The mirror should
be adjusted while set in the day position (toward the
windshield).
Adjusting Rearview Mirror
Automatic Dimming Mirror — If Equipped
The rearview mirror can be adjusted up, down, left, and
right. The mirror should be adjusted to center on the view
through the rear window.
This mirror automatically adjusts for headlight glare from
vehicles behind you.
NOTE:The Automatic Dimming Mirror feature is disabled when
the vehicle is in REVERSE to improve the driver’s rear view.
WARNING!
Do not adjust the pedals while the vehicle is moving.
You could lose control and have an accident. Always
adjust the pedals while the vehicle is parked.
Do not allow anything to be placed under the adjust -
able pedals that could impede their movement.
Failure to follow this warning could interfere with the
accelerator, brake, or clutch pedals and cause
damage to the pedals or a loss of control which could
result in serious injury or death.
23_DT_OM_EN_USC_t.book Page 38
Page 42 of 416
40GETTING TO KNOW YOUR VEHICLE
Slide-On-Rod Features Of Sun Visor —
If Equipped
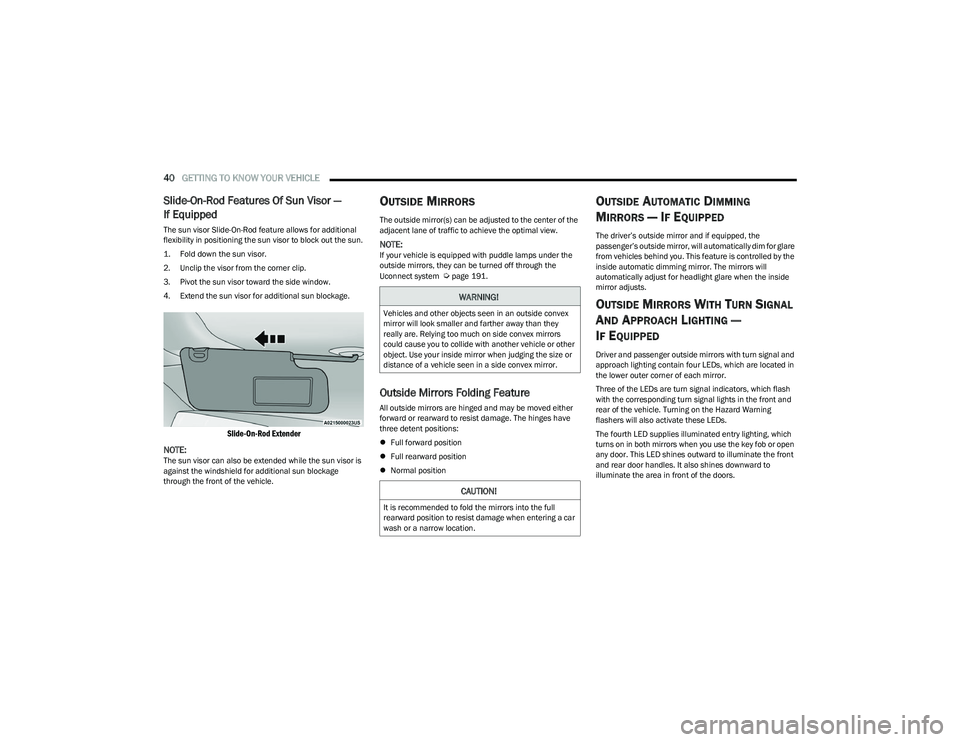
The sun visor Slide-On-Rod feature allows for additional
flexibility in positioning the sun visor to block out the sun.
1. Fold down the sun visor.
2. Unclip the visor from the corner clip.
3. Pivot the sun visor toward the side window.
4. Extend the sun visor for additional sun blockage.
Slide-On-Rod Extender
NOTE:
The sun visor can also be extended while the sun visor is
against the windshield for additional sun blockage
through the front of the vehicle.
OUTSIDE MIRRORS
The outside mirror(s) can be adjusted to the center of the
adjacent lane of traffic to achieve the optimal view.
NOTE:If your vehicle is equipped with puddle lamps under the
outside mirrors, they can be turned off through the
Uconnect system
Úpage 191.
Outside Mirrors Folding Feature
All outside mirrors are hinged and may be moved either
forward or rearward to resist damage. The hinges have
three detent positions:
Full forward position
Full rearward position
Normal position
OUTSIDE AUTOMATIC DIMMING
M
IRRORS — IF EQUIPPED
The driver’s outside mirror and if equipped, the
passenger’s outside mirror, will automatically dim for glare
from vehicles behind you. This feature is controlled by the
inside automatic dimming mirror. The mirrors will
automatically adjust for headlight glare when the inside
mirror adjusts.
OUTSIDE MIRRORS WITH TURN SIGNAL
A
ND APPROACH LIGHTING —
I
F EQUIPPED
Driver and passenger outside mirrors with turn signal and
approach lighting contain four LEDs, which are located in
the lower outer corner of each mirror.
Three of the LEDs are turn signal indicators, which flash
with the corresponding turn signal lights in the front and
rear of the vehicle. Turning on the Hazard Warning
flashers will also activate these LEDs.
The fourth LED supplies illuminated entry lighting, which
turns on in both mirrors when you use the key fob or open
any door. This LED shines outward to illuminate the front
and rear door handles. It also shines downward to
illuminate the area in front of the doors.
WARNING!
Vehicles and other objects seen in an outside convex
mirror will look smaller and farther away than they
really are. Relying too much on side convex mirrors
could cause you to collide with another vehicle or other
object. Use your inside mirror when judging the size or
distance of a vehicle seen in a side convex mirror.
CAUTION!
It is recommended to fold the mirrors into the full
rearward position to resist damage when entering a car
wash or a narrow location.
23_DT_OM_EN_USC_t.book Page 40
Page 47 of 416
GETTING TO KNOW YOUR VEHICLE45
REPROGRAMMING A SINGLE
H
OMELINK® BUTTON
To reprogram a single HomeLink® button that has been
previously trained, without erasing all the channels, refer
to the following procedure. Be sure to determine whether
the new device you want to program the HomeLink®
button to has a rolling code, or non-rolling code.
1. Place the ignition in the ON/RUN position, without
starting the engine.
2. Push and hold the desired HomeLink® button until the HomeLink® indicator light begins to flash after
20 seconds. Do not release the button.
3. Without releasing the button , proceed with Step 2 in
“Programming HomeLink® To A Garage Door
Opener”
Úpage 44, and follow all remaining steps.
CANADIAN/GATE OPERATOR
P
ROGRAMMING
For programming transmitters in Canada/United States
that require the transmitter signals to “time-out” after
several seconds of transmission:
Canadian Radio Frequency (RF) laws require transmitter
signals to time-out (or quit) after several seconds of
transmission, which may not be long enough for
HomeLink® to pick up the signal during programming.
Similar to this Canadian law, some U.S. gate operators are
designed to time-out in the same manner.
It may be helpful to unplug the device during the cycling
process to prevent possible overheating of the garage
door or gate motor.
1. Place the ignition in the ON/RUN position.
NOTE:For vehicles equipped with Keyless Enter ‘n Go™, place
the ignition in the RUN position. Make sure while
programming HomeLink® with the engine on that your
vehicle is outside of your garage, or that the garage door
remains open at all times.
2. Place the hand-held transmitter 1 to 3 inches
(3 to 8 cm) away from the HomeLink® button you
wish to program while keeping the HomeLink®
indicator light in view.
3. Continue to push and hold the HomeLink® button while you push and release (cycle) your hand-held
transmitter every two seconds until HomeLink® has
successfully accepted the frequency signal. The
indicator light will flash slowly and then rapidly when
fully trained.
4. Watch for the HomeLink® indicator to change flash rates. When it changes, it is programmed. It may take
up to 30 seconds or longer in rare cases. The garage
door may open and close while you are programming.
5. Push and hold the programmed HomeLink® button and observe the indicator light.
NOTE:
If the indicator light stays on constantly, program -
ming is complete and the garage door/device
should activate when the HomeLink® button is
pushed.
To program the two remaining HomeLink®
buttons, repeat each step for each remaining
button. DO NOT erase the channels. If you unplugged the garage door opener/device for
programming, plug it back in at this time.
Reprogramming A Single HomeLink® Button
(Canadian/Gate Operator)
To reprogram a channel that has been previously trained,
follow these steps:
1. Place the ignition in the ON/RUN position.
2. Press and hold the desired HomeLink® button until
the indicator light begins to flash after 20 seconds.
Do not release the button.
3. Without releasing the button, proceed with “Canadian/Gate Operator Programming” Step 2 and
follow all remaining steps.
SECURITY
It is advised to erase all channels before you sell or turn in
your vehicle.
To do this, push and hold the two outside buttons for
20 seconds until the indicator flashes. Note that all
channels will be erased. Individual channels cannot be
erased.
The HomeLink® Universal Transceiver is disabled when
the Vehicle Security system is active.
2
23_DT_OM_EN_USC_t.book Page 45
Page 52 of 416
50GETTING TO KNOW YOUR VEHICLE
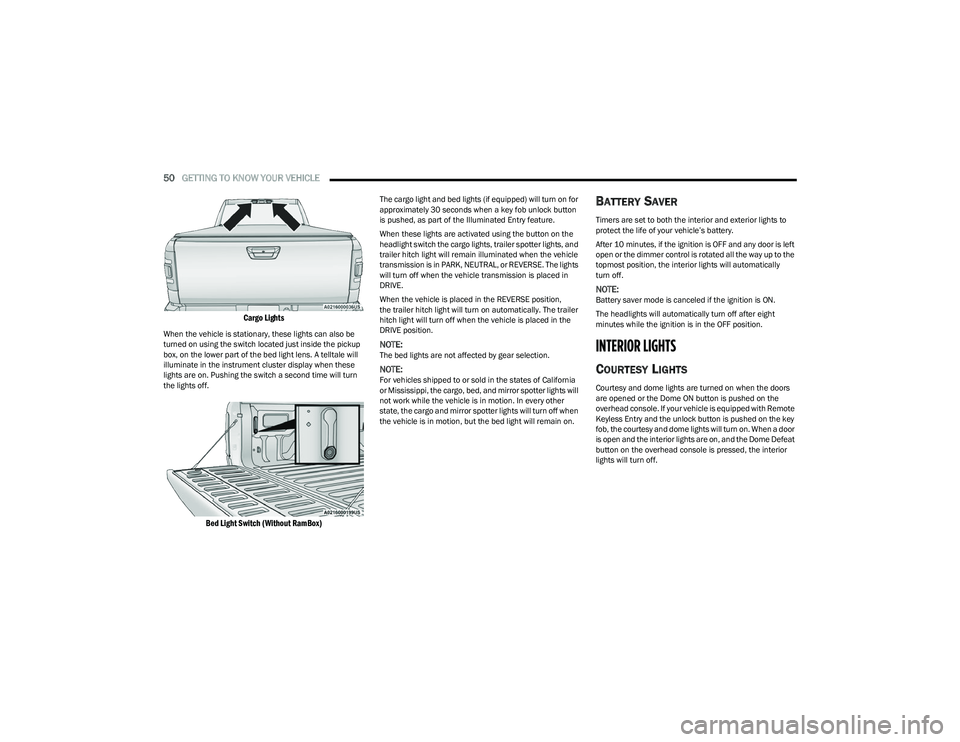
Cargo Lights
When the vehicle is stationary, these lights can also be
turned on using the switch located just inside the pickup
box, on the lower part of the bed light lens. A telltale will
illuminate in the instrument cluster display when these
lights are on. Pushing the switch a second time will turn
the lights off.
Bed Light Switch (Without RamBox)
The cargo light and bed lights (if equipped) will turn on for
approximately 30 seconds when a key fob unlock button
is pushed, as part of the Illuminated Entry feature.
When these lights are activated using the button on the
headlight switch the cargo lights, trailer spotter lights, and
trailer hitch light will remain illuminated when the vehicle
transmission is in PARK, NEUTRAL, or REVERSE. The lights
will turn off when the vehicle transmission is placed in
DRIVE.
When the vehicle is placed in the REVERSE position,
the trailer hitch light will turn on automatically. The trailer
hitch light will turn off when the vehicle is placed in the
DRIVE position.
NOTE:The bed lights are not affected by gear selection.
NOTE:For vehicles shipped to or sold in the states of California
or Mississippi, the cargo, bed, and mirror spotter lights will
not work while the vehicle is in motion. In every other
state, the cargo and mirror spotter lights will turn off when
the vehicle is in motion, but the bed light will remain on.
BATTERY SAVER
Timers are set to both the interior and exterior lights to
protect the life of your vehicle’s battery.
After 10 minutes, if the ignition is OFF and any door is left
open or the dimmer control is rotated all the way up to the
topmost position, the interior lights will automatically
turn off.
NOTE:Battery saver mode is canceled if the ignition is ON.
The headlights will automatically turn off after eight
minutes while the ignition is in the OFF position.
INTERIOR LIGHTS
COURTESY LIGHTS
Courtesy and dome lights are turned on when the doors
are opened or the Dome ON button is pushed on the
overhead console. If your vehicle is equipped with Remote
Keyless Entry and the unlock button is pushed on the key
fob, the courtesy and dome lights will turn on. When a door
is open and the interior lights are on, and the Dome Defeat
button on the overhead console is pressed, the interior
lights will turn off.
23_DT_OM_EN_USC_t.book Page 50
Page 54 of 416
52GETTING TO KNOW YOUR VEHICLE
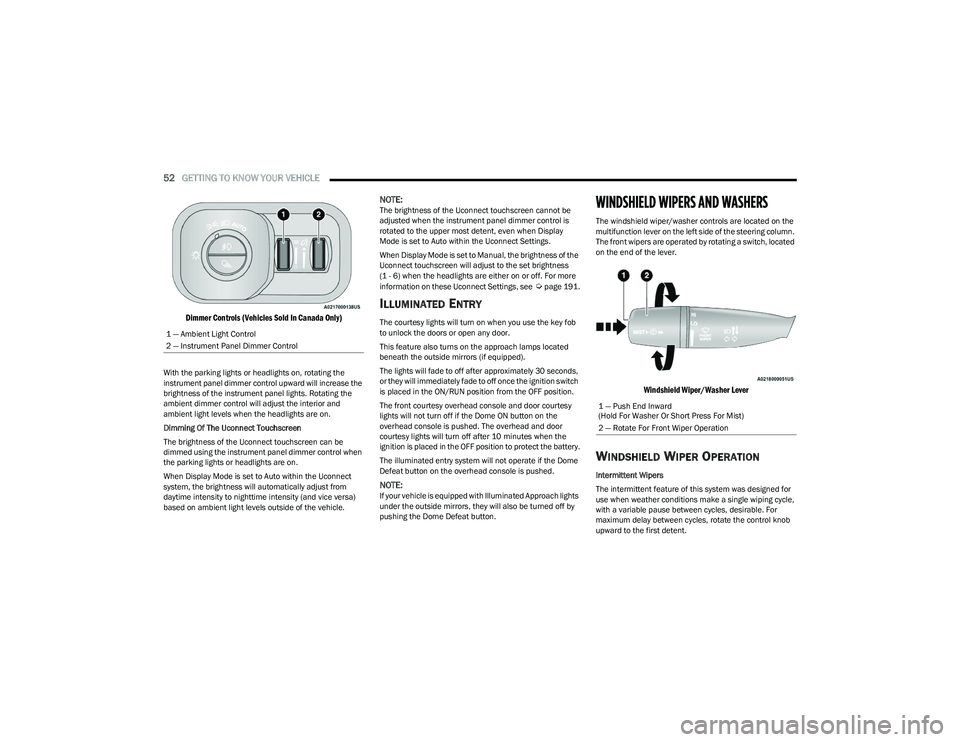
Dimmer Controls (Vehicles Sold In Canada Only)
With the parking lights or headlights on, rotating the
instrument panel dimmer control upward will increase the
brightness of the instrument panel lights. Rotating the
ambient dimmer control will adjust the interior and
ambient light levels when the headlights are on.
Dimming Of The Uconnect Touchscreen
The brightness of the Uconnect touchscreen can be
dimmed using the instrument panel dimmer control when
the parking lights or headlights are on.
When Display Mode is set to Auto within the Uconnect
system, the brightness will automatically adjust from
daytime intensity to nighttime intensity (and vice versa)
based on ambient light levels outside of the vehicle.
NOTE:The brightness of the Uconnect touchscreen cannot be
adjusted when the instrument panel dimmer control is
rotated to the upper most detent, even when Display
Mode is set to Auto within the Uconnect Settings.
When Display Mode is set to Manual, the brightness of the
Uconnect touchscreen will adjust to the set brightness
(1 - 6) when the headlights are either on or off. For more
information on these Uconnect Settings, see
Úpage 191.
ILLUMINATED ENTRY
The courtesy lights will turn on when you use the key fob
to unlock the doors or open any door.
This feature also turns on the approach lamps located
beneath the outside mirrors (if equipped).
The lights will fade to off after approximately 30 seconds,
or they will immediately fade to off once the ignition switch
is placed in the ON/RUN position from the OFF position.
The front courtesy overhead console and door courtesy
lights will not turn off if the Dome ON button on the
overhead console is pushed. The overhead and door
courtesy lights will turn off after 10 minutes when the
ignition is placed in the OFF position to protect the battery.
The illuminated entry system will not operate if the Dome
Defeat button on the overhead console is pushed.
NOTE:If your vehicle is equipped with Illuminated Approach lights
under the outside mirrors, they will also be turned off by
pushing the Dome Defeat button.
WINDSHIELD WIPERS AND WASHERS
The windshield wiper/washer controls are located on the
multifunction lever on the left side of the steering column.
The front wipers are operated by rotating a switch, located
on the end of the lever.
Windshield Wiper/Washer Lever
WINDSHIELD WIPER OPERATION
Intermittent Wipers
The intermittent feature of this system was designed for
use when weather conditions make a single wiping cycle,
with a variable pause between cycles, desirable. For
maximum delay between cycles, rotate the control knob
upward to the first detent.
1 — Ambient Light Control
2 — Instrument Panel Dimmer Control
1 — Push End Inward
(Hold For Washer Or Short Press For Mist)
2 — Rotate For Front Wiper Operation
23_DT_OM_EN_USC_t.book Page 52
Page 68 of 416

66GETTING TO KNOW YOUR VEHICLE
NOTE:Charge unsupported devices with the Charge Only USB
ports. If an unsupported device is plugged into a Media
USB port, a message will display on the touchscreen that
the device is not supported by the system.
Plugging in a phone or another USB device may cause the
connection to a previous device to be lost.
If equipped, your vehicle may also contain a USB port
located on the top tray of the vehicle’s center console.
If equipped, two Mini-USB ports (Type C), two Standard
USB ports (Type A), and one AUX port may be located to the
left of the center stack, just below the climate controls.
Center Console USB/AUX Media Hub
Some USB ports support media and charging. You can use
features, such as Apple CarPlay®, Android Auto™,
Pandora®, and others while charging your phone.
NOTE:Plugging in a phone or another USB device may cause the
connection to a previous device to be lost.
For further information, refer to the Uconnect Radio
Instruction Manual or visit UconnectPhone.com.
ELECTRICAL POWER OUTLETS
The auxiliary 12 Volt (13 Amp) power outlet can provide
power for in-cab accessories designed for use with the
standard “cigarette lighter” style plug. The 12 Volt power
outlets and 5 Volt (2.5 Amp) USB Port (Charge Only) have
a cap attached to the outlet indicating “12V DC”, together
with either a key symbol, battery symbol, or USB symbol.
An auxiliary power outlet can be found in the tray on top of
the center stack. This power outlet works when the ignition
is in the ON/RUN, ACC, or OFF position.
Power Outlet — Top Of Center Stack
Power Outlet Fuse Locations
1 — Standard USB Type A Ports
2 — Mini-USB Type C Ports
3 — AUX Port
CAUTION!
Do not exceed the maximum power of 160 Watts
(13 Amps) at 12 Volts. If the 160 Watts (13 Amps)
power rating is exceeded, the fuse protecting the
system will need to be replaced.
Power outlets are designed for accessory plugs only.
Do not insert any other object in the power outlets as
this will damage the outlet and blow the fuse.
Improper use of the power outlet can cause damage
not covered by your New Vehicle Limited Warranty.
1 — F54 Fuse 20 A Yellow Power Outlet Battery Fed
Position
2 — F54 Fuse 20 A Yellow Power Outlet Ignition Fed
Position
3 — F48 Fuse 10 A Red Port Power or Rear USB
(Charge Only)
23_DT_OM_EN_USC_t.book Page 66
Page 71 of 416
GETTING TO KNOW YOUR VEHICLE69
iPhone® 12 (including iPod®) is equipped with
software to protect the device from overheating. When
the software is active, the rate of charge is slowed
down to protect the device.
Phones must always be placed on the wireless
charging pad within the outline shown on the pad so
that its charging parts connect with the charging coils
of the system. Movement of the phone during charging
may prevent or slow the rate of charge.
Having multiple applications open on the phone while
charging will reduce the charging efficiency, and may
even shut down an application that is actively running
(i.e. Apple CarPlay®). This may also cause the phone to
overheat.
Wireless chargers may implement certain methods to
prevent the phone from overheating during charging
such as slowing down the rate of charge. In certain
instances, the device may shut down for a brief period
of time (when the device reaches a certain tempera -
ture). If this happens, it does not mean there is a fault
with the wireless charging pad. This may just be a
protective measure to prevent damage to the phone.UV-C LIGHT — IF EQUIPPED
Your vehicle may be equipped with a UV-C light located
inside the glove compartment used to hygienize surface
areas of items placed inside. The UV-C light hygienizes
using a very specialized, and high powered, UV-C light
source.
NOTE:No chemicals are used in the hygienizing process.
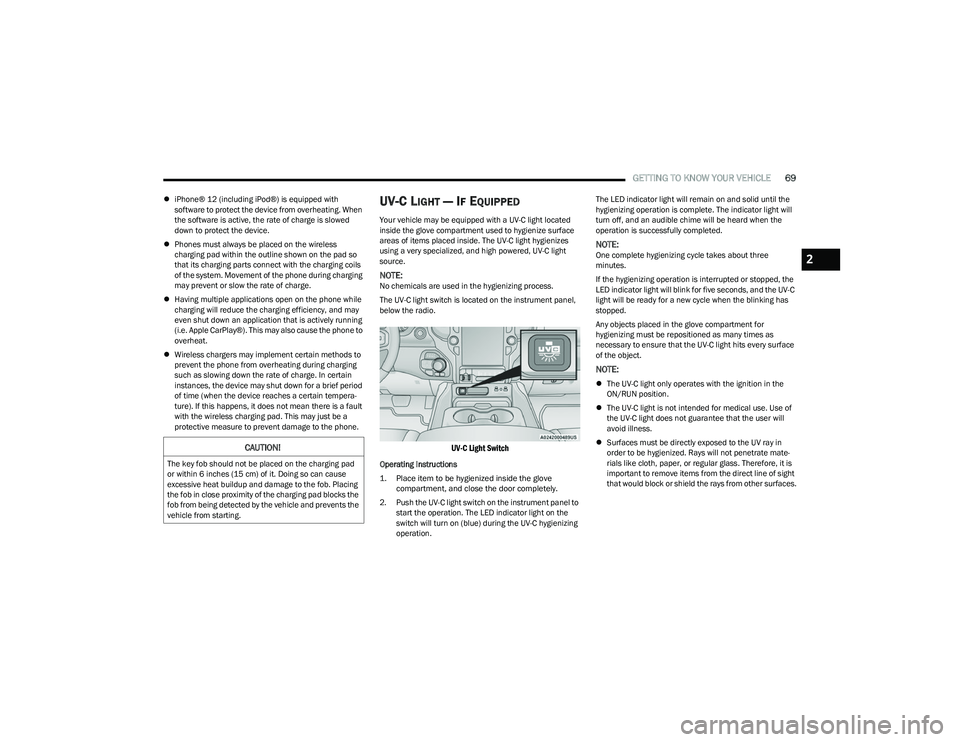
The UV-C light switch is located on the instrument panel,
below the radio.
UV-C Light Switch
Operating Instructions
1. Place item to be hygienized inside the glove compartment, and close the door completely.
2. Push the UV-C light switch on the instrument panel to start the operation. The LED indicator light on the
switch will turn on (blue) during the UV-C hygienizing
operation. The LED indicator light will remain on and solid until the
hygienizing operation is complete. The indicator light will
turn off, and an audible chime will be heard when the
operation is successfully completed.
NOTE:One complete hygienizing cycle takes about three
minutes.
If the hygienizing operation is interrupted or stopped, the
LED indicator light will blink for five seconds, and the UV-C
light will be ready for a new cycle when the blinking has
stopped.
Any objects placed in the glove compartment for
hygienizing must be repositioned as many times as
necessary to ensure that the UV-C light hits every surface
of the object.
NOTE:
The UV-C light only operates with the ignition in the
ON/RUN position.
The UV-C light is not intended for medical use. Use of
the UV-C light does not guarantee that the user will
avoid illness.
Surfaces must be directly exposed to the UV ray in
order to be hygienized. Rays will not penetrate mate -
rials like cloth, paper, or regular glass. Therefore, it is
important to remove items from the direct line of sight
that would block or shield the rays from other surfaces.
CAUTION!
The key fob should not be placed on the charging pad
or within 6 inches (15 cm) of it. Doing so can cause
excessive heat buildup and damage to the fob. Placing
the fob in close proximity of the charging pad blocks the
fob from being detected by the vehicle and prevents the
vehicle from starting.
2
23_DT_OM_EN_USC_t.book Page 69
Page 72 of 416
70GETTING TO KNOW YOUR VEHICLE
Frequent exposure of items to the UV-C light can cause
early fading of the item’s colored surfaces.
For optimum effectiveness, the UV-C lights must be
free of fingerprints, moisture, and dust. Clean with a
lint-free cloth.
WINDOWS
POWER WINDOWS
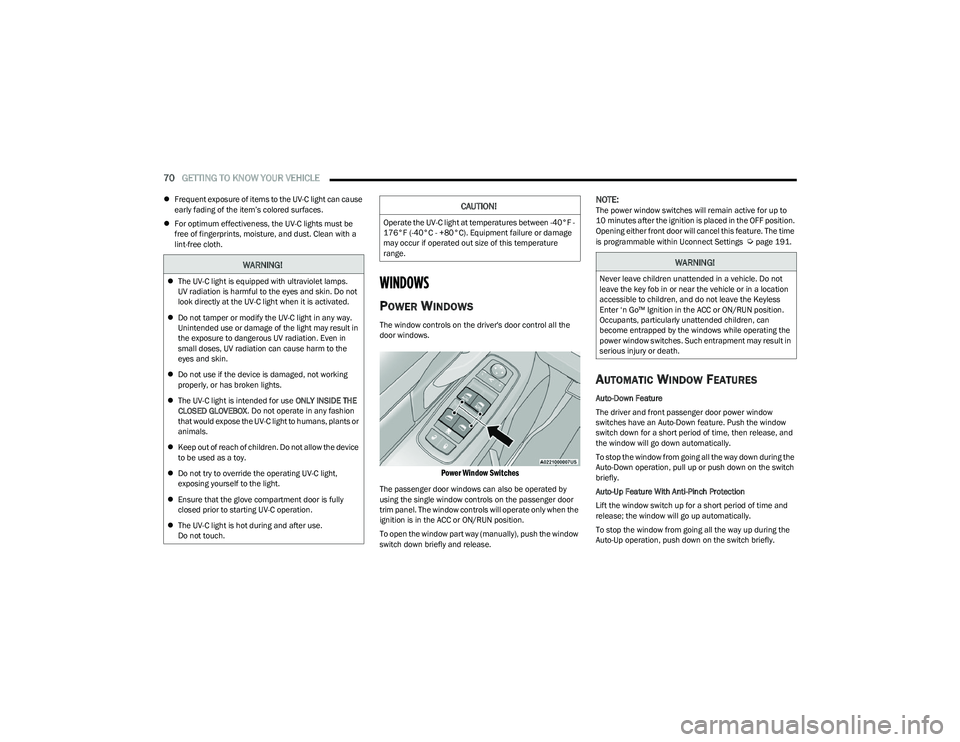
The window controls on the driver's door control all the
door windows.
Power Window Switches
The passenger door windows can also be operated by
using the single window controls on the passenger door
trim panel. The window controls will operate only when the
ignition is in the ACC or ON/RUN position.
To open the window part way (manually), push the window
switch down briefly and release.
NOTE:The power window switches will remain active for up to
10 minutes after the ignition is placed in the OFF position.
Opening either front door will cancel this feature. The time
is programmable within Uconnect Settings
Úpage 191.
AUTOMATIC WINDOW FEATURES
Auto-Down Feature
The driver and front passenger door power window
switches have an Auto-Down feature. Push the window
switch down for a short period of time, then release, and
the window will go down automatically.
To stop the window from going all the way down during the
Auto-Down operation, pull up or push down on the switch
briefly.
Auto-Up Feature With Anti-Pinch Protection
Lift the window switch up for a short period of time and
release; the window will go up automatically.
To stop the window from going all the way up during the
Auto-Up operation, push down on the switch briefly.
WARNING!
The UV-C light is equipped with ultraviolet lamps.
UV radiation is harmful to the eyes and skin. Do not
look directly at the UV-C light when it is activated.
Do not tamper or modify the UV-C light in any way.
Unintended use or damage of the light may result in
the exposure to dangerous UV radiation. Even in
small doses, UV radiation can cause harm to the
eyes and skin.
Do not use if the device is damaged, not working
properly, or has broken lights.
The UV-C light is intended for use ONLY INSIDE THE
CLOSED GLOVEBOX . Do not operate in any fashion
that would expose the UV-C light to humans, plants or
animals.
Keep out of reach of children. Do not allow the device
to be used as a toy.
Do not try to override the operating UV-C light,
exposing yourself to the light.
Ensure that the glove compartment door is fully
closed prior to starting UV-C operation.
The UV-C light is hot during and after use.
Do not touch.
CAUTION!
Operate the UV-C light at temperatures between -40°F -
176°F (-40°C - +80°C). Equipment failure or damage
may occur if operated out size of this temperature
range.
WARNING!
Never leave children unattended in a vehicle. Do not
leave the key fob in or near the vehicle or in a location
accessible to children, and do not leave the Keyless
Enter ‘n Go™ Ignition in the ACC or ON/RUN position.
Occupants, particularly unattended children, can
become entrapped by the windows while operating the
power window switches. Such entrapment may result in
serious injury or death.
23_DT_OM_EN_USC_t.book Page 70
Page 74 of 416
72GETTING TO KNOW YOUR VEHICLE
(Continued)
WIND BUFFETING
Wind buffeting can be described as the perception of
pressure on the ears or a helicopter-type sound in the
ears. Your vehicle may exhibit wind buffeting with the
windows down, or the sunroof (if equipped) in certain open
or partially open positions. This is a normal occurrence
and can be minimized. If the buffeting occurs with the rear
windows open, open the front and rear windows together
to minimize the buffeting. If the buffeting occurs with the
sunroof open, adjust the sunroof opening to minimize the
buffeting or open any window.
POWER SUNROOF — IF EQUIPPED
DUAL PANE POWER SUNROOF
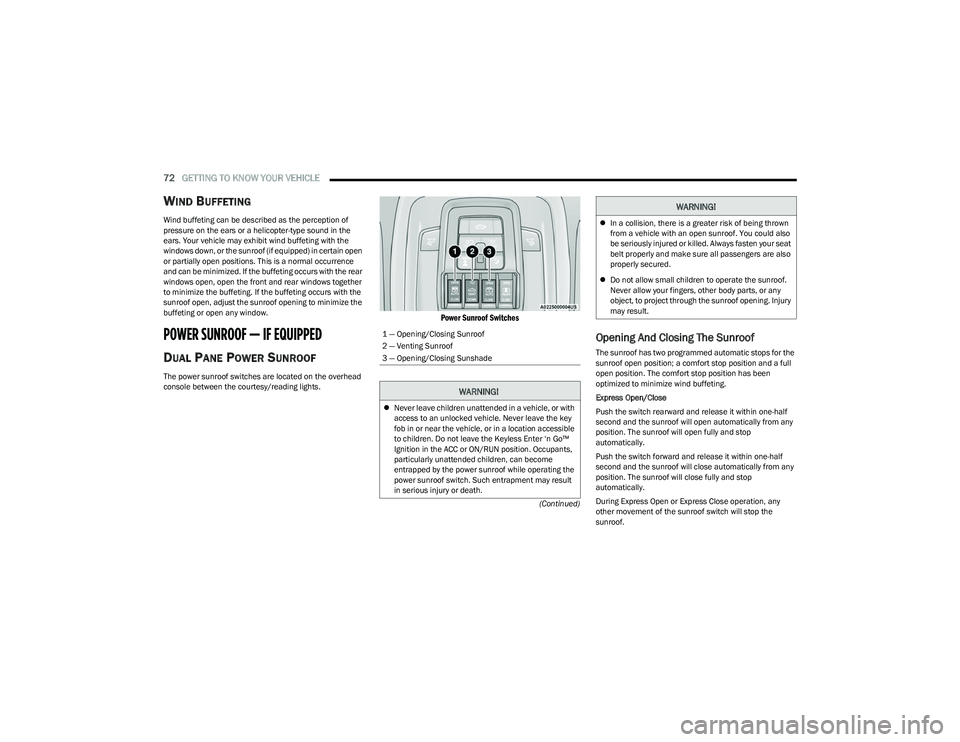
The power sunroof switches are located on the overhead
console between the courtesy/reading lights.
Power Sunroof Switches
Opening And Closing The Sunroof
The sunroof has two programmed automatic stops for the
sunroof open position; a comfort stop position and a full
open position. The comfort stop position has been
optimized to minimize wind buffeting.
Express Open/Close
Push the switch rearward and release it within one-half
second and the sunroof will open automatically from any
position. The sunroof will open fully and stop
automatically.
Push the switch forward and release it within one-half
second and the sunroof will close automatically from any
position. The sunroof will close fully and stop
automatically.
During Express Open or Express Close operation, any
other movement of the sunroof switch will stop the
sunroof.
1 — Opening/Closing Sunroof
2 — Venting Sunroof
3 — Opening/Closing Sunshade
WARNING!
Never leave children unattended in a vehicle, or with
access to an unlocked vehicle. Never leave the key
fob in or near the vehicle, or in a location accessible
to children. Do not leave the Keyless Enter ‘n Go™
Ignition in the ACC or ON/RUN position. Occupants,
particularly unattended children, can become
entrapped by the power sunroof while operating the
power sunroof switch. Such entrapment may result
in serious injury or death.
In a collision, there is a greater risk of being thrown
from a vehicle with an open sunroof. You could also
be seriously injured or killed. Always fasten your seat
belt properly and make sure all passengers are also
properly secured.
Do not allow small children to operate the sunroof.
Never allow your fingers, other body parts, or any
object, to project through the sunroof opening. Injury
may result.
WARNING!
23_DT_OM_EN_USC_t.book Page 72
Page 77 of 416
GETTING TO KNOW YOUR VEHICLE75
Electronic Tailgate Release — If Equipped
The key fob may be equipped with an electronic
release feature for the tailgate, allowing
hands-free tailgate opening. To activate, push
and release the Tailgate Release button on the
key fob twice within five seconds. The tailgate door will
unlatch, and slowly lower into the open position.
If equipped, a button on the center overhead console
inside the vehicle can be used to release the tailgate.
An indicator light may also signal when the tailgate is
open.
For the tailgate to lower, the vehicle must be stationary
and in PARK or NEUTRAL.
NOTE:The optional Tri-Fold Tonneau Cover Úpage 86 may
prevent electronic tailgate release. The Tonneau Cover
must be removed or folded up before releasing the
tailgate.
CLOSING
To close the tailgate, push it upward until both sides are
securely latched.
LOCKING TAILGATE
The tailgate can be locked using the key fob lock button.
MULTIFUNCTION TAILGATE —
I
F EQUIPPED
The 60/40 multifunction tailgate has two swing doors to
allow for closer access to the pickup box with the doors
open.
Opening
The tailgate must be latched closed to open the swing
doors. Push the paddle down, then pull the release handle
beneath the tailgate lowering handle. This opens the
60 split door.
60 Split Door Release Handle
Once the 60 split swing door is opened, pull the release
handle on the inboard side of the 40 split door to open.
40 Split Door Release Handle
Closing
Always close the 40 split door first, then close the 60 split
door. The swing doors must be securely latched before the
tailgate can be lowered.
NOTE:
When the swing doors are open, the maximum load
placed on a door cannot exceed 180 lb (82 kg).
Pull back on the swing doors firmly after closing to
ensure they are securely latched. Similar to the side
door ajar light inside the cab, the bed light above the
rear window will remain on if the tailgate doors are not
fully closed.
WARNING!
To avoid injury, make sure there is no one in the way of
the power tailgate as it is opening or closing, and keep
hands away from the tailgate hinges when in use. You
or other could be injured if caught in the path of the
power tailgate or tailgate hinges.
2
23_DT_OM_EN_USC_t.book Page 75