automatic transmission Ram 2500 2018 Owner's Manual
[x] Cancel search | Manufacturer: RAM, Model Year: 2018, Model line: 2500, Model: Ram 2500 2018Pages: 372, PDF Size: 7.1 MB
Page 199 of 372
Recreational Towing —
Two-Wheel Drive Models
DO NOT flat tow this vehicle. Damage to the
drivetrain will result.
Recreational towing (for two-wheel drive
models) is allowedONLYif the rear wheels are
OFF the ground. This may be accomplished
using a tow dolly or vehicle trailer. If using a
tow dolly, follow this procedure:
NOTE:
If vehicle is equipped with air suspension,
ensure the vehicle is set to Normal Ride
Height.
1. Properly secure the dolly to the tow ve- hicle, following the dolly manufacturer's
instructions.
2. Drive the rear wheels onto the tow dolly. 3. Firmly apply the parking brake. Place au-
tomatic transmission in PARK, manual
transmission in gear (not in NEUTRAL).
4. Properly secure the rear wheels to the dolly, following the dolly manufacturer's
instructions.
5. Turn the ignition OFF and remove the key fob.
6. Install a suitable clamping device, de- signed for towing, to secure the front
wheels in the straight position.
CAUTION!
• Towing with the rear wheels on theground will cause severe transmission
damage. Damage from improper towing
is not covered under the New Vehicle
Limited Warranty.
• Do not disconnect the driveshaft be-
cause fluid may leak from the transmis-
sion, causing damage to internal parts.
Recreational Towing —
Four-Wheel Drive Models
NOTE:
Both the manual shift and electronic shift
transfer cases must be shifted into NEUTRAL
(N) for recreational towing. Automatic trans-
missions must be shifted into PARK for rec-
reational towing. Manual transmissions must
be placed in gear (NOT in NEUTRAL) for
recreational towing. Refer to the following for
the proper transfer case NEUTRAL (N) shift-
ing procedure for your vehicle.
CAUTION!
• DO NOT dolly tow any 4WD vehicle.Towing with only one set of wheels on the
ground (front or rear) will cause severe
transmission and/or transfer case dam-
age. Tow with all four wheels either ON
the ground, or OFF the ground (using a
vehicle trailer).
• Tow only in the forward direction. Towing
this vehicle backwards can cause severe
damage to the transfer case.
197
Page 200 of 372
CAUTION!
• Before recreational towing, the transfercase must be in NEUTRAL. To be certain
the transfer case is fully in NEUTRAL,
perform the procedure outlined under
“Shifting Into NEUTRAL”. Internal
transmission damage will result, if the
transfer case is not in NEUTRAL during
towing.
• Automatic transmissions must be
placed in PARK, and manual transmis-
sions must be placed in gear (not in
Neutral) for recreational towing.
• Towing this vehicle in violation of the
above requirements can cause severe
transmission and/or transfer case dam-
age. Damage from improper towing is
not covered under the New Vehicle Lim-
ited Warranty.
• Do not disconnect the rear driveshaft
because fluid will leak from the transfer
case, causing damage to internal parts.
• Do not use a bumper-mounted clamp-on
tow bar on your vehicle. The bumper
face bar will be damaged.
Shifting Into NEUTRAL (N)
Use the following procedure to prepare your
vehicle for recreational towing.
WARNING!
You or others could be injured or killed if
you leave the vehicle unattended with the
transfer case in the NEUTRAL (N) position
without first fully engaging the parking
brake. The transfer case NEUTRAL (N)
position disengages both the front and rear
driveshafts from the powertrain, and will
allow the vehicle to roll, even if the auto-
matic transmission is in PARK (or manual
transmission is in gear). The parking brake
should always be applied when the driver
is not in the vehicle.
CAUTION!
It is necessary to follow these steps to be
certain that the transfer case is fully in
NEUTRAL (N) before recreational towing
to prevent damage to internal parts. 1. Bring the vehicle to a complete stop on
level ground, with the engine running.
Firmly apply the parking brake.
2. Shift the transmission to NEUTRAL.
NOTE:
If vehicle is equipped with air suspension,
ensure the vehicle is set to Normal Ride
Height.
3. Press and hold the brake pedal.
4. Depress the clutch pedal on a manual transmission.
5. Shift the transfer case into NEUTRAL:
• With manual shift transfer case, shiftthe transfer case lever into NEUTRAL
(N)
• With electronic shift transfer case, push and hold the transfer case NEU-
TRAL (N) button. Some models have a
small, recessed “N” button (at the cen-
ter of the transfer case switches) that
must be pushed using a ballpoint pen
or similar object. Other models have a
rectangular NEUTRAL switch, below
the rotary transfer case control knob.
STARTING AND OPERATING
198
Page 201 of 372

The NEUTRAL (N) indicator light will
blink while the shift is in progress. The
light will stop blinking (stay on solid)
when the shift to NEUTRAL (N) is com-
plete. After the shift is completed and
the NEUTRAL (N) light stays on, re-
lease the NEUTRAL (N) button.
6. Release the parking brake.
7. Shift the transmission into REVERSE.
8. Release the brake pedal (and clutch pedal on manual transmissions) for five seconds
and ensure that there is no vehicle
movement.
9. Repeat steps 7 and 8 with automatic transmission in DRIVE or manual trans-
mission in first gear.
10. Shift the transmission to NEUTRAL. Firmly apply the parking brake. Turn OFF
the engine. For vehicles with Keyless
Enter-N-Go, push and hold the ENGINE
START/STOP button until the engine
shuts off.
11. Shift the transmission into PARK or place manual transmission in gear (NOT in Neutral). On 8-speed transmissions
the shifter will automatically select
PARK when the engine is turned off.
12. Turn the ignition to the OFF mode, then cycle the ignition to the RUN mode and
back to the OFF mode. Remove the key
fob from the ignition.
13. Attach the vehicle to the tow vehicle using a suitable tow bar.
14. Release the parking brake.
NOTE:
With electronic shift transfer case:
• Steps 2 through 4 are requirements that must be met before pushing the NEUTRAL
(N) button, and must continue to be met
until the shift has been completed. If any of
these requirements are not met before
pushing the NEUTRAL (N) button or are no
longer met during the shift, the NEUTRAL
(N) indicator light will flash continuously
until all requirements are met or until the
NEUTRAL (N) button is released. • The ignition must be in the ON/RUN mode
for a shift to take place and for the position
indicator lights to be operable. If the igni-
tion is not in the ON/RUN mode, the shift
will not take place and no position indicator
lights will be on or flashing.
• A flashing NEUTRAL (N) position indicator light indicates that shift requirements have
not been met.
• If the vehicle is equipped with air suspen- sion, the engine should be started and left
running for a minimum of 60 seconds (with
all the doors closed) at least once every
24 hours. This process allows the air sus-
pension to adjust the vehicle’s ride height
to compensate for temperature effects.
Shifting Out Of NEUTRAL (N)
Use the following procedure to prepare your
vehicle for normal usage:
1. Bring the vehicle to a complete stop, leav-
ing it connected to the tow vehicle.
2. Firmly apply the parking brake.
3. Press and hold the brake pedal.
199
Page 202 of 372
4. Start the engine. Shift the transmissioninto NEUTRAL. Depress the clutch pedal
on a manual transmission.
• With manual shift transfer case, shift the transfer case lever to the desired
position.
• With electronic shift transfer case with rotary selector switch, push and hold
the transfer case NEUTRAL (N) button
until the NEUTRAL (N) indicator light
turns off. After the NEUTRAL (N) indi-
cator light turns off, release the NEU-
TRAL (N) button. After the NEUTRAL
(N) button has been released, the
transfer case will shift to the position
indicated by the selector switch.
• With electronic shift transfer case with push-button selector switch, push and
hold the switch for the desired transfer
case position, until the NEUTRAL (N)
indicator light turns off and the desired
position indicator light turns on. NOTE:
When shifting out of transfer case NEUTRAL
(N), turning the engine OFF is not required,
but may be helpful to avoid gear clash. With
the 8-speed automatic transmission, the en-
gine must remain running, since turning the
engine OFF will shift the transmission to
PARK (and the transmission must be in NEU-
TRAL for the transfer case to shift out of
NEUTRAL).
5. Turn the engine OFF. Shift automatic
transmission into PARK. On 8-speed
transmissions the shifter will automati-
cally select PARK when the engine is
turned off.
6. Release the brake pedal (and clutch pedal on a manual transmission).
7. Disconnect vehicle from the tow vehicle.
8. Start the engine.
9. Press and hold the brake pedal.
10. Release the parking brake.
11. Shift the transmission into gear, release the brake pedal (and clutch pedal on
manual transmissions), and check that
the vehicle operates normally. NOTE:
With electronic shift transfer case:
• Steps 3 and 4 are requirements that must
be met before pushing the button to shift
out of NEUTRAL (N), and must continue to
be met until the shift has been completed.
If any of these requirements are not met
before pushing the button or are no longer
met during the shift, the NEUTRAL (N)
indicator light will flash continuously until
all requirements are met or until the button
is released.
• The ignition must be in the ON/RUN mode for a shift to take place and for the position
indicator lights to be operable. If the igni-
tion is not in the ON/RUN mode, the shift
will not take place and no position indicator
lights will be on or flashing.
• A flashing NEUTRAL (N) position indicator light indicates that shift requirements have
not been met.
STARTING AND OPERATING
200
Page 216 of 372

To Stow The Flat Or Spare
NOTE:
RAM 1500 vehicles equipped with alumi-
num wheels cannot be stored under the ve-
hicle because the wheel retainer will not fit
through the wheel pilot hole. Secure the flat
tire in the bed of the truck. Have the flat tire
repaired or replaced immediately.
1. Turn the wheel so that the valve stem isdown. Slide the wheel retainer through
the center of the wheel and position it
properly across the wheel opening.
2. For convenience in checking the spare tire inflation, stow with the valve stem toward
the rear of the vehicle.
3. Attach the lug wrench to the extension tubes with the curved angle facing away
from the vehicle. Rotate the lug wrench
handle clockwise until the wheel is drawn
into place against the underside of the
vehicle. Continue to rotate until you feel
the winch mechanism slip, or click three
or four times. It cannot be overtightened.
Push against the tire several times to be
sure it is firmly in place.
WARNING!
• Do not attempt to change a tire on theside of the vehicle close to moving traf-
fic. Pull far enough off the road to avoid
the danger of being hit when operating
the jack or changing the wheel.
• Being under a jacked-up vehicle is dan-
gerous. The vehicle could slip off the
jack and fall on you. You could be
crushed. Never put any part of your body
under a vehicle that is on a jack.
• Never start or run the engine while the
vehicle is on a jack. If you need to get
under a raised vehicle, take it to your
authorized dealer where it can be raised
on a lift.
• The jack is designed to be used as a tool
for changing tires only. The jack should
not be used to lift the vehicle for service
purposes. The vehicle should be jacked
on a firm level surface only. Avoid ice or
slippery areas.
• Do not attempt to change a tire on the
side of the vehicle close to moving traf-
fic, pull far enough off the road to avoid
WARNING!
the danger of being hit when operating
the jack or changing the wheel.
• Carefully follow these tire changing
warnings to help prevent personal injury
or damage to your vehicle:• Always park on a firm, level surface
as far from the edge of the roadway
as possible before raising the ve-
hicle.
• Turn on the Hazard Warning flash-
ers.
• Block the wheel diagonally opposite
the wheel to be raised.
• Set the parking brake firmly and set
an automatic transmission in
PARK; a manual transmission in
REVERSE.
• Do not let anyone sit in the vehicle
when it is on a jack.
• Do not get under the vehicle when it
is on a jack.
• Only use the jack in the positions
indicated and for lifting this vehicle
during a tire change.
IN CASE OF EMERGENCY
214
Page 226 of 372

2. Rotate the Manual Park Release leverforward to its original position, until the
locking tab snaps into place to secure the
lever.
3. Pull gently on the tether strap to confirm that the lever is locked in its stowed
position.
4. Re-install the access cover.
FREEING A STUCK VEHICLE
If your vehicle becomes stuck in mud, sand,
or snow, it can often be moved using a rock-
ing motion. Turn the steering wheel right and
left to clear the area around the front wheels.
Then shift back and forth between DRIVE
and REVERSE (with automatic transmission)
or SECOND GEAR and REVERSE (with
manual transmission), while gently pressing
the accelerator. Use the least amount of ac-
celerator pedal pressure that will maintain
the rocking motion, without spinning the
wheels or racing the engine. NOTE:
For trucks equipped with 8-speed automatic
transmission: Shifts between DRIVE and RE-
VERSE can only be achieved at wheel speeds
of 5 mph (8 km/h) or less. Whenever the
transmission remains in NEUTRAL for more
than two seconds, you must press the brake
pedal to engage DRIVE or REVERSE.
NOTE:
Push the "ESC Off" switch, to place the Elec-
tronic Stability Control (ESC) system in "Par-
tial Off" mode, before rocking the vehicle.
Refer to “Electronic Brake Control” in
“Safety” in the Owner’s Manual for further
information. Once the vehicle has been
freed, push the "ESC Off" switch again to
restore "ESC On" mode.
WARNING!
Fast spinning tires can be dangerous.
Forces generated by excessive wheel
speeds may cause damage, or even failure,
of the axle and tires. A tire could explode
and injure someone. Do not spin your
vehicle's wheels faster than 30 mph
(48 km/h) or for longer than 30 seconds
continuously without stopping when you
WARNING!
are stuck and do not let anyone near a
spinning wheel, no matter what the speed.
CAUTION!
• Racing the engine or spinning the
wheels may lead to transmission over-
heating and failure. Allow the engine to
idle with the transmission in NEUTRAL
for at least one minute after every five
rocking-motion cycles. This will mini-
mize overheating and reduce the risk of
clutch or transmission failure during
prolonged efforts to free a stuck vehicle.
• When “rocking” a stuck vehicle by shift- ing between DRIVE/2nd gear and RE-
VERSE, do not spin the wheels faster
than 15 mph (24 km/h), or drivetrain
damage may result.
• Revving the engine or spinning the wheels too fast may lead to transmission
overheating and failure. It can also dam-
age the tires. Do not spin the wheels
above 30 mph (48 km/h) while in gear
(no transmission shifting occurring).
IN CASE OF EMERGENCY
224
Page 228 of 372

Two-Wheel Drive Models
The manufacturer recommends towing your
vehicle with all four wheelsOFFthe ground
using a flatbed.
If flatbed equipment is not available, and the
transmission is operable, the vehicle may be
towed (with rear wheels on the ground) under
the following conditions:
• The transmission must be in NEUTRAL. Refer to "Manual Park Release" in this sec-
tion for instructions on shifting the
8–speed transmission to NEUTRAL when
the engine is OFF.
• The towing speed must not exceed 30 mph (48 km/h).
• The towing distance must not exceed 15 miles (24 km) for 6–speed transmis-
sion, or 30 miles (48 km) for 8–speed
transmission.
If the transmission is not operable, or the
vehicle must be towed faster than 30 mph
(48 km/h) or farther than 15 miles (24 km)
for 6–speed transmission, or 30 miles
(48 km) for 8–speed transmission, tow with
the rear wheels OFFthe ground. Acceptable methods are to tow the vehicle on a flatbed,
or with the front wheels raised and the rear
wheels on a towing dolly, or (when using a
suitable steering wheel stabilizer to hold the
front wheels in the straight position) with the
rear wheels raised and the front wheels on the
ground.
CAUTION!
Towing this vehicle in violation of the
above requirements can cause severe en-
gine and/or transmission damage. Damage
from improper towing is not covered under
the New Vehicle Limited Warranty.
Four-Wheel Drive Models
The manufacturer recommends towing with
all wheels
OFFthe ground. Acceptable meth-
ods are to tow the vehicle on a flatbed or with
one end of vehicle raised and the opposite
end on a towing dolly.
If flatbed equipment is not available, and the
transfer case is operable, the vehicle may be
towed (in the forward direction, with ALL
wheels on the ground), IFthe transfer case is
in NEUTRAL and the transmission is in PARK (for automatic transmissions) or in gear (NOT
in NEUTRAL, for manual transmissions). Re-
fer to “Recreational Towing” in “Starting And
Operating” for further information and de-
tailed instructions.
CAUTION!
• Front or rear wheel lifts must not be used
(if the remaining wheels are on the
ground). Internal damage to the trans-
mission or transfer case will occur if a
front or rear wheel lift is used when
towing.
• Towing this vehicle in violation of the
above requirements can cause severe
transmission and/or transfer case dam-
age. Damage from improper towing is
not covered under the New Vehicle Lim-
ited Warranty.
IN CASE OF EMERGENCY
226
Page 232 of 372
SCHEDULED SERVICING — GASOLINE
ENGINE
Your vehicle is equipped with an automatic
oil change indicator system. The oil change
indicator system will remind you that it is
time to take your vehicle in for scheduled
maintenance.
Based on engine operation conditions, the oil
change indicator message will illuminate.
This means that service is required for your
vehicle. Operating conditions such as fre-
quent short-trips, trailer tow, extremely hot or
cold ambient temperatures, and E85 fuel
usage will influence when the “Oil Change
Required” message is displayed. Severe Op-
erating Conditions can cause the change oil
message to illuminate as early as
3,500 miles (5,600 km) since last reset.
Have your vehicle serviced as soon as pos-
sible, within the next 500 miles (805 km).Your authorized dealer will reset the oil
change indicator message after completing
the scheduled oil change. If a scheduled oil
change is performed by someone other than
your authorized dealer, the message can be
reset by referring to the steps described un-
der “Instrument Cluster Display” in “Getting
To Know Your Instrument Panel”.
1500 Models Only
NOTE:
Under no circumstances should oil change
intervals exceed 10,000 miles (16,000 km),
twelve months or 350 hours of engine run
time, whichever comes first. The 350 hours
of engine run or idle time is generally only a
concern for fleet customers.
2500 – 3500 Models Only
NOTE:
Under no circumstances should oil change
intervals exceed 8,000 miles (13,000 km),
twelve months or 350 hours of engine run
time, whichever comes first. The 350 hours
of engine run or idle time is generally only a
concern for fleet customers. Severe Duty All Models
NOTE:
Change Engine Oil at 4,000 miles
(6,500 km) or 350 hours of engine run time
if the vehicle is operated in a dusty and off
road environment or is operated predomi-
nantly at idle, or only very low engine RPM’s.
This type of vehicle use is considered Severe
Duty.
Once A Month Or Before A Long Trip:
• Check engine oil level
• Check windshield washer fluid level
• Check tire pressure and look for unusual
wear or damage. Rotate tires at the first
sign of irregular wear, even if it occurs
before the oil indicator system turns on.
• Check the fluid levels of the coolant reser- voir, brake master cylinder, power steering
(2500/3500 Models Only) and automatic
transmission (six-speed only) and fill as
needed
• Check function of all interior and exterior lights
SERVICING AND MAINTENANCE
230
Page 233 of 372
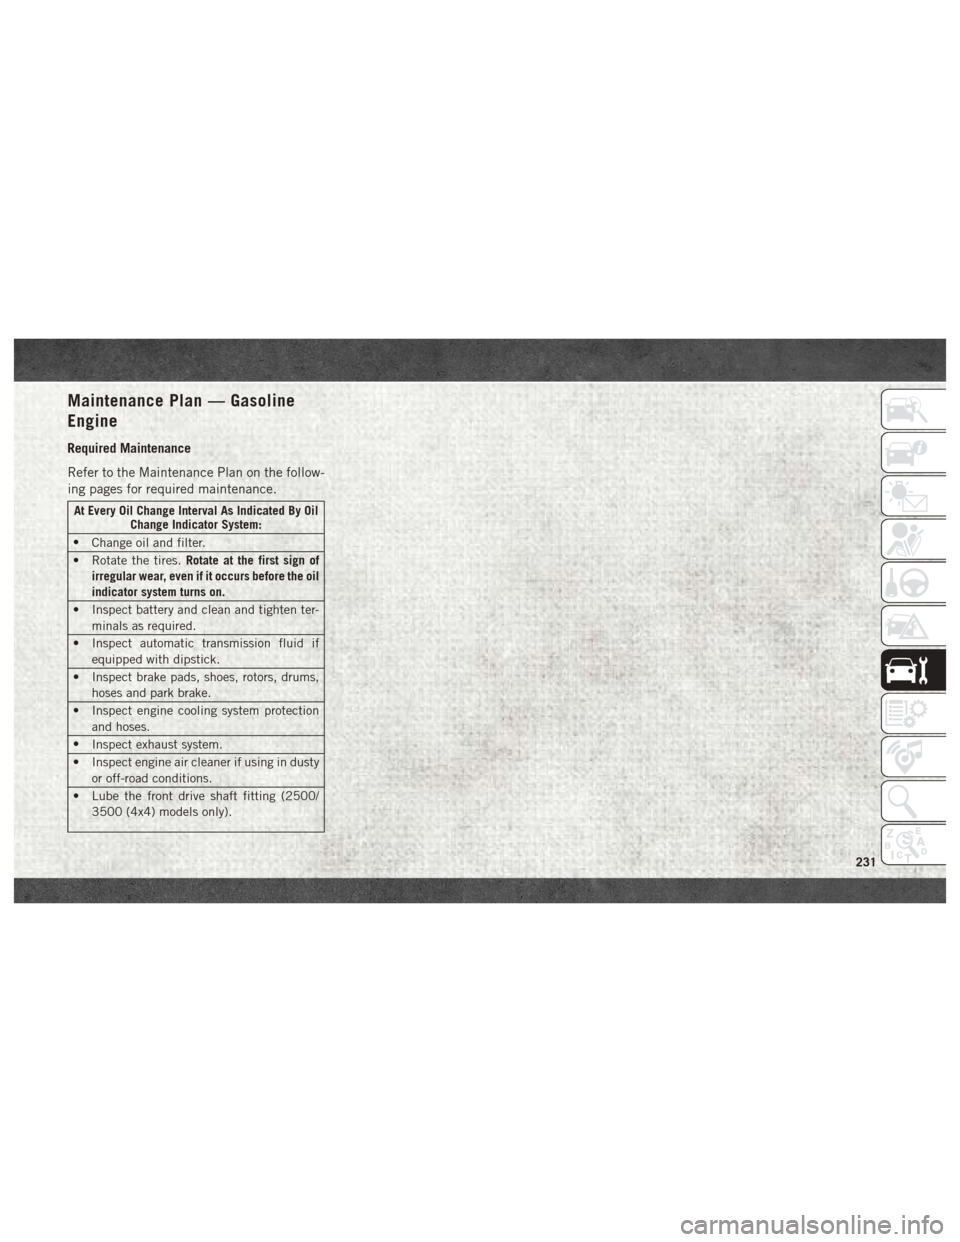
Maintenance Plan — Gasoline
Engine
Required Maintenance
Refer to the Maintenance Plan on the follow-
ing pages for required maintenance.
At Every Oil Change Interval As Indicated By OilChange Indicator System:
• Change oil and filter.
• Rotate the tires. Rotate at the first sign of
irregular wear, even if it occurs before the oil
indicator system turns on.
• Inspect battery and clean and tighten ter- minals as required.
• Inspect automatic transmission fluid if equipped with dipstick.
• Inspect brake pads, shoes, rotors, drums, hoses and park brake.
• Inspect engine cooling system protection and hoses.
• Inspect exhaust system.
• Inspect engine air cleaner if using in dusty or off-road conditions.
• Lube the front drive shaft fitting (2500/ 3500 (4x4) models only).
231
Page 235 of 372
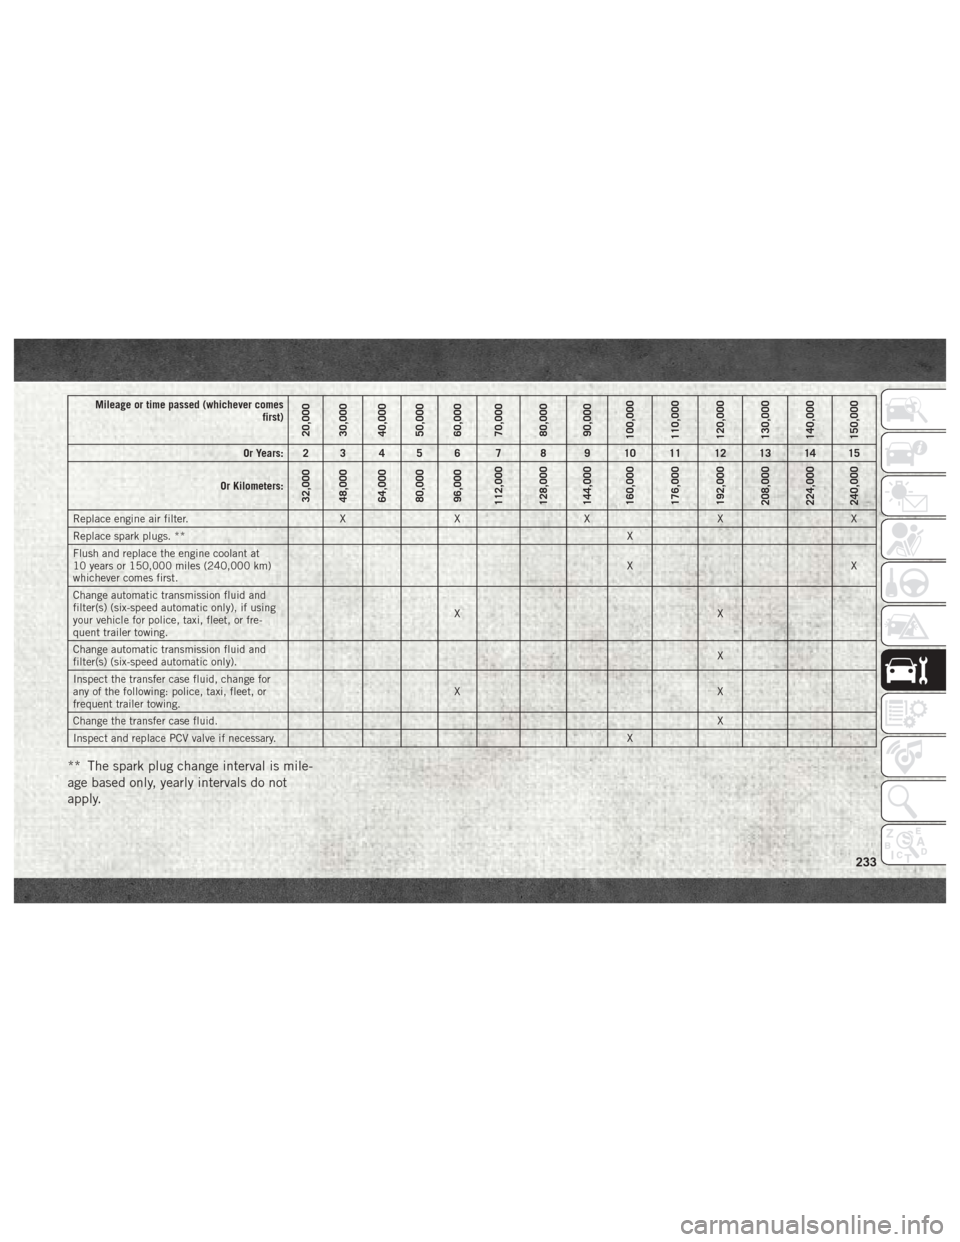
Mileage or time passed (whichever comesfirst)
20,000
30,000
40,000
50,000
60,000
70,000
80,000
90,000
100,000
110,000
120,000
130,000
140,000
150,000
Or Years: 2 3 4 5 6 7 8 9 10 11 12 13 14 15
Or Kilometers:
32,000
48,000
64,000
80,000
96,000
112,000
128,000
144,000
160,000
176,000
192,000
208,000
224,000
240,000
Replace engine air filter. XX X X X
Replace spark plugs. ** X
Flush and replace the engine coolant at
10 years or 150,000 miles (240,000 km)
whichever comes first. XX
Change automatic transmission fluid and
filter(s) (six-speed automatic only), if using
your vehicle for police, taxi, fleet, or fre-
quent trailer towing. XX
Change automatic transmission fluid and
filter(s) (six-speed automatic only). X
Inspect the transfer case fluid, change for
any of the following: police, taxi, fleet, or
frequent trailer towing. XX
Change the transfer case fluid. X
Inspect and replace PCV valve if necessary. X
** The spark plug change interval is mile-
age based only, yearly intervals do not
apply.
233