service Ram 2500 2018 Service Manual
[x] Cancel search | Manufacturer: RAM, Model Year: 2018, Model line: 2500, Model: Ram 2500 2018Pages: 372, PDF Size: 7.1 MB
Page 207 of 372

CavityCartridge Fuse Micro Fuse Description
F25 30 Amp Pink – Front Wiper
F26 30 Amp Pink –Antilock Brakes / Stability Control Module / Valves
F28 20 Amp Blue –Trailer Tow Backup Lights – If Equipped
F29 20 Amp Blue –Trailer Tow Parking Lights – If Equipped
F30 30 Amp Pink –Trailer Tow Receptacle
F31 30 Amp Pink (1500 LD
Diesel) –
Urea Heater Control – If Equipped
F32 –– Spare Fuse
F33 20 Amp Blue –Special Services Vehicle Only
F34 30 Amp Pink –Vehicle System Interface Module #2 – If Equipped
F35 30 Amp Pink –Sunroof – If Equipped
F36 30 Amp Pink –Rear Defroster – If Equipped
F37 30 Amp Pink –Cummins Diesel Fuel Heater #2 – If Equipped
F38 30 Amp Pink –Power Inverter 115V AC – If Equipped
F39 20 Amp Blue –Power Outlet – Special Services Only
F41 –10 Amp Red Active Grill Shutter – If Equipped
F42 –20 Amp Yellow Horn
F44 –10 Amp Red Diagnostic Port
F46 –10 Amp Red Upfitter – If Equipped
F49 –10 Amp Red Instrument Panel Cluster (Except Fleet Vehicles)
F50 –20 Amp Yellow Air Suspension Control Module – If Equipped
F51 –10 Amp Red Ignition Node Module / Keyless Ignition (Instrument
Panel Cluster – Fleet Vehicles Only)
205
Page 215 of 372

When changing a rear wheel, assemble the
jack driver to the jack and connect the jack
driver to the extension tubes. Place the jack
under the axle between the spring and the
shock absorber with the extension tubes ex-
tending to the rear.• Connect the extension tubes and lugwrench.
NOTE:
If the bottle jack will not lower by turning the
dial (thumbwheel) by hand, it may be neces-
sary to use the jack driver in order to lower the
jack.
• By rotating the lug wrench clockwise, raise the vehicle until the wheel just clears the
surface.
• Remove the lug nuts and pull the wheel off. On single rear-wheel (SRW) trucks, install
the spare wheel and lug nuts with the cone
shaped end of the lug nuts toward the
wheel. On 3500 dual rear-wheel models (DRW) the lug nuts are a two-piece assem-
bly with a flat face. Lightly tighten the lug
nuts. To avoid the risk of forcing the vehicle
off the jack, do not fully tighten the lug nuts
until the vehicle has been lowered.
• Using the lug wrench, finish tightening the lug nuts using a crisscross pattern. Refer to
“Torque Specifications” in “Technical
Specifications” for the correct tightness. If
in doubt about the correct tightness, have
them checked with a torque wrench by your
authorized dealer or at a service station.
• Install the wheel center cap and remove the wheel blocks. Do not install chrome or alu-
minum wheel center caps on the spare
wheel. This may result in cap damage.
• Lower the jack to its fully closed position. If the bottle jack will not lower by turning the
dial (thumb wheel) by hand, it may be
necessary to use the jack driver in order to
lower the jack. Stow the replaced tire, jack,
and tools as previously described.
• Adjust the tire pressure when possible.
NOTE:
Do not oil wheel studs. For chrome wheels, do
not substitute with chrome plated lug nuts.
Rear Jacking Location
Rear Jacking Location
213
Page 216 of 372

To Stow The Flat Or Spare
NOTE:
RAM 1500 vehicles equipped with alumi-
num wheels cannot be stored under the ve-
hicle because the wheel retainer will not fit
through the wheel pilot hole. Secure the flat
tire in the bed of the truck. Have the flat tire
repaired or replaced immediately.
1. Turn the wheel so that the valve stem isdown. Slide the wheel retainer through
the center of the wheel and position it
properly across the wheel opening.
2. For convenience in checking the spare tire inflation, stow with the valve stem toward
the rear of the vehicle.
3. Attach the lug wrench to the extension tubes with the curved angle facing away
from the vehicle. Rotate the lug wrench
handle clockwise until the wheel is drawn
into place against the underside of the
vehicle. Continue to rotate until you feel
the winch mechanism slip, or click three
or four times. It cannot be overtightened.
Push against the tire several times to be
sure it is firmly in place.
WARNING!
• Do not attempt to change a tire on theside of the vehicle close to moving traf-
fic. Pull far enough off the road to avoid
the danger of being hit when operating
the jack or changing the wheel.
• Being under a jacked-up vehicle is dan-
gerous. The vehicle could slip off the
jack and fall on you. You could be
crushed. Never put any part of your body
under a vehicle that is on a jack.
• Never start or run the engine while the
vehicle is on a jack. If you need to get
under a raised vehicle, take it to your
authorized dealer where it can be raised
on a lift.
• The jack is designed to be used as a tool
for changing tires only. The jack should
not be used to lift the vehicle for service
purposes. The vehicle should be jacked
on a firm level surface only. Avoid ice or
slippery areas.
• Do not attempt to change a tire on the
side of the vehicle close to moving traf-
fic, pull far enough off the road to avoid
WARNING!
the danger of being hit when operating
the jack or changing the wheel.
• Carefully follow these tire changing
warnings to help prevent personal injury
or damage to your vehicle:• Always park on a firm, level surface
as far from the edge of the roadway
as possible before raising the ve-
hicle.
• Turn on the Hazard Warning flash-
ers.
• Block the wheel diagonally opposite
the wheel to be raised.
• Set the parking brake firmly and set
an automatic transmission in
PARK; a manual transmission in
REVERSE.
• Do not let anyone sit in the vehicle
when it is on a jack.
• Do not get under the vehicle when it
is on a jack.
• Only use the jack in the positions
indicated and for lifting this vehicle
during a tire change.
IN CASE OF EMERGENCY
214
Page 223 of 372

WARNING!
You or others can be badly burned by hot
engine coolant (antifreeze) or steam from
your radiator. If you see or hear steam
coming from under the hood, do not open
the hood until the radiator has had time to
cool. Never try to open a cooling system
pressure cap when the radiator or coolant
bottle is hot.
CAUTION!
Driving with a hot cooling system could
damage your vehicle. If the temperature
gauge reads HOT (H), pull over and stop
the vehicle. Idle the vehicle with the air
conditioner turned off until the pointer
drops back into the normal range. If the
pointer remains on HOT (H), and you hear
continuous chimes, turn the engine off
immediately and call for service.
GEAR SELECTOR OVERRIDE —
6-SPEED TRANSMISSION
If a malfunction occurs and the gear selector
cannot be moved out of the PARK position,
you can use one of the following procedures
to temporarily move the gear selector.
Column Gear Selector — If
Equipped
1. Turn the engine OFF.
2. Firmly apply the parking brake.
3. Tilt the steering wheel to the full upposition.
4. Press and maintain firm pressure on the brake pedal.
5. Insert a screwdriver or similar tool into the access port (ringed circle) on the bottom
of the steering column, and push and hold
the override release lever up. 6. Move the gear selector to the NEUTRAL
position.
7. The vehicle may then be started in NEUTRAL.
Shift Lock Manual Override Access Port
221
Page 227 of 372

TOWING A DISABLED VEHICLE
This section describes procedures for towing
a disabled vehicle using a commercial towing
service. If the transmission and drivetrain are
operable, disabled vehicles may also be
towed as described under “Recreational Tow-
ing” in the “Starting And Operating” section.NOTE:
Vehicles equipped with air suspension must
be placed in Transport mode, before tying
them down (from the body) on a trailer or
flatbed truck. Refer to "Air Suspension" in
"Starting And Operating" for more informa-
tion. If the vehicle cannot be placed in Trans-
port mode (for example, engine will not run),
tie-downs must be fastened to the axles (not
to the body). Failure to follow these instruc-
tions may cause fault codes to be set and/or
cause loss of proper tie-down tension.
Towing Condition Wheels OFF The Ground
2WD Models4WD Models
Flat Tow NONE If transmission is operable:
• Transmission in NEUTRAL
• 30 mph (48 km/h) max
• 15 miles (24 km) maxdistance •
Auto Transmission in PARK
• Manual Transmission in gear
(NOT NEUTRAL)
• Transfer Case in NEUTRAL
• Tow in FORWARDdirection
Wheel Lift Or Dolly Tow Front
NOT ALLOWED
Rear OK
NOT ALLOWED
Flatbed ALL
BEST METHOD BEST METHOD
CAUTION!
• Do not use sling type equipment when
towing. Vehicle damage may occur.
CAUTION!
•When securing the vehicle to a flat bed
truck, do not attach to front or rear sus-
CAUTION!
pension components. Damage to your ve-
hicle may result from improper towing.
225
Page 231 of 372
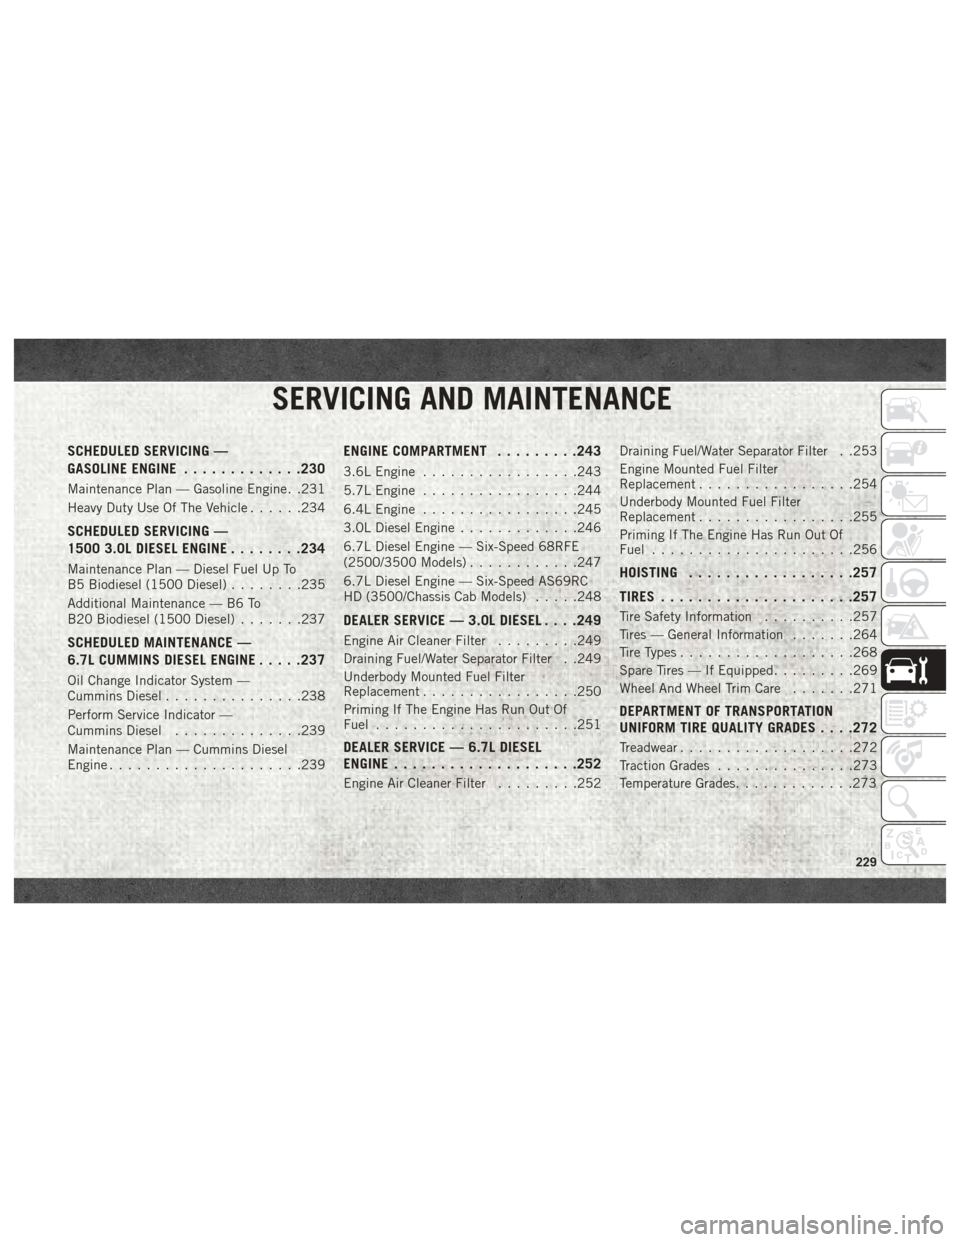
SERVICING AND MAINTENANCE
SCHEDULED SERVICING —
GASOLINE ENGINE.............230
Maintenance Plan — Gasoline Engine. .231
Heavy Duty Use Of The Vehicle ......234
SCHEDULED SERVICING —
1500 3.0L DIESEL ENGINE........234
Maintenance Plan — Diesel Fuel Up To
B5 Biodiesel (1500 Diesel) ........235
Additional Maintenance — B6 To
B20 Biodiesel (1500 Diesel) .......237
SCHEDULED MAINTENANCE —
6.7L CUMMINS DIESEL ENGINE .....237
Oil Change Indicator System —
Cummins Diesel...............238
Perform Service Indicator —
Cummins Diesel ..............239
Maintenance Plan — Cummins Diesel
Engine .....................239
ENGINE COMPARTMENT .........243
3.6L Engine.................243
5.7L Engine .................244
6.4L Engine .................245
3.0L Diesel Engine .............246
6.7L Diesel Engine — Six-Speed 68RFE
(2500/3500 Models) ............247
6.7L Diesel Engine — Six-Speed AS69RC
HD (3500/Chassis Cab Models) .....248
DEALER SERVICE — 3.0L DIESEL . . . .249
Engine Air Cleaner Filter.........249
Draining Fuel/Water Separator Filter . .249
Underbody Mounted Fuel Filter
Replacement .................250
Priming If The Engine Has Run Out Of
Fuel ......................251
DEALER SERVICE — 6.7L DIESEL
ENGINE ................... .252
Engine Air Cleaner Filter.........252Draining Fuel/Water Separator Filter . .253
Engine Mounted Fuel Filter
Replacement
.................254
Underbody Mounted Fuel Filter
Replacement .................255
Priming If The Engine Has Run Out Of
Fuel ......................256
HOISTING ................. .257
TIRES .................... .257
Tire Safety Information..........257
Tires — General Information .......264
Tire Types ...................268
Spare Tires — If Equipped .........269
Wheel And Wheel Trim Care .......271
DEPARTMENT OF TRANSPORTATION
UNIFORM TIRE QUALITY GRADES . . . .272
Treadwear...................272
Traction Grades ...............273
Temperature Grades .............273
SERVICING AND MAINTENANCE
229
Page 232 of 372
SCHEDULED SERVICING — GASOLINE
ENGINE
Your vehicle is equipped with an automatic
oil change indicator system. The oil change
indicator system will remind you that it is
time to take your vehicle in for scheduled
maintenance.
Based on engine operation conditions, the oil
change indicator message will illuminate.
This means that service is required for your
vehicle. Operating conditions such as fre-
quent short-trips, trailer tow, extremely hot or
cold ambient temperatures, and E85 fuel
usage will influence when the “Oil Change
Required” message is displayed. Severe Op-
erating Conditions can cause the change oil
message to illuminate as early as
3,500 miles (5,600 km) since last reset.
Have your vehicle serviced as soon as pos-
sible, within the next 500 miles (805 km).Your authorized dealer will reset the oil
change indicator message after completing
the scheduled oil change. If a scheduled oil
change is performed by someone other than
your authorized dealer, the message can be
reset by referring to the steps described un-
der “Instrument Cluster Display” in “Getting
To Know Your Instrument Panel”.
1500 Models Only
NOTE:
Under no circumstances should oil change
intervals exceed 10,000 miles (16,000 km),
twelve months or 350 hours of engine run
time, whichever comes first. The 350 hours
of engine run or idle time is generally only a
concern for fleet customers.
2500 – 3500 Models Only
NOTE:
Under no circumstances should oil change
intervals exceed 8,000 miles (13,000 km),
twelve months or 350 hours of engine run
time, whichever comes first. The 350 hours
of engine run or idle time is generally only a
concern for fleet customers. Severe Duty All Models
NOTE:
Change Engine Oil at 4,000 miles
(6,500 km) or 350 hours of engine run time
if the vehicle is operated in a dusty and off
road environment or is operated predomi-
nantly at idle, or only very low engine RPM’s.
This type of vehicle use is considered Severe
Duty.
Once A Month Or Before A Long Trip:
• Check engine oil level
• Check windshield washer fluid level
• Check tire pressure and look for unusual
wear or damage. Rotate tires at the first
sign of irregular wear, even if it occurs
before the oil indicator system turns on.
• Check the fluid levels of the coolant reser- voir, brake master cylinder, power steering
(2500/3500 Models Only) and automatic
transmission (six-speed only) and fill as
needed
• Check function of all interior and exterior lights
SERVICING AND MAINTENANCE
230
Page 236 of 372
WARNING!
• You can be badly injured working on oraround a motor vehicle. Do only service
work for which you have the knowledge
and the right equipment. If you have any
doubt about your ability to perform a
service job, take your vehicle to a com-
petent mechanic.
• Failure to properly inspect and maintain
your vehicle could result in a component
malfunction and effect vehicle handling
and performance. This could cause an
accident.
Heavy Duty Use Of The Vehicle
Change engine oil at 4,000 miles (6,500 km)
or 350 hours of engine run time if the vehicle
is operated in a dusty and off road environ-
ment or is operated predominately at idle or
only very low engine RPM’s. This type of
vehicle use is considered Severe Duty.
SCHEDULED SERVICING — 1500 3.0L
DIESEL ENGINE
Your vehicle is equipped with an automatic
oil change indicator system. The oil change
indicator system will remind you that it is
time to take your vehicle in for scheduled
maintenance.
Based on engine operation conditions, the oil
change indicator message will illuminate.
This means that service is required for your
vehicle. Operating conditions such as fre-
quent short-trips, trailer tow, extremely hot or
cold ambient temperatures will influence
when the “Oil Change Required” message is
displayed. Severe Operating Conditions will
cause the change oil message to illuminate
more frequently. Have your vehicle serviced
as soon as possible, within the next
500 miles (805 km). Your authorized dealer will reset the oil
change indicator message after completing
the scheduled oil change. If a scheduled oil
change is performed by someone other than
your authorized dealer, the message can be
reset by referring to the steps described un-
der “Instrument Cluster Display” in “Getting
To Know Your Instrument Panel” in your Own-
er’s Manual for further information.
NOTE:
Under no circumstances should oil change
intervals exceed 10,000 miles (16,000 km)
or twelve months, whichever comes first.
Once A Month Or Before A Long Trip:
• Check engine oil level
• Check windshield washer fluid level
• Check the tire inflation pressures and look
for unusual wear or damage
• Check the fluid levels of the coolant reser- voir, brake master cylinder, and power
steering, and fill as needed
• Check function of all interior and exterior lights
SERVICING AND MAINTENANCE
234
Page 239 of 372
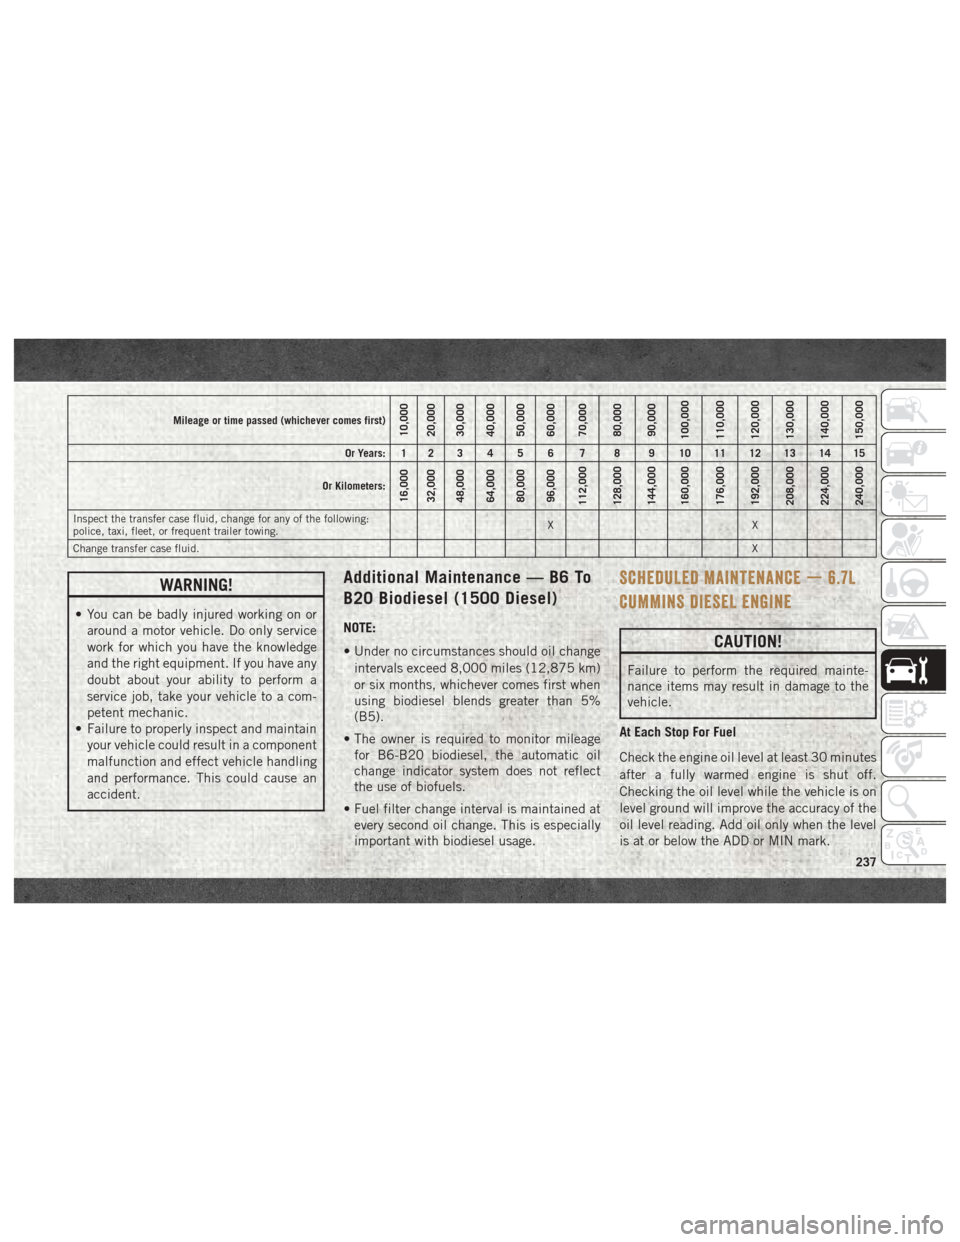
Mileage or time passed (whichever comes first)10,000
20,000
30,000
40,000
50,000
60,000
70,000
80,000
90,000
100,000
110,000
120,000
130,000
140,000
150,000
Or Years: 1 2 3 4 5 6 7 8 9 10 11 12 13 14 15
Or Kilometers:
16,000
32,000
48,000
64,000
80,000
96,000
112,000
128,000
144,000
160,000
176,000
192,000
208,000
224,000
240,000
Inspect the transfer case fluid, change for any of the following:
police, taxi, fleet, or frequent trailer towing. XX
Change transfer case fluid. X
WARNING!
• You can be badly injured working on or
around a motor vehicle. Do only service
work for which you have the knowledge
and the right equipment. If you have any
doubt about your ability to perform a
service job, take your vehicle to a com-
petent mechanic.
• Failure to properly inspect and maintain
your vehicle could result in a component
malfunction and effect vehicle handling
and performance. This could cause an
accident.
Additional Maintenance — B6 To
B20 Biodiesel (1500 Diesel)
NOTE:
• Under no circumstances should oil change
intervals exceed 8,000 miles (12,875 km)
or six months, whichever comes first when
using biodiesel blends greater than 5%
(B5).
• The owner is required to monitor mileage for B6-B20 biodiesel, the automatic oil
change indicator system does not reflect
the use of biofuels.
• Fuel filter change interval is maintained at every second oil change. This is especially
important with biodiesel usage.
SCHEDULED MAINTENANCE — 6.7L
CUMMINS DIESEL ENGINE
CAUTION!
Failure to perform the required mainte-
nance items may result in damage to the
vehicle.
At Each Stop For Fuel
Check the engine oil level at least 30 minutes
after a fully warmed engine is shut off.
Checking the oil level while the vehicle is on
level ground will improve the accuracy of the
oil level reading. Add oil only when the level
is at or below the ADD or MIN mark.
237
Page 240 of 372
Once A Month
• Inspect the batteries, and clean andtighten the terminals as required.
• Check the fluid levels of the coolant reser- voir, brake master cylinder, and automatic
transmission (if equipped), and add as
needed.
At Each Oil Change
• Change the engine oil filter.
• Inspect the exhaust system.
• Inspect engine air filter.
• Check the coolant level, hoses, and clamps.
• Inspect front end, and lubricate — If equipped with serviceable fittings.
• Lube the front drive shaft fitting (4X4 mod- els only).
Inspection and service should also be per-
formed anytime a malfunction is observed or
suspected. Retain all receipts.Oil Change Indicator System —
Cummins Diesel
Your vehicle is equipped with an engine oil
change indicator system. This system will
alert you when it is time to change your
engine oil by displaying the words “Oil
Change Due” in your instrument cluster dis-
play. The oil change reminder will remind the
owner to change the engine oil every
15,000 miles or 500 hours, whichever
comes first, except for the Chassis Cab mod-
els and Pickup models configured with op-
tional B20 capability that are using B20 bio-
diesel, which are 12,500 miles or 400 hours,
whichever comes first. Failure to change the
engine oil per the maintenance schedule can
result in internal engine damage. Replace the engine oil and oil filter every
15,000 miles (24,000 km) or six months, or
sooner if prompted by the oil change indicator
system. Under no circumstances should oil
change intervals exceed 15,000 miles
(24,000 km) or six months, whichever comes
first.
NOTE:
• Under no circumstances should oil change
intervals exceed 15,000 miles
(24,000 km) or six months or 500 Hours,
whichever comes first.
• Replace the engine oil and oil filter every 12,500 miles (20 000 km) when running
B20 fuel (Chassis Cab Only).
If Chassis Cab models and Pickup models
configured with optional B20 capability are
operated with greater than 5% levels of bio-
diesel, the oil change interval must not exceed
12,500 miles (20 000 km) under any circum-
stances. See the Fuel Requirements section
for more information regarding operation of
Chassis Cab models and Pickup models con-
figured for use with biodiesel blend (B6-B20)
fuel meeting ASTM specification D-7467.SERVICING AND MAINTENANCE
238