ignition Ram 2500 2020 Owner's Manual
[x] Cancel search | Manufacturer: RAM, Model Year: 2020, Model line: 2500, Model: Ram 2500 2020Pages: 553, PDF Size: 21.99 MB
Page 483 of 553
MULTIMEDIA481
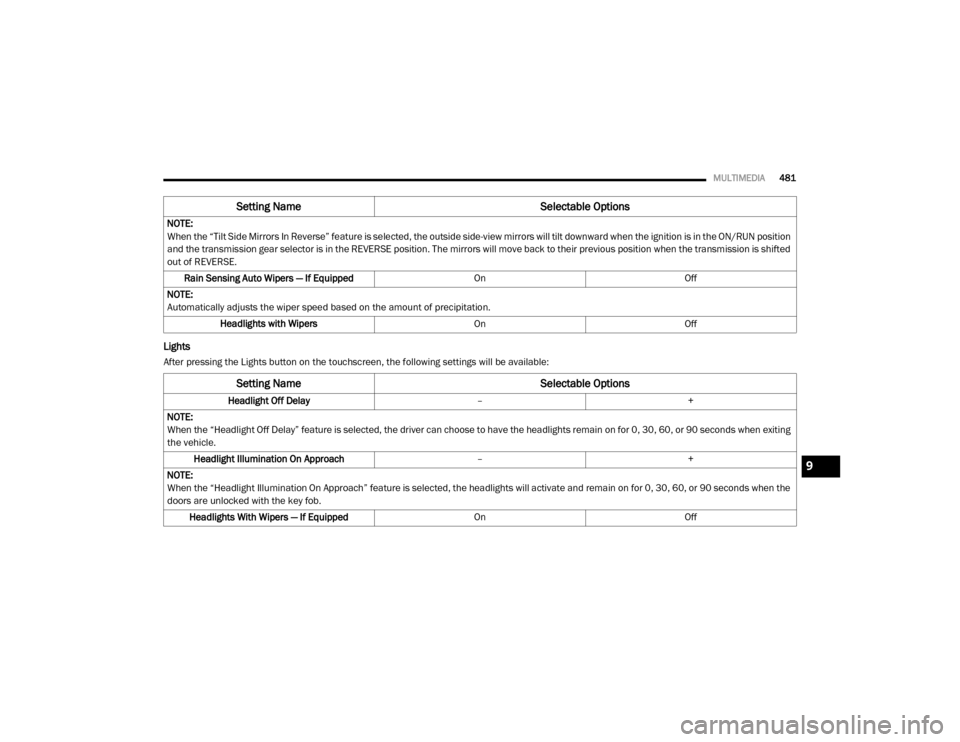
Lights
After pressing the Lights button on the touchscreen, the following settings will be available:NOTE:
When the “Tilt Side Mirrors In Reverse” feature is selected, the outside side-view mirrors will tilt downward when the ignition is in the ON/RUN position
and the transmission gear selector is in the REVERSE position. The mirrors will move back to their previous position when the transmission is shifted
out of REVERSE.
Rain Sensing Auto Wipers — If Equipped OnOff
NOTE:
Automatically adjusts the wiper speed based on the amount of precipitation. Headlights with Wipers OnOff
Setting Name Selectable Options
Setting NameSelectable Options
Headlight Off Delay–+
NOTE:
When the “Headlight Off Delay” feature is selected, the driver can choose to have the headlights remain on for 0, 30, 60, or 90 seconds when exiting
the vehicle. Headlight Illumination On Approach –+
NOTE:
When the “Headlight Illumination On Approach” feature is selected, the headlights will activate and remain on for 0, 30, 60, or 90 seconds when the
doors are unlocked with the key fob. Headlights With Wipers — If Equipped OnOff
9
20_DJD2_OM_EN_USC_t.book Page 481
Page 487 of 553
MULTIMEDIA485
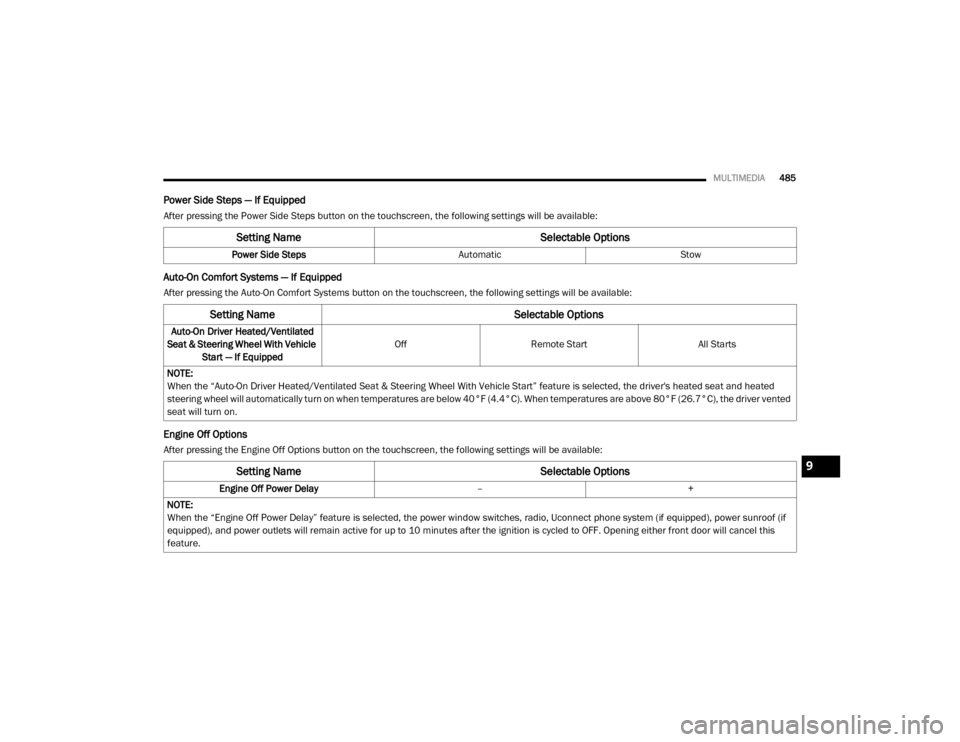
Power Side Steps — If Equipped
After pressing the Power Side Steps button on the touchscreen, the following settings will be available:
Auto-On Comfort Systems — If Equipped
After pressing the Auto-On Comfort Systems button on the touchscreen, the following settings will be available:
Engine Off Options
After pressing the Engine Off Options button on the touchscreen, the following settings will be available:
Setting Name Selectable Options
Power Side StepsAutomaticStow
Setting Name Selectable Options
Auto-On Driver Heated/Ventilated
Seat & Steering Wheel With Vehicle Start — If Equipped Off
Remote Start All Starts
NOTE:
When the “Auto-On Driver Heated/Ventilated Seat & Steering Wheel With Vehicle Start” feature is selected, the driver's heated seat and heated
steering wheel will automatically turn on when temperatures are below 40°F (4.4°C). When temperatures are above 80°F (26.7°C), the driver vented
seat will turn on.
Setting Name Selectable Options
Engine Off Power Delay–+
NOTE:
When the “Engine Off Power Delay” feature is selected, the power window switches, radio, Uconnect phone system (if equipped), power sunroof (if
equipped), and power outlets will remain active for up to 10 minutes after the ignition is cycled to OFF. Opening either front door will cancel this
feature.
9
20_DJD2_OM_EN_USC_t.book Page 485
Page 495 of 553
MULTIMEDIA493
Uconnect 4C NAV With 12-inch Display
Settings
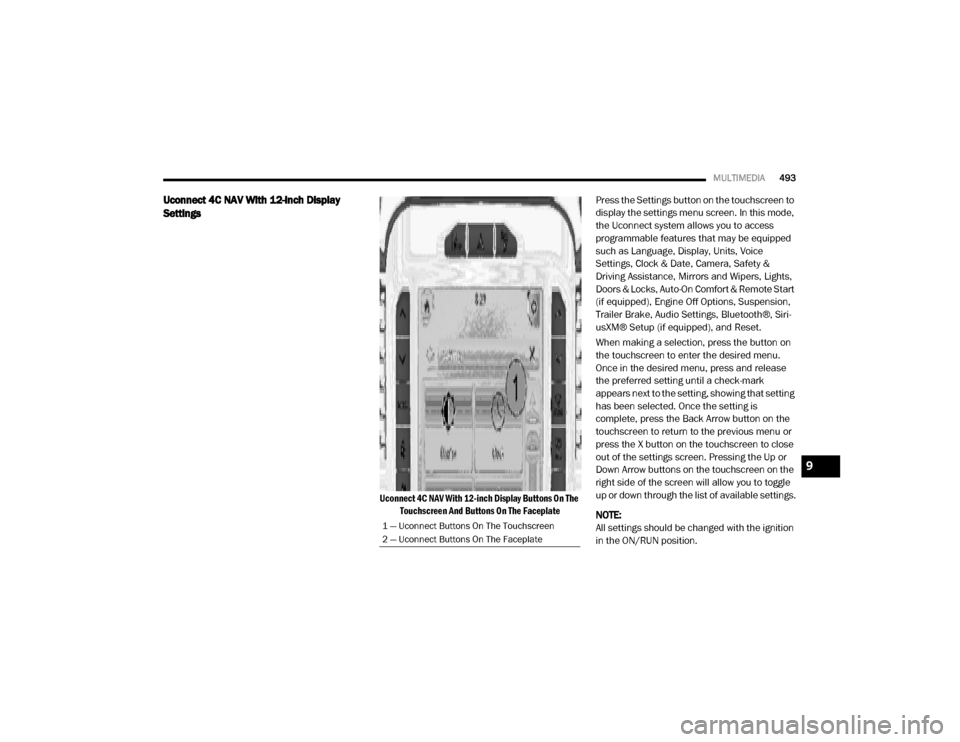
Uconnect 4C NAV With 12-inch Display Buttons On The
Touchscreen And Buttons On The Faceplate
Press the Settings button on the touchscreen to
display the settings menu screen. In this mode,
the Uconnect system allows you to access
programmable features that may be equipped
such as Language, Display, Units, Voice
Settings, Clock & Date, Camera, Safety &
Driving Assistance, Mirrors and Wipers, Lights,
Doors & Locks, Auto-On Comfort & Remote Start
(if equipped), Engine Off Options, Suspension,
Trailer Brake, Audio Settings, Bluetooth®, Siri-
usXM® Setup (if equipped), and Reset.
When making a selection, press the button on
the touchscreen to enter the desired menu.
Once in the desired menu, press and release
the preferred setting until a check-mark
appears next to the setting, showing that setting
has been selected. Once the setting is
complete, press the Back Arrow button on the
touchscreen to return to the previous menu or
press the X button on the touchscreen to close
out of the settings screen. Pressing the Up or
Down Arrow buttons on the touchscreen on the
right side of the screen will allow you to toggle
up or down through the list of available settings.
NOTE:
All settings should be changed with the ignition
in the ON/RUN position.
1 — Uconnect Buttons On The Touchscreen
2 — Uconnect Buttons On The Faceplate
9
20_DJD2_OM_EN_USC_t.book Page 493
Page 499 of 553
MULTIMEDIA497
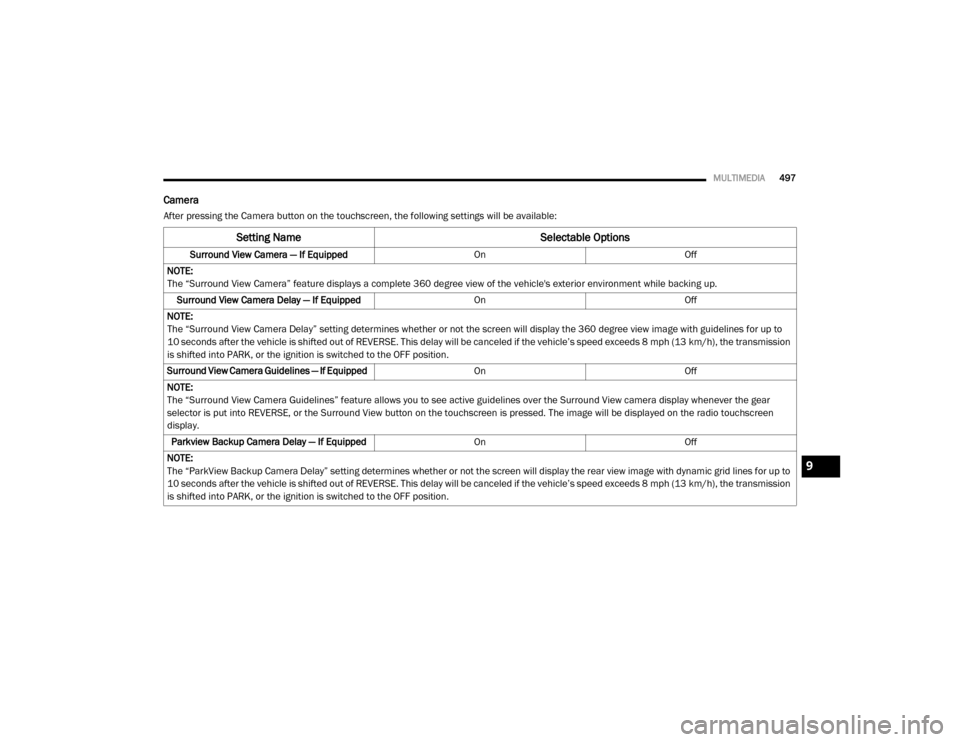
Camera
After pressing the Camera button on the touchscreen, the following settings will be available:
Setting Name Selectable Options
Surround View Camera — If Equipped OnOff
NOTE:
The “Surround View Camera” feature displays a complete 360 degree view of the vehicle's exterior environment while backing up. Surround View Camera Delay — If Equipped OnOff
NOTE:
The “Surround View Camera Delay” setting determines whether or not the screen will display the 360 degree view image with guidelines for up to
10 seconds after the vehicle is shifted out of REVERSE. This delay will be canceled if the vehicle’s speed exceeds 8 mph (13 km/h), the transmission
is shifted into PARK, or the ignition is switched to the OFF position.
Surround View Camera Guidelines — If Equipped On Off
NOTE:
The “Surround View Camera Guidelines” feature allows you to see active guidelines over the Surround View camera display whenever the gear
selector is put into REVERSE, or the Surround View button on the touchscreen is pressed. The image will be displayed on the radio touchscreen
display. Parkview Backup Camera Delay — If Equipped OnOff
NOTE:
The “ParkView Backup Camera Delay” setting determines whether or not the screen will display the rear view image with dynamic grid lines for up to
10 seconds after the vehicle is shifted out of REVERSE. This delay will be canceled if the vehicle’s speed exceeds 8 mph (13 km/h), the transmission
is shifted into PARK, or the ignition is switched to the OFF position.
9
20_DJD2_OM_EN_USC_t.book Page 497
Page 500 of 553
498MULTIMEDIA
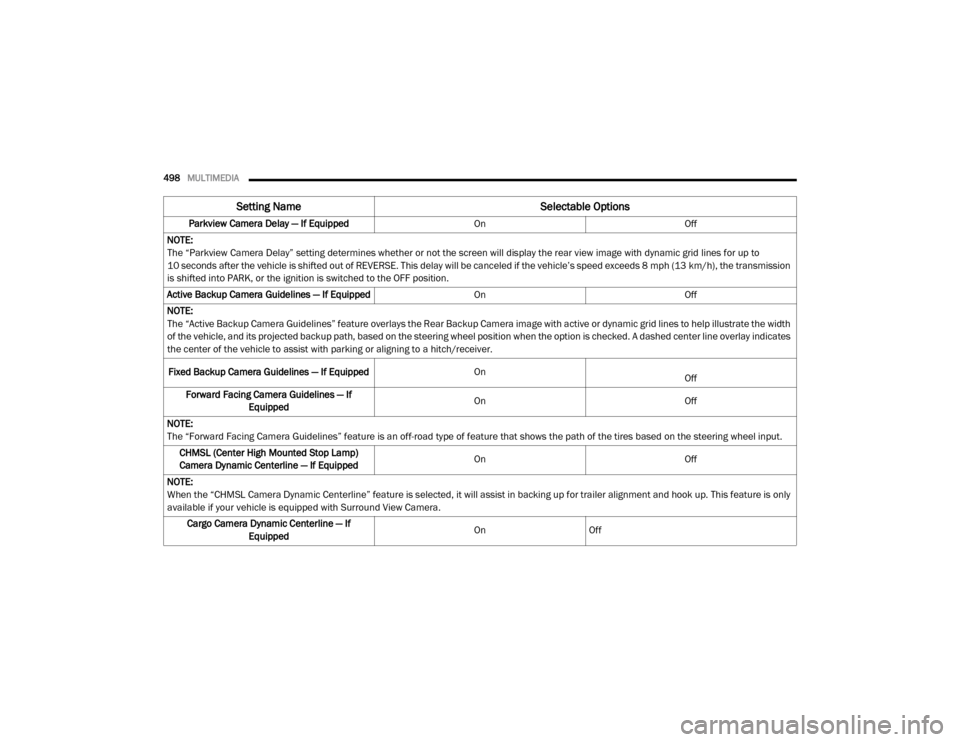
Parkview Camera Delay — If Equipped OnOff
NOTE:
The “Parkview Camera Delay” setting determines whether or not the screen will display the rear view image with dynamic grid lines for up to
10 seconds after the vehicle is shifted out of REVERSE. This delay will be canceled if the vehicle’s speed exceeds 8 mph (13 km/h), the transmission
is shifted into PARK, or the ignition is switched to the OFF position. Active Backup Camera Guidelines — If Equipped OnOff
NOTE:
The “Active Backup Camera Guidelines” feature overlays the Rear Backup Camera image with active or dynamic grid lines to help illustrate the width
of the vehicle, and its projected backup path, based on the steering wheel position when the option is checked. A dashed center line overlay indicates
the center of the vehicle to assist with parking or aligning to a hitch/receiver.
Fixed Backup Camera Guidelines — If Equipped On
Off
Forward Facing Camera Guidelines — If Equipped On
Off
NOTE:
The “Forward Facing Camera Guidelines” feature is an off-road type of feature that shows the path of the tires based on the steering wheel input. CHMSL (Center High Mounted Stop Lamp)
Camera Dynamic Centerline — If Equipped On
Off
NOTE:
When the “CHMSL Camera Dynamic Centerline” feature is selected, it will assist in backing up for trailer alignment and hook up. This feature is only
available if your vehicle is equipped with Surround View Camera. Cargo Camera Dynamic Centerline — If Equipped On
Off
Setting Name Selectable Options
20_DJD2_OM_EN_USC_t.book Page 498
Page 502 of 553

500MULTIMEDIA
Mirrors & Wipers
After pressing the Mirror & Wipers button on the touchscreen, the following settings will be available:
Lights
After pressing the Lights button on the touchscreen, the following settings will be available:
Setting Name Selectable Options
Tilt Side Mirrors In Reverse — If Equipped OnOff
NOTE:
When the “Tilt Side Mirrors In Reverse” feature is selected, the outside side-view mirrors will tilt downward when the ignition is in the ON/RUN position
and the transmission gear selector is in the REVERSE position. The mirrors will move back to their previous position when the transmission is shifted
out of REVERSE. Rain Sensing Auto Wipers OnOff
NOTE:
Automatically adjusts the wiper speed based on the amount of precipitation. Headlights with Wipers OnOff
Setting Name Selectable Options
Headlight Off Delay-+
NOTE:
When the “Headlight Off Delay” feature is selected, the driver can choose to have the headlights remain on for 0, 30, 60, or 90 seconds when exiting
the vehicle. Headlight Illumination On Approach –+
NOTE:
When the “Headlight Illumination On Approach” feature is selected, the headlights will activate and remain on for 0, 30, 60, or 90 seconds when the
doors are unlocked with the key fob.
20_DJD2_OM_EN_USC_t.book Page 500
Page 506 of 553
504MULTIMEDIA
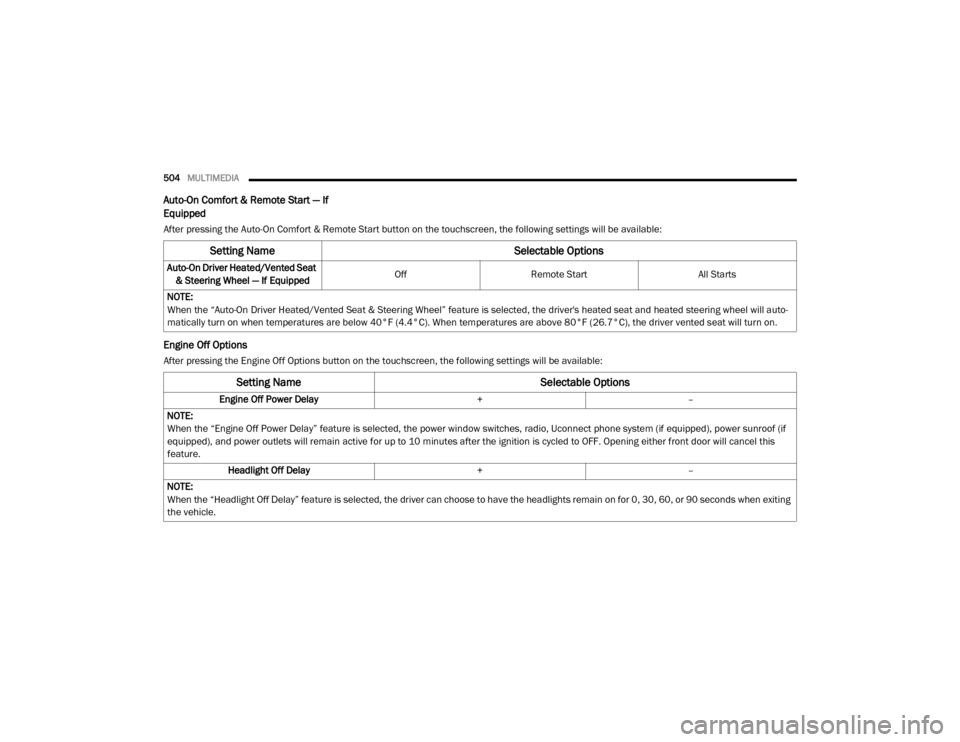
Auto-On Comfort & Remote Start — If
Equipped
After pressing the Auto-On Comfort & Remote Start button on the touchscreen, the following settings will be available:
Engine Off Options
After pressing the Engine Off Options button on the touchscreen, the following settings will be available:
Setting Name Selectable Options
Auto-On Driver Heated/Vented Seat
& Steering Wheel — If Equipped Off
Remote Start All Starts
NOTE:
When the “Auto-On Driver Heated/Vented Seat & Steering Wheel” feature is selected, the driver's heated seat and heated steering wheel will auto -
matically turn on when temperatures are below 40°F (4.4°C). When temperatures are above 80°F (26.7°C), the driver vented seat will turn on.
Setting Name Selectable Options
Engine Off Power Delay+–
NOTE:
When the “Engine Off Power Delay” feature is selected, the power window switches, radio, Uconnect phone system (if equipped), power sunroof (if
equipped), and power outlets will remain active for up to 10 minutes after the ignition is cycled to OFF. Opening either front door will cancel this
feature. Headlight Off Delay +–
NOTE:
When the “Headlight Off Delay” feature is selected, the driver can choose to have the headlights remain on for 0, 30, 60, or 90 seconds when exiting
the vehicle.
20_DJD2_OM_EN_USC_t.book Page 504
Page 519 of 553
MULTIMEDIA517
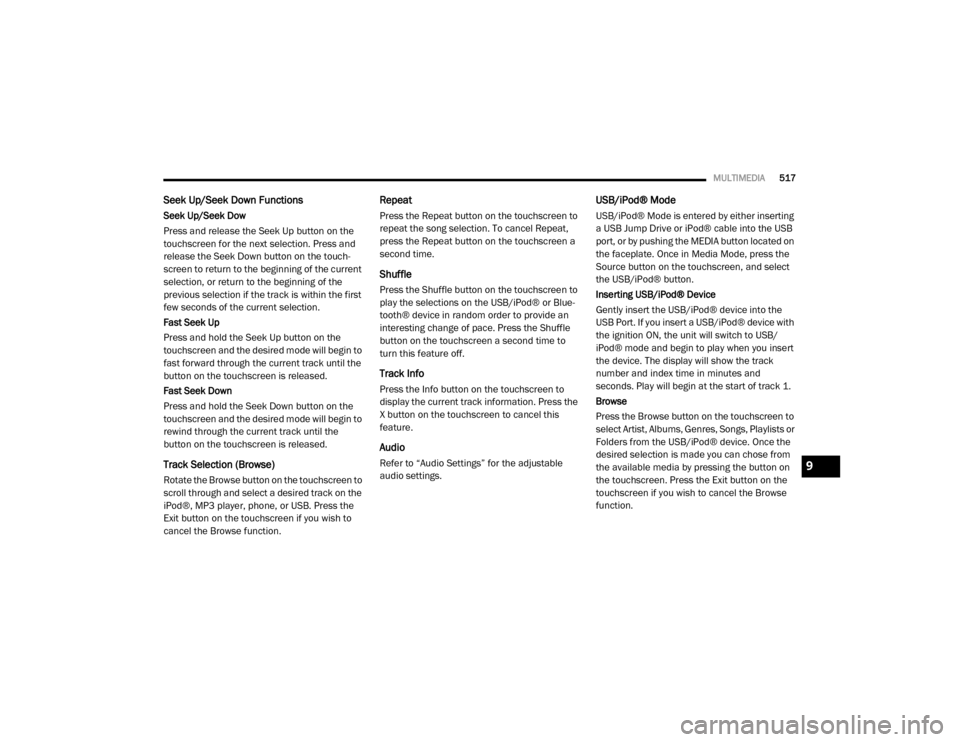
Seek Up/Seek Down Functions
Seek Up/Seek Dow
Press and release the Seek Up button on the
touchscreen for the next selection. Press and
release the Seek Down button on the touch -
screen to return to the beginning of the current
selection, or return to the beginning of the
previous selection if the track is within the first
few seconds of the current selection.
Fast Seek Up
Press and hold the Seek Up button on the
touchscreen and the desired mode will begin to
fast forward through the current track until the
button on the touchscreen is released.
Fast Seek Down
Press and hold the Seek Down button on the
touchscreen and the desired mode will begin to
rewind through the current track until the
button on the touchscreen is released.
Track Selection (Browse)
Rotate the Browse button on the touchscreen to
scroll through and select a desired track on the
iPod®, MP3 player, phone, or USB. Press the
Exit button on the touchscreen if you wish to
cancel the Browse function.
Repeat
Press the Repeat button on the touchscreen to
repeat the song selection. To cancel Repeat,
press the Repeat button on the touchscreen a
second time.
Shuffle
Press the Shuffle button on the touchscreen to
play the selections on the USB/iPod® or Blue -
tooth® device in random order to provide an
interesting change of pace. Press the Shuffle
button on the touchscreen a second time to
turn this feature off.
Track Info
Press the Info button on the touchscreen to
display the current track information. Press the
X button on the touchscreen to cancel this
feature.
Audio
Refer to “Audio Settings” for the adjustable
audio settings.
USB/iPod® Mode
USB/iPod® Mode is entered by either inserting
a USB Jump Drive or iPod® cable into the USB
port, or by pushing the MEDIA button located on
the faceplate. Once in Media Mode, press the
Source button on the touchscreen, and select
the USB/iPod® button.
Inserting USB/iPod® Device
Gently insert the USB/iPod® device into the
USB Port. If you insert a USB/iPod® device with
the ignition ON, the unit will switch to USB/
iPod® mode and begin to play when you insert
the device. The display will show the track
number and index time in minutes and
seconds. Play will begin at the start of track 1.
Browse
Press the Browse button on the touchscreen to
select Artist, Albums, Genres, Songs, Playlists or
Folders from the USB/iPod® device. Once the
desired selection is made you can chose from
the available media by pressing the button on
the touchscreen. Press the Exit button on the
touchscreen if you wish to cancel the Browse
function.
9
20_DJD2_OM_EN_USC_t.book Page 517
Page 520 of 553
518MULTIMEDIA
Bluetooth® Mode
Bluetooth® Streaming Audio (BTSA) or Blue -
tooth® Mode is entered by pairing a Bluetooth®
device containing music to the Uconnect
system.
Before proceeding, the Bluetooth® device must
be paired with the Uconnect Phone to communi -
cate with the Uconnect system.
Refer to Phone Mode chapter in this manual for
pairing procedure.
Once the Bluetooth® device is paired to the
Uconnect system, push the MEDIA button
located on the faceplate. Once in Media Mode,
press the Source button on the touchscreen
and select the Bluetooth® button.
NOTE:
For mobile phone compatibility and pairing
instructions, please visit UconnectPhone.com.
AUX Mode
AUX Mode is entered by inserting a AUX device
using a stereo cable with a 3.5 mm audio jack
into the AUX port or by pushing the MEDIA button located on the faceplate. Once in Media
Mode, press the Source button on the touch
-
screen, and select the AUX button.
Inserting Auxiliary Device
Gently insert the Auxiliary device cable into the
AUX Port. If you insert an Auxiliary device with
the ignition on, the unit will switch to AUX mode
and begin to play when you insert the device
cable.
Controlling The Auxiliary Device
The control of the Auxiliary device (e.g.,
selecting playlists, play, fast forward, etc.)
cannot be provided by the radio; use the device
controls instead. Adjust the volume with the
VOLUME rotary knob or with the volume of the
attached device.
The radio unit is acting as the amplifier for audio
output from the Auxiliary device. Therefore, if
the volume control on the Auxiliary device is set
too low, there will be insufficient audio signal for
the radio unit to play the music on the device.
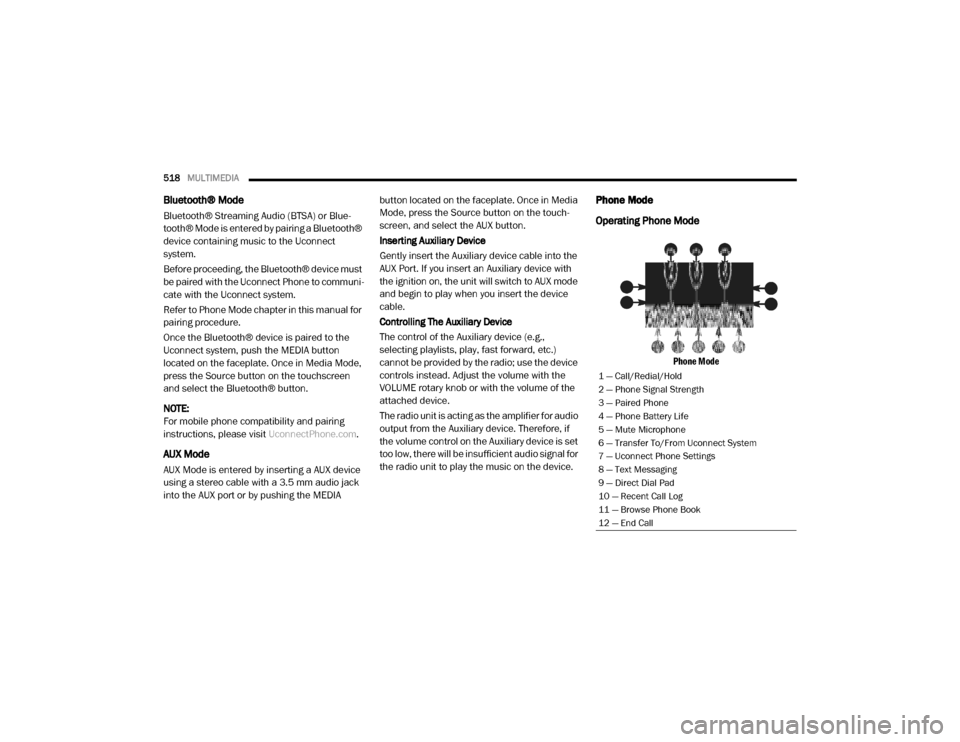
Phone Mode
Operating Phone Mode
Phone Mode
1 — Call/Redial/Hold
2 — Phone Signal Strength
3 — Paired Phone
4 — Phone Battery Life
5 — Mute Microphone
6 — Transfer To/From Uconnect System
7 — Uconnect Phone Settings
8 — Text Messaging
9 — Direct Dial Pad
10 — Recent Call Log
11 — Browse Phone Book
12 — End Call
20_DJD2_OM_EN_USC_t.book Page 518
Page 521 of 553
MULTIMEDIA519
The Uconnect Phone is a voice-activated,
hands-free, in-vehicle communications system
with voice command capability. Refer to Voice
Recognition (VR) within this publication for
further information.
The Uconnect Phone allows you to dial a phone
number with your mobile phone using simple
voice commands.
NOTE:
The Uconnect Phone requires a mobile phone
equipped with the Bluetooth® Hands-Free
Profile. To check mobile phone compatibility,
please visit UconnectPhone.com .
For Uconnect customer support:
US residents - visit UconnectPhone.com or
call 1-877-855-8400
Canadian residents - visit Uconnect-
Phone.com or call 1-800-465-2001 (English)
or 1-800-387-9983 (French)
Phone Mode Activation
Press the PHONE button on the front panel to
activate the Phone mode.
Main Functions
The buttons on the display can be used to:
Compose phone numbers using the graphic
keypad on the display.
Display and call the contacts in the mobile
phone phonebook.
Display and call contacts from the Recent
Calls menu.
Pair up to 10 phones/audio devices to make
access and connection easier and quicker.
Transfer calls from the system to the mobile
phone and vice versa.
Deactivate the microphone audio for privacy.
The mobile phone audio is transmitted through
the vehicle’s audio system. The system auto -
matically mutes the radio when the Phone func -
tion is used.
Connecting/Disconnecting A Mobile Phone
Or Bluetooth® Device
Pairing A Phone
To begin using your Uconnect Phone, you must
pair your compatible Bluetooth®-enabled
mobile phone. Mobile phone pairing is the process of establishing a wireless connection
between a cellular phone and the Uconnect
system.
To complete the pairing process, you need to
reference your mobile phone Owner's Manual.
Please visit
UconnectPhone.com for complete
mobile phone compatibility information.
NOTE:
You must have Bluetooth® enabled on your
phone to complete this procedure.
The vehicle must be in PARK.
1. Place the ignition in the ACC or ON/RUN position.
2. Push the PHONE button on the faceplate.
If there are no phones currently connected with the system, a pop-up
appears asking if you would like to pair a
mobile phone.
3. Select “Yes” to begin the pairing process.
9
20_DJD2_OM_EN_USC_t.book Page 519