ignition Ram 2500 2020 Owner's Manual
[x] Cancel search | Manufacturer: RAM, Model Year: 2020, Model line: 2500, Model: Ram 2500 2020Pages: 553, PDF Size: 21.99 MB
Page 414 of 553
412SERVICING AND MAINTENANCE
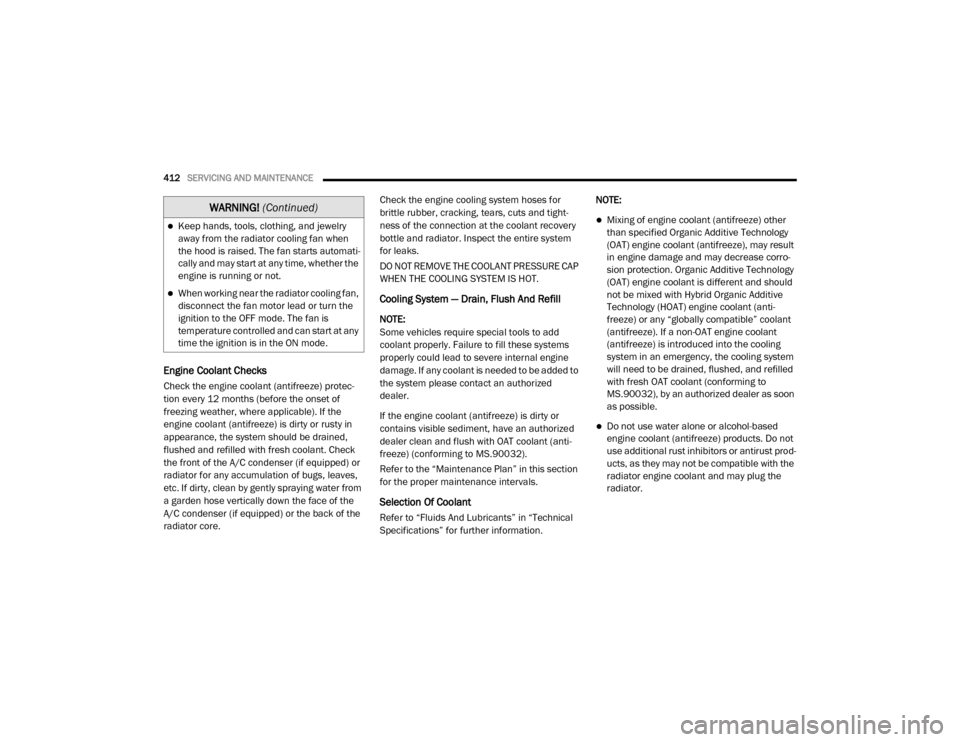
Engine Coolant Checks
Check the engine coolant (antifreeze) protec-
tion every 12 months (before the onset of
freezing weather, where applicable). If the
engine coolant (antifreeze) is dirty or rusty in
appearance, the system should be drained,
flushed and refilled with fresh coolant. Check
the front of the A/C condenser (if equipped) or
radiator for any accumulation of bugs, leaves,
etc. If dirty, clean by gently spraying water from
a garden hose vertically down the face of the
A/C condenser (if equipped) or the back of the
radiator core. Check the engine cooling system hoses for
brittle rubber, cracking, tears, cuts and tight
-
ness of the connection at the coolant recovery
bottle and radiator. Inspect the entire system
for leaks.
DO NOT REMOVE THE COOLANT PRESSURE CAP
WHEN THE COOLING SYSTEM IS HOT.
Cooling System — Drain, Flush And Refill
NOTE:
Some vehicles require special tools to add
coolant properly. Failure to fill these systems
properly could lead to severe internal engine
damage. If any coolant is needed to be added to
the system please contact an authorized
dealer.
If the engine coolant (antifreeze) is dirty or
contains visible sediment, have an authorized
dealer clean and flush with OAT coolant (anti -
freeze) (conforming to MS.90032).
Refer to the “Maintenance Plan” in this section
for the proper maintenance intervals.
Selection Of Coolant
Refer to “Fluids And Lubricants” in “Technical
Specifications” for further information. NOTE:
Mixing of engine coolant (antifreeze) other
than specified Organic Additive Technology
(OAT) engine coolant (antifreeze), may result
in engine damage and may decrease corro
-
sion protection. Organic Additive Technology
(OAT) engine coolant is different and should
not be mixed with Hybrid Organic Additive
Technology (HOAT) engine coolant (anti -
freeze) or any “globally compatible” coolant
(antifreeze). If a non-OAT engine coolant
(antifreeze) is introduced into the cooling
system in an emergency, the cooling system
will need to be drained, flushed, and refilled
with fresh OAT coolant (conforming to
MS.90032), by an authorized dealer as soon
as possible.
Do not use water alone or alcohol-based
engine coolant (antifreeze) products. Do not
use additional rust inhibitors or antirust prod -
ucts, as they may not be compatible with the
radiator engine coolant and may plug the
radiator.
Keep hands, tools, clothing, and jewelry
away from the radiator cooling fan when
the hood is raised. The fan starts automati -
cally and may start at any time, whether the
engine is running or not.
When working near the radiator cooling fan,
disconnect the fan motor lead or turn the
ignition to the OFF mode. The fan is
temperature controlled and can start at any
time the ignition is in the ON mode.
WARNING! (Continued)
20_DJD2_OM_EN_USC_t.book Page 412
Page 439 of 553

SERVICING AND MAINTENANCE437
(Continued)
increase tread life, help to maintain mud, snow
and wet traction levels and contribute to a
smooth, quiet ride.
Refer to the “Maintenance Plan” for the proper
maintenance intervals. More frequent rotation
is permissible if desired. The reasons for any
rapid or unusual wear should be corrected prior
to rotation being performed.
The suggested rotation method is the “rearward
cross” shown in the following diagram. This
rotation pattern does not apply to some direc -
tional tires that must not be reversed.
Tire Rotation (Rearward Cross)
Dual Rear Wheels — If Equipped
The tires used on dual wheel assemblies should
be matched for wear to prevent overloading one
tire in a set. To check if tires are even, lay a
straight edge across all four tires. The straight
edge should touch all the tires.
Tire Rotation
NOTE:
If your vehicle is equipped with a Tire Pressure
Information System (TPIS):
The Tire Pressure Information System (TPIS)
uses unique sensors in the inner rear wheels
to help identify them from the outer rear
wheels, because of this, the inner and outer
wheel locations can’t be switched.
After a tire rotation is completed, as shown
below, the system can auto learn the loca -
tions of each sensor ID. Auto learning/local -
ization occurs when the vehicle ignition
status is changed from Off to On and speeds
of greater than 5 mph (8km/h) are obtained
and remain over 5 mph (8km/h) for at about
a 15 minute period. You may need to drive
for 20 minutes to account slower speeds and
stops.
If the tires are rotated incorrectly, The auto
localization of the TPIS sensors will fail to
locate correctly resulting in incorrect loca -
tions for the pressure values displayed in the
instrument cluster.
CAUTION!
3500 Dual Rear Tires may only have one
approved direction of rotation. This is to
accommodate the asymmetrical design
(tread pattern) of the On/Off-Road tire and
the use of Outline White Letter (OWL) tires.
7
20_DJD2_OM_EN_USC_t.book Page 437
Page 462 of 553
460MULTIMEDIA
NOTE:
Only one category may be selected at a time.
When making a selection, press the button on
the touchscreen to enter the desired menu.
Once in the desired menu, press and release
the preferred setting until the button is high -lighted. Once the setting is complete, either
press the Back Arrow or the Done button on the
touchscreen or push the Back button on the
faceplate to return to the previous menu.
Pressing the Up or Down Arrow buttons on the
touchscreen on the right side of the screen will
allow you to toggle up or down through the list
of available settings.
NOTE:
All settings should be changed with the ignition
in the ON/RUN position.
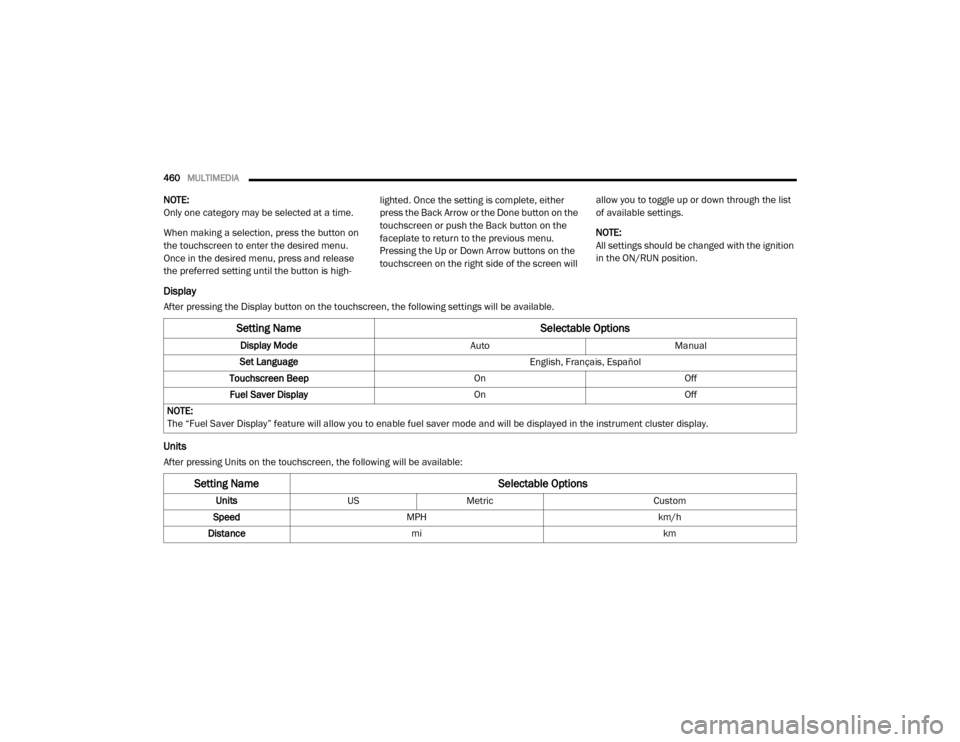
Display
After pressing the Display button on the touchscreen, the following settings will be available.
Units
After pressing Units on the touchscreen, the following will be available:
Setting Name
Selectable Options
Display ModeAutoManual
Set Language English, Français, Español
Touchscreen Beep OnOff
Fuel Saver Display OnOff
NOTE:
The “Fuel Saver Display” feature will allow you to enable fuel saver mode and will be displayed in the instrument cluster display.
Setting Name Selectable Options
UnitsUSMetric Custom
Speed MPH km/h
Distance mi km
20_DJD2_OM_EN_USC_t.book Page 460
Page 464 of 553
462MULTIMEDIA
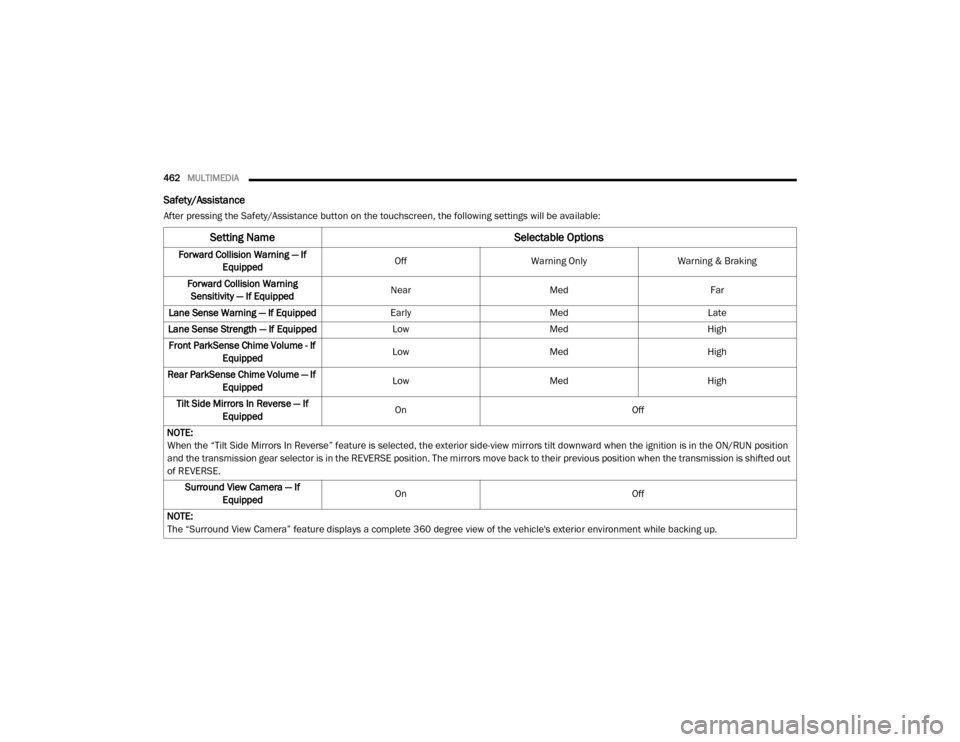
Safety/Assistance
After pressing the Safety/Assistance button on the touchscreen, the following settings will be available:
Setting Name Selectable Options
Forward Collision Warning — If
Equipped Off
Warning Only Warning & Braking
Forward Collision Warning Sensitivity — If Equipped Near
Med Far
Lane Sense Warning — If Equipped EarlyMedLate
Lane Sense Strength — If Equipped LowMed High
Front ParkSense Chime Volume - If Equipped Low
Med High
Rear ParkSense Chime Volume — If Equipped Low
Med High
Tilt Side Mirrors In Reverse — If Equipped On
Off
NOTE:
When the “Tilt Side Mirrors In Reverse” feature is selected, the exterior side-view mirrors tilt downward when the ignition is in the ON/RUN position
and the transmission gear selector is in the REVERSE position. The mirrors move back to their previous position when the transmission is shifted out
of REVERSE. Surround View Camera — If Equipped On
Off
NOTE:
The “Surround View Camera” feature displays a complete 360 degree view of the vehicle's exterior environment while backing up.
20_DJD2_OM_EN_USC_t.book Page 462
Page 465 of 553
MULTIMEDIA463
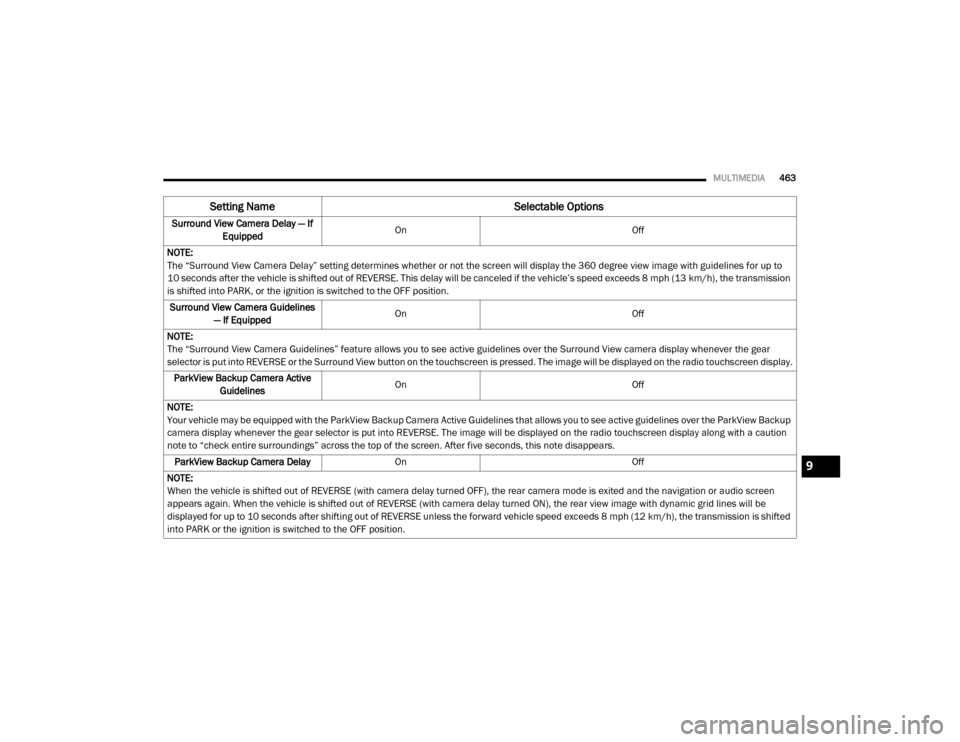
Surround View Camera Delay — If
Equipped On
Off
NOTE:
The “Surround View Camera Delay” setting determines whether or not the screen will display the 360 degree view image with guidelines for up to
10 seconds after the vehicle is shifted out of REVERSE. This delay will be canceled if the vehicle’s speed exceeds 8 mph (13 km/h), the transmission
is shifted into PARK, or the ignition is switched to the OFF position. Surround View Camera Guidelines — If Equipped On
Off
NOTE:
The “Surround View Camera Guidelines” feature allows you to see active guidelines over the Surround View camera display whenever the gear
selector is put into REVERSE or the Surround View button on the touchscreen is pressed. The image will be displayed on the radio touchscreen display. ParkView Backup Camera Active Guidelines On
Off
NOTE:
Your vehicle may be equipped with the ParkView Backup Camera Active Guidelines that allows you to see active guidelines over the ParkView Backup
camera display whenever the gear selector is put into REVERSE. The image will be displayed on the radio touchscreen display along with a caution
note to “check entire surroundings” across the top of the screen. After five seconds, this note disappears. ParkView Backup Camera Delay On Off
NOTE:
When the vehicle is shifted out of REVERSE (with camera delay turned OFF), the rear camera mode is exited and the navigation or audio screen
appears again. When the vehicle is shifted out of REVERSE (with camera delay turned ON), the rear view image with dynamic grid lines will be
displayed for up to 10 seconds after shifting out of REVERSE unless the forward vehicle speed exceeds 8 mph (12 km/h), the transmission is shifted into PARK or the ignition is switched to the OFF position.
Setting Name Selectable Options
9
20_DJD2_OM_EN_USC_t.book Page 463
Page 475 of 553
MULTIMEDIA473
Uconnect 4/4C/4C NAV Settings
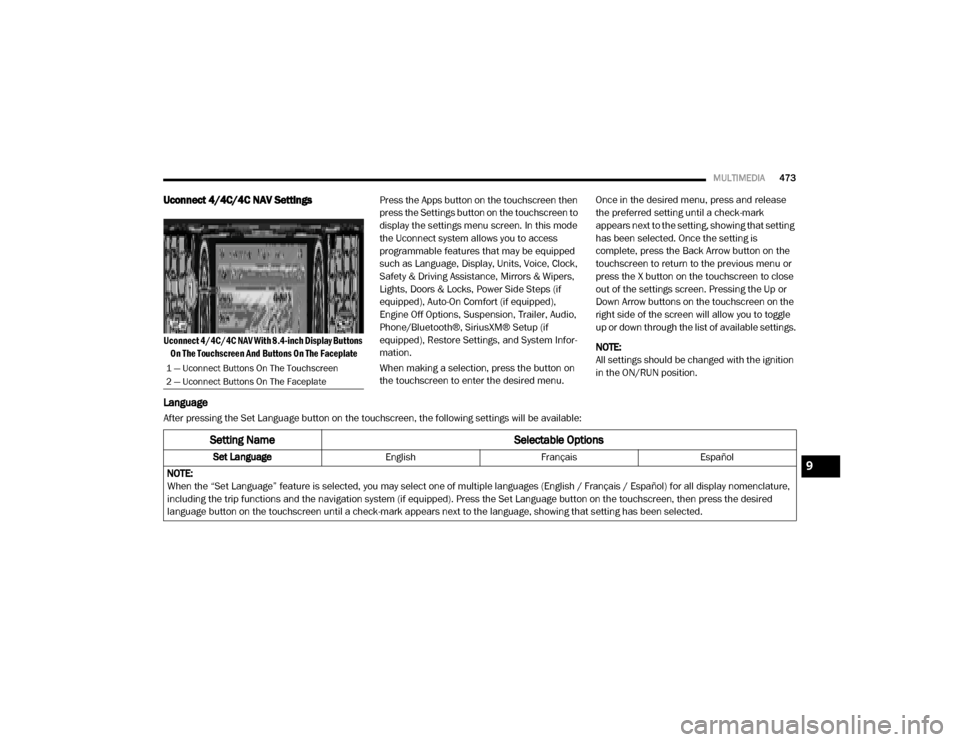
Uconnect 4/4C/4C NAV With 8.4-inch Display Buttons
On The Touchscreen And Buttons On The Faceplate
Press the Apps button on the touchscreen then
press the Settings button on the touchscreen to
display the settings menu screen. In this mode
the Uconnect system allows you to access
programmable features that may be equipped
such as Language, Display, Units, Voice, Clock,
Safety & Driving Assistance, Mirrors & Wipers,
Lights, Doors & Locks, Power Side Steps (if
equipped), Auto-On Comfort (if equipped),
Engine Off Options, Suspension, Trailer, Audio,
Phone/Bluetooth®, SiriusXM® Setup (if
equipped), Restore Settings, and System Infor
-
mation.
When making a selection, press the button on
the touchscreen to enter the desired menu. Once in the desired menu, press and release
the preferred setting until a check-mark
appears next to the setting, showing that setting
has been selected. Once the setting is
complete, press the Back Arrow button on the
touchscreen to return to the previous menu or
press the X button on the touchscreen to close
out of the settings screen. Pressing the Up or
Down Arrow buttons on the touchscreen on the
right side of the screen will allow you to toggle
up or down through the list of available settings.
NOTE:
All settings should be changed with the ignition
in the ON/RUN position.
Language
After pressing the Set Language button on the touchscreen, the following settings will be available:
1 — Uconnect Buttons On The Touchscreen
2 — Uconnect Buttons On The Faceplate
Setting Name
Selectable Options
Set LanguageEnglishFrançais Español
NOTE:
When the “Set Language” feature is selected, you may select one of multiple languages (English / Français / Español) for all display nomenclature,
including the trip functions and the navigation system (if equipped). Press the Set Language button on the touchscreen, then press the desired
language button on the touchscreen until a check-mark appears next to the language, showing that setting has been selected.9
20_DJD2_OM_EN_USC_t.book Page 473
Page 478 of 553
476MULTIMEDIA
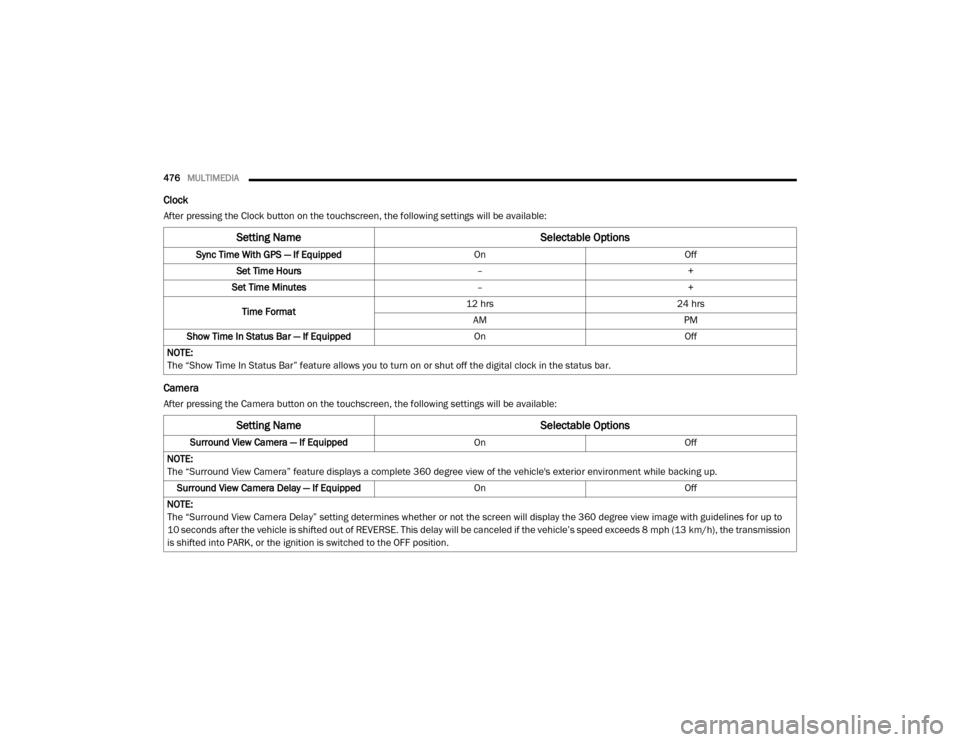
Clock
After pressing the Clock button on the touchscreen, the following settings will be available:
Camera
After pressing the Camera button on the touchscreen, the following settings will be available:
Setting Name Selectable Options
Sync Time With GPS — If Equipped OnOff
Set Time Hours –+
Set Time Minutes –+
Time Format 12 hrs
24 hrs
AM PM
Show Time In Status Bar — If Equipped OnOff
NOTE:
The “Show Time In Status Bar” feature allows you to turn on or shut off the digital clock in the status bar.
Setting Name Selectable Options
Surround View Camera — If Equipped OnOff
NOTE:
The “Surround View Camera” feature displays a complete 360 degree view of the vehicle's exterior environment while backing up. Surround View Camera Delay — If Equipped OnOff
NOTE:
The “Surround View Camera Delay” setting determines whether or not the screen will display the 360 degree view image with guidelines for up to
10 seconds after the vehicle is shifted out of REVERSE. This delay will be canceled if the vehicle’s speed exceeds 8 mph (13 km/h), the transmission
is shifted into PARK, or the ignition is switched to the OFF position.
20_DJD2_OM_EN_USC_t.book Page 476
Page 479 of 553

MULTIMEDIA477
Surround View Camera Guidelines — If Equipped OnOff
NOTE:
The “Surround View Camera Guidelines” feature allows you to see active guidelines over the Surround View camera display whenever the gear
selector is put into REVERSE, or the Surround View button on the touchscreen is pressed. The image will be displayed on the radio touchscreen
display. ParkView Backup Camera Delay OnOff
NOTE:
The “ParkView Backup Camera Delay” setting determines whether or not the screen will display the rear view image with dynamic grid lines for up to
10 seconds after the vehicle is shifted out of REVERSE. This delay will be canceled if the vehicle’s speed exceeds 8 mph (13 km/h), the transmission
is shifted into PARK, or the ignition is switched to the OFF position. Active Parkview Backup Camera Guidelines OnOff
NOTE:
The “Active ParkView Backup Camera Guidelines” feature overlays the Rear Backup Camera image with active, or dynamic, grid lines to help illustrate
the width of the vehicle and its projected backup path, based on the steering wheel position when the option is checked. A dashed center line overlay
indicates the center of the vehicle to assist with parking or aligning to a hitch/receiver. Fixed Parkview Backup Camera Guidelines OnOff
Forward Facing Camera Guidelines — If Equipped On
Off
NOTE:
The “Forward Facing Camera Guidelines” feature is an off-road type of feature that shows the path of the tires based on the steering wheel input. CHMSL (Center High Mounted Stop Lamp)
Camera Dynamic Centerline — If Equipped On
Off
Setting Name Selectable Options
9
20_DJD2_OM_EN_USC_t.book Page 477
Page 480 of 553

478MULTIMEDIA
Safety & Driving Assistance
After pressing the Safety & Driving Assistance button on the touchscreen, the following settings will be available:NOTE:
When the “CHMSL Camera Dynamic Centerline” feature is selected, it will assist in backing up for trailer alignment and hook up. This feature is only
available if your vehicle is equipped with Surround View Camera.
Setting Name
Selectable Options
Setting NameSelectable Options
Surround View Camera — If
Equipped On
Off
NOTE:
The “Surround View Camera” feature displays a complete 360 degree view of the vehicle's exterior environment while backing up. Surround View Camera Delay — If Equipped On
Off
NOTE:
The “Surround View Camera Delay” setting determines whether or not the screen will display the 360 degree view image with guidelines for up to
10 seconds after the vehicle is shifted out of REVERSE. This delay will be canceled if the vehicle’s speed exceeds 8 mph (13 km/h), the transmission
is shifted into PARK, or the ignition is switched to the OFF position. Surround View Camera Guidelines — If Equipped On
Off
NOTE:
The “Surround View Camera Guidelines” feature allows you to see active guidelines over the Surround View camera display whenever the gear
selector is put into REVERSE, or the Surround View button on the touchscreen is pressed. The image will be displayed on the radio touchscreen
display.
20_DJD2_OM_EN_USC_t.book Page 478
Page 481 of 553
MULTIMEDIA479
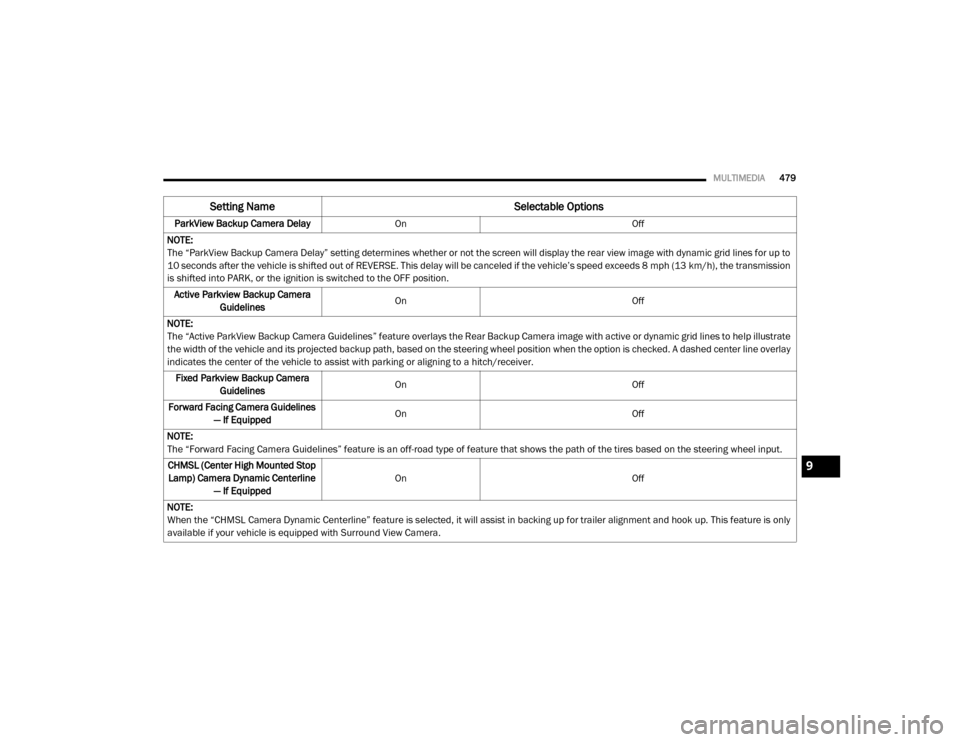
ParkView Backup Camera Delay On Off
NOTE:
The “ParkView Backup Camera Delay” setting determines whether or not the screen will display the rear view image with dynamic grid lines for up to
10 seconds after the vehicle is shifted out of REVERSE. This delay will be canceled if the vehicle’s speed exceeds 8 mph (13 km/h), the transmission
is shifted into PARK, or the ignition is switched to the OFF position. Active Parkview Backup Camera Guidelines On
Off
NOTE:
The “Active ParkView Backup Camera Guidelines” feature overlays the Rear Backup Camera image with active or dynamic grid lines to help illustrate
the width of the vehicle and its projected backup path, based on the steering wheel position when the option is checked. A dashed center line overlay
indicates the center of the vehicle to assist with parking or aligning to a hitch/receiver. Fixed Parkview Backup Camera Guidelines On
Off
Forward Facing Camera Guidelines — If Equipped On
Off
NOTE:
The “Forward Facing Camera Guidelines” feature is an off-road type of feature that shows the path of the tires based on the steering wheel input. CHMSL (Center High Mounted Stop Lamp) Camera Dynamic Centerline — If Equipped On
Off
NOTE:
When the “CHMSL Camera Dynamic Centerline” feature is selected, it will assist in backing up for trailer alignment and hook up. This feature is only
available if your vehicle is equipped with Surround View Camera.
Setting Name Selectable Options
9
20_DJD2_OM_EN_USC_t.book Page 479