audio Ram 2500 2020 User Guide
[x] Cancel search | Manufacturer: RAM, Model Year: 2020, Model line: 2500, Model: Ram 2500 2020Pages: 553, PDF Size: 21.99 MB
Page 343 of 553
IN CASE OF EMERGENCY341
SOS Call System Limitations
Vehicles sold in Mexico DO NOT have SOS Call
system capabilities.
SOS or other emergency line operators in
Mexico may not answer or respond to SOS
system calls.
If the SOS Call system detects a malfunction,
any of the following may occur at the time the
malfunction is detected, and at the beginning of
each ignition cycle:
The overhead console light located between
the ASSIST and SOS buttons will continuously
be illuminated red.
The Device Screen will display the following
message: “Vehicle device requires service.
Please contact your dealer.”
An In-Vehicle Audio message will state
“Vehicle device requires service. Please
contact your dealer.” Even if the SOS Call system is fully functional,
factors beyond FCA US LLC’s control may
prevent or stop the SOS Call system operation.
These include, but are not limited to, the
following factors:
Delayed accessories mode is active.
The ignition is in the OFF position.
The vehicle’s electrical systems are not
intact.
The SOS Call system software and/or hard
-
ware are damaged during a crash.
The vehicle battery loses power or becomes
disconnected during a vehicle crash.
LTE (voice/data) or 4G (data) network and/or
Global Positioning Satellite signals are
unavailable or obstructed.
Equipment malfunction at the SOS operator
facility.
Operator error by the SOS operator.
LTE (voice/data) or 4G (data) network
congestion.
Weather.
Buildings, structures, geographic terrain, or
tunnels.
WARNING!
Ignoring the overhead console light could
mean you will not have SOS Call services. If
the overhead console light is illuminated,
have an authorized dealer service the SOS
Call system immediately.
The Occupant Restraint Control module
turns on the air bag Warning Light on the
instrument panel if a malfunction in any
part of the system is detected. If the Air Bag
Warning Light is illuminated, have an
authorized dealer service the Occupant
Restraint Control system immediately.
WARNING!
ALWAYS obey traffic laws and pay attention to
the road. ALWAYS drive safely with your hands
on the steering wheel. You have full
responsibility and assume all risks related to
the use of the features and applications in
this vehicle. Only use the features and
applications when it is safe to do so. Failure
to do so may result in an accident involving
serious injury or death.
6
20_DJD2_OM_EN_USC_t.book Page 341
Page 461 of 553
MULTIMEDIA459
NOTE:
FCA US LLC or your dealer may contact you
directly regarding software updates.
To help further improve vehicle security and
minimize the potential risk of a security
breach, vehicle owners should:
Routinely check www.driveuconnect.com
(US Residents) or www.driveuconnect.ca
(Canadian Residents) to learn about
available Uconnect software updates.
Only connect and use trusted media devices (e.g. personal mobile phones,
USBs, CDs).
Privacy of any wireless and wired communica -
tions cannot be assured. Third parties may
unlawfully intercept information and private
communications without your consent. For
further information, refer to “Data Collection &
Privacy” in your Uconnect Owner’s Manual
Supplement or “Onboard Diagnostic System
(OBD II) Cybersecurity” in “Getting To Know Your
Instrument Panel”.
UCONNECT SETTINGS
The Uconnect system uses a combination of
buttons on the touchscreen and buttons on the
faceplate located on the center of the instru -
ment panel. These buttons allow you to access
and change the customer programmable
features. Many features can vary by vehicle.
Buttons on the faceplate are located below
and/or beside the Uconnect system in the
center of the instrument panel. In addition,
there is a Scroll/Enter control knob located on
the right side. Turn the control knob to scroll
through menus and change settings. Push the
center of the control knob one or more times to
select or change a setting.
Your Uconnect system may also have Screen
Off and Mute buttons on the faceplate.
Push the Screen Off button on the faceplate to
turn off the Uconnect screen. Push the button
again or tap the screen to turn the screen on.
Push the Back Arrow button to exit out of a
Menu or certain option on the Uconnect system.
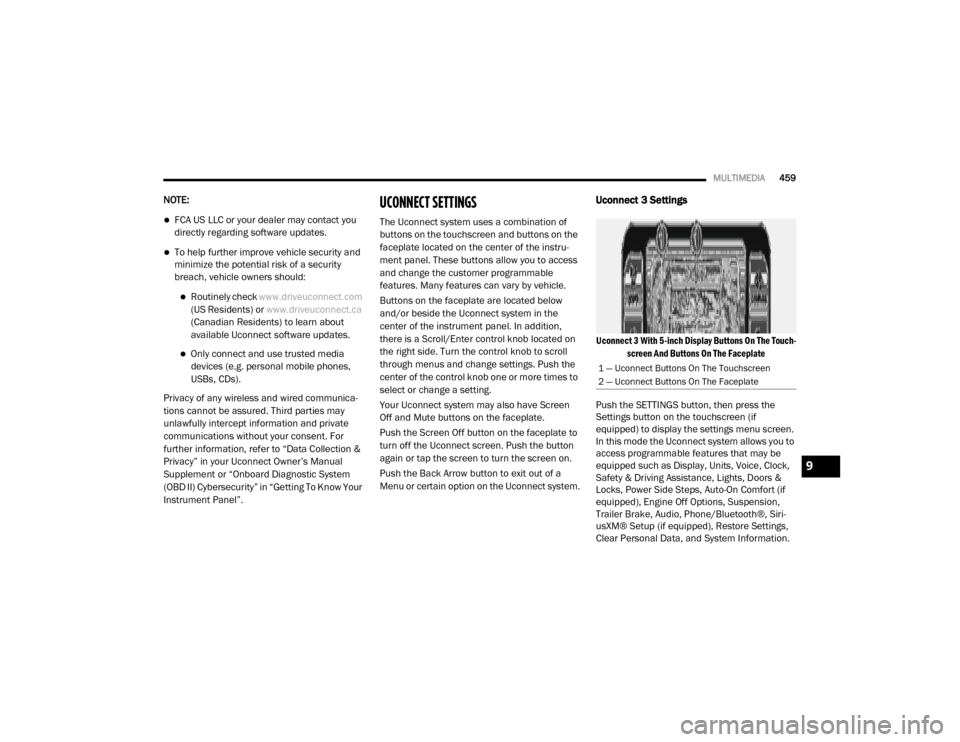
Uconnect 3 Settings
Uconnect 3 With 5-inch Display Buttons On The Touch -
screen And Buttons On The Faceplate
Push the SETTINGS button, then press the
Settings button on the touchscreen (if
equipped) to display the settings menu screen.
In this mode the Uconnect system allows you to
access programmable features that may be
equipped such as Display, Units, Voice, Clock,
Safety & Driving Assistance, Lights, Doors &
Locks, Power Side Steps, Auto-On Comfort (if
equipped), Engine Off Options, Suspension,
Trailer Brake, Audio, Phone/Bluetooth®, Siri -
usXM® Setup (if equipped), Restore Settings,
Clear Personal Data, and System Information.
1 — Uconnect Buttons On The Touchscreen
2 — Uconnect Buttons On The Faceplate
9
20_DJD2_OM_EN_USC_t.book Page 459
Page 465 of 553
MULTIMEDIA463
Surround View Camera Delay — If
Equipped On
Off
NOTE:
The “Surround View Camera Delay” setting determines whether or not the screen will display the 360 degree view image with guidelines for up to
10 seconds after the vehicle is shifted out of REVERSE. This delay will be canceled if the vehicle’s speed exceeds 8 mph (13 km/h), the transmission
is shifted into PARK, or the ignition is switched to the OFF position. Surround View Camera Guidelines — If Equipped On
Off
NOTE:
The “Surround View Camera Guidelines” feature allows you to see active guidelines over the Surround View camera display whenever the gear
selector is put into REVERSE or the Surround View button on the touchscreen is pressed. The image will be displayed on the radio touchscreen display. ParkView Backup Camera Active Guidelines On
Off
NOTE:
Your vehicle may be equipped with the ParkView Backup Camera Active Guidelines that allows you to see active guidelines over the ParkView Backup
camera display whenever the gear selector is put into REVERSE. The image will be displayed on the radio touchscreen display along with a caution
note to “check entire surroundings” across the top of the screen. After five seconds, this note disappears. ParkView Backup Camera Delay On Off
NOTE:
When the vehicle is shifted out of REVERSE (with camera delay turned OFF), the rear camera mode is exited and the navigation or audio screen
appears again. When the vehicle is shifted out of REVERSE (with camera delay turned ON), the rear view image with dynamic grid lines will be
displayed for up to 10 seconds after shifting out of REVERSE unless the forward vehicle speed exceeds 8 mph (12 km/h), the transmission is shifted into PARK or the ignition is switched to the OFF position.
Setting Name Selectable Options
9
20_DJD2_OM_EN_USC_t.book Page 463
Page 472 of 553

470MULTIMEDIA
Audio
After pressing the Audio button on the touchscreen, the following settings will be available:
Setting Name Selectable Options
Balance/FadeFrontBack LeftRight
NOTE:
The “Balance/Fade” feature allows you to adjust the Balance and Fade settings. Press and drag the Speaker icon or use the arrows to adjust, tap the
C icon to readjust to the center. Equalizer + –
NOTE:
When in the “Equalizer” display you may adjust the Bass, Mid and Treble settings. Speed Adjusted Volume Off123
NOTE:
The “Speed Adjusted Volume” feature increases or decreases volume relative to vehicle speed. Surround Sound — If Equipped On
Off
NOTE:
The “Surround Sound” feature provides simulated surround sound mode. AUX Volume Offset — If Equipped On
Off
NOTE:
The “AUX Volume Offset” feature provides the ability to tune the audio level for portable devices connected through the AUX input. Loudness — If Equipped On Off
NOTE:
The “Loudness” feature improves sound quality at lower volumes.
20_DJD2_OM_EN_USC_t.book Page 470
Page 474 of 553
472MULTIMEDIA
Restore Default Settings
After pressing the Restore Default Settings button on the touchscreen, the following settings will be available:
Clear Personal Data
After pressing the Clear Personal Data Settings button on the touchscreen, the following settings will be available:
Setting Name Selectable Options
Restore Default SettingsYesCancel
NOTE:
When the “Restore Default Settings” feature is selected it will reset the Display, Clock, Audio, and Radio Settings to their default settings. If “Yes” is
selected a pop-up will appear asking "Are you sure you want to reset your settings to default?” select “Yes” to restore, or “Cancel” to exit.
Setting Name Selectable Options
Clear Personal DataYesCancel
NOTE:
When this feature is selected it will remove all personal data including Bluetooth® devices and presets. If “Yes” is selected a pop-up will appear asking
"Are you sure you want to clear all personal data?” select “Yes” to Clear, or “Cancel” to exit.
20_DJD2_OM_EN_USC_t.book Page 472
Page 475 of 553
MULTIMEDIA473
Uconnect 4/4C/4C NAV Settings
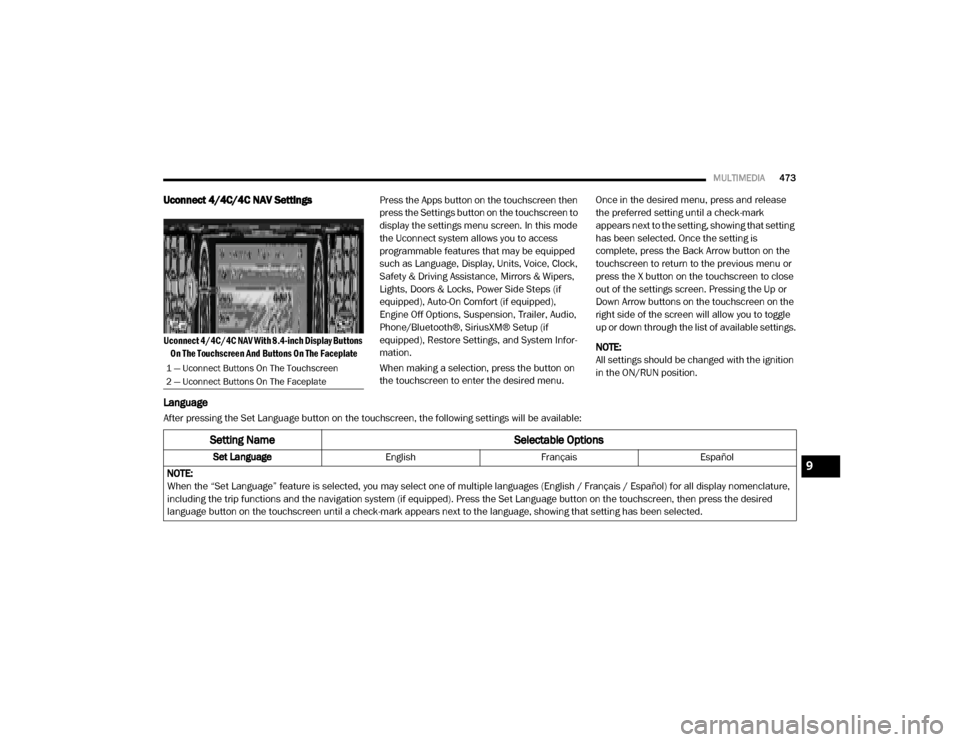
Uconnect 4/4C/4C NAV With 8.4-inch Display Buttons
On The Touchscreen And Buttons On The Faceplate
Press the Apps button on the touchscreen then
press the Settings button on the touchscreen to
display the settings menu screen. In this mode
the Uconnect system allows you to access
programmable features that may be equipped
such as Language, Display, Units, Voice, Clock,
Safety & Driving Assistance, Mirrors & Wipers,
Lights, Doors & Locks, Power Side Steps (if
equipped), Auto-On Comfort (if equipped),
Engine Off Options, Suspension, Trailer, Audio,
Phone/Bluetooth®, SiriusXM® Setup (if
equipped), Restore Settings, and System Infor
-
mation.
When making a selection, press the button on
the touchscreen to enter the desired menu. Once in the desired menu, press and release
the preferred setting until a check-mark
appears next to the setting, showing that setting
has been selected. Once the setting is
complete, press the Back Arrow button on the
touchscreen to return to the previous menu or
press the X button on the touchscreen to close
out of the settings screen. Pressing the Up or
Down Arrow buttons on the touchscreen on the
right side of the screen will allow you to toggle
up or down through the list of available settings.
NOTE:
All settings should be changed with the ignition
in the ON/RUN position.
Language
After pressing the Set Language button on the touchscreen, the following settings will be available:
1 — Uconnect Buttons On The Touchscreen
2 — Uconnect Buttons On The Faceplate
Setting Name
Selectable Options
Set LanguageEnglishFrançais Español
NOTE:
When the “Set Language” feature is selected, you may select one of multiple languages (English / Français / Español) for all display nomenclature,
including the trip functions and the navigation system (if equipped). Press the Set Language button on the touchscreen, then press the desired
language button on the touchscreen until a check-mark appears next to the language, showing that setting has been selected.9
20_DJD2_OM_EN_USC_t.book Page 473
Page 490 of 553
488MULTIMEDIA
NOTE:
For further information about Trailer Tire Pressure Monitoring, refer to “Auxiliary Driving Systems” in “Safety.”
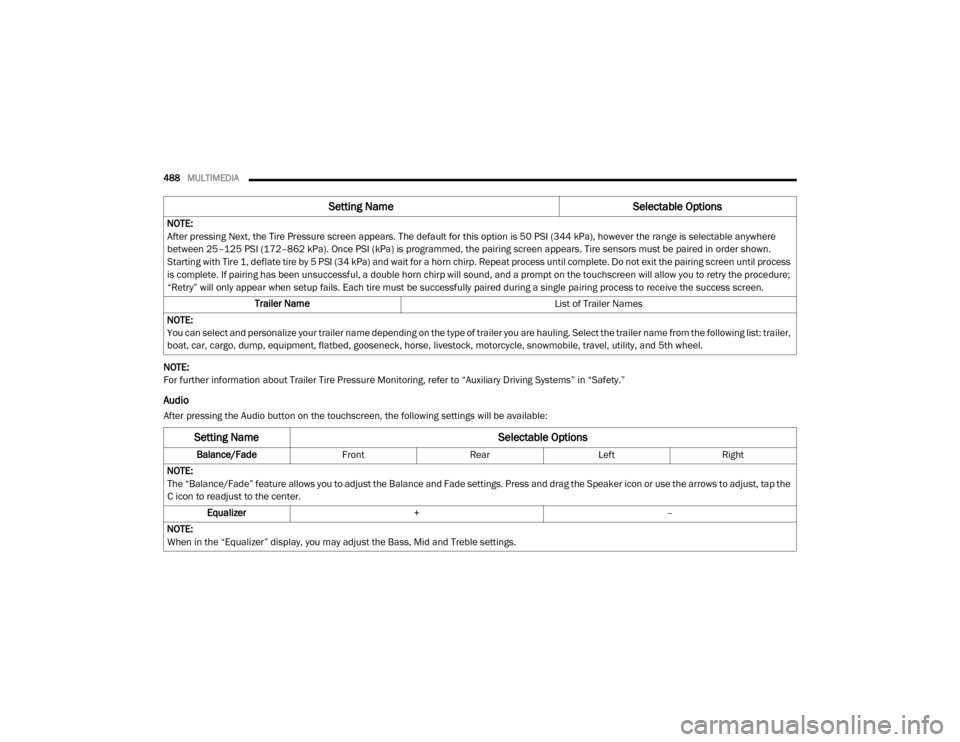
Audio
After pressing the Audio button on the touchscreen, the following settings will be available:NOTE:
After pressing Next, the Tire Pressure screen appears. The default for this option is 50 PSI (344 kPa), however the range is selectable anywhere
between 25–125 PSI (172–862 kPa). Once PSI (kPa) is programmed, the pairing screen appears. Tire sensors must be paired in order shown.
Starting with Tire 1, deflate tire by 5 PSI (34 kPa) and wait for a horn chirp. Repeat process until complete. Do not exit the pairing screen until process
is complete. If pairing has been unsuccessful, a double horn chirp will sound, and a prompt on the touchscreen will allow you to retry the procedure;
“Retry” will only appear when setup fails. Each tire must be successfully paired during a single pairing process to receive the success screen.
Trailer Name List of Trailer Names
NOTE:
You can select and personalize your trailer name depending on the type of trailer you are hauling. Select the trailer name from the following list: trailer,
boat, car, cargo, dump, equipment, flatbed, gooseneck, horse, livestock, motorcycle, snowmobile, travel, utility, and 5th wheel.
Setting Name Selectable Options
Setting NameSelectable Options
Balance/Fade Front Rear LeftRight
NOTE:
The “Balance/Fade” feature allows you to adjust the Balance and Fade settings. Press and drag the Speaker icon or use the arrows to adjust, tap the
C icon to readjust to the center. Equalizer + –
NOTE:
When in the “Equalizer” display, you may adjust the Bass, Mid and Treble settings.
20_DJD2_OM_EN_USC_t.book Page 488
Page 491 of 553
MULTIMEDIA489
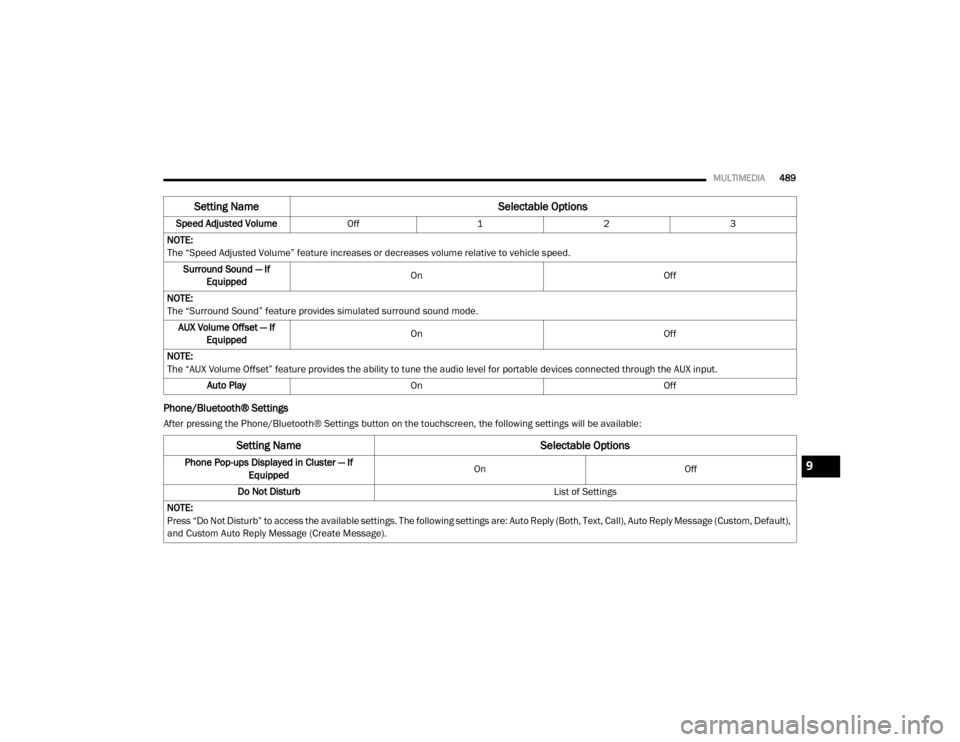
Phone/Bluetooth® Settings
After pressing the Phone/Bluetooth® Settings button on the touchscreen, the following settings will be available:Speed Adjusted Volume
Off123
NOTE:
The “Speed Adjusted Volume” feature increases or decreases volume relative to vehicle speed. Surround Sound — If Equipped On
Off
NOTE:
The “Surround Sound” feature provides simulated surround sound mode. AUX Volume Offset — If Equipped On
Off
NOTE:
The “AUX Volume Offset” feature provides the ability to tune the audio level for portable devices connected through the AUX input. Auto Play On Off
Setting Name Selectable Options
Setting NameSelectable Options
Phone Pop-ups Displayed in Cluster — If
Equipped On
Off
Do Not Disturb List of Settings
NOTE:
Press “Do Not Disturb” to access the available settings. The following settings are: Auto Reply (Both, Text, Call), Auto Reply Message (Custom, Default),
and Custom Auto Reply Message (Create Message).9
20_DJD2_OM_EN_USC_t.book Page 489
Page 492 of 553
490MULTIMEDIA
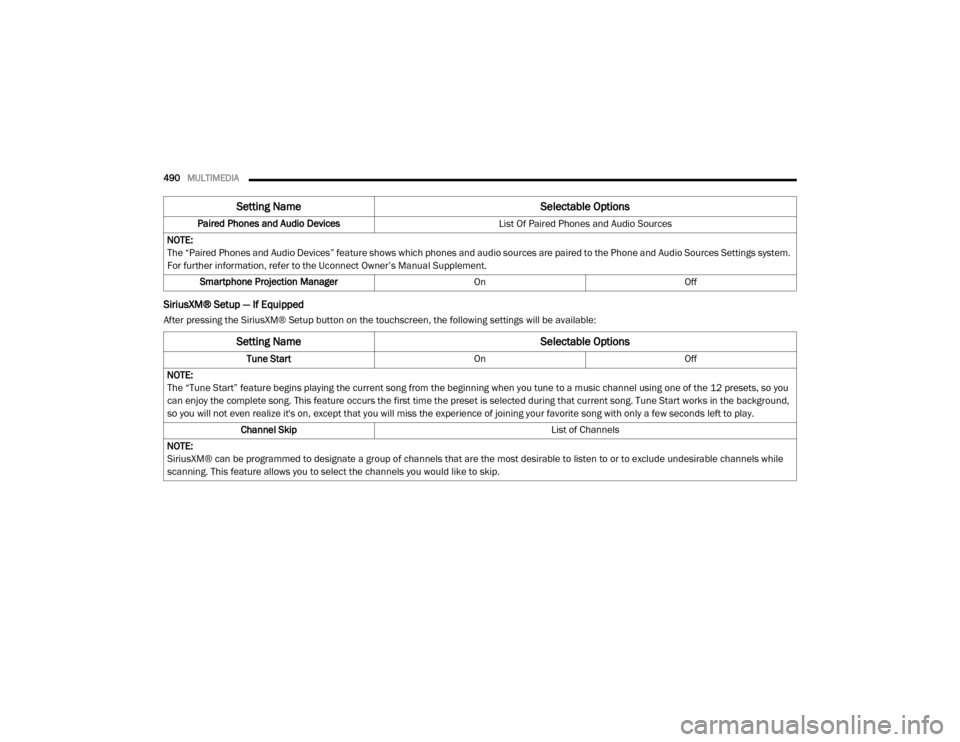
SiriusXM® Setup — If Equipped
After pressing the SiriusXM® Setup button on the touchscreen, the following settings will be available:Paired Phones and Audio Devices
List Of Paired Phones and Audio Sources
NOTE:
The “Paired Phones and Audio Devices” feature shows which phones and audio sources are paired to the Phone and Audio Sources Settings system.
For further information, refer to the Uconnect Owner’s Manual Supplement. Smartphone Projection Manager OnOff
Setting Name Selectable Options
Setting NameSelectable Options
Tune StartOnOff
NOTE:
The “Tune Start” feature begins playing the current song from the beginning when you tune to a music channel using one of the 12 presets, so you
can enjoy the complete song. This feature occurs the first time the preset is selected during that current song. Tune Start works in the background,
so you will not even realize it's on, except that you will miss the experience of joining your favorite song with only a few seconds left to play. Channel Skip List of Channels
NOTE:
SiriusXM® can be programmed to designate a group of channels that are the most desirable to listen to or to exclude undesirable channels while
scanning. This feature allows you to select the channels you would like to skip.
20_DJD2_OM_EN_USC_t.book Page 490
Page 493 of 553
MULTIMEDIA491
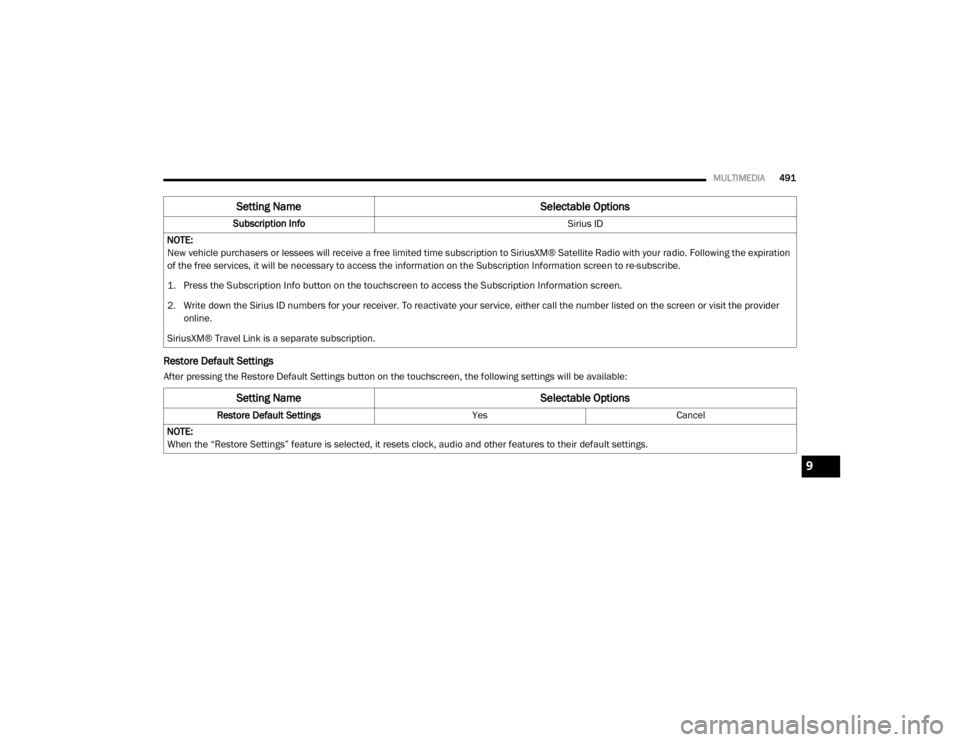
Restore Default Settings
After pressing the Restore Default Settings button on the touchscreen, the following settings will be available:Subscription Info
Sirius ID
NOTE:
New vehicle purchasers or lessees will receive a free limited time subscription to SiriusXM® Satellite Radio with your radio. Following the expiration
of the free services, it will be necessary to access the information on the Subscription Information screen to re-subscribe.
1. Press the Subscription Info button on the touchscreen to access the Subscription Information screen.
2. Write down the Sirius ID numbers for your receiver. To reactivate your service, either call the number listed on the screen or visit the provider online.
SiriusXM® Travel Link is a separate subscription.
Setting Name Selectable Options
Setting NameSelectable Options
Restore Default SettingsYesCancel
NOTE:
When the “Restore Settings” feature is selected, it resets clock, audio and other features to their default settings.
9
20_DJD2_OM_EN_USC_t.book Page 491