display Ram 3500 2020 Owner's Manual
[x] Cancel search | Manufacturer: RAM, Model Year: 2020, Model line: 3500, Model: Ram 3500 2020Pages: 568
Page 425 of 568

SERVICING AND MAINTENANCE423
Fluid Level Check — Six-Speed
Transmission
It is best to check the fluid level when the
transmission is at normal operating
temperature (158-176°F / 70-80°C). This
normally occurs after at least 15 miles (25 km)
of driving. At normal operating temperature the
fluid cannot be held comfortably between the
fingertips. You can read the transmission sump
temperature in the instrument cluster screen
refer to “Instrument Cluster Display” in “Getting
To Know Your Instrument Panel” for further
information.
Use the following procedure to check the
transmission fluid level properly:
1. Monitor the transmission temperature using the instrument cluster display, and
operate the vehicle as required to reach
the normal operating temperature. If the transmission is not functioning properly, or
the vehicle cannot be driven, see the NOTE
and CAUTION below about checking the
fluid level at colder temperatures.
2. Park the vehicle on level ground.
3. Run the engine at normal idle speed for at least 60 seconds, and leave the engine
running for the rest of this procedure.
4. Fully apply the parking brake, and press the brake pedal.
5. Place the gear selector momentarily into each gear position (allowing time for the
transmission to fully engage in each
position), ending with the transmission in
PARK.
6. Remove the dipstick, wipe it clean and reinsert it until seated.
7. Remove the dipstick again and note the fluid level on both sides. The fluid level
reading is only valid if there is a solid
coating of oil on both sides of the dipstick.
Note that the holes in the dipstick will be full
of fluid if the actual level is at or above the
hole. The fluid level should be between the
“HOT” (upper) reference holes on the dipstick at normal operating temperature. If
the fluid level is low, add fluid through the
dipstick tube to bring it to the proper level.
Do not overfill.
Use ONLY the specified fluid
refer to "Fluids And Lubricants" in
“Technical Specifications” for fluid specifi -
cations. After adding any quantity of oil
through the dipstick tube, wait a minimum
of two minutes for the oil to fully drain into
the transmission before rechecking the
fluid level.
NOTE:
If it is necessary to check the transmission
below the operating temperature, the fluid level
should be between the two “COLD” (lower)
holes on the dipstick with the fluid at 60-70°F /
16-21°C. Only use the COLD region of the
dipstick as a rough reference when setting the
fluid level after a transmission service or fluid
change. Re-check the fluid level, and adjust as
required, once the transmission reaches
normal operating temperature.
CAUTION!
If a transmission fluid leak occurs, visit an
authorized dealer immediately. Severe
transmission damage may occur. An
authorized dealer has the proper tools to
adjust the fluid level accurately.
7
20_DJD2_OM_EN_USC_t.book Page 423
Page 447 of 568
SERVICING AND MAINTENANCE445
(Continued)
increase tread life, help to maintain mud, snow
and wet traction levels and contribute to a
smooth, quiet ride.
Refer to the “Maintenance Plan” for the proper
maintenance intervals. More frequent rotation
is permissible if desired. The reasons for any
rapid or unusual wear should be corrected prior
to rotation being performed.
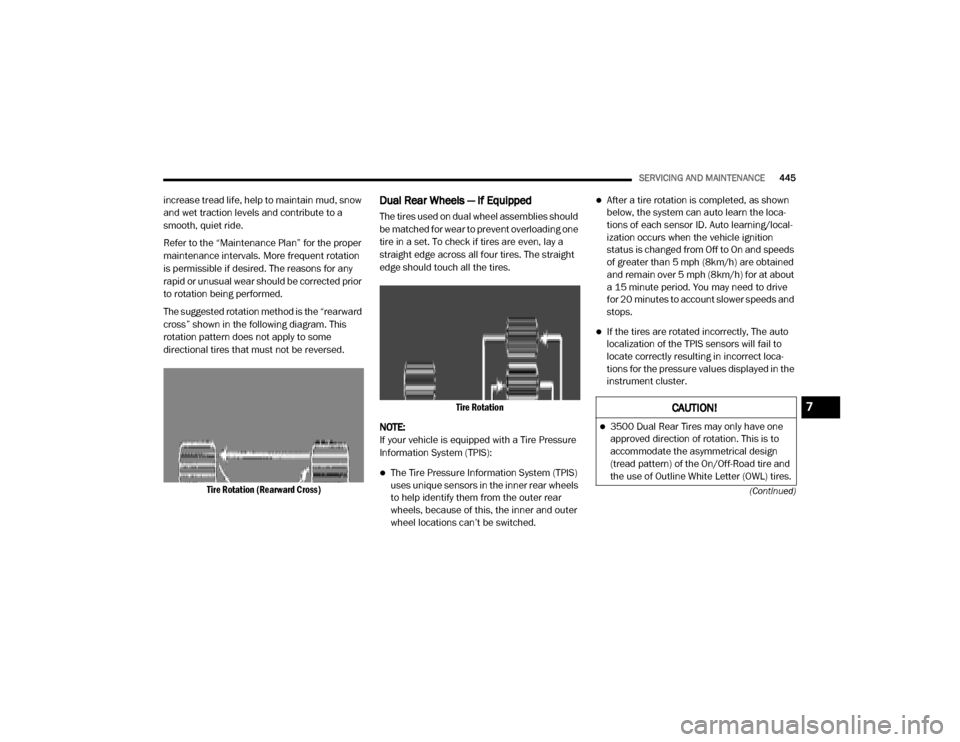
The suggested rotation method is the “rearward
cross” shown in the following diagram. This
rotation pattern does not apply to some
directional tires that must not be reversed.
Tire Rotation (Rearward Cross)
Dual Rear Wheels — If Equipped
The tires used on dual wheel assemblies should
be matched for wear to prevent overloading one
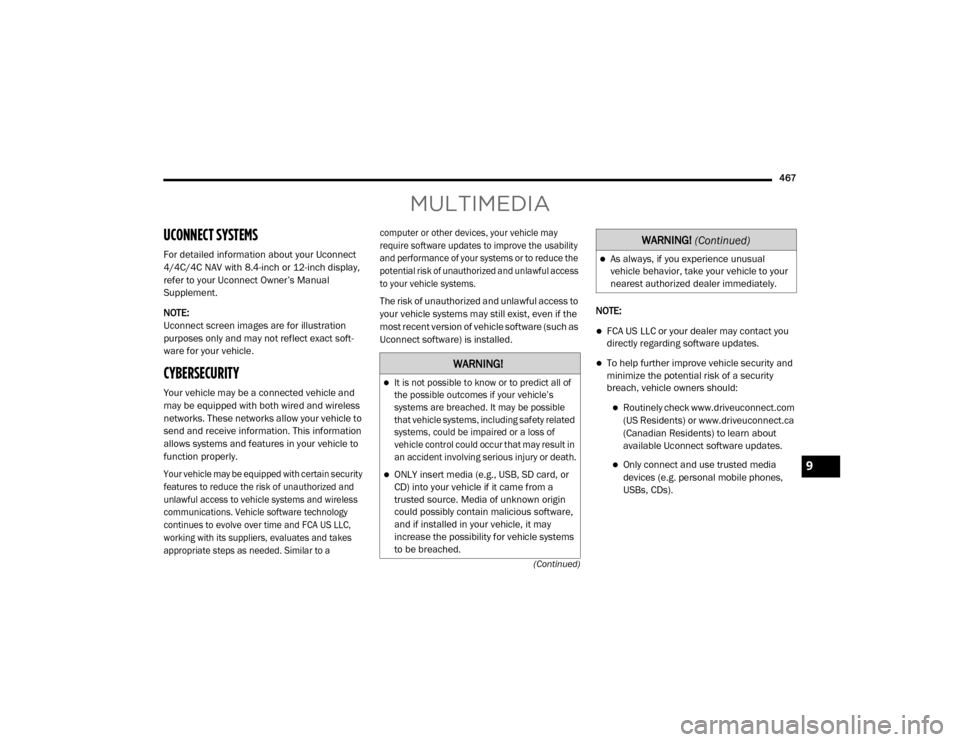
tire in a set. To check if tires are even, lay a
straight edge across all four tires. The straight
edge should touch all the tires.
Tire Rotation
NOTE:
If your vehicle is equipped with a Tire Pressure
Information System (TPIS):
The Tire Pressure Information System (TPIS)
uses unique sensors in the inner rear wheels
to help identify them from the outer rear
wheels, because of this, the inner and outer
wheel locations can’t be switched.
After a tire rotation is completed, as shown
below, the system can auto learn the loca -
tions of each sensor ID. Auto learning/local -
ization occurs when the vehicle ignition
status is changed from Off to On and speeds
of greater than 5 mph (8km/h) are obtained
and remain over 5 mph (8km/h) for at about
a 15 minute period. You may need to drive
for 20 minutes to account slower speeds and
stops.
If the tires are rotated incorrectly, The auto
localization of the TPIS sensors will fail to
locate correctly resulting in incorrect loca -
tions for the pressure values displayed in the
instrument cluster.
CAUTION!
3500 Dual Rear Tires may only have one
approved direction of rotation. This is to
accommodate the asymmetrical design
(tread pattern) of the On/Off-Road tire and
the use of Outline White Letter (OWL) tires.
7
20_DJD2_OM_EN_USC_t.book Page 445
Page 469 of 568
467
(Continued)
MULTIMEDIA
UCONNECT SYSTEMS
For detailed information about your Uconnect
4/4C/4C NAV with 8.4-inch or 12-inch display,
refer to your Uconnect Owner’s Manual
Supplement.
NOTE:
Uconnect screen images are for illustration
purposes only and may not reflect exact soft-
ware for your vehicle.
CYBERSECURITY
Your vehicle may be a connected vehicle and
may be equipped with both wired and wireless
networks. These networks allow your vehicle to
send and receive information. This information
allows systems and features in your vehicle to
function properly.
Your vehicle may be equipped with certain security
features to reduce the risk of unauthorized and
unlawful access to vehicle systems and wireless
communications. Vehicle software technology
continues to evolve over time and FCA US LLC,
working with its suppliers, evaluates and takes
appropriate steps as needed. Similar to a computer or other devices, your vehicle may
require software updates to improve the usability
and performance of your systems or to reduce the
potential risk of unauthorized and unlawful access
to your vehicle systems.
The risk of unauthorized and unlawful access to
your vehicle systems may still exist, even if the
most recent version of vehicle software (such as
Uconnect software) is installed.
NOTE:
FCA US LLC or your dealer may contact you
directly regarding software updates.
To help further improve vehicle security and
minimize the potential risk of a security
breach, vehicle owners should:
Routinely check www.driveuconnect.com
(US Residents) or www.driveuconnect.ca
(Canadian Residents) to learn about
available Uconnect software updates.
Only connect and use trusted media
devices (e.g. personal mobile phones,
USBs, CDs).
WARNING!
It is not possible to know or to predict all of
the possible outcomes if your vehicle’s
systems are breached. It may be possible
that vehicle systems, including safety related
systems, could be impaired or a loss of
vehicle control could occur that may result in
an accident involving serious injury or death.
ONLY insert media (e.g., USB, SD card, or
CD) into your vehicle if it came from a
trusted source. Media of unknown origin
could possibly contain malicious software,
and if installed in your vehicle, it may
increase the possibility for vehicle systems
to be breached.
As always, if you experience unusual
vehicle behavior, take your vehicle to your
nearest authorized dealer immediately.
WARNING!
(Continued)
9
20_DJD2_OM_EN_USC_t.book Page 467
Page 470 of 568
468MULTIMEDIA
Privacy of any wireless and wired
communications cannot be assured. Third
parties may unlawfully intercept information
and private communications without your
consent. For further information, refer to “Data
Collection & Privacy” in your Uconnect Owner’s
Manual Supplement or “Onboard Diagnostic
System (OBD II) Cybersecurity” in “Getting To
Know Your Instrument Panel”.
UCONNECT SETTINGS
The Uconnect system uses a combination of
buttons on the touchscreen and buttons on the
faceplate located on the center of the
instrument panel. These buttons allow you to
access and change the customer
programmable features. Many features can
vary by vehicle.
Buttons on the faceplate are located below
and/or beside the Uconnect system in the
center of the instrument panel. In addition,
there is a Scroll/Enter control knob located on
the right side. Turn the control knob to scroll
through menus and change settings. Push the
center of the control knob one or more times to
select or change a setting. Your Uconnect system may also have Screen
Off and Mute buttons on the faceplate.
Push the Screen Off button on the faceplate to
turn off the Uconnect screen. Push the button
again or tap the screen to turn the screen on.
Push the Back Arrow button to exit out of a
Menu or certain option on the Uconnect system.
UCONNECT 3 SETTINGS
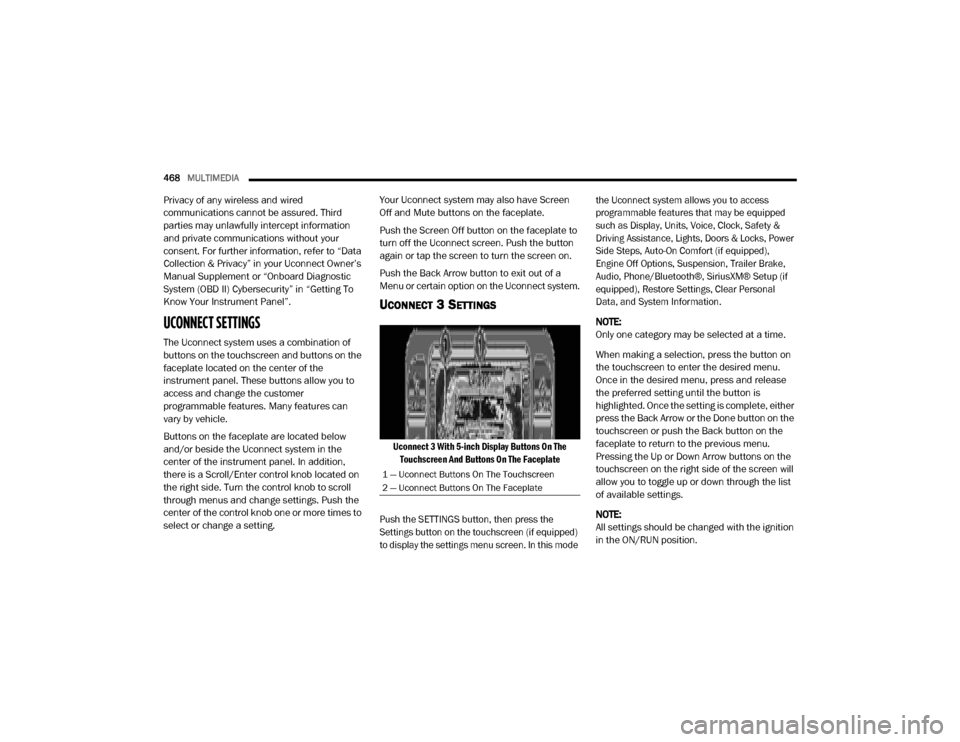
Uconnect 3 With 5-inch Display Buttons On The
Touchscreen And Buttons On The Faceplate
Push the SETTINGS button, then press the
Settings button on the touchscreen (if equipped)
to display the settings menu screen. In this mode the Uconnect system allows you to access
programmable features that may be equipped
such as Display, Units, Voice, Clock, Safety &
Driving Assistance, Lights, Doors & Locks, Power
Side Steps, Auto-On Comfort (if equipped),
Engine Off Options, Suspension, Trailer Brake,
Audio, Phone/Bluetooth®, SiriusXM® Setup (if
equipped), Restore Settings, Clear Personal
Data, and System Information.
NOTE:
Only one category may be selected at a time.
When making a selection, press the button on
the touchscreen to enter the desired menu.
Once in the desired menu, press and release
the preferred setting until the button is
highlighted. Once the setting is complete, either
press the Back Arrow or the Done button on the
touchscreen or push the Back button on the
faceplate to return to the previous menu.
Pressing the Up or Down Arrow buttons on the
touchscreen on the right side of the screen will
allow you to toggle up or down through the list
of available settings.
NOTE:
All settings should be changed with the ignition
in the ON/RUN position.
1 — Uconnect Buttons On The Touchscreen
2 — Uconnect Buttons On The Faceplate
20_DJD2_OM_EN_USC_t.book Page 468
Page 471 of 568
MULTIMEDIA469
Language
After pressing the Language button on the touchscreen, the following setting will be available:
Display
After pressing the Display button on the touchscreen, the following settings will be available.
Setting Name Selectable Options
Set LanguageEnglishFrançais Español
NOTE:
When the “Set Language” feature is selected, you may select one of multiple languages (English / Français / Español) for all display nomenclature,
including the trip functions and the navigation system (if equipped). Press the Set Language button on the touchscreen, then press the desired
language button on the touchscreen until a check mark appears next to the language, showing that setting has been selected.
Setting Name Selectable Options
Display ModeAutoManual
Touchscreen Beep OnOff
Phone Pop-Up OnOff
Fuel Saver Display OnOff
NOTE:
The “Fuel Saver Display” feature will allow you to enable fuel saver mode and will be displayed in the instrument cluster display.
9
20_DJD2_OM_EN_USC_t.book Page 469
Page 474 of 568

472MULTIMEDIA
Tilt Side Mirrors In Reverse —
If Equipped On
Off
NOTE:
When the “Tilt Side Mirrors In Reverse” feature is selected, the exterior side-view mirrors tilt downward when the ignition is in the ON/RUN position
and the transmission gear selector is in the REVERSE position. The mirrors move back to their previous position when the transmission is shifted out
of REVERSE. Surround View Camera — If Equipped On
Off
NOTE:
The “Surround View Camera” feature displays a complete 360 degree view of the vehicle's exterior environment while backing up. Surround View Camera Delay — If Equipped On
Off
NOTE:
The “Surround View Camera Delay” setting determines whether or not the screen will display the 360 degree view image with guidelines for up to
10 seconds after the vehicle is shifted out of REVERSE. This delay will be canceled if the vehicle’s speed exceeds 8 mph (13 km/h), the transmission
is shifted into PARK, or the ignition is switched to the OFF position.
Surround View Camera Guidelines — If Equipped On
Off
NOTE:
The “Surround View Camera Guidelines” feature allows you to see active guidelines over the Surround View camera display whenever the gear
selector is put into REVERSE or the Surround View button on the touchscreen is pressed. The image will be displayed on the radio touchscreen display.
Setting Name Selectable Options
20_DJD2_OM_EN_USC_t.book Page 472
Page 475 of 568
MULTIMEDIA473
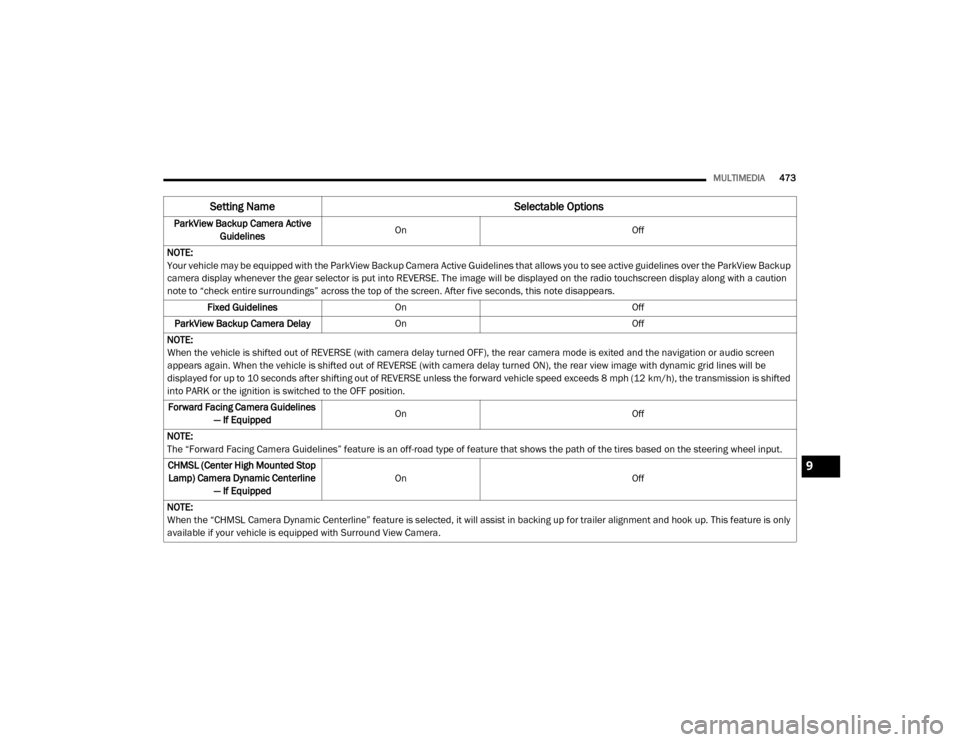
ParkView Backup Camera Active
Guidelines On
Off
NOTE:
Your vehicle may be equipped with the ParkView Backup Camera Active Guidelines that allows you to see active guidelines over the ParkView Backup
camera display whenever the gear selector is put into REVERSE. The image will be displayed on the radio touchscreen display along with a caution
note to “check entire surroundings” across the top of the screen. After five seconds, this note disappears. Fixed Guidelines On Off
ParkView Backup Camera Delay On Off
NOTE:
When the vehicle is shifted out of REVERSE (with camera delay turned OFF), the rear camera mode is exited and the navigation or audio screen
appears again. When the vehicle is shifted out of REVERSE (with camera delay turned ON), the rear view image with dynamic grid lines will be
displayed for up to 10 seconds after shifting out of REVERSE unless the forward vehicle speed exceeds 8 mph (12 km/h), the transmission is shifted
into PARK or the ignition is switched to the OFF position. Forward Facing Camera Guidelines — If Equipped On
Off
NOTE:
The “Forward Facing Camera Guidelines” feature is an off-road type of feature that shows the path of the tires based on the steering wheel input. CHMSL (Center High Mounted Stop Lamp) Camera Dynamic Centerline — If Equipped On
Off
NOTE:
When the “CHMSL Camera Dynamic Centerline” feature is selected, it will assist in backing up for trailer alignment and hook up. This feature is only
available if your vehicle is equipped with Surround View Camera.
Setting Name Selectable Options
9
20_DJD2_OM_EN_USC_t.book Page 473
Page 481 of 568
MULTIMEDIA479
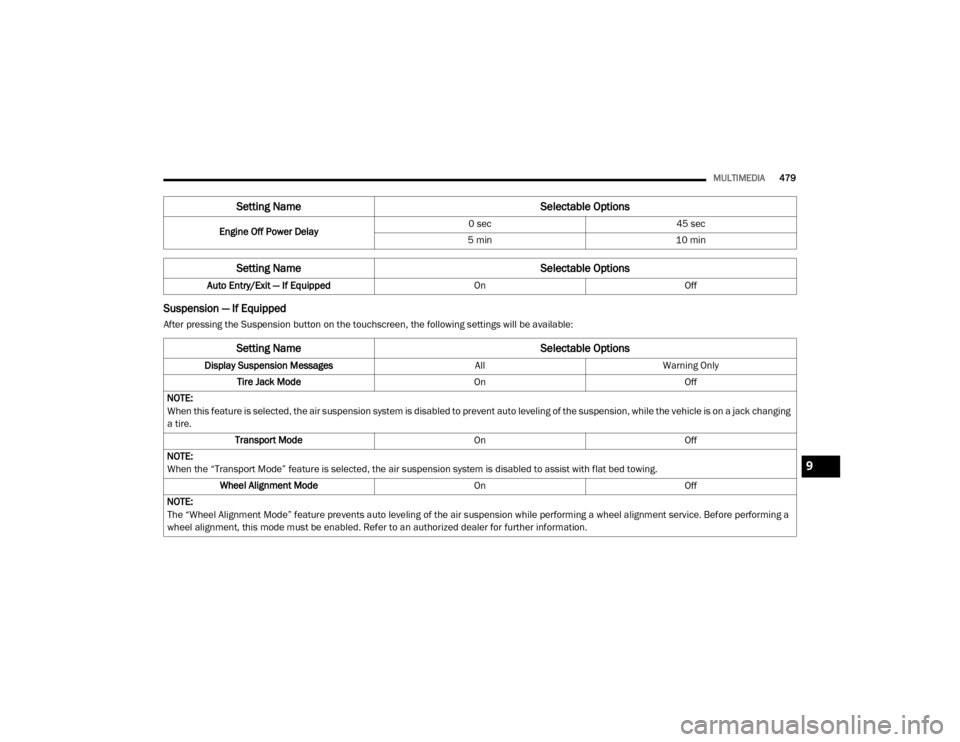
Suspension — If Equipped
After pressing the Suspension button on the touchscreen, the following settings will be available:Engine Off Power Delay
0 sec
45 sec
5 min 10 min
Setting Name Selectable Options
Auto Entry/Exit — If EquippedOnOff
Setting Name Selectable Options
Setting NameSelectable Options
Display Suspension MessagesAllWarning Only
Tire Jack Mode OnOff
NOTE:
When this feature is selected, the air suspension system is disabled to prevent auto leveling of the suspension, while the vehicle is on a jack changing
a tire. Transport Mode OnOff
NOTE:
When the “Transport Mode” feature is selected, the air suspension system is disabled to assist with flat bed towing. Wheel Alignment Mode OnOff
NOTE:
The “Wheel Alignment Mode” feature prevents auto leveling of the air suspension while performing a wheel alignment service. Before performing a
wheel alignment, this mode must be enabled. Refer to an authorized dealer for further information.
9
20_DJD2_OM_EN_USC_t.book Page 479
Page 482 of 568

480MULTIMEDIA
Trailer Brake — If Equipped
After pressing the Trailer Brake button on the touchscreen, the following settings will be available:
Audio
After pressing the Audio button on the touchscreen, the following settings will be available:
Setting Name Selectable Options
Trailer SelectTrailer 1Trailer 2Trailer 3Trailer 4
Trailer Brake Type Light ElectricHeavy Electric Light EOHHeavy EOH
Trailer Name List of Trailer Names Available
NOTE:
You can select and personalize your trailer name depending on the type of trailer you are hauling. Select the trailer name from the following list: trailer,
boat, car, cargo, dump, equipment, flatbed, gooseneck, horse, livestock, motorcycle, snowmobile, travel, utility, and 5th wheel.
Setting Name Selectable Options
Balance/FadeFrontBack LeftRight
NOTE:
The “Balance/Fade” feature allows you to adjust the Balance and Fade settings. Press and drag the Speaker icon or use the arrows to adjust, tap the
C icon to readjust to the center. Equalizer + –
NOTE:
When in the “Equalizer” display you may adjust the Bass, Mid and Treble settings. Speed Adjusted Volume Off123
NOTE:
The “Speed Adjusted Volume” feature increases or decreases volume relative to vehicle speed.
20_DJD2_OM_EN_USC_t.book Page 480
Page 483 of 568
MULTIMEDIA481
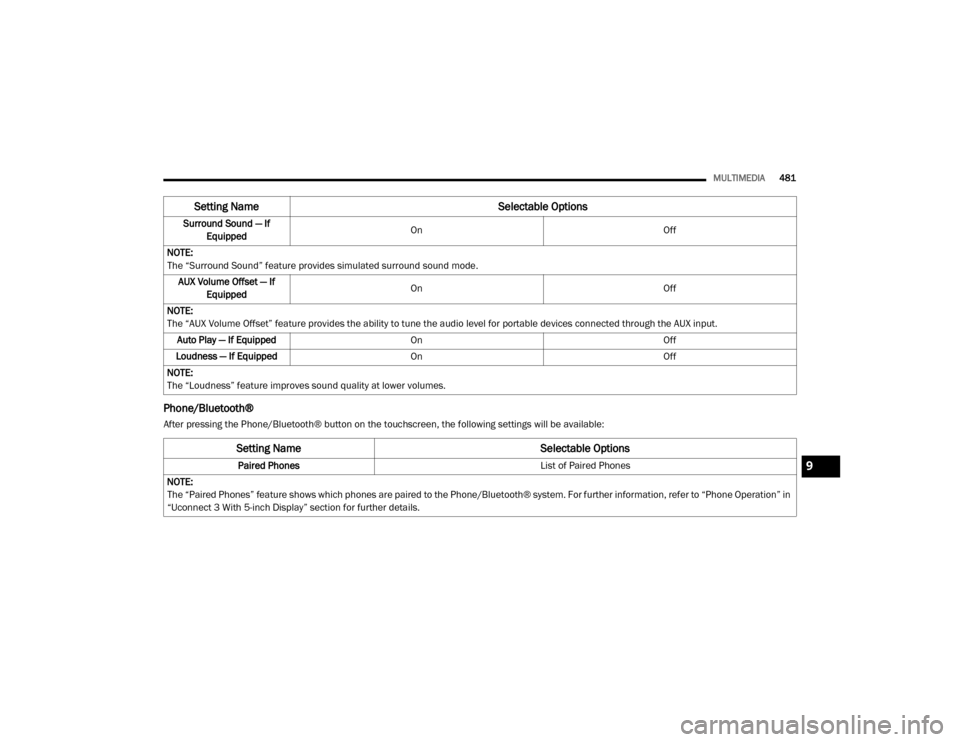
Phone/Bluetooth®
After pressing the Phone/Bluetooth® button on the touchscreen, the following settings will be available:Surround Sound — If
Equipped On
Off
NOTE:
The “Surround Sound” feature provides simulated surround sound mode. AUX Volume Offset — If Equipped On
Off
NOTE:
The “AUX Volume Offset” feature provides the ability to tune the audio level for portable devices connected through the AUX input. Auto Play — If Equipped On Off
Loudness — If Equipped On Off
NOTE:
The “Loudness” feature improves sound quality at lower volumes.
Setting Name Selectable Options
Setting NameSelectable Options
Paired Phones List of Paired Phones
NOTE:
The “Paired Phones” feature shows which phones are paired to the Phone/Bluetooth® system. For further information, refer to “Phone Operation” in
“Uconnect 3 With 5-inch Display” section for further details.9
20_DJD2_OM_EN_USC_t.book Page 481