display Ram 3500 2020 Owner's Manual
[x] Cancel search | Manufacturer: RAM, Model Year: 2020, Model line: 3500, Model: Ram 3500 2020Pages: 568
Page 506 of 568
504MULTIMEDIA
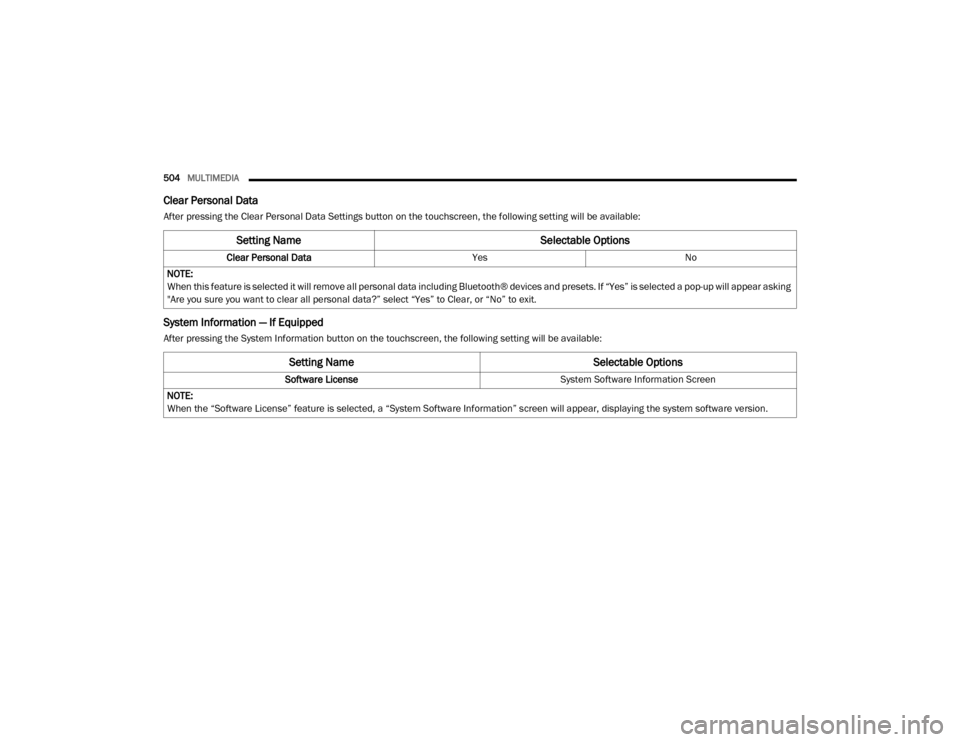
Clear Personal Data
After pressing the Clear Personal Data Settings button on the touchscreen, the following setting will be available:
System Information — If Equipped
After pressing the System Information button on the touchscreen, the following setting will be available:
Setting Name Selectable Options
Clear Personal DataYesNo
NOTE:
When this feature is selected it will remove all personal data including Bluetooth® devices and presets. If “Yes” is selected a pop-up will appear asking
"Are you sure you want to clear all personal data?” select “Yes” to Clear, or “No” to exit.
Setting Name Selectable Options
Software License System Software Information Screen
NOTE:
When the “Software License” feature is selected, a “System Software Information” screen will appear, displaying the system software version.
20_DJD2_OM_EN_USC_t.book Page 504
Page 507 of 568
MULTIMEDIA505
UCONNECT 4C NAV WITH 12-INCH
D
ISPLAY SETTINGS
Uconnect 4C NAV With 12-inch Display Buttons On The
Touchscreen And Buttons On The Faceplate
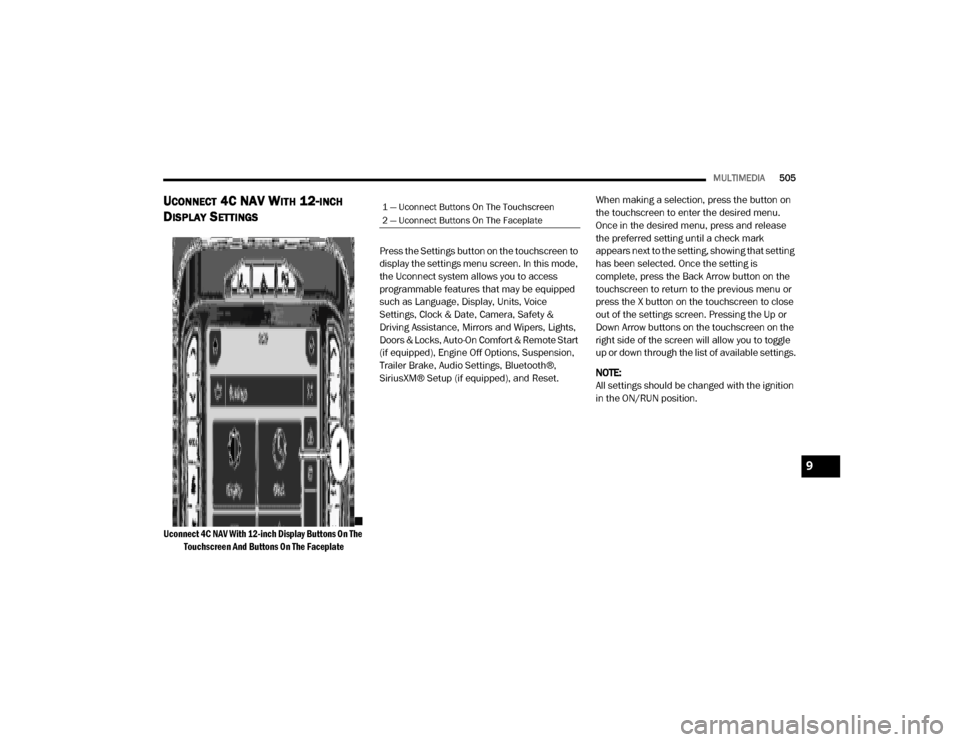
Press the Settings button on the touchscreen to
display the settings menu screen. In this mode,
the Uconnect system allows you to access
programmable features that may be equipped
such as Language, Display, Units, Voice
Settings, Clock & Date, Camera, Safety &
Driving Assistance, Mirrors and Wipers, Lights,
Doors & Locks, Auto-On Comfort & Remote Start
(if equipped), Engine Off Options, Suspension,
Trailer Brake, Audio Settings, Bluetooth®,
SiriusXM® Setup (if equipped), and Reset.
When making a selection, press the button on
the touchscreen to enter the desired menu.
Once in the desired menu, press and release
the preferred setting until a check mark
appears next to the setting, showing that setting
has been selected. Once the setting is
complete, press the Back Arrow button on the
touchscreen to return to the previous menu or
press the X button on the touchscreen to close
out of the settings screen. Pressing the Up or
Down Arrow buttons on the touchscreen on the
right side of the screen will allow you to toggle
up or down through the list of available settings.
NOTE:
All settings should be changed with the ignition
in the ON/RUN position.
1 — Uconnect Buttons On The Touchscreen
2 — Uconnect Buttons On The Faceplate
9
20_DJD2_OM_EN_USC_t.book Page 505
Page 508 of 568
506MULTIMEDIA
Language
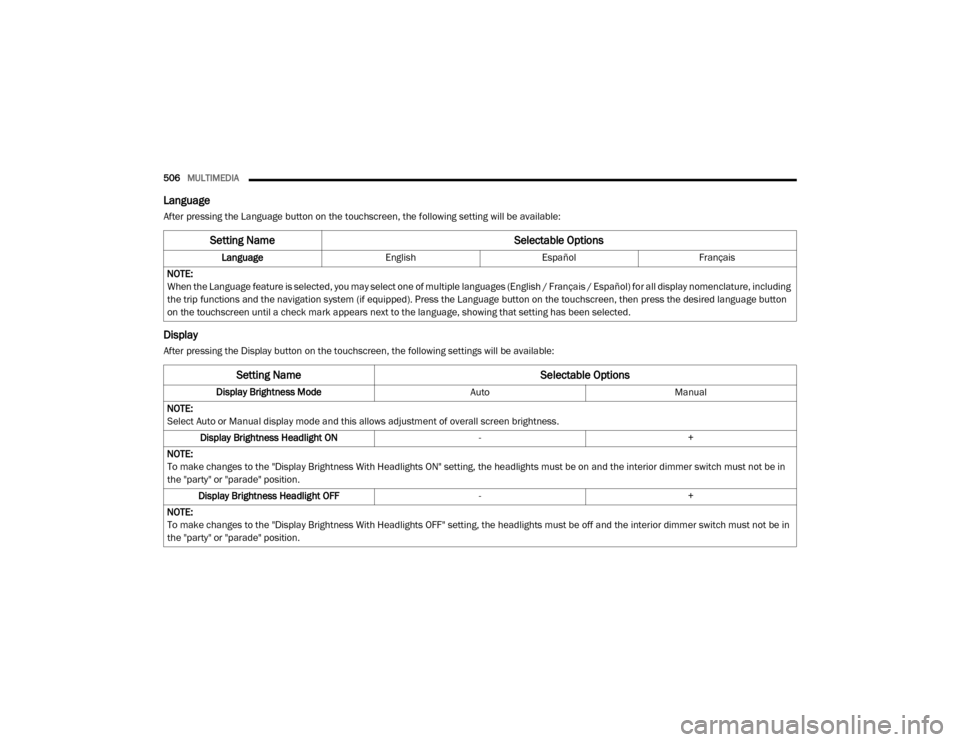
After pressing the Language button on the touchscreen, the following setting will be available:
Display
After pressing the Display button on the touchscreen, the following settings will be available:
Setting Name Selectable Options
LanguageEnglishEspañol Français
NOTE:
When the Language feature is selected, you may select one of multiple languages (English / Français / Español) for all display nomenclature, including
the trip functions and the navigation system (if equipped). Press the Language button on the touchscreen, then press the desired language button
on the touchscreen until a check mark appears next to the language, showing that setting has been selected.
Setting Name Selectable Options
Display Brightness ModeAutoManual
NOTE:
Select Auto or Manual display mode and this allows adjustment of overall screen brightness. Display Brightness Headlight ON -+
NOTE:
To make changes to the "Display Brightness With Headlights ON" setting, the headlights must be on and the interior dimmer switch must not be in
the "party" or "parade" position. Display Brightness Headlight OFF -+
NOTE:
To make changes to the "Display Brightness With Headlights OFF" setting, the headlights must be off and the interior dimmer switch must not be in
the "party" or "parade" position.
20_DJD2_OM_EN_USC_t.book Page 506
Page 509 of 568
MULTIMEDIA507
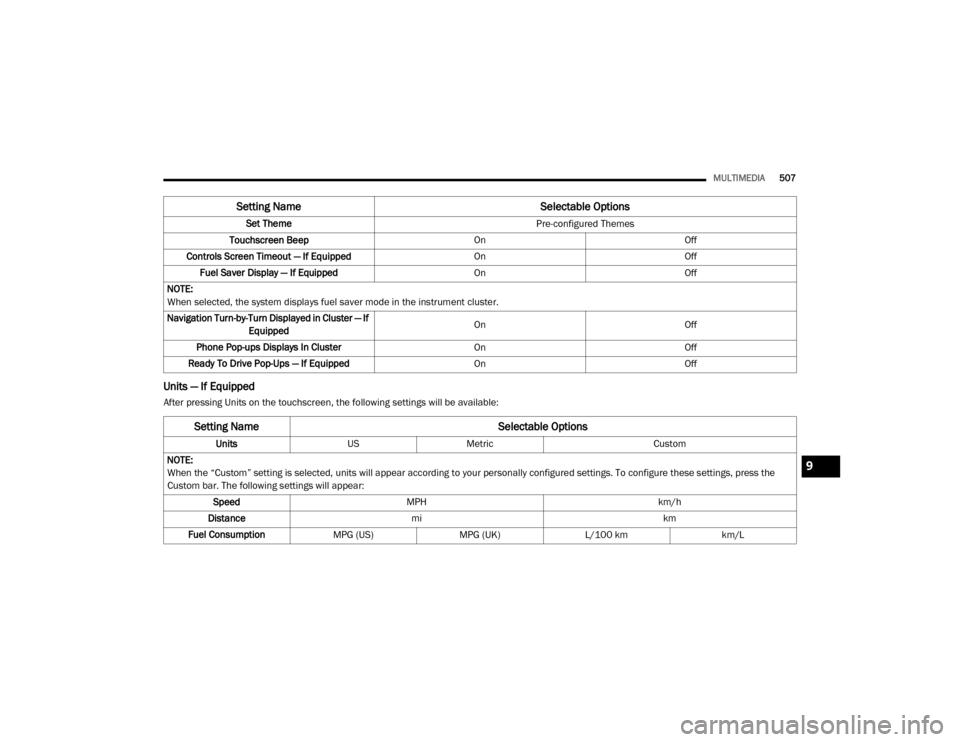
Units — If Equipped
After pressing Units on the touchscreen, the following settings will be available: Set Theme
Pre-configured Themes
Touchscreen Beep OnOff
Controls Screen Timeout — If Equipped OnOff
Fuel Saver Display — If Equipped OnOff
NOTE:
When selected, the system displays fuel saver mode in the instrument cluster.
Navigation Turn-by-Turn Displayed in Cluster — If Equipped On
Off
Phone Pop-ups Displays In Cluster OnOff
Ready To Drive Pop-Ups — If Equipped OnOff
Setting Name Selectable Options
Setting NameSelectable Options
UnitsUSMetric Custom
NOTE:
When the “Custom” setting is selected, units will appear according to your personally configured settings. To configure these settings, press the
Custom bar. The following settings will appear: Speed MPH km/h
Distance mi km
Fuel Consumption MPG (US)MPG (UK)L/100 km km/L
9
20_DJD2_OM_EN_USC_t.book Page 507
Page 511 of 568
MULTIMEDIA509
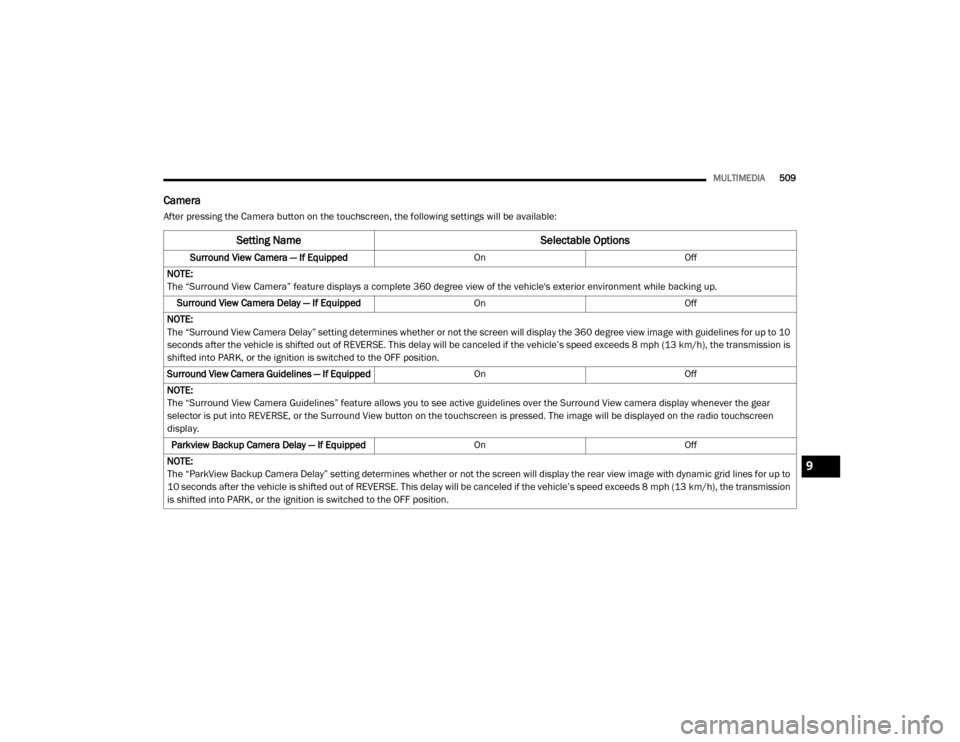
Camera
After pressing the Camera button on the touchscreen, the following settings will be available:
Setting Name Selectable Options
Surround View Camera — If Equipped OnOff
NOTE:
The “Surround View Camera” feature displays a complete 360 degree view of the vehicle's exterior environment while backing up. Surround View Camera Delay — If Equipped OnOff
NOTE:
The “Surround View Camera Delay” setting determines whether or not the screen will display the 360 degree view image with guidelines for up to 10
seconds after the vehicle is shifted out of REVERSE. This delay will be canceled if the vehicle’s speed exceeds 8 mph (13 km/h), the transmission is
shifted into PARK, or the ignition is switched to the OFF position.
Surround View Camera Guidelines — If Equipped OnOff
NOTE:
The “Surround View Camera Guidelines” feature allows you to see active guidelines over the Surround View camera display whenever the gear
selector is put into REVERSE, or the Surround View button on the touchscreen is pressed. The image will be displayed on the radio touchscreen
display. Parkview Backup Camera Delay — If Equipped On Off
NOTE:
The “ParkView Backup Camera Delay” setting determines whether or not the screen will display the rear view image with dynamic grid lines for up to
10 seconds after the vehicle is shifted out of REVERSE. This delay will be canceled if the vehicle’s speed exceeds 8 mph (13 km/h), the transmission
is shifted into PARK, or the ignition is switched to the OFF position.
9
20_DJD2_OM_EN_USC_t.book Page 509
Page 512 of 568
510MULTIMEDIA
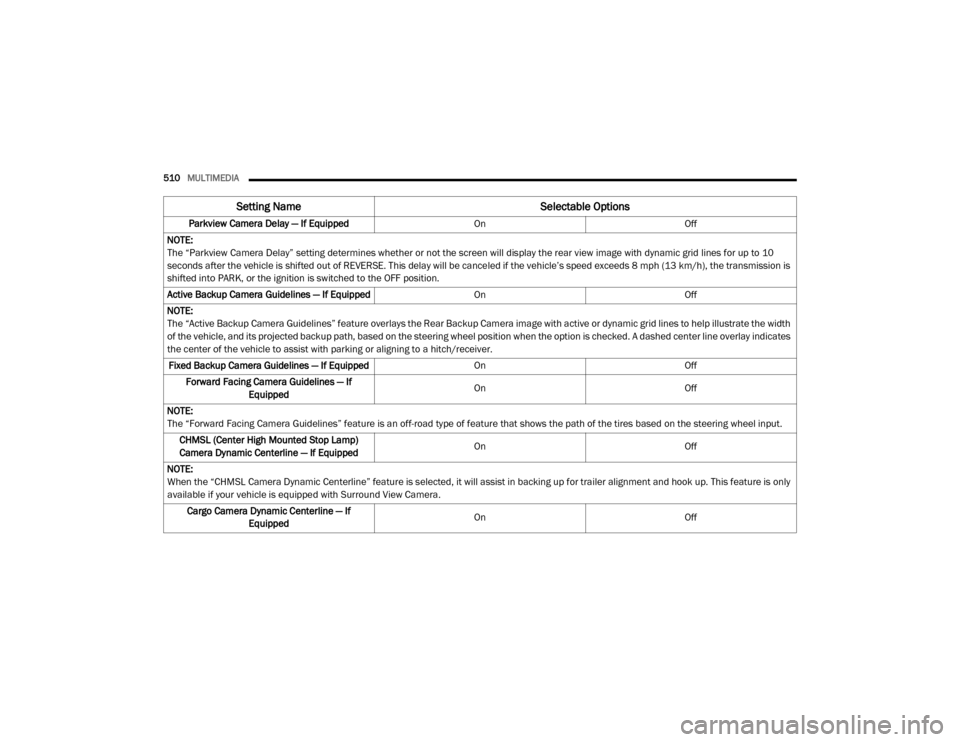
Parkview Camera Delay — If Equipped OnOff
NOTE:
The “Parkview Camera Delay” setting determines whether or not the screen will display the rear view image with dynamic grid lines for up to 10
seconds after the vehicle is shifted out of REVERSE. This delay will be canceled if the vehicle’s speed exceeds 8 mph (13 km/h), the transmission is
shifted into PARK, or the ignition is switched to the OFF position. Active Backup Camera Guidelines — If Equipped OnOff
NOTE:
The “Active Backup Camera Guidelines” feature overlays the Rear Backup Camera image with active or dynamic grid lines to help illustrate the width
of the vehicle, and its projected backup path, based on the steering wheel position when the option is checked. A dashed center line overlay indicates
the center of the vehicle to assist with parking or aligning to a hitch/receiver. Fixed Backup Camera Guidelines — If Equipped OnOff
Forward Facing Camera Guidelines — If Equipped On
Off
NOTE:
The “Forward Facing Camera Guidelines” feature is an off-road type of feature that shows the path of the tires based on the steering wheel input. CHMSL (Center High Mounted Stop Lamp)
Camera Dynamic Centerline — If Equipped On
Off
NOTE:
When the “CHMSL Camera Dynamic Centerline” feature is selected, it will assist in backing up for trailer alignment and hook up. This feature is only
available if your vehicle is equipped with Surround View Camera. Cargo Camera Dynamic Centerline — If Equipped On
Off
Setting Name Selectable Options
20_DJD2_OM_EN_USC_t.book Page 510
Page 519 of 568
MULTIMEDIA517
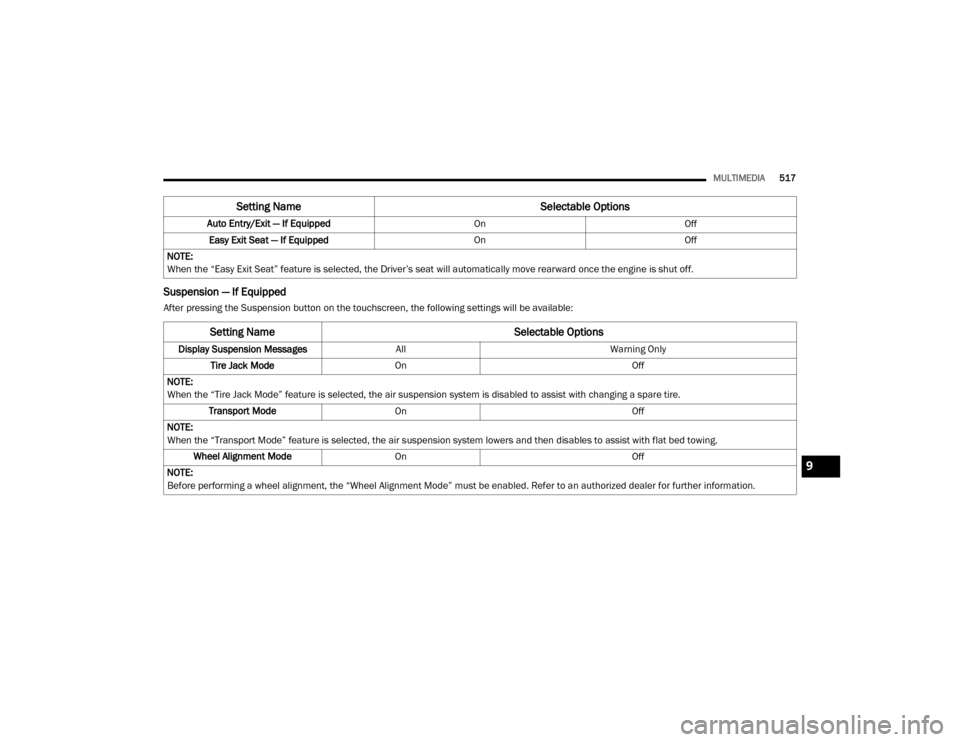
Suspension — If Equipped
After pressing the Suspension button on the touchscreen, the following settings will be available:
Setting Name Selectable Options
Auto Entry/Exit — If EquippedOnOff
Easy Exit Seat — If Equipped OnOff
NOTE:
When the “Easy Exit Seat” feature is selected, the Driver’s seat will automatically move rearward once the engine is shut off.
Setting Name Selectable Options
Display Suspension MessagesAllWarning Only
Tire Jack Mode On Off
NOTE:
When the “Tire Jack Mode” feature is selected, the air suspension system is disabled to assist with changing a spare tire. Transport Mode On Off
NOTE:
When the “Transport Mode” feature is selected, the air suspension system lowers and then disables to assist with flat bed towing. Wheel Alignment Mode On Off
NOTE:
Before performing a wheel alignment, the “Wheel Alignment Mode” must be enabled. Refer to an authorized dealer for further information.
9
20_DJD2_OM_EN_USC_t.book Page 517
Page 521 of 568
MULTIMEDIA519
NOTE:
For further information about Trailer Tire Pressure Monitoring, refer to ”Auxiliary Driving Systems” in “Safety.”
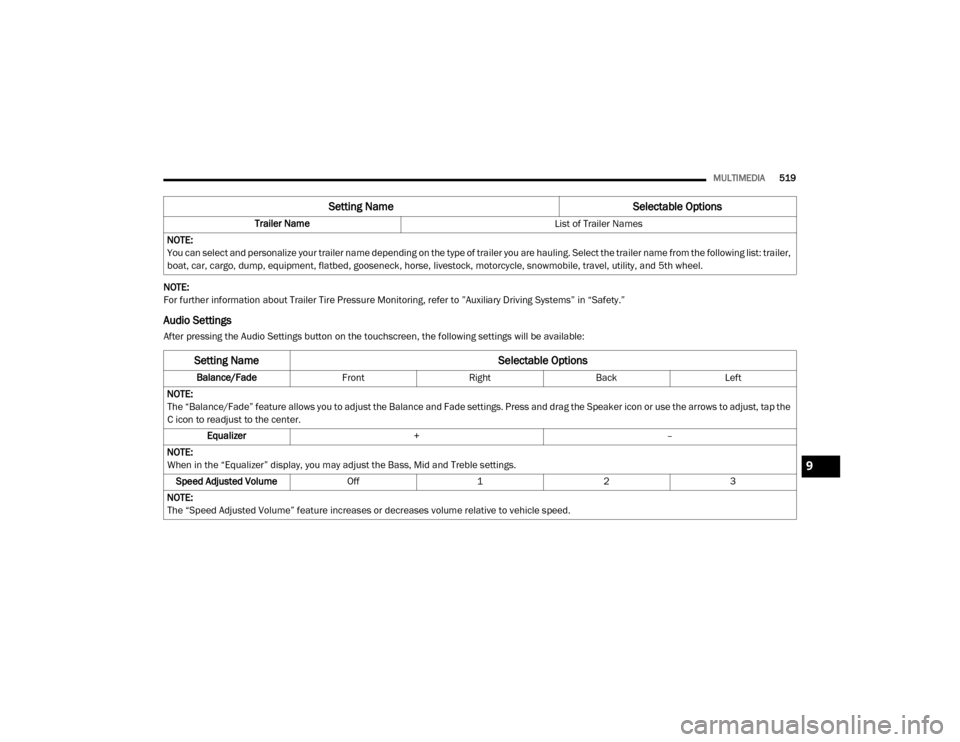
Audio Settings
After pressing the Audio Settings button on the touchscreen, the following settings will be available: Trailer Name
List of Trailer Names
NOTE:
You can select and personalize your trailer name depending on the type of trailer you are hauling. Select the trailer name from the following list: trailer,
boat, car, cargo, dump, equipment, flatbed, gooseneck, horse, livestock, motorcycle, snowmobile, travel, utility, and 5th wheel.
Setting Name Selectable Options
Setting NameSelectable Options
Balance/FadeFrontRight Back Left
NOTE:
The “Balance/Fade” feature allows you to adjust the Balance and Fade settings. Press and drag the Speaker icon or use the arrows to adjust, tap the
C icon to readjust to the center. Equalizer + –
NOTE:
When in the “Equalizer” display, you may adjust the Bass, Mid and Treble settings. Speed Adjusted Volume Off123
NOTE:
The “Speed Adjusted Volume” feature increases or decreases volume relative to vehicle speed.
9
20_DJD2_OM_EN_USC_t.book Page 519
Page 522 of 568
520MULTIMEDIA
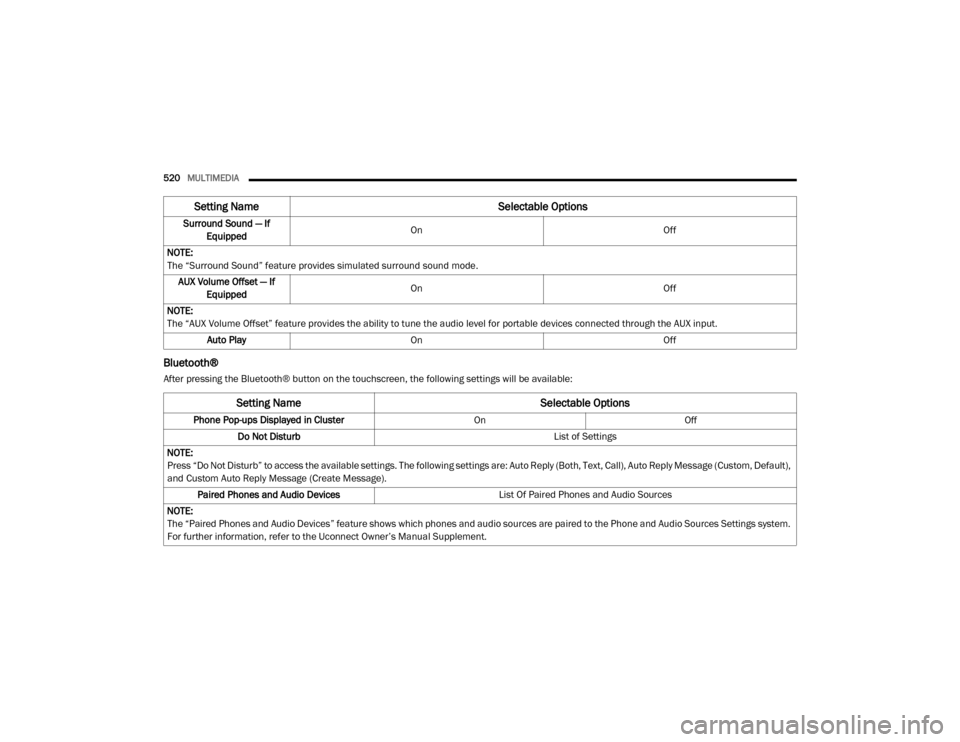
Bluetooth®
After pressing the Bluetooth® button on the touchscreen, the following settings will be available:Surround Sound — If
Equipped On
Off
NOTE:
The “Surround Sound” feature provides simulated surround sound mode. AUX Volume Offset — If Equipped On
Off
NOTE:
The “AUX Volume Offset” feature provides the ability to tune the audio level for portable devices connected through the AUX input. Auto Play On Off
Setting Name Selectable Options
Setting NameSelectable Options
Phone Pop-ups Displayed in Cluster OnOff
Do Not Disturb List of Settings
NOTE:
Press “Do Not Disturb” to access the available settings. The following settings are: Auto Reply (Both, Text, Call), Auto Reply Message (Custom, Default),
and Custom Auto Reply Message (Create Message). Paired Phones and Audio Devices List Of Paired Phones and Audio Sources
NOTE:
The “Paired Phones and Audio Devices” feature shows which phones and audio sources are paired to the Phone and Audio Sources Settings system.
For further information, refer to the Uconnect Owner’s Manual Supplement.
20_DJD2_OM_EN_USC_t.book Page 520
Page 523 of 568
MULTIMEDIA521
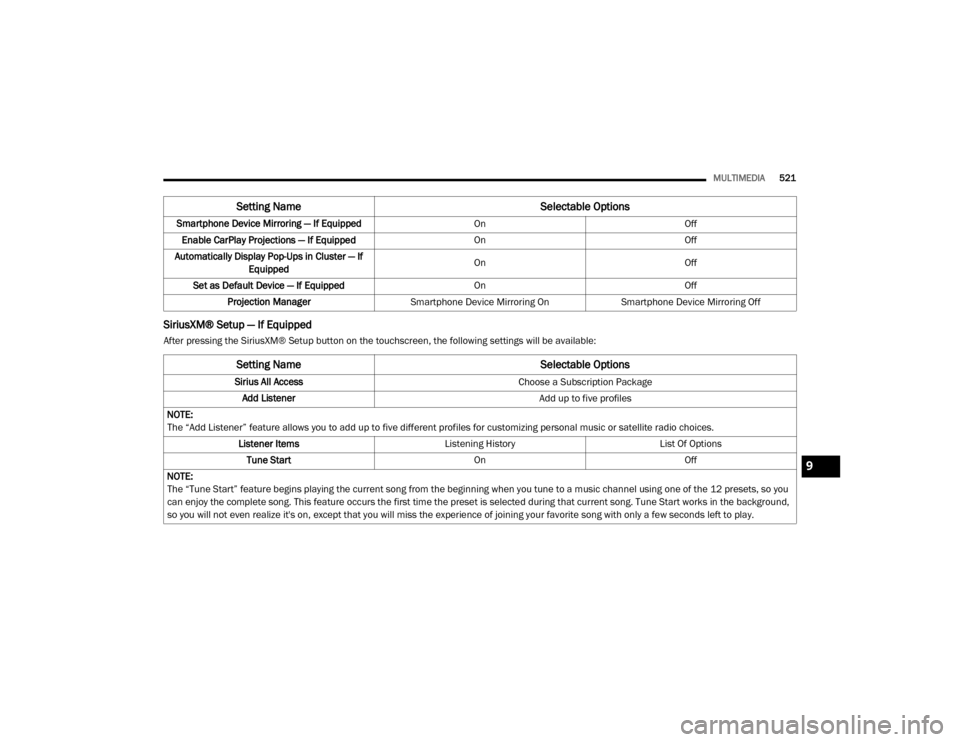
SiriusXM® Setup — If Equipped
After pressing the SiriusXM® Setup button on the touchscreen, the following settings will be available:Smartphone Device Mirroring — If Equipped
OnOff
Enable CarPlay Projections — If Equipped OnOff
Automatically Display Pop-Ups in Cluster — If Equipped On
Off
Set as Default Device — If Equipped OnOff
Projection Manager Smartphone Device Mirroring On Smartphone Device Mirroring Off
Setting Name Selectable Options
Setting NameSelectable Options
Sirius All Access Choose a Subscription Package
Add Listener Add up to five profiles
NOTE:
The “Add Listener” feature allows you to add up to five different profiles for customizing personal music or satellite radio choices. Listener Items Listening History List Of Options
Tune Start OnOff
NOTE:
The “Tune Start” feature begins playing the current song from the beginning when you tune to a music channel using one of the 12 presets, so you
can enjoy the complete song. This feature occurs the first time the preset is selected during that current song. Tune Start works in the background,
so you will not even realize it's on, except that you will miss the experience of joining your favorite song with only a few seconds left to play.
9
20_DJD2_OM_EN_USC_t.book Page 521