torque Ram 3500 2020 Owner's Guide
[x] Cancel search | Manufacturer: RAM, Model Year: 2020, Model line: 3500, Model: Ram 3500 2020Pages: 568
Page 361 of 568

IN CASE OF EMERGENCY359
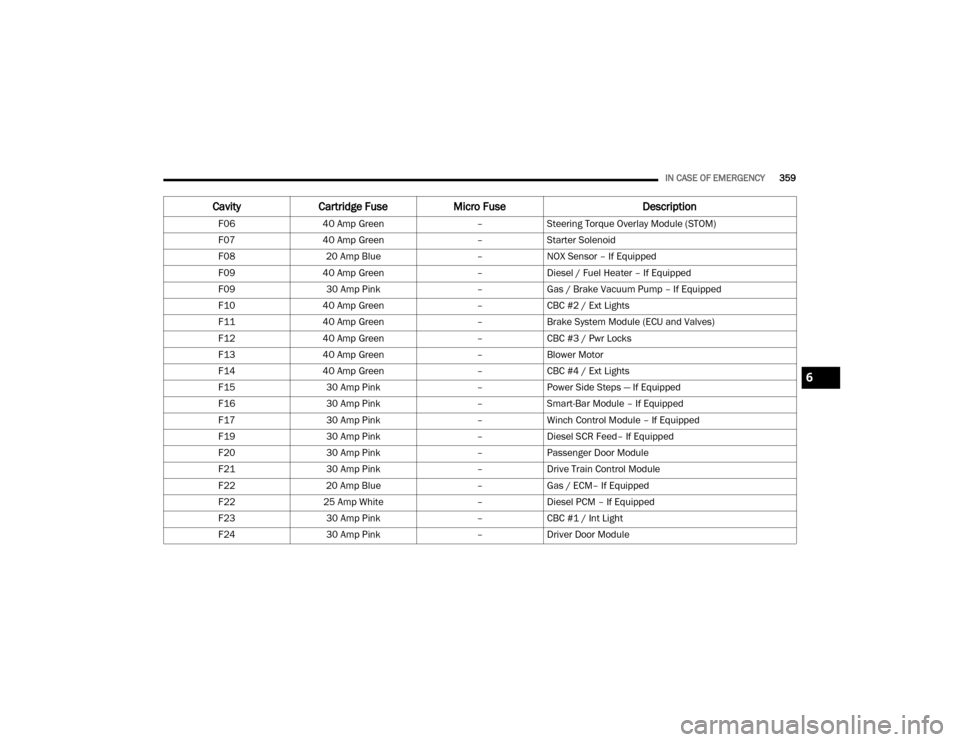
F0640 Amp Green –Steering Torque Overlay Module (STOM)
F07 40 Amp Green –Starter Solenoid
F08 20 Amp Blue –NOX Sensor – If Equipped
F09 40 Amp Green –Diesel / Fuel Heater – If Equipped
F09 30 Amp Pink –Gas / Brake Vacuum Pump – If Equipped
F10 40 Amp Green –CBC #2 / Ext Lights
F11 40 Amp Green –Brake System Module (ECU and Valves)
F12 40 Amp Green –CBC #3 / Pwr Locks
F13 40 Amp Green –Blower Motor
F14 40 Amp Green –CBC #4 / Ext Lights
F15 30 Amp Pink –Power Side Steps — If Equipped
F16 30 Amp Pink –Smart-Bar Module – If Equipped
F17 30 Amp Pink –Winch Control Module – If Equipped
F19 30 Amp Pink –Diesel SCR Feed– If Equipped
F20 30 Amp Pink –Passenger Door Module
F21 30 Amp Pink –Drive Train Control Module
F22 20 Amp Blue –Gas / ECM– If Equipped
F22 25 Amp White –Diesel PCM – If Equipped
F23 30 Amp Pink –CBC #1 / Int Light
F24 30 Amp Pink –Driver Door Module
Cavity Cartridge Fuse Micro Fuse Description
6
20_DJD2_OM_EN_USC_t.book Page 359
Page 374 of 568

372IN CASE OF EMERGENCY
6. Finish tightening the lug nuts. Push down on
the lug wrench while at the end of the
handle for increased leverage. Tighten the
lug nuts in a star pattern until each nut has
been tightened twice. For the correct lug nut
torque refer to “Wheel And Tire Torque
Specifications” in “Technical Specifi -
cations”. If in doubt about the correct
tightness, have them checked with a torque
wrench by an authorized dealer or service
station.
7. Install the wheel center cap and remove the wheel blocks. Do not install chrome or
aluminum wheel center caps on the spare
wheel. This may result in cap damage. 8. Lower the jack to its fully closed position.
Stow the replaced tire, jack, and tools as
previously described.
NOTE:
The bottle jack will not lower by turning the dial
(thumbwheel) by hand, it may be necessary to
use the jack driver in order to lower the jack.
9. Adjust the tire pressure when possible.
NOTE:
Do not oil wheel studs. For chrome wheels, do
not substitute with chrome plated lug nuts.
TO STOW THE FLAT OR SPARE
NOTE:
Have the flat tire repaired or replaced immedi -
ately.
1. Turn the wheel so that the valve stem is facing the ground and toward the rear of
the vehicle for convenience in checking the
spare tire inflation. Slide the wheel retainer
through the center of the wheel.
Reinstalling The Retainer
2. Lift the spare tire with one hand to give clearance to tilt the retainer at the end of
the cable and position it properly across the
wheel opening.
WARNING!
A loose tire or jack thrown forward in a
collision or hard stop, could endanger the
occupants of the vehicle. Always stow the jack
parts and the spare tire in the places
provided.
WARNING!
A loose tire or jack thrown forward in a
collision or hard stop could endanger the
occupants of the vehicle. Always stow the jack
parts and the spare tire in the places
provided. Have the deflated (flat) tire repaired
or replaced immediately.
20_DJD2_OM_EN_USC_t.book Page 372
Page 424 of 568

422SERVICING AND MAINTENANCE
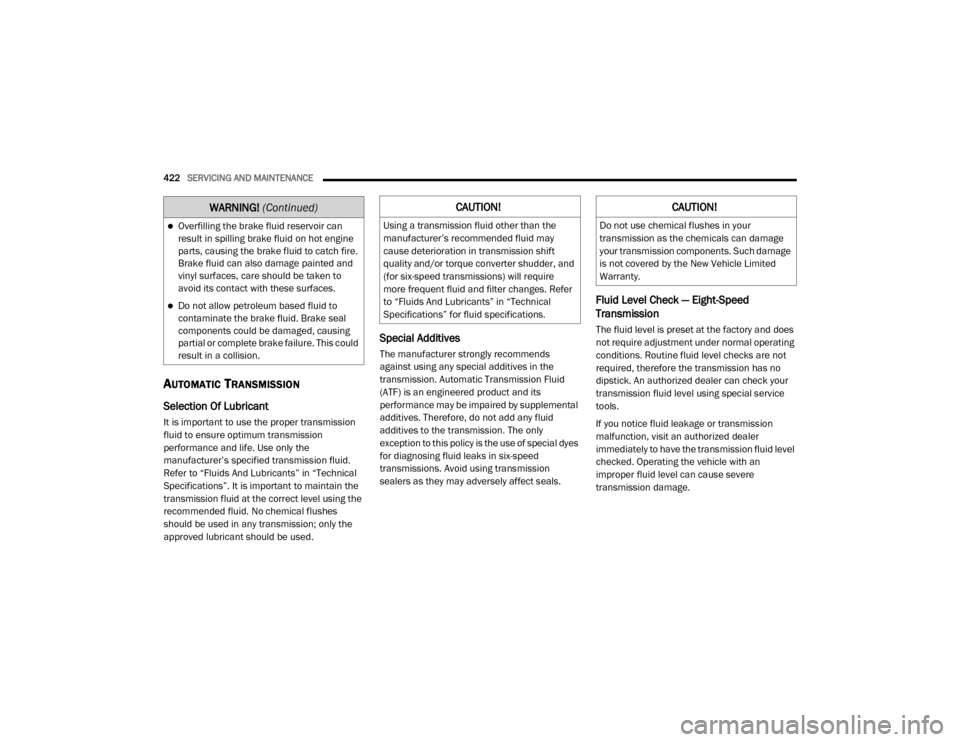
AUTOMATIC TRANSMISSION
Selection Of Lubricant
It is important to use the proper transmission
fluid to ensure optimum transmission
performance and life. Use only the
manufacturer’s specified transmission fluid.
Refer to “Fluids And Lubricants” in “Technical
Specifications”. It is important to maintain the
transmission fluid at the correct level using the
recommended fluid. No chemical flushes
should be used in any transmission; only the
approved lubricant should be used.
Special Additives
The manufacturer strongly recommends
against using any special additives in the
transmission. Automatic Transmission Fluid
(ATF) is an engineered product and its
performance may be impaired by supplemental
additives. Therefore, do not add any fluid
additives to the transmission. The only
exception to this policy is the use of special dyes
for diagnosing fluid leaks in six-speed
transmissions. Avoid using transmission
sealers as they may adversely affect seals.
Fluid Level Check — Eight-Speed
Transmission
The fluid level is preset at the factory and does
not require adjustment under normal operating
conditions. Routine fluid level checks are not
required, therefore the transmission has no
dipstick. An authorized dealer can check your
transmission fluid level using special service
tools.
If you notice fluid leakage or transmission
malfunction, visit an authorized dealer
immediately to have the transmission fluid level
checked. Operating the vehicle with an
improper fluid level can cause severe
transmission damage.
Overfilling the brake fluid reservoir can
result in spilling brake fluid on hot engine
parts, causing the brake fluid to catch fire.
Brake fluid can also damage painted and
vinyl surfaces, care should be taken to
avoid its contact with these surfaces.
Do not allow petroleum based fluid to
contaminate the brake fluid. Brake seal
components could be damaged, causing
partial or complete brake failure. This could
result in a collision.
WARNING! (Continued)CAUTION!
Using a transmission fluid other than the
manufacturer’s recommended fluid may
cause deterioration in transmission shift
quality and/or torque converter shudder, and
(for six-speed transmissions) will require
more frequent fluid and filter changes. Refer
to “Fluids And Lubricants” in “Technical
Specifications” for fluid specifications.
CAUTION!
Do not use chemical flushes in your
transmission as the chemicals can damage
your transmission components. Such damage
is not covered by the New Vehicle Limited
Warranty.
20_DJD2_OM_EN_USC_t.book Page 422
Page 454 of 568

452
TECHNICAL SPECIFICATIONS
IDENTIFICATION DATA
VEHICLE IDENTIFICATION NUMBER
The Vehicle Identification Number (VIN) is found
on the left front corner of the instrument panel,
visible through the windshield.
Vehicle Identification Number
NOTE:
It is illegal to remove or alter the VIN.
BRAKE SYSTEM
If power assist is lost for any reason (for
example, repeated brake applications with the
engine off), the brakes will still function. However, you will experience a substantial
increase in braking effort to stop the vehicle.
If either the front or rear hydraulic system loses
normal braking capability, the remaining
system will still function with some loss of
overall braking effectiveness. This will be
evident by increased pedal travel during
application, greater pedal force required to slow
or stop, and activation of the “Brake Warning
Light” and/or the “ABS Warning Light” during
brake use.
HYDRAULIC BRAKE ASSIST — IF
E
QUIPPED
The brake system power assist is provided by a
hydro-boost unit which shares fluid with the
power steering system. You may experience
some clicking or hissing noises from the
hydro-boost system during hard braking
conditions.
NOTE:
Under cold temperatures, pedal effort will be
higher than normal until the power steering fluid
reaches operating temperature.
WHEEL AND TIRE TORQUE SPECIFICATIONS
Proper lug nut/bolt torque is very important to
ensure that the wheel is properly mounted to
the vehicle. Any time a wheel has been removed
and reinstalled on the vehicle, the lug nuts/
bolts should be torqued using a properly
calibrated torque wrench using a high quality six
sided (hex) deep wall socket.
TORQUE SPECIFICATIONS
**Use only authorized dealer recommended
lug nuts/bolts and clean or remove any dirt or
oil before tightening.
Lug Nut/
Bolt
Torque Lug Nut/
Bolt Type **Lug
Nut/Bolt
SizeLug Nut/
Bolt
Socket
Size
130
Ft-Lbs
(176 N·m) Cone
M14 x
1.5022 mm
140
Ft-Lbs
(190 N·m) Flanged
20_DJD2_OM_EN_USC_t.book Page 452
Page 455 of 568

TECHNICAL SPECIFICATIONS453
NOTE:
Dual wheels are flat mounted, center piloted.
The lug nuts are a two-piece assembly. When
the tires are being rotated or replaced, clean
these lug nuts and add two drops of oil at the
interface between the lug nut/bolt and the
washer. Do not oil wheel studs.
Two-Piece Lug Nut
Inspect the wheel mounting surface prior to
mounting the tire and remove any corrosion or
loose particles.
Wheel Mounting Surface
Tighten the lug nuts/bolts in a star pattern until
each nut/bolt has been tightened twice. Ensure
that the socket is fully engaged on the lug nut/
bolt (do not insert it halfway).
After 25 miles (40 km), check the lug nut/bolt torque to be sure that all the lug nuts/bolts are
properly seated against the wheel.
Four And Five Lug Nuts/Bolts Torque Pattern
WARNING!
To avoid the risk of forcing the vehicle off the
jack, do not tighten the lug nuts/bolts fully
until the vehicle has been lowered. Failure to
follow this warning may result in personal
injury.
8
20_DJD2_OM_EN_USC_t.book Page 453
Page 472 of 568

470MULTIMEDIA
Units
After pressing Units on the touchscreen, the following settings will be available:
Voice
After pressing the Voice button on the touchscreen, the following settings will be available:
Setting Name Selectable Options
UnitsUSMetric Custom
Speed MPH km/h
Distance mi km
Fuel Consumption MPG (UG)MPG (UK)L/100 km km/L
Pressure psikPa bar
Power — If Equipped HP (US)HP (UK) Kw
Temperature °C °F
Torque — If Equipped lb-ft Nm
Setting Name Selectable Options
Voice Response LengthBrief Long
Show Command List AlwaysWith Help Never
20_DJD2_OM_EN_USC_t.book Page 470
Page 489 of 568

MULTIMEDIA487
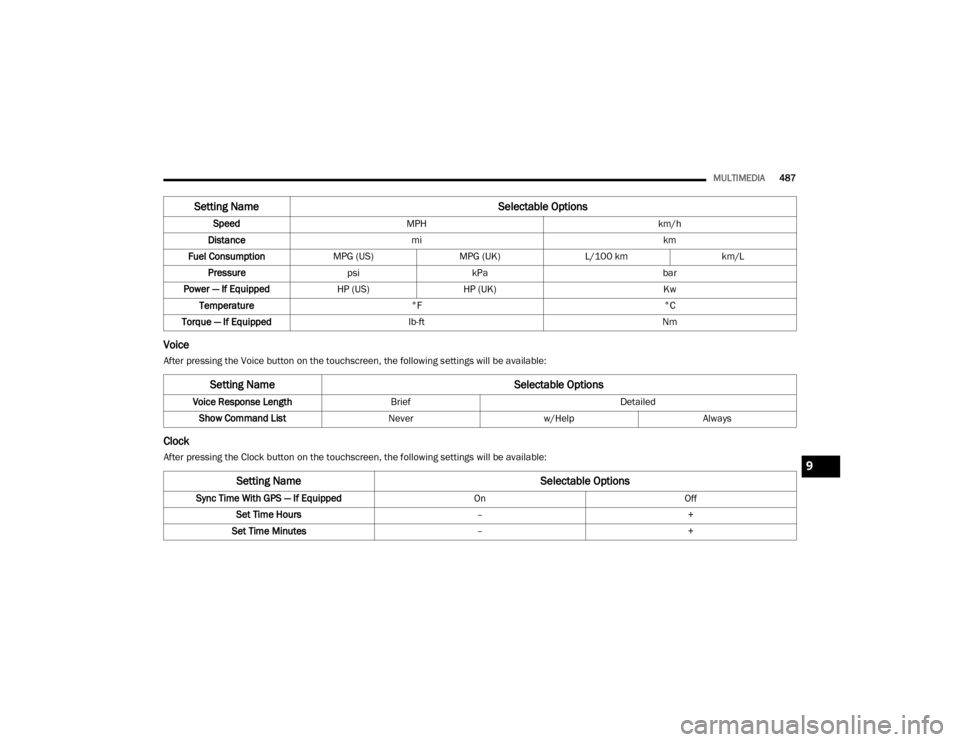
Voice
After pressing the Voice button on the touchscreen, the following settings will be available:
Clock
After pressing the Clock button on the touchscreen, the following settings will be available:Speed
MPH km/h
Distance mi km
Fuel Consumption MPG (US)MPG (UK)L/100 km km/L
Pressure psikPa bar
Power — If Equipped HP (US)HP (UK) Kw
Temperature °F °C
Torque — If Equipped lb-ft Nm
Setting Name Selectable Options
Setting NameSelectable Options
Voice Response LengthBrief Detailed
Show Command List Neverw/Help Always
Setting Name Selectable Options
Sync Time With GPS — If Equipped OnOff
Set Time Hours –+
Set Time Minutes –+
9
20_DJD2_OM_EN_USC_t.book Page 487
Page 510 of 568

508MULTIMEDIA
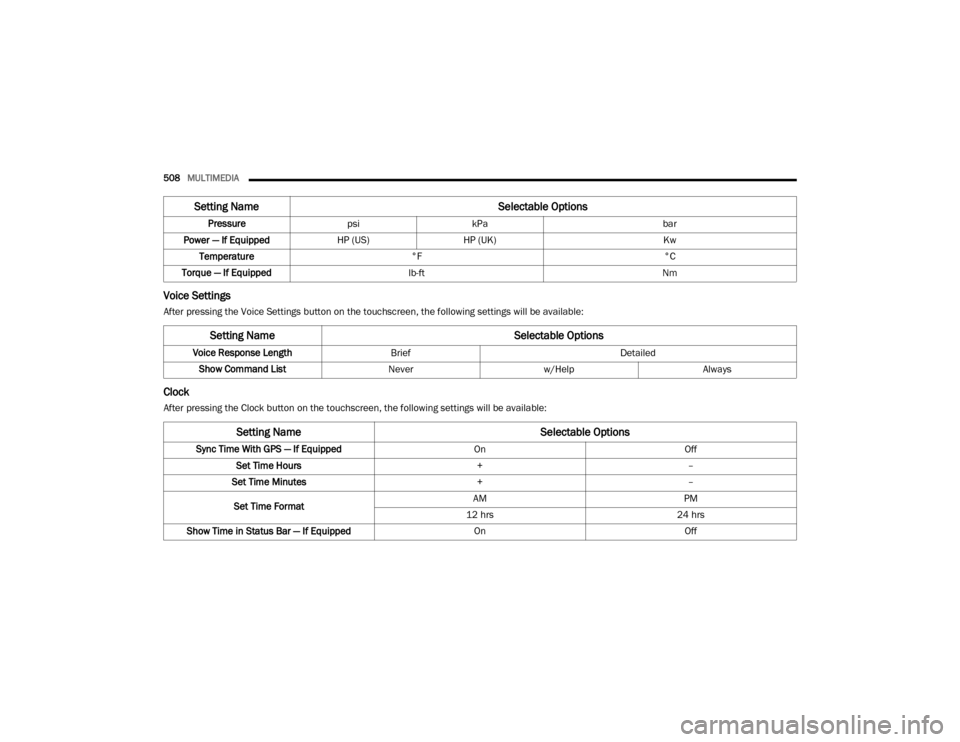
Voice Settings
After pressing the Voice Settings button on the touchscreen, the following settings will be available:
Clock
After pressing the Clock button on the touchscreen, the following settings will be available:Pressure
psikPa bar
Power — If Equipped HP (US)HP (UK) Kw
Temperature °F °C
Torque — If Equipped lb-ft Nm
Setting Name Selectable Options
Setting NameSelectable Options
Voice Response LengthBrief Detailed
Show Command List Neverw/Help Always
Setting Name Selectable Options
Sync Time With GPS — If Equipped OnOff
Set Time Hours +–
Set Time Minutes +–
Set Time Format AM
PM
12 hrs 24 hrs
Show Time in Status Bar — If Equipped OnOff
20_DJD2_OM_EN_USC_t.book Page 508
Page 562 of 568

560 Inflation Pressure
...................................... 436Life Of Tires............................................... 439Load Capacity.................................. 433, 434
Pressure Monitoring System (TPMS)... 136, 163
Quality Grading.......................................... 446Radial........................................................ 437Replacement............................................. 439Rotation.................................................... 444Safety.............................................. 429, 435Sizes.......................................................... 430Snow Tires................................................. 440Spare Tires...................................... 441, 442Spinning.................................................... 438Trailer Towing............................................ 331Tread Wear Indicators............................... 438Wheel Nut Torque..................................... 452To Open Hood.................................................. 74Tongue Weight/Trailer Weight....................... 330Tonneau Cover.................................... 100, 448Tonneau Cover Cleaning................................ 448Torque Converter Clutch................................ 245
Towing................................................. 325, 381Disabled Vehicle....................................... 381Guide........................................................ 330Recreational............................................. 339Weight...................................................... 330Towing Behind A Motorhome........................ 339Traction......................................................... 343Traction Control............................................ 153Trailer Sway Control (TSC)............................. 153Trailer Towing............................................... 325Cooling System Tips................................. 336Hitches..................................................... 329Minimum Requirements........................... 330Mirrors......................................................... 46Tips........................................................... 335Trailer And Tongue Weight........................ 330Wiring....................................................... 334Trailer Towing Guide..................................... 330Trailer Weight................................................ 330Transfer Case............................................... 425Electronically Shifted....................... 246, 250Fluid................................................ 463, 466
Transmission................................................. 235Automatic............................... 235, 239, 422Fluid................................................. 463, 466Maintenance............................................ 422Shifting..................................................... 233Transporting Pets.......................................... 209Tread Wear Indicators................................... 438Turn Signals......................... 51, 141, 353, 355
U
UconnectUconnect Settings
.......................... 476, 478,494, 497, 514, 516Uconnect PhoneCall Continuation...................................... 537Uconnect SettingsCustomer Programmable Features... 28, 476, 478, 494, 497, 514, 516Passive Entry Programming............... 28, 476, 494, 514Uconnect Voice Command............................ 541Uniform Tire Quality Grades.......................... 446
20_DJD2_OM_EN_USC_t.book Page 560