Master Cylinder Reservoir Ram 3500 2020 Owner's Manual
[x] Cancel search | Manufacturer: RAM, Model Year: 2020, Model line: 3500, Model: Ram 3500 2020Pages: 568
Page 133 of 568
GETTING TO KNOW YOUR INSTRUMENT PANEL131
on, or turns on while driving, have the system
inspected at an authorized dealer as soon as
possible.
Brake Warning Light
This warning light monitors various
brake functions, including brake fluid
level and parking brake application. If
the brake light turns on it may
indicate that the parking brake is applied, that
the brake fluid level is low, or that there is a
problem with the Anti-Lock Brake System
reservoir.
If the light remains on when the parking brake
has been disengaged, and the fluid level is at
the full mark on the master cylinder reservoir, it
indicates a possible brake hydraulic system
malfunction or that a problem with the Brake
Booster has been detected by the Anti-Lock
Brake System (ABS) / Electronic Stability
Control (ESC) system. In this case, the light will
remain on until the condition has been
corrected. If the problem is related to the brake
booster, the ABS pump will run when applying
the brake, and a brake pedal pulsation may be
felt during each stop. The dual brake system provides a reserve
braking capacity in the event of a failure to a
portion of the hydraulic system. A leak in either
half of the dual brake system is indicated by the
Brake Warning Light, which will turn on when
the brake fluid level in the master cylinder has
dropped below a specified level.
The light will remain on until the cause is
corrected.
NOTE:
The light may flash momentarily during sharp
cornering maneuvers, which change fluid level
conditions. The vehicle should have service
performed, and the brake fluid level checked.
If brake failure is indicated, immediate repair is
necessary.
Vehicles equipped with the Anti-Lock Brake
System (ABS) are also equipped with Electronic
Brake Force Distribution (EBD). In the event of
an EBD failure, the Brake Warning Light will turn
on along with the ABS Light. Immediate repair to
the ABS system is required.
Operation of the Brake Warning Light can be
checked by turning the ignition switch from the
OFF position to the ON/RUN position. The light
should illuminate for approximately two
seconds. The light should then turn off unless
the parking brake is applied or a brake fault is
detected. If the light does not illuminate, have
the light inspected by an authorized dealer.
The light also will turn on when the parking
brake is applied with the ignition switch in the
ON/RUN position.
NOTE:
This light shows only that the parking brake is
applied. It does not show the degree of brake
application.
WARNING!
Driving a vehicle with the red brake light on is
dangerous. Part of the brake system may
have failed. It will take longer to stop the
vehicle. You could have a collision. Have the
vehicle checked immediately.
3
20_DJD2_OM_EN_USC_t.book Page 131
Page 387 of 568
385
SERVICING AND MAINTENANCE
SCHEDULED SERVICING — GAS ENGINE
Your vehicle is equipped with an automatic oil
change indicator system. The oil change
indicator system will remind you that it is time to
take your vehicle in for scheduled maintenance.
Based on engine operation conditions, the oil
change indicator message will illuminate. This
means that service is required for your vehicle.
Operating conditions such as frequent
short-trips, trailer tow, extremely hot or cold
ambient temperatures, and E85 fuel usage will
influence when the “Oil Change Required”
message is displayed. Severe Operating
Conditions can cause the change oil message to
illuminate as early as 3,500 miles (5,600 km)
since last reset. Have your vehicle serviced as
soon as possible, within the next 500 miles
(805 km).
An authorized dealer will reset the oil change
indicator message after completing the
scheduled oil change.If a scheduled oil change is performed by
someone other than an authorized dealer, the
message can be reset by referring to the steps
described under “Instrument Cluster Display” in
“Getting To Know Your Instrument Panel”.
NOTE:
Under no circumstances should oil change
intervals exceed 8,000 miles (13,000 km),
12 months or 350 hours of engine run time,
whichever comes first. The 350 hours of engine
run or idle time is generally only a concern for
fleet customers.
Severe Duty All Models
NOTE:
Change Engine Oil at 4,000 miles (6,500 km) or
350 hours of engine run time if the vehicle is
operated in a dusty and off road environment or
is operated predominantly at idle, or only very
low engine RPM. This type of vehicle use is
considered Severe Duty.
Once A Month Or Before A Long Trip:Check engine oil level
Check windshield washer fluid level
Check tire pressure and look for unusual
wear or damage. Rotate tires at the first sign
of irregular wear, even if it occurs before the
oil indicator system turns on.
Check the fluid levels of the coolant reservoir,
brake master cylinder, power steering and
automatic transmission (six-speed only) and
fill as needed
Check function of all interior and exterior
lights7
20_DJD2_OM_EN_USC_t.book Page 385
Page 391 of 568
SERVICING AND MAINTENANCE389
HEAVY DUTY USE OF THE VEHICLE
Change engine oil at 4,000 miles (6,500 km) or
350 hours of engine run time if the vehicle is
operated in a dusty and off road environment or
is operated predominately at idle or only very
low engine RPM. This type of vehicle use is
considered Severe Duty.
SCHEDULED SERVICING— DIESEL ENGINE
Required Maintenance Intervals
Refer to the maintenance plan on the following
pages for the required maintenance intervals.
More frequent maintenance may be needed in
severe conditions, such as dusty areas and very
short trip driving. In some extreme conditions,
additional maintenance not specified in the
maintenance schedule may be required.
At Each Stop For Fuel
Check the engine oil level at least 30 minutes
after a fully warmed engine is shut off. Checking
the oil level while the vehicle is on level ground
will improve the accuracy of the oil level
reading. Add oil only when the level is at or
below the ADD or MIN mark. Once A Month
Inspect the batteries, and clean and tighten
the terminals as required.
Check the fluid levels of the coolant reservoir,
brake master cylinder, and automatic trans-
mission, and add as needed.
At Each Oil Change
Change the engine oil filter.
Inspect the exhaust system.
Inspect engine air filter. Replace the engine
air filter cleaner, if necessary.
Inspect the CV/Universal joints.
Check the coolant level, hoses, and clamps.
Inspect front end, and lubricate — If equipped
with serviceable fittings.
Inspect and replace the Evaporative System
Fresh Air Filter as necessary, replacement
may be more frequent if vehicle is operated
in extreme dusty conditions.
WARNING!
You can be badly injured working on or
around a motor vehicle. Do only service
work for which you have the knowledge and
the right equipment. If you have any doubt
about your ability to perform a service job,
take your vehicle to a competent mechanic.
Failure to properly inspect and maintain
your vehicle could result in a component
malfunction and effect vehicle handling
and performance. This could cause an acci -
dent.
CAUTION!
Failure to perform the required maintenance
items may result in damage to the vehicle.
7
20_DJD2_OM_EN_USC_t.book Page 389
Page 423 of 568
SERVICING AND MAINTENANCE421
(Continued)
CHARGE AIR COOLER — INTER-COOLER
The charge air cooler is positioned below the
radiator and the air conditioner condenser. Air
enters the engine through the air cleaner and
passes through the turbocharger, where it is
pressurized. This pressurized air rapidly
reaches high temperature. The air is then
directed through a hose to the charge air cooler
and through another hose to the intake
manifold of the engine. The air entering the
engine has been cooled by about 50° to 100°F
(10° to 38°C). This cooling process enables
more efficient burning of fuel resulting in fewer
emissions.
To guarantee optimum performance of the
system, keep the surfaces of the charge air
cooler, condenser and radiator clean and free
of debris. Periodically check the hoses leading
to and from the charge air cooler for cracks or
loose clamps resulting in loss of pressure and
reduced engine performance.
BRAKE SYSTEM
In order to ensure brake system performance,
all brake system components should be
inspected periodically. Refer to the “Maintenance Plan” in this section for the
proper maintenance intervals.
Fluid Level Check — Brake Master Cylinder
The fluid level of the master cylinder should be
checked when performing under the hood
service or immediately if the brake system
warning lamp indicates system failure.
If necessary, add fluid to bring level within the
designated marks on the side of the reservoir of
the brake master cylinder. Be sure to clean the
top of the master cylinder area before removing
cap.
With disc brakes the fluid level can be expected
to fall as the brake linings wear. However, an
unexpected drop in fluid level may be caused by
a leak and a system check should be
conducted.
Refer to “Fluids And Lubricants” in “Technical
Specifications” for further information.
WARNING!
Riding the brakes can lead to brake failure
and possibly a collision. Driving with your foot
resting or riding on the brake pedal can result
in abnormally high brake temperatures,
excessive lining wear, and possible brake
damage. You would not have your full braking
capacity in an emergency.
WARNING!
Use only manufacturer's recommended
brake fluid. Refer to “Fluids And Lubricants”
in “Technical Specifications” for further infor-
mation. Using the wrong type of brake fluid
can severely damage your brake system
and/or impair its performance. The proper
type of brake fluid for your vehicle is also
identified on the original factory installed
hydraulic master cylinder reservoir.
To avoid contamination from foreign matter
or moisture, use only new brake fluid or fluid
that has been in a tightly closed container.
Keep the master cylinder reservoir cap
secured at all times. Brake fluid in a open
container absorbs moisture from the air
resulting in a lower boiling point. This may
cause it to boil unexpectedly during hard or
prolonged braking, resulting in sudden brake
failure. This could result in a collision.
7
20_DJD2_OM_EN_USC_t.book Page 421
Page 465 of 568
TECHNICAL SPECIFICATIONS463
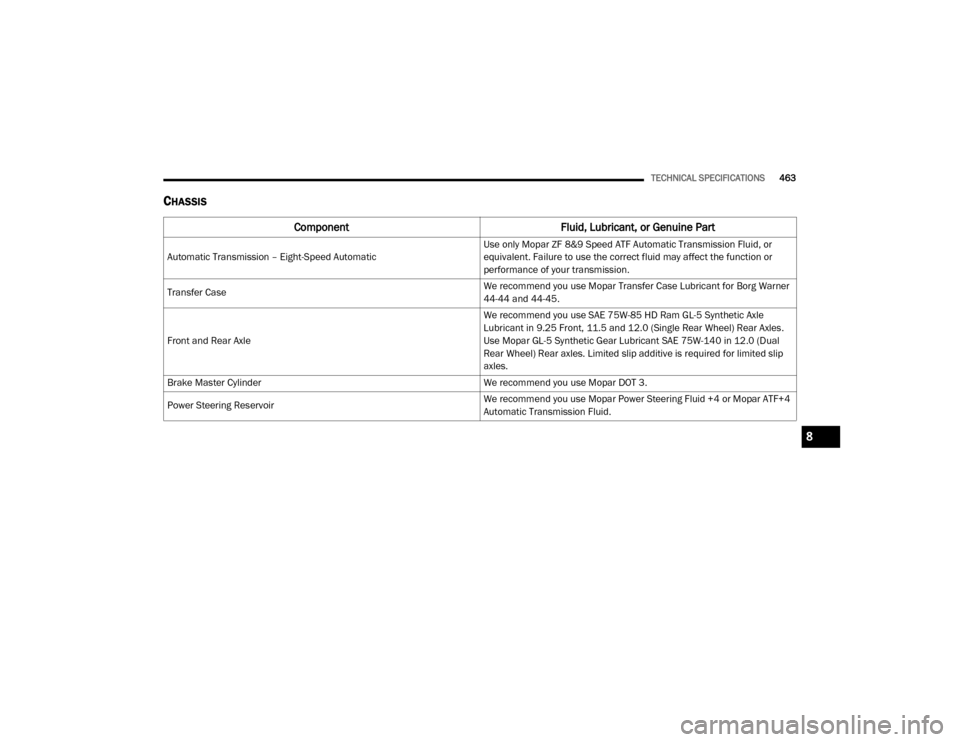
CHASSIS
Component Fluid, Lubricant, or Genuine Part
Automatic Transmission – Eight-Speed Automatic Use only Mopar ZF 8&9 Speed ATF Automatic Transmission Fluid, or
equivalent. Failure to use the correct fluid may affect the function or
performance of your transmission.
Transfer Case We recommend you use Mopar Transfer Case Lubricant for Borg Warner
44-44 and 44-45.
Front and Rear Axle We recommend you use SAE 75W-85 HD Ram GL-5 Synthetic Axle
Lubricant in 9.25 Front, 11.5 and 12.0 (Single Rear Wheel) Rear Axles.
Use Mopar GL-5 Synthetic Gear Lubricant SAE 75W-140 in 12.0 (Dual
Rear Wheel) Rear axles. Limited slip additive is required for limited slip
axles.
Brake Master Cylinder We recommend you use Mopar DOT 3.
Power Steering Reservoir We recommend you use Mopar Power Steering Fluid +4 or Mopar ATF+4
Automatic Transmission Fluid.
8
20_DJD2_OM_EN_USC_t.book Page 463