weight Ram 3500 2020 Owner's Manual
[x] Cancel search | Manufacturer: RAM, Model Year: 2020, Model line: 3500, Model: Ram 3500 2020Pages: 568
Page 9 of 568
7
PARKSENSE REAR PARK ASSIST —
IF EQUIPPED ...................................................... 296 ParkSense Sensors ...................................296
ParkSense Warning Display ......................296
ParkSense Display ..................................... 297Enabling And Disabling ParkSense ..........299
Service The ParkSense Rear Park
Assist System .............................................299 Cleaning The ParkSense System ..............299
ParkSense System Usage Precautions ....299
PARKSENSE FRONT AND REAR
PARK ASSIST ..................................................... 301
ParkSense Sensors ...................................301
ParkSense Warning Display ......................301
ParkSense Display ..................................... 301Enabling And Disabling Front And/Or
Rear ParkSense .........................................304 Service The ParkSense Front/Rear
Park Assist System ....................................305 Cleaning The ParkSense System ..............305
ParkSense System Usage Precautions ....305
LANESENSE — IF EQUIPPED ........................... 306
LaneSense Operation ................................306Turning LaneSense On Or Off ...................307LaneSense Warning Message ..................307
Changing LaneSense Status .....................309 PARKVIEW REAR BACK UP CAMERA..............309
AUX Camera — If Equipped ...................... 311
SURROUND VIEW CAMERA SYSTEM —
IF EQUIPPED ....................................................... 312
AUX Camera — If Equipped ...................... 318
ENGINE RUNAWAY — DIESEL ENGINE ............ 319
REFUELING THE VEHICLE — GAS ENGINE ...... 319
Loose Fuel Filler Cap Message ................ 320
REFUELING THE VEHICLE — DIESEL ENGINE ... 320
Diesel Exhaust Fluid .................................. 321
VEHICLE LOADING ............................................324
Gross Vehicle Weight Rating (GVWR) ...... 324
Payload ....................................................... 324Gross Axle Weight Rating (GAWR) ............ 324
Tire Size ...................................................... 324
Rim Size ..................................................... 324
Inflation Pressure ...................................... 324
Curb Weight................................................ 324
Loading ....................................................... 324
TRAILER TOWING ............................................... 325
Common Towing Definitions ..................... 325Trailer Hitch Type and Maximum
Trailer Weight ............................................. 329 Trailer Towing Weights (Maximum Trailer
Weight Ratings) ......................................... 330 Trailer And Tongue Weight ........................ 330
Towing Requirements ............................... 330Towing Tips ................................................ 335 SNOWPLOW ...................................................... 336
Before Plowing ........................................... 337
Snowplow Prep Package Model
Availability .................................................. 337 Over The Road Operation With
Snowplow Attached ................................... 338 Operating Tips............................................ 338General Maintenance................................ 338
RECREATIONAL TOWING (BEHIND
MOTORHOME, ETC.) ......................................... 339
Towing This Vehicle Behind Another
Vehicle ........................................................ 339 Recreational Towing — Two-Wheel Drive
Models........................................................ 339 Recreational Towing — Four-Wheel Drive
Models........................................................ 340
DRIVING TIPS ..................................................... 343
Driving On Slippery Surfaces ................... 343
Driving Through Water ............................. 343
Off-Road Driving Tips ................................. 344
IN CASE OF EMERGENCY
HAZARD WARNING FLASHERS ...................... 346
ASSIST AND SOS SYSTEM — IF EQUIPPED .... 346General Information .................................. 350
20_DJD2_OM_EN_USC_t.book Page 7
Page 84 of 568

82GETTING TO KNOW YOUR VEHICLE
Pull on the upper handle on the front of the
armrest to raise the cover. The upper storage
area contains a USB power outlet located at the
rear of the area that can be used to power small
electrical devices, refer to “Electrical Power
Outlets” in this section for further information.
With the upper lid closed, pull on the lower
handle to open the lower storage bin. The lower
bin contains a power inverter outlet located in
the forward portion of the lower bin. There is
also a “fill line” located along the rear inside wall of the lower bin. Contents above the “fill
line” may interfere with cupholder placement if
equipped with a premium center console.
Forward Portion Of Lower Storage Bin
Premium Center Console — If Equipped
The premium center console is equipped with
two front storage bins located in front of the
center storage compartment. These storage
bins may be equipped with tandem doors. Push
the front bin to access the cupholders. Or push
the rear bin to access the coinholder/small
storage bin.
Center Console Tandem Doors— If Equipped
WARNING!
This armrest is not a seat. Anyone seated
on the armrest could be seriously injured
during vehicle operation, or a collision. Only
use the center seating position when the
armrest is fully upright.
In a collision, the latch may open if the total
weight of the items stored exceeds about
10 lbs (4.5 kg). These items could be
thrown about endangering occupants of
the vehicle. Items stored should not exceed
a total of 10 lbs (4.5 kg).
1 — Wireless Charging Pad
2 — Power Inverter
3 — Storage Area
WARNING!
Do not operate this vehicle with a console
compartment lid in the open position. Driving
with the console compartment lid open may
result in injury in a collision.
1 — Push Front Bin Access
2 — Push Rear Bin Access
20_DJD2_OM_EN_USC_t.book Page 82
Page 92 of 568

90GETTING TO KNOW YOUR VEHICLE
OVERHEAD SUNGLASS STORAGE
At the front of the overhead console, a
compartment is provided for the storage of one
pair of sunglasses.
From the closed position, push the door latch to
open the compartment.
Overhead Sunglass Door
The door will slowly rotate to the full open
position.
PICKUP BOX
The pickup box has many features designed for
utility and convenience.
Pick Up Box Features
NOTE:
If you are installing a Toolbox, Ladder Rack or
Headache Rack at the front of the Pickup Box,
you must use Mopar Box Reinforcement
Brackets that are available from an authorized
dealer.
You can carry wide building materials (sheets of
plywood, etc.) by building a raised load floor.
Place lumber across the box in the indentations
provided above the wheel housings and in the
bulkhead dividers to form the floor.
1 — Cleats
2 — Upper Load Floor Indents
3 — Bulk Head Dividers
4 — Anchors
WARNING!
The pickup box is intended for load carrying
purposes only, not for passengers, who
should sit in seats and use seat belts.
Care should always be exercised when oper -
ating a vehicle with unrestrained cargo.
Vehicle speeds may need to be reduced.
Severe turns or rough roads may cause
shifting or bouncing of the cargo that may
result in vehicle damage. If wide building
materials are to be frequently carried, the
installation of a support is recommended.
This will restrain the cargo and transfer the
load to the pickup box floor.
If you wish to carry more than 600 lbs
(272 kg) of material suspended above the
wheelhouse, supports must be installed to
transfer the weight of the load to the pickup
box floor or vehicle damage may result. The
use of proper supports will permit loading
up to the rated payload.
Unrestrained cargo may be thrown forward
in an accident causing serious or fatal
injury.
20_DJD2_OM_EN_USC_t.book Page 90
Page 95 of 568

GETTING TO KNOW YOUR VEHICLE93
(Continued)
To open a storage bin with the RamBox
unlocked, push and release the button located
on the lid. The RamBox lid will open upward to
allow hand access. Lift the lid to fully open.
NOTE:
RamBox will not open when the button is
pushed if the RamBox is locked.
RamBox Pushbutton And Lock
The interior of the RamBox will automatically
illuminate when the lid is opened. In addition to
the automatic illumination, there is a manual
on/off switch located at the rear of each storage
bin. Pushing the switch once will turn off the bin
lights, pushing the switch again will turn the
lights back on.
RamBox Light Switch
Cargo bins feature two removable drain plugs
(to allow water to drain from bins). To remove
plug, pull up on the edge. To install, push the
plug downward into drain hole.
NOTE:
Provisions are provided in the bins for cargo
dividers and shelf supports. These accessories
(in addition to other RamBox accessories) are
available from Mopar.Locking And Unlocking RamBox
Push and release the lock or unlock button on
the key fob to lock and unlock all doors, the
tailgate and the RamBox (if equipped). Refer to
“Keys” in this chapter for further details. The
RamBox storage bins can be locked using the
vehicle key. To lock and unlock the storage bin,
insert the key into the keyhole on the push
button and turn clockwise to lock or
counterclockwise to unlock. Always return the
key to the upright (vertical) position before
removing the key from the push button.
CAUTION!
Failure to follow the following items could
cause damage to the vehicle:
Assure that all cargo inside the storage bins
is properly secured.
Do not exceed cargo weight rating of 300 lbs
(136 kg) for 2500 and 3500 series vehicles
per bin.
CAUTION!
Leaving the lid open for extended periods of
time could cause the vehicle battery to
discharge. If the lid is required to stay open
for extended periods of time, it is
recommended that the bin lights be turned
off manually using the on/off switch.
CAUTION!
Ensure cargo bin lids are closed and
latched before moving or driving vehicle.
2
20_DJD2_OM_EN_USC_t.book Page 93
Page 103 of 568

GETTING TO KNOW YOUR VEHICLE101
4. Fold the rear panel up onto the center panel
(intermediate position).
Folded Rear Panel (Intermediate Position)
NOTE:
The vehicle cannot be driven when the Tonneau
Cover is in this position.
5. Fold the rear and center panels up onto the front panel (Tri-Folded position).
Tri-Folded Position
NOTE:
When folding the center and rear panels, the
sections MUST be held together to avoid
damage to the cover material.
Incorrect Folding — Will Cause Damage Correct Folding — Hold Panels Together
NOTE:
Fold the panels gently. It is not recommended to
allow the panels to drop under their own weight.
6. Clip both stowage straps to prevent the Tonneau Cover panels from unfolding.
Stowage Strap
2
20_DJD2_OM_EN_USC_t.book Page 101
Page 155 of 568
SAFETY153
Traction Control System (TCS)
This system monitors the amount of wheel spin
of each of the driven wheels. If wheel spin is
detected, the Traction Control System (TCS)
may apply brake pressure to the spinning
wheel(s) and/or reduce engine power to provide
enhanced acceleration and stability. A feature
of the TCS, Brake Limited Differential (BLD),
functions similar to a limited slip differential
and controls the wheel spin across a driven
axle. If one wheel on a driven axle is spinning
faster than the other, the system will apply the
brake of the spinning wheel. This will allow more
engine power to be applied to the wheel that is
not spinning. BLD may remain enabled even if
TCS and Electronic Stability Control (ESC) are in
a reduced mode.
Trailer Sway Control (TSC)
Trailer Sway Control (TSC) uses sensors in the
vehicle to recognize an excessively swaying
trailer and will take the appropriate actions to
attempt to stop the sway. TSC will become active automatically once an excessively
swaying trailer is recognized.
NOTE:
TSC cannot stop all trailers from swaying.
Always use caution when towing a trailer and
follow the trailer tongue weight recommenda
-
tions. Refer to “Trailer Towing” in “Starting And
Operating” for further information.
When TSC is functioning, the “ESC Activation/
Malfunction Indicator Light” will flash, the
engine power may be reduced and you may feel
the brakes being applied to individual wheels to
attempt to stop the trailer from swaying. TSC is
disabled when the ESC system is in the “Partial
Off” or “Full Off” modes.
AUXILIARY DRIVING SYSTEMS
BLIND SPOT MONITORING (BSM) — IF
E
QUIPPED
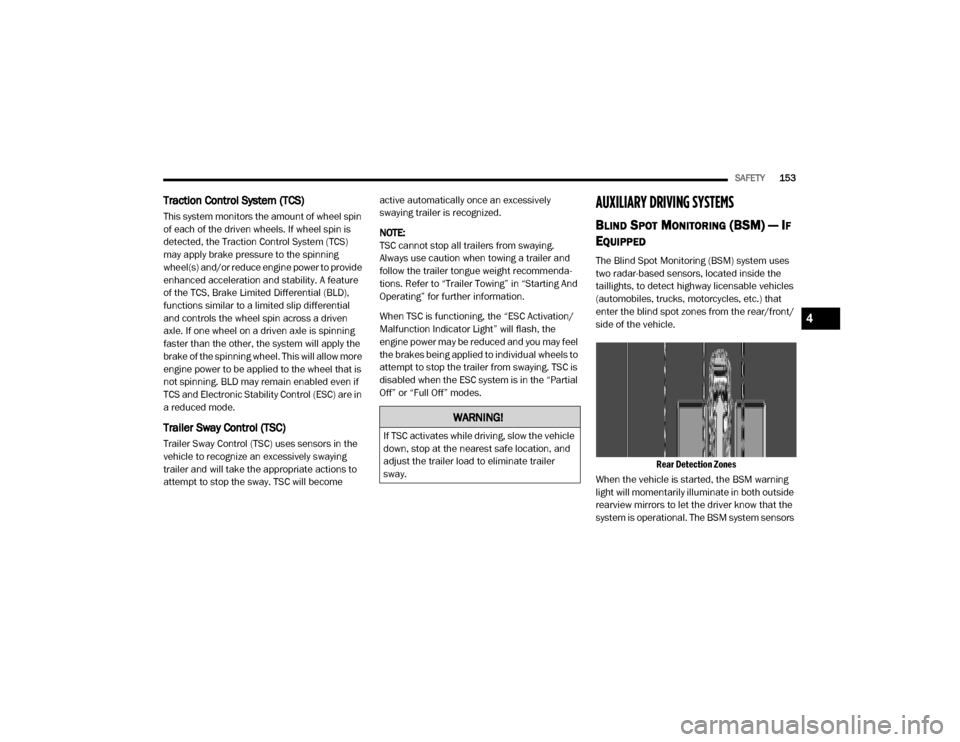
The Blind Spot Monitoring (BSM) system uses
two radar-based sensors, located inside the
taillights, to detect highway licensable vehicles
(automobiles, trucks, motorcycles, etc.) that
enter the blind spot zones from the rear/front/
side of the vehicle.
Rear Detection Zones
When the vehicle is started, the BSM warning
light will momentarily illuminate in both outside
rearview mirrors to let the driver know that the
system is operational. The BSM system sensors
WARNING!
If TSC activates while driving, slow the vehicle
down, stop at the nearest safe location, and
adjust the trailer load to eliminate trailer
sway.
4
20_DJD2_OM_EN_USC_t.book Page 153
Page 194 of 568
192SAFETY
(Continued)
Summary Of Recommendations For Restraining Children In Vehicles
Infant And Child Restraints
Safety experts recommend that children ride
rear-facing in the vehicle until they are two years
old or until they reach either the height or
weight limit of their rear-facing child restraint.
Two types of child restraints can be used
rear-facing: infant carriers and convertible child
seats.
The infant carrier is only used rear-facing in the
vehicle. It is recommended for children from
birth until they reach the weight or height limit of the infant carrier. Convertible child seats can be
used either rear-facing or forward-facing in the
vehicle. Convertible child seats often have a
higher weight limit in the rear-facing direction
than infant carriers do, so they can be used
rear-facing by children who have outgrown their
infant carrier but are still less than at least two
years old. Children should remain rear-facing
until they reach the highest weight or height
allowed by their convertible child seat.
Child Size, Height, Weight Or Age Recommended Type Of Child Restraint
Infants and Toddlers
Children who are two years old or younger and
who have not reached the height or weight limits of their child restraint Either an Infant Carrier or a Convertible Child
Restraint, facing rearward in a rear seat of the vehicle
Small Children Children who are at least two years old or who
have outgrown the height or weight limit of their rear-facing child restraint Forward-Facing Child Restraint with a five-point
Harness, facing forward in a rear seat of the vehicle
Larger Children Children who have outgrown their forward-facing
child restraint, but are too small to properly fit the vehicle’s seat belt Belt Positioning Booster Seat and the vehicle
seat belt, seated in a rear seat of the vehicle
Children Too Large for Child Restraints Children 12 years old or younger, who have
outgrown the height or weight limit of their booster seat Vehicle Seat Belt, seated in a rear seat of the
vehicle
WARNING!
Never place a rear-facing child restraint in
front of an air bag. A deploying passenger
front air bag can cause death or serious
injury to a child 12 years or younger,
including a child in a rear-facing child
restraint.
20_DJD2_OM_EN_USC_t.book Page 192
Page 195 of 568
SAFETY193
Older Children And Child Restraints
Children who are two years old or who have
outgrown their rear-facing convertible child seat
can ride forward-facing in the vehicle.
Forward-facing child seats and convertible child
seats used in the forward-facing direction are
for children who are over two years old or who
have outgrown the rear-facing weight or height
limit of their rear-facing convertible child seat.
Children should remain in a forward-facing child
seat with a harness for as long as possible, up
to the highest weight or height allowed by the
child seat.
All children whose weight or height is above the
forward-facing limit for the child seat should use
a belt-positioning booster seat until the
vehicle’s seat belts fit properly. If the child
cannot sit with knees bent over the vehicle’s
seat cushion while the child’s back is against
the seatback, they should use a belt-positioning
booster seat. The child and belt-positioning
booster seat are held in the vehicle by the seat
belt.Never install a rear-facing child restraint in
the front seat of a vehicle. Only use a
rear-facing child restraint in the rear seat. If
the vehicle does not have a rear seat, do
not transport a rear-facing child restraint in
that vehicle.
WARNING!
Do not install a rear-facing car seat using a
rear support leg in this vehicle. The floor of
this vehicle is not designed to manage the
crash forces of this type of car seat. In a
crash, the support leg may not function as it
was designed by the car seat manufacturer,
and your child may be more severely injured
as a result.
WARNING! (Continued)WARNING!
Improper installation can lead to failure of
an infant or child restraint. It could come
loose in a collision. The child could be badly
injured or killed. Follow the child restraint
manufacturer’s directions exactly when
installing an infant or child restraint.
After a child restraint is installed in the
vehicle, do not move the vehicle seat
forward or rearward because it can loosen
the child restraint attachments. Remove
the child restraint before adjusting the
vehicle seat position. When the vehicle seat
has been adjusted, reinstall the child
restraint.
When your child restraint is not in use,
secure it in the vehicle with the seat belt or
LATCH anchorages, or remove it from the
vehicle. Do not leave it loose in the vehicle.
In a sudden stop or accident, it could strike
the occupants or seatbacks and cause
serious personal injury.
4
20_DJD2_OM_EN_USC_t.book Page 193
Page 197 of 568
SAFETY195
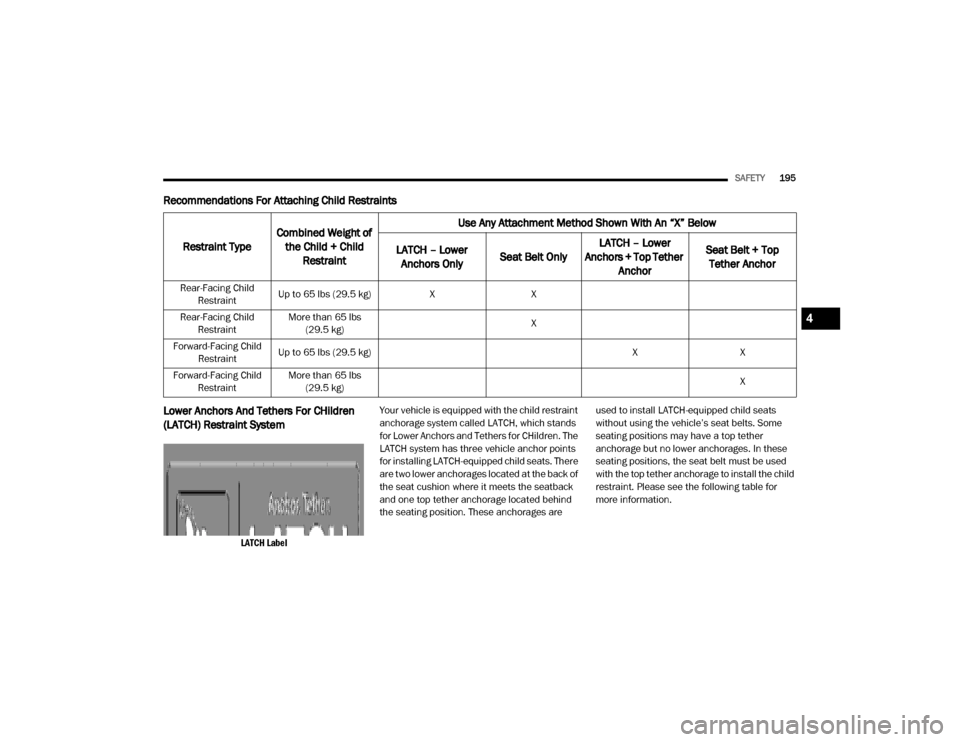
Recommendations For Attaching Child Restraints
Lower Anchors And Tethers For CHildren
(LATCH) Restraint System
LATCH Label
Your vehicle is equipped with the child restraint
anchorage system called LATCH, which stands
for Lower Anchors and Tethers for CHildren. The
LATCH system has three vehicle anchor points
for installing LATCH-equipped child seats. There
are two lower anchorages located at the back of
the seat cushion where it meets the seatback
and one top tether anchorage located behind
the seating position. These anchorages are
used to install LATCH-equipped child seats
without using the vehicle’s seat belts. Some
seating positions may have a top tether
anchorage but no lower anchorages. In these
seating positions, the seat belt must be used
with the top tether anchorage to install the child
restraint. Please see the following table for
more information.
Restraint Type
Combined Weight of
the Child + Child Restraint Use Any Attachment Method Shown With An “X” Below
LATCH – Lower Anchors Only Seat Belt Only LATCH – Lower
Anchors + Top Tether Anchor Seat Belt + Top
Tether Anchor
Rear-Facing Child
Restraint Up to 65 lbs (29.5 kg)
XX
Rear-Facing Child Restraint More than 65 lbs
(29.5 kg) X
Forward-Facing Child Restraint Up to 65 lbs (29.5 kg)
XX
Forward-Facing Child Restraint More than 65 lbs
(29.5 kg) X
4
20_DJD2_OM_EN_USC_t.book Page 195
Page 199 of 568
SAFETY197
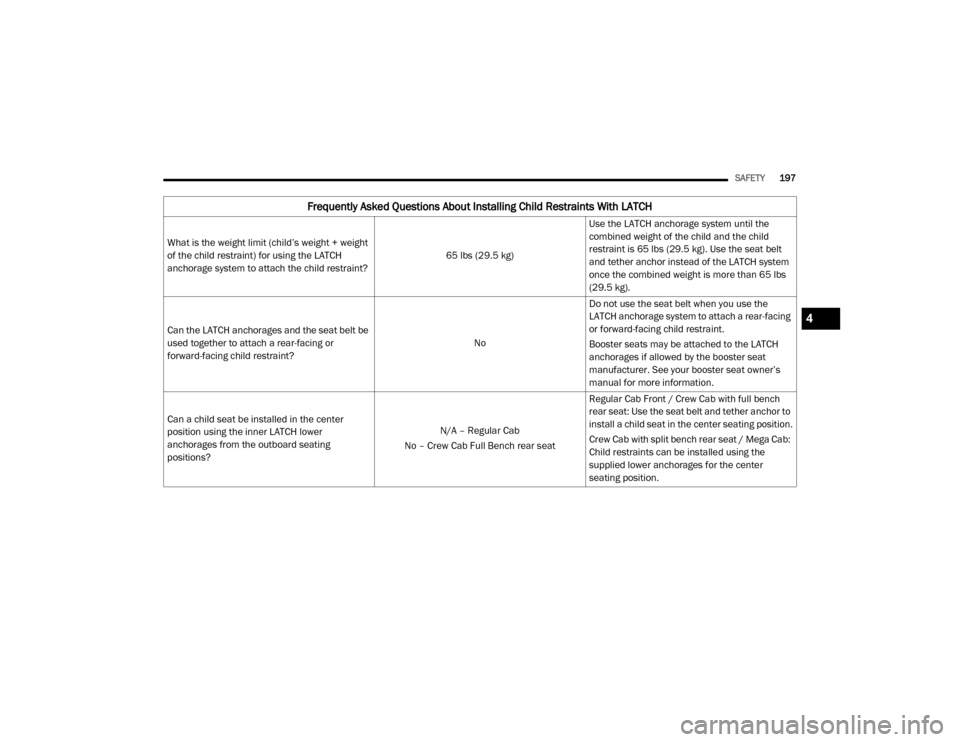
Frequently Asked Questions About Installing Child Restraints With LATCH
What is the weight limit (child’s weight + weight
of the child restraint) for using the LATCH
anchorage system to attach the child restraint? 65 lbs (29.5 kg)Use the LATCH anchorage system until the
combined weight of the child and the child
restraint is 65 lbs (29.5 kg). Use the seat belt
and tether anchor instead of the LATCH system
once the combined weight is more than 65 lbs
(29.5 kg).
Can the LATCH anchorages and the seat belt be
used together to attach a rear-facing or
forward-facing child restraint? NoDo not use the seat belt when you use the
LATCH anchorage system to attach a rear-facing
or forward-facing child restraint.
Booster seats may be attached to the LATCH
anchorages if allowed by the booster seat
manufacturer. See your booster seat owner’s
manual for more information.
Can a child seat be installed in the center
position using the inner LATCH lower
anchorages from the outboard seating
positions? N/A – Regular Cab
No – Crew Cab Full Bench rear seat Regular Cab Front / Crew Cab with full bench
rear seat: Use the seat belt and tether anchor to
install a child seat in the center seating position.
Crew Cab with split bench rear seat / Mega Cab:
Child restraints can be installed using the
supplied lower anchorages for the center
seating position.
4
20_DJD2_OM_EN_USC_t.book Page 197