horn Ram 4500 Chassis Cab 2018 User Guide
[x] Cancel search | Manufacturer: RAM, Model Year: 2018, Model line: 4500 Chassis Cab, Model: Ram 4500 Chassis Cab 2018Pages: 298, PDF Size: 5.88 MB
Page 16 of 298
operating positions, three of which are la-
beled and will illuminate when in position.
The three positions are OFF, ACC, and ON/
RUN. The fourth position is START, during
start RUN will illuminate. It also contains the
key fob and an emergency key, which stores
in the rear of the key fob.
The emergency key allows for entry into the
vehicle should the battery in the vehicle or
the key fob go dead. You can keep the emer-
gency key with you when valet parking.
To remove the emergency key, slide the me-
chanical latch on the backside of the key fob
sideways with your thumb and then pull the
key out with your other hand.
NOTE:
• When using the emergency key to gainaccess to your vehicle, be aware that the
security alarm may be triggered. Put the
nose side (side opposite of the emergency
key) of the key fob against the ENGINE
START/STOP button and push to disarm
the security system. • You can insert the double-sided emergency
key into the door lock cylinder with either
side up.
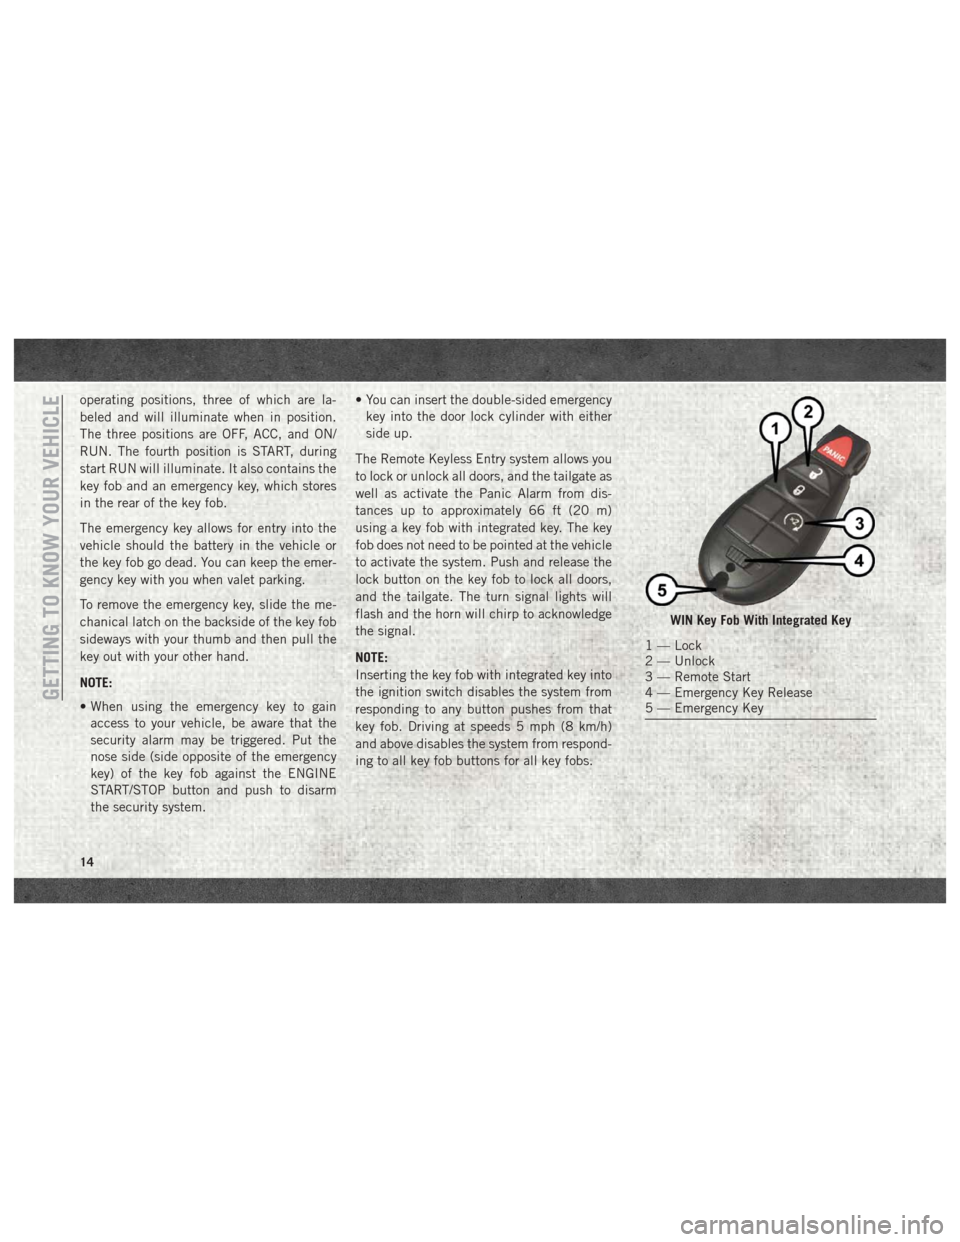
The Remote Keyless Entry system allows you
to lock or unlock all doors, and the tailgate as
well as activate the Panic Alarm from dis-
tances up to approximately 66 ft (20 m)
using a key fob with integrated key. The key
fob does not need to be pointed at the vehicle
to activate the system. Push and release the
lock button on the key fob to lock all doors,
and the tailgate. The turn signal lights will
flash and the horn will chirp to acknowledge
the signal.
NOTE:
Inserting the key fob with integrated key into
the ignition switch disables the system from
responding to any button pushes from that
key fob. Driving at speeds 5 mph (8 km/h)
and above disables the system from respond-
ing to all key fob buttons for all key fobs.
WIN Key Fob With Integrated Key
1 — Lock
2 — Unlock
3 — Remote Start
4 — Emergency Key Release
5 — Emergency Key
GETTING TO KNOW YOUR VEHICLE
14
Page 17 of 298
To Unlock The Doors And Tailgate
Push and release the unlock button on the
key fob once to unlock the driver’s door. Push
the unlock button twice within five seconds
to unlock all doors, and the tailgate. The turnsignal lights will flash to acknowledge the
unlock signal. The illuminated entry system
will also turn on.
NOTE:
The instrument cluster display or Uconnect
Settings are setup for driver door first, other-
wise this will unlock all doors.
To Lock The Doors And Tailgate
Push and release the lock button on the key
fob to lock all doors, and the tailgate. The
turn signal lights will flash and the horn will
chirp to acknowledge the signal.
Using The Panic Alarm
To turn the Panic Alarm feature on or off,
push the Panic button on the key fob. When
the Panic Alarm is activated, the turn signals
will flash, the horn will pulse on and off, and
the interior lights will turn on.
The Panic Alarm will stay on for three min-
utes unless you turn it off by either pushing
the Panic button a second time or drive the
vehicle at a speed of 15 mph (24 km/h) or
greater.
NOTE:
• The interior lights will turn off if you place
the ignition in the ACC or ON/RUN position
while the Panic Alarm is activated. How-
ever, the exterior lights and horn will remain
on.
• You may need to be less than 35 ft (11 m) from the vehicle when using the key fob to
turn off the Panic Alarm due to the radio
frequency noises emitted by the system.
General Information
The following regulatory statement applies to
all radio frequency (RF) devices equipped in
this vehicle:
This device complies with Part 15 of the FCC
Rules and with Industry Canada license-
exempt RSS standard(s). Operation is sub-
ject to the following two conditions:
1. This device may not cause harmful inter-
ference, and
2. This device must accept any interference received, including interference that may
cause undesired operation.
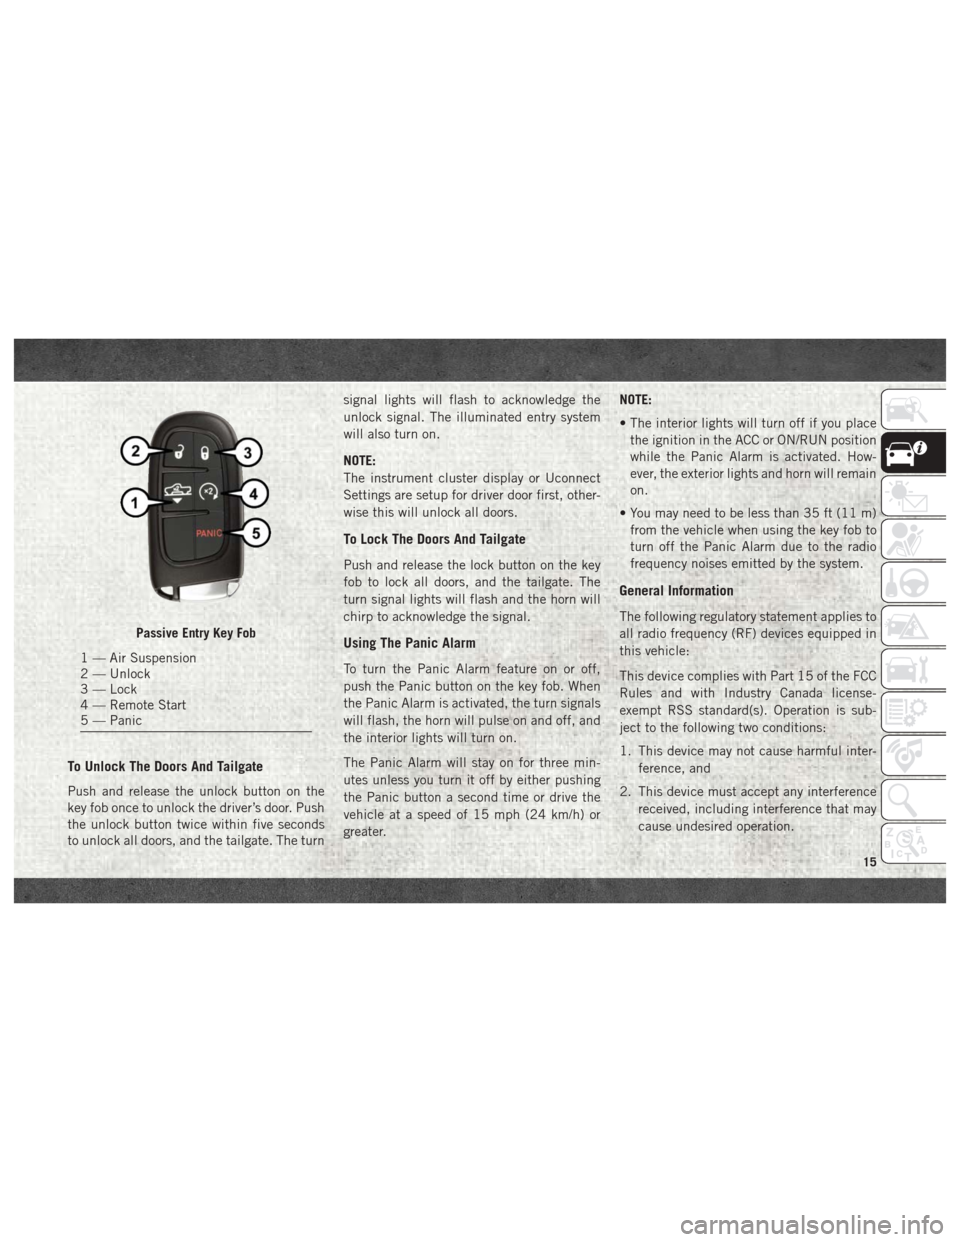
Passive Entry Key Fob
1 — Air Suspension
2 — Unlock
3 — Lock
4 — Remote Start
5 — Panic
15
Page 18 of 298
NOTE:
Changes or modifications not expressly ap-
proved by the party responsible for compli-
ance could void the user’s authority to oper-
ate the equipment.
IGNITION SWITCH
Wireless Ignition Node (WIN) —
If Equipped
The Wireless Ignition Node (WIN) operates
similar to an ignition switch. It has four
operating positions, three with detents and
one that is spring-loaded. The detent posi-
tions are OFF, ACC, and ON/RUN. The START
position is a spring-loaded momentary con-
tact position. When released from the START
position, the switch automatically returns to
the ON/RUN position.
Keyless Push Button Ignition —
If Equipped
This feature allows the driver to operate the
ignition switch with the push of a button as
long as the Remote Keyless Entry key fob is in
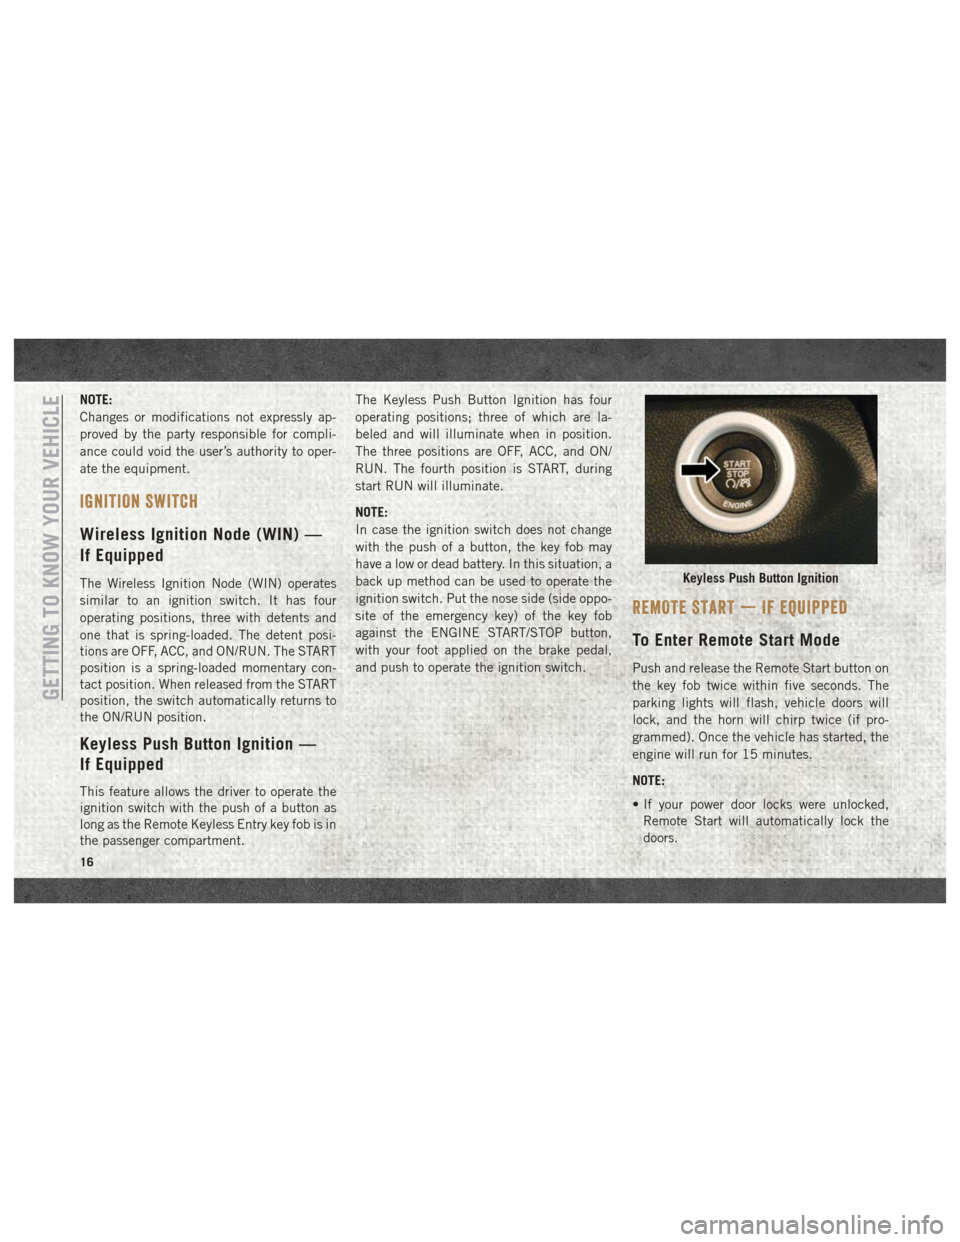
the passenger compartment.The Keyless Push Button Ignition has four
operating positions; three of which are la-
beled and will illuminate when in position.
The three positions are OFF, ACC, and ON/
RUN. The fourth position is START, during
start RUN will illuminate.
NOTE:
In case the ignition switch does not change
with the push of a button, the key fob may
have a low or dead battery. In this situation, a
back up method can be used to operate the
ignition switch. Put the nose side (side oppo-
site of the emergency key) of the key fob
against the ENGINE START/STOP button,
with your foot applied on the brake pedal,
and push to operate the ignition switch.
REMOTE START — IF EQUIPPED
To Enter Remote Start Mode
Push and release the Remote Start button on
the key fob twice within five seconds. The
parking lights will flash, vehicle doors will
lock, and the horn will chirp twice (if pro-
grammed). Once the vehicle has started, the
engine will run for 15 minutes.
NOTE:
• If your power door locks were unlocked,
Remote Start will automatically lock the
doors.
Keyless Push Button Ignition
GETTING TO KNOW YOUR VEHICLE
16
Page 19 of 298
• If an engine fault is present or fuel level islow, the vehicle will start and then shut
down in 10 seconds.
• The park lamps will turn on and remain on during Remote Start mode.
• For security, power window and power sun- roof operation (if equipped) are disabled
when the vehicle is in the Remote Start
mode.
• The engine can be started two consecutive times (two 15-minute cycles) with the key
fob. However, the ignition must be placed
in the ON/RUN position before you can
repeat the start sequence for a third cycle.
To Exit Remote Start Mode
Without Driving The Vehicle
Push and release the remote start button one
time or allow the engine to run for the entire
15-minute cycle.
NOTE:
To avoid unintentional shutdowns, the system
will disable with a one time push of the
remote start button for two seconds after
receiving a valid remote start request.
To Exit Remote Start Mode And
Drive The Vehicle
Before the end of the 15-minute cycle, push
and release the unlock button on the key fob
to unlock the doors and disarm the vehicle
security alarm system (if equipped). Then,
prior to the end of the 15-minute cycle, cycle
the ignition to the ON/RUN position.
General Information
The following regulatory statement applies to
all radio frequency (RF) devices equipped in
this vehicle:
This device complies with Part 15 of the FCC
Rules and with Industry Canada license-
exempt RSS standard(s). Operation is sub-
ject to the following two conditions:
1. This device may not cause harmful inter-
ference, and
2. This device must accept any interference received, including interference that may
cause undesired operation. NOTE:
Changes or modifications not expressly ap-
proved by the party responsible for compli-
ance could void the user’s authority to oper-
ate the equipment.
VEHICLE SECURITY ALARM
The vehicle security alarm monitors the ve-
hicle doors and ignition for unauthorized op-
eration. When the vehicle security alarm is
activated, interior switches for door locks are
disabled. The system provides both audible
and visible signals for the first three minutes.
The horn will sound, the headlights will turn
on, the park lamps and/or turn signals will
flash and vehicle security light will flash
repeatedly. For an additional 15 minutes
only, the headlights will turn on, the park
lamps and/or turn signals, and vehicle secu-
rity light will flash.
17
Page 21 of 298
battery is reconnected; the exterior lights will
flash, and the horn will sound. If this occurs,
disarm the vehicle security alarm.
DOORS
Keyless Enter-N-Go — Passive
Entry
The Passive Entry system is an enhancement
to the vehicle’s Remote Keyless Entry system
and a feature of Keyless Enter-N-Go. This
feature allows you to lock and unlock the
vehicle’s door(s) without having to push the
key fob lock or unlock buttons.
NOTE:
•
Refer to “Uconnect Settings” in “Multimedia”
in the Owner’s Manual at
www.mopar.com/
en-us/care/owners-manual.html (U.S.
Residents) or www.owners.mopar.ca
(Canadian Residents) for further information.
• If wearing gloves on your hands, or if it has been raining/snowing on the Passive Entry
door handle, the unlock sensitivity can be
affected, resulting in a slower response
time. • If the vehicle is unlocked by Passive Entry
and no door is opened within 60 seconds,
the vehicle will re-lock and if equipped will
arm the security alarm.
• The vehicles security alarm can be armed/ disarmed by pushing the passive entry key
fob lock/unlock buttons (if equipped).
• The key fob may not be able to be detected by the vehicle passive entry system if it is
located next to a mobile phone, laptop or
other electronic device; these devices may
block the key fob's wireless signal and pre-
vent the passive entry handle from locking/
unlocking the vehicle.
To Unlock From The Driver's Side:
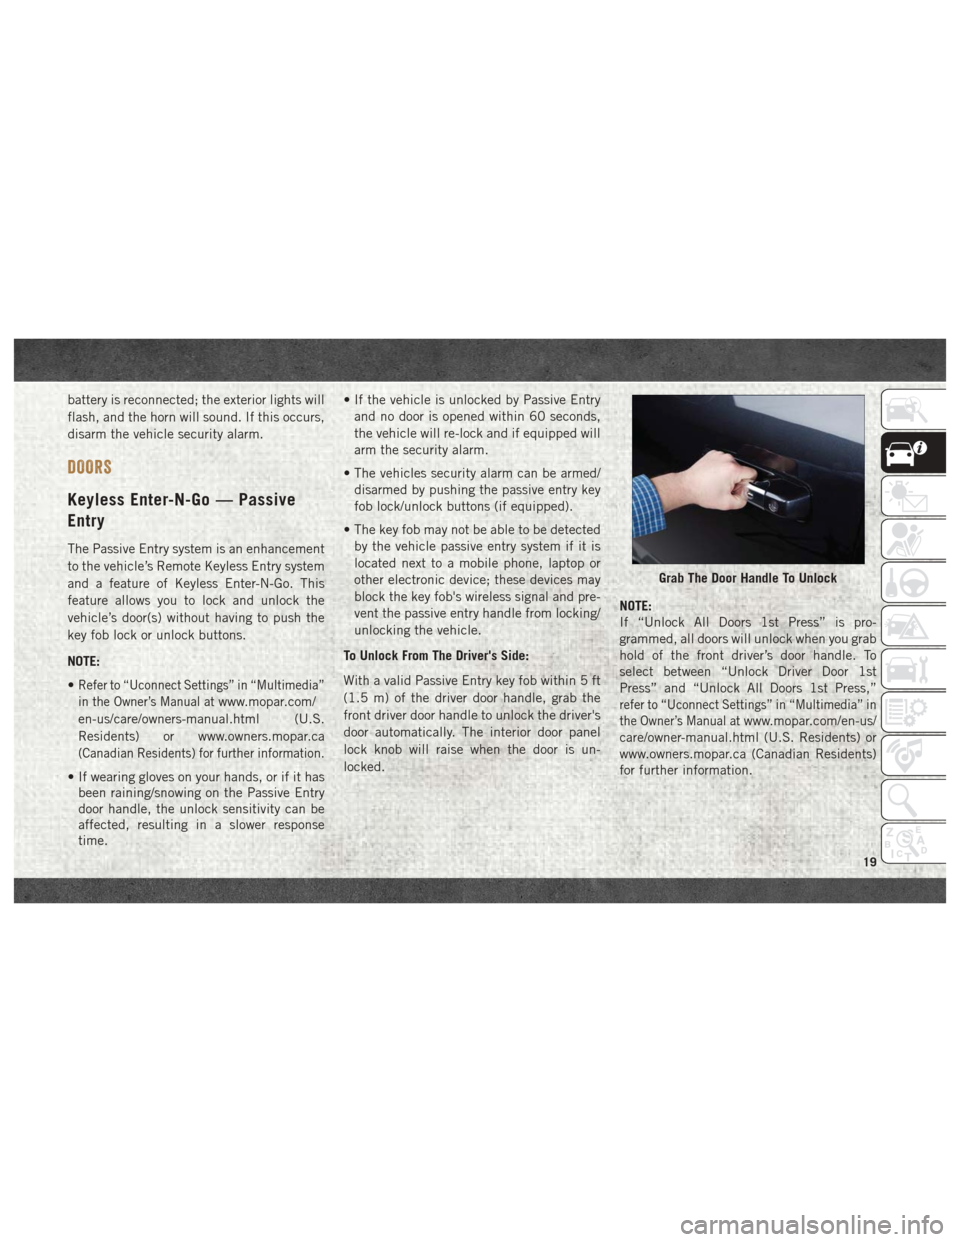
With a valid Passive Entry key fob within 5 ft
(1.5 m) of the driver door handle, grab the
front driver door handle to unlock the driver's
door automatically. The interior door panel
lock knob will raise when the door is un-
locked. NOTE:
If “Unlock All Doors 1st Press” is pro-
grammed, all doors will unlock when you grab
hold of the front driver’s door handle. To
select between “Unlock Driver Door 1st
Press” and “Unlock All Doors 1st Press,”
refer to “Uconnect Settings” in “Multimedia” in
the Owner’s Manual at
www.mopar.com/en-us/
care/owner-manual.html (U.S. Residents) or
www.owners.mopar.ca (Canadian Residents)
for further information.
Grab The Door Handle To Unlock
19
Page 22 of 298
To Unlock From The Passenger Side:
With a valid Passive Entry key fob within 5 ft
(1.5 m) of the passenger door handle, grab
the front passenger door handle to unlock all
doors automatically. The interior door panel
lock knob will raise when the door is un-
locked.
NOTE:
All doors will unlock when the front passen-
ger door handle is grabbed regardless of the
driver’s door unlock preference setting (“Un-
lock Driver Door 1st Press” or “Unlock All
Doors 1st Press”).
Preventing Inadvertent Locking Of Passive Entry
Key Fob In Vehicle:
To minimize the possibility of unintentionally
locking a Passive Entry key fob inside your
vehicle, the Passive Entry system is equipped
with an automatic door unlock feature which
will function if the ignition switch is in the
OFF position.
If one of the vehicle doors is open and the
door panel switch is used to lock the vehicle,
once all open doors have been closed the
vehicle checks the inside and outside of thevehicle for any valid Passive Entry key fobs. If
one of the vehicle's Passive Entry key fobs is
detected inside the vehicle, and no other
valid Passive Entry key fobs are detected
outside the vehicle, the Passive Entry System
automatically unlocks all vehicle doors and
chirps the horn three times (on the third
attempt ALL doors will lock and the Passive
Entry key fob can be locked in the vehicle).
To Lock The Vehicle’s Doors:
With one of the vehicle’s Passive Entry key
fobs within 5 ft (1.5 m) of the driver or
passenger front door handles, push the door
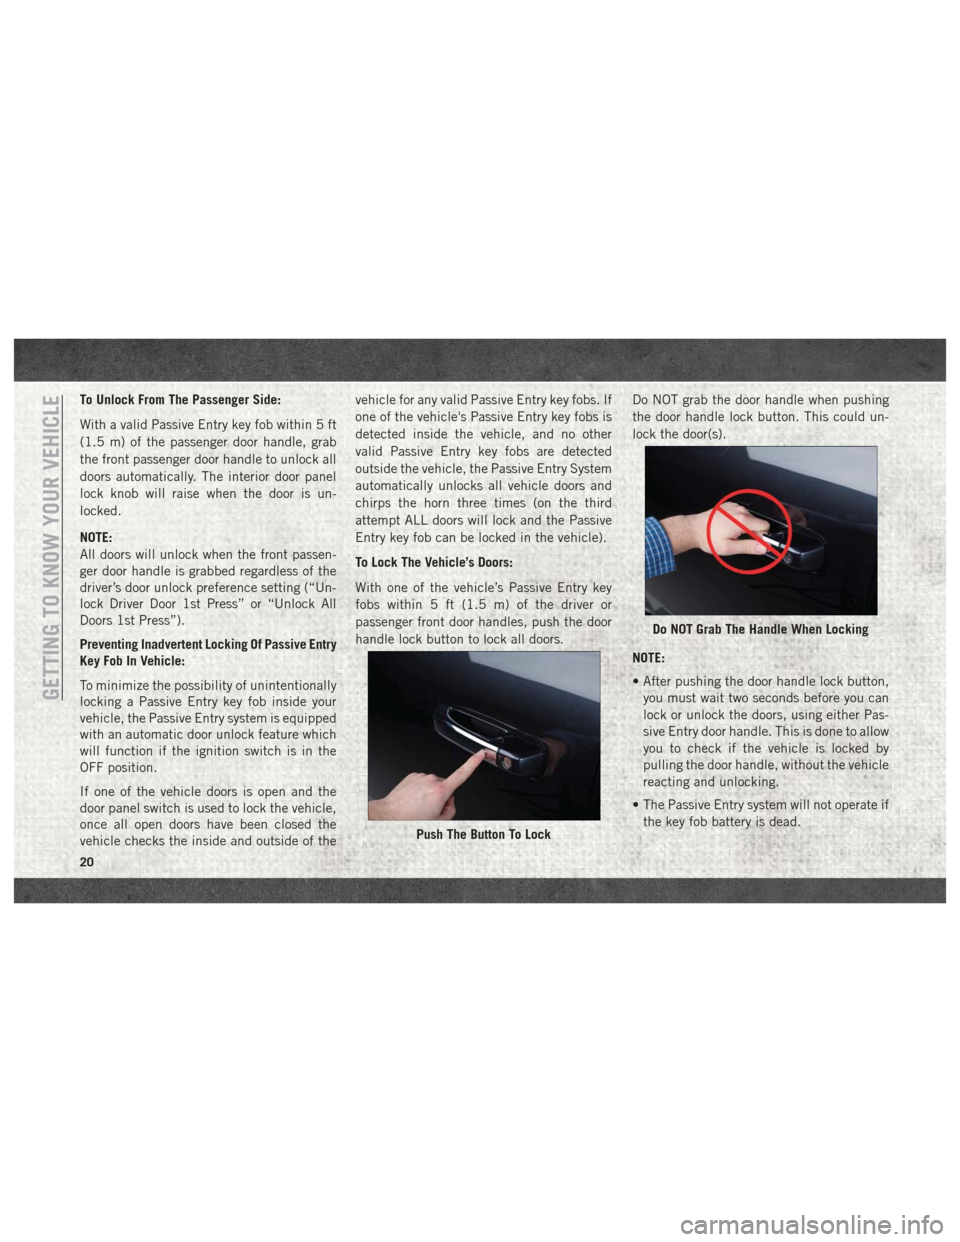
handle lock button to lock all doors.
Do NOT grab the door handle when pushing
the door handle lock button. This could un-
lock the door(s).
NOTE:
• After pushing the door handle lock button,
you must wait two seconds before you can
lock or unlock the doors, using either Pas-
sive Entry door handle. This is done to allow
you to check if the vehicle is locked by
pulling the door handle, without the vehicle
reacting and unlocking.
• The Passive Entry system will not operate if the key fob battery is dead.
Push The Button To Lock
Do NOT Grab The Handle When Locking
GETTING TO KNOW YOUR VEHICLE
20
Page 62 of 298
Instrument Cluster Display Programmable Features
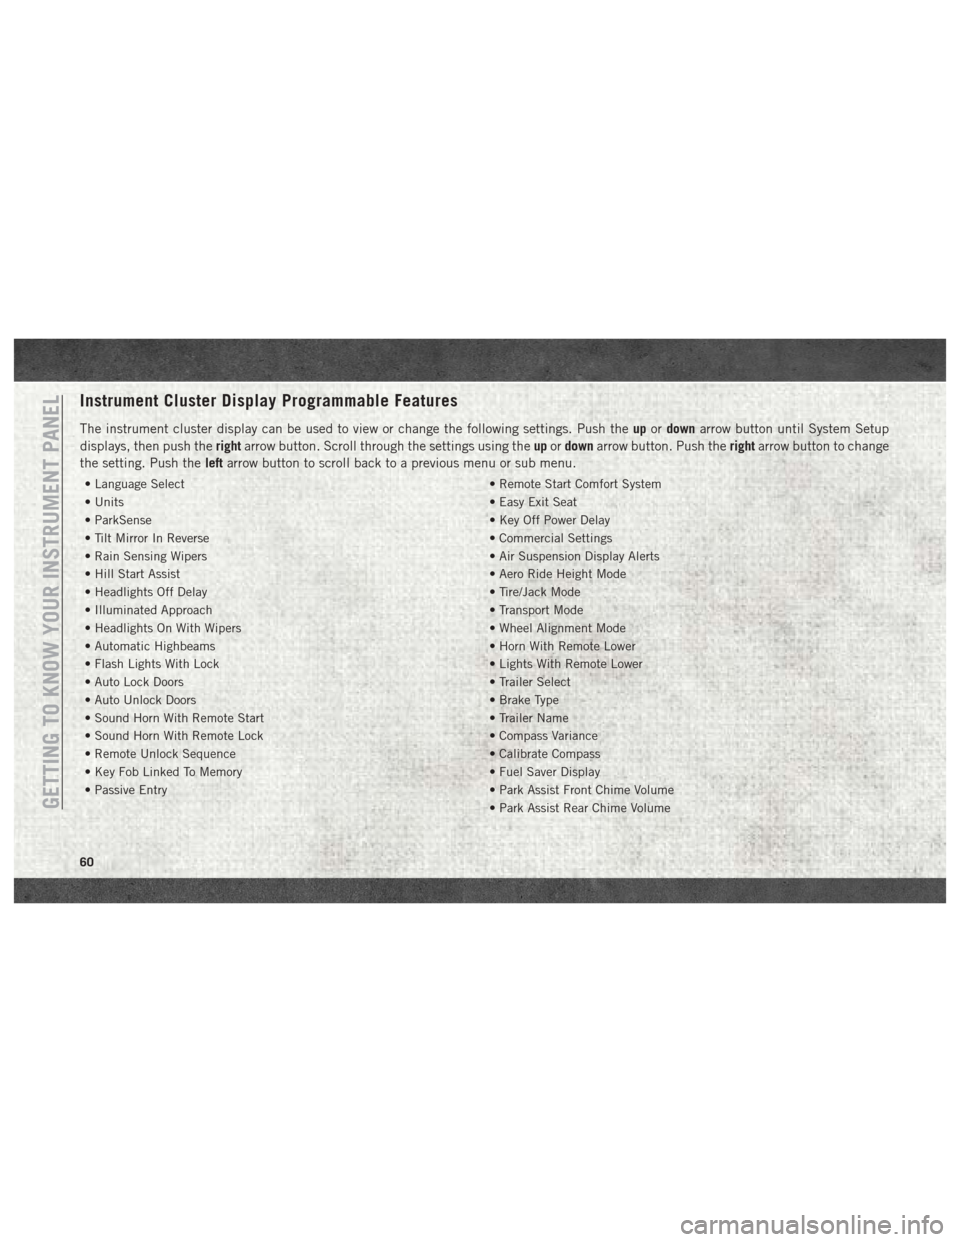
The instrument cluster display can be used to view or change the following settings. Push theupordown arrow button until System Setup
displays, then push the rightarrow button. Scroll through the settings using the upordown arrow button. Push the rightarrow button to change
the setting. Push the leftarrow button to scroll back to a previous menu or sub menu.
• Language Select • Remote Start Comfort System
• Units • Easy Exit Seat
• ParkSense • Key Off Power Delay
• Tilt Mirror In Reverse • Commercial Settings
• Rain Sensing Wipers • Air Suspension Display Alerts
• Hill Start Assist • Aero Ride Height Mode
• Headlights Off Delay • Tire/Jack Mode
• Illuminated Approach • Transport Mode
• Headlights On With Wipers • Wheel Alignment Mode
• Automatic Highbeams • Horn With Remote Lower
• Flash Lights With Lock • Lights With Remote Lower
• Auto Lock Doors • Trailer Select
• Auto Unlock Doors • Brake Type
• Sound Horn With Remote Start • Trailer Name
• Sound Horn With Remote Lock • Compass Variance
• Remote Unlock Sequence • Calibrate Compass
• Key Fob Linked To Memory • Fuel Saver Display
• Passive Entry • Park Assist Front Chime Volume
• Park Assist Rear Chime Volume
GETTING TO KNOW YOUR INSTRUMENT PANEL
60
Page 159 of 298
CavityCartridge Fuse Micro Fuse Description
F29 20 Amp Blue –Trailer Tow Parking Lights – If Equipped
F30 30 Amp Pink –Trailer Tow Receptacle
F31 30 Amp Pink (1500 LD
Diesel) –
Urea Heater Control – If Equipped
F32 –– Spare Fuse
F33 20 Amp Blue –Special Services Vehicle Only
F34 30 Amp Pink –Vehicle System Interface Module #2 – If Equipped
F35 30 Amp Pink –Sunroof – If Equipped
F36 30 Amp Pink –Rear Defroster – If Equipped
F37 30 Amp Pink –Cummins Diesel Fuel Heater #2 – If Equipped
F38 30 Amp Pink –Power Inverter 115V AC – If Equipped
F39 20 Amp Blue –Power Outlet – Special Services Only
F41 –10 Amp Red Active Grill Shutter – If Equipped
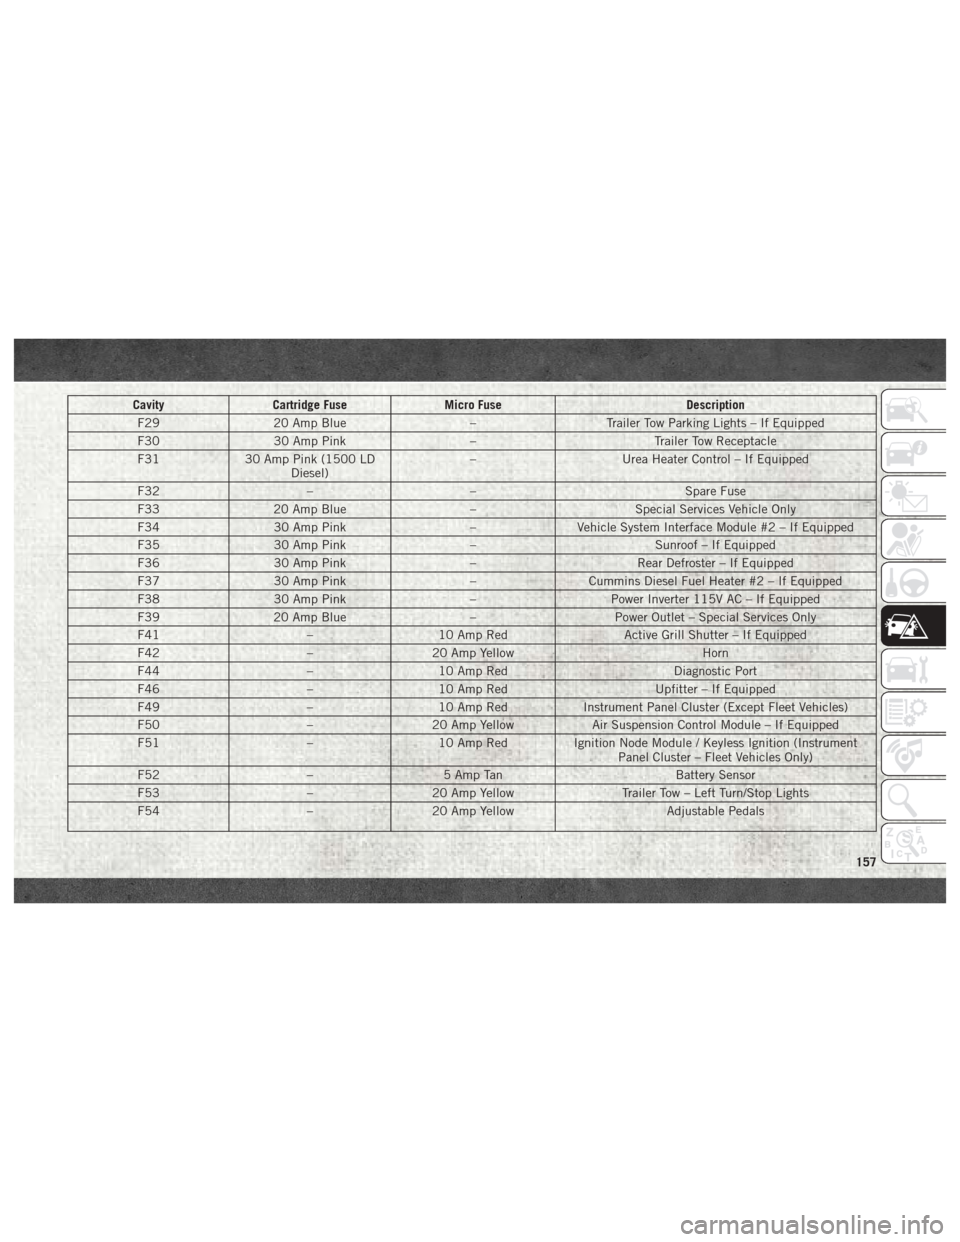
F42 –20 Amp Yellow Horn
F44 –10 Amp Red Diagnostic Port
F46 –10 Amp Red Upfitter – If Equipped
F49 –10 Amp Red Instrument Panel Cluster (Except Fleet Vehicles)
F50 –20 Amp Yellow Air Suspension Control Module – If Equipped
F51 –10 Amp Red Ignition Node Module / Keyless Ignition (Instrument
Panel Cluster – Fleet Vehicles Only)
F52 –5 Amp Tan Battery Sensor
F53 –20 Amp Yellow Trailer Tow – Left Turn/Stop Lights
F54 –20 Amp Yellow Adjustable Pedals
157
Page 252 of 298
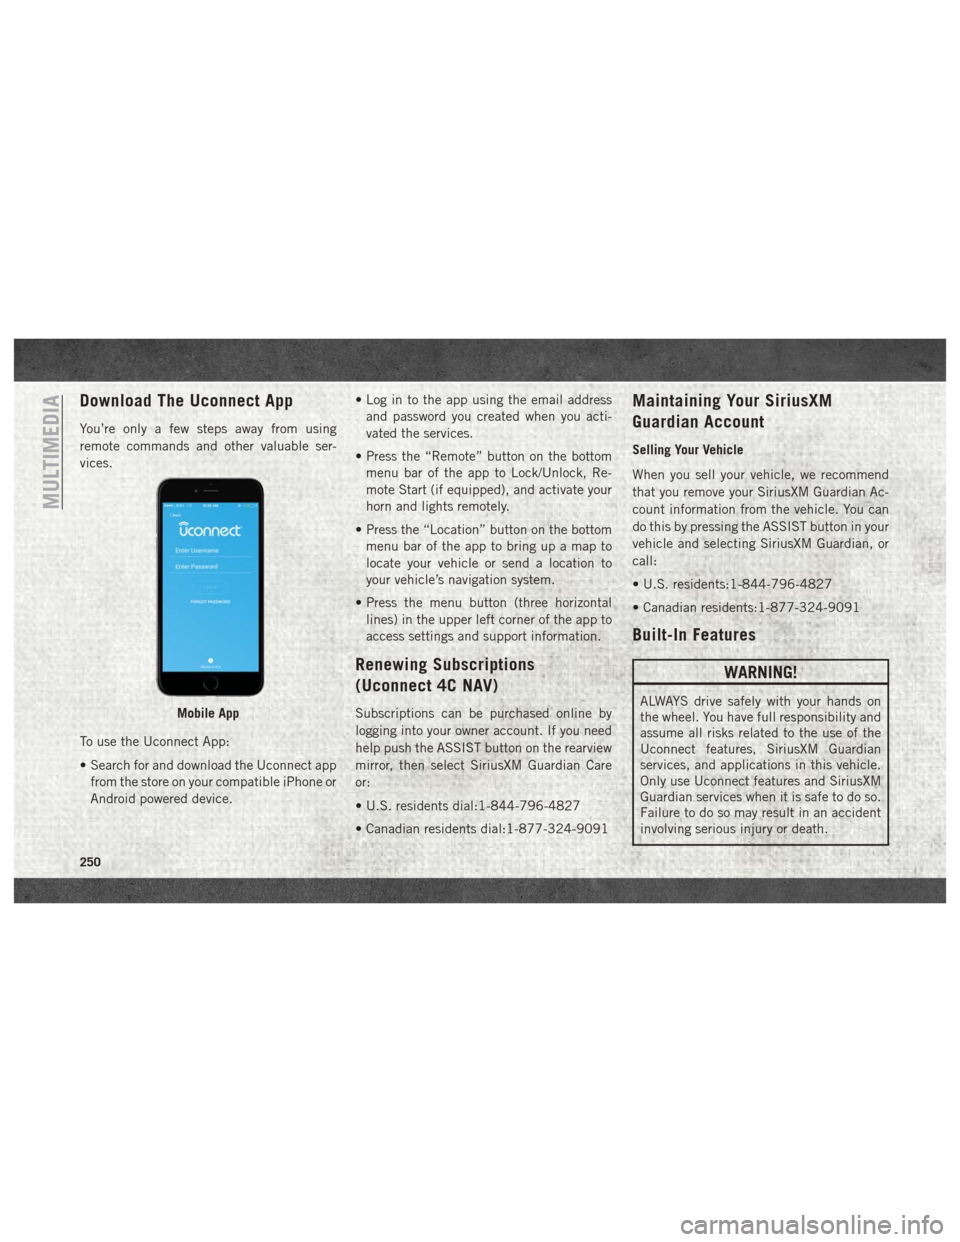
Download The Uconnect App
You’re only a few steps away from using
remote commands and other valuable ser-
vices.
To use the Uconnect App:
• Search for and download the Uconnect appfrom the store on your compatible iPhone or
Android powered device. • Log in to the app using the email address
and password you created when you acti-
vated the services.
• Press the “Remote” button on the bottom menu bar of the app to Lock/Unlock, Re-
mote Start (if equipped), and activate your
horn and lights remotely.
• Press the “Location” button on the bottom menu bar of the app to bring up a map to
locate your vehicle or send a location to
your vehicle’s navigation system.
• Press the menu button (three horizontal lines) in the upper left corner of the app to
access settings and support information.
Renewing Subscriptions
(Uconnect 4C NAV)
Subscriptions can be purchased online by
logging into your owner account. If you need
help push the ASSIST button on the rearview
mirror, then select SiriusXM Guardian Care
or:
• U.S. residents dial:1-844-796-4827
• Canadian residents dial:1-877-324-9091
Maintaining Your SiriusXM
Guardian Account
Selling Your Vehicle
When you sell your vehicle, we recommend
that you remove your SiriusXM Guardian Ac-
count information from the vehicle. You can
do this by pressing the ASSIST button in your
vehicle and selecting SiriusXM Guardian, or
call:
• U.S. residents:1-844-796-4827
• Canadian residents:1-877-324-9091
Built-In Features
WARNING!
ALWAYS drive safely with your hands on
the wheel. You have full responsibility and
assume all risks related to the use of the
Uconnect features, SiriusXM Guardian
services, and applications in this vehicle.
Only use Uconnect features and SiriusXM
Guardian services when it is safe to do so.
Failure to do so may result in an accident
involving serious injury or death.Mobile App
MULTIMEDIA
250
Page 255 of 298
4.Stolen Vehicle Assistance — If your vehicle
is stolen, contact local law enforcement
immediately to file a stolen vehicle report.
Once this report has been filed, SiriusXM
Guardian Care can help locate your ve-
hicle. The SiriusXM Guardian Care agent
will ask for the stolen vehicle report num-
ber issued by local law enforcement. As
long as your vehicle has a SiriusXM Guard-
ian subscription and an operable network
connection, the agent may be able to
locate the stolen vehicle and work with
law enforcement to help recover it. Your
vehicle must have an operable network
connection and must be registered with
SiriusXM Guardian with an active sub-
scription that includes the applicable
feature.
5. 4G Wi-Fi Hotspot — If Equipped — Allows
you and your passengers to connect their
portable devices to the built-in 4G Wi-Fi
capabilities of your Uconnect system.
Purchasing 4G Wi-Fi Hotspot requires the
use of an Internet-enabled portable
device.
a. Select Wi-Fi Hotspot located under the Uconnect “Apps” menu. b. Select the Setup Wi-Fi Hotspot option
from the touchscreen to locate your
Hotspot Name and Password.
c. From your portable device Wi-Fi set- tings menu, select the Hotspot Name
from the list of available networks and
enter the provided Password.
d. Open the web browser on your por- table device and enter the following
web address:
www.att.com/myvehicleaccount.
e. Create a myVehicle account or log in to your existing one.
f. Select and purchase the desired sub- scription option. The Wi-Fi Hotspot
will activate after a few minutes.
For additional assistance, call AT&T
Customer Care at: 866-595-1330.
NOTE:
Your vehicle must have a working electrical
system for any of the in vehicle SiriusXM
Guardian services to operate.SiriusXM Guardian Remote
Features
If you own a compatible iPhone or Android
powered device, the Uconnect App allows
you to remotely lock or unlock your doors,
start your engine or activate your horn and
lights from virtually anywhere. Your vehicle
must be equipped with remote start, must
have a SiriusXM Guardian subscription, and
must have an operable network connection.
Services can only be used where coverage is
available. You can download the App from
Mopar Owner Connect or from the App Store
(iPhone) or Google Play Store (Android). Visit
UconnectPhone.com to determine if your de-
vice is compatible. For Uconnect Phone cus-
tomer support and to determine if your device
is compatible.
U.S. residents - visit UconnectPhone.com
or call 1-877-855-8400.
Canadian residents -
visit UconnectPhone.com or call:
1-800-465-2001 (English) or
call:1-800-387-9983 (French).
253