ECU Ram 4500 Chassis Cab 2018 Owner's Guide
[x] Cancel search | Manufacturer: RAM, Model Year: 2018, Model line: 4500 Chassis Cab, Model: Ram 4500 Chassis Cab 2018Pages: 298, PDF Size: 5.88 MB
Page 164 of 298
CAUTION!
Do not attempt to raise the vehicle by
jacking on locations other than those indi-
cated in the Jacking Instructions for this
vehicle.
1. If equipped, remove the spare wheel, jack, and tools from storage.
2. Using the lug wrench, loosen, but do not remove, the lug nuts by turning them
counterclockwise one turn while the
wheel is still on the ground.
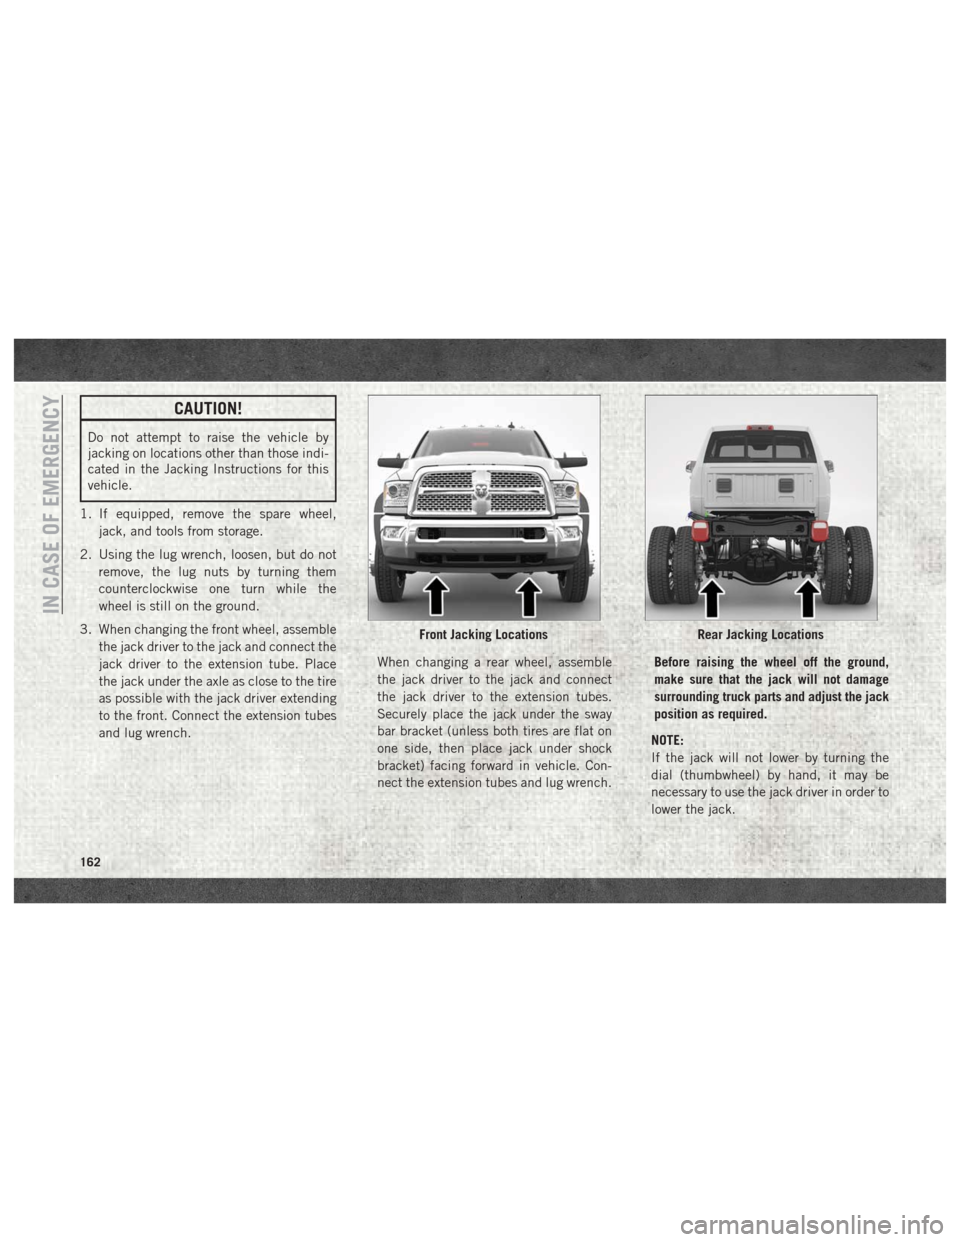
3. When changing the front wheel, assemble the jack driver to the jack and connect the
jack driver to the extension tube. Place
the jack under the axle as close to the tire
as possible with the jack driver extending
to the front. Connect the extension tubes
and lug wrench. When changing a rear wheel, assemble
the jack driver to the jack and connect
the jack driver to the extension tubes.
Securely place the jack under the sway
bar bracket (unless both tires are flat on
one side, then place jack under shock
bracket) facing forward in vehicle. Con-
nect the extension tubes and lug wrench.Before raising the wheel off the ground,
make sure that the jack will not damage
surrounding truck parts and adjust the jack
position as required.
NOTE:
If the jack will not lower by turning the
dial (thumbwheel) by hand, it may be
necessary to use the jack driver in order to
lower the jack.
Front Jacking LocationsRear Jacking Locations
IN CASE OF EMERGENCY
162
Page 172 of 298
CAUTION!
• Do not use sling type equipment whentowing. Vehicle damage may occur.
• When securing the vehicle to a flat bed
truck, do not attach to front or rear
suspension components. Damage to
your vehicle may result from improper
towing.
Two-Wheel Drive Models
The manufacturer recommends towing your
vehicle with all four wheels OFFthe ground
using a flatbed.
If flatbed equipment is not available, and the
transmission is operable, the vehicle may be
towed (with the rear wheels on the ground)
under the following conditions:
• The transmission must be in NEUTRAL.
• The towing speed must not exceed 30 mph (48 km/h).
• The towing distance must not exceed 15 miles (24 km). If the transmission is not operable, or the
vehicle must be towed faster than 30 mph
(48 km/h) or farther than 15 miles (24 km),
tow with the rear wheels
OFFthe ground.
Acceptable methods are to tow the vehicle on
a flatbed, or with the front wheels raised and
the rear wheels on a towing dolly, or (when
using a suitable steering wheel stabilizer to
hold the front wheels in the straight position)
with rear wheels raised and the front wheels
on the ground.CAUTION!
Towing this vehicle in violation of the
above requirements can cause severe en-
gine and/or transmission damage. Damage
from improper towing is not covered under
the New Vehicle Limited Warranty.
Four-Wheel Drive Models
The manufacturer recommends towing with
all wheels OFFthe ground. Acceptable meth-
ods are to tow the vehicle on a flatbed or with
one end of vehicle raised and the opposite
end on a towing dolly. If flatbed equipment is not available, and the
transfer case is operable, the vehicle may be
towed (in the forward direction, with
ALL
wheels on the ground), IFthe transfer case is
in NEUTRAL and the transmission is in PARK
(for automatic transmissions) or in gear (NOT
in NEUTRAL, for manual transmissions). Re-
fer to “Recreational Towing” in “Starting And
Operating” for further information and de-
tailed instructions.
CAUTION!
• Front or rear wheel lifts must not be used (if the remaining wheels are on the
ground). Internal damage to the trans-
mission or transfer case will occur if a
front or rear wheel lift is used when
towing.
• Towing this vehicle in violation of the
above requirements can cause severe
transmission and/or transfer case dam-
age. Damage from improper towing is
not covered under the New Vehicle Lim-
ited Warranty.IN CASE OF EMERGENCY
170
Page 223 of 298
MULTIMEDIA
CYBERSECURITY..............223
RADIO 3.0 ................. .224
Clock Setting.................225
Audio Setting .................225
Radio Operation ...............225
Disc Operation — If Equipped ......225
USB/Audio Jack (AUX) Manual
Operation ...................226
UCONNECT 3.0 ...............227
Clock Setting.................228
Audio Setting .................228
Radio Operation ...............228
Disc Operation — If Equipped ......228
USB/Audio Jack (AUX) Manual
Operation ...................229
UCONNECT 3 WITH 5-INCH DISPLAY . .230
Controls On The Front Panel .......230
Clock Setting .................231
Equalizer, Balance And Fade .......231
Radio Mode ..................232
Media Mode .................233 Bluetooth Source
..............236
UCONNECT 4C/4C NAV WITH
8.4-INCH DISPLAY .............237
Uconnect 4C/4C NAV At A Glance . . . .238
Personalized Menu Bar ...........241
Radio .....................242
Android Auto .................243
Apple CarPlay Integration .........246
SIRIUSXM GUARDIAN —
IF EQUIPPED................ .248
SiriusXM Guardian — If Equipped
(Available on Uconnect 4C NAV) .....248
SiriusXM Guardian Activation ......249
Download The Uconnect App .......250
Renewing Subscriptions
(Uconnect 4C NAV) .............250
Maintaining Your SiriusXM Guardian
Account ...................250
Built-In Features ..............250
SiriusXM Guardian Remote Features . .253
UCONNECT SETTINGS ...........256 TIPS CONTROLS AND GENERAL
INFORMATION
............... .257
Steering Wheel Audio Controls ......257
Reception Conditions ............257
Care And Maintenance ...........257
Anti-Theft Protection ............257
IPOD/USB/MEDIA PLAYER CONTROL . .257
Audio Jack (AUX)..............258
USB Port ...................258
Bluetooth Streaming Audio ........259
NAVIGATION................ .259
Changing The Navigation Voice Prompt
Volume....................259
Finding Points Of Interest .........261
Finding A Place By Spelling The Name .261
One-Step Voice Destination Entry . . . .261
Setting Your Home Location ........261
Home .....................261
Adding A Stop ................262
Taking A Detour ...............262
SiriusXM Traffic Plus (4C NAV) .....262
SiriusXM Travel Link (4C NAV) ......263
MULTIMEDIA
221
Page 225 of 298
CYBERSECURITY
Your vehicle may be a connected vehicle and
may be equipped with both wired and wire-
less networks. These networks allow your ve-
hicle to send and receive information. This
information allows systems and features in
your vehicle to function properly.
Your vehicle may be equipped with certain
security features to reduce the risk of unau-
thorized and unlawful access to vehicle sys-
tems and wireless communications. Vehicle
software technology continues to evolve over
time and FCA US LLC, working with its sup-
pliers, evaluates and takes appropriate steps
as needed. Similar to a computer or other
devices, your vehicle may require software
updates to improve the usability and perfor-
mance of your systems or to reduce the po-
tential risk of unauthorized and unlawful ac-
cess to your vehicle systems.
The risk of unauthorized and unlawful access
to your vehicle systems may still exist, even if
the most recent version of vehicle software
(such as Uconnect software) is installed.
WARNING!
• It is not possible to know or to predict allof the possible outcomes if your vehi-
cle’s systems are breached. It may be
possible that vehicle systems, including
safety related systems, could be im-
paired or a loss of vehicle control could
occur that may result in an accident
involving serious injury or death.
• ONLY insert media (e.g., USB, SD card,
or CD) into your vehicle if it came from a
trusted source. Media of unknown origin
could possibly contain malicious soft-
ware, and if installed in your vehicle, it
may increase the possibility for vehicle
systems to be breached.
• As always, if you experience unusual
vehicle behavior, take your vehicle to
your nearest authorized dealer immedi-
ately.
NOTE:
• FCA US LLC or your dealer may contact you directly regarding software updates. • To help further improve vehicle security and
minimize the potential risk of a security
breach, vehicle owners should: – Routinely check
www.driveuconnect.com/
software-update to learn about
available Uconnect software updates.
– Only connect and use trusted media devices (e.g. personal mobile phones,
USBs, CDs).
Privacy of any wireless and wired communi-
cations cannot be assured. Third parties may
unlawfully intercept information and private
communications without your consent. For
further information, refer to “Data Collection
& Privacy” in “Uconnect + SiriusXM Guard-
ian” in your Uconnect Owner's Manual
Supplement and “Onboard Diagnostic Sys-
tem (OBD II) Cybersecurity” in “Getting To
Know Your Instrument Panel” in your Owner’s
Manual at www.mopar.com/en-us/care/
owners-manual.html (U.S Residents) or
www.owners.mopar.ca (Canadian Residents)
for further information.
223
Page 248 of 298
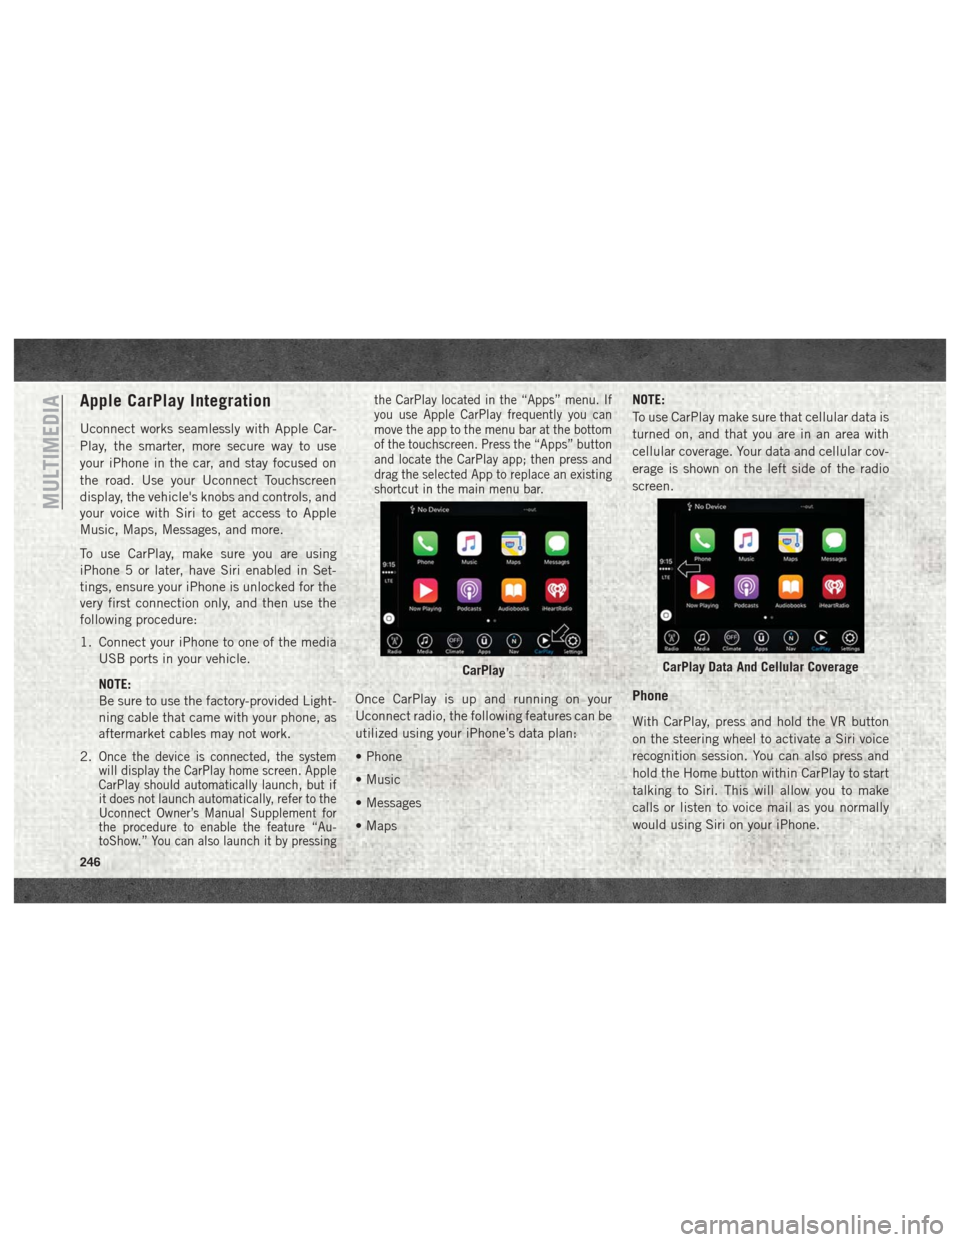
Apple CarPlay Integration
Uconnect works seamlessly with Apple Car-
Play, the smarter, more secure way to use
your iPhone in the car, and stay focused on
the road. Use your Uconnect Touchscreen
display, the vehicle's knobs and controls, and
your voice with Siri to get access to Apple
Music, Maps, Messages, and more.
To use CarPlay, make sure you are using
iPhone 5 or later, have Siri enabled in Set-
tings, ensure your iPhone is unlocked for the
very first connection only, and then use the
following procedure:
1. Connect your iPhone to one of the mediaUSB ports in your vehicle.
NOTE:
Be sure to use the factory-provided Light-
ning cable that came with your phone, as
aftermarket cables may not work.
2.
Once the device is connected, the system
will display the CarPlay home screen. Apple
CarPlay should automatically launch, but if
it does not launch automatically, refer to the
Uconnect Owner’s Manual Supplement for
the procedure to enable the feature “Au-
toShow.” You can also launch it by pressing the CarPlay located in the “Apps” menu. If
you use Apple CarPlay frequently you can
move the app to the menu bar at the bottom
of the touchscreen. Press the “Apps” button
and locate the CarPlay app; then press and
drag the selected App to replace an existing
shortcut in the main menu bar.
Once CarPlay is up and running on your
Uconnect radio, the following features can be
utilized using your iPhone’s data plan:
• Phone
• Music
• Messages
• Maps
NOTE:
To use CarPlay make sure that cellular data is
turned on, and that you are in an area with
cellular coverage. Your data and cellular cov-
erage is shown on the left side of the radio
screen.Phone
With CarPlay, press and hold the VR button
on the steering wheel to activate a Siri voice
recognition session. You can also press and
hold the Home button within CarPlay to start
talking to Siri. This will allow you to make
calls or listen to voice mail as you normally
would using Siri on your iPhone.
CarPlayCarPlay Data And Cellular Coverage
MULTIMEDIA
246
Page 250 of 298
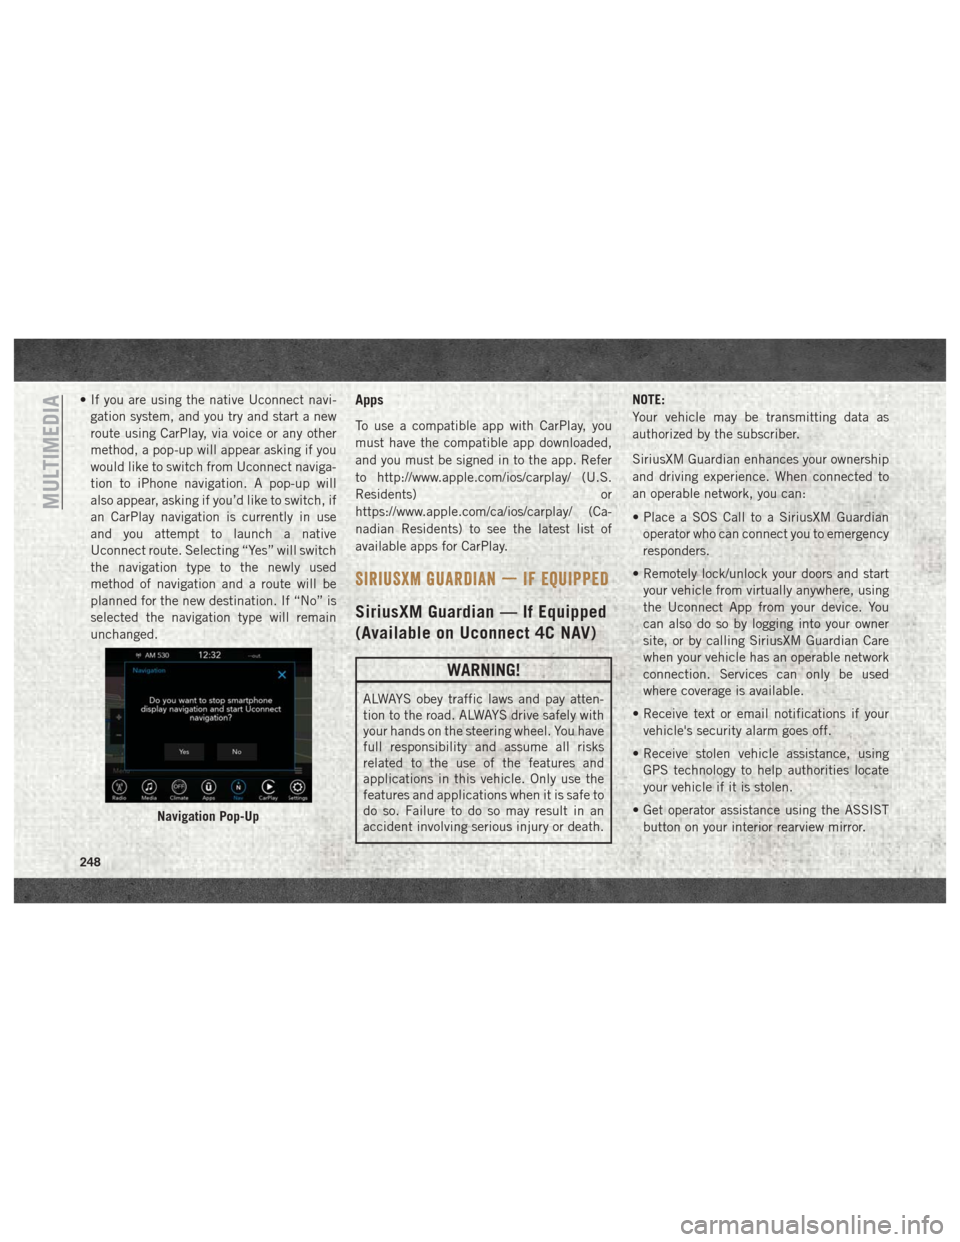
• If you are using the native Uconnect navi-gation system, and you try and start a new
route using CarPlay, via voice or any other
method, a pop-up will appear asking if you
would like to switch from Uconnect naviga-
tion to iPhone navigation. A pop-up will
also appear, asking if you’d like to switch, if
an CarPlay navigation is currently in use
and you attempt to launch a native
Uconnect route. Selecting “Yes” will switch
the navigation type to the newly used
method of navigation and a route will be
planned for the new destination. If “No” is
selected the navigation type will remain
unchanged.Apps
To use a compatible app with CarPlay, you
must have the compatible app downloaded,
and you must be signed in to the app. Refer
to http://www.apple.com/ios/carplay/ (U.S.
Residents) or
https://www.apple.com/ca/ios/carplay/ (Ca-
nadian Residents) to see the latest list of
available apps for CarPlay.
SIRIUSXM GUARDIAN — IF EQUIPPED
SiriusXM Guardian — If Equipped
(Available on Uconnect 4C NAV)
WARNING!
ALWAYS obey traffic laws and pay atten-
tion to the road. ALWAYS drive safely with
your hands on the steering wheel. You have
full responsibility and assume all risks
related to the use of the features and
applications in this vehicle. Only use the
features and applications when it is safe to
do so. Failure to do so may result in an
accident involving serious injury or death. NOTE:
Your vehicle may be transmitting data as
authorized by the subscriber.
SiriusXM Guardian enhances your ownership
and driving experience. When connected to
an operable network, you can:
• Place a SOS Call to a SiriusXM Guardian
operator who can connect you to emergency
responders.
• Remotely lock/unlock your doors and start your vehicle from virtually anywhere, using
the Uconnect App from your device. You
can also do so by logging into your owner
site, or by calling SiriusXM Guardian Care
when your vehicle has an operable network
connection. Services can only be used
where coverage is available.
• Receive text or email notifications if your vehicle's security alarm goes off.
• Receive stolen vehicle assistance, using GPS technology to help authorities locate
your vehicle if it is stolen.
• Get operator assistance using the ASSIST button on your interior rearview mirror.
Navigation Pop-Up
MULTIMEDIA
248
Page 254 of 298
•Uconnect Care — In vehicle support for
Uconnect Apps and Features.
• SiriusXM Guardian Care — In vehicle
support for SiriusXM Guardian ser-
vices.
• Vehicle Care — Total support for your
FCA US LLC vehicle.
NOTE:
In order to provide SiriusXM Guardian Ser-
vices to you, we may record and monitor your
conversations with Roadside Assistance,
Uconnect Care, SiriusXM Guardian Care, or
Vehicle Care, whether such conversations are
initiated through the SiriusXM Guardian ser-
vices in your vehicle, your device, or via a
landline device, and may share information
obtained through such recording and moni-
toring in accordance with regulatory require-
ments. You acknowledge, agree, and consent
to any recording, monitoring or sharing of
information obtained through any such call
recordings. 2.
Emergency SOS Call (If Equipped) — The
rearview mirror contains a SOS Call but-
ton that, when pressed, may place a call
from your vehicle to a SiriusXM Guardian
Care operator, who can connect you to
emergency service operators, to request
help from local police, fire or ambulance
personnel. If this button is accidentally
pressed, you will have ten seconds to stop
the call. To cancel, press the SOS Call
button again or press the “Cancel” button
shown on the touchscreen. After ten sec-
onds has passed, the SOS call will be
placed and only the SOS Call operator can
cancel it. The LED light on the rearview
mirror will turn green once a connection to
a SOS Call operator has been made. The
green LED light will turn off once the SOS
Call is terminated. Have an authorized
dealer service the vehicle if the rearview
mirror light is continuously red. On
equipped vehicles, this feature requires a
functioning electrical system, a subscrip-
tion, and an operable network connection. If a connection is made between a SOS Call
operator and your vehicle, you understand
and agree that SOS Call operators will stay
on the line, even after you connect with
emergency services. The Emergency ser-
vices operator may, like any other emer-
gency call, record conversations and
sounds in and near your vehicle upon
connection.
3. Theft Alarm Notification — The Theft Alarm
Notification feature notifies you via email
or text (SMS) message when the vehicle’s
factory-installed security alarm system
has been set-off. There are a number of
reasons why your alarm may have been
triggered, one of which could be that your
vehicle was stolen. If so, please see the
details of the Stolen Vehicle Assistance
service below. When you activate, Theft
Alarm Notification is automatically set to
send you an email at the email address
you provide should the alarm go off. You
may also opt to have a text message sent
to your device.
MULTIMEDIA
252
Page 256 of 298
Remote Start (If Equipped)— This feature
provides the ability to start the engine on your
vehicle, without the keys and from virtually
any distance. You can send a request to your
vehicle in one of two ways:
1. Using the Uconnect App from a compat- ible device.
2. From the Mopar Owner Connect website.
• After 15 minutes if you have not en-tered your vehicle with the key, the
engine will shut off automatically.
• You can also send a command to turn- off an engine that has been remote
started.
• This remote function requires your ve- hicle to be equipped with a factory-
installed Remote Start system. To uti-
lize this feature after the Uconnect App
is downloaded, login with your user
name and password. To use this feature after the Uconncet App is
downloaded, login using your user name and
password. You will need your four digit
SiriusXM Guardian Security PIN to confirm
the request. Press the “remote start” icon on
your Uconnect App to remotely start the ve-
hicle.
You can set-up notifications for your account to
receive an email or text (SMS) message every
time a command is sent. Login to Mopar Owner
Connect at
moparownerconnect.com and
click on Edit Profile to manage SiriusXM
Guardian Notifications.
Remote Door Lock/Unlock — This feature pro-
vides the ability to lock or unlock the door on
your vehicle, without the keys and from virtu-
ally any distance. You can send a request to
your vehicle in one of three ways:
1. Using the Uconnect App from a compat- ible device.
2. From the Mopar Owner Connect website. 3. By contacting the SiriusXM Guardian Care
on the phone.
To use this feature after the Uconnect App is
downloaded, login using your user name and
password. You will need your four digit
SiriusXM Guardian Security PIN to confirm
the request. Press the “closed lock” icon on
your Uconnect App to lock the doors, and
press the “open lock” icon to unlock the
driver’s door.You can set-up notifications for your account to
receive an email or text (SMS) message every
time a command is sent. Login to Mopar Owner
Connect at
moparownerconnect.com and
click on Edit Profile to manage SiriusXM
Guardian Notifications.
MULTIMEDIA
254
Page 257 of 298
Remote Horn And Lights— It’s easy to locate a
vehicle in a dark, crowded or noisy parking
area by activating the horn and lights. It may
also help if you need to draw attention to your
vehicle for any reason. You can send a re-
quest to your vehicle in one of three ways:
1. Using the Uconnect App from a compat- ible device.
2. From the Mopar Owner Connect website.
3. By contacting the SiriusXM Guardian Care on the phone.
To use this feature after the Uconnect App is
downloaded, login using your user name and
password. You will need your four digit
SiriusXM Guardian Security PIN to confirm
the request. You can set-up notifications for
your account to receive an email or text
(SMS) message every time a command is
sent. Login to Mopar Owner Connect at
moparownerconnect.com and click on Edit
Profile to manage SiriusXM Guardian Notifi-
cations.Vehicle Finder
The Vehicle Finder feature of the Uconnect
Mobile App allows you to find the location of
your vehicle when you can't remember where
it's parked. You can also sound the alarm and
flash the lights to make finding your vehicle
even easier.
To find your vehicle:
1. Press the “Location” tab on the Uconnect Mobile App bottom bar.
2. Select the “Vehicle” icon to determine the location of your vehicle.
3. Select the “Find Route” button that ap- pears, once your vehicle is located.
4. Select your preferred Navigation App to route a path to your vehicle.
Send & Go
The Send & Go feature of the Uconnect
Mobile App allows you to search for a desti-
nation on your mobile device and then send
the route to your vehicle’s Uconnect Naviga-
tion system.
To send a navigation route to your vehicle:
1. Press the “Location” tab on the UconnectMobile App bottom bar.
2. Either type in the destination you would like to navigate to, or search through one
of the categories provided.
3. Select the destination you want to route to from the list that appears.
4. Press the “Send To Vehicle” button, and then confirm the destination by pressing
“Yes,” to send the navigation route to the
Uconnect Navigation in your vehicle.
5. Finally, confirm the route inside your ve- hicle by pressing the “Go Now” option on
the pop-up that appears on the touch-
screen, when the vehicle is started.
255
Page 291 of 298
Accessories..................219
Mopar ...................219
Adding Fuel ..............138, 139
Additives, Fuel ................139
Adjustable Pedals ...............29
Air Bag Air Bag Operation .............90
Air Bag Warning Light ..........87
Enhanced Accident Response . .94, 171
Event Data Recorder (EDR) ......171
If A Deployment Occurs .........94
Knee Impact Bolsters ..........90
Maintaining Your Air Bag System . . .95
Transporting Pets ............115
Air Bag Light ............61, 87, 116
Air Bag Maintenance .............95
Air Cleaner, Engine (Engine Air Cleaner Filter) .......186
Air Conditioning Filter ............44
Air Conditioning, Operating Tips ......44
Air Conditioning System ...........43
Air Filter ...................186
Air Pressure, Tires ..............200
Alarm, Panic ..................15
Alarm (Security Alarm) .........17, 63 Alarm System (Security Alarm)
.......17
Antifreeze (Engine Coolant) Capacities ................213
Anti-Lock Warning Light ...........66
Audio Jack ..................257
Automatic Headlights ............33
Automatic High Beams ...........32
Automatic Temperature Control (ATC) . . .43
Automatic Transmission Fluid Type ............216, 218
Shifting .................129
Axle Fluid ...............216, 218
Back-Up ...................136
Back-Up Camera ..............136
Battery .....................62
Charging System Light .........62
Belts, Seat ..................116
Body Builders Guide ..............2
B-Pillar Location ..............196
Brake Fluid ................. .216
Brake
System
Warning Light ...............61
Brake/Transmission Interlock .......129
Bulb Replacement .............154 Bulbs, Light
..............118, 154
Camera ....................136
Camera, Rear ................136
Capacities, Antifreeze (Engine Coolant) .............213
Capacities, Fluid ..............213
Caps, Filler Oil (Engine) ...............184
Carbon Monoxide Warning .........115
Cargo Light ...................34
Changing A Flat Tire ............160
Chart, Tire Sizing ..............192
Checking Your Vehicle For Safety . . . .115
Checks, Safety ................115
Child Restraint ................96
Child Restraints Booster Seats ...............99
Child Restraints ..............96
Child Seat Installation .....107, 109
How To Stow An Unused
ALR Seat Belt ..............106
Infants And Child Restraints ......97
Locating The LATCH Anchorages . .104
INDEX
289