brake Ram 4500 Chassis Cab 2018 Service Manual
[x] Cancel search | Manufacturer: RAM, Model Year: 2018, Model line: 4500 Chassis Cab, Model: Ram 4500 Chassis Cab 2018Pages: 298, PDF Size: 5.88 MB
Page 170 of 298

6. Move the gear selector to the NEUTRALposition.
7. The vehicle may then be started in NEUTRAL.
FREEING A STUCK VEHICLE
If your vehicle becomes stuck in mud, sand,
or snow, it can often be moved using a rock-
ing motion. Turn the steering wheel right and
left to clear the area around the front wheels.
Next, shift back and forth between DRIVE
and REVERSE (with automatic transmission)
or SECOND GEAR and REVERSE (with
manual transmission) while gently pressing
the accelerator. Use the least amount of ac-
celerator pedal pressure that will maintain
the rocking motion, without spinning the
wheels or racing the engine. NOTE:
Push the "ESC Off" switch, to place the Elec-
tronic Stability Control (ESC) system in "Par-
tial Off" mode, before rocking the vehicle.
Refer to “Electronic Brake Control System”
in “Safety” in the Owner’s Manual at
www.mopar.com/en-us/care/owners-manual.html
(U.S. Residents) or www.owners.mopar.ca
(Canadian Residents) for further information.
Once the vehicle has been freed, push the
"ESC Off" switch again to restore "ESC On"
mode.
WARNING!
Fast spinning tires can be dangerous.
Forces generated by excessive wheel
speeds may cause damage, or even failure,
of the axle and tires. A tire could explode
and injure someone. Do not spin your
vehicle's wheels faster than 30 mph
(48 km/h) or for longer than 30 seconds
continuously without stopping when you
are stuck and do not let anyone near a
spinning wheel, no matter what the speed.
CAUTION!
• Racing the engine or spinning the
wheels may lead to transmission over-
heating and failure. Allow the engine to
idle with the transmission in NEUTRAL
for at least one minute after every five
rocking-motion cycles. This will mini-
mize overheating and reduce the risk of
clutch or transmission failure during
prolonged efforts to free a stuck vehicle.
• When “rocking” a stuck vehicle by shift-
ing between DRIVE/SECOND GEAR and
REVERSE, do not spin the wheels faster
than 15 mph (24 km/h), or drivetrain
damage may result.
• Revving the engine or spinning the
wheels too fast may lead to transmission
overheating and failure. It can also dam-
age the tires. Do not spin the wheels
above 30 mph (48 km/h) while in gear
(no transmission shifting occurring).
IN CASE OF EMERGENCY
168
Page 176 of 298
SCHEDULED SERVICING — GASOLINE
ENGINE
Your vehicle is equipped with an automatic
oil change indicator system. The oil change
indicator system will remind you that it is
time to take your vehicle in for scheduled
maintenance.
Based on engine operation conditions, the oil
change indicator message will illuminate.
This means that service is required for your
vehicle. Operating conditions such as fre-
quent short-trips, trailer tow, extremely hot or
cold ambient temperatures, and E85 fuel
usage will influence when the “Oil Change
Required” message is displayed. Severe Op-
erating Conditions can cause the change oil
message to illuminate as early as
3,500 miles (5,600 km) since last reset.
Have your vehicle serviced as soon as pos-
sible, within the next 500 miles (805 km).
Your authorized dealer will reset the oil
change indicator message after completing
the scheduled oil change. If a scheduled oil
change is performed by someone other than
your authorized dealer, the message can bereset by referring to the steps described under
“Warning And Indicator Lights” or “Instru-
ment Cluster Display” in “Getting To Know
Your Instrument Panel” in your Owner’s
Manual at
www.mopar.com/en-us/care/
owner-manual.html (U.S. Residents) or
www.owners.mopar.ca (Canadian Residents)
for further information.
Gasoline Engines:
Under no circumstances should oil change
intervals exceed 8,000 miles (13,000 km),
twelve months or 350 hours of engine run
time, whichever comes first. The 350 hours
of engine run or idle time is generally only a
concern for fleet customers.
Severe Duty:
Change Engine Oil at 4,000 miles
(6,500 km) or 350 hours of engine run time
if the vehicle is operated in a dusty and off
road environment or is operated predomi-
nately at idle or very low engine RPM’s. This
type of vehicle use is considered Severe Duty. Once A Month Or Before A Long Trip:
• Check engine oil level
• Check windshield washer fluid level
• Check the tire inflation pressures and look
for unusual wear or damage
• Check the fluid levels of the coolant reser- voir, brake master cylinder, power steering
and automatic transmission, and fill as
needed
• Check function of all interior and exterior lights
SERVICING AND MAINTENANCE
174
Page 177 of 298
Maintenance Plan –
Gasoline Engine
Required Maintenance
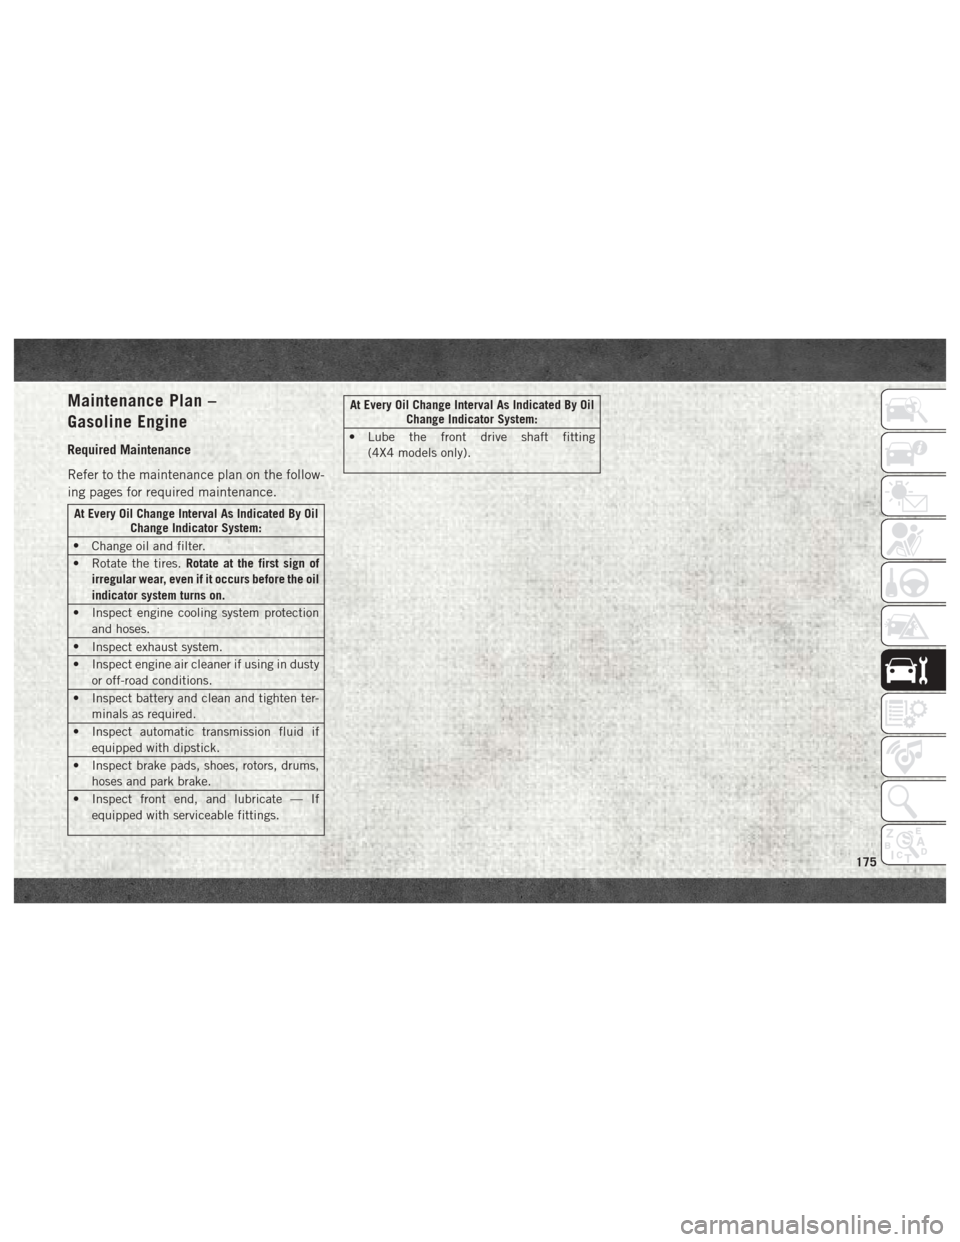
Refer to the maintenance plan on the follow-
ing pages for required maintenance.
At Every Oil Change Interval As Indicated By OilChange Indicator System:
• Change oil and filter.
• Rotate the tires. Rotate at the first sign of
irregular wear, even if it occurs before the oil
indicator system turns on.
• Inspect engine cooling system protection and hoses.
• Inspect exhaust system.
• Inspect engine air cleaner if using in dusty or off-road conditions.
• Inspect battery and clean and tighten ter- minals as required.
• Inspect automatic transmission fluid if equipped with dipstick.
• Inspect brake pads, shoes, rotors, drums, hoses and park brake.
• Inspect front end, and lubricate — If equipped with serviceable fittings.
At Every Oil Change Interval As Indicated By Oil Change Indicator System:
• Lube the front drive shaft fitting (4X4 models only).
175
Page 178 of 298

Mileage or time passed (whichever comesfirst)
20,000
30,000
40,000
50,000
60,000
70,000
80,000
90,000
100,000
110,000
120,000
130,000
140,000
150,000
Or Years: 2 3 4 5 6 7 8 9 10 11 12 13 14 15
Or Kilometers:
32,000
48,000
64,000
80,000
96,000
112,000
128,000
144,000
160,000
176,000
192,000
208,000
224,000
240,000
Additional Inspections
Inspect the CV/Universal joints. X X X X X
Inspect front suspension, tie rod ends, and
replace if necessary. XXX X X X X
Inspect the front and rear axle surfaces. If
gear oil leakage is suspected, check the
fluid level. If using your vehicle for police,
taxi, fleet, off-road or frequent trailer tow-
ing, change axle fluid. XXX X X X X
Inspect the brake linings, parking brake
function. XXX X X X X
Additional Maintenance
Replace engine air filter. X X X X X
Replace spark plugs. ** X
Flush and replace the engine coolant at
10 years or 150,000 miles (240,000 km)
whichever comes first. XX
Change the automatic transmission fluid
(AS66RC Transmission Only). XX X
Change the automatic transmission fluid
and sump filter (AS66RC Transmission
Only). XX
SERVICING AND MAINTENANCE
176
Page 180 of 298
Heavy Duty Use Of The Vehicle
Change engine oil at 4,000 miles (6,500 km)
or 350 hours of engine run time if the vehicle
is operated in a dusty and off road environ-
ment or is operated predominately at idle or
only very low engine RPM’s. This type of
vehicle use is considered Severe Duty.
SCHEDULED MAINTENANCE — 6.7L
CUMMINS DIESEL ENGINE
CAUTION!
Failure to perform the required mainte-
nance items may result in damage to the
vehicle.
At Each Stop For Fuel
Check the engine oil level at least 30 minutes
after a fully warmed engine is shut off.
Checking the oil level while the vehicle is on
level ground will improve the accuracy of the
oil level reading. Add oil only when the level
is at or below the ADD or MIN mark. Once A Month
• Inspect the batteries, and clean and
tighten the terminals as required.
• Check the fluid levels of the coolant reser- voir, brake master cylinder, and automatic
transmission (if equipped), and add as
needed.
At Each Oil Change
• Change the engine oil filter.
• Inspect the exhaust system.
• Inspect engine air filter.
• Check the coolant level, hoses, and clamps.
• Inspect front end, and lubricate — If equipped with serviceable fittings.
• Lube the front drive shaft fitting (4X4 mod- els only).
Inspection and service should also be per-
formed anytime a malfunction is observed or
suspected. Retain all receipts.
Oil Change Indicator System —
Cummins Diesel
Your vehicle is equipped with an engine oil
change indicator system. This system will
alert you when it is time to change your
engine oil by displaying the words “Oil
Change Due” in your instrument cluster dis-
play. The oil change reminder will remind the
owner to change the engine oil every
15,000 miles or 500 hours, whichever
comes first, except for the Chassis Cab mod-
els and Pickup models configured with op-
tional B20 capability that are using B20 bio-
diesel, which are 12,500 miles or 400 hours,
whichever comes first. Failure to change the
engine oil per the maintenance schedule can
result in internal engine damage.
Replace the engine oil and oil filter every
15,000 miles (24,000 km) or six months, or
sooner if prompted by the oil change indicator
system. Under no circumstances should oil
change intervals exceed 15,000 miles
(24,000 km) or six months, whichever comes
first.
SERVICING AND MAINTENANCE
178
Page 182 of 298
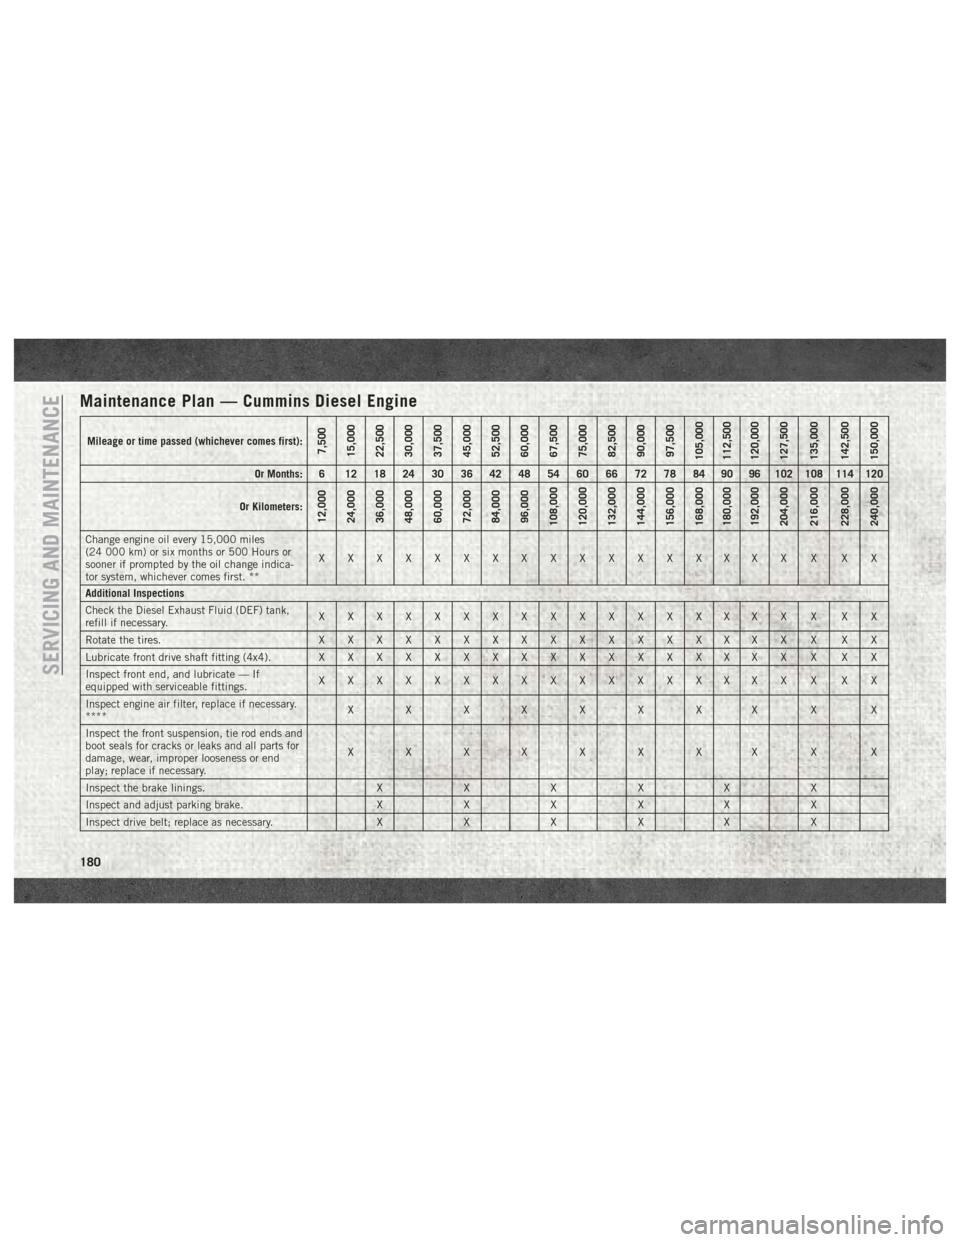
Maintenance Plan — Cummins Diesel Engine
Mileage or time passed (whichever comes first):7,500
15,000
22,500
30,000
37,500
45,000
52,500
60,000
67,500
75,000
82,500
90,000
97,500
105,000
112,500
120,000
127,500
135,000
142,500
150,000
Or Months: 6 12 18 24 30 36 42 48 54 60 66 72 78 84 90 96 102 108 114 120
Or Kilometers:
12,000
24,000
36,000
48,000
60,000
72,000
84,000
96,000
108,000
120,000
132,000
144,000
156,000
168,000
180,000
192,000
204,000
216,000
228,000
240,000
Change engine oil every 15,000 miles
(24 000 km) or six months or 500 Hours or
sooner if prompted by the oil change indica-
tor system, whichever comes first. ** XXXXXXXXXXXXXXXXX X XX
Additional Inspections
Check the Diesel Exhaust Fluid (DEF) tank,
refill if necessary. XXXXXXXXXXXXXXXXX X XX
Rotate the tires. X X X X X X X XXXXXXXXXX X XX
Lubricate front drive shaft fitting (4x4). X X X X X X X XXXXXXXXXX X XX
Inspect front end, and lubricate — If
equipped with serviceable fittings. XXXXXXXXXXXXXXXXX X XX
Inspect engine air filter, replace if necessary.
**** XX XX X X XX X X
Inspect the front suspension, tie rod ends and
boot seals for cracks or leaks and all parts for
damage, wear, improper looseness or end
play; replace if necessary. XX XX X X XX X X
Inspect the brake linings. XXX XX X
Inspect and adjust parking brake. XXX XX X
Inspect drive belt; replace as necessary. XXX XX X
SERVICING AND MAINTENANCE
180
Page 186 of 298
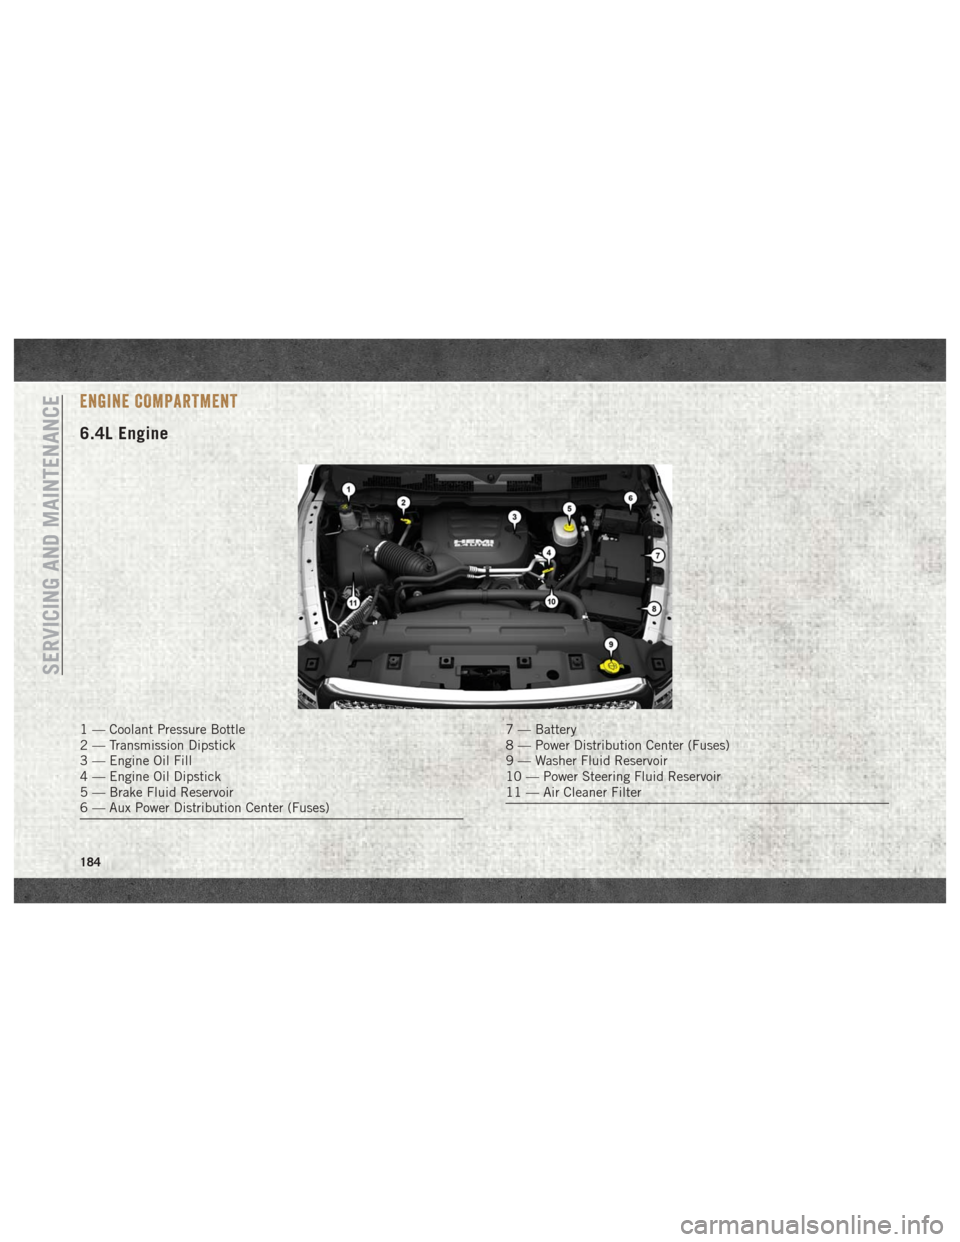
ENGINE COMPARTMENT
6.4L Engine
1 — Coolant Pressure Bottle
2 — Transmission Dipstick
3 — Engine Oil Fill
4 — Engine Oil Dipstick
5 — Brake Fluid Reservoir
6 — Aux Power Distribution Center (Fuses)7 — Battery
8 — Power Distribution Center (Fuses)
9 — Washer Fluid Reservoir
10 — Power Steering Fluid Reservoir
11 — Air Cleaner Filter
SERVICING AND MAINTENANCE
184
Page 187 of 298
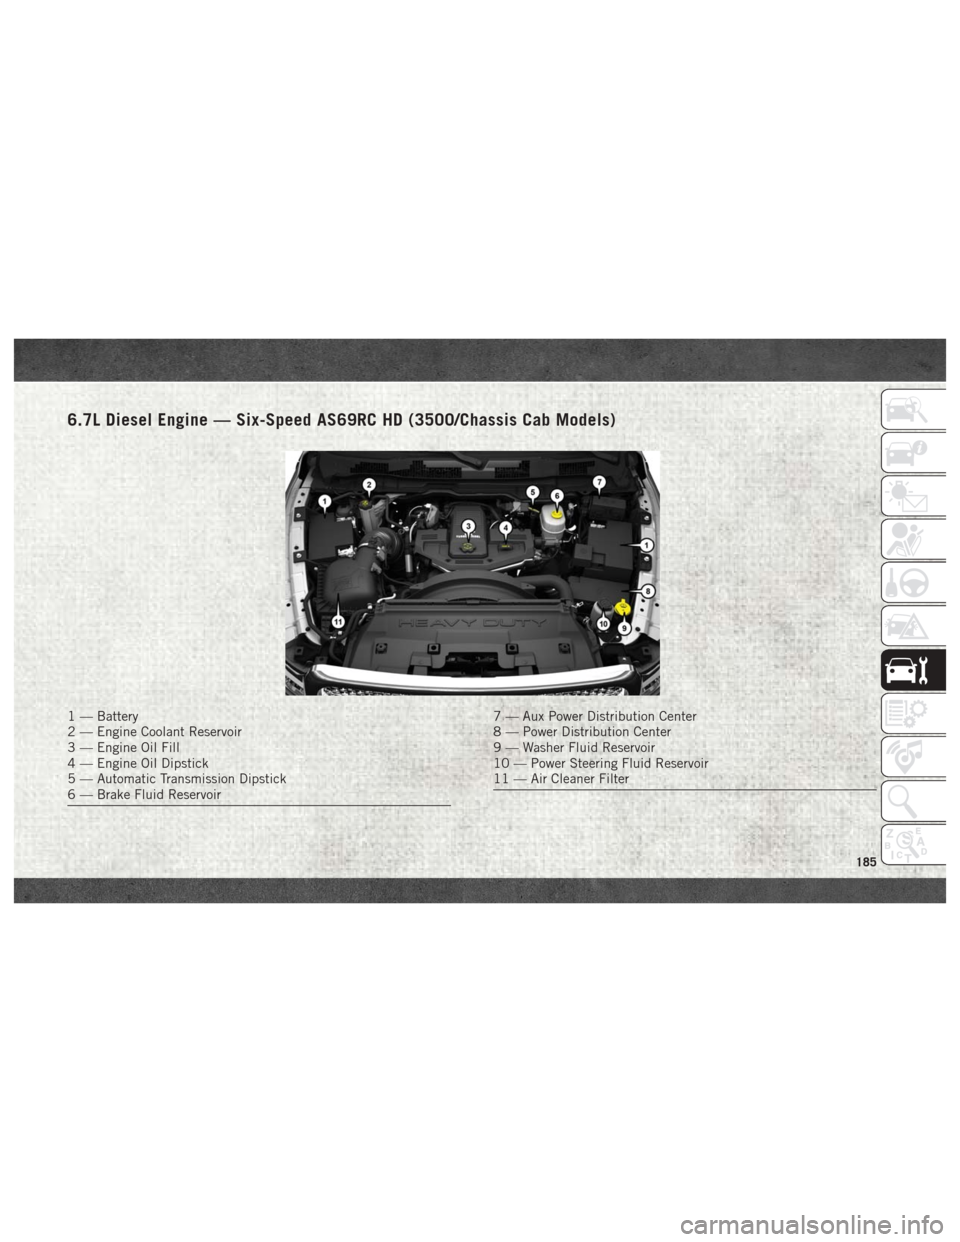
6.7L Diesel Engine — Six-Speed AS69RC HD (3500/Chassis Cab Models)
1 — Battery
2 — Engine Coolant Reservoir
3 — Engine Oil Fill
4 — Engine Oil Dipstick
5 — Automatic Transmission Dipstick
6 — Brake Fluid Reservoir7 — Aux Power Distribution Center
8 — Power Distribution Center
9 — Washer Fluid Reservoir
10 — Power Steering Fluid Reservoir
11 — Air Cleaner Filter
185
Page 208 of 298

Limited Use Spare — If Equipped
The limited use spare tire is for temporary
emergency use only. This tire is identified by
a label located on the limited use spare
wheel. This label contains the driving limita-
tions for this spare. This tire may look like the
original equipped tire on the front or rear axle
of your vehicle, but it is not. Installation of
this limited use spare tire affects vehicle
handling. Since it is not the same as your
original equipment tire, replace (or repair)
the original equipment tire and reinstall on
the vehicle at the first opportunity.
WARNING!
Limited use spares are for emergency use
only. Installation of this limited use spare
tire affects vehicle handling. With this tire,
do not drive more than the speed listed on
the limited use spare wheel. Keep inflated
to the cold tire inflation pressures listed on
your Tire and Loading Information Placard
located on the driver’s side B-Pillar or the
rear edge of the driver’s side door. Replace
(or repair) the original equipment tire at
the first opportunity and reinstall it on your
WARNING!
vehicle. Failure to do so could result in
loss of vehicle control.
Wheel And Wheel Trim Care
All wheels and wheel trim, especially alumi-
num and chrome plated wheels, should be
cleaned regularly using mild (neutral Ph)
soap and water to maintain their luster and to
prevent corrosion. Wash wheels with the
same soap solution recommended for the
body of the vehicle.
Your wheels are susceptible to deterioration
caused by salt, sodium chloride, magnesium
chloride, calcium chloride, etc., and other
road chemicals used to melt ice or control
dust on dirt roads. Use a soft cloth or sponge
and mild soap to wipe away promptly. Do not
use harsh chemicals or a stiff brush. They
can damage the wheel’s protective coating
that helps keep them from corroding and
tarnishing.
CAUTION!
Avoid products or automatic car washes
that use acidic solutions or strong alkaline
additives or harsh brushes. Many aftermar-
ket wheel cleaners and automatic car
washes may damage the wheel's protective
finish. Such damage is not covered by the
New Vehicle Limited Warranty. Only car
wash soap, Mopar Wheel Cleaner or
equivalent is recommended.
When cleaning extremely dirty wheels includ-
ing excessive brake dust, care must be taken
in the selection of tire and wheel cleaning
chemicals and equipment to prevent damage
to the wheels. Mopar Wheel Treatment or
Mopar Chrome Cleaner or their equivalent is
recommended or select a non-abrasive, non-
acidic cleaner for aluminum or chrome
wheels.
CAUTION!
Do not use scouring pads, steel wool, a
bristle brush, metal polishes or oven
cleaner. These products may damage the
SERVICING AND MAINTENANCE
206
Page 209 of 298

CAUTION!
wheel's protective finish. Such damage is
not covered by the New Vehicle Limited
Warranty. Only car wash soap, Mopar
Wheel Cleaner or equivalent is recom-
mended.
NOTE:
If you intend parking or storing your vehicle
for an extended period after cleaning the
wheels with wheel cleaner, drive your vehicle
and apply the brakes to remove the water
droplets from the brake components. This
activity will remove the red rust on the brake
rotors and prevent vehicle vibration when
braking.
Dark Vapor Chrome, Black Satin Chrome, or Low
Gloss Clear Coat Wheels
CAUTION!
If your vehicle is equipped with these
specialty wheels, DO NOT USE wheel
cleaners, abrasives, or polishing com-
pounds. They will permanently damage
this finish and such damage is not covered
CAUTION!
by the New Vehicle Limited Warranty.
HAND WASH ONLY USING MILD SOAP
AND WATER WITH A SOFT CLOTH. Used
on a regular basis; this is all that is re-
quired to maintain this finish.
DEPARTMENT OF TRANSPORTATION
UNIFORM TIRE QUALITY GRADES
The following tire grading categories
were established by the National High-
way Traffic Safety Administration. The
specific grade rating assigned by the
tire's manufacturer in each category is
shown on the sidewall of the tires on
your vehicle.
All passenger vehicle tires must con-
form to Federal safety requirements in
addition to these grades.
Treadwear
The Treadwear grade is a comparative
rating, based on the wear rate of the
tire when tested under controlled con-
ditions on a specified government test
course. For example, a tire graded
150 would wear one and one-half
times as well on the government
course as a tire graded 100. The rela-
tive performance of tires depends
upon the actual conditions of their
use, however, and may depart signifi-
cantly from the norm due to variations
in driving habits, service practices,
and differences in road characteristics
and climate.
Traction Grades
The Traction grades, from highest to
lowest, are AA, A, B, and C. These
grades represent the tire's ability to
stop on wet pavement, as measured
under controlled conditions on speci-
207