display Ram 4500 Chassis Cab 2018 Service Manual
[x] Cancel search | Manufacturer: RAM, Model Year: 2018, Model line: 4500 Chassis Cab, Model: Ram 4500 Chassis Cab 2018Pages: 298, PDF Size: 5.88 MB
Page 147 of 298
GAIN Adjustment Buttons (+/-)
Pushing these buttons will adjust the brake
control power output to the trailer brakes in
0.5 increments. The GAIN setting can be
increased to a maximum of 10 or decreased
to a minimum of 0 (no trailer braking).
GAIN
The GAIN setting is used to set the trailer
brake control for the specific towing condi-
tion and should be changed as towing condi-
tions change. Changes to towing conditions
include trailer load, vehicle load, road condi-
tions and weather.
Adjusting GAIN
NOTE:
This should only be performed in a traffic free
environment at speeds of approximately 20–
25 mph (30–40 km/h).
1. Make sure the trailer brakes are in goodworking condition, functioning normally
and properly adjusted. See your trailer
dealer if necessary. 2. Hook up the trailer and make the electri-
cal connections according to the trailer
manufacturer's instructions.
3. When a trailer with electric/EOH brakes is plugged in, the trailer connected message
should appear in the instrument cluster
display (if the connection is not recog-
nized by the ITBM, braking functions will
not be available), the GAIN setting will
illuminate and the correct type of trailer
must be selected from the instrument
cluster display options.
4. Push the UP or DOWN button on the steering wheel until “TRAILER TOW” ap-
pears on the screen.
5. Push the RIGHT arrow on the steering wheel to enter “TRAILER TOW”.
6. Push the UP or DOWN buttons until the Trailer Brake Type appears on the screen. 7. Push the RIGHT arrow and then push the
UP or DOWN buttons until the proper
Trailer Brake Type appears on the screen.
8. In a traffic-free environment, tow the trailer on a dry, level surface at a speed of
20–25 mph (30–40 km/h) and squeeze
the manual brake control lever
completely.
9. If the trailer wheels lockup (indicated by squealing tires), reduce the GAIN setting;
if the trailer wheels turn freely, increase
the GAIN setting.
Repeat steps 8 and 9 until the GAIN setting
is at a point just below trailer wheel lockup. If
towing a heavier trailer, trailer wheel lockup
may not be attainable even with the maxi-
mum GAIN setting of 10.
145
Page 148 of 298
Light ElectricHeavy ElectricLight EOHHeavy EOH
Type of Trailer Brakes Electric Trailer Brakes Electric Trailer Brakes Electric over Hydraulic Trailer BrakesElectric over
Hydraulic Trailer Brakes
Load *Under 10,000 lbs *Above 10,000 lbs *Under 10,000 lbs *Above 10,000 lbs
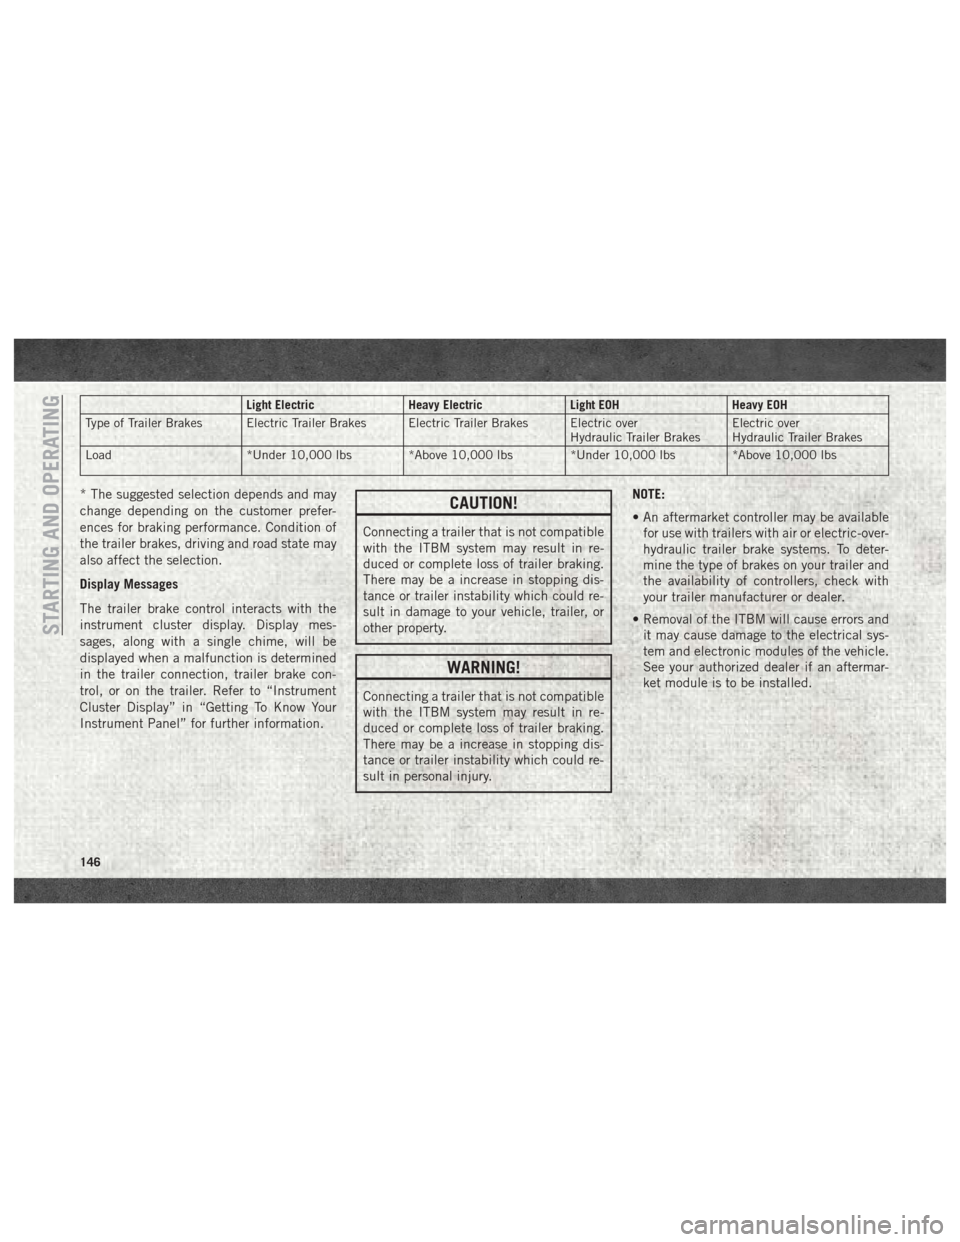
* The suggested selection depends and may
change depending on the customer prefer-
ences for braking performance. Condition of
the trailer brakes, driving and road state may
also affect the selection.
Display Messages
The trailer brake control interacts with the
instrument cluster display. Display mes-
sages, along with a single chime, will be
displayed when a malfunction is determined
in the trailer connection, trailer brake con-
trol, or on the trailer. Refer to “Instrument
Cluster Display” in “Getting To Know Your
Instrument Panel” for further information.CAUTION!
Connecting a trailer that is not compatible
with the ITBM system may result in re-
duced or complete loss of trailer braking.
There may be a increase in stopping dis-
tance or trailer instability which could re-
sult in damage to your vehicle, trailer, or
other property.
WARNING!
Connecting a trailer that is not compatible
with the ITBM system may result in re-
duced or complete loss of trailer braking.
There may be a increase in stopping dis-
tance or trailer instability which could re-
sult in personal injury. NOTE:
• An aftermarket controller may be available
for use with trailers with air or electric-over-
hydraulic trailer brake systems. To deter-
mine the type of brakes on your trailer and
the availability of controllers, check with
your trailer manufacturer or dealer.
• Removal of the ITBM will cause errors and it may cause damage to the electrical sys-
tem and electronic modules of the vehicle.
See your authorized dealer if an aftermar-
ket module is to be installed.
STARTING AND OPERATING
146
Page 176 of 298
SCHEDULED SERVICING — GASOLINE
ENGINE
Your vehicle is equipped with an automatic
oil change indicator system. The oil change
indicator system will remind you that it is
time to take your vehicle in for scheduled
maintenance.
Based on engine operation conditions, the oil
change indicator message will illuminate.
This means that service is required for your
vehicle. Operating conditions such as fre-
quent short-trips, trailer tow, extremely hot or
cold ambient temperatures, and E85 fuel
usage will influence when the “Oil Change
Required” message is displayed. Severe Op-
erating Conditions can cause the change oil
message to illuminate as early as
3,500 miles (5,600 km) since last reset.
Have your vehicle serviced as soon as pos-
sible, within the next 500 miles (805 km).
Your authorized dealer will reset the oil
change indicator message after completing
the scheduled oil change. If a scheduled oil
change is performed by someone other than
your authorized dealer, the message can bereset by referring to the steps described under
“Warning And Indicator Lights” or “Instru-
ment Cluster Display” in “Getting To Know
Your Instrument Panel” in your Owner’s
Manual at
www.mopar.com/en-us/care/
owner-manual.html (U.S. Residents) or
www.owners.mopar.ca (Canadian Residents)
for further information.
Gasoline Engines:
Under no circumstances should oil change
intervals exceed 8,000 miles (13,000 km),
twelve months or 350 hours of engine run
time, whichever comes first. The 350 hours
of engine run or idle time is generally only a
concern for fleet customers.
Severe Duty:
Change Engine Oil at 4,000 miles
(6,500 km) or 350 hours of engine run time
if the vehicle is operated in a dusty and off
road environment or is operated predomi-
nately at idle or very low engine RPM’s. This
type of vehicle use is considered Severe Duty. Once A Month Or Before A Long Trip:
• Check engine oil level
• Check windshield washer fluid level
• Check the tire inflation pressures and look
for unusual wear or damage
• Check the fluid levels of the coolant reser- voir, brake master cylinder, power steering
and automatic transmission, and fill as
needed
• Check function of all interior and exterior lights
SERVICING AND MAINTENANCE
174
Page 180 of 298
Heavy Duty Use Of The Vehicle
Change engine oil at 4,000 miles (6,500 km)
or 350 hours of engine run time if the vehicle
is operated in a dusty and off road environ-
ment or is operated predominately at idle or
only very low engine RPM’s. This type of
vehicle use is considered Severe Duty.
SCHEDULED MAINTENANCE — 6.7L
CUMMINS DIESEL ENGINE
CAUTION!
Failure to perform the required mainte-
nance items may result in damage to the
vehicle.
At Each Stop For Fuel
Check the engine oil level at least 30 minutes
after a fully warmed engine is shut off.
Checking the oil level while the vehicle is on
level ground will improve the accuracy of the
oil level reading. Add oil only when the level
is at or below the ADD or MIN mark. Once A Month
• Inspect the batteries, and clean and
tighten the terminals as required.
• Check the fluid levels of the coolant reser- voir, brake master cylinder, and automatic
transmission (if equipped), and add as
needed.
At Each Oil Change
• Change the engine oil filter.
• Inspect the exhaust system.
• Inspect engine air filter.
• Check the coolant level, hoses, and clamps.
• Inspect front end, and lubricate — If equipped with serviceable fittings.
• Lube the front drive shaft fitting (4X4 mod- els only).
Inspection and service should also be per-
formed anytime a malfunction is observed or
suspected. Retain all receipts.
Oil Change Indicator System —
Cummins Diesel
Your vehicle is equipped with an engine oil
change indicator system. This system will
alert you when it is time to change your
engine oil by displaying the words “Oil
Change Due” in your instrument cluster dis-
play. The oil change reminder will remind the
owner to change the engine oil every
15,000 miles or 500 hours, whichever
comes first, except for the Chassis Cab mod-
els and Pickup models configured with op-
tional B20 capability that are using B20 bio-
diesel, which are 12,500 miles or 400 hours,
whichever comes first. Failure to change the
engine oil per the maintenance schedule can
result in internal engine damage.
Replace the engine oil and oil filter every
15,000 miles (24,000 km) or six months, or
sooner if prompted by the oil change indicator
system. Under no circumstances should oil
change intervals exceed 15,000 miles
(24,000 km) or six months, whichever comes
first.
SERVICING AND MAINTENANCE
178
Page 181 of 298
NOTE:
• Under no circumstances should oil changeintervals exceed 15,000 miles
(24,000 km) or six months or 500 Hours,
whichever comes first.
• Replace the engine oil and oil filter every 12,500 miles (20 000 km) when running
B20 fuel (Chassis Cab Only).
If Chassis Cab models and Pickup models
configured with optional B20 capability are
operated with greater than 5% levels of bio-
diesel, the oil change interval must not ex-
ceed 12,500 miles (20 000 km) under any
circumstances. See the Fuel Requirements
section for more information regarding opera-
tion of Chassis Cab models and Pickup mod-
els configured for use with biodiesel blend
(B6-B20) fuel meeting ASTM specification
D-7467.Perform Service Indicator —
Cummins Diesel
Your vehicle will require emissions mainte-
nance at a set interval. To help remind you
when this maintenance is due, the instru-
ment cluster will display “Perform Service”.
When the “Perform Service” message is dis-
played on the instrument cluster it is neces-
sary to have the emissions maintenance per-
formed. Emissions maintenance may include
replacing the Closed Crankcase Ventilation
(CCV) filter element. The procedure for clear-
ing and resetting the “Perform Service” indi-
cator message is located in the appropriate
Service Information.
179
Page 188 of 298
DEALER SERVICE — 6.7L DIESEL
ENGINE
Your authorized dealer has the qualified ser-
vice personnel, special tools, and equipment
to perform all service operations in an expert
manner. Service Manuals are available which
include detailed service information for your
vehicle. Refer to these Service Manuals be-
fore attempting any procedure yourself.
NOTE:
Intentional tampering with emissions control
systems may void your warranty and could
result in civil penalties being assessed
against you.
WARNING!
You can be badly injured working on or
around a motor vehicle. Only do service
work for which you have the knowledge
and the proper equipment. If you have any
doubt about your ability to perform a ser-
vice job, take your vehicle to a competent
mechanic.
Engine Air Cleaner Filter
CAUTION!
All air entering the engine intake must be
filtered. The abrasive particles in unfil-
tered air will cause rapid wear to engine
components.
WARNING!
The air induction system (air cleaner,
hoses, etc.) provides a measure of protec-
tion. Do not remove the air induction sys-
tem (air cleaner, hoses, etc.) unless such
removal is necessary for repair or mainte-
nance. Make sure that no one is near the
engine compartment before starting the
vehicle with the air induction system (air
cleaner, hoses, etc.) removed. Failure to
do so can result in serious personal injury.
The condition of the air cleaner filter is moni-
tored by the Engine Control Module. The
“SERVICE AIR FILTER” message will display
in the instrument cluster when service is required. Refer to “Instrument Cluster Dis-
play” in “Getting To Know Your Instrument
Panel” for further information.
The “SERVICE AIR FILTER” message could
be displayed periodically. This is because
engine air flow requirements change based
on driving conditions. As the filter becomes
more restrictive and air flow requirements
increase the “SERVICE AIR FILTER” mes-
sage will be displayed. The message may not
be displayed in subsequent drive cycles if the
same conditions are not met. The air filter
element should be replaced within 250 miles
(402 km) from the first time this message is
displayed to ensure proper engine operation
during all driving conditions.
CAUTION!
Driving with a restricted air filter can
cause engine damage. Driving in dusty
environments for extended periods will
lead to rapid air filter plugging. Action
should be taken as soon as the “SERVICE
AIR FILTER” message is displayed.
SERVICING AND MAINTENANCE
186
Page 223 of 298
MULTIMEDIA
CYBERSECURITY..............223
RADIO 3.0 ................. .224
Clock Setting.................225
Audio Setting .................225
Radio Operation ...............225
Disc Operation — If Equipped ......225
USB/Audio Jack (AUX) Manual
Operation ...................226
UCONNECT 3.0 ...............227
Clock Setting.................228
Audio Setting .................228
Radio Operation ...............228
Disc Operation — If Equipped ......228
USB/Audio Jack (AUX) Manual
Operation ...................229
UCONNECT 3 WITH 5-INCH DISPLAY . .230
Controls On The Front Panel .......230
Clock Setting .................231
Equalizer, Balance And Fade .......231
Radio Mode ..................232
Media Mode .................233 Bluetooth Source
..............236
UCONNECT 4C/4C NAV WITH
8.4-INCH DISPLAY .............237
Uconnect 4C/4C NAV At A Glance . . . .238
Personalized Menu Bar ...........241
Radio .....................242
Android Auto .................243
Apple CarPlay Integration .........246
SIRIUSXM GUARDIAN —
IF EQUIPPED................ .248
SiriusXM Guardian — If Equipped
(Available on Uconnect 4C NAV) .....248
SiriusXM Guardian Activation ......249
Download The Uconnect App .......250
Renewing Subscriptions
(Uconnect 4C NAV) .............250
Maintaining Your SiriusXM Guardian
Account ...................250
Built-In Features ..............250
SiriusXM Guardian Remote Features . .253
UCONNECT SETTINGS ...........256 TIPS CONTROLS AND GENERAL
INFORMATION
............... .257
Steering Wheel Audio Controls ......257
Reception Conditions ............257
Care And Maintenance ...........257
Anti-Theft Protection ............257
IPOD/USB/MEDIA PLAYER CONTROL . .257
Audio Jack (AUX)..............258
USB Port ...................258
Bluetooth Streaming Audio ........259
NAVIGATION................ .259
Changing The Navigation Voice Prompt
Volume....................259
Finding Points Of Interest .........261
Finding A Place By Spelling The Name .261
One-Step Voice Destination Entry . . . .261
Setting Your Home Location ........261
Home .....................261
Adding A Stop ................262
Taking A Detour ...............262
SiriusXM Traffic Plus (4C NAV) .....262
SiriusXM Travel Link (4C NAV) ......263
MULTIMEDIA
221
Page 227 of 298
Clock Setting
1. Push the Menu button at the bottom ofthe radio, and push the Enter/Browse but-
ton for System Settings. Next, select the
Time and Format setting and then select
Set Time by pushing the Enter/Browse
button.
2. Adjust the hours or minutes by turning the Tune/Scroll knob, then pushing the Enter/
Browse button to move to the next entry.
You can also select 12hr or 24hr format by
turning the Tune/Scroll knob, then push-
ing the Enter/Browse button on the de-
sired selection.
3. Once the time is set, press the “Ok” button to exit the time screen.
Audio Setting
• Push the AUDIO button on the radio face-plate.
• The Audio Menu shows the following op- tions for you to customize your audio
settings. Treble, Mid, Bass, Fade, Balance, Speed Ad-
justed Volume, Loudness and AUX Offset
• Select the desired setting to adjust, then
push the ENTER/BROWSE button. Turn the
TUNE/SCROLL knob to adjust the setting +
or - . Push the “Back” button when done.
Radio Operation
Seek Up/Down Buttons
• Push the up or down button to seek throughradio stations in AM, FM or SXM bands.
• Hold either button to bypass stations with- out stopping.
Store Radio Presets Manually
The presets are available for all Radio Modes,
and are activated by pushing any of the six
preset buttons. The Radio stores up to
18 presets in each of the Radio modes. Push
the A-B-C button on the faceplate to select
the A, B, or C preset list. To store a radio preset manually, follow the
steps below:
1. Tune to the desired station.
2. Push and hold the desired numbered but-
ton for more than two seconds, or until you
hear a confirmation beep.Disc Operation — If Equipped
Your vehicle may have a remote CD player
located in the lower center console storage
bin, or in the lower center bench seat bin.
• CD/Disc Mode is entered by either insertinga CD/Disc or by pushing the MEDIA button
located on the side of the display. Once in
Media Mode, select “Disc.”
Gently insert one CD into the CD player with
the CD label facing as indicated on the illus-
tration located on the Disc player.
Seek Up/Down Buttons
• Push to seek through CD tracks.
• Hold either button to bypass tracks without stopping.
225
Page 228 of 298
USB/Audio Jack (AUX) Manual
Operation
To select a specific audio source, push the
MEDIA button on the faceplate and select
from the following modes:
USB/iPod
• USB/iPod Mode is entered by either insert-ing a USB Jump Drive or iPod cable into the
USB port or by pushing the MEDIA button
located left of the display.
Audio Jack (AUX)
• The AUX allows a device such as an MP3 player or an iPod to be plugged into
the radio and utilize the vehicle’s audio
system, using a 3.5 mm audio cable, to
amplify the source and play through the
vehicle’s speakers.
• The functions of the device are controlled using the device buttons, not the buttons
on the radio. The volume may be controlled
using the radio or the device.
MULTIMEDIA
226
Page 230 of 298
Clock Setting
1. Push the Menu button at the bottom ofthe radio, and push the Enter/Browse but-
ton for System Settings. Next, select the
Time and Format setting and then select
Set Time by pushing the Enter/Browse
button.
2. Adjust the hours or minutes by turning the Tune/Scroll knob, then pushing the Enter/
Browse button to move to the next entry.
You can also select 12hr or 24hr format
by turning the Tune/Scroll knob, then
pushing the Enter/Browse button on the
desired selection.
3. Once the time is set, press the “Ok” button to exit the time screen.
Audio Setting
• Push the AUDIO button on the radio face-plate.
• The Audio Menu shows the following op- tions for you to customize your audio
settings. Treble, Mid, Bass, Fade, Balance, Speed Ad-
justed Volume, Loudness and AUX Offset
• Select the desired setting to adjust, then
push the ENTER/BROWSE button. Turn the
TUNE/SCROLL knob to adjust the setting +
or - . Push the “Back” button when done.
Radio Operation
Seek Up/Down Buttons
• Push the up or down button to seek throughradio stations in AM, FM or SXM bands.
• Hold either button to bypass stations with- out stopping.
Store Radio Presets Manually
The presets are available for all Radio Modes,
and are activated by pushing any of the six
preset buttons. The Radio stores up to
18 presets in each of the Radio modes. Push
the A-B-C button on the faceplate to select
the A, B, or C preset list. To store a radio preset manually, follow the
steps below:
1. Tune to the desired station.
2. Push and hold the desired numbered but-
ton for more than two seconds, or until
you hear a confirmation beep.Disc Operation — If Equipped
Your vehicle may have a remote CD player
located in the lower center console storage
bin, or in the lower center bench seat bin.
• CD/Disc Mode is entered by either insertinga CD/Disc or by pushing the MEDIA button
located on the side of the display. Once in
Media Mode, select “Disc.”
Gently insert one CD into the CD player with
the CD label facing as indicated on the illus-
tration located on the Disc player.
Seek Up/Down Buttons
• Push to seek through CD tracks.
• Hold either button to bypass tracks without stopping.
MULTIMEDIA
228