alarm Ram 4500 Chassis Cab 2018 User Guide
[x] Cancel search | Manufacturer: RAM, Model Year: 2018, Model line: 4500 Chassis Cab, Model: Ram 4500 Chassis Cab 2018Pages: 298, PDF Size: 5.88 MB
Page 11 of 298
GETTING TO KNOW YOUR VEHICLE
VEHICLE USER GUIDE — IF EQUIPPED .11
KEYS......................13
Key Fobs ....................13
IGNITION SWITCH ..............16
Wireless Ignition Node (WIN) —
If Equipped...................16
Keyless Push Button Ignition —
If Equipped ...................16
REMOTE START — IF EQUIPPED .....16
To Enter Remote Start Mode........16
To Exit Remote Start Mode Without
Driving The Vehicle .............17
To Exit Remote Start Mode And Drive
The Vehicle ...................17
General Information .............17
VEHICLE SECURITY ALARM ........17
To Arm The System..............18
To Disarm The System ............18
DOORS.....................19
Keyless Enter-N-Go — Passive Entry . . .19
SEATS .....................21
Driver Memory Seat — If Equipped ....21
Heated Seats ..................24
HEAD RESTRAINTS ..............26
Front Head Restraint Adjustment .....26
Rear Head Restraint Adjustment ......26
Front Head Restraint Removal .......27
Rear Head Restraint Removal ........27
STEERING WHEEL..............28
Tilt Steering Column .............28
Heated Steering Wheel — If Equipped . .28
DRIVER ADJUSTABLE PEDALS —
IF EQUIPPED .................29
MIRRORS ...................30
Power Folding Outside Mirrors For Standard
And Trailer Tow — If Equipped .......30
EXTERIOR LIGHTS..............31
Headlight Switch...............31
Headlights ...................32
Multifunction Lever .............32
High/Low Beam Switch ...........32Automatic High Beam Headlamp Control —
If Equipped
..................32
Automatic Headlights — If Equipped . .33
Parking Lights And Panel Lights ......34
Headlights On With Wipers (Available
With Automatic Headlights Only) ......34
Turn Signals ..................34
Lane Change Assist — If Equipped ....34
Cargo Light ..................34
WINDSHIELD WIPERS AND WASHERS .34
Windshield Wipers ..............34
Rain Sensing Wipers — If Equipped . . .35
CLIMATE CONTROLS .............37
Automatic Climate Controls With A
Touchscreen..................37
Climate Control Functions ..........42
Automatic Temperature Control (ATC) —
If Equipped ...................43
Operating Tips .................44
HOOD......................44
To Open The Hood ..............44
To Close The Hood ..............45
GETTING TO KNOW YOUR VEHICLE
9
Page 15 of 298
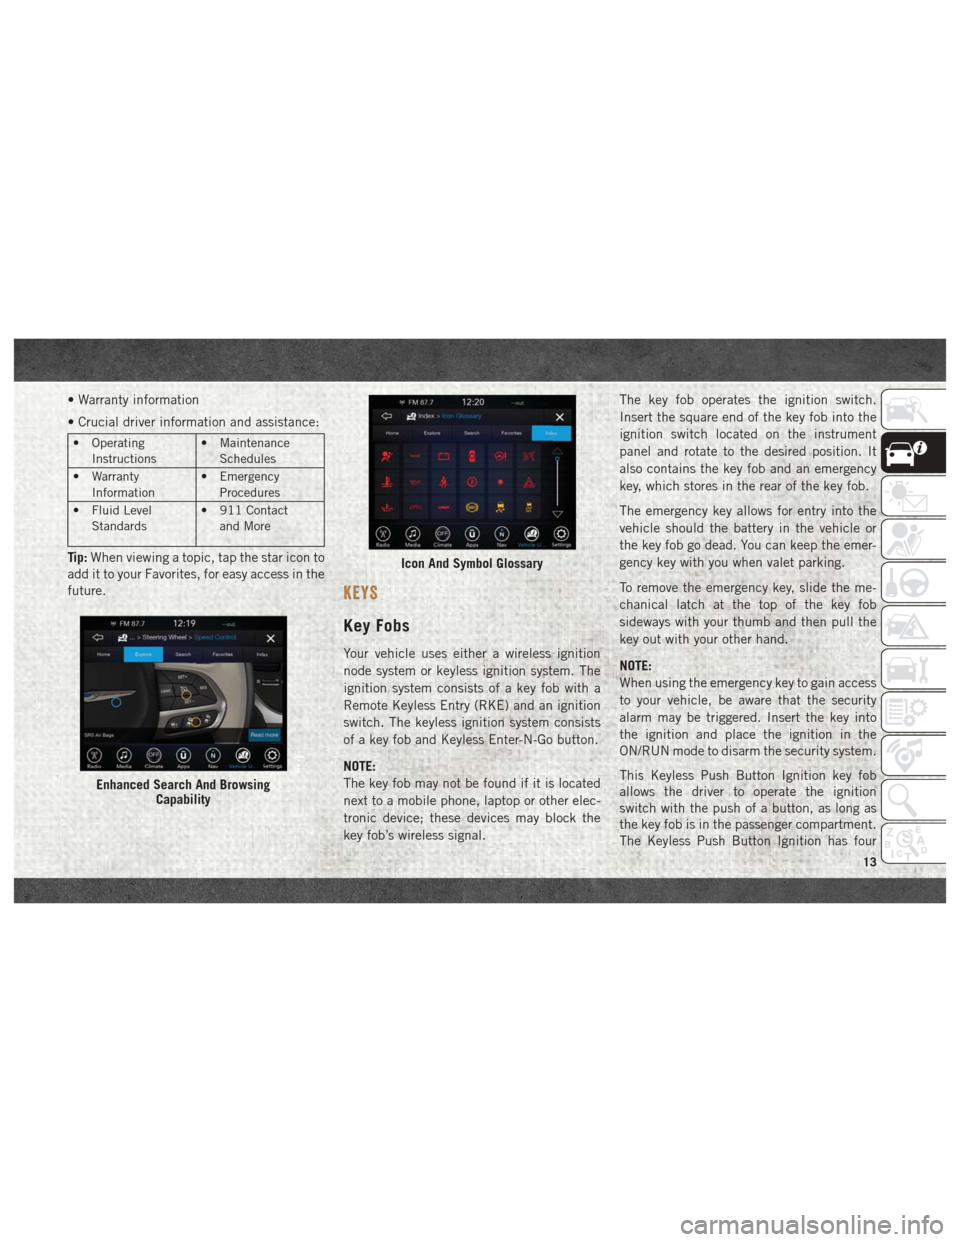
• Warranty information
• Crucial driver information and assistance:
• OperatingInstructions • Maintenance
Schedules
• Warranty Information • Emergency
Procedures
• Fluid Level Standards • 911 Contact
and More
Tip: When viewing a topic, tap the star icon to
add it to your Favorites, for easy access in the
future.
KEYS
Key Fobs
Your vehicle uses either a wireless ignition
node system or keyless ignition system. The
ignition system consists of a key fob with a
Remote Keyless Entry (RKE) and an ignition
switch. The keyless ignition system consists
of a key fob and Keyless Enter-N-Go button.
NOTE:
The key fob may not be found if it is located
next to a mobile phone, laptop or other elec-
tronic device; these devices may block the
key fob’s wireless signal. The key fob operates the ignition switch.
Insert the square end of the key fob into the
ignition switch located on the instrument
panel and rotate to the desired position. It
also contains the key fob and an emergency
key, which stores in the rear of the key fob.
The emergency key allows for entry into the
vehicle should the battery in the vehicle or
the key fob go dead. You can keep the emer-
gency key with you when valet parking.
To remove the emergency key, slide the me-
chanical latch at the top of the key fob
sideways with your thumb and then pull the
key out with your other hand.
NOTE:
When using the emergency key to gain access
to your vehicle, be aware that the security
alarm may be triggered. Insert the key into
the ignition and place the ignition in the
ON/RUN mode to disarm the security system.
This Keyless Push Button Ignition key fob
allows the driver to operate the ignition
switch with the push of a button, as long as
the key fob is in the passenger compartment.
The Keyless Push Button Ignition has four
Enhanced Search And Browsing
Capability
Icon And Symbol Glossary
13
Page 16 of 298
operating positions, three of which are la-
beled and will illuminate when in position.
The three positions are OFF, ACC, and ON/
RUN. The fourth position is START, during
start RUN will illuminate. It also contains the
key fob and an emergency key, which stores
in the rear of the key fob.
The emergency key allows for entry into the
vehicle should the battery in the vehicle or
the key fob go dead. You can keep the emer-
gency key with you when valet parking.
To remove the emergency key, slide the me-
chanical latch on the backside of the key fob
sideways with your thumb and then pull the
key out with your other hand.
NOTE:
• When using the emergency key to gainaccess to your vehicle, be aware that the
security alarm may be triggered. Put the
nose side (side opposite of the emergency
key) of the key fob against the ENGINE
START/STOP button and push to disarm
the security system. • You can insert the double-sided emergency
key into the door lock cylinder with either
side up.
The Remote Keyless Entry system allows you
to lock or unlock all doors, and the tailgate as
well as activate the Panic Alarm from dis-
tances up to approximately 66 ft (20 m)
using a key fob with integrated key. The key
fob does not need to be pointed at the vehicle
to activate the system. Push and release the
lock button on the key fob to lock all doors,
and the tailgate. The turn signal lights will
flash and the horn will chirp to acknowledge
the signal.
NOTE:
Inserting the key fob with integrated key into
the ignition switch disables the system from
responding to any button pushes from that
key fob. Driving at speeds 5 mph (8 km/h)
and above disables the system from respond-
ing to all key fob buttons for all key fobs.
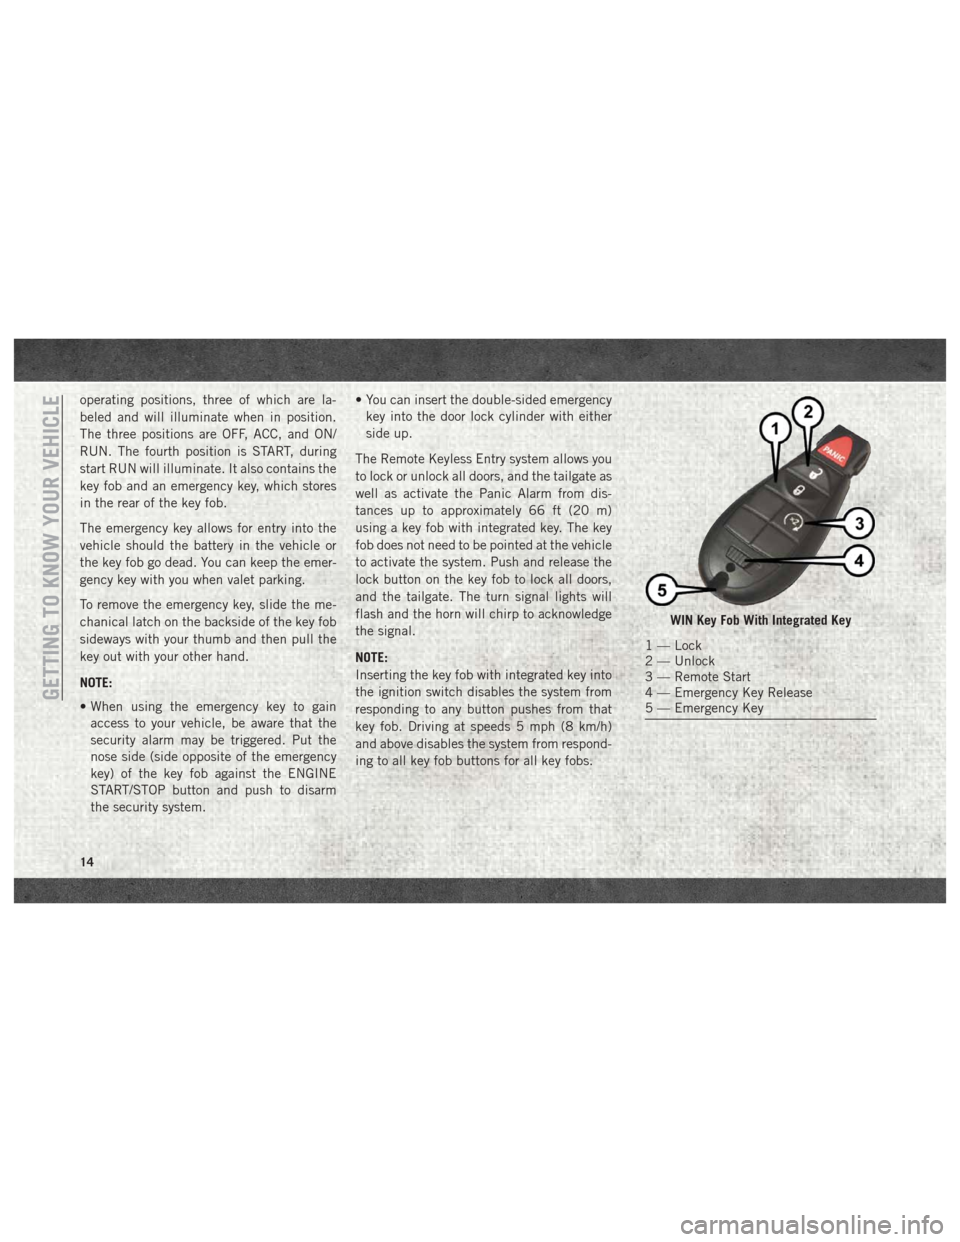
WIN Key Fob With Integrated Key
1 — Lock
2 — Unlock
3 — Remote Start
4 — Emergency Key Release
5 — Emergency Key
GETTING TO KNOW YOUR VEHICLE
14
Page 17 of 298
To Unlock The Doors And Tailgate
Push and release the unlock button on the
key fob once to unlock the driver’s door. Push
the unlock button twice within five seconds
to unlock all doors, and the tailgate. The turnsignal lights will flash to acknowledge the
unlock signal. The illuminated entry system
will also turn on.
NOTE:
The instrument cluster display or Uconnect
Settings are setup for driver door first, other-
wise this will unlock all doors.
To Lock The Doors And Tailgate
Push and release the lock button on the key
fob to lock all doors, and the tailgate. The
turn signal lights will flash and the horn will
chirp to acknowledge the signal.
Using The Panic Alarm
To turn the Panic Alarm feature on or off,
push the Panic button on the key fob. When
the Panic Alarm is activated, the turn signals
will flash, the horn will pulse on and off, and
the interior lights will turn on.
The Panic Alarm will stay on for three min-
utes unless you turn it off by either pushing
the Panic button a second time or drive the
vehicle at a speed of 15 mph (24 km/h) or
greater.
NOTE:
• The interior lights will turn off if you place
the ignition in the ACC or ON/RUN position
while the Panic Alarm is activated. How-
ever, the exterior lights and horn will remain
on.
• You may need to be less than 35 ft (11 m) from the vehicle when using the key fob to
turn off the Panic Alarm due to the radio
frequency noises emitted by the system.
General Information
The following regulatory statement applies to
all radio frequency (RF) devices equipped in
this vehicle:
This device complies with Part 15 of the FCC
Rules and with Industry Canada license-
exempt RSS standard(s). Operation is sub-
ject to the following two conditions:
1. This device may not cause harmful inter-
ference, and
2. This device must accept any interference received, including interference that may
cause undesired operation.
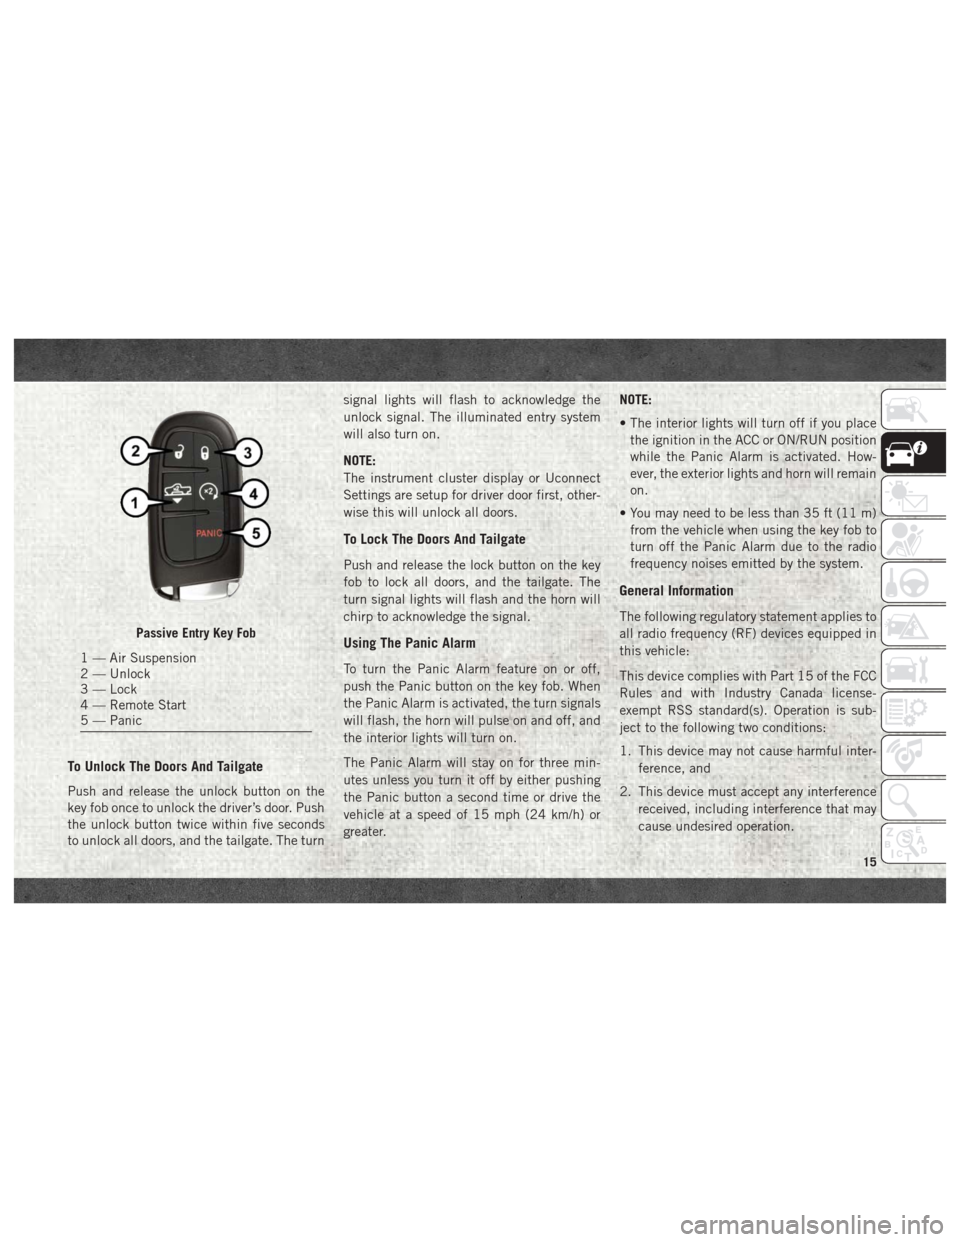
Passive Entry Key Fob
1 — Air Suspension
2 — Unlock
3 — Lock
4 — Remote Start
5 — Panic
15
Page 19 of 298
• If an engine fault is present or fuel level islow, the vehicle will start and then shut
down in 10 seconds.
• The park lamps will turn on and remain on during Remote Start mode.
• For security, power window and power sun- roof operation (if equipped) are disabled
when the vehicle is in the Remote Start
mode.
• The engine can be started two consecutive times (two 15-minute cycles) with the key
fob. However, the ignition must be placed
in the ON/RUN position before you can
repeat the start sequence for a third cycle.
To Exit Remote Start Mode
Without Driving The Vehicle
Push and release the remote start button one
time or allow the engine to run for the entire
15-minute cycle.
NOTE:
To avoid unintentional shutdowns, the system
will disable with a one time push of the
remote start button for two seconds after
receiving a valid remote start request.
To Exit Remote Start Mode And
Drive The Vehicle
Before the end of the 15-minute cycle, push
and release the unlock button on the key fob
to unlock the doors and disarm the vehicle
security alarm system (if equipped). Then,
prior to the end of the 15-minute cycle, cycle
the ignition to the ON/RUN position.
General Information
The following regulatory statement applies to
all radio frequency (RF) devices equipped in
this vehicle:
This device complies with Part 15 of the FCC
Rules and with Industry Canada license-
exempt RSS standard(s). Operation is sub-
ject to the following two conditions:
1. This device may not cause harmful inter-
ference, and
2. This device must accept any interference received, including interference that may
cause undesired operation. NOTE:
Changes or modifications not expressly ap-
proved by the party responsible for compli-
ance could void the user’s authority to oper-
ate the equipment.
VEHICLE SECURITY ALARM
The vehicle security alarm monitors the ve-
hicle doors and ignition for unauthorized op-
eration. When the vehicle security alarm is
activated, interior switches for door locks are
disabled. The system provides both audible
and visible signals for the first three minutes.
The horn will sound, the headlights will turn
on, the park lamps and/or turn signals will
flash and vehicle security light will flash
repeatedly. For an additional 15 minutes
only, the headlights will turn on, the park
lamps and/or turn signals, and vehicle secu-
rity light will flash.
17
Page 20 of 298
To Arm The System
Follow these steps to arm the vehicle security
alarm:
1. Remove the key from the ignition system(refer to "Starting The Engine" in "Starting
And Operating" for further information).
• For vehicles equipped with Keyless Enter-N-Go — Ignition, make sure the
vehicle ignition system is "OFF."
• For vehicles not equipped with Keyless Enter-N-Go — Ignition, make sure the
vehicle ignition system is "OFF" and
the key is physically removed from the
ignition.
2. Perform one of the following methods to lock the vehicle:
• Push lock button on the interior power door lock switch with the driver and/or
passenger door open.
• Push the lock button on the exterior Passive Entry Door Handle with a valid
key fob available in the same exterior zone (refer to "Keyless Enter- N-Go —
Passive Entry" in "Getting To Know Your
Vehicle" for further information).
• Push the lock button on the key fob.
3. If any doors are open, close them.
The vehicle security alarm will set when you
use the power door locks, or use the key fob to
lock the doors. After all the doors are locked
and closed, the vehicle security light, in the
instrument panel cluster, will flash rapidly for
about 16 seconds to indicate that the alarm
is being set. After the alarm is set, the vehicle
security light will flash at a slower rate to
indicate that the system is armed.
To Disarm The System
The vehicle security alarm can be disarmed
using any of the following methods:
1. Push the unlock button on the key fob.
2. Grasp the Passive Entry Unlock Door Handle with a valid key fob within 5 ft
(1.5 m) of the passive entry door handle.
If equipped, refer to "Keyless Enter-N-Go
— Passive Entry" in "Getting To Know Your
Vehicle" for further information. 3. Cycle the ignition out of the OFF position.
• For vehicles equipped with KeylessEnter-N-Go — Ignition, push the Key-
less Ignition START/STOP button (re-
quires at least one valid key fob in the
vehicle).
• For vehicles not equipped with Keyless Enter-N-Go, insert a valid key into the
ignition switch and turn the key to the
ON position.
The vehicle security alarm is designed to
protect your vehicle. However, you can create
conditions where the system will give you a
false alarm. If one of the previously described
arming sequences has occurred, the vehicle
security alarm will arm regardless of whether
you are in the vehicle or not. If you remain in
the vehicle and open a door, the alarm will
sound. If this occurs, disarm the vehicle
security alarm.
If the vehicle security alarm is armed and the
battery becomes disconnected, the vehicle
security alarm will remain armed when theGETTING TO KNOW YOUR VEHICLE
18
Page 21 of 298
battery is reconnected; the exterior lights will
flash, and the horn will sound. If this occurs,
disarm the vehicle security alarm.
DOORS
Keyless Enter-N-Go — Passive
Entry
The Passive Entry system is an enhancement
to the vehicle’s Remote Keyless Entry system
and a feature of Keyless Enter-N-Go. This
feature allows you to lock and unlock the
vehicle’s door(s) without having to push the
key fob lock or unlock buttons.
NOTE:
•
Refer to “Uconnect Settings” in “Multimedia”
in the Owner’s Manual at
www.mopar.com/
en-us/care/owners-manual.html (U.S.
Residents) or www.owners.mopar.ca
(Canadian Residents) for further information.
• If wearing gloves on your hands, or if it has been raining/snowing on the Passive Entry
door handle, the unlock sensitivity can be
affected, resulting in a slower response
time. • If the vehicle is unlocked by Passive Entry
and no door is opened within 60 seconds,
the vehicle will re-lock and if equipped will
arm the security alarm.
• The vehicles security alarm can be armed/ disarmed by pushing the passive entry key
fob lock/unlock buttons (if equipped).
• The key fob may not be able to be detected by the vehicle passive entry system if it is
located next to a mobile phone, laptop or
other electronic device; these devices may
block the key fob's wireless signal and pre-
vent the passive entry handle from locking/
unlocking the vehicle.
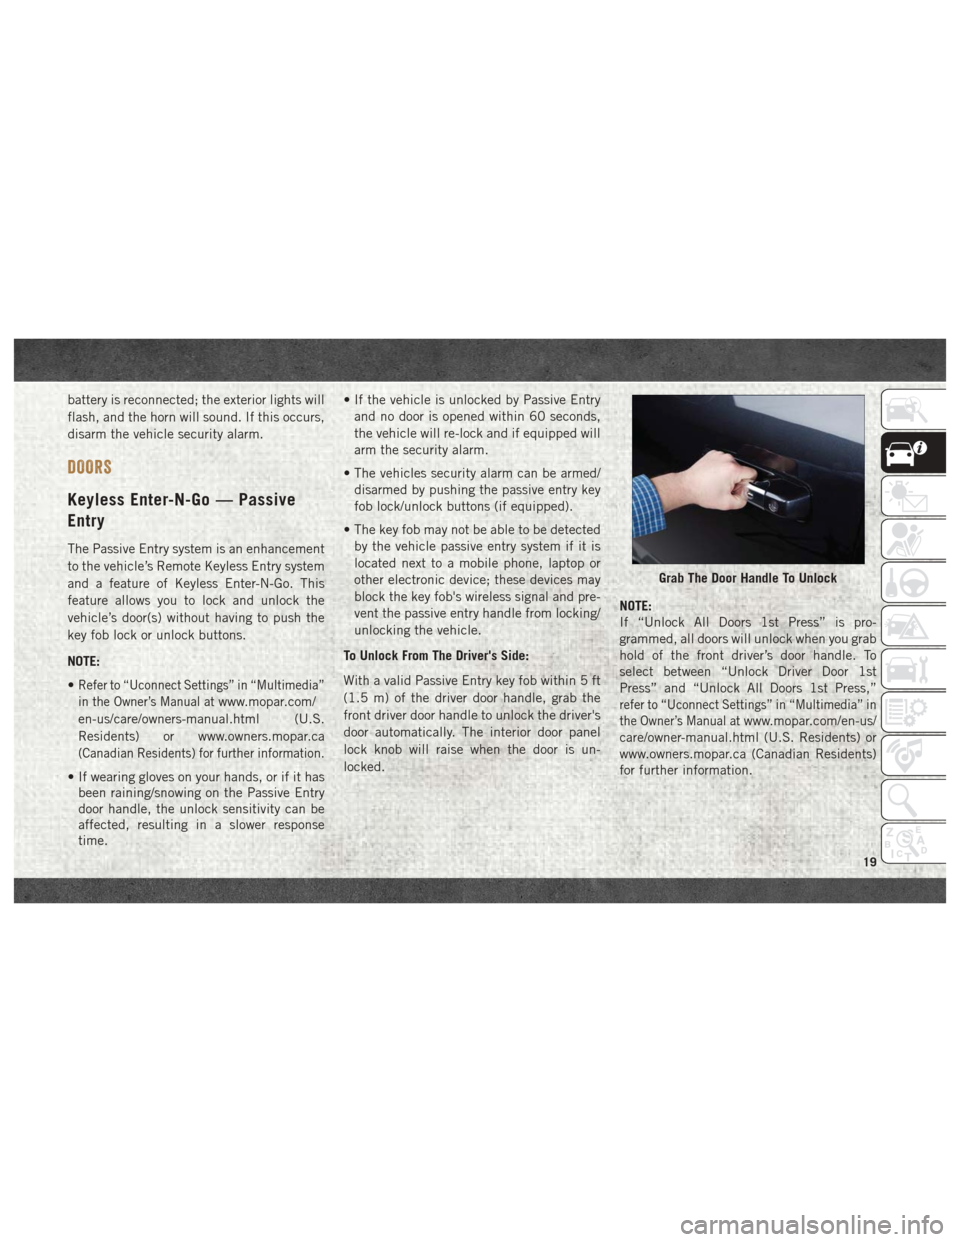
To Unlock From The Driver's Side:
With a valid Passive Entry key fob within 5 ft
(1.5 m) of the driver door handle, grab the
front driver door handle to unlock the driver's
door automatically. The interior door panel
lock knob will raise when the door is un-
locked. NOTE:
If “Unlock All Doors 1st Press” is pro-
grammed, all doors will unlock when you grab
hold of the front driver’s door handle. To
select between “Unlock Driver Door 1st
Press” and “Unlock All Doors 1st Press,”
refer to “Uconnect Settings” in “Multimedia” in
the Owner’s Manual at
www.mopar.com/en-us/
care/owner-manual.html (U.S. Residents) or
www.owners.mopar.ca (Canadian Residents)
for further information.
Grab The Door Handle To Unlock
19
Page 65 of 298
— Electric Power Steering Fault
Warning Light
This light will turn on when there's a fault
with the EPS (Electric Power Steering) sys-
tem. Refer to “Power Steering” in “Starting
And Operating” in the Owner’s Manual at
https://www.mopar.com/en-us/care/
owners-manual.html (U.S. Residents) or
www.owners.mopar.ca (Canadian Residents)
for further information.
WARNING!
Continued operation with reduced assist
could pose a safety risk to yourself and
others. Service should be obtained as soon
as possible.
— Engine Coolant Temperature
Warning Light
This light warns of an overheated engine
condition. If the engine coolant temperature
is too high, this indicator will illuminate and a
single chime will sound. If the temperature
reaches the upper limit, a continuous chime
will be sound for four minutes or until the
engine is able to cool: whichever comes first. If the light turns on while driving, safely pull
over and stop the vehicle. If the A/C system is
on, turn it off. Also, shift the transmission
into NEUTRAL and idle the vehicle. If the
temperature reading does not return to nor-
mal, turn the engine off immediately and call
for service. Refer to “If Your Engine Over-
heats” in “In Case Of Emergency” for further
information.
— Oil Pressure Warning Light
This light indicates low engine oil pressure. If
the light turns on while driving, stop the
vehicle and shut off the engine as soon as
possible. A chime will sound when this light
turns on.
Do not operate the vehicle until the cause is
corrected. This light does not indicate how
much oil is in the engine. The engine oil level
must be checked under the hood.
— Oil Temperature Warning Light
This telltale indicates engine oil temperature
is high. If the light turns on while driving,
stop the vehicle and shut off the engine as
soon as possible. Wait for oil temperature to
return to normal levels.
— Trailer Brake Disconnected
Warning Light
This telltale is on when the Trailer Brake has
been disconnected.
— Vehicle Security Warning Light —
If Equipped
This light will flash at a fast rate for approxi-
mately 15 seconds when the vehicle security
alarm is arming, and then will flash slowly
until the vehicle is disarmed.
Yellow Warning Lights
— Engine Check/Malfunction
Indicator Warning Light (MIL)
The Engine Check/Malfunction Indicator
Light (MIL) is a part of an Onboard Diagnostic
System called OBD II that monitors engine
and automatic transmission control systems.
The light will illuminate when the ignition is
in the ON/RUN position before engine start.
If the bulb does not come on when turning
the ignition switch from OFF to ON/RUN,
have the condition checked promptly.
63
Page 92 of 298
WARNING!
are designed to open only when the air
bags are inflating.
• Relying on the air bags alone could lead
to more severe injuries in a collision. The
air bags work with your seat belt to
restrain you properly. In some collisions,
air bags won’t deploy at all. Always wear
your seat belts even though you have air
bags.
Front Air Bag Operation
Front Air Bags are designed to provide addi-
tional protection by supplementing the seat
belts. Front air bags are not expected to
reduce the risk of injury in rear, side, or
rollover collisions. The front air bags will not
deploy in all frontal collisions, including
some that may produce substantial vehicle
damage — for example, some pole collisions,
truck underrides, and angle offset collisions.
On the other hand, depending on the type
and location of impact, front air bags may
deploy in crashes with little vehicle front-end
damage but that produce a severe initial
deceleration. Because air bag sensors measure vehicle
deceleration over time, vehicle speed and
damage by themselves are not good indica-
tors of whether or not an air bag should have
deployed.
Seat belts are necessary for your protection in
all collisions, and also are needed to help
keep you in position, away from an inflating
air bag.
When the ORC detects a collision requiring
the front air bags, it signals the inflator units.
A large quantity of non-toxic gas is generated
to inflate the front air bags.
The steering wheel hub trim cover and the
upper right side of the instrument panel
separate and fold out of the way as the air
bags inflate to their full size. The front air
bags fully inflate in less time than it takes to
blink your eyes. The front air bags then
quickly deflate while helping to restrain the
driver and front passenger.
Knee Impact Bolsters
The Knee Impact Bolsters help protect the
knees of the driver and front passenger, and
position the front occupants for improved
interaction with the front air bags.
WARNING!
• Do not drill, cut, or tamper with the knee
impact bolsters in any way.
• Do not mount any accessories to the
knee impact bolsters such as alarm
lights, stereos, citizen band radios, etc.
Supplemental Side Air Bags
Supplemental Seat-Mounted Side Air Bags
(SABs) — If Equipped
Your vehicle may be equipped with Supple-
mental Seat-Mounted Side Air Bags (SABs).
If your vehicle is equipped with Supplemen-
tal Seat-Mounted Side Air Bags (SABs),
please refer to the information below.
SAFETY
90
Page 250 of 298
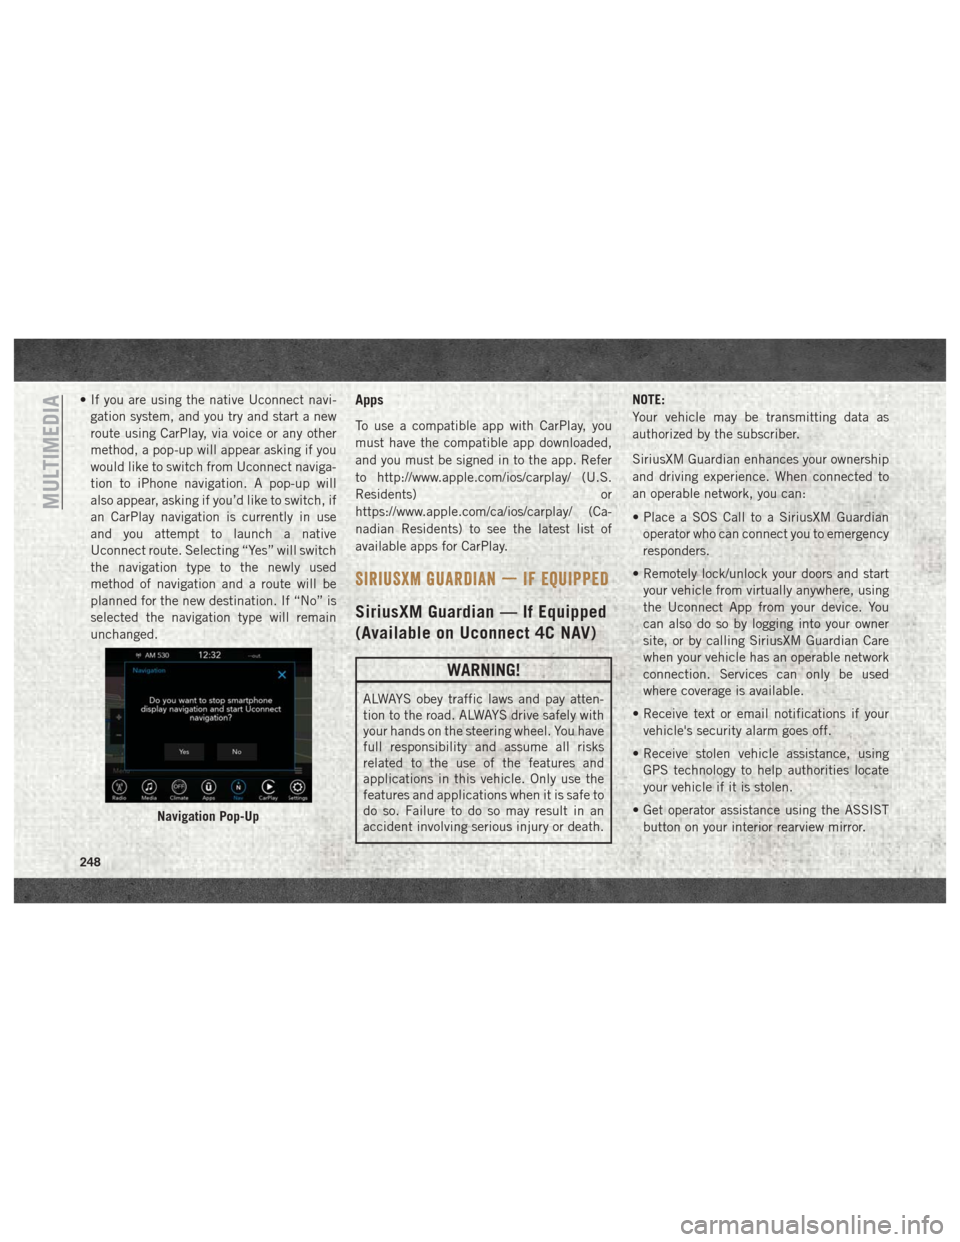
• If you are using the native Uconnect navi-gation system, and you try and start a new
route using CarPlay, via voice or any other
method, a pop-up will appear asking if you
would like to switch from Uconnect naviga-
tion to iPhone navigation. A pop-up will
also appear, asking if you’d like to switch, if
an CarPlay navigation is currently in use
and you attempt to launch a native
Uconnect route. Selecting “Yes” will switch
the navigation type to the newly used
method of navigation and a route will be
planned for the new destination. If “No” is
selected the navigation type will remain
unchanged.Apps
To use a compatible app with CarPlay, you
must have the compatible app downloaded,
and you must be signed in to the app. Refer
to http://www.apple.com/ios/carplay/ (U.S.
Residents) or
https://www.apple.com/ca/ios/carplay/ (Ca-
nadian Residents) to see the latest list of
available apps for CarPlay.
SIRIUSXM GUARDIAN — IF EQUIPPED
SiriusXM Guardian — If Equipped
(Available on Uconnect 4C NAV)
WARNING!
ALWAYS obey traffic laws and pay atten-
tion to the road. ALWAYS drive safely with
your hands on the steering wheel. You have
full responsibility and assume all risks
related to the use of the features and
applications in this vehicle. Only use the
features and applications when it is safe to
do so. Failure to do so may result in an
accident involving serious injury or death. NOTE:
Your vehicle may be transmitting data as
authorized by the subscriber.
SiriusXM Guardian enhances your ownership
and driving experience. When connected to
an operable network, you can:
• Place a SOS Call to a SiriusXM Guardian
operator who can connect you to emergency
responders.
• Remotely lock/unlock your doors and start your vehicle from virtually anywhere, using
the Uconnect App from your device. You
can also do so by logging into your owner
site, or by calling SiriusXM Guardian Care
when your vehicle has an operable network
connection. Services can only be used
where coverage is available.
• Receive text or email notifications if your vehicle's security alarm goes off.
• Receive stolen vehicle assistance, using GPS technology to help authorities locate
your vehicle if it is stolen.
• Get operator assistance using the ASSIST button on your interior rearview mirror.
Navigation Pop-Up
MULTIMEDIA
248