technical specifications Ram 4500 Chassis Cab 2018 User Guide
[x] Cancel search | Manufacturer: RAM, Model Year: 2018, Model line: 4500 Chassis Cab, Model: Ram 4500 Chassis Cab 2018Pages: 298, PDF Size: 5.88 MB
Page 4 of 298
HOW TO USE THIS MANUAL
Essential Information
Each time direction instructions (left/right or
forwards/backwards) about the vehicle are
given, these must be intended as regarding
an occupant in the driver's seat. Special
cases not complying with this rule will be
properly specified in the text.
The figures in this User Guide are provided by
way of example only: this might imply that
some details of the image do not correspond
to the actual arrangement of your vehicle.
In addition, the User Guide has been con-
ceived considering vehicles with steering
wheel on the left side; it is therefore possible
that on vehicles with steering wheel on the
right side, the position or construction of
some controls is not exactly mirror-like with
respect to the figure.
To identify the chapter with the information
needed you can consult the index at the end
of this User Guide.Chapters can be rapidly identified with dedi-
cated graphic tabs, at the side of each odd
page. A few pages further there is a key for
getting to know the chapter order and the
relevant symbols in the tabs. There is anyway
a textual indication of the current chapter at
the side of each even page.
Symbols
Some vehicle components have colored la-
bels whose symbols indicate precautions to
be observed when using this component.
WARNINGS AND CAUTIONS
While reading this User Guide you will find a
series of WARNINGS to be followed to pre-
vent incorrect use of components which
could cause accidents or injuries.
There are also CAUTIONS that must be fol-
lowed to prevent against procedures that
could result in damage to your vehicle.
VAN CONVERSIONS/CAMPERS
The New Vehicle Limited Warranty does not
apply to body modifications or special equip- ment installed by van conversion/camper
manufacturers/body builders. U.S. residents
refer to the Warranty Information book, Sec-
tion 2.1.C. Canadian residents refer to the
“What Is Not Covered” section of the War-
ranty Information book. Such equipment in-
cludes video monitors, VCRs, heaters, stoves,
refrigerators, etc. For warranty coverage and
service on these items, contact the appli-
cable manufacturer.
Operating instructions for the special equip-
ment installed by the conversion/camper
manufacturer should also be supplied with
your vehicle. If these instructions are miss-
ing, please contact your authorized dealer for
assistance in obtaining replacement docu-
ments from the applicable manufacturer.
For information on the Body Builder’s Guide
refer to www.rambodybuilder.com. This web-
site contains dimensional and technical
specifications for your vehicle. It is intended
for Second Stage Manufacturer's technical
support. For service issues, contact your au-
thorized dealer.
INTRODUCTION
2
Page 5 of 298
GRAPHICAL TABLE OF CONTENTS
GETTING TO KNOW YOUR VEHICLE
GETTING TO KNOW YOUR INSTRUMENT PANEL SAFETY
STARTING AND OPERATING IN CASE OF EMERGENCY
SERVICING AND MAINTENANCE TECHNICAL SPECIFICATIONS MULTIMEDIA
CUSTOMER ASSISTANCE INDEX
Page 129 of 298

Driving ConditionLoadTurbocharger Temperature Idle Time (min.)
Before Engine Shutdown
Stop and Go EmptyCoolLess than One
Stop and Go Medium -One
Highway Speeds MediumWarmTwo
City Traffic Maximum GCWR -Three
Highway Speeds Maximum GCWR -Four
Uphill Grade Maximum GCWR HotFive
ENGINE BREAK-IN
RECOMMENDATIONS — GASOLINE
ENGINE
A long break-in period is not required for the
engine and drivetrain (transmission and axle)
in your vehicle.
Drive moderately during the first 300 miles
(500 km). After the initial 60 miles
(100 km), speeds up to 50 or 55 mph (80 or
90 km/h) are desirable.
While cruising, brief full-throttle acceleration
within the limits of local traffic laws contrib-
utes to a good break-in. Wide-open throttle
acceleration in low gear can be detrimental
and should be avoided. The engine oil installed in the engine at the
factory is a high-quality energy conserving
type lubricant. Oil changes should be consis-
tent with anticipated climate conditions un-
der which vehicle operations will occur. For
the recommended viscosity and quality
grades, refer to “Fluids And Lubricants” in
“Technical Specifications”.
CAUTION!
Never use Non-Detergent Oil or Straight
Mineral Oil in the engine or damage may
result.
NOTE:
A new engine may consume some oil during
its first few thousand miles (kilometers) of
operation. This should be considered a nor-
mal part of the break-in and not interpreted
as a problem. Please check your oil level with
the engine oil indicator often during the
break in period. Add oil as required.
ENGINE BREAK-IN
RECOMMENDATIONS — 6.7L DIESEL
The Cummins turbocharged diesel engine
does not require a break-in period due to its
construction. Normal operation is allowed,
providing the following recommendations are
followed:
127
Page 165 of 298
4. By rotating the lug wrench clockwise,raise the vehicle until the wheel just
clears the surface.
WARNING!
Raising the vehicle higher than necessary
can make the vehicle less stable. It could
slip off the jack and hurt someone near it.
Raise the vehicle only enough to remove
the tire.
5. Remove the lug nuts and pull the wheel off. Install the spare wheel and lug nuts
with the cone shaped end of the nuts
toward the wheel on single rear wheel
(SRW) models. On dual rear wheel models
(DRW) the lug nuts are a two-piece assem-
bly with a flat face. Lightly tighten the
nuts. To avoid risk of forcing the vehicle
off the jack, do not fully tighten the nuts
until the vehicle has been lowered.
6. Using the lug wrench, finish tightening the nuts using a crisscross pattern. For
the proper lug nut torque specifications
refer to “Wheel And Tire Torque Specifi-
cations” in “Technical Specifications.” If
in doubt about the correct tightness, have them checked with a torque wrench by an
authorized dealer or at a service station.
WARNING!
A loose tire or jack thrown forward in a
collision or hard stop, could endanger the
occupants of the vehicle. Always stow the
jack parts and the spare tire in the places
provided.
7. Install wheel center cap (if equipped) and remove wheel blocks. Do not install
chrome or aluminum wheel center caps
on the spare wheel. This may result in cap
damage.
8. Lower the jack to its fully closed position. If the jack will not lower by turning the
dial (thumbwheel) by hand, it may be
necessary to use the jack driver in order to
lower the jack. Stow the replaced tire,
jack, and tools as previously described.
9. Adjust the tire pressure when possible.
To Stow The Flat Or Spare —
If Equipped
Refer to Upfitters Body Builders Guide for
information on stowing your spare tire (if
equipped).
Hub Caps/Wheel Covers —
If Equipped
The hub caps must be removed before raising
the vehicle off the ground.
CAUTION!
Use extreme caution when removing the
front and rear center caps. Damage can
occur to the center cap and/or the wheel if
screwdriver type tools are used. A pulling
motion, not a pry off motion, is recom-
mended to remove the caps.
For single rear wheel (SRW) models, use the
flat blade on the end of the lug wrench to pull
the hub cap off. Insert the blade end into the
pull off notch and carefully pull the hub cap
off with a back and forth motion.
163
Page 211 of 298

TECHNICAL SPECIFICATIONS
WHEEL AND TIRE TORQUE
SPECIFICATIONS..............210
Torque Specifications ...........210
Dual Rear Wheels ..............211
FLUID CAPACITIES — GAS ENGINE . . .213 FLUID CAPACITIES — 6.7L CUMMINS
DIESEL ENGINE
...............213
FLUIDS AND LUBRICANTS —
GAS ENGINE ................ .214Engine.....................214
Chassis ....................216
FLUIDS AND LUBRICANTS —
6.7L DIESEL ENGINES ...........216
Engine.....................216
Chassis ....................218
MOPAR ACCESSORIES ...........219
Authentic Accessories By Mopar .....219
TECHNICAL SPECIFICATIONS
209
Page 212 of 298
WHEEL AND TIRE TORQUE
SPECIFICATIONS
Proper lug nut/bolt torque is very important to
ensure that the wheel is properly mounted to
the vehicle. Any time a wheel has been re-
moved and reinstalled on the vehicle, the lug
nuts/bolts should be torqued using a properly
calibrated torque wrench using a high quality
six sided (hex) deep wall socket.
Torque Specifications
Lug Nut/Bolt
Torque Lug Nut/
Bolt Type **Lug
Nut/Bolt Size Lug Nut/
Bolt
Socket Size
120-150 Ft-Lbs(160-
200 N·m) Cone
M14 x1.50 22 mm
130-160
Ft-Lbs(190-
220 N·m) Flanged
**Use only your authorized dealer recom-
mended lug nuts/bolts and clean or remove
any dirt or oil before tightening.
Inspect the wheel mounting surface prior to
mounting the tire and remove any corrosion
or loose particles. NOTE:
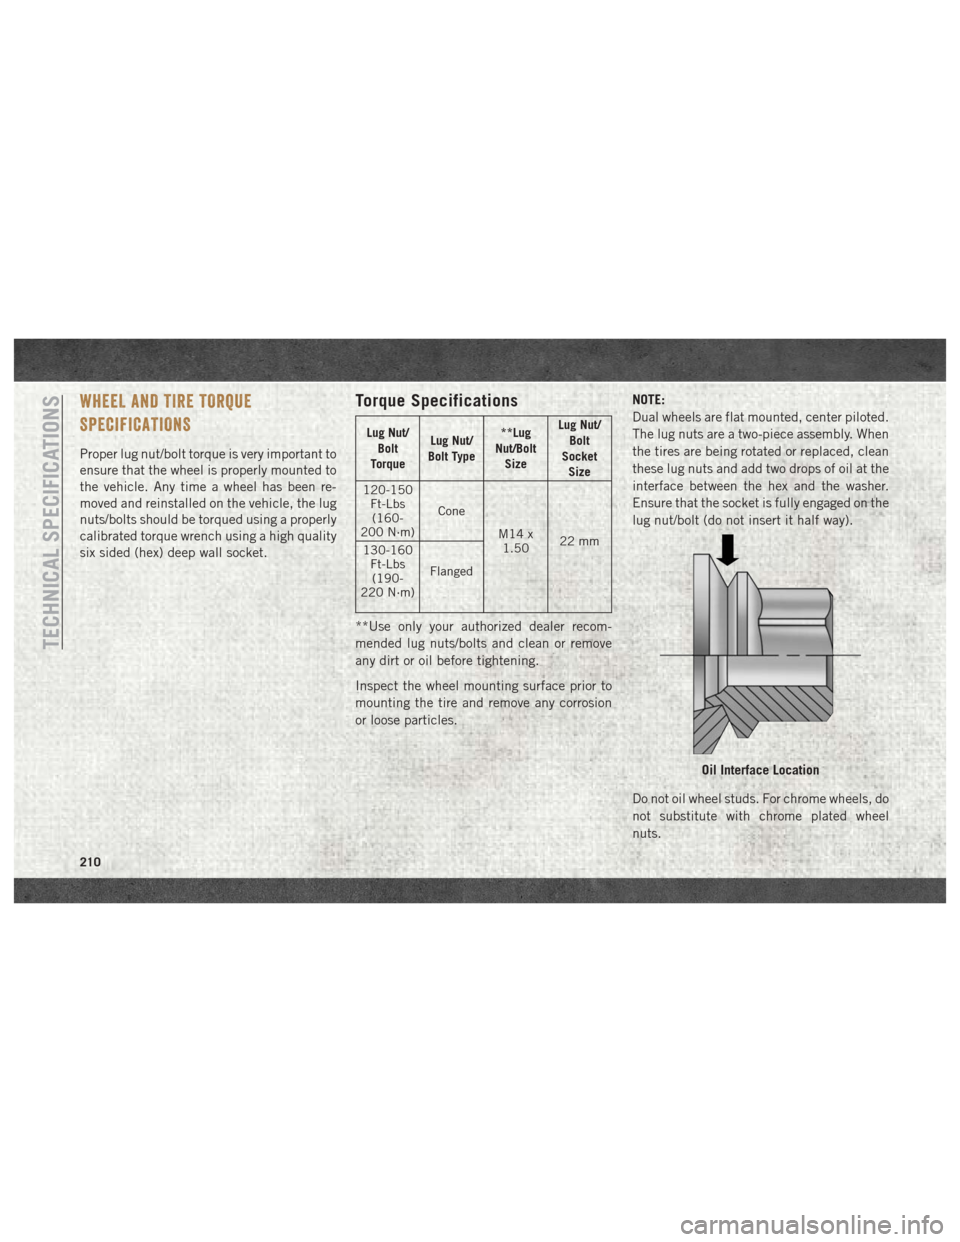
Dual wheels are flat mounted, center piloted.
The lug nuts are a two-piece assembly. When
the tires are being rotated or replaced, clean
these lug nuts and add two drops of oil at the
interface between the hex and the washer.
Ensure that the socket is fully engaged on the
lug nut/bolt (do not insert it half way).
Do not oil wheel studs. For chrome wheels, do
not substitute with chrome plated wheel
nuts.
Oil Interface Location
TECHNICAL SPECIFICATIONS
210
Page 214 of 298

NOTE:
When installing a spare tire (if equipped) as
part of a dual rear wheel end combination,
the tire diameter of the two individual tires
must be compared. If there is a significant
difference, the larger tire should be installed
in a front location. The correct direction of
rotation for dual tire installations must also
be observed.
These dual rear wheels should be tightened as
follows:It is recommended that wheel stud nuts be
kept torqued to specifications at all times.
Torque wheel stud nuts to specifications at
each lubrication interval.
Wheel Nuts Numbered Sequence (8)
Wheel Nuts Numbered Sequence (10)TECHNICAL SPECIFICATIONS
212
Page 216 of 298
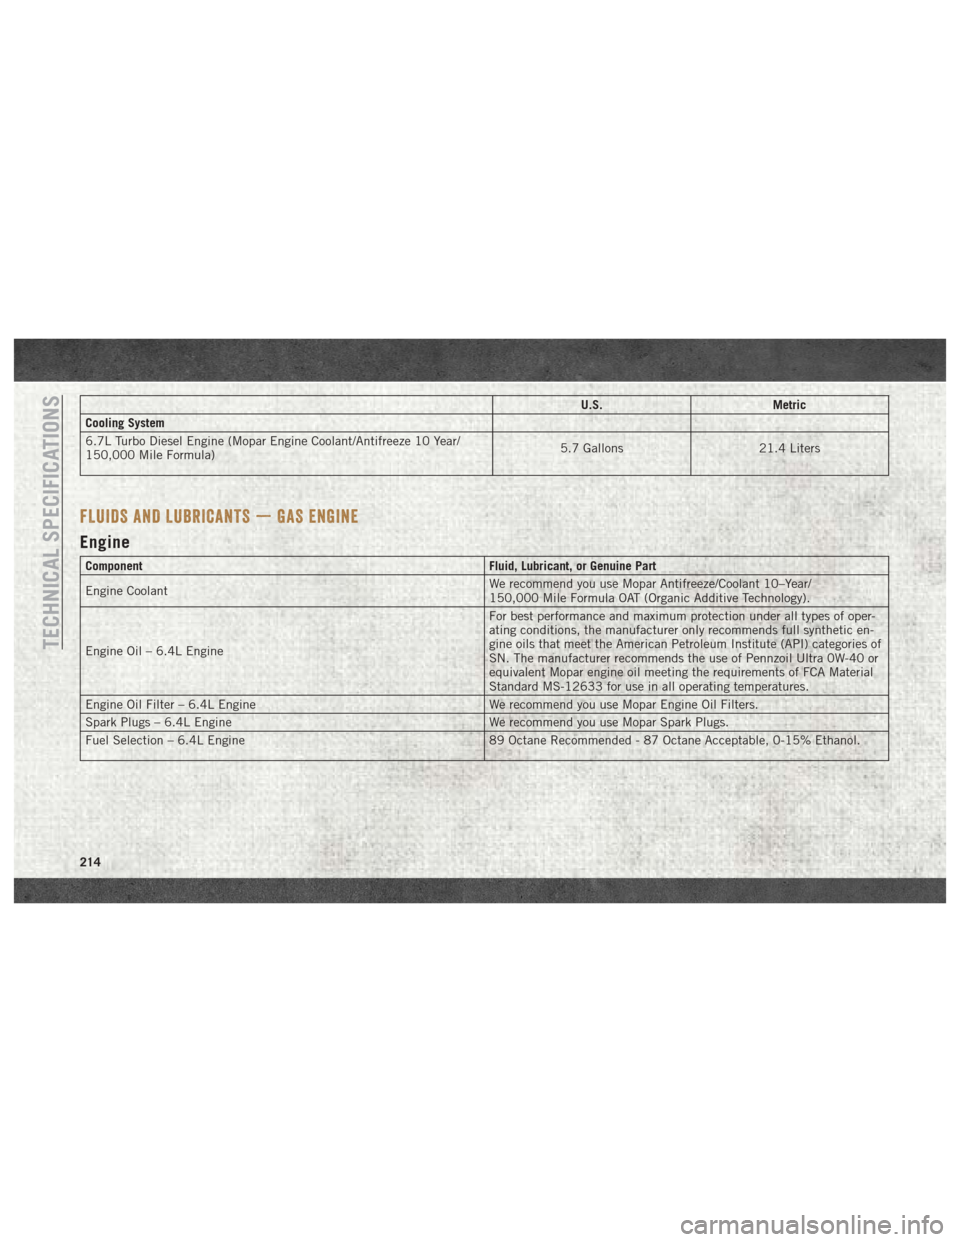
U.S.Metric
Cooling System
6.7L Turbo Diesel Engine (Mopar Engine Coolant/Antifreeze 10 Year/
150,000 Mile Formula) 5.7 Gallons
21.4 Liters
FLUIDS AND LUBRICANTS — GAS ENGINE
Engine
Component Fluid, Lubricant, or Genuine Part
Engine Coolant We recommend you use Mopar Antifreeze/Coolant 10–Year/
150,000 Mile Formula OAT (Organic Additive Technology).
Engine Oil – 6.4L Engine For best performance and maximum protection under all types of oper-
ating conditions, the manufacturer only recommends full synthetic en-
gine oils that meet the American Petroleum Institute (API) categories of
SN. The manufacturer recommends the use of Pennzoil Ultra 0W-40 or
equivalent Mopar engine oil meeting the requirements of FCA Material
Standard MS-12633 for use in all operating temperatures.
Engine Oil Filter – 6.4L Engine We recommend you use Mopar Engine Oil Filters.
Spark Plugs – 6.4L Engine We recommend you use Mopar Spark Plugs.
Fuel Selection – 6.4L Engine 89 Octane Recommended - 87 Octane Acceptable, 0-15% Ethanol.
TECHNICAL SPECIFICATIONS
214
Page 218 of 298
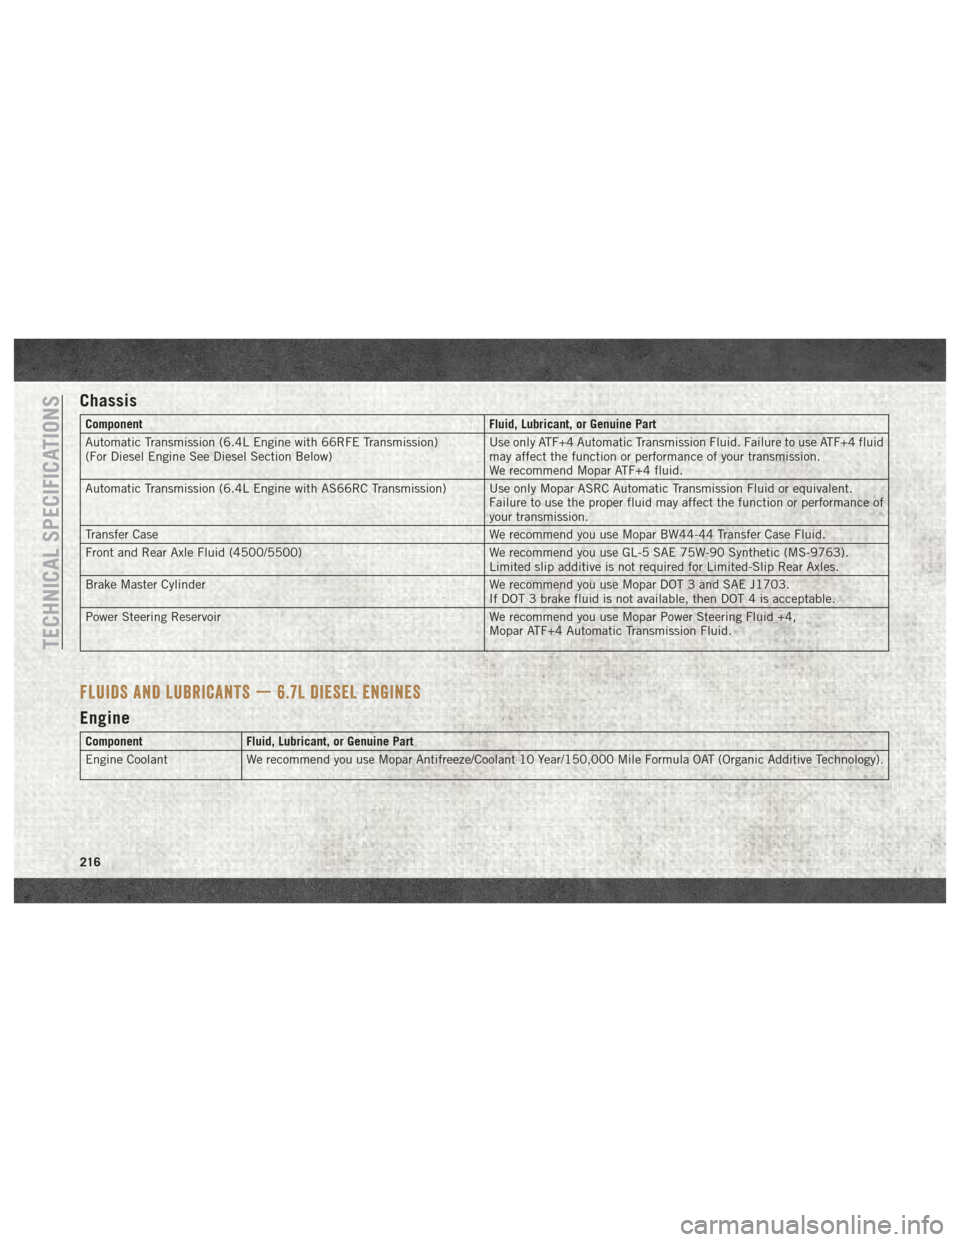
Chassis
ComponentFluid, Lubricant, or Genuine Part
Automatic Transmission (6.4L Engine with 66RFE Transmission)
(For Diesel Engine See Diesel Section Below) Use only ATF+4 Automatic Transmission Fluid. Failure to use ATF+4 fluid
may affect the function or performance of your transmission.
We recommend Mopar ATF+4 fluid.
Automatic Transmission (6.4L Engine with AS66RC Transmission) Use only Mopar ASRC Automatic Transmission Fluid or equivalent. Failure to use the proper fluid may affect the function or performance of
your transmission.
Transfer Case We recommend you use Mopar BW44-44 Transfer Case Fluid.
Front and Rear Axle Fluid (4500/5500) We recommend you use GL-5 SAE 75W-90 Synthetic (MS-9763).
Limited slip additive is not required for Limited-Slip Rear Axles.
Brake Master Cylinder We recommend you use Mopar DOT 3 and SAE J1703.
If DOT 3 brake fluid is not available, then DOT 4 is acceptable.
Power Steering Reservoir We recommend you use Mopar Power Steering Fluid +4,
Mopar ATF+4 Automatic Transmission Fluid.
FLUIDS AND LUBRICANTS — 6.7L DIESEL ENGINES
Engine
Component Fluid, Lubricant, or Genuine Part
Engine Coolant We recommend you use Mopar Antifreeze/Coolant 10 Year/150,000 Mile Formula OAT (Organic Additive Technology).
TECHNICAL SPECIFICATIONS
216
Page 220 of 298

Chassis
ComponentFluid, Lubricant, or Genuine Part
Automatic Transmission – If Equipped 6.7L Diesel with (Six-Speed
68RFE) – 2500/3500 Pickup models without PTO Only use ATF+4 Automatic Transmission Fluid. Failure to use ATF+4 fluid
may affect the function or performance of your transmission. We recom-
mend Mopar ATF+4 fluid.
Automatic Transmission – If Equipped 6.7L Diesel with (Six-Speed
AS69RC) – Pickup models with PTO and All Chassis Cab models Only use Mopar ASRC Automatic Transmission Fluid or equivalent. Failure
to use the proper fluid may affect the function or performance of your
transmission.
Transfer Case We recommend you use Mopar BW44–44 Transfer Case Fluid.
Front and Rear Axle Fluid (2500/3500) We recommend you use SAE 75W-85 HD Ram GL-5 Synthetic Axle
Lubricant. Limited slip additive is not required for Limited-Slip Rear
Axles.
Front and Rear Axle Fluid (4500/5500) We recommend you use GL-5 SAE 75W-90 Synthetic (MS-9763). Limited
slip additive is not required for Limited-Slip Rear Axles.
Clutch Linkage We recommend you use Mopar Multi-Purpose Grease, NLGI Grade 2 E.P.
or equivalent.
Manual Transmission (G-56) – If Equipped We recommend you use Mopar ATF+4 Automatic Transmission Fluid or
equivalent licensed ATF+4 product.
TECHNICAL SPECIFICATIONS
218