manual radio set Ram 4500 Chassis Cab 2018 User Guide
[x] Cancel search | Manufacturer: RAM, Model Year: 2018, Model line: 4500 Chassis Cab, Model: Ram 4500 Chassis Cab 2018Pages: 298, PDF Size: 5.88 MB
Page 24 of 298
Programming The Memory Feature
To create a new memory profile, perform the
following:
1. Cycle the vehicle’s ignition to the ON/RUN position (do not start the engine).
2. Adjust all memory profile settings to de- sired preferences (i.e., driver’s seat, out-
side mirrors and radio station presets).
3. Push and release the set (S) button on the memory switch.
4. Within five seconds, push and release either of the memory buttons (1) or (2).
The instrument cluster display will show
which memory position has been set.
NOTE:
• Memory profiles can be set without the vehicle in PARK, but the vehicle must be in
PARK to recall a memory profile.
• To set a memory profile to your key fob, refer to “Linking And Unlinking The Re-
mote Keyless Entry Key Fob To Memory” in
this section.
Linking And Unlinking The Remote Keyless
Entry Key Fob To Memory
Your key fobs can be programmed to recall
one of two pre-programmed memory profiles
by pushing the unlock button on the key fob.
NOTE:
Before programming your key fobs to memory
the feature has to be selected.
• If your vehicle is equipped with a touch-screen, you must select the “Memory To
Fob” feature through the Uconnect system.
Refer to “Uconnect Settings” in “Multimedia”
in the Owner’s Manual at
www.mopar.com/
en-us/care/owners-manual.html (U.S.
Residents) or www.owners.mopar.ca
(Canadian Residents) for further information.
• If your vehicle is not equipped with a touch- screen, you must select the “Key Fob
Linked To Memory” feature through the
instrument cluster display. Refer to “In-
strument Cluster Display” in “Getting To
Know Your Instrument Panel” in the Own-
er’s Manual at www.mopar.com/en-us/
care/owners-manual.html (U.S. Residents)
or www.owners.mopar.ca (Canadian
Residents) for further information. To program your key fobs, perform the follow-
ing:
1. Cycle the vehicle’s ignition to the OFF
position.
2. Select desired memory profile (1) or (2).
NOTE:
If a memory profile has not already been
set, refer to "Programming The Memory
Feature" for instructions on how to set a
memory profile.
3. Once the profile has been recalled, push and release the set (S) button on the
memory switch, then push and release
button (1) or (2) accordingly. “Memory
Profile Set” (1 or 2) will display in the
instrument cluster display.
4. Push and release the lock button on the key fob within 10 seconds.
NOTE:
Your key fobs can be unlinked to your memory
settings by pushing the set (S) button, and
within 10 seconds, followed by pushing the
unlock button on the key fob.GETTING TO KNOW YOUR VEHICLE
22
Page 223 of 298
MULTIMEDIA
CYBERSECURITY..............223
RADIO 3.0 ................. .224
Clock Setting.................225
Audio Setting .................225
Radio Operation ...............225
Disc Operation — If Equipped ......225
USB/Audio Jack (AUX) Manual
Operation ...................226
UCONNECT 3.0 ...............227
Clock Setting.................228
Audio Setting .................228
Radio Operation ...............228
Disc Operation — If Equipped ......228
USB/Audio Jack (AUX) Manual
Operation ...................229
UCONNECT 3 WITH 5-INCH DISPLAY . .230
Controls On The Front Panel .......230
Clock Setting .................231
Equalizer, Balance And Fade .......231
Radio Mode ..................232
Media Mode .................233 Bluetooth Source
..............236
UCONNECT 4C/4C NAV WITH
8.4-INCH DISPLAY .............237
Uconnect 4C/4C NAV At A Glance . . . .238
Personalized Menu Bar ...........241
Radio .....................242
Android Auto .................243
Apple CarPlay Integration .........246
SIRIUSXM GUARDIAN —
IF EQUIPPED................ .248
SiriusXM Guardian — If Equipped
(Available on Uconnect 4C NAV) .....248
SiriusXM Guardian Activation ......249
Download The Uconnect App .......250
Renewing Subscriptions
(Uconnect 4C NAV) .............250
Maintaining Your SiriusXM Guardian
Account ...................250
Built-In Features ..............250
SiriusXM Guardian Remote Features . .253
UCONNECT SETTINGS ...........256 TIPS CONTROLS AND GENERAL
INFORMATION
............... .257
Steering Wheel Audio Controls ......257
Reception Conditions ............257
Care And Maintenance ...........257
Anti-Theft Protection ............257
IPOD/USB/MEDIA PLAYER CONTROL . .257
Audio Jack (AUX)..............258
USB Port ...................258
Bluetooth Streaming Audio ........259
NAVIGATION................ .259
Changing The Navigation Voice Prompt
Volume....................259
Finding Points Of Interest .........261
Finding A Place By Spelling The Name .261
One-Step Voice Destination Entry . . . .261
Setting Your Home Location ........261
Home .....................261
Adding A Stop ................262
Taking A Detour ...............262
SiriusXM Traffic Plus (4C NAV) .....262
SiriusXM Travel Link (4C NAV) ......263
MULTIMEDIA
221
Page 227 of 298
Clock Setting
1. Push the Menu button at the bottom ofthe radio, and push the Enter/Browse but-
ton for System Settings. Next, select the
Time and Format setting and then select
Set Time by pushing the Enter/Browse
button.
2. Adjust the hours or minutes by turning the Tune/Scroll knob, then pushing the Enter/
Browse button to move to the next entry.
You can also select 12hr or 24hr format by
turning the Tune/Scroll knob, then push-
ing the Enter/Browse button on the de-
sired selection.
3. Once the time is set, press the “Ok” button to exit the time screen.
Audio Setting
• Push the AUDIO button on the radio face-plate.
• The Audio Menu shows the following op- tions for you to customize your audio
settings. Treble, Mid, Bass, Fade, Balance, Speed Ad-
justed Volume, Loudness and AUX Offset
• Select the desired setting to adjust, then
push the ENTER/BROWSE button. Turn the
TUNE/SCROLL knob to adjust the setting +
or - . Push the “Back” button when done.
Radio Operation
Seek Up/Down Buttons
• Push the up or down button to seek throughradio stations in AM, FM or SXM bands.
• Hold either button to bypass stations with- out stopping.
Store Radio Presets Manually
The presets are available for all Radio Modes,
and are activated by pushing any of the six
preset buttons. The Radio stores up to
18 presets in each of the Radio modes. Push
the A-B-C button on the faceplate to select
the A, B, or C preset list. To store a radio preset manually, follow the
steps below:
1. Tune to the desired station.
2. Push and hold the desired numbered but-
ton for more than two seconds, or until you
hear a confirmation beep.Disc Operation — If Equipped
Your vehicle may have a remote CD player
located in the lower center console storage
bin, or in the lower center bench seat bin.
• CD/Disc Mode is entered by either insertinga CD/Disc or by pushing the MEDIA button
located on the side of the display. Once in
Media Mode, select “Disc.”
Gently insert one CD into the CD player with
the CD label facing as indicated on the illus-
tration located on the Disc player.
Seek Up/Down Buttons
• Push to seek through CD tracks.
• Hold either button to bypass tracks without stopping.
225
Page 230 of 298
Clock Setting
1. Push the Menu button at the bottom ofthe radio, and push the Enter/Browse but-
ton for System Settings. Next, select the
Time and Format setting and then select
Set Time by pushing the Enter/Browse
button.
2. Adjust the hours or minutes by turning the Tune/Scroll knob, then pushing the Enter/
Browse button to move to the next entry.
You can also select 12hr or 24hr format
by turning the Tune/Scroll knob, then
pushing the Enter/Browse button on the
desired selection.
3. Once the time is set, press the “Ok” button to exit the time screen.
Audio Setting
• Push the AUDIO button on the radio face-plate.
• The Audio Menu shows the following op- tions for you to customize your audio
settings. Treble, Mid, Bass, Fade, Balance, Speed Ad-
justed Volume, Loudness and AUX Offset
• Select the desired setting to adjust, then
push the ENTER/BROWSE button. Turn the
TUNE/SCROLL knob to adjust the setting +
or - . Push the “Back” button when done.
Radio Operation
Seek Up/Down Buttons
• Push the up or down button to seek throughradio stations in AM, FM or SXM bands.
• Hold either button to bypass stations with- out stopping.
Store Radio Presets Manually
The presets are available for all Radio Modes,
and are activated by pushing any of the six
preset buttons. The Radio stores up to
18 presets in each of the Radio modes. Push
the A-B-C button on the faceplate to select
the A, B, or C preset list. To store a radio preset manually, follow the
steps below:
1. Tune to the desired station.
2. Push and hold the desired numbered but-
ton for more than two seconds, or until
you hear a confirmation beep.Disc Operation — If Equipped
Your vehicle may have a remote CD player
located in the lower center console storage
bin, or in the lower center bench seat bin.
• CD/Disc Mode is entered by either insertinga CD/Disc or by pushing the MEDIA button
located on the side of the display. Once in
Media Mode, select “Disc.”
Gently insert one CD into the CD player with
the CD label facing as indicated on the illus-
tration located on the Disc player.
Seek Up/Down Buttons
• Push to seek through CD tracks.
• Hold either button to bypass tracks without stopping.
MULTIMEDIA
228
Page 235 of 298
Seek Previous/Next Buttons
Seek Up
Press and release the “Seek Up”button
on the touchscreen to tune the radio to the
next listenable station or channel.
During a Seek Up function, if the radio
reaches the starting station after passing
through the entire band two times, the radio
will stop at the station where it began.
Fast Seek Up
Press and hold the “Seek Up”button on
the touchscreen to advance the radio through
the available stations or channels at a faster
rate, the radio stops at the next available
station or channel when the button on the
touchscreen is released.
Seek Down
Press and release the “Seek Down”but-
ton on the touchscreen to tune the radio to
the next listenable station or channel.
During a Seek Down function, if the radio
reaches the starting station after passing
through the entire band two times, the radio
will stop at the station where it began. Fast Seek Down
Press and hold the “Seek Down”button
on the touchscreen to advance the radio
through the available stations or channel at a
faster rate, the radio stops at the next avail-
able station or channel when the button on
the touchscreen is released.
Store Radio Presets
The Radio stores up to 12 presets in each of
the Radio modes. There are four visible pre-
sets at the top of the radio screen. Pressing
the “All” button on the touchscreen on the
radio home screen will display all of the
preset stations for that mode.
To store a radio preset manually, follow the
steps below:
1. Tune to the desired station.
2. Press and hold the desired numbered but- ton on the touchscreen for more than two
seconds or until you hear a confirmation
beep.
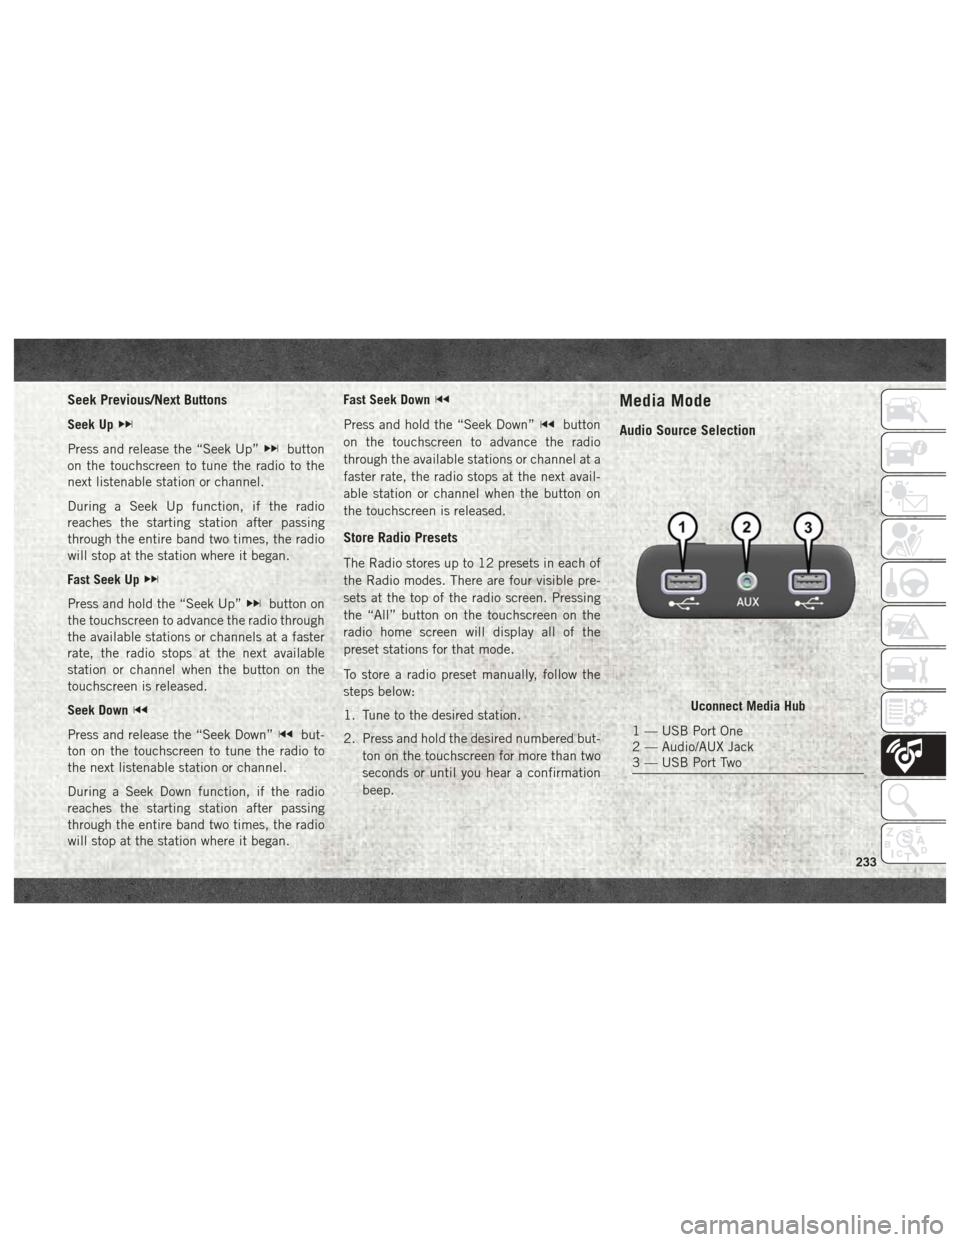
Media Mode
Audio Source Selection
Uconnect Media Hub
1 — USB Port One
2 — Audio/AUX Jack
3 — USB Port Two
233
Page 241 of 298
WARNING!
ALWAYS drive safely with your hands on
the wheel. You have full responsibility and
assume all risks related to the use of the
Uconnect features, SiriusXM Guardian
services, and applications in this vehicle.
Only use Uconnect features and SiriusXM
Guardian services when it is safe to do so.
Failure to do so may result in an accident
involving serious injury or death.
CAUTION!
Do NOT attach any object to the touch-
screen, doing so can result in damage to
the screen.
NOTE:
Uconnect screen images are for illustration
purposes only and may not reflect exact soft-
ware for your vehicle. Setting The Time
• Model 4C NAV synchronizes time automati-
cally via GPS, so it should not require any
time adjustment. If you do need to set the
time manually, follow the instructions be-
low for Model 4C NAV.
• For Model 4C, turn the unit on, and then press the time display at the top of the
screen. Press “Yes.”
• If the time is not displayed at the top of the screen, press the “Settings” button on the
touchscreen. In the Settings screen, press
the “Clock” button on the touchscreen,
then check or uncheck this option.
• Press “+” or “–” next to Set Time Hours and Set Time Minutes to adjust the time.
• If these features are not available, uncheck the Sync Time box.
• Press “X” to save your settings and exit out of the Clock Setting screen. Background Themes
• Screen background themes are selectable
from a pre-loaded list of themes. If you’d
like to set a theme, follow the instructions
below.
• Press the “Settings” button on the touch- screen.
• Press the “Display” button on the touch- screen.
• Then press “Set Theme” button on the touchscreen and select a theme.
Audio Settings
• Press of the “Audio” button on the touch- screen to activate the Audio settings screen
to adjust Balance\Fade, Equalizer, and
Speed Adjusted Volume.
• You can return to the Radio screen by pressing the “X” located at the top right.
239
Page 244 of 298
1. Press the “Apps” button to open the
App screen.
2. Press and hold, then drag the selected App to replace an existing shortcut in the
main menu bar.
The new app shortcut, that was dragged
down onto the main menu bar, will now
be an active App/shortcut.
NOTE:
This feature is only available if the vehicle is
in PARK.
Radio
WARNING!
ALWAYS drive safely with your hands on
the wheel. You have full responsibility and
assume all risks related to the use of the
Uconnect features, SiriusXM Guardian
services, and applications in this vehicle.
Only use Uconnect features and SiriusXM
Guardian services when it is safe to do so.
Failure to do so may result in an accident
involving serious injury or death. • To access the Radio mode, press the “Ra-
dio” button on the touchscreen.
Selecting Radio Stations
• Press the desired radio band (AM, FM or SXM) button on the touchscreen.
Seek Up/Seek Down
• Press the Seek up or down arrow buttons on the touchscreen for less than two seconds
to seek through radio stations.
• Press and hold either arrow button on the touchscreen for more than two seconds to
bypass stations without stopping. The radio
will stop at the next listenable station once
the arrow button on the touchscreen is
released.
Direct Tune
• Tune directly to a radio station by pressing the “Tune” button on the screen, and en-
tering the desired station number. Store Radio Presets Manually
Your radio can store 36 total preset stations,
12 presets per band (AM, FM and SXM). They
are shown at the top of your radio screen. To
see the 12 preset stations per band, press the
arrow button on the touchscreen at the top
right of the screen to toggle between the two
sets of six presets.
To store a radio preset manually, follow the
steps below:
1. Tune to the desired station.
2. Press and hold the desired numbered but-
ton on the touchscreen for more than two
seconds or until you hear a confirmation
beep.
HD Radio — If Equipped
• HD Radio (available on Uconnect 4C/4C NAV) operates similar to conventional radio
except it allows broadcasters to transmit a
high-quality digital signal.
• With an HD radio receiver, the listener is provided with a clear sound that enhances
the listening experience. HD radio can also
transmit data such as song title or artist.
MULTIMEDIA
242
Page 248 of 298
Apple CarPlay Integration
Uconnect works seamlessly with Apple Car-
Play, the smarter, more secure way to use
your iPhone in the car, and stay focused on
the road. Use your Uconnect Touchscreen
display, the vehicle's knobs and controls, and
your voice with Siri to get access to Apple
Music, Maps, Messages, and more.
To use CarPlay, make sure you are using
iPhone 5 or later, have Siri enabled in Set-
tings, ensure your iPhone is unlocked for the
very first connection only, and then use the
following procedure:
1. Connect your iPhone to one of the mediaUSB ports in your vehicle.
NOTE:
Be sure to use the factory-provided Light-
ning cable that came with your phone, as
aftermarket cables may not work.
2.
Once the device is connected, the system
will display the CarPlay home screen. Apple
CarPlay should automatically launch, but if
it does not launch automatically, refer to the
Uconnect Owner’s Manual Supplement for
the procedure to enable the feature “Au-
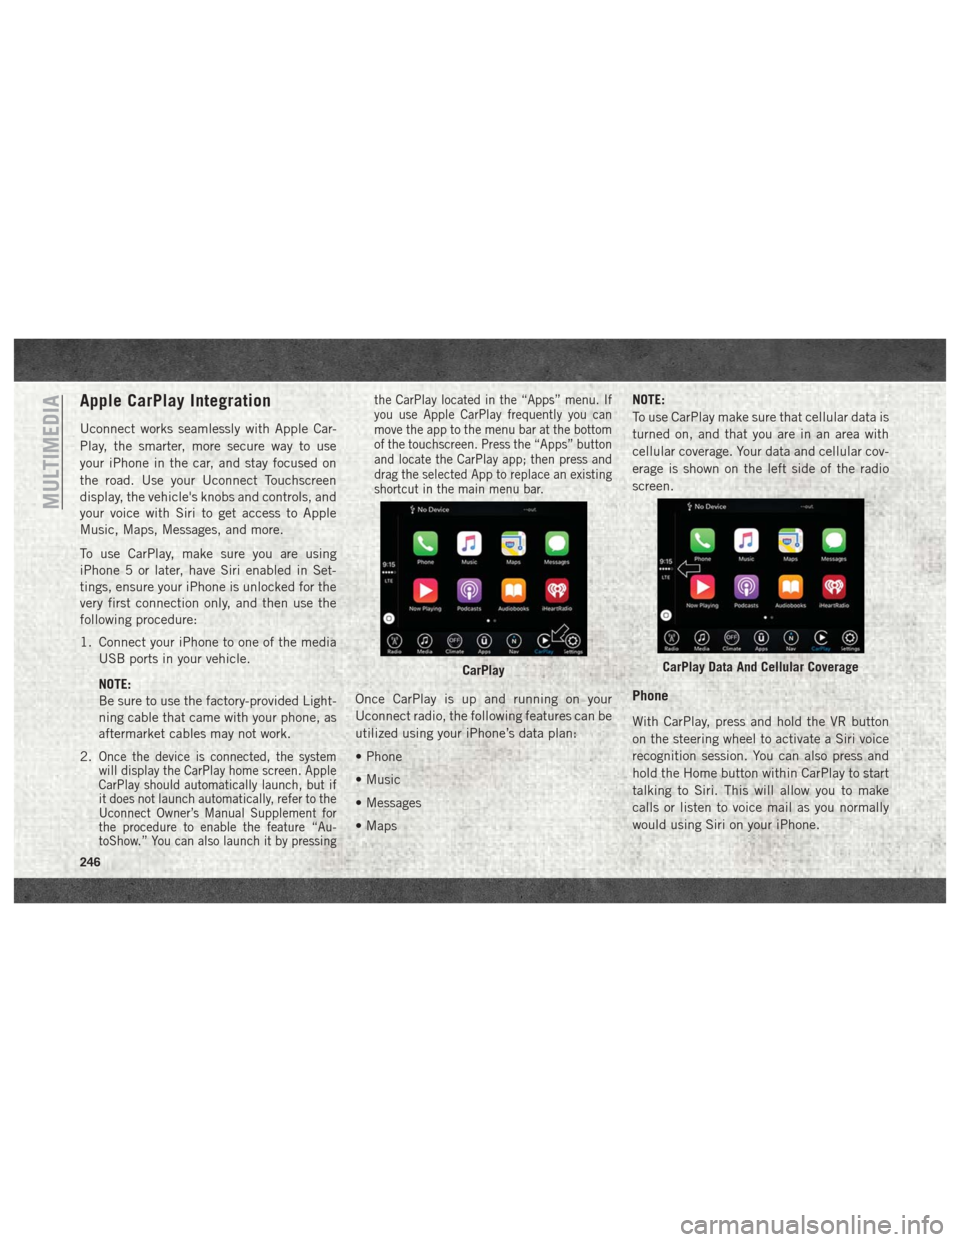
toShow.” You can also launch it by pressing the CarPlay located in the “Apps” menu. If
you use Apple CarPlay frequently you can
move the app to the menu bar at the bottom
of the touchscreen. Press the “Apps” button
and locate the CarPlay app; then press and
drag the selected App to replace an existing
shortcut in the main menu bar.
Once CarPlay is up and running on your
Uconnect radio, the following features can be
utilized using your iPhone’s data plan:
• Phone
• Music
• Messages
• Maps
NOTE:
To use CarPlay make sure that cellular data is
turned on, and that you are in an area with
cellular coverage. Your data and cellular cov-
erage is shown on the left side of the radio
screen.Phone
With CarPlay, press and hold the VR button
on the steering wheel to activate a Siri voice
recognition session. You can also press and
hold the Home button within CarPlay to start
talking to Siri. This will allow you to make
calls or listen to voice mail as you normally
would using Siri on your iPhone.
CarPlayCarPlay Data And Cellular Coverage
MULTIMEDIA
246
Page 272 of 298
Phonebook
The Uconnect system will automatically sync
your phonebook from your paired phone, if
this feature is supported by your phone.
Phonebook contacts are updated each time
that the phone is connected. If your phone
book entries do not appear, check the set-
tings on your phone. Some phones require
you to enable this feature manually.
• Your phonebook can be browsed on theUconnect system touchscreen, but editing
can only be done on your phone. To browse,
press the “Phone” button on the touch-
screen, then the “Phonebook” button on
the touchscreen.
Favorite phonebook entries can be saved as
Favorites for quicker access. Favorites are
shown at the top of the main phone screen.
Voice Command Tips
• Speaking complete names (i.e; Call John Doe vs. Call John) will result in greater
system accuracy.
• You can “link” commands together for faster results. Say “Call John Doe, mobile,”
for example. • If you are listening to available voice com-
mand options, you do not have to listen to
the entire list. When you hear the command
that you need, push the
button on the
steering wheel, wait for the beep and say
your command.
Changing The Volume
• Start a dialogue by pushing the VR button
, then say a command. For example,
"Help".
• Use the radio VOLUME/MUTE rotary knob to adjust the volume to a comfortable level
while the Uconnect system is speaking.
NOTE:
The volume setting for Uconnect is different
than the audio system.
NOTE:
To access help, push the Uconnect VR button
(if active) on the steering wheel and say
"help." Push the Uconnect VR Pickup button
(if active) or the VR button(if
active) and say "cancel" to cancel the help
session.
Using Do Not Disturb
With Do Not Disturb, you can disable notifi-
cations from incoming calls and texts, allow-
ing you to keep your eyes on the road and
hands on the wheel. For your convenience,
there is a counter display to keep track of
your missed calls and text messages while
you were using Do Not Disturb.
Do Not Disturb can automatically reply with a
text message, a call or both, when declining
an incoming call and send it to voicemail.
Automatic reply messages can be:
• “I am driving right now, I will get back to
you shortly.”
• Create a custom auto reply message up to 160 characters.
While in Do Not Disturb, Conference Call can
be selected so you can still place a second
call without being interrupted by incoming
calls.
NOTE:
• Only the beginning of your custom message will be seen on the touchscreen.
MULTIMEDIA
270
Page 294 of 298
Security Alarm..............63
Service ..................154
Tire Pressure Monitoring
(TPMS) ................65, 72
Turn Signal ..........34, 68, 118
Warning (Instrument
Cluster Description) ........63, 68
Loading Vehicle Tires ...................196
Low Tire Pressure System ..........72
Lug Nuts ............163, 210, 211
Maintenance Plan ..............180
Maintenance Schedule . . . .174, 178, 180
Malfunction Indicator Light (Check Engine) ...............63
Manual, Service ...............286
Memory Feature (Memory Seat) ......21
Memory Seat ..................21
Memory Seats And Radio ..........21
Mirrors .....................30
Memory ..................21
Monitor, Tire Pressure System .......72
Mopar .....................219
Mopar Accessories .............219
Multi-Function Control Lever ........32Navigation
...........259, 261, 262
Navigation System (Uconnect GPS) . . .136
New Vehicle Break-In Period .......127
Occupant Restraints ...........76, 77
Oil Change Indicator ............178
Oil, Engine ..............214, 216
Capacity .................213
Filter ................214, 216
Pressure Warning Light .........63
Oil Pressure Light ...............63
Onboard Diagnostic System .........69
Operating Precautions ............69
Overheating, Engine ............166
Owner's Manual (Operator Manual) . . .286
Panic Alarm ..................15
ParkSense System, Rear ..........136
Passive Entry .................19
Pedals, Adjustable ..............29
Perform Service Indicator, Reset .....179
Personalized Menu Bar ...........241
Pets ......................115
Phone,
Hands-Free (Uconnect) ......264
Phone (Pairing) ...............266
Phone (Uconnect) ..............264
Placard, Tire And Loading Information .196 Power
Distribution Center (Fuses) ......155
Outlet (Auxiliary
Electrical Outlet) ..........49, 51
Power Steering Fluid ............216
Pregnant Women And Seat Belts ......85
Radial Ply Tires ...............201
Radio Presets ........225, 228, 233, 242
Radio 3.0 ...................224
Radio Frequency General Information ......15, 17, 21
Radio Operation ...............232
Radio Screens ................238
Radio (Sound Systems) ..........232
Rain Sensitive Wiper System ........35
Rear ParkSense System ..........136
Rear Seat, Folding ..............21
Recreational Towing ............147
Shifting Into Transfer Case
Neutral (N) ...............148
Shifting Out Of Transfer Case
Neutral (N) ...............150
Release, Hood .................44
Reminder, Seat Belt .............78
Remote Keyless Entry ............15
INDEX
292