check engine Ram 5500 Chassis Cab 2012 User Guide
[x] Cancel search | Manufacturer: RAM, Model Year: 2012, Model line: 5500 Chassis Cab, Model: Ram 5500 Chassis Cab 2012Pages: 508, PDF Size: 7.01 MB
Page 205 of 508
WARNING!
If the Transmission Temperature Warning Light is
illuminated and you continue operating the vehicle,
in some circumstances you could cause the fluid to
boil over, come in contact with hot engine or exhaust
components and cause a fire.
For vehicles equipped with a premium cluster this warn-
ing light will display in the Electronic Vehicle Informa-
tion Center (EVIC). Refer to ”Electronic Vehicle Informa-
tion Center (EVIC) — If Equipped” for further
information.
28. Seat Belt Reminder Light
When the ignition switch is first turned to ON/
RUN, this light will turn on for four to eight
seconds as a bulb check. During the bulb check, if
the driver’s seat belt is unbuckled, a chime will sound.
After the bulb check or when driving, if the driver’s seatbelt remains unbuckled, the seat belt reminder light will
flash or remain on continuously. Refer to “Occupant
Restraints” in “Things To Know Before Starting Your
Vehicle” for further information.
29. Charging System Light
This light shows the status of the electrical charg-
ing system. The light should come on when the
ignition switch is first turned to ON/RUN and remain on
briefly as a bulb check. If the light stays on or comes on
while driving, turn off some of the vehicle’s non-essential
electrical devices or increase engine speed (if at idle). If
the charging system light remains on, it means that the
vehicle is experiencing a problem with the charging
system. Obtain SERVICE IMMEDIATELY. See an autho-
rized dealer.
If jump starting is required, refer to “Jump Starting
Procedures” in “What To Do In Emergencies”.
4
UNDERSTANDING YOUR INSTRUMENT PANEL 203
Page 211 of 508
•Adjustable Pedals Unavail — Cruise Engaged
EVIC Warning Lights
•
Door Ajar
This light will turn on to indicate that one or
more doors may be ajar.
•Oil Pressure Warning Light
This light indicates low engine oil pressure. The
light should turn on momentarily when the engine
is started. If the light turns on while driving, stop the
vehicle and shut off the engine as soon as possible. A
chime will sound for four minutes when this light turns
on.
Do not operate the vehicle until the cause is corrected.
This light does not show how much oil is in the engine.
The engine oil level must be checked under the hood.
•Charging System Light
This light shows the status of the electrical charg-
ing system. The light should come on when the
ignition switch is first turned ON and remain on briefly
as a bulb check. If the light stays on or comes on while
driving, turn off some of the vehicle’s non-essential
electrical devices or increase engine speed (if at idle). If
the charging system light remains on, it means that the
vehicle is experiencing a problem with the charging
system. Obtain SERVICE IMMEDIATELY. See an autho-
rized dealer.
•Electronic Speed Control Light
This light will turn on when the electronic
speed control is ON.
4
UNDERSTANDING YOUR INSTRUMENT PANEL 209
Page 212 of 508
•Electronic Throttle Control (ETC) Light
This light informs you of a problem with the
Electronic Throttle Control (ETC) system. The
light will come on when the ignition is first
turned ON and remain on briefly as a bulb
check. If the light does not come on during starting, have
the system checked by an authorized dealer.
If a problem is detected, the light will come on while the
engine is running. Cycle the ignition key when the
vehicle has completely stopped and the shift lever is
placed in the PARK position. The light should turn off.
If the light remains lit with the engine running, your
vehicle will usually be drivable. However, see an autho-
rized dealer for service as soon as possible. If the light is
flashing when the engine is running, immediate service is
required. You may experience reduced performance, an
elevated/rough idle or engine stall and your vehicle may
require towing.•Engine Temperature Warning Light
This light warns of an overheated engine condi-
tion. As temperatures rise and the gauge ap-
proachesH,this indicator will illuminate and a
single chime will sound after reaching a set threshold.
Further overheating will cause the temperature gauge to
passH,the indicator will continuously flash and a
continuous chime will occur until the engine is allowed
to cool.
If the light turns on while driving, safely pull over and
stop the vehicle. If the A/C system is on, turn it off. Also,
shift the transmission into NEUTRAL and idle the ve-
hicle. If the temperature reading does not return to
normal, turn the engine off immediately and call for
service. Refer to “If Your Engine Overheats” in “What To
Do In Emergencies” for more information.
210 UNDERSTANDING YOUR INSTRUMENT PANEL
Page 217 of 508
•Trailer Brake — If Equipped
Displays trailer brake output power and trailer brake
status indicator.
•Engine Hours
Displays the number of hours of engine operation.
Units
Press and release the UP or DOWN button until “Units”
displays in the EVIC and press the SELECT button. The
EVIC, odometer, and navigation system (if equipped) can
be changed between English and Metric units of mea-
sure. To make your selection, scroll up or down until the
preferred setting is highlighted, then press and release
the SELECT button until a check-mark appears next to
the setting, showing that the setting has been selected.
Compass / Temperature Display
The compass readings indicate the direction the vehicle is
facing. The EVIC will display one of eight compass
readings and the outside temperature.
NOTE:
•The system will display the last known outside tem-
perature when starting the vehicle and may need to be
driven several minutes before the updated tempera-
ture is displayed. Engine temperature can also affect
the displayed temperature; therefore, temperature
readings are not updated when the vehicle is not
moving.
•During snowplow usage on vehicles equipped with
outside temperature display, the display may show
higher temperatures than the outside ambient tem-
perature. The higher displayed temperature is due to
blocked or reduced airflow to the underhood ambient
4
UNDERSTANDING YOUR INSTRUMENT PANEL 215
Page 288 of 508

WARNING! (Continued)
•Your vehicle could move and injure you and others
if it is not completely in PARK. Check by trying to
move the shift lever clockwise without first pull-
ing it toward you after you have placed it in PARK.
Make sure the transmission is in PARK before
leaving the vehicle.
•It is dangerous to move the shift lever out of PARK
or NEUTRAL if the engine speed is higher than
idle speed. If your foot is not firmly pressing the
brake pedal, the vehicle could accelerate quickly
forward or in reverse. You could lose control of the
vehicle and hit someone or something. Only shift
into gear when the engine is idling normally and
when your foot is firmly pressing the brake pedal.
(Continued)
WARNING! (Continued)
•Unintended movement of a vehicle could injure
those in and near the vehicle. As with all vehicles,
you should never exit a vehicle while the engine is
running. Before exiting a vehicle, always apply the
parking brake, shift the transmission into PARK,
and remove the key fob. Once the key fob is
removed, the shift lever is locked in the PARK
position, securing the vehicle against unwanted
movement. Furthermore, you should never leave
unattended children inside a vehicle.
•Never leave children alone in a vehicle. Leaving
unattended children in a vehicle is dangerous for a
number of reasons. A child or others could be
seriously or fatally injured. Do not leave the key
fob in the vehicle. A child could operate power
windows, other controls, or move the vehicle.
286 STARTING AND OPERATING
Page 309 of 508
CAUTION!
•Always check the depth of the standing water
before driving through it. Never drive through
standing water that is deeper than the bottom of
the tire rims mounted on the vehicle.
•Determine the condition of the road or the path
that is under water and if there are any obstacles in
the way before driving through the standing wa-
ter.
•Do not exceed 5 mph (8 km/h) when driving
through standing water. This will minimize wave
effects.
(Continued)
CAUTION! (Continued)
•Driving through standing water may cause dam-
age to your vehicle’s drivetrain components. Al-
ways inspect your vehicle’s fluids (i.e., engine oil,
transmission, axle, etc.) for signs of contamination
(i.e., fluid that is milky or foamy in appearance)
after driving through standing water. Do not con-
tinue to operate the vehicle if any fluid appears
contaminated, as this may result in further dam-
age. Such damage is not covered by the New
Vehicle Limited Warranty.
•Getting water inside your vehicle’s engine can
cause it to lock up and stall out, and cause serious
internal damage to the engine. Such damage is not
covered by the New Vehicle Limited Warranty.
5
STARTING AND OPERATING 307
Page 312 of 508
WARNING!
Fluid level should be checked on a level surface and
with the engine off to prevent injury from moving
parts and to ensure accurate fluid level reading. Do
not overfill. Use only manufacturer’s recommended
power steering fluid.
If necessary, add fluid to restore to the proper indicated
level. With a clean cloth, wipe any spilled fluid from all
surfaces. Refer to “Fluids, Lubricants, and Genuine
Parts” in “Maintaining Your Vehicle” for further
information.
PARKING BRAKE
Before leaving the vehicle, make sure that the parking
brake is fully applied, the engine is off and the key fob is
removed from the ignition switch. Also, be certain to
leave an automatic transmission in PARK, or manual
transmission in REVERSE or first gear.The foot operated parking brake is located below the
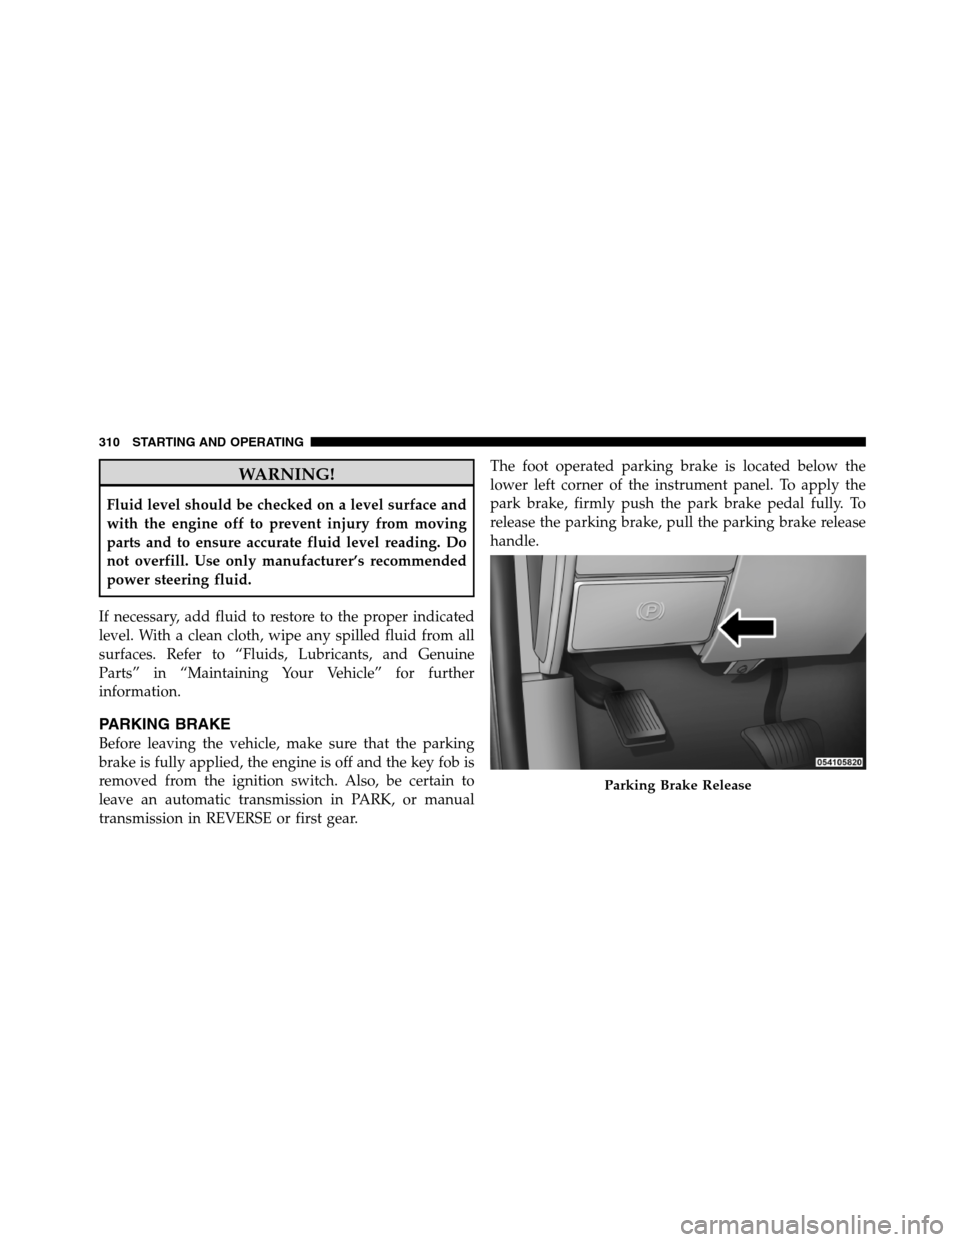
lower left corner of the instrument panel. To apply the
park brake, firmly push the park brake pedal fully. To
release the parking brake, pull the parking brake release
handle.
Parking Brake Release
310 STARTING AND OPERATING
Page 365 of 508
Automatic Transmission
The “DRIVE” range can be selected when towing. How-
ever, if frequent shifting occurs while in this range, select
“TOW/HAUL” mode or select a lower gear using the
Electronic Range Select (ERS) feature.
NOTE:Using “TOW/HAUL” mode or a lower gear
range while operating the vehicle under heavy operating
conditions will improve performance and extend trans-
mission life by reducing excessive shifting and heat build
up. This action will also provide better engine braking.
The automatic transmission fluid and filter should be
changed if you regularly tow a trailer for more than
45 minutes of continuous operation. Refer to “Mainte-
nance Schedule” for the proper maintenance intervals.
NOTE:Check the automatic transmission fluid level
before towing.
Tow/Haul
To reduce potential for automatic transmission overheat-
ing, turn the “TOW/HAUL” feature ON when driving in
hilly areas, or select a lower gear range (using the
Electronic Range Select (ERS) feature) on more severe
grades.
Electronic Speed Control – If Equipped
�
Do not use in hilly terrain or with heavy loads.
�When using the speed control, if you experience speed
drops greater than 10 mph (16 km/h), disengage until
you can get back to cruising speed.
�Use speed control in flat terrain and with light loads to
maximize fuel efficiency.
5
STARTING AND OPERATING 363
Page 375 of 508

6. Shift the transfer case lever to the desired position.
NOTE:When shifting out of transfer case NEUTRAL
(N), turning the engine OFF may be required to avoid
gear clash.
7. Shift the automatic transmission into PARK, or place
manual transmission in NEUTRAL.
8. Release the brake pedal.
9. Disconnect vehicle from the tow vehicle.
10. Start the engine.
11. Press and hold the brake pedal.
12. Release the parking brake.
13. Shift the transmission into gear, release the brake
pedal (and clutch pedal on manual transmissions), and
check that the vehicle operates normally.Shifting Into NEUTRAL – Electronic Shift Transfer
Case (If Equipped)
Use the following procedure to prepare your vehicle for
recreational towing:
WARNING!
You or others could be injured if you leave the
vehicle unattended with the transfer case in the
NEUTRAL position without first fully engaging the
parking brake. The transfer case NEUTRAL position
disengages both the front and rear driveshafts from
the powertrain and will allow the vehicle to move,
even if the transmission is in PARK. The parking
brake should always be applied when the driver is
not in the vehicle.
5
STARTING AND OPERATING 373
Page 409 of 508

the SELECT button to turn off the message. If the
problem continues, the message will appear the next time
the vehicle is started.
A loose, improperly installed, or damaged fuel filler cap
may also turn on the Malfunction Indicator Light (MIL).
EMISSIONS INSPECTION AND MAINTENANCE
PROGRAMS
In some localities, it may be a legal requirement to pass
an inspection of your vehicle’s emissions control system.
Failure to pass could prevent vehicle registration.
For states that require an Inspection and Mainte-
nance (I/M), this check verifies the “Malfunction
Indicator Light (MIL)” is functioning and is not
on when the engine is running, and that the OBD II
system is ready for testing.Normally, the OBD II system will be ready. The OBD II
system maynotbe ready if your vehicle was recently
serviced, recently had a dead battery or a battery replace-
ment. If the OBD II system should be determined not
ready for the I/M test, your vehicle may fail the test.
Your vehicle has a simple ignition key-actuated test,
which you can use prior to going to the test station. To
check if your vehicle’s OBD II system is ready, you must
do the following:
1. Turn the ignition switch to the ON position, but do not
crank or start the engine.
2. If you crank or start the engine, you will have to start
this test over.
3. As soon as you turn the ignition switch to the ON
position, you will see the MIL symbol come on as part of
a normal bulb check.
7
MAINTAINING YOUR VEHICLE 407