RAM CHASSIS CAB 2016 Owners Manual
Manufacturer: RAM, Model Year: 2016, Model line: CHASSIS CAB, Model: RAM CHASSIS CAB 2016Pages: 675, PDF Size: 5.46 MB
Page 311 of 675
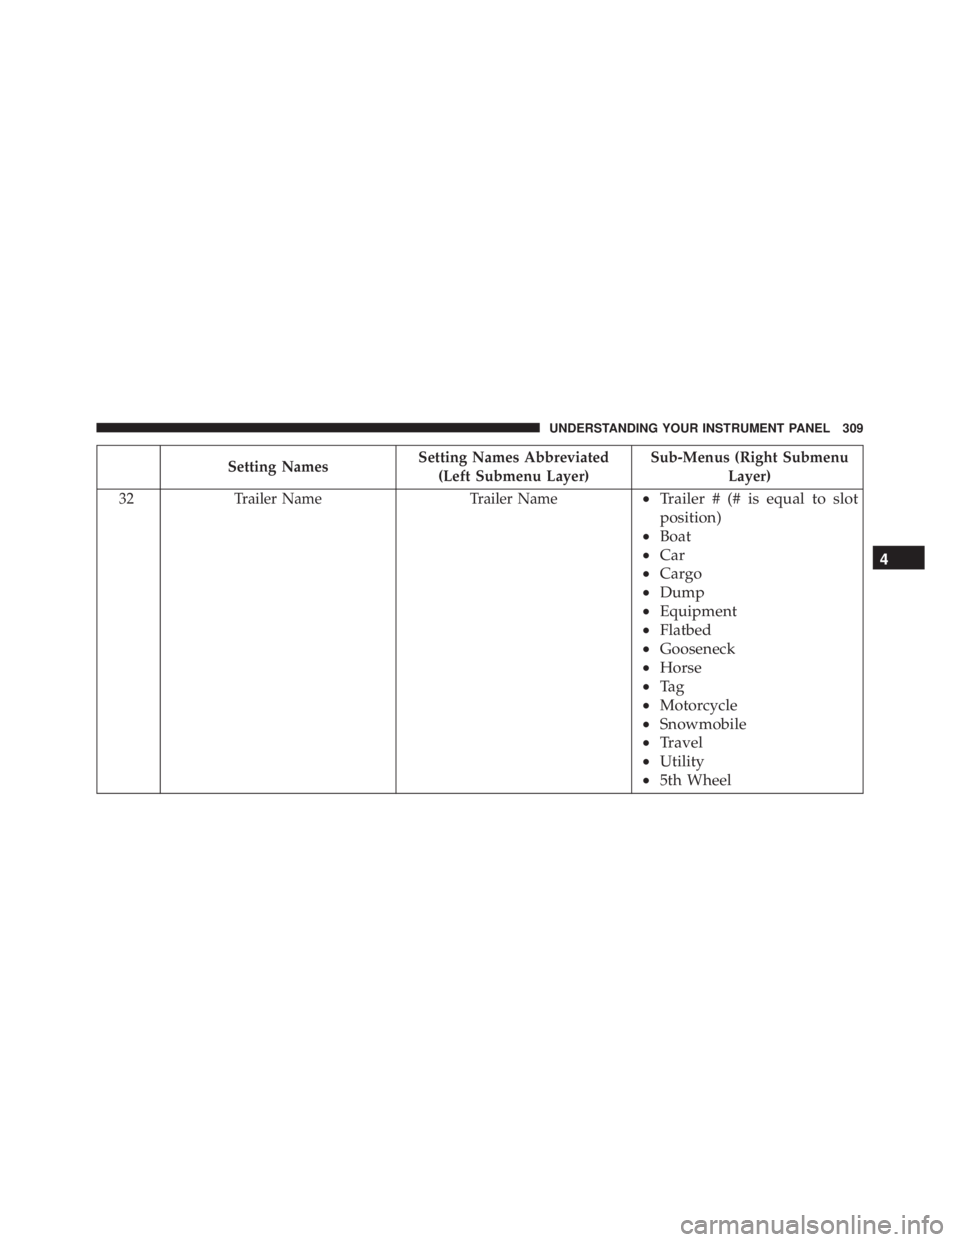
Setting Names Setting Names Abbreviated
(Left Submenu Layer) Sub-Menus (Right Submenu
Layer)
32 Trailer Name Trailer Name • Trailer # (# is equal to slot
position)
• Boat
• Car
• Cargo
• Dump
• Equipment
• Flatbed
• Gooseneck
• Horse
• Ta g
• Motorcycle
• Snowmobile
• Travel
• Utility
• 5th Wheel 4UNDERSTANDING YOUR INSTRUMENT PANEL 309
Page 312 of 675
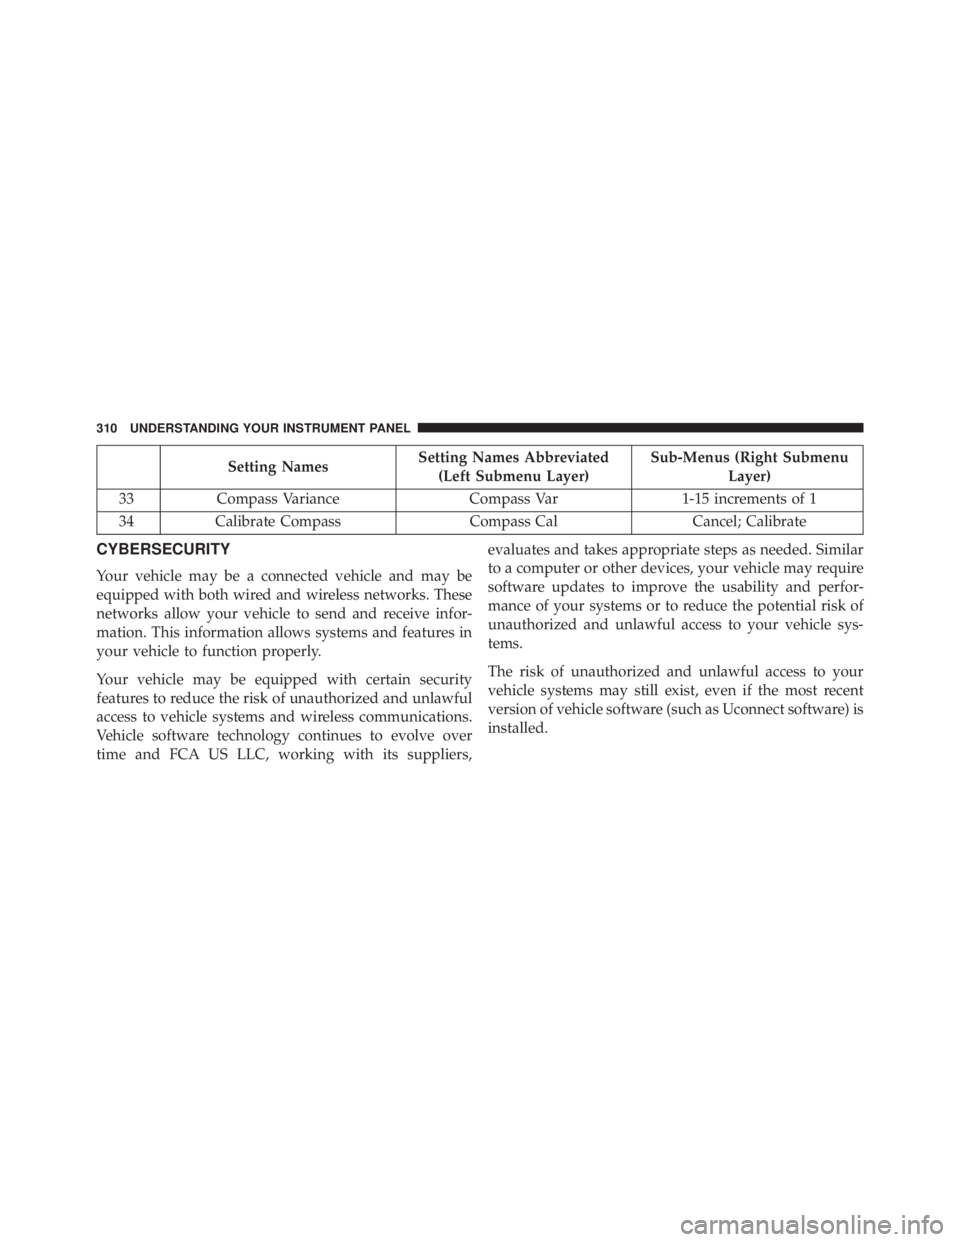
Setting Names Setting Names Abbreviated
(Left Submenu Layer) Sub-Menus (Right Submenu
Layer)
33 Compass Variance Compass Var 1-15 increments of 1
34 Calibrate Compass Compass Cal Cancel; Calibrate
CYBERSECURITY
Your vehicle may be a connected vehicle and may be
equipped with both wired and wireless networks. These
networks allow your vehicle to send and receive infor-
mation. This information allows systems and features in
your vehicle to function properly.
Your vehicle may be equipped with certain security
features to reduce the risk of unauthorized and unlawful
access to vehicle systems and wireless communications.
Vehicle software technology continues to evolve over
time and FCA US LLC, working with its suppliers, evaluates and takes appropriate steps as needed. Similar
to a computer or other devices, your vehicle may require
software updates to improve the usability and perfor-
mance of your systems or to reduce the potential risk of
unauthorized and unlawful access to your vehicle sys-
tems.
The risk of unauthorized and unlawful access to your
vehicle systems may still exist, even if the most recent
version of vehicle software (such as Uconnect software) is
installed.310 UNDERSTANDING YOUR INSTRUMENT PANEL
Page 313 of 675
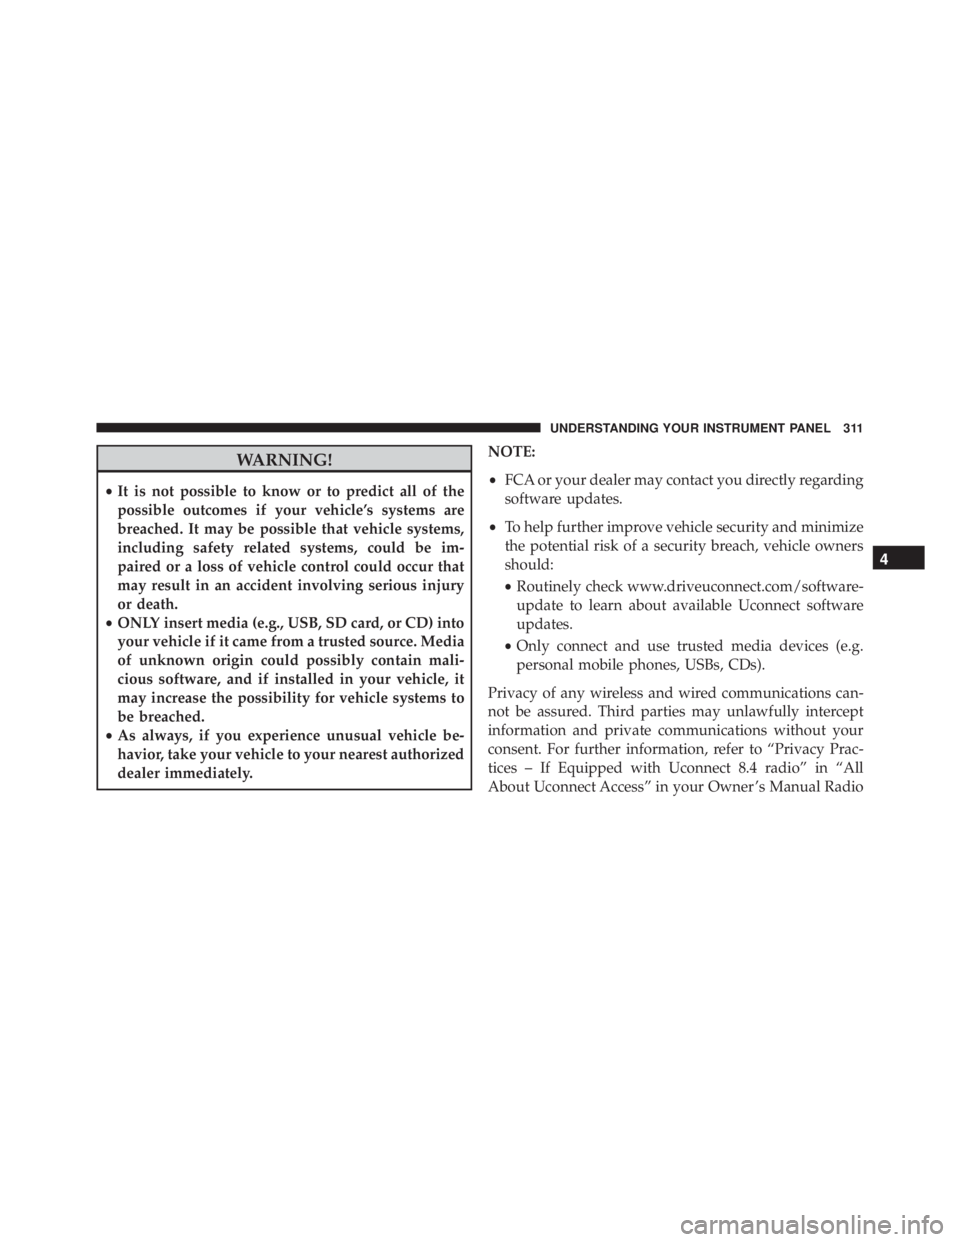
WARNING!• It is not possible to know or to predict all of the
possible outcomes if your vehicle’s systems are
breached. It may be possible that vehicle systems,
including safety related systems, could be im-
paired or a loss of vehicle control could occur that
may result in an accident involving serious injury
or death.
• ONLY insert media (e.g., USB, SD card, or CD) into
your vehicle if it came from a trusted source. Media
of unknown origin could possibly contain mali-
cious software, and if installed in your vehicle, it
may increase the possibility for vehicle systems to
be breached.
• As always, if you experience unusual vehicle be-
havior, take your vehicle to your nearest authorized
dealer immediately. NOTE:
• FCA or your dealer may contact you directly regarding
software updates.
• To help further improve vehicle security and minimize
the potential risk of a security breach, vehicle owners
should:
• Routinely check www.driveuconnect.com/software-
update to learn about available Uconnect software
updates.
• Only connect and use trusted media devices (e.g.
personal mobile phones, USBs, CDs).
Privacy of any wireless and wired communications can-
not be assured. Third parties may unlawfully intercept
information and private communications without your
consent. For further information, refer to “Privacy Prac-
tices – If Equipped with Uconnect 8.4 radio” in “All
About Uconnect Access” in your Owner ’s Manual Radio 4UNDERSTANDING YOUR INSTRUMENT PANEL 311
Page 314 of 675
Supplement and “Onboard Diagnostic System (OBD II)
Cybersecurity” in “Maintaining Your Vehicle”.
UCONNECT SETTINGS
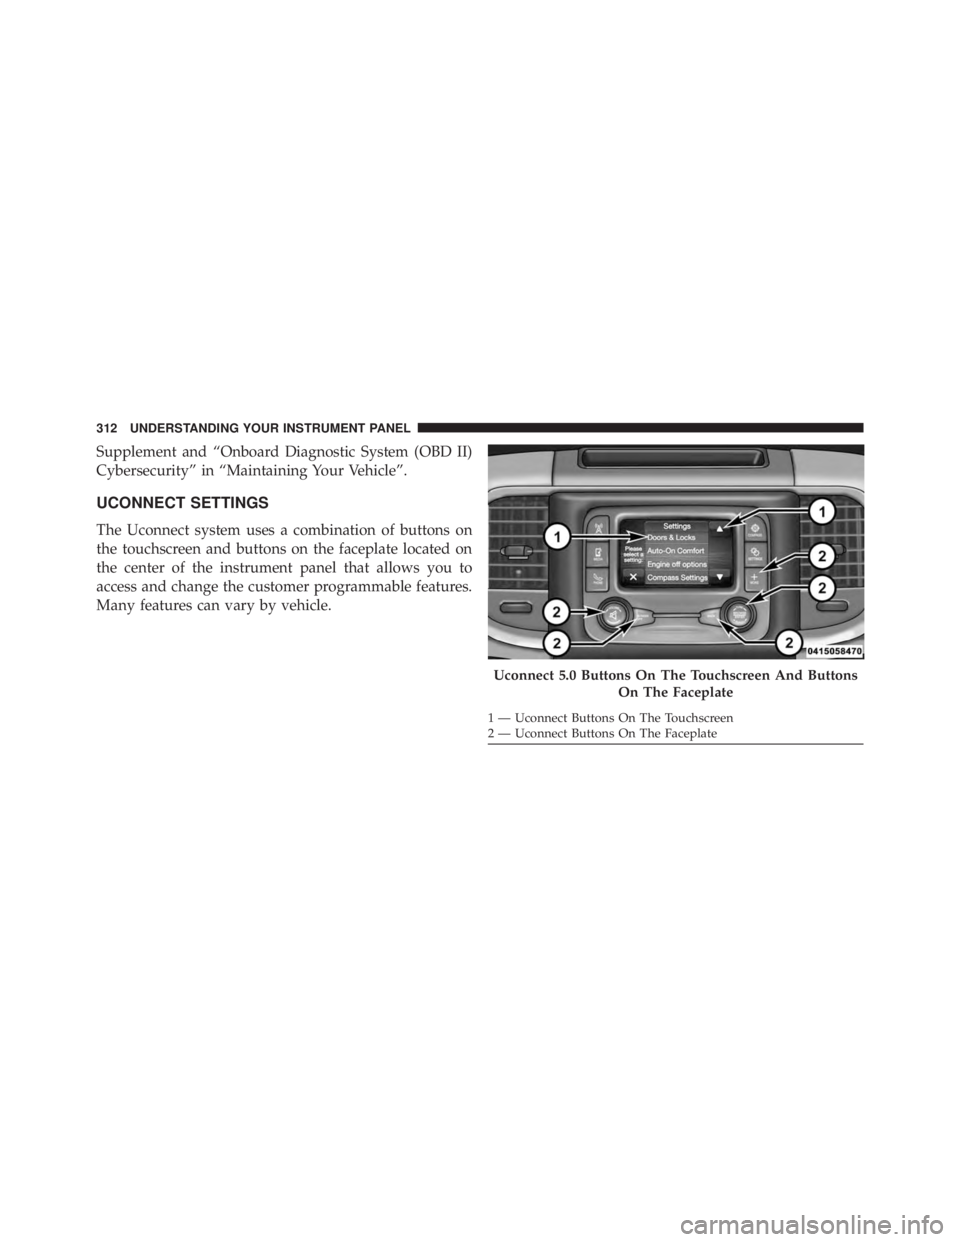
The Uconnect system uses a combination of buttons on
the touchscreen and buttons on the faceplate located on
the center of the instrument panel that allows you to
access and change the customer programmable features.
Many features can vary by vehicle.
Uconnect 5.0 Buttons On The Touchscreen And Buttons
On The Faceplate1 — Uconnect Buttons On The Touchscreen
2 — Uconnect Buttons On The Faceplate312 UNDERSTANDING YOUR INSTRUMENT PANEL
Page 315 of 675
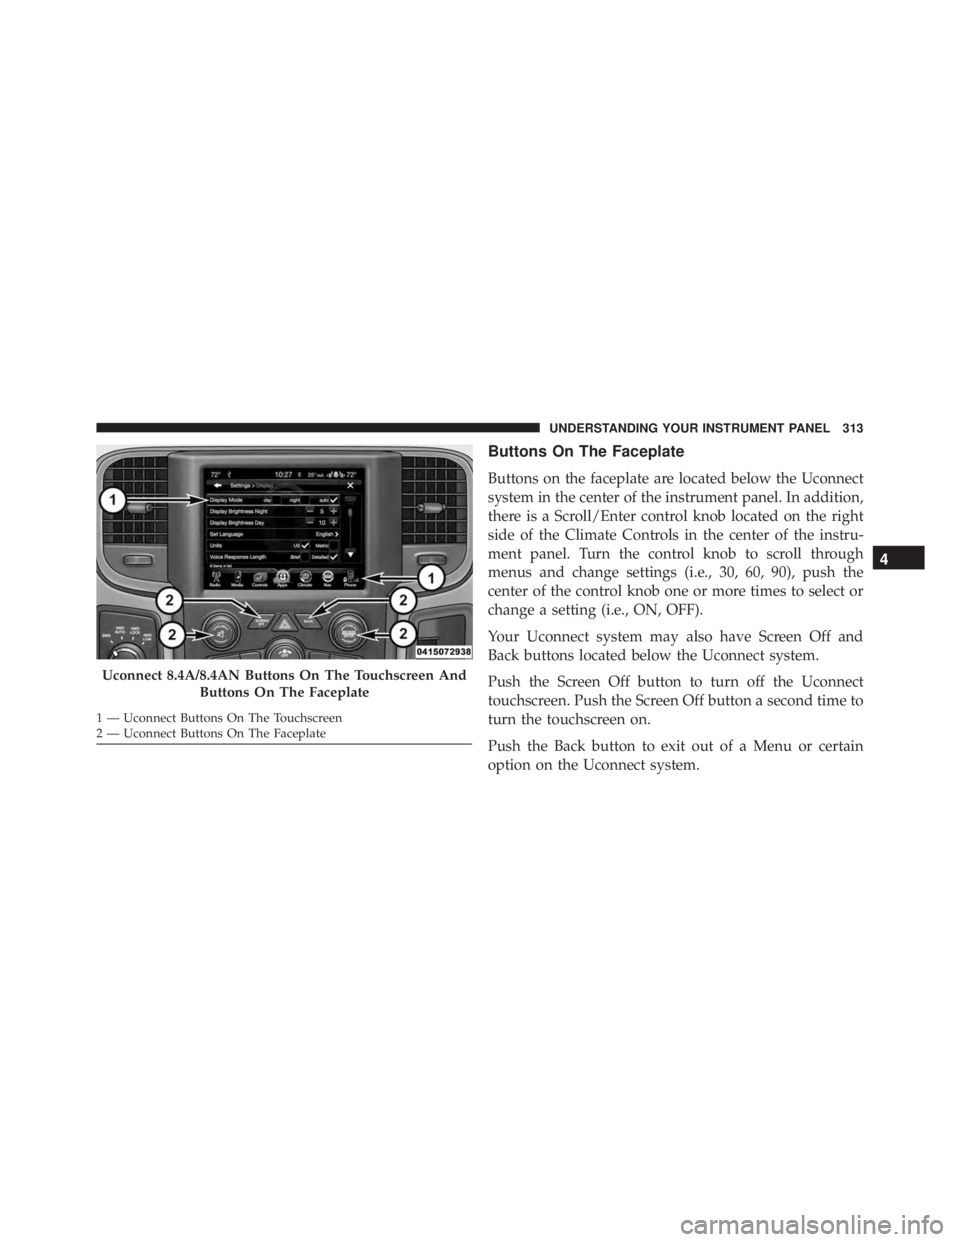
Buttons On The Faceplate
Buttons on the faceplate are located below the Uconnect
system in the center of the instrument panel. In addition,
there is a Scroll/Enter control knob located on the right
side of the Climate Controls in the center of the instru-
ment panel. Turn the control knob to scroll through
menus and change settings (i.e., 30, 60, 90), push the
center of the control knob one or more times to select or
change a setting (i.e., ON, OFF).
Your Uconnect system may also have Screen Off and
Back buttons located below the Uconnect system.
Push the Screen Off button to turn off the Uconnect
touchscreen. Push the Screen Off button a second time to
turn the touchscreen on.
Push the Back button to exit out of a Menu or certain
option on the Uconnect system.Uconnect 8.4A/8.4AN Buttons On The Touchscreen And
Buttons On The Faceplate1 — Uconnect Buttons On The Touchscreen
2 — Uconnect Buttons On The Faceplate 4UNDERSTANDING YOUR INSTRUMENT PANEL 313
Page 316 of 675
Buttons On The Touchscreen
Buttons on the touchscreen are accessible on the
Uconnect display.
Customer Programmable Features — Uconnect
5.0 Personal Settings
Push the MORE or SETTINGS button on the faceplate,
then press the “Settings” button on the touchscreen (if
equipped) to display the settings menu screen. In this
mode the Uconnect system allows you to access pro-
grammable features that may be equipped such as Dis-
play, Units, Voice, Clock, Safety & Driving Assistance,
Lights, Doors & Locks, Auto-On Comfort (if equipped),
Engine Off Options, Trailer Brake, Audio, Compass Set-
tings, Phone/Bluetooth, SiriusXM Setup (if equipped),
Restore Settings, Clear Personal Data and System Infor-
mation. NOTE: Only one category may be selected at a time.
When making a selection, press the button on the touch-
screen to enter the desired mode. Once in the desired
mode, press and release the preferred setting until the
button is highlighted. Once the setting is complete, either
press the back arrow or Done button on the touchscreen
or the Back button on the faceplate to return to the
previous menu. Pressing the Up or Down Arrow buttons
on the touchscreen on the right side of the screen will
allow you to toggle up or down through the list of
available settings.
NOTE: All settings should be changed with the ignition
in the “Run” position.314 UNDERSTANDING YOUR INSTRUMENT PANEL
Page 317 of 675
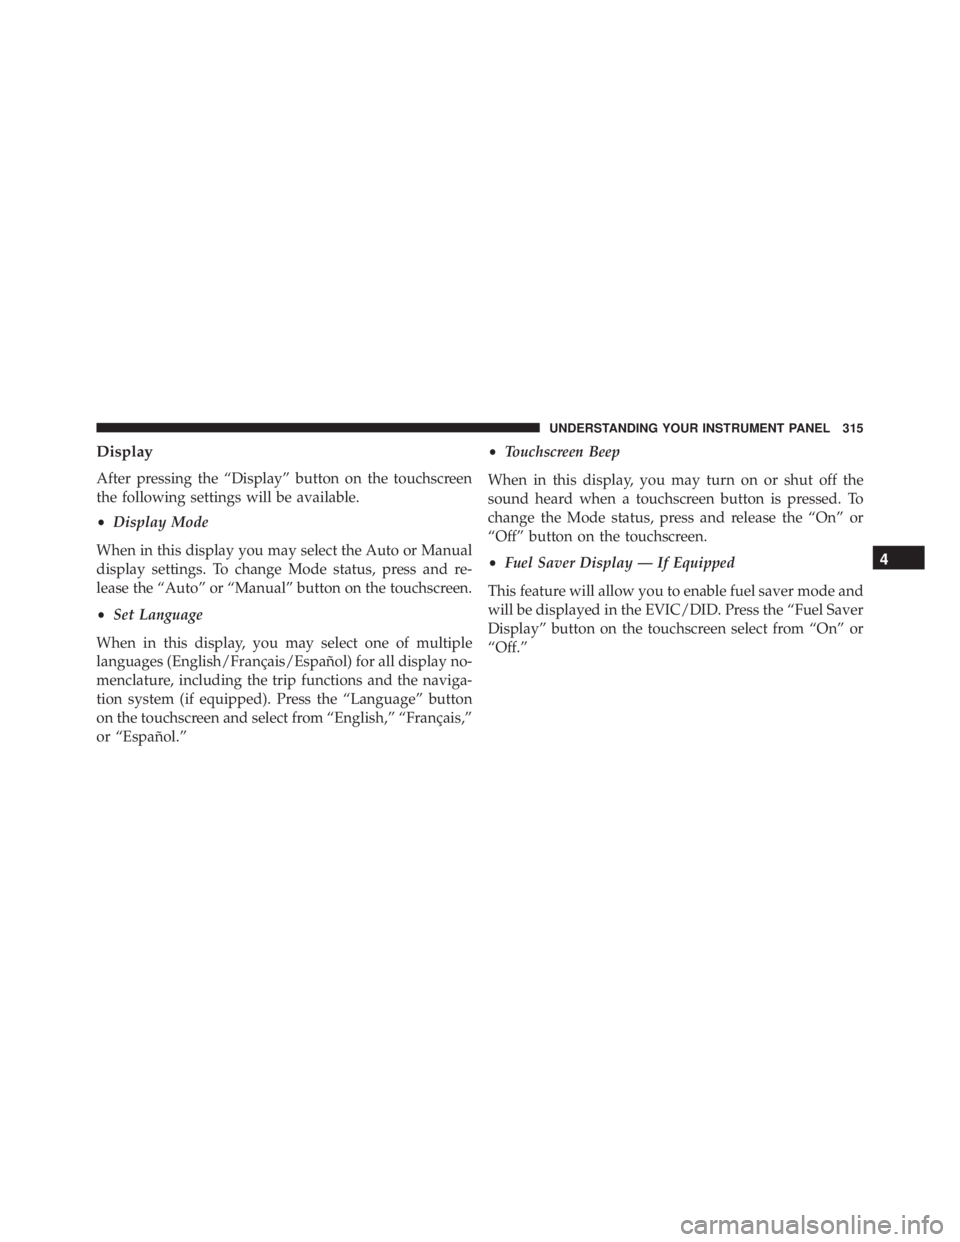
Display
After pressing the “Display” button on the touchscreen
the following settings will be available.
• Display Mode
When in this display you may select the Auto or Manual
display settings. To change Mode status, press and re-
lease the “Auto” or “Manual” button on the touchscreen.
• Set Language
When in this display, you may select one of multiple
languages (English/Français/Español) for all display no-
menclature, including the trip functions and the naviga-
tion system (if equipped). Press the “Language” button
on the touchscreen and select from “English,” “Français,”
or “Español.” • Touchscreen Beep
When in this display, you may turn on or shut off the
sound heard when a touchscreen button is pressed. To
change the Mode status, press and release the “On” or
“Off” button on the touchscreen.
• Fuel Saver Display — If Equipped
This feature will allow you to enable fuel saver mode and
will be displayed in the EVIC/DID. Press the “Fuel Saver
Display” button on the touchscreen select from “On” or
“Off.” 4UNDERSTANDING YOUR INSTRUMENT PANEL 315
Page 318 of 675
Units
After pressing the “Units” button on the touchscreen you
may select each unit of measure independently displayed
in the Driver Information Display (DID), and navigation
system (if equipped). The following selectable units of
measure are listed below:
• Speed
Select from: “MPH” or “km/h.”
• Distance
Select from: “mi” or “km.”
• Fuel Consumption
Select from: “MPG” (US), “MPG” (UK), “L/100 km” or
“km/L.”
• Capacity
Select from: “gal” (US), “gal” (UK), “L/100 km” or “L.” • Pressure
Select from: “psi,” “kPa,” or “bar.”
• Temperature
Select from: “°C,” or “°F.”
• Power
Select from: “HP” (US), “HP” (UK), and “kW.”
• Torque
Select from: “lb-ft” or “Nm.”
Voice
After pressing the “Voice” button on the touchscreen the
following settings will be available:
• Voice Response Length
When in this display, you may change the Voice Re-
sponse Length settings. To change the Voice Response316 UNDERSTANDING YOUR INSTRUMENT PANEL
Page 319 of 675
Length, press the “Voice Response Length” button on the
touchscreen and select from “Brief” or “Detailed.”
• Show Command List
When in this display, you may change the Show Com-
mand List settings. To change the Show Command List
settings, press the “Show Command List” button on the
touchscreen and select from “Always,” “With Help” or
“Never.”
Clock & Date
After pressing the “Clock & Date” button on the touch-
screen the following settings will be available:
• Set Time
When in this display, you may set the time and format
manually. Press the “Set Time” button then choose from
a “12 hour” or “24 hour format.” Press the corresponding
arrow above and below the current time to adjust, then
select “AM” or “PM.” • Set Date
When in this display, you may set the date manually.
Press the “Set Date” button then press the corresponding
arrows above and below the current date to adjust.
Safety/Assistance
After pressing the “Safety/Assistance” button on the
touchscreen the following settings will be available:
• ParkSense — If Equipped
The ParkSense system will scan for objects behind the
vehicle when the transmission shift lever/gear selector is
in REVERSE and the vehicle speed is less than 11 mph
(18 km/h). It will provide an alert (audible and/or
visual) to indicate the proximity to other objects. The
system can be enabled with Sound Only, or Sound and
Display. To change the ParkSense status, press and re-
lease the “Sound Only” or “Sounds and Display” button. 4UNDERSTANDING YOUR INSTRUMENT PANEL 317
Page 320 of 675
Refer to “ParkSense” in “Understanding The Features Of
Your Vehicle” for system function and operating infor-
mation.
• Front ParkSense Chime Volume
The Front ParkSense Chime Volume settings can be
selected from the EVIC/DID or Uconnect System — if
equipped. The chime volume settings include LOW,
MEDIUM, and HIGH. The factory default volume setting
is MEDIUM. To change the mode status, press the “Front
ParkSense Volume” button and select the “Low” “Med”
or “High” buttons on the touchscreen. ParkSense will
retain its last known configuration state through ignition
cycles.
• Rear ParkSense Chime Volume — If Equipped
The Rear ParkSense Chime Volume settings can be se-
lected from the EVIC/DID or Uconnect System — if
equipped. The chime volume settings include LOW,
MEDIUM, and HIGH. The factory default volume setting is MEDIUM. To change the mode status, press the “Rear
ParkSense Volume” button and select the “Low” “Med”
or “High” buttons on the touchscreen. ParkSense will
retain its last known configuration state through ignition
cycles.
• Tilt Mirrors In Reverse — If Equipped
When this feature is selected, the exterior sideview
mirrors will tilt downward when the ignition is in the
RUN position and the transmission shift lever/gear
selector is in the REVERSE position. The mirrors will
move back to their previous position when the transmis-
sion is shifted out of REVERSE. To make your selection,
press the “Tilt Mirrors In Reverse” button on the touch-
screen and make your selection.
• ParkView Backup Camera Active Guidelines
Your vehicle may be equipped with the ParkView Rear
Back Up Camera Active Guidelines that allows you to see
active guidelines over the ParkView Back up camera318 UNDERSTANDING YOUR INSTRUMENT PANEL