start stop button RAM CHASSIS CAB 2020 Owner's Manual
[x] Cancel search | Manufacturer: RAM, Model Year: 2020, Model line: CHASSIS CAB, Model: RAM CHASSIS CAB 2020Pages: 516, PDF Size: 16.57 MB
Page 284 of 516
282STARTING AND OPERATING
The trailer and the vehicle’s stop lamps will
come on when braking normally with the vehicle
brake pedal. Only the trailer stop lamps will
come on when the manual brake control lever is
applied.
Trailer Brake Status Indicator Light
This light indicates the trailer electrical connec -
tion status.
If no electrical connection is detected after the
ignition is turned on, pushing the GAIN adjust -
ment button or sliding the manual brake control
lever will display the GAIN setting for 10
seconds and the “Trailer Brake Status Indicator
Light” will not be displayed.
If a fault is detected in the trailer wiring or the
Integrated Trailer Brake Module (ITBM), the
“Trailer Brake Status Indicator Light” will flash.
GAIN Adjustment Buttons (+/-)
Pushing these buttons will adjust the brake
control power output to the trailer brakes in
0.5 increments. The GAIN setting can be
increased to a maximum of 10 or decreased to
a minimum of 0 (no trailer braking).
GAIN
The GAIN setting is used to set the trailer brake
control for the specific towing condition and
should be changed as towing conditions change. Changes to towing conditions include
trailer load, vehicle load, road conditions and
weather.
Adjusting GAIN
NOTE:
This should only be performed in a traffic free
environment at speeds of approximately
20–25 mph (30–40 km/h).
1. Make sure the trailer brakes are in good
working condition, functioning normally
and properly adjusted. See your trailer
dealer if necessary.
2. Hook up the trailer and make the electrical connections according to the trailer manu -
facturer's instructions.
3. When a trailer with electric/EOH brakes is plugged in, the trailer connected message
should appear in the instrument cluster
display (if the connection is not recognized
by the ITBM, braking functions will not be
available), the GAIN setting will illuminate
and the correct type of trailer must be
selected from the instrument cluster display
options. 4. Push the UP or DOWN button on the
steering wheel until “TRAILER TOW”
appears on the screen.
5. Push the RIGHT arrow on the steering wheel to enter “TRAILER TOW”.
6. Push the UP or DOWN buttons until the Trailer Brake Type appears on the screen.
7. Push the RIGHT arrow and then push the UP or DOWN buttons until the proper Trailer
Brake Type appears on the screen.
8. In a traffic-free environment, tow the trailer on a dry, level surface at a speed of
20–25 mph (30–40 km/h) and squeeze
the manual brake control lever completely.
9. If the trailer wheels lockup (indicated by squealing tires), reduce the GAIN setting; if
the trailer wheels turn freely, increase the
GAIN setting.
Repeat steps 8 and 9 until the GAIN setting is at
a point just below trailer wheel lockup. If towing
a heavier trailer, trailer wheel lockup may not be
attainable even with the maximum GAIN setting
of 10.
2020_RAM_CHASSIS_CAB_OM_USA=GUID-6C67832B-7839-4CCF-BEFC-CDF988F949EA=1=en=.book Page 282
Page 292 of 516
290STARTING AND OPERATING
Shifting Into N (Neutral)
Use the following procedure to prepare your
vehicle for recreational towing.
1. Bring the vehicle to a complete stop on
level ground, with the engine running.
Firmly apply the parking brake.
2. Shift the transmission to NEUTRAL.
3. Press and hold the brake pedal.
4. Shift the transfer case into N (Neutral):
With manual shift transfer case, shift the transfer case lever into N (Neutral).
With electronic shift transfer case, push and hold the transfer case N (Neutral)
button. Some models have a small,
recessed "N" button (at the center of the
transfer case switches) that must be
pressed using a ballpoint pen or similar
object. Other models have a rectangular
N (Neutral) switch, below the rotary
transfer case control knob. The N
(Neutral) indicator light will blink while
the shift is in progress. The light will stop blinking (stay on solid) when the shift to N
(Neutral) is complete. After the shift is
completed and the N (Neutral) light stays
on, release the N (Neutral) button.
5. Release the parking brake.
6. Shift the transmission into REVERSE.
7. Release the brake pedal for five seconds and ensure that there is no vehicle move-
ment.
8. Repeat steps six and seven with automatic transmission in DRIVE.
9. Shift the transmission to NEUTRAL. Firmly apply the parking brake. Turn off the engine.
For vehicles with Keyless Enter-N-Go, push
and hold the ENGINE START/STOP button
until the engine shuts off.
10. Shift the transmission into PARK.
11. Place the ignition in the OFF mode, and remove the key fob.
12. Attach the vehicle to the tow vehicle using a suitable tow bar.
13. Release the parking brake.
Do not disconnect the rear driveshaft
because fluid will leak from the transfer
case, causing damage to internal parts.
Do not use a bumper-mounted clamp-on
tow bar on your vehicle. The bumper face
bar will be damaged.
WARNING!
You or others could be injured or killed if you
leave the vehicle unattended with the transfer
case in the NEUTRAL (N) position without first
fully engaging the parking brake. The transfer
case NEUTRAL (N) position disengages both
the front and rear driveshafts from the
powertrain, and will allow the vehicle to roll,
even if the automatic transmission is in PARK
(or manual transmission is in gear). The
parking brake should always be applied when
the driver is not in the vehicle.
CAUTION! (Continued)CAUTION!
It is necessary to follow these steps to be
certain that the transfer case is fully in
NEUTRAL (N) before recreational towing to
prevent damage to internal parts.
2020_RAM_CHASSIS_CAB_OM_USA=GUID-6C67832B-7839-4CCF-BEFC-CDF988F949EA=1=en=.book Page 290
Page 293 of 516
STARTING AND OPERATING291
NOTE:
With electronic shift transfer case:
Steps 2 through 3 are requirements that
must be met before pushing the N (Neutral)
button, and must continue to be met until the
shift has been completed. If any of these
requirements are not met before pushing the
N (Neutral) button or are no longer met
during the shift, the N (Neutral) indicator light
will flash continuously until all requirements
are met or until the N (Neutral) button is
released.
The ignition must be in the ON/RUN mode for
a shift to take place and for the position indi -
cator lights to be operable. If the ignition is
not in the ON/RUN mode, the shift will not
take place and no position indicator lights will
be on or flashing.
A flashing N (Neutral) position indicator light
indicates that shift requirements have not
been met.
Shifting Out Of N (Neutral)
Use the following procedure to prepare your
vehicle for normal usage:
1. Bring the vehicle to a complete stop,
leaving it connected to the tow vehicle.
2. Firmly apply the parking brake.
3. Press and hold the brake pedal.
4. Start the engine, and shift the transmission into NEUTRAL.
With manual shift transfer case, shift the transfer case lever to the desired posi -
tion.
With electronic shift transfer case with rotary selector switch, push and hold the
transfer case N (Neutral) button until the
N (Neutral) indicator light turns off. After
the N (Neutral) indicator light turns off,
release the N (Neutral) button. After the
N (Neutral) button has been released, the
transfer case will shift to the position indi -
cated by the selector switch.
With electronic shift transfer case with push-button selector switch, push and
hold the switch for the desired transfer
case position, until the N (Neutral) indi -
cator light turns off and the desired posi -
tion indicator light turns on.
NOTE:
When shifting out of transfer case N (Neutral),
turning the engine off is not required, but may
be helpful to avoid gear clash. With 8-speed
automatic transmission, the engine must
remain running, since turning the engine off will
shift the transmission to PARK (and the trans -
mission must be in NEUTRAL for the transfer
case to shift out of NEUTRAL).
5. Turn the engine off. Shift automatic trans- mission into PARK. On 8-speed transmis -
sions the shifter will automatically select
PARK when the engine is turned off.
6. Release the brake pedal.
7. Disconnect vehicle from the tow vehicle.
8. Start the engine.
5
2020_RAM_CHASSIS_CAB_OM_USA=GUID-6C67832B-7839-4CCF-BEFC-CDF988F949EA=1=en=.book Page 291
Page 425 of 516
MULTIMEDIA423
Doors & Locks
After pressing the Doors & Locks button on the touchscreen, the following settings will be available:
Setting Name Selectable Options
Auto Door Locks — If EquippedOn Off
NOTE:
When the “Auto Door Locks” feature is selected, all doors lock automatically when the vehicle reaches a speed of 15 mph (24 km/h). Auto Unlock On Exit On Off
NOTE:
When the “Auto Unlock On Exit” feature is selected, all doors unlock when the vehicle is stopped, the transmission is in the PARK or NEUTRAL position
and the driver's door is opened. Sound Horn With Lock Off1st Press 2nd Press
Remote Door Unlock All Driver
NOTE:
The “Remote Door Unlock” feature allows you to program your remote door locks to open “All doors” or only the “Driver door” with the first push of
the key fob or grabbing the Passive Entry door handle. Sound Horn With Remote Start On Off
NOTE:
When the “Sound Horn With Remote Start” feature is selected, the horn sounds when the remote start is activated. Memory Linked To Fob — If Equipped On
Off
NOTE:
The “Memory Linked To Fob” feature provides automatic driver seat positioning to enhance driver mobility when entering and exiting the vehicle.
The seat returns to the memorized seat location if “Memory Linked To Fob” is set to “On” when the key fob is used to unlock the door.
9
2020_RAM_CHASSIS_CAB_OM_USA=GUID-6C67832B-7839-4CCF-BEFC-CDF988F949EA=1=en=.book Page 423
Page 460 of 516
458MULTIMEDIA
Doors & Locks
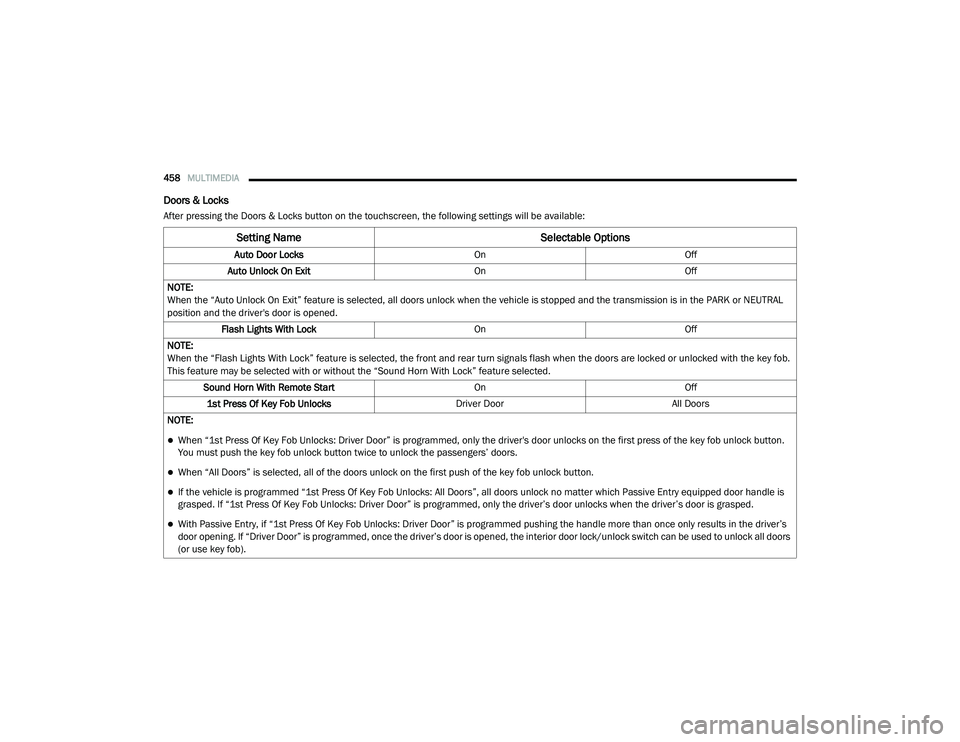
After pressing the Doors & Locks button on the touchscreen, the following settings will be available:
Setting Name Selectable Options
Auto Door LocksOnOff
Auto Unlock On Exit OnOff
NOTE:
When the “Auto Unlock On Exit” feature is selected, all doors unlock when the vehicle is stopped and the transmission is in the PARK or NEUTRAL
position and the driver's door is opened. Flash Lights With Lock OnOff
NOTE:
When the “Flash Lights With Lock” feature is selected, the front and rear turn signals flash when the doors are locked or unlocked with the key fob.
This feature may be selected with or without the “Sound Horn With Lock” feature selected. Sound Horn With Remote Start OnOff
1st Press Of Key Fob Unlocks Driver DoorAll Doors
NOTE:
When “1st Press Of Key Fob Unlocks: Driver Door” is programmed, only the driver's door unlocks on the first press of the key fob unlock button.
You must push the key fob unlock button twice to unlock the passengers’ doors.
When “All Doors” is selected, all of the doors unlock on the first push of the key fob unlock button.
If the vehicle is programmed “1st Press Of Key Fob Unlocks: All Doors”, all doors unlock no matter which Passive Entry equipped door handle is
grasped. If “1st Press Of Key Fob Unlocks: Driver Door” is programmed, only the driver’s door unlocks when the driver’s door is grasped.
With Passive Entry, if “1st Press Of Key Fob Unlocks: Driver Door” is programmed pushing the handle more than once only results in the driver’s
door opening. If “Driver Door” is programmed, once the driver’s door is opened, the interior door lock/unlock switch can be used to unlock all doors
(or use key fob).
2020_RAM_CHASSIS_CAB_OM_USA=GUID-6C67832B-7839-4CCF-BEFC-CDF988F949EA=1=en=.book Page 458
Page 471 of 516
MULTIMEDIA469
10 — MEDIA
Pushing the MEDIA button on the faceplate will
allow you to switch to Media mode: CD (if
equipped), USB, AUX, and Bluetooth®.
Radio Mode
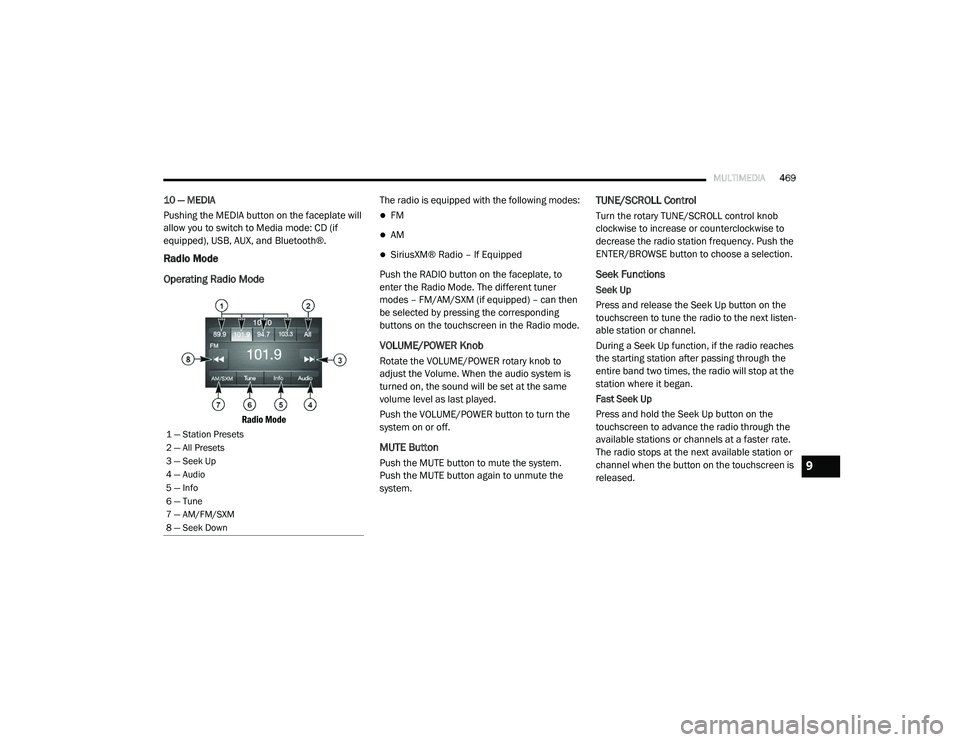
Operating Radio Mode
Radio Mode
The radio is equipped with the following modes:
FM
AM
SiriusXM® Radio – If Equipped
Push the RADIO button on the faceplate, to
enter the Radio Mode. The different tuner
modes – FM/AM/SXM (if equipped) – can then
be selected by pressing the corresponding
buttons on the touchscreen in the Radio mode.
VOLUME/POWER Knob
Rotate the VOLUME/POWER rotary knob to
adjust the Volume. When the audio system is
turned on, the sound will be set at the same
volume level as last played.
Push the VOLUME/POWER button to turn the
system on or off.
MUTE Button
Push the MUTE button to mute the system.
Push the MUTE button again to unmute the
system.
TUNE/SCROLL Control
Turn the rotary TUNE/SCROLL control knob
clockwise to increase or counterclockwise to
decrease the radio station frequency. Push the
ENTER/BROWSE button to choose a selection.
Seek Functions
Seek Up
Press and release the Seek Up button on the
touchscreen to tune the radio to the next listen -
able station or channel.
During a Seek Up function, if the radio reaches
the starting station after passing through the
entire band two times, the radio will stop at the
station where it began.
Fast Seek Up
Press and hold the Seek Up button on the
touchscreen to advance the radio through the
available stations or channels at a faster rate.
The radio stops at the next available station or
channel when the button on the touchscreen is
released.
1 — Station Presets
2 — All Presets
3 — Seek Up
4 — Audio
5 — Info
6 — Tune
7 — AM/FM/SXM
8 — Seek Down
9
2020_RAM_CHASSIS_CAB_OM_USA=GUID-6C67832B-7839-4CCF-BEFC-CDF988F949EA=1=en=.book Page 469
Page 472 of 516
470MULTIMEDIA
Seek Down
Press and release the Seek Down button on the
touchscreen to tune the radio to the next listen -
able station or channel.
During a Seek Down function, if the radio
reaches the starting station after passing
through the entire band two times, the radio will
stop at the station where it began.
Fast Seek Down
Press and hold the Seek Down button on the
touchscreen to advance the radio through the
available stations or channels at a faster rate.
The radio stops at the next available station or
channel when the button on the touchscreen is
released.
Direct Tune Functions
Press the Tune button on the touchscreen to
directly tune to a specific radio station. A
keypad will appear. On the keypad, enter in your
desired radio station, and the system will auto -
matically tune to it.
SiriusXM® Satellite Radio Mode — If
Equipped
SiriusXM® Satellite Radio uses direct satel -
lite-to-receiver broadcasting technology to
provide clear, coast to coast radio content. Siri -
usXM® is a subscription based service.
Get over 160 channels on your satellite radio,
and enjoy all you want, all in one place. Hear
commercial-free music, sports, news, talk, and
entertainment. Get all the premium program -
ming, including Howard Stern, every NFL®
game, every MLB®, every NHL® game, every
NASCAR® race, Martha Stewart, Oprah Radio,
and more. Get 20+ extra channels, including
SiriusXM® Latino, offering 20 channels of
commercial-free music, news, talk, comedy,
sports, and more dedicated to Spanish
language programming.
SiriusXM® services require subscriptions, sold
separately after the trial included with the new
vehicle purchase. If you decide to continue your
service at the end of your trial subscription, the
plan you choose will automatically renew and
bill at then-current rates until you call Siri -
usXM® at 1-866-635-2349 to cancel. See Siri -
usXM® Customer Agreement for complete
terms at www.siriusxm.com (US Residents) or
www.siriusxm.ca (Canadian Residents). All fees and programming subject to change. Our satel
-
lite service is available only to those at least 18
and older in the 48 contiguous USA and D.C.
Our Sirius satellite service is also available in
Puerto Rico (with coverage limitations). Our
Internet radio service is available throughout
our satellite service area and in Alaska and
Hawai. © 2019 SiriusXM® Radio Inc. Siri -
usXM® and all related marks and logos are
trademarks of SiriusXM® Radio Inc.
This functionality is only available for radios
equipped with a Satellite receiver. To receive
satellite radio, the vehicle needs to be outside
with a clear view to the sky.
If the screen displays Acquiring Signal, you may
need to change the vehicle’s position to receive
a signal. In most cases, the satellite radio does
not receive a signal in underground parking
garages or tunnels.
Setting Presets
The Presets are available for all Radio Modes
and are activated by pressing any of the four
Preset buttons on the touchscreen, located at
the top of the screen.
2020_RAM_CHASSIS_CAB_OM_USA=GUID-6C67832B-7839-4CCF-BEFC-CDF988F949EA=1=en=.book Page 470
Page 487 of 516
MULTIMEDIA485
If this equipment does cause harmful inter -
ference to radio or television reception,
which can be determined by turning the
equipment off and on, the user is encour -
aged to try to correct the interference by one
or more of the following measures:
a. Increase the separation between the equipment and receiver.
b. Consult an authorized dealer or an expe -
rienced radio technician for help.
VOICE RECOGNITION QUICK TIPS
Introducing Uconnect
Start using Uconnect Voice Recognition (VR)
with these helpful quick tips. It provides the key
Voice Commands and tips you need to know to
control your Uconnect system.
If you see the NAV icon on the bottom bar, or in
the Apps menus, of your touchscreen, you have
the Uconnect 4C NAV With 8.4-inch Display or
the Uconnect 4C NAV With 12-inch Display
system. If not, you have a Uconnect 4C With
8.4-inch Display system.
Get Started
All you need to control your Uconnect system
with your voice are the buttons on your steering
wheel.
1. Visit
UconnectPhone.com
to check mobile
device and feature compatibility and to
find phone pairing instructions.
2. Reduce background noise. Wind noise and passenger conversations are examples of
noise that may impact recognition.
3. Speak clearly at a normal pace and volume while facing straight ahead. The micro -
phone is located in the headliner and aimed
at the driver.
4. Each time you give a Voice Command, you must first push either the VR or Phone
button, wait until after the beep, then say
your Voice Command.
5. You can interrupt the help message or system prompts by pushing the VR or Phone
button and saying a Voice Command from
current category.
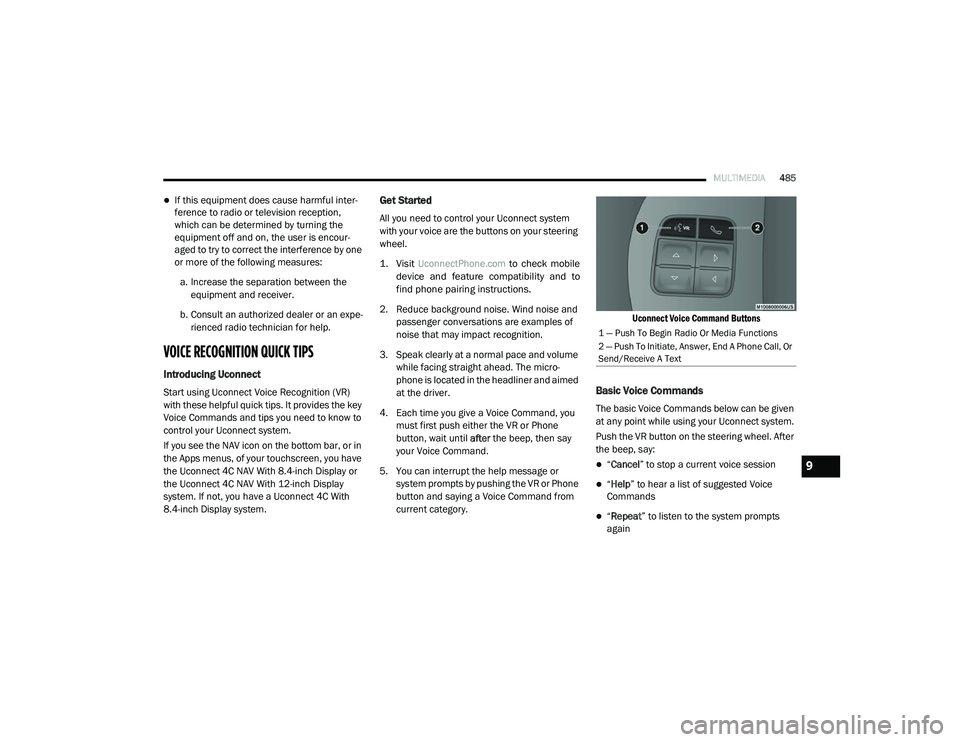
Uconnect Voice Command Buttons
Basic Voice Commands
The basic Voice Commands below can be given
at any point while using your Uconnect system.
Push the VR button on the steering wheel. After
the beep, say:
“
Cancel ” to stop a current voice session
“Help ” to hear a list of suggested Voice
Commands
“ Repeat ” to listen to the system prompts
again
1 — Push To Begin Radio Or Media Functions
2 — Push To Initiate, Answer, End A Phone Call, Or
Send/Receive A Text
9
2020_RAM_CHASSIS_CAB_OM_USA=GUID-6C67832B-7839-4CCF-BEFC-CDF988F949EA=1=en=.book Page 485