steering RAM CHASSIS CAB 2021 Owner's Manual
[x] Cancel search | Manufacturer: RAM, Model Year: 2021, Model line: CHASSIS CAB, Model: RAM CHASSIS CAB 2021Pages: 463, PDF Size: 21.5 MB
Page 114 of 463

112GETTING TO KNOW YOUR INSTRUMENT PANEL
Each tire, including the spare (if provided),
should be checked monthly when cold and
inflated to the inflation pressure recommended
by the vehicle manufacturer on the vehicle
placard or tire inflation pressure label. If your
vehicle has tires of a different size than the size
indicated on the vehicle placard or tire inflation
pressure label, you should determine the
proper tire inflation pressure for those tires.
As an added safety feature, your vehicle has
been equipped with a TPMS that illuminates
a low tire pressure telltale when one or more
of your tires is significantly underinflated.
Accordingly, when the low tire pressure telltale
illuminates, you should stop and check your
tires as soon as possible, and inflate them to
the proper pressure. Driving on a significantly underinflated tire causes the tire to overheat
and can lead to tire failure. Under inflation also
reduces fuel efficiency and tire tread life, and
may affect the vehicle’s handling and stopping
ability.
Please note that the TPMS is not a substitute for
proper tire maintenance, and it is the driver’s
responsibility to maintain correct tire pressure,
even if under inflation has not reached the level
to trigger illumination of the TPMS low tire
pressure telltale.
Your vehicle has also been equipped with a TPMS
malfunction indicator to indicate when the
system is not operating properly. The TPMS
malfunction indicator is combined with the
low tire pressure telltale. When the system
detects a malfunction, the telltale will flash for
approximately one minute and then remain
continuously illuminated. This sequence will
continue upon subsequent vehicle start-ups
as long as the malfunction exists. When the
malfunction indicator is illuminated, the system
may not be able to detect or signal low tire
pressure as intended. TPMS malfunctions may
occur for a variety of reasons, including the
installation of replacement or alternate tires or
wheels on the vehicle that prevent the TPMS from
functioning properly. Always check the TPMS
malfunction telltale after replacing one or more
tires or wheels on your vehicle to ensure that the
replacement or alternate tires and wheels allow
the TPMS to continue to function properly.
CAUTION!
Do not continue driving with one or more
flat tires as handling may be compromised.
Stop the vehicle, avoiding sharp braking and
steering. If a tire puncture occurs, repair
immediately using the dedicated tire repair
kit and contact an authorized dealer as soon
as possible.
CAUTION!
The TPMS has been optimized for the original
equipment tires and wheels. TPMS pressures
and warning have been established for the tire
size equipped on your vehicle. Undesirable
system operation or sensor damage may
result when using replacement equipment that
is not of the same size, type, and/or style.
Aftermarket wheels can cause sensor damage.
Using aftermarket tire sealants may cause the
Tire Pressure Monitoring System (TPMS)
sensor to become inoperable. After using an
aftermarket tire sealant it is recommended
that you take your vehicle to an authorized
dealer to have your sensor function checked.
21_DPF_OM_EN_USC_t.book Page 112
Page 144 of 463

142STARTING AND OPERATING
(Continued)
Only shift from DRIVE to PARK or REVERSE
when the accelerator pedal is released and the
vehicle is stopped. Be sure to keep your foot on
the brake pedal when shifting between these
gears.
The transmission gear selector has only PARK,
REVERSE, NEUTRAL, and DRIVE positions.
Manual downshifts can be made using the
Electronic Range Select (ERS) shift control.
Pressing the GEAR -/GEAR + switches (on the
steering wheel) while in the DRIVE position will
select the highest available transmission gear,
and will display that gear limit in the instrument
cluster as 1, 2, 3, etc Úpage 145. Some
models will display both the selected gear limit,
and the actual current gear, while in ERS mode.
Electronic Transmission Gear Selector
Gear Ranges
Do not press the accelerator pedal when
shifting from PARK or NEUTRAL into another
gear range.
NOTE:
After selecting any gear range, wait a moment
to allow the selected gear to engage before
accelerating. This is especially important when
the engine is cold.
PARK (P)
This range supplements the parking brake by
locking the transmission. The engine can be
started in this range. Never attempt to use
PARK while the vehicle is in motion. Apply the
parking brake when exiting the vehicle in this
range.
When parking on a hill, apply the parking brake
before shifting the transmission to PARK. As an
added precaution, turn the front wheels toward
the curb on a downhill grade and away from the
curb on an uphill grade. NOTE:
On four-wheel drive vehicles be sure that the
transfer case is in a drive position.
When exiting the vehicle, always:
Apply the parking brake.
Shift the transmission into PARK.
Turn the engine off.
Remove the key fob.
WARNING!
Never use the PARK position as a substi
-
tute for the parking brake. Always apply the
parking brake fully when exiting the vehicle
to guard against vehicle movement and
possible injury or damage.
Your vehicle could move and injure you and
others if it is not in PARK. Check by trying to
move the transmission gear selector out of
PARK with the brake pedal released. Make
sure the transmission is in PARK before
exiting the vehicle.
21_DPF_OM_EN_USC_t.book Page 142
Page 147 of 463

STARTING AND OPERATING145
Transmission Limp Home Mode
Transmission function is monitored
electronically for abnormal conditions.
If a condition is detected that could result in
transmission damage, Transmission Limp
Home Mode is activated. In this mode, the
transmission may operate only in certain gears,
or may not shift at all. Vehicle performance may
be severely degraded and the engine may stall.
In some situations, the transmission may not
re-engage if the engine is turned off and
restarted. The Malfunction Indicator Light (MIL)
may be illuminated. A message in the
instrument cluster will inform the driver of the
more serious conditions, and indicate what
actions may be necessary.
In the event of a momentary problem, the
transmission can be reset to regain all forward
gears by performing the following steps:
NOTE:
In cases where the instrument cluster message
indicates the transmission may not re-engage
after engine shutdown, perform this procedure
only in a desired location (preferably, at an
authorized dealer).
1. Stop the vehicle.
2. Shift the transmission into PARK, if
possible. If not, shift the transmission to
NEUTRAL.
3. Push and hold the ignition switch until the engine turns off.
4. Wait approximately 30 seconds.
5. Restart the engine.
6. Shift into the desired gear range. If the problem is no longer detected, the
transmission will return to normal operation.
NOTE:
Even if the transmission can be reset, we
recommend that you visit an authorized dealer
at your earliest possible convenience. An autho -
rized dealer has diagnostic equipment to
assess the condition of your transmission.
If the transmission cannot be reset, authorized
dealer service is required.
Electronic Range Select (ERS) Operation
The ERS shift control allows the driver to
limit the highest available gear when the
transmission is in DRIVE. For example, if you set
the transmission gear limit to FOURTH gear, the
transmission will not shift above FOURTH gear
(except to prevent engine overspeed), but will
shift through the lower gears normally.
You can switch between DRIVE and ERS mode at
any vehicle speed. When the transmission gear
selector is in DRIVE, the transmission will operate
automatically, shifting between all available
gears. Tapping the GEAR – switch (on the
steering wheel) will activate ERS mode, display
the current gear in the instrument cluster, and
set that gear as the top available gear. Once in
ERS mode, tapping the GEAR – or GEAR + switch
will change the top available gear.
4
21_DPF_OM_EN_USC_t.book Page 145
Page 148 of 463

146STARTING AND OPERATING
ERS Control
To exit ERS mode, simply push and hold the
GEAR + switch until the gear limit display
disappears from the instrument cluster.
When to Use TOW/HAUL Mode
When driving in hilly areas, towing a trailer, carrying
a heavy load, etc., and frequent transmission
shifting occurs, push the TOW/HAUL switch to
activate TOW/HAUL mode. This will improve
performance and reduce the potential for
transmission overheating or failure due to
excessive shifting.
TOW/HAUL Switch
The “TOW/HAUL Indicator Light” will illuminate in
the instrument cluster to indicate that TOW/HAUL
mode has been activated. Pushing the switch a
second time restores normal operation. Normal
operation is always the default at engine start-up.
If TOW/HAUL mode is desired, the switch must be
pushed each time the engine is started.
SIX-SPEED AUTOMATIC
T
RANSMISSION — IF EQUIPPED
Chassis Cab models may use either the
AS66RC or AS69RC transmission (which are
equipped with a Power Take-Off (PTO) access
cover on the side of the transmission case).
The transmission gear position display
(located in the instrument cluster) indicates the
transmission gear range. The gear selector is
mounted on the right side of the steering column.
You must press the brake pedal to move the gear
selector out of PARK
Ú
page 141. Pull the gear
selector toward you when shifting into REVERSE
or PARK, or when shifting out of PARK.
1 — GEAR + Switch
2 — GEAR – Switch
WARNING!
Do not downshift for additional engine
braking on a slippery surface. The drive
wheels could lose their grip and the vehicle
could skid, causing a collision or personal
injury.
WARNING!
Do not use the TOW/HAUL feature when driving
in icy or slippery conditions. The increased
engine braking can cause the rear wheels to
slide, and the vehicle to swing around with the
possible loss of vehicle control, which may
cause an accident possibly resulting in
personal injury or death.
21_DPF_OM_EN_USC_t.book Page 146
Page 149 of 463

STARTING AND OPERATING147
(Continued)
The electronically-controlled transmission
provides a precise shift schedule. The
transmission electronics are self-calibrating;
therefore, the first few shifts on a new vehicle
may be somewhat abrupt. This is a normal
condition, and precision shifts will develop
within a few hundred miles (kilometers).
Only shift from DRIVE to PARK or REVERSE
when the accelerator pedal is released and the
vehicle is stopped. Be sure to keep your foot on
the brake pedal when shifting between these
gears.
The transmission gear selector has only PARK,
REVERSE, NEUTRAL, and DRIVE shift positions.
Manual downshifts can be made using the
Electronic Range Select (ERS) shift control.
Pushing the ERS (-/+) switches (on the steering
wheel) while in the DRIVE position will select the
highest available transmission gear, and will
display that gear limit in the instrument cluster
as 1, 2, 3, etc Ú page 150. Some models will
display both the selected gear limit, and the
actual current gear, while in ERS mode.Gear Ranges
Do not press the accelerator pedal when
shifting from PARK or NEUTRAL into another
gear range.
NOTE:
After selecting any gear range, wait a moment
to allow the selected gear to engage before
accelerating. This is especially important when
the engine is cold.
PARK (P)
This range supplements the parking brake by
locking the transmission. The engine can be
started in this range. Never attempt to use
PARK while the vehicle is in motion. Apply the
parking brake when exiting the vehicle in this
range.
When parking on a hill, apply the parking brake
before shifting the transmission to PARK,
otherwise the load on the transmission locking
mechanism may make it difficult to move the
gear selector out of PARK. As an added
precaution, turn the front wheels toward the
curb on a downhill grade and away from the
curb on an uphill grade. NOTE:
On four-wheel drive vehicles be sure that the
transfer case is in a drive position.
When exiting the vehicle, always:
Apply the parking brake.
Shift the transmission into PARK.
Turn the engine off.
Remove the key fob.
WARNING!
Never use the PARK position as a substi
-
tute for the parking brake. Always apply the
parking brake fully when exiting the vehicle
to guard against vehicle movement and
possible injury or damage.
Your vehicle could move and injure you and
others if it is not in PARK. Check by trying to
move the gear selector out of PARK with the
brake pedal released. Make sure the trans -
mission is in PARK before exiting the vehicle.
4
21_DPF_OM_EN_USC_t.book Page 147
Page 165 of 463

STARTING AND OPERATING163
POWER TAKE OFF (PTO) OPERATION — IF
EQUIPPED
This vehicle when equipped with PTO Prep and
the AS66RC/AS69RC automatic six-speed, will
allow for an aftermarket upfit with a transmission
driven PTO (power take off). The customer will
have the ability to operate the PTO in either
a “stationary”, “mobile” or “remote” mode.
The vehicles will be factory set to the “stationary”
mode. To select a different mode, or to change
any other PTO setting, you will need to enter the
commercial vehicle menu on the instrument
cluster screen. Details of the PTO selection
modes and further PTO information is available
at the Ram Truck Bodybuilders web site:
https://
www.ramtrucks.com/ram-commercial/
body-builders-guide.html
POWER STEERING
HYDRAULIC POWER STEERING
The standard power steering system will give
you good vehicle response and increased ease
of maneuverability in tight spaces. The system
will provide mechanical steering capability if
power assist is lost.
If for some reason the power assist is interrupted,
it will still be possible to steer your vehicle. Under
these conditions, you will observe a substantial
increase in steering effort, especially at very low
vehicle speeds and during parking maneuvers.
NOTE:
Increased noise levels at the end of the
steering wheel travel are considered normal
and do not indicate that there is a problem
with the power steering system.
Upon initial start-up in cold weather, the
power steering pump may make noise for a
short amount of time. This is due to the cold,
thick fluid in the steering system. This noise
should be considered normal, and it does not
in any way damage the steering system.
Power Steering Fluid Check
Checking the power steering fluid level at a
defined service interval is not required. The fluid
should only be checked if a leak is suspected,
abnormal noises are apparent, and/or the
system is not functioning as anticipated. Check
fluid level when the engine is cold and off.
Coordinate inspection efforts through an
authorized dealer.
CAUTION!
Prolonged operation of the steering system
at the end of the steering wheel travel will
increase the steering fluid temperature and it
should be avoided when possible. Damage to
the power steering pump may occur.
WARNING!
Fluid level should be checked on a level
surface and with the engine off to prevent
injury from moving parts and to ensure
accurate fluid level reading. Do not overfill.
Use only manufacturer's recommended
power steering fluid.
4
21_DPF_OM_EN_USC_t.book Page 163
Page 166 of 463

164STARTING AND OPERATING
If necessary, add fluid to restore to the proper
indicated level. With a clean cloth, wipe any
spilled fluid from all surfaces Ú page 444.
CRUISE CONTROL SYSTEMS — IF EQUIPPED
Your vehicle may be equipped with the Cruise
Control system, or the Adaptive Cruise Control
(ACC) system:
Cruise Control for cruising at a constant
preset speed.
Adaptive Cruise Control (ACC) for maintaining
a set distance between you and the vehicle
ahead using Fixed Speed Cruise Control to
automatically adjust the preset speed.
NOTE:
In vehicles equipped with ACC, if an ACC
distance is not set, Fixed Speed Cruise Control will not detect vehicles directly ahead of you.
Always be aware of the mode selected.
CRUISE CONTROL — IF EQUIPPED
When engaged, the Cruise Control takes over
accelerator operations at speeds greater than
20 mph (32 km/h), or 25 mph (40 km/h),
depending on the powertrain equipped in the
vehicle.
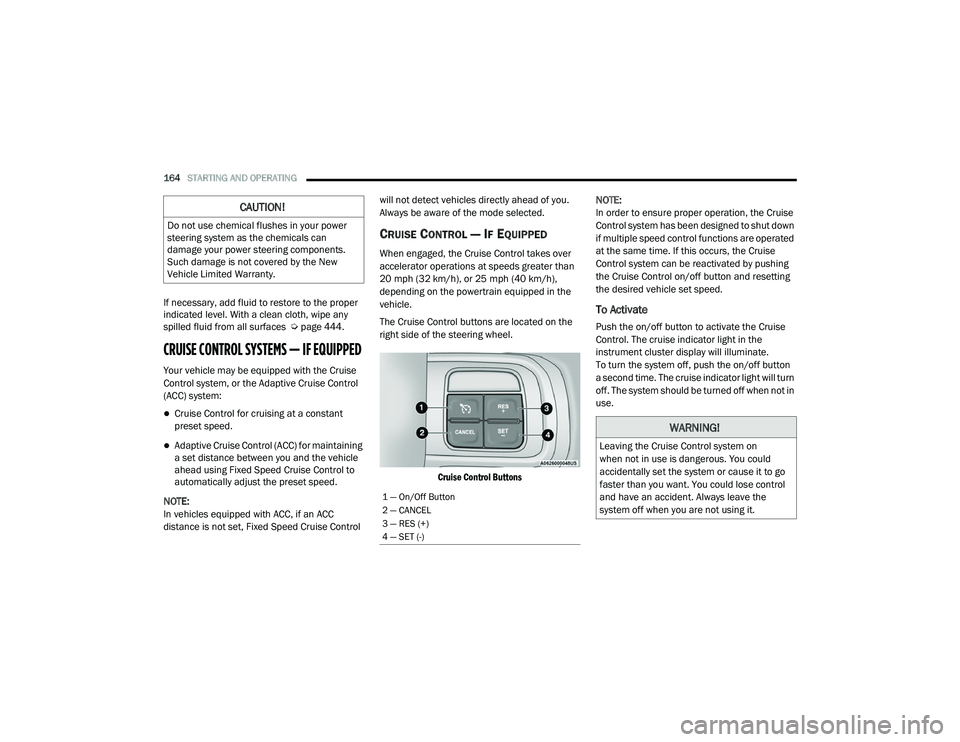
The Cruise Control buttons are located on the
right side of the steering wheel.
Cruise Control Buttons
NOTE:
In order to ensure proper operation, the Cruise
Control system has been designed to shut down
if multiple speed control functions are operated
at the same time. If this occurs, the Cruise
Control system can be reactivated by pushing
the Cruise Control on/off button and resetting
the desired vehicle set speed.
To Activate
Push the on/off button to activate the Cruise
Control. The cruise indicator light in the
instrument cluster display will illuminate.
To turn the system off, push the on/off button
a second time. The cruise indicator light will turn
off. The system should be turned off when not in
use.
CAUTION!
Do not use chemical flushes in your power
steering system as the chemicals can
damage your power steering components.
Such damage is not covered by the New
Vehicle Limited Warranty.
1 — On/Off Button
2 — CANCEL
3 — RES (+)
4 — SET (-)
WARNING!
Leaving the Cruise Control system on
when not in use is dangerous. You could
accidentally set the system or cause it to go
faster than you want. You could lose control
and have an accident. Always leave the
system off when you are not using it.
21_DPF_OM_EN_USC_t.book Page 164
Page 169 of 463

STARTING AND OPERATING167
(Continued)
Adaptive Cruise Control (ACC) Operation
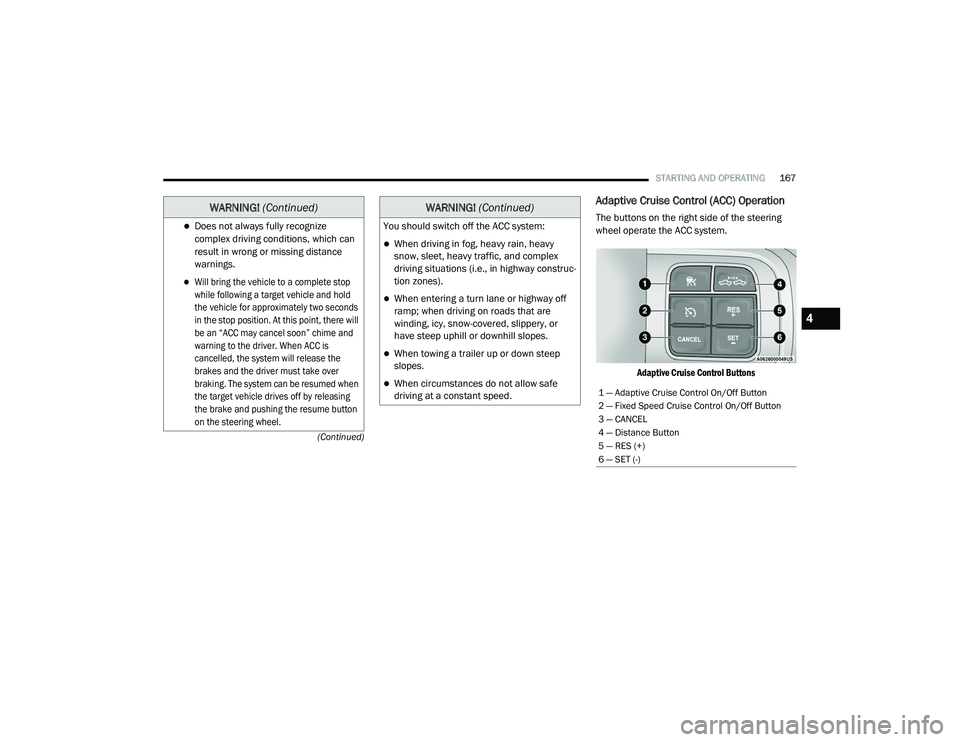
The buttons on the right side of the steering
wheel operate the ACC system.
Adaptive Cruise Control Buttons
Does not always fully recognize
complex driving conditions, which can
result in wrong or missing distance
warnings.
Will bring the vehicle to a complete stop
while following a target vehicle and hold
the vehicle for approximately two seconds
in the stop position. At this point, there will
be an “ACC may cancel soon” chime and
warning to the driver. When ACC is
cancelled, the system will release the
brakes and the driver must take over
braking. The system can be resumed when
the target vehicle drives off by releasing
the brake and pushing the resume button
on the steering wheel.
WARNING! (Continued)
You should switch off the ACC system:
When driving in fog, heavy rain, heavy
snow, sleet, heavy traffic, and complex
driving situations (i.e., in highway construc -
tion zones).
When entering a turn lane or highway off
ramp; when driving on roads that are
winding, icy, snow-covered, slippery, or
have steep uphill or downhill slopes.
When towing a trailer up or down steep
slopes.
When circumstances do not allow safe
driving at a constant speed.
WARNING! (Continued)
1 — Adaptive Cruise Control On/Off Button
2 — Fixed Speed Cruise Control On/Off Button
3 — CANCEL
4 — Distance Button
5 — RES (+)
6 — SET (-)
4
21_DPF_OM_EN_USC_t.book Page 167
Page 174 of 463

172STARTING AND OPERATING
To adjust the distance setting, push the
Distance Button and release. Each time the
button is pushed, the distance setting increases
by one bar (longer). When the farthest distance
is set, pushing the distance button again will
reset to the shortest distance.
If there is no vehicle ahead, the vehicle will
maintain the set speed. If a slower moving
vehicle is detected in the same lane, the
instrument cluster displays the ACC Set With
Target Detected Indicator Light, and the system
adjusts vehicle speed automatically to maintain
the distance setting, regardless of the set speed.
The vehicle will then maintain the set distance
until:
The vehicle ahead accelerates to a speed
above the set speed.
The vehicle ahead moves out of your lane or
view of the sensor.
The distance setting is changed.
The system disengages. The maximum braking applied by ACC is limited;
however, the driver can always apply the brakes
manually, if necessary. NOTE:
The brake lights will illuminate whenever the
ACC system applies the brakes.
A Proximity Warning wil l alert the driver if ACC
predicts that its maximum braking level is not
sufficient to maintain the set distance. If this
occurs, a visua l alert “BRAKE” will flash in the
instrument cluster display and a chime will
sound while ACC continues to apply its
maximum braking force.
NOTE:
The “BRAKE!” screen in the instrument cluster
display is a warning for the driver to take action
and does not necessarily mean that the
Forward Collision Warning system is applying
the brakes autonomously. Overtake Aid
When driving with ACC engaged and following a
vehicle, the system will provide an additional
acceleration up to the ACC set speed to assist in
passing the vehicle. This additional
acceleration is triggered when the driver
utilizes the left turn signal and will only be
active when passing on the left hand side.
ACC Operation At Stop
If the ACC system brings your vehicle to a
standstill while following the vehicle in front,
your vehicle will resume motion without any
driver intervention if the vehicle in front starts
moving within two seconds.
21_DPF_OM_EN_USC_t.book Page 172
Trailer Detect — If Equipped
When a trailer is detected, the ACC system
automatically defaults to the longest setting
(four bars). The setting can be overridden by
pushing the Distance Button on the steering
wheel.
Page 185 of 463

STARTING AND OPERATING183
LANESENSE — IF EQUIPPED
LANESENSE OPERATION
The LaneSense system is operational at speeds
above 37 mph (60 km/h) and below 112 mph
(180 km/h). It uses a forward looking camera to
detect lane markings and measure vehicle
position within the lane boundaries.
When both lane markings are detected and the
driver drifts out of the lane (no turn signal has
been applied) OR the driver departs the lane on
the opposite side of the applied turn signal (if the left turn signal is applied and the vehicle
departs to the right), the LaneSense system
provides a haptic warning in the form of torque
applied to the steering wheel, as well as a visual
warning in the instrument cluster display to
prompt the driver to remain within the lane
boundaries.
The driver may manually override the haptic
warning by applying torque into the steering
wheel at any time.
When only a single lane marking is detected
and the driver drifts across that lane marking
(no turn signal applied), the LaneSense system
provides a visual warning through the
instrument cluster display to prompt the driver
to remain within the lane.
When only a single lane marking is detected, a
haptic (torque) warning will not be provided.
NOTE:
When operating conditions have been met, the
LaneSense system will monitor if the driver’s
hands are on the steering wheel and provide
an audible and visual warning to the driver if
removed. The system will cancel if the driver
does not return their hands to the wheel.
WARNING!
Drivers must be careful when backing up
even when using ParkSense. Always check
carefully behind your vehicle, look behind
you, and be sure to check for pedestrians,
animals, other vehicles, obstructions, and
blind spots before backing up. You are
responsible for safety and must continue to
pay attention to your surroundings. Failure to
do so can result in serious injury or death.
Before using ParkSense, it is strongly
recommended that the ball mount and
hitch ball assembly be disconnected from
the vehicle when the vehicle is not used for
towing. Failure to do so can result in injury
or damage to vehicles or obstacles
because the hitch ball will be much closer
to the obstacle than the rear fascia when
the vehicle sounds the continuous tone.
Also, the sensors could detect the ball
mount and hitch ball assembly, depending
on its size and shape, giving a false indica
-
tion that an obstacle is behind the vehicle.
CAUTION!
ParkSense is only a parking aid and it is
unable to recognize every obstacle, including
small obstacles. Parking curbs might be
temporarily detected or not detected at all.
Obstacles located above or below the
sensors will not be detected when they are in
close proximity.
The vehicle must be driven slowly when
using ParkSense in order to be able to stop
in time when an obstacle is detected. It is
recommended that the driver looks over
his/her shoulder when using ParkSense.4
21_DPF_OM_EN_USC_t.book Page 183