wheel RAM CHASSIS CAB 2022 Repair Manual
[x] Cancel search | Manufacturer: RAM, Model Year: 2022, Model line: CHASSIS CAB, Model: RAM CHASSIS CAB 2022Pages: 428, PDF Size: 20.18 MB
Page 187 of 428

STARTING AND OPERATING185
RECREATIONAL TOWING (BEHIND MOTORHOME)
TOWING THIS VEHICLE BEHIND ANOTHER VEHICLE
NOTE:When towing your vehicle, always follow applicable
state and provincial laws. Contact state and
provincial Highway Safety offices for additional
details.
RECREATIONAL TOWING — TWO-WHEEL
D
RIVE MODELS
DO NOT flat tow this vehicle. Damage to the
drivetrain will result.
Recreational towing (for two-wheel drive models) is
allowed ONLY if the rear wheels are OFF the
ground. This may be accomplished using a tow dolly or vehicle trailer. If using a tow dolly, follow
this procedure:
1. Properly secure the dolly to the tow vehicle,
following the dolly manufacturer's
instructions.
2. Drive the rear wheels onto the tow dolly.
3. Firmly apply the parking brake. Place automatic transmission in PARK.
4. Properly secure the rear wheels to the dolly, following the dolly manufacturer's instructions.
5. Turn the ignition to the OFF position and remove the key fob. 6. Install a suitable clamping device, designed for
towing, to secure the front wheels in the
straight position.
Towing Condition Wheels OFF The Ground Two-Wheel Drive ModelsFour-Wheel Drive Models
Flat Tow NONENOT ALLOWED See InstructionsAutomatic transmission in PARK
Transfer case in N (Neutral)
Tow in forward direction
Dolly Tow Front
NOT ALLOWED NOT ALLOWED
Rear OKNOT ALLOWED
On Trailer ALLOKOK
CAUTION!
Towing with the rear wheels on the ground will
cause severe transmission damage. Damage
from improper towing is not covered under the
New Vehicle Limited Warranty.
Do not disconnect the driveshaft because
fluid may leak from the transmission, causing
damage to internal parts.
4
22_DPF_OM_EN_USC_t.book Page 185
Page 188 of 428

186STARTING AND OPERATING
(Continued)
RECREATIONAL TOWING —
F
OUR-WHEEL DRIVE MODELS
NOTE:Both the manual shift and electronically shifted
transfer cases must be shifted into N (Neutral) for
recreational towing. Automatic transmissions must
be shifted into PARK for recreational towing. Refer
to the following for the proper transfer case N
(Neutral) shifting procedure for your vehicle.
Shifting Into N (Neutral)
Use the following procedure to prepare your
vehicle for recreational towing.
1. Bring the vehicle to a complete stop on level
ground, with the engine running. Firmly apply
the parking brake.
2. Shift the transmission to NEUTRAL.
3. Press and hold the brake pedal.
CAUTION!
DO NOT dolly tow any four-wheel drive vehicle.
Towing with only one set of wheels on the
ground (front or rear) will cause severe trans -
mission and/or transfer case damage. Tow
with all four wheels either ON the ground, or
OFF the ground (using a vehicle trailer).
Tow only in the forward direction. Towing this
vehicle backwards can cause severe damage
to the transfer case.
Before recreational towing, the transfer case
must be in N (Neutral). To be certain the
transfer case is fully in N (Neutral), perform
the procedure outlined under “Shifting Into N
(Neutral)”. Internal transmission damage will
result, if the transfer case is not in N (Neutral)
during towing.
The transmission must be placed in PARK for
recreational towing.
Towing this vehicle in violation of the above
requirements can cause severe transmission
and/or transfer case damage. Damage from
improper towing is not covered under the New
Vehicle Limited Warranty.
Do not disconnect the rear driveshaft because
fluid will leak from the transfer case, causing
damage to internal parts.
Do not use a bumper-mounted clamp-on tow
bar on your vehicle. The bumper face bar will
be damaged.
CAUTION!
WARNING!
You or others could be injured or killed if you
leave the vehicle unattended with the transfer
case in the N (Neutral) position without first fully
engaging the parking brake. The transfer case N
(Neutral) position disengages both the front and
rear driveshafts from the powertrain, and will
allow the vehicle to roll, even if the automatic
transmission is in PARK. The parking brake
should always be applied when the driver is not
in the vehicle.
CAUTION!
It is necessary to follow these steps to be certain
that the transfer case is fully in N (Neutral)
before recreational towing to prevent damage to
internal parts.
22_DPF_OM_EN_USC_t.book Page 186
Page 190 of 428

188STARTING AND OPERATING
NOTE:When shifting the transfer case out of N (Neutral),
turning the engine off is not required, but may be
helpful to avoid gear clash. With 8-speed auto -
matic transmission, the engine must remain
running, since turning the engine off will shift the
transmission to PARK (and the transmission must
be in NEUTRAL for the transfer case to shift out of
NEUTRAL).
5. Turn the engine off. Shift automatic transmission into PARK. On 8-speed
transmissions the shifter will automatically
select PARK when the engine is turned off.
6. Release the brake pedal.
7. Disconnect vehicle from the tow vehicle.
8. Start the engine.
9. Press and hold the brake pedal.
10. Release the parking brake.
11. Shift the transmission into gear, release the brake pedal, and check that the vehicle
operates normally.NOTE:With electronically shifted transfer case:
Steps 3 and 4 are requirements that must be
met before pushing the button to shift out of N
(Neutral), and must continue to be met until the
shift has been completed. If any of these
requirements are not met before pushing the
button or are no longer met during the shift, the
N (Neutral) indicator light will flash continuously
until all requirements are met or until the button
is released.
The ignition must be in the ON/RUN mode for a
shift to take place and for the position indicator
lights to be operable. If the ignition is not in the
ON/RUN mode, the shift will not take place and
no position indicator lights will be on or flashing.
A flashing N (Neutral) position indicator light
indicates that shift requirements have not been
met.
DRIVING TIPS
DRIVING ON SLIPPERY SURFACES
Acceleration
Rapid acceleration on snow covered, wet, or other
slippery surfaces may cause the driving wheels to
pull erratically to the right or left. This phenomenon
occurs when there is a difference in the surface
traction under the rear (driving) wheels.
WARNING!
Rapid acceleration on slippery surfaces is
dangerous. Unequal traction can cause sudden
pulling of the rear wheels. You could lose control
of the vehicle and possibly have a collision.
Accelerate slowly and carefully whenever there
is likely to be poor traction (ice, snow, wet, mud,
loose sand, etc.).
22_DPF_OM_EN_USC_t.book Page 188
Page 195 of 428
MULTIMEDIA193
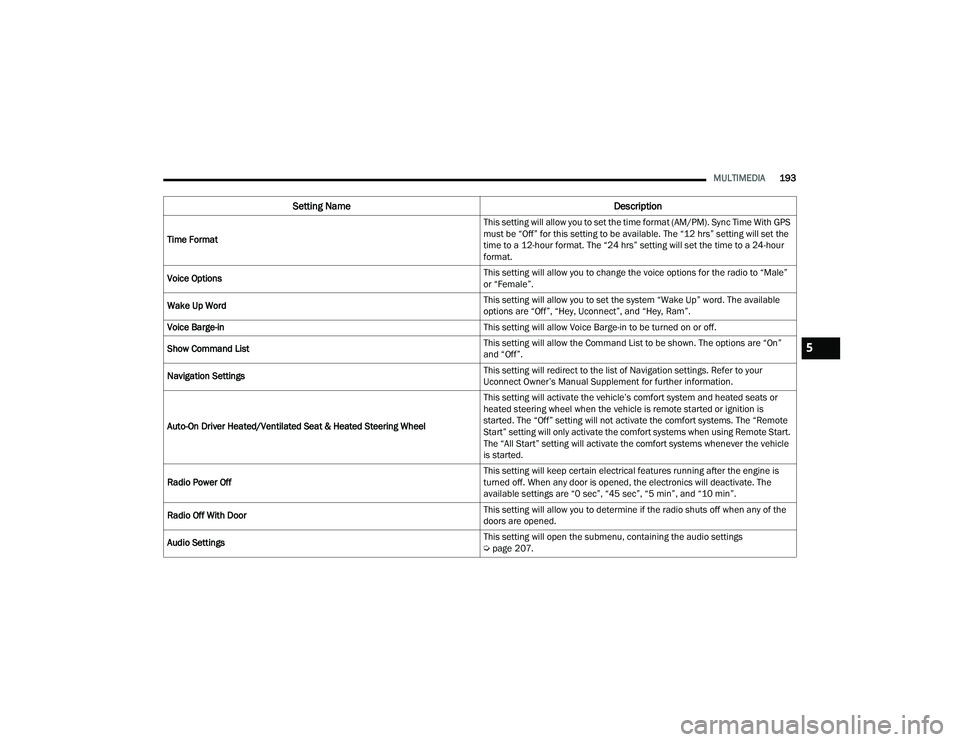
Time Format This setting will allow you to set the time format (AM/PM). Sync Time With GPS
must be “Off” for this setting to be available. The “12 hrs” setting will set the
time to a 12-hour format. The “24 hrs” setting will set the time to a 24-hour
format.
Voice Options This setting will allow you to change the voice options for the radio to “Male”
or “Female”.
Wake Up Word This setting will allow you to set the system “Wake Up” word. The available
options are “Off”, “Hey, Uconnect”, and “Hey, Ram”.
Voice Barge-in This setting will allow Voice Barge-in to be turned on or off.
Show Command List This setting will allow the Command List to be shown. The options are “On”
and “Off”.
Navigation Settings This setting will redirect to the list of Navigation settings. Refer to your
Uconnect Owner’s Manual Supplement for further information.
Auto-On Driver Heated/Ventilated Seat & Heated Steering Wheel This setting will activate the vehicle’s comfort system and heated seats or
heated steering wheel when the vehicle is remote started or ignition is
started. The “Off” setting will not activate the comfort systems. The “Remote
Start” setting will only activate the comfort systems when using Remote Start.
The “All Start” setting will activate the comfort systems whenever the vehicle
is started.
Radio Power Off This setting will keep certain electrical features running after the engine is
turned off. When any door is opened, the electronics will deactivate. The
available settings are “0 sec”, “45 sec”, “5 min”, and “10 min”.
Radio Off With Door This setting will allow you to determine if the radio shuts off when any of the
doors are opened.
Audio Settings This setting will open the submenu, containing the audio settings
Ú
page 207.
Setting Name Description
5
22_DPF_OM_EN_USC_t.book Page 193
Page 199 of 428

MULTIMEDIA197
Forward Collision Warning This setting will turn the Forward Collision Warning system on or off. The “Off”
setting will deactivate the FCW system. The “Warning Only” setting will provide
only an audible chime when a collision is detected. The “Warning + Active
Braking” setting will provide an audible chime and apply some brake pressure
when a collision is detected.
Pedestrian Emergency Braking This setting will turn the Pedestrian Emergency Braking system on or off.
LaneSense Warning This setting will change the distance at which the steering wheel will provide
lane departure feedback. The available settings are “Early”, “Medium”, and
“Late”.
LaneSense Strength This setting will change the strength of the steering wheel feedback during a
lane departure. The available settings are “Low”, “Medium”, and “High”.
ParkSense This setting will change the type of ParkSense alert when a close object is
detected and provide both an audible chime and a visual display.
Front ParkSense Volume This setting adjusts the volume of the Front ParkSense system. The available
settings are “Low”, “Medium”, and “High”.
Rear ParkSense Volume This setting adjusts the volume of the Rear ParkSense system. The available
settings are “Low”, “Medium”, and “High”.
Rear ParkSense Braking Assist This setting will turn the Rear ParkSense Braking Assist on or off.
Blind Spot Alert This setting will change the type of alert provided when an object is detected
in a vehicle’s blind spot. The “Off” setting will turn off Blind Spot Alert. The
“Lights” setting will activate the Blind Spot Alert lights on the outside mirrors.
The “Lights & Chime” setting will activate both the lights on the outside
mirrors and an audible chime.
Trailer Length For Blind Spot Alert This setting will auto detect the length of an attached trailer. The “Auto”
setting will have the system automatically set the trailer length. The “Max”
setting will always set the length to the maximum 39.5 ft (12 m).
Setting Name
Description
5
22_DPF_OM_EN_USC_t.book Page 197
Page 203 of 428

MULTIMEDIA201
Trailer Brake/Trailer
Camera
When the Trailer Brake/Trailer button is pressed on the touchscreen, the system will display settings related to trailer towing.
NOTE:Depending on the vehicle’s options, feature settings may vary.
Setting Name Description
Trailer Select Select from “Trailer 1”, “Trailer 2”, “Trailer 3”, or “Trailer 4”. These trailer
designations can be used to save different trailer settings.
Trailer Brake Type This setting will set the system to a specific trailer type. The available options
are “Light Electric”, “Heavy Electric”, “Light Electric-Over-Hydraulic”, and
“Heavy Electric-Over-Hydraulic”.
Trailer Name This setting will personalize the trailer name depending on the type of trailer
you are hauling. Select the trailer name from the following list: trailer, boat,
car, cargo, dump, equipment, flatbed, gooseneck, horse, livestock,
motorcycle, snowmobile, travel, utility, and 5th wheel.
When the Camera button is pressed on the touchscreen, the system displays the options related to the vehicle’s camera features.
NOTE:Depending on the vehicle’s options, feature settings may vary.
Setting Name
Description
Surround View Camera Delay This setting will add a timed delay to the Surround View Camera when shifting
out of REVERSE.
Surround View Camera Guidelines This setting will turn the Surround View Camera Guidelines on or off.
5
22_DPF_OM_EN_USC_t.book Page 201
Page 205 of 428
MULTIMEDIA203
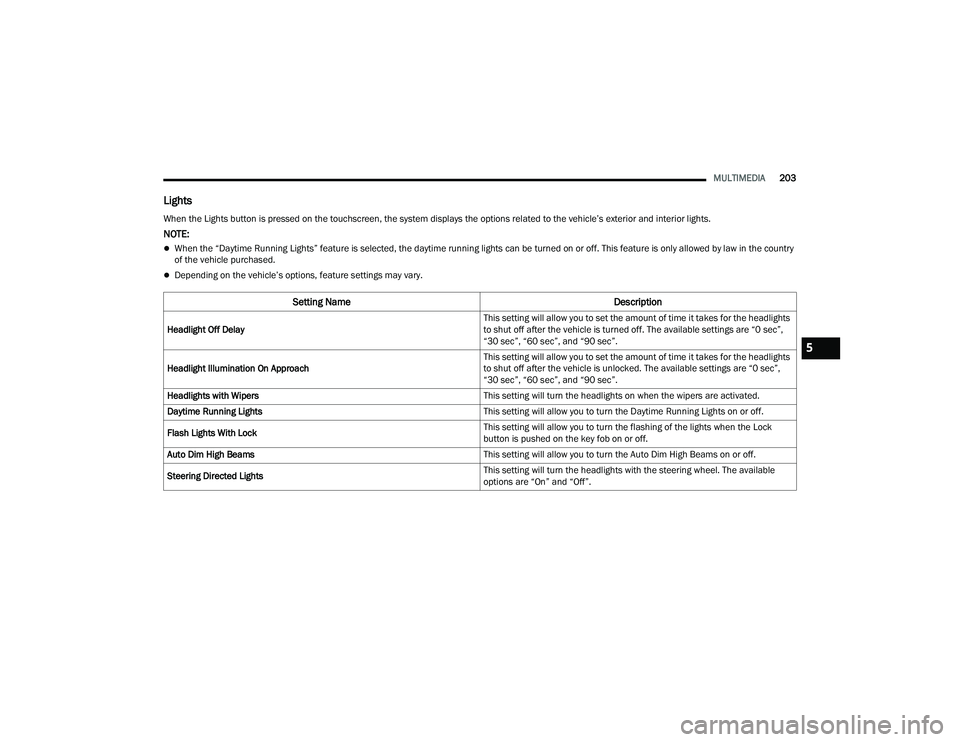
Lights
When the Lights button is pressed on the touchscreen, the system displays the options related to the vehicle’s exterior and interior lights.
NOTE:
When the “Daytime Running Lights” feature is selected, the daytime running lights can be turned on or off. This feature is only allowed by law in the country
of the vehicle purchased.
Depending on the vehicle’s options, feature settings may vary.
Setting Name Description
Headlight Off Delay This setting will allow you to set the amount of time it takes for the headlights
to shut off after the vehicle is turned off. The available settings are “0 sec”,
“30 sec”, “60 sec”, and “90 sec”.
Headlight Illumination On Approach This setting will allow you to set the amount of time it takes for the headlights
to shut off after the vehicle is unlocked. The available settings are “0 sec”,
“30 sec”, “60 sec”, and “90 sec”.
Headlights with Wipers This setting will turn the headlights on when the wipers are activated.
Daytime Running Lights This setting will allow you to turn the Daytime Running Lights on or off.
Flash Lights With Lock This setting will allow you to turn the flashing of the lights when the Lock
button is pushed on the key fob on or off.
Auto Dim High Beams This setting will allow you to turn the Auto Dim High Beams on or off.
Steering Directed Lights This setting will turn the headlights with the steering wheel. The available
options are “On” and “Off”.
5
22_DPF_OM_EN_USC_t.book Page 203
Page 207 of 428
MULTIMEDIA205
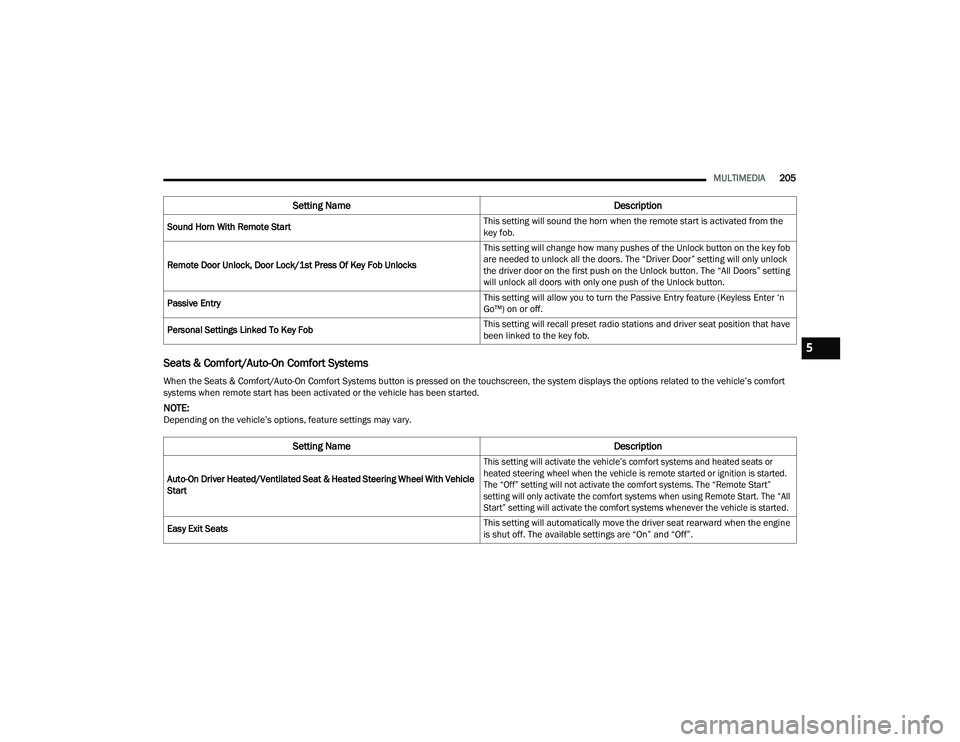
Seats & Comfort/Auto-On Comfort Systems
Sound Horn With Remote Start This setting will sound the horn when the remote start is activated from the
key fob.
Remote Door Unlock, Door Lock/1st Press Of Key Fob Unlocks This setting will change how many pushes of the Unlock button on the key fob
are needed to unlock all the doors. The “Driver Door” setting will only unlock
the driver door on the first push on the Unlock button. The “All Doors” setting
will unlock all doors with only one push of the Unlock button.
Passive Entry This setting will allow you to turn the Passive Entry feature (Keyless Enter ‘n
Go™) on or off.
Personal Settings Linked To Key Fob This setting will recall preset radio stations and driver seat position that have
been linked to the key fob.
When the Seats & Comfort/Auto-On Comfort Systems button is pressed on the touchscreen, the system displays the options related to the vehicle’s comfort
systems when remote start has been activated or the vehicle has been started.
NOTE:Depending on the vehicle’s options, feature settings may vary.
Setting Name Description
Auto-On Driver Heated/Ventilated Seat & Heated Steering Wheel With Vehicle
Start
This setting will activate the vehicle’s comfort systems and heated seats or
heated steering wheel when the vehicle is remote started or ignition is started.
The “Off” setting will not activate the comfort systems. The “Remote Start”
setting will only activate the comfort systems when using Remote Start. The “All
Start” setting will activate the comfort systems whenever the vehicle is started.
Easy Exit Seats This setting will automatically move the driver seat rearward when the engine
is shut off. The available settings are “On” and “Off”.
Setting Name
Description
5
22_DPF_OM_EN_USC_t.book Page 205
Page 209 of 428
MULTIMEDIA207
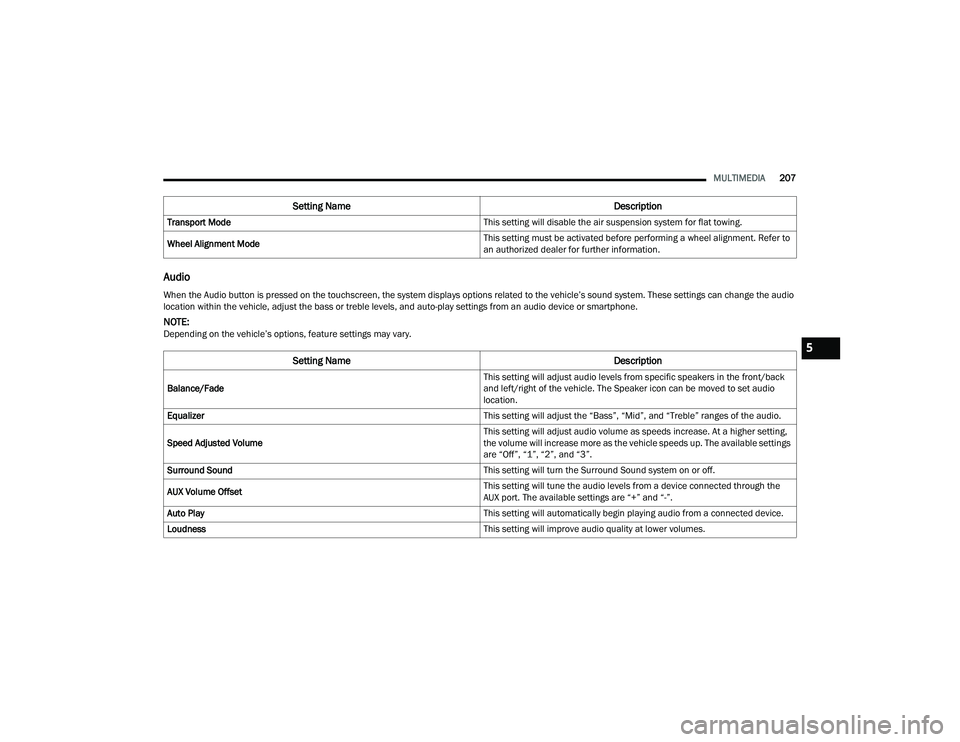
Audio
Transport Mode This setting will disable the air suspension system for flat towing.
Wheel Alignment Mode This setting must be activated before performing a wheel alignment. Refer to
an authorized dealer for further information.
Setting Name
Description
When the Audio button is pressed on the touchscreen, the system displays options related to the vehicle’s sound system. These settings can change the audio
location within the vehicle, adjust the bass or treble levels, and auto-play settings from an audio device or smartphone.
NOTE:Depending on the vehicle’s options, feature settings may vary.
Setting NameDescription
Balance/Fade This setting will adjust audio levels from specific speakers in the front/back
and left/right of the vehicle. The Speaker icon can be moved to set audio
location.
Equalizer This setting will adjust the “Bass”, “Mid”, and “Treble” ranges of the audio.
Speed Adjusted Volume This setting will adjust audio volume as speeds increase. At a higher setting,
the volume will increase more as the vehicle speeds up. The available settings
are “Off”, “1”, “2”, and “3”.
Surround Sound This setting will turn the Surround Sound system on or off.
AUX Volume Offset This setting will tune the audio levels from a device connected through the
AUX port. The available settings are “+” and “-”.
Auto Play This setting will automatically begin playing audio from a connected device.
Loudness This setting will improve audio quality at lower volumes.
5
22_DPF_OM_EN_USC_t.book Page 207
Page 215 of 428
MULTIMEDIA213
SAFETY AND GENERAL INFORMATION
Safety Guidelines
Please read this manual carefully before using the
system. It contains instructions on how to use the
system in a safe and effective manner.
Do NOT attach any object to the touchscreen.
Doing so can result in damage to the touchscreen.
Please read and follow these safety precautions.
Failure to do so may result in injury or property
damage.
Glance at the screen only when safe to do so. If
prolonged viewing of the screen is required,
park in a safe location and set the parking
brake.
Stop use immediately if a problem occurs.
Failure to do so may cause injury or damage to
the product. See an authorized dealer for repair.
Ensure the volume level of the system is set to a
level that still allows you to hear outside traffic
and emergency vehicles.
Safe Usage Of The Uconnect System
The Uconnect system is a sophisticated elec -
tronic device. Do not let young children use the
system.
Permanent hearing loss may occur if you play
your music or sound system at loud volumes.
Exercise caution when setting the volume on the
system.
Keep drinks, rain and other sources of moisture
away from the system. Besides damage to the
system, moisture can cause electric shocks as
with any electronic device.
NOTE:Many features of this system are speed
dependent. For your own safety, it is not possible to
use some of the touchscreen features while the
vehicle is in motion.
Care And Maintenance
Do not press the touchscreen with any hard or
sharp objects (pen, USB stick, jewelry, etc.),
which could scratch the surface.
Do not spray any liquid or chemicals directly on
the screen! Use a clean and dry microfiber lens
cleaning cloth in order to clean the touchscreen.
If necessary, use a lint-free cloth dampened
with a cleaning solution, such as isopropyl
alcohol or an isopropyl alcohol and water solu -
tion ratio of 50:50. Be sure to follow the solvent
manufacturer's precautions and directions
Ú page 412.
UCONNECT MODES
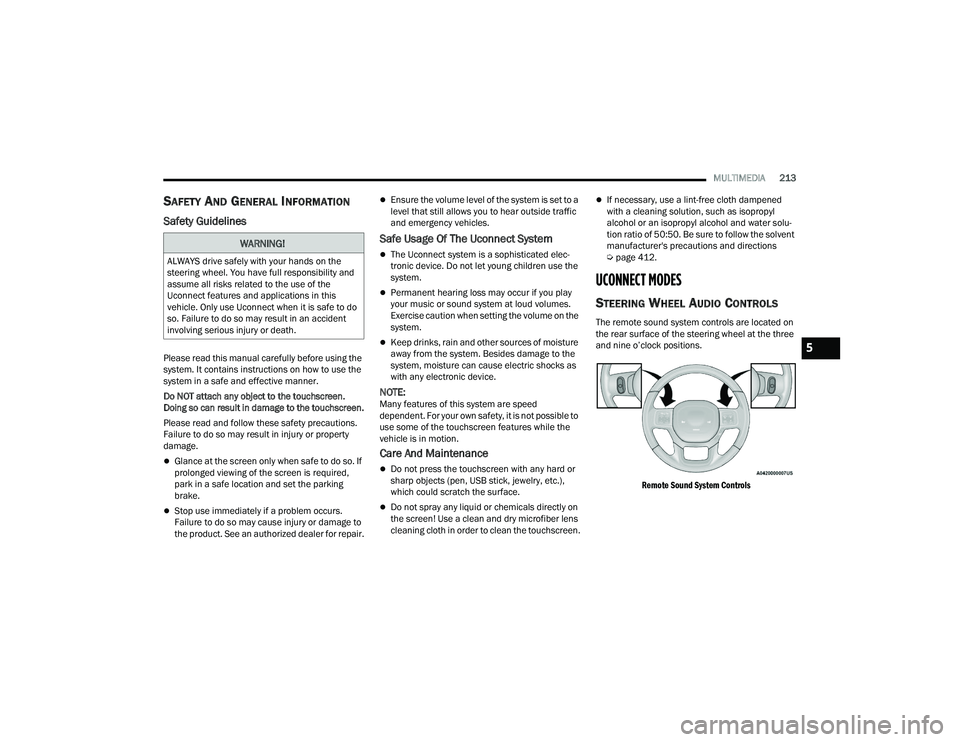
STEERING WHEEL AUDIO CONTROLS
The remote sound system controls are located on
the rear surface of the steering wheel at the three
and nine o’clock positions.
Remote Sound System Controls
WARNING!
ALWAYS drive safely with your hands on the
steering wheel. You have full responsibility and
assume all risks related to the use of the
Uconnect features and applications in this
vehicle. Only use Uconnect when it is safe to do
so. Failure to do so may result in an accident
involving serious injury or death.
5
22_DPF_OM_EN_USC_t.book Page 213