brake light RAM CHASSIS CAB 2022 Owners Manual
[x] Cancel search | Manufacturer: RAM, Model Year: 2022, Model line: CHASSIS CAB, Model: RAM CHASSIS CAB 2022Pages: 428, PDF Size: 20.18 MB
Page 8 of 428
6
CONNECTED SERVICES FAQS ........................... 247 Connected Services SOS FAQs —
If Equipped .................................................... 248
Connected Services Remote Door Lock/
Unlock FAQs .................................................. 248
Connected Services Roadside Assistance
FAQs .............................................................. 248
Connected Services Send & Go FAQs —
If Equipped .................................................... 248
Connected Services Vehicle Finder FAQs ... 249
Connected Services Stolen Vehicle
Assistance FAQs — If Equipped ................... 249
Connected Services Remote Vehicle Start
FAQs .............................................................. 249
Connected Services Remote Horn & Lights
FAQs ............................................................... 250
Connected Services Account FAQs —
If Equipped..................................................... 250
Data Collection & Privacy.............................. 252
RADIO OPERATION AND MOBILE PHONES...... 252
Regulatory And Safety Information .............. 252
OFF-ROAD PAGES — IF EQUIPPED .................... 253
Off-Road Pages Status Bar ........................... 254
Vehicle Dynamics .......................................... 255
Accessory Gauge ........................................... 256Pitch & Roll .................................................... 257
Suspension .................................................... 258
Forward Facing Camera ................................ 258
SAFETY
SAFETY FEATURES .............................................. 259
Anti-Lock Brake System (ABS) ..................... 259
Electronic Brake Control (EBC) System ...... 260
AUXILIARY DRIVING SYSTEMS.......................... 266
Forward Collision Warning (FCW) With
Mitigation — If Equipped ............................... 266
Tire Pressure Monitoring System (TPMS) .... 268
OCCUPANT RESTRAINT SYSTEMS ................... 275
Occupant Restraint Systems Features ....... 275
Important Safety Precautions ...................... 276Seat Belt Systems ........................................ 276Supplemental Restraint Systems (SRS) ...... 284Child Restraints ............................................. 291
SAFETY TIPS ........................................................ 307
Transporting Passengers .............................. 307Transporting Pets .......................................... 307
Safety Checks You Should Make Inside
The Vehicle ................................................... 307
Periodic Safety Checks You Should Make
Outside The Vehicle ...................................... 309
Exhaust Gas .................................................. 309
Carbon Monoxide Warnings ......................... 310
IN CASE OF EMERGENCY
HAZARD WARNING FLASHERS ......................... 311
ASSIST AND SOS SYSTEM — IF EQUIPPED ...... 312
JACKING AND TIRE CHANGING ........................ 315 4500/5500 Models...................................... 315
Preparations For Jacking .............................. 316
Jacking Instructions 4500 And 5500
Series ............................................................. 316
To Stow The Flat Or Spare — If Equipped ... 318Hub Caps/Wheel Covers — If Equipped....... 318
JUMP STARTING ................................................. 319
Preparations For Jump Start ........................ 320Jump Starting Procedure .............................. 320
IF YOUR ENGINE OVERHEATS ........................... 322
GEAR SELECTOR OVERRIDE .............................. 322
6–Speed Transmission ................................ 322
MANUAL PARK RELEASE ................................... 323
8–Speed Transmission................................. 323
FREEING A STUCK VEHICLE .............................. 324
TOWING A DISABLED VEHICLE .......................... 325
Two-Wheel Drive Models .............................. 326
Four-Wheel Drive Models ............................. 326Emergency Tow Hooks — If Equipped .......... 327
ENHANCED ACCIDENT RESPONSE SYSTEM
(EARS) .................................................................. 327
EVENT DATA RECORDER (EDR) ......................... 327
22_DPF_OM_EN_USC_t.book Page 6
Page 13 of 428
11
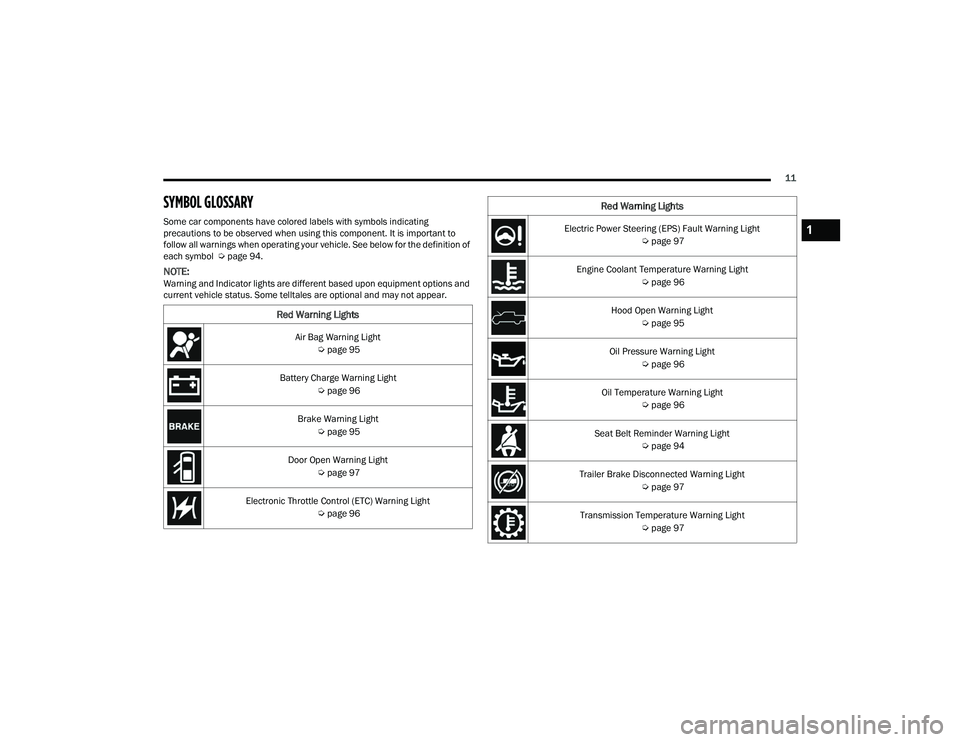
SYMBOL GLOSSARY
Some car components have colored labels with symbols indicating
precautions to be observed when using this component. It is important to
follow all warnings when operating your vehicle. See below for the definition of
each symbol Úpage 94.
NOTE:Warning and Indicator lights are different based upon equipment options and
current vehicle status. Some telltales are optional and may not appear.
Red Warning Lights
Air Bag Warning Light
Úpage 95
Battery Charge Warning Light Úpage 96
Brake Warning Light Úpage 95
Door Open Warning Light Úpage 97
Electronic Throttle Control (ETC) Warning Light Úpage 96
Electric Power Steering (EPS) Fault Warning Light
Úpage 97
Engine Coolant Temperature Warning Light Úpage 96
Hood Open Warning Light Úpage 95
Oil Pressure Warning Light Úpage 96
Oil Temperature Warning Light Úpage 96
Seat Belt Reminder Warning Light Úpage 94
Trailer Brake Disconnected Warning Light Úpage 97
Transmission Temperature Warning Light Úpage 97
Red Warning Lights
1
22_DPF_OM_EN_USC_t.book Page 11
Page 14 of 428
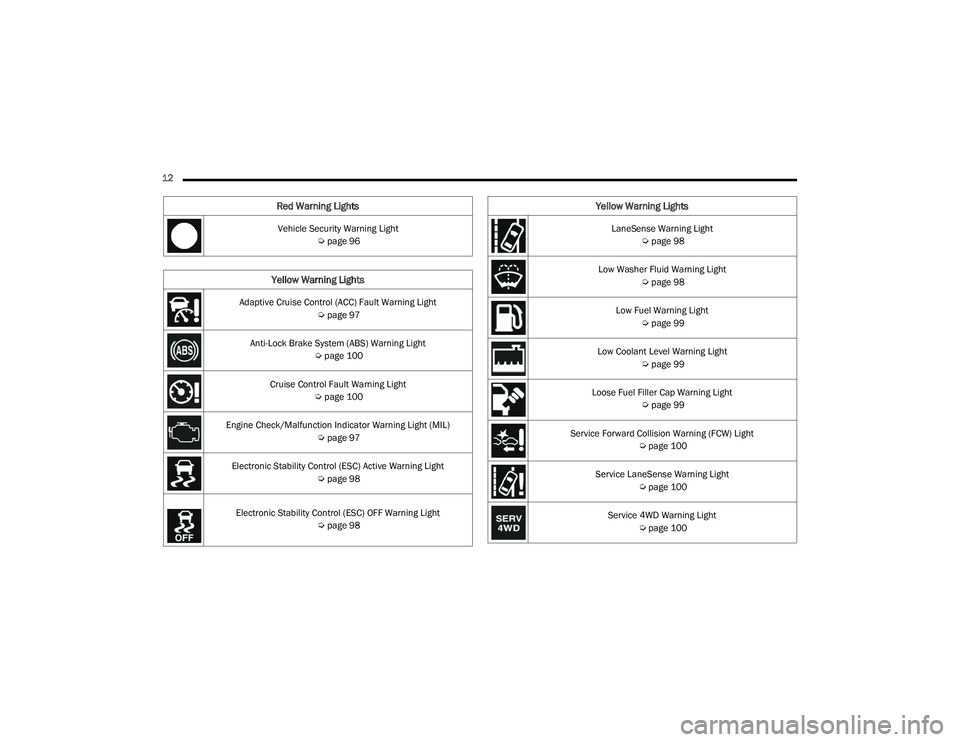
12 Vehicle Security Warning Light Úpage 96
Yellow Warning Lights
Adaptive Cruise Control (ACC) Fault Warning Light
Úpage 97
Anti-Lock Brake System (ABS) Warning Light Úpage 100
Cruise Control Fault Warning Light Úpage 100
Engine Check/Malfunction Indicator Warning Light (MIL) Úpage 97
Electronic Stability Control (ESC) Active Warning Light Úpage 98
Electronic Stability Control (ESC) OFF Warning Light
Úpage 98
Red Warning Lights
LaneSense Warning Light
Úpage 98
Low Washer Fluid Warning Light Úpage 98
Low Fuel Warning Light Úpage 99
Low Coolant Level Warning Light Úpage 99
Loose Fuel Filler Cap Warning Light Úpage 99
Service Forward Collision Warning (FCW) Light Úpage 100
Service LaneSense Warning Light Úpage 100
Service 4WD Warning Light Úpage 100
Yellow Warning Lights
22_DPF_OM_EN_USC_t.book Page 12
Page 15 of 428
13
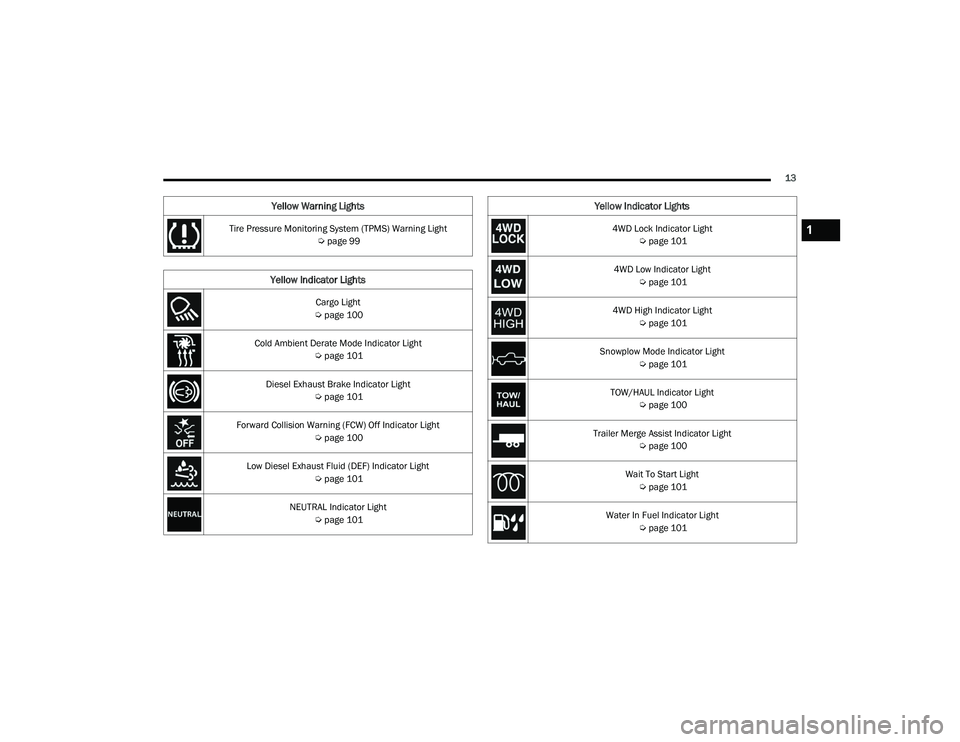
Tire Pressure Monitoring System (TPMS) Warning Light Úpage 99
Yellow Indicator Lights
Cargo Light
Ú page 100
Cold Ambient Derate Mode Indicator Light Úpage 101
Diesel Exhaust Brake Indicator Light Úpage 101
Forward Collision Warning (FCW) Off Indicator Light Úpage 100
Low Diesel Exhaust Fluid (DEF) Indicator Light Úpage 101
NEUTRAL Indicator Light Úpage 101
Yellow Warning Lights
4WD Lock Indicator Light
Úpage 101
4WD Low Indicator Light Úpage 101
4WD High Indicator Light Úpage 101
Snowplow Mode Indicator Light Úpage 101
TOW/HAUL Indicator Light Úpage 100
Trailer Merge Assist Indicator Light Úpage 100
Wait To Start Light Úpage 101
Water In Fuel Indicator Light Úpage 101
Yellow Indicator Lights
1
22_DPF_OM_EN_USC_t.book Page 13
Page 16 of 428
14
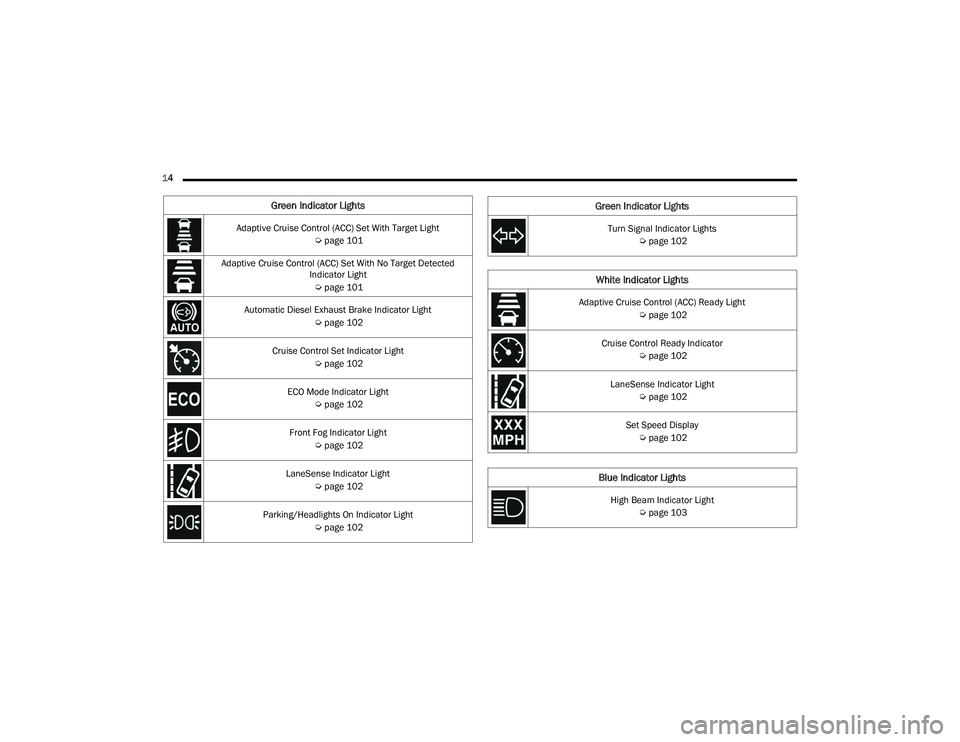
Green Indicator Lights
Adaptive Cruise Control (ACC) Set With Target Light Úpage 101
Adaptive Cruise Control (ACC) Set With No Target Detected Indicator Light
Ú page 101
Automatic Diesel Exhaust Brake Indicator Light Úpage 102
Cruise Control Set Indicator Light Úpage 102
ECO Mode Indicator Light Úpage 102
Front Fog Indicator Light Úpage 102
LaneSense Indicator Light Úpage 102
Parking/Headlights On Indicator Light Úpage 102Turn Signal Indicator Lights
Úpage 102
White Indicator Lights
Adaptive Cruise Control (ACC) Ready Light
Úpage 102
Cruise Control Ready Indicator Úpage 102
LaneSense Indicator Light Úpage 102
Set Speed Display Ú page 102
Blue Indicator Lights
High Beam Indicator Light
Úpage 103
Green Indicator Lights
22_DPF_OM_EN_USC_t.book Page 14
Page 20 of 428
18GETTING TO KNOW YOUR VEHICLE
NOTE:
When having the Sentry Key Immobilizer system
serviced, bring all vehicle keys with you to an
authorized dealer.
Keys must be ordered to the correct key cut to
match the vehicle locks.
SENTRY KEY
The Sentry Key Immobilizer system prevents
unauthorized vehicle operation by disabling the
engine. The system does not need to be armed or
activated. Operation is automatic, regardless of
whether the vehicle is locked or unlocked.
The system uses a key fob, keyless push button
ignition and a Radio Frequency (RF) receiver to
prevent unauthorized vehicle operation. Therefore,
only key fobs that are programmed to the vehicle
can be used to start and operate the vehicle. The
system cannot reprogram a key fob obtained from
another vehicle.
After placing the ignition in the ON/RUN position,
the Vehicle Security Light will turn on for three
seconds for a bulb check. If the light remains on
after the bulb check, it indicates that there is a
problem with the electronics. In addition, if the light
begins to flash after the bulb check, it indicates
that someone attempted to start the engine with
an invalid key fob. In the event that a valid key fob
is used to start the engine but there is an issue with the vehicle electronics, the engine will start
and shut off after two seconds.
If the Vehicle Security Light turns on during normal
vehicle operation (vehicle running for longer than
10 seconds), it indicates that there is a fault in the
electronics. Should this occur, have the vehicle
serviced as soon as possible by an authorized
dealer.
All of the key fobs provided with your new vehicle
have been programmed to the vehicle electronics
Ú
page 412.
IGNITION SWITCH
KEYLESS ENTER ‘N GO™ IGNITION
This feature allows the driver to operate the
ignition switch with the push of a button as long as
the Remote Keyless Entry key fob is in the
passenger compartment.
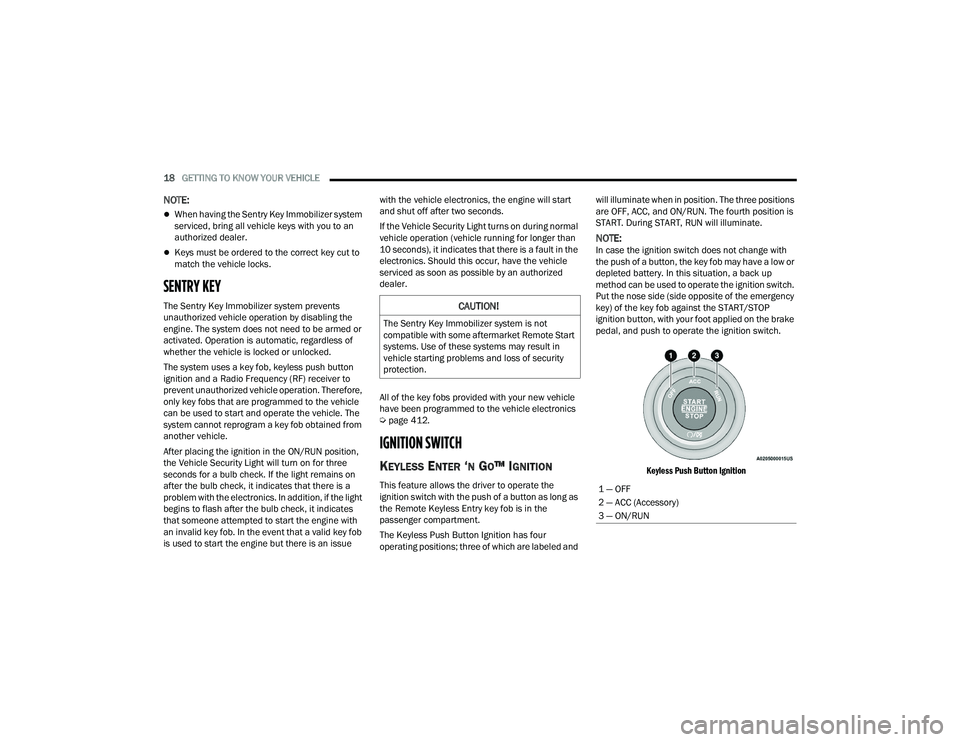
The Keyless Push Button Ignition has four
operating positions; three of which are labeled and will illuminate when in position. The three positions
are OFF, ACC, and ON/RUN. The fourth position is
START. During START, RUN will illuminate.
NOTE:In case the ignition switch does not change with
the push of a button, the key fob may have a low or
depleted battery. In this situation, a back up
method can be used to operate the ignition switch.
Put the nose side (side opposite of the emergency
key) of the key fob against the START/STOP
ignition button, with your foot applied on the brake
pedal, and push to operate the ignition switch.
Keyless Push Button Ignition
CAUTION!
The Sentry Key Immobilizer system is not
compatible with some aftermarket Remote Start
systems. Use of these systems may result in
vehicle starting problems and loss of security
protection.
1 — OFF
2 — ACC (Accessory)
3 — ON/RUN
22_DPF_OM_EN_USC_t.book Page 18
Page 22 of 428
20GETTING TO KNOW YOUR VEHICLE
REMOTE START — IF EQUIPPED
(GASOLINE)
This system uses the key fob to start the
engine conveniently from outside the
vehicle while still maintaining security.
The system has a range of approximately
300 ft (91 m).
Remote Start is used to defrost windows in cold
weather, and to reach a comfortable climate in all
ambient conditions before the driver enters the
vehicle.
NOTE:Obstructions between the vehicle and the key fob
may reduce this range Ú page 412.
HOW TO USE REMOTE START
Push and release the Remote Start button on the
key fob twice within five seconds. The parking
lights will flash, vehicle doors will lock, and the
horn will chirp twice (if programmed). Once the
vehicle has started, the engine will run for
15 minutes.
Pushing the Remote Start button a third time shuts
the engine off.
To drive the vehicle, push the unlock button, and
place the ignition in the ON/RUN position.
NOTE:
With Remote Start, the engine will only run for
15 minutes.
Remote Start can only be used twice.
If an engine fault is present or fuel level is low,
the vehicle will start and then shut down in
10 seconds.
The parking lights will turn on and remain on
during Remote Start mode.
For security, power window operation is
disabled when the vehicle is in the Remote Start
mode.
The ignition must be placed in the ON/RUN posi -
tion before the Remote Start sequence can be
repeated for a third cycle.
If your power door locks were unlocked, Remote
Start will automatically lock the doors.
All of the following conditions must be met before
the engine will remote start:
Gear selector in PARK
Doors closed
Hood closed
Hazard switch off
Brake switch inactive (brake pedal not pressed)
Battery at an acceptable charge level
PANIC button not pushed
Fuel meets minimum requirement
System not disabled from previous Remote
Start event
Vehicle Security system not active
Malfunction Indicator Light (MIL) is not illumi -
nated
WARNING!
Do not start or run an engine in a closed
garage or confined area. Exhaust gas contains
Carbon Monoxide (CO) which is odorless and
colorless. Carbon Monoxide is poisonous and
can cause serious injury or death when
inhaled.
Keep key fobs away from children. Operation
of the Remote Start system, windows, door
locks or other controls could cause serious
injury or death.
22_DPF_OM_EN_USC_t.book Page 20
Page 24 of 428
22GETTING TO KNOW YOUR VEHICLE
REMOTE START ABORT MESSAGE
The following messages will display in the
instrument cluster display if the vehicle fails to
remote start or exits Remote Start prematurely:
Remote Start Cancelled — Door Open
Remote Start Cancelled — Hood Open
Remote Start Cancelled — Fuel Low
Remote Start Cancelled — System Fault
Remote Start Disabled — Start Vehicle to Reset
The instrument cluster display message stays
active until the ignition is placed in the ON/RUN
position.
REMOTE START — IF EQUIPPED (DIESEL)
This system uses the key fob to start the
engine conveniently from outside the
vehicle while still maintaining security.
The system has a range of approximately
300 ft (91 m).
Remote Start is used to defrost windows in cold
weather, and to reach a comfortable climate in all
ambient conditions before the driver enters the
vehicle.
NOTE:
Obstructions between the vehicle and the key
fob may reduce this range.
The Remote Start system will wait for the Wait
To Start Light Úpage 101 to extinguish before
cranking the engine. This allows time for the
intake heater to preheat the incoming air, and is
normal operation in cold weather Ú page 412.
HOW TO USE REMOTE START
Push and release the Remote Start button on the
key fob twice within five seconds. The vehicle
doors will lock, the parking lights will flash, and the
horn will chirp twice (if programmed). Then, the
engine will start, and the vehicle will remain in the
Remote Start mode for a 15 minute cycle.
Pushing the Remote Start button a third time shuts
the engine off.
To drive the vehicle, push the unlock button, and
place the ignition in the ON/RUN position.
All of the following conditions must be met before
the engine will remote start:
Gear selector in PARK
Doors closed
Hood closed
Hazard switch off
Brake switch inactive (brake pedal not pressed)
Battery at an acceptable charge level
PANIC button not pushed
Fuel meets minimum requirement
Water In Fuel Indicator Light is not illuminated
Wait To Start Light is not illuminated
Malfunction Indicator Light (MIL) is not illumi -
nated
For additional functions of the Remote Start
system, see Ú page 21
WARNING!
Do not start or run an engine in a closed
garage or confined area. Exhaust gas contains
Carbon Monoxide (CO) which is odorless and
colorless. Carbon Monoxide is poisonous and
can cause serious injury or death when
inhaled.
Keep key fobs away from children. Operation
of the Remote Start system, windows, door
locks or other controls could cause serious
injury or death.
22_DPF_OM_EN_USC_t.book Page 22
Page 50 of 428
48GETTING TO KNOW YOUR VEHICLE
DAYTIME RUNNING LIGHTS (DRLS)
The Daytime Running Lights (DRLs) come on
whenever the engine is running, and the low
beams are not on. The lights will remain on until
the ignition is placed in the OFF or ACC position, or
the parking brake is engaged.
NOTE:
For vehicles sold in Canada, the Daytime
Running Lights will automatically deactivate
when the front fog lights are turned on.
If allowed by law in the country in which the
vehicle was purchased, the Daytime Running
Lights can be turned on and off using the
Uconnect system Úpage 191.
On some vehicles, the Daytime Running Lights
may deactivate, or reduce intensity, on one side
of the vehicle (when a turn signal is activated on
that side), or on both sides of the vehicle (when
the hazard warning lights are activated).
HIGH/LOW BEAM SWITCH
Push the multifunction lever toward the instrument
panel to switch the headlights to high beam.
Pulling the multifunction lever back toward the
steering wheel will turn the low beams back on.
AUTOMATIC HIGH BEAM HEADLAMP
C
ONTROL — IF EQUIPPED
The Automatic High Beam Headlamp Control
system provides increased forward lighting at night
by automating high beam control through the use
of a camera mounted on the inside rearview mirror
or a windshield mounted camera. These cameras
detect vehicle specific light and automatically
switch from high beams to low beams until the
approaching vehicle is out of view.
NOTE:
The Automatic High Beam Headlamp Control
can be turned on or off by selecting “ON” under
“Auto Dim High Beams” within your Uconnect
Settings Ú page 191, as well as turning the
headlight switch to the AUTO position.
Broken, muddy, or obstructed headlights and
taillights of vehicles in the field of view will
cause headlights to remain on longer (closer to
the vehicle). Also, dirt, film, and other obstruc -
tions on the windshield or camera lens will
cause the system to function improperly.
If the windshield or Automatic High Beam Head -
lamp Control mirror is replaced, the mirror must
be re-aimed to ensure proper performance. See
a local authorized dealer.
To opt out of the Automatic High-Beam Sensi -
tivity Control (default) and enter Reduced
High-Beam Sensitivity Control (not recom -
mended), toggle the multifunction lever six full
on/off cycles within 10 seconds of ignition ON.
The system will return to the default setting
when the ignition is placed in the OFF position.
FLASH-TO-PASS
You can signal another vehicle with your headlights
by lightly pulling the multifunction lever toward you.
This will cause the high beam headlights to turn on,
and remain on, until the lever is released.
AUTOMATIC HEADLIGHTS — IF EQUIPPED
This system automatically turns your headlights on
or off based on ambient light levels. To turn the
system on, rotate the headlight switch to the AUTO
position.
When the system is on, the Headlight Delay feature
is also on. This means the headlights will stay on
for up to 90 seconds after you place the ignition
into the OFF position. To turn the automatic
headlights off, turn the headlight switch out of the
AUTO position.
NOTE:The engine must be running before the headlights
will come on in the Automatic mode.
22_DPF_OM_EN_USC_t.book Page 48
Page 85 of 428

GETTING TO KNOW YOUR INSTRUMENT PANEL83
Oil Life Reset Procedure
1. Without pushing the brake pedal, push the ENGINE START/STOP button and place the
ignition to the ON/RUN position (do not start
the engine).
2. Push and release the down arrow button to
scroll downward through the main menu to
“Vehicle Info.”
3. Push and release the right arrow button to
access the ”Vehicle Info” screen, then scroll up
or down to select “Oil Life.”
4. Push and hold the right arrow button to
select “Reset”.
5. Push and release the down arrow button to
select “Yes,” then push and release the
right arrow button to reset the Oil Life to
100%.
6. Push and release the up arrow button to
exit the instrument cluster display screen.
Secondary Method Of Resetting Engine Oil Life
1. Without pressing the brake pedal, push the ENGINE START/STOP button and place the
ignition to the ON/RUN position (do not start
the engine).
2. Fully press the accelerator pedal, slowly, three
times within ten seconds.
3. Without pushing the brake pedal, push the ENGINE START/STOP button once to return the
ignition to the OFF position.
NOTE:If the indicator message illuminates when you start
the vehicle, the oil change indicator system did not
reset. If necessary, repeat this procedure.
DISPLAY MENU ITEMS
Push and release the up or down arrow
button until the desired selectable menu icon is
highlighted in the instrument cluster display.
The instrument cluster display menu items may
consist of the following:
Speedometer
Push and release the up or down arrow
button until the speedometer menu item is
highlighted in the instrument cluster display. Push
and release the right arrow button to cycle the
display between mph and km/h.
Vehicle Info
Push and release the up or down arrow
button until the Vehicle Info menu item is
highlighted in the instrument cluster display. Push
and release the right arrow button to enter the
submenus items of Vehicle Info. Follow the
directional prompts to access or reset any of the
following Vehicle Info submenu items:
Speedometer Vehicle Info Off Road —
If Equipped
Driver Assist — If Equipped Fuel Economy Trip A/Trip B
Screen Set Up Vehicle
Settings —
If Equipped Commercial
Settings —
If Equipped
Trailer Tow Audio Messages
Tire Pressure Coolant
Temperature Transmission
Temperature — If Equipped
Oil
Temperature Oil PressureExhaust Brake
— If Equipped
Boost
Pressure —
If Equipped Diesel
Particulate
Filter (DPF) — If Equipped Oil Life
Fuel Filter Life — If Equipped Battery
Voltage Gauge
Summary
Engine Hours
3
22_DPF_OM_EN_USC_t.book Page 83