light RAM CHASSIS CAB 2023 Owners Manual
[x] Cancel search | Manufacturer: RAM, Model Year: 2023, Model line: CHASSIS CAB, Model: RAM CHASSIS CAB 2023Pages: 444, PDF Size: 20.51 MB
Page 204 of 444
202MULTIMEDIA
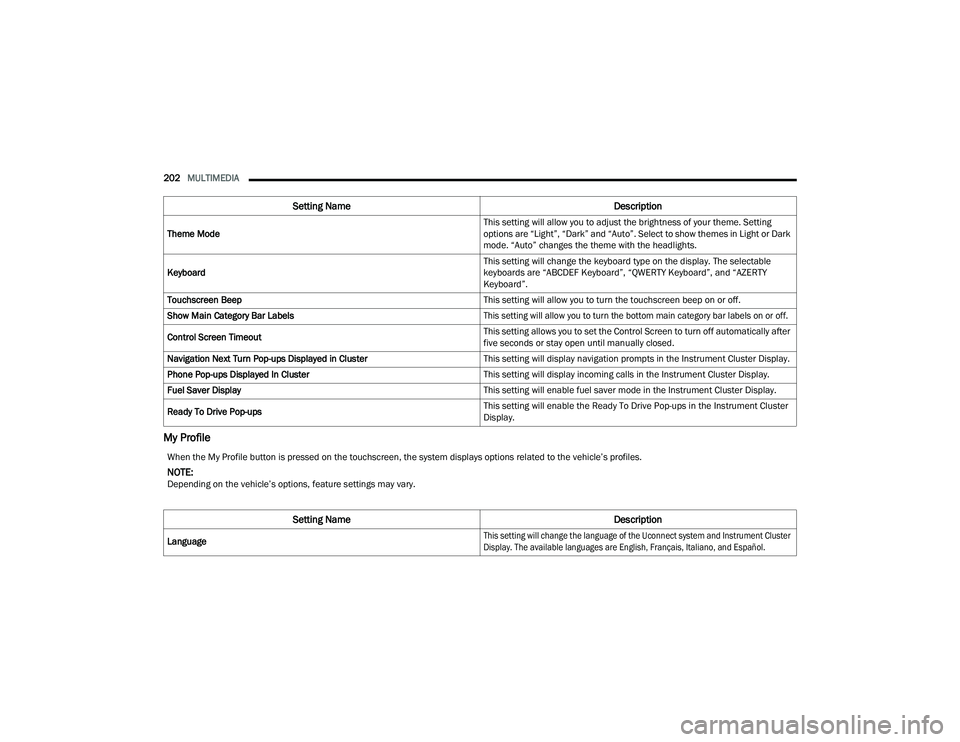
My Profile
Theme Mode This setting will allow you to adjust the brightness of your theme. Setting
options are “Light”, “Dark” and “Auto”. Select to show themes in Light or Dark
mode. “Auto” changes the theme with the headlights.
Keyboard This setting will change the keyboard type on the display. The selectable
keyboards are “ABCDEF Keyboard”, “QWERTY Keyboard”, and “AZERTY
Keyboard”.
Touchscreen Beep This setting will allow you to turn the touchscreen beep on or off.
Show Main Category Bar Labels
This setting will allow you to turn the bottom main category bar labels on or off.
Control Screen Timeout This setting allows you to set the Control Screen to turn off automatically after
five seconds or stay open until manually closed.
Navigation Next Turn Pop-ups Displayed in Cluster This setting will display navigation prompts in the Instrument Cluster Display.
Phone Pop-ups Displayed In Cluster This setting will display incoming calls in the Instrument Cluster Display.
Fuel Saver Display This setting will enable fuel saver mode in the Instrument Cluster Display.
Ready To Drive Pop-ups This setting will enable the Ready To Drive Pop-ups in the Instrument Cluster
Display.
Setting Name
Description
When the My Profile button is pressed on the touchscreen, the system displays options related to the vehicle’s profiles.
NOTE:Depending on the vehicle’s options, feature settings may vary.
Setting NameDescription
Language
This setting will change the language of the Uconnect system and Instrument Cluster
Display. The available languages are English, Français, Italiano, and Español.
23_DPF_OM_EN_USC_t.book Page 202
Page 205 of 444
MULTIMEDIA203
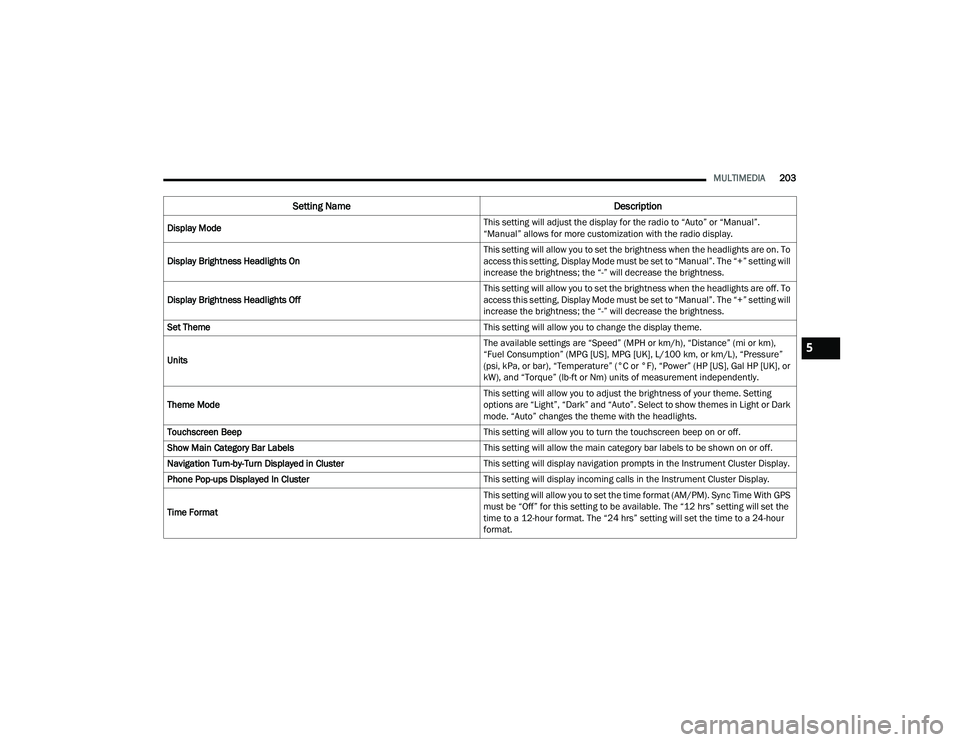
Display Mode This setting will adjust the display for the radio to “Auto” or “Manual”.
“Manual” allows for more customization with the radio display.
Display Brightness Headlights On This setting will allow you to set the brightness when the headlights are on. To
access this setting, Display Mode must be set to “Manual”. The “+” setting will
increase the brightness; the “-” will decrease the brightness.
Display Brightness Headlights Off This setting will allow you to set the brightness when the headlights are off. To
access this setting, Display Mode must be set to “Manual”. The “+” setting will
increase the brightness; the “-” will decrease the brightness.
Set Theme This setting will allow you to change the display theme.
Units The available settings are “Speed” (MPH or km/h), “Distance” (mi or km),
“Fuel Consumption” (MPG [US], MPG [UK], L/100 km, or km/L), “Pressure”
(psi, kPa, or bar), “Temperature” (°C or °F), “Power” (HP [US], Gal HP [UK], or
kW), and “Torque” (lb-ft or Nm) units of measurement independently.
Theme Mode This setting will allow you to adjust the brightness of your theme. Setting
options are “Light”, “Dark” and “Auto”. Select to show themes in Light or Dark
mode. “Auto” changes the theme with the headlights.
Touchscreen Beep This setting will allow you to turn the touchscreen beep on or off.
Show Main Category Bar Labels This setting will allow the main category bar labels to be shown on or off.
Navigation Turn-by-Turn Displayed in Cluster This setting will display navigation prompts in the Instrument Cluster Display.
Phone Pop-ups Displayed In Cluster This setting will display incoming calls in the Instrument Cluster Display.
Time Format This setting will allow you to set the time format (AM/PM). Sync Time With GPS
must be “Off” for this setting to be available. The “12 hrs” setting will set the
time to a 12-hour format. The “24 hrs” setting will set the time to a 24-hour
format.
Setting Name
Description
5
23_DPF_OM_EN_USC_t.book Page 203
Page 209 of 444
MULTIMEDIA207
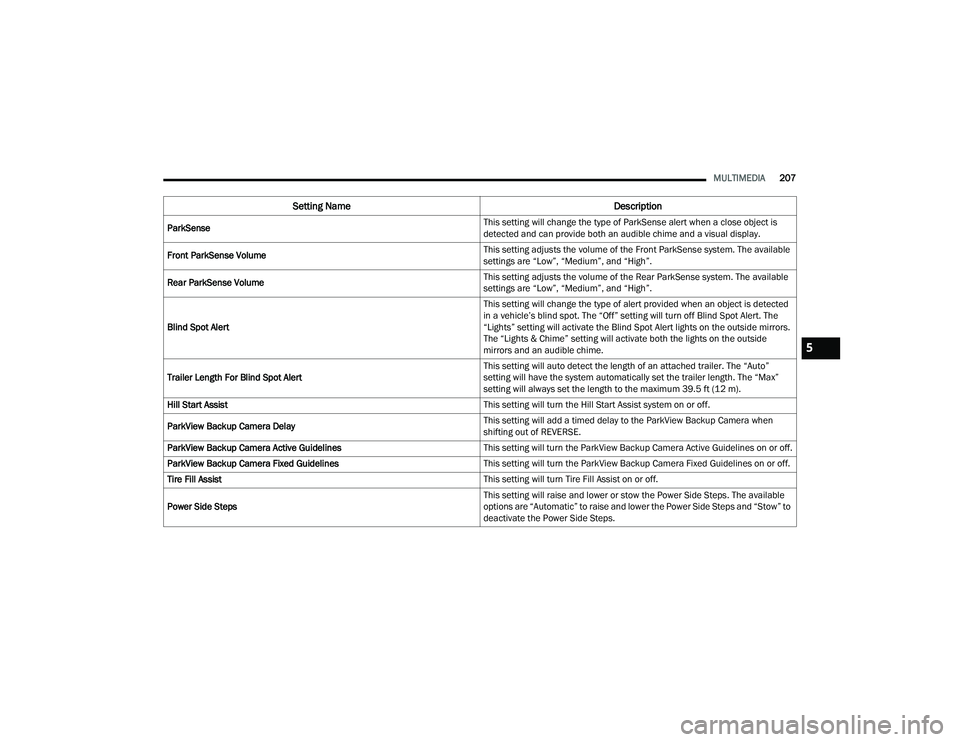
ParkSense This setting will change the type of ParkSense alert when a close object is
detected and can provide both an audible chime and a visual display.
Front ParkSense Volume This setting adjusts the volume of the Front ParkSense system. The available
settings are “Low”, “Medium”, and “High”.
Rear ParkSense Volume This setting adjusts the volume of the Rear ParkSense system. The available
settings are “Low”, “Medium”, and “High”.
Blind Spot Alert This setting will change the type of alert provided when an object is detected
in a vehicle’s blind spot. The “Off” setting will turn off Blind Spot Alert. The
“Lights” setting will activate the Blind Spot Alert lights on the outside mirrors.
The “Lights & Chime” setting will activate both the lights on the outside
mirrors and an audible chime.
Trailer Length For Blind Spot Alert This setting will auto detect the length of an attached trailer. The “Auto”
setting will have the system automatically set the trailer length. The “Max”
setting will always set the length to the maximum 39.5 ft (12 m).
Hill Start Assist This setting will turn the Hill Start Assist system on or off.
ParkView Backup Camera Delay This setting will add a timed delay to the ParkView Backup Camera when
shifting out of REVERSE.
ParkView Backup Camera Active Guidelines This setting will turn the ParkView Backup Camera Active Guidelines on or off.
ParkView Backup Camera Fixed Guidelines This setting will turn the ParkView Backup Camera Fixed Guidelines on or off.
Tire Fill Assist This setting will turn Tire Fill Assist on or off.
Power Side Steps This setting will raise and lower or stow the Power Side Steps. The available
options are “Automatic” to raise and lower the Power Side Steps and “Stow” to
deactivate the Power Side Steps.
Setting Name
Description
5
23_DPF_OM_EN_USC_t.book Page 207
Page 212 of 444
210MULTIMEDIA
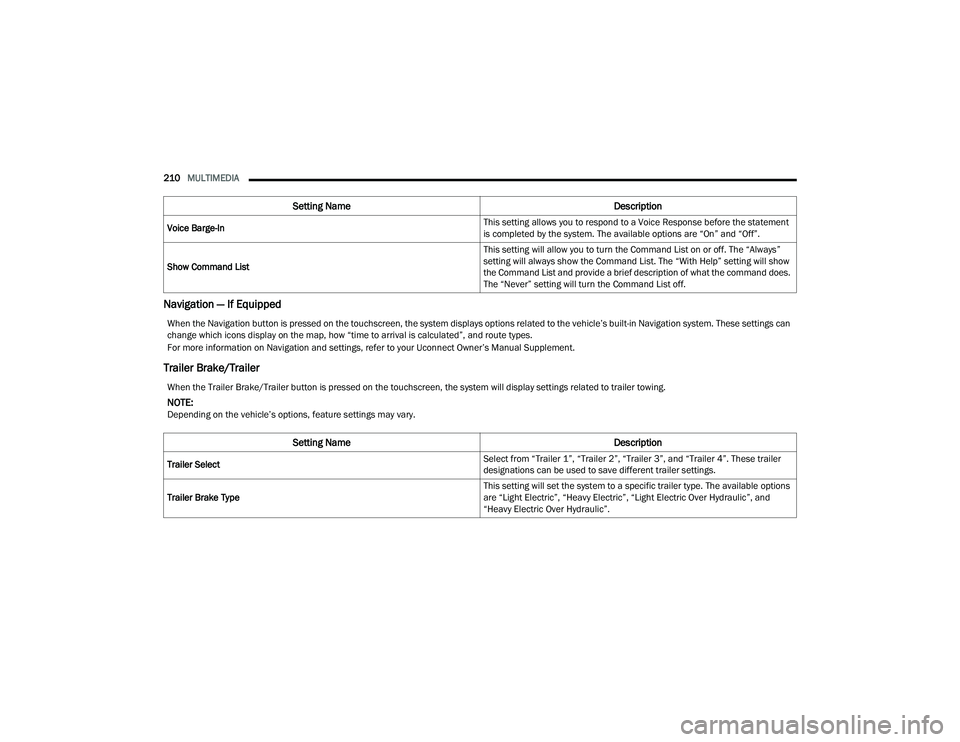
Navigation — If Equipped
Trailer Brake/Trailer
Voice Barge-In This setting allows you to respond to a Voice Response before the statement
is completed by the system. The available options are “On” and “Off”.
Show Command List This setting will allow you to turn the Command List on or off. The “Always”
setting will always show the Command List. The “With Help” setting will show
the Command List and provide a brief description of what the command does.
The “Never” setting will turn the Command List off.
Setting Name
Description
When the Navigation button is pressed on the touchscreen, the system displays options related to the vehicle’s built-in Navigation system. These settings can
change which icons display on the map, how “time to arrival is calculated”, and route types.
For more information on Navigation and settings, refer to your Uconnect Owner’s Manual Supplement.
When the Trailer Brake/Trailer button is pressed on the touchscreen, the system will display settings related to trailer towing.
NOTE:Depending on the vehicle’s options, feature settings may vary.
Setting NameDescription
Trailer Select Select from “Trailer 1”, “Trailer 2”, “Trailer 3”, and “Trailer 4”. These trailer
designations can be used to save different trailer settings.
Trailer Brake Type This setting will set the system to a specific trailer type. The available options
are “Light Electric”, “Heavy Electric”, “Light Electric Over Hydraulic”, and
“Heavy Electric Over Hydraulic”.
23_DPF_OM_EN_USC_t.book Page 210
Page 214 of 444
212MULTIMEDIA
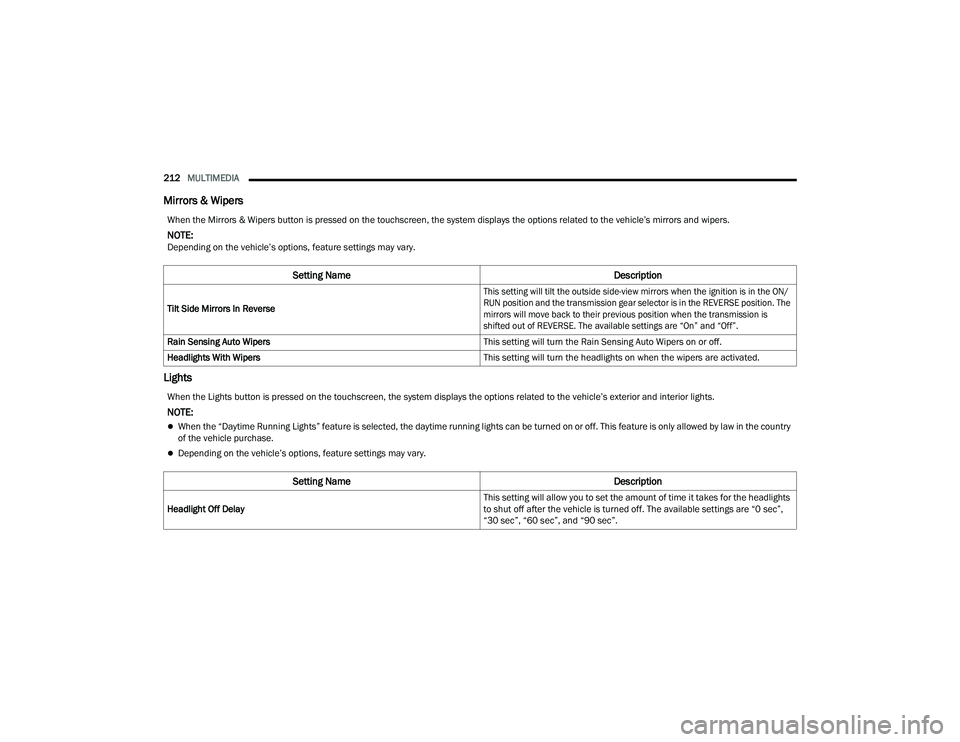
Mirrors & Wipers
Lights
When the Mirrors & Wipers button is pressed on the touchscreen, the system displays the options related to the vehicle’s mirrors and wipers.
NOTE:Depending on the vehicle’s options, feature settings may vary.
Setting Name Description
Tilt Side Mirrors In Reverse
This setting will tilt the outside side-view mirrors when the ignition is in the ON/
RUN position and the transmission gear selector is in the REVERSE position. The
mirrors will move back to their previous position when the transmission is
shifted out of REVERSE. The available settings are “On” and “Off”.
Rain Sensing Auto Wipers This setting will turn the Rain Sensing Auto Wipers on or off.
Headlights With Wipers This setting will turn the headlights on when the wipers are activated.
When the Lights button is pressed on the touchscreen, the system displays the options related to the vehicle’s exterior and interior lights.
NOTE:
When the “Daytime Running Lights” feature is selected, the daytime running lights can be turned on or off. This feature is only allowed by law in the country
of the vehicle purchase.
Depending on the vehicle’s options, feature settings may vary.
Setting NameDescription
Headlight Off Delay This setting will allow you to set the amount of time it takes for the headlights
to shut off after the vehicle is turned off. The available settings are “0 sec”,
“30 sec”, “60 sec”, and “90 sec”.
23_DPF_OM_EN_USC_t.book Page 212
Page 215 of 444
MULTIMEDIA213
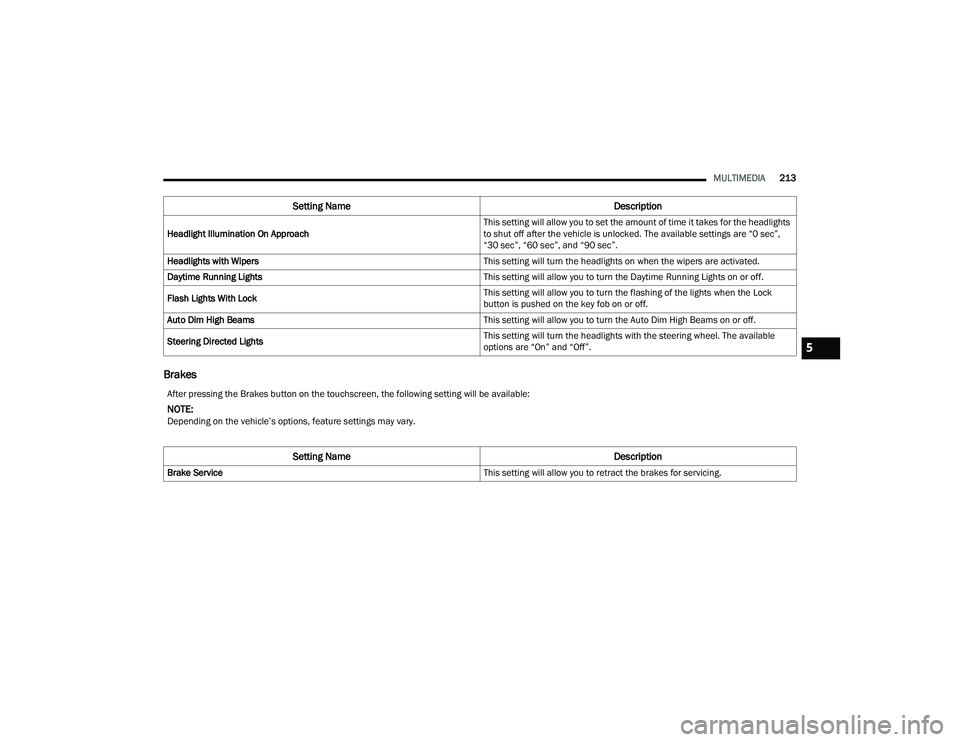
Brakes
Headlight Illumination On Approach This setting will allow you to set the amount of time it takes for the headlights
to shut off after the vehicle is unlocked. The available settings are “0 sec”,
“30 sec”, “60 sec”, and “90 sec”.
Headlights with Wipers This setting will turn the headlights on when the wipers are activated.
Daytime Running Lights This setting will allow you to turn the Daytime Running Lights on or off.
Flash Lights With Lock This setting will allow you to turn the flashing of the lights when the Lock
button is pushed on the key fob on or off.
Auto Dim High Beams This setting will allow you to turn the Auto Dim High Beams on or off.
Steering Directed Lights This setting will turn the headlights with the steering wheel. The available
options are “On” and “Off”.
Setting Name
Description
After pressing the Brakes button on the touchscreen, the following setting will be available:
NOTE:Depending on the vehicle’s options, feature settings may vary.
Setting NameDescription
Brake Service This setting will allow you to retract the brakes for servicing.
5
23_DPF_OM_EN_USC_t.book Page 213
Page 216 of 444
214MULTIMEDIA
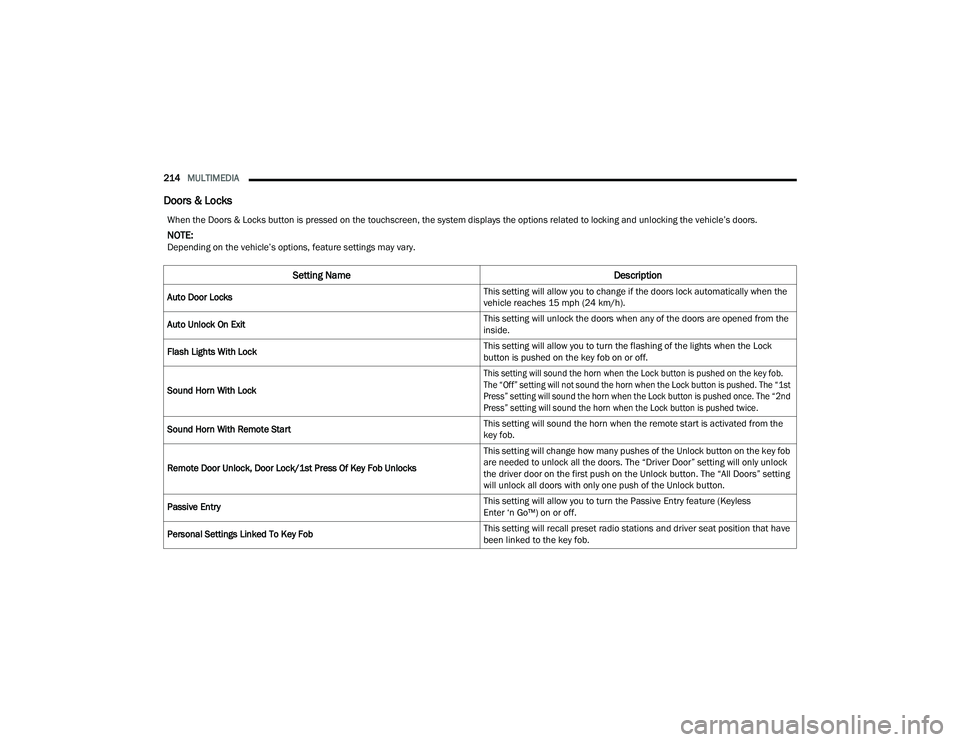
Doors & Locks
When the Doors & Locks button is pressed on the touchscreen, the system displays the options related to locking and unlocking the vehicle’s doors.
NOTE:Depending on the vehicle’s options, feature settings may vary.
Setting Name Description
Auto Door Locks This setting will allow you to change if the doors lock automatically when the
vehicle reaches 15 mph (24 km/h).
Auto Unlock On Exit This setting will unlock the doors when any of the doors are opened from the
inside.
Flash Lights With Lock This setting will allow you to turn the flashing of the lights when the Lock
button is pushed on the key fob on or off.
Sound Horn With Lock
This setting will sound the horn when the Lock button is pushed on the key fob.
The “Off” setting will not sound the horn when the Lock button is pushed. The “1st
Press” setting will sound the horn when the Lock button is pushed once. The “2nd
Press” setting will sound the horn when the Lock button is pushed twice.
Sound Horn With Remote Start This setting will sound the horn when the remote start is activated from the
key fob.
Remote Door Unlock, Door Lock/1st Press Of Key Fob Unlocks This setting will change how many pushes of the Unlock button on the key fob
are needed to unlock all the doors. The “Driver Door” setting will only unlock
the driver door on the first push on the Unlock button. The “All Doors” setting
will unlock all doors with only one push of the Unlock button.
Passive Entry This setting will allow you to turn the Passive Entry feature (Keyless
Enter ‘n Go™) on or off.
Personal Settings Linked To Key Fob This setting will recall preset radio stations and driver seat position that have
been linked to the key fob.
23_DPF_OM_EN_USC_t.book Page 214
Page 218 of 444
216MULTIMEDIA
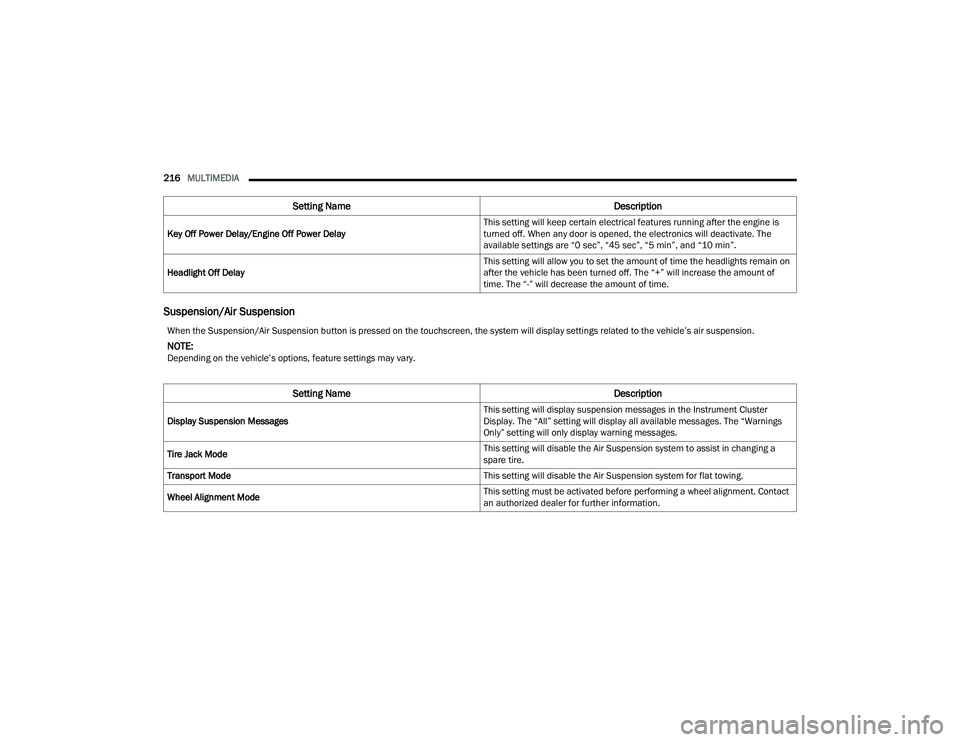
Suspension/Air Suspension
Key Off Power Delay/Engine Off Power Delay This setting will keep certain electrical features running after the engine is
turned off. When any door is opened, the electronics will deactivate. The
available settings are “0 sec”, “45 sec”, “5 min”, and “10 min”.
Headlight Off Delay This setting will allow you to set the amount of time the headlights remain on
after the vehicle has been turned off. The “+” will increase the amount of
time. The “-” will decrease the amount of time.
Setting Name
Description
When the Suspension/Air Suspension button is pressed on the touchscreen, the system will display settings related to the vehicle’s air suspension.
NOTE:Depending on the vehicle’s options, feature settings may vary.
Setting NameDescription
Display Suspension Messages This setting will display suspension messages in the Instrument Cluster
Display. The “All” setting will display all available messages. The “Warnings
Only” setting will only display warning messages.
Tire Jack Mode This setting will disable the Air Suspension system to assist in changing a
spare tire.
Transport Mode This setting will disable the Air Suspension system for flat towing.
Wheel Alignment Mode This setting must be activated before performing a wheel alignment. Contact
an authorized dealer for further information.
23_DPF_OM_EN_USC_t.book Page 216
Page 224 of 444

222MULTIMEDIA
NOTE:Uconnect screen images are for illustration purposes only and may not reflect exact software for your vehicle.
Feature Description
Radio/MediaPress/Push the Radio button or Media button to enter Radio Mode/Media Mode and access the radio functions and external
audio sources Úpage 224.
Phone Press/Push the Phone button to enter Phone Mode and access the hands-free phone system Ú page 234.
Settings Press/Push the Settings button to access the Uconnect Settings Ú page 199.
Push the ENTER/BROWSE button on the faceplate to accept a highlighted selection on the screen. Rotate the TUNE/SCROLL rotary knob to scroll through a list or tune a radio station.
Push the SCREEN OFF button on the faceplate to turn the screen on or off.
Push the MUTE button on the faceplate to turn the audio of the radio system off. Push it again to turn the audio back on.
Rotate the rotary knob to adjust the volume. Push the VOLUME & On/Off button on the faceplate to turn the system on or off.
NOTE:Push and hold the VOLUME & On/Off button for approximately 10 seconds to reset the radio manually. Doing this can also recover
the radio screen from freezing.
Feature Description
CompassPush the COMPASS button on the faceplate to access the vehicle’s compass.
More Push the MORE button on the faceplate to access additional options.
23_DPF_OM_EN_USC_t.book Page 222
Page 229 of 444

MULTIMEDIA227
Acquiring SiriusXM® Subscription
To activate the SiriusXM® Satellite Radio
subscription, US residents visit
https://
www.siriusxm.com/phx/getlogin or call:
1-800-643-2112
Canadian residents visit
https://
www.siriusxm.ca/ or call: 1-888-539-7474.
NOTE:You will need to provide the SiriusXM® ID (RID)
located at the bottom of the Channel 0 screen.
The Satellite Mode is activated by a press of the
SXM button on the touchscreen. When in Satellite Mode:
The SXM button on the touchscreen is high
-
lighted.
The SiriusXM® Presets are displayed at the top
of the screen.
The SiriusXM® Channel Number is displayed in
the center.
The Program Information is displayed at the
bottom of the Channel Number.
The SiriusXM® function buttons are displayed
below the Program Information.
Tuning is done by operating the Tune Knob or by
Direct Tune, similar to other Radio Bands.
In addition to the tuning operation functions
common to all radio modes, the Replay, Traffic/
Weather button, and Favorite button functions are
available in SiriusXM® Mode.
Uconnect 3 With 5-inch Display SiriusXM® Satellite Radio
1 — Browse
2 — Radio Bands
3 — Direct Tune
4 — Info Button
5 — Next Button
5
23_DPF_OM_EN_USC_t.book Page 227