USB RAM CHASSIS CAB 2023 Owners Manual
[x] Cancel search | Manufacturer: RAM, Model Year: 2023, Model line: CHASSIS CAB, Model: RAM CHASSIS CAB 2023Pages: 444, PDF Size: 20.51 MB
Page 5 of 444
3
Forward Utility Lights and Rear Guidance
Lights — If Equipped .........................................46
Heated Mirrors — If Equipped..........................46
Tilt Side Mirrors In Reverse —
If Equipped........................................................46
UNIVERSAL GARAGE DOOR OPENER
(HOMELINK®) — IF EQUIPPED ............................ 47
Before You Begin Programming HomeLink® ... 47
Erasing All The HomeLink® Channels ............47
Identifying Whether You Have A Rolling Code
Or Non-Rolling Code Device.............................47
Programming HomeLink® To A Garage Door
Opener ..............................................................48
Programming HomeLink® To A Miscellaneous
Device ...............................................................49
Reprogramming A Single HomeLink® Button .. 49
Canadian/Gate Operator Programming .........49
Security .............................................................50
Troubleshooting Tips ........................................50
EXTERIOR LIGHTS.................................................. 51
Headlight Switch...............................................51
Multifunction Lever ..........................................51
Daytime Running Lights (DRLs) ......................52
High/Low Beam Switch....................................52 Automatic High Beam Headlamp Control —
If Equipped........................................................52
Flash-To-Pass ...................................................52
Automatic Headlights — If Equipped ..............52
Directional LED Headlamp System —
If Equipped........................................................53
Parking Lights ...................................................53
Headlights On With Wipers ..............................53
Headlight Illumination On Approach ...............53
Headlight Delay ................................................53
Lights-On Reminder .........................................54
Front Fog Lights — If Equipped .......................54
Turn Signals ......................................................54
Lane Change Assist — If Equipped ..................54
Cargo Lights/Rear Guidance Lights —
If Equipped........................................................54
Battery Saver ....................................................55
INTERIOR LIGHTS ..................................................55
Courtesy Lights .................................................55
WINDSHIELD WIPERS AND WASHERS............... 57
Windshield Wiper Operation ...........................57
Rain Sensing Wipers — If Equipped ...............58
CLIMATE CONTROLS .............................................58
Automatic Climate Control Descriptions
And Functions ...................................................59
Manual Climate Control Descriptions
And Functions ...................................................62 Automatic Temperature Control (ATC) ............ 64
Climate Voice Recognition —If Equipped ........ 64
Operating Tips .................................................64
INTERIOR STORAGE AND EQUIPMENT ............... 65
Storage ............................................................. 65
USB/AUX Control ............................................. 70
Electrical Power Outlets................................... 71
Power Inverter — If Equipped ......................... 72
Wireless Charging Pad —If Equipped ............. 74
WINDOWS ............................................................. 74
Power Windows — If Equipped ........................ 74
Automatic Window Features —If Equipped..... 75
Reset Auto-Up .................................................. 75
Window Lockout Switch — If Equipped ........... 76
Power Sliding Rear Window —If Equipped ..... 76
Manual Sliding Rear Window —
If Equipped .......................................................76
Wind Buffeting .................................................76
HOOD....................................................................... 77
To Open The Hood ........................................... 77
To Close The Hood ........................................... 77
23_DPF_OM_EN_USC_t.book Page 3
Page 72 of 444
70GETTING TO KNOW YOUR VEHICLE
Below Rear Seat Storage (Crew Cab)
The Crew Cab models provide additional storage
under the rear seats. Lift the seats to access the
storage compartment.
To open the storage compartments, unsnap the
securing snap located at either side of the load
floor and lift upward on the fold flat lid.
Crew Cab Storage
NOTE:For more information on storage and the fold flat
floor, refer to “Fold Flat Load Floor” in the previous
section.
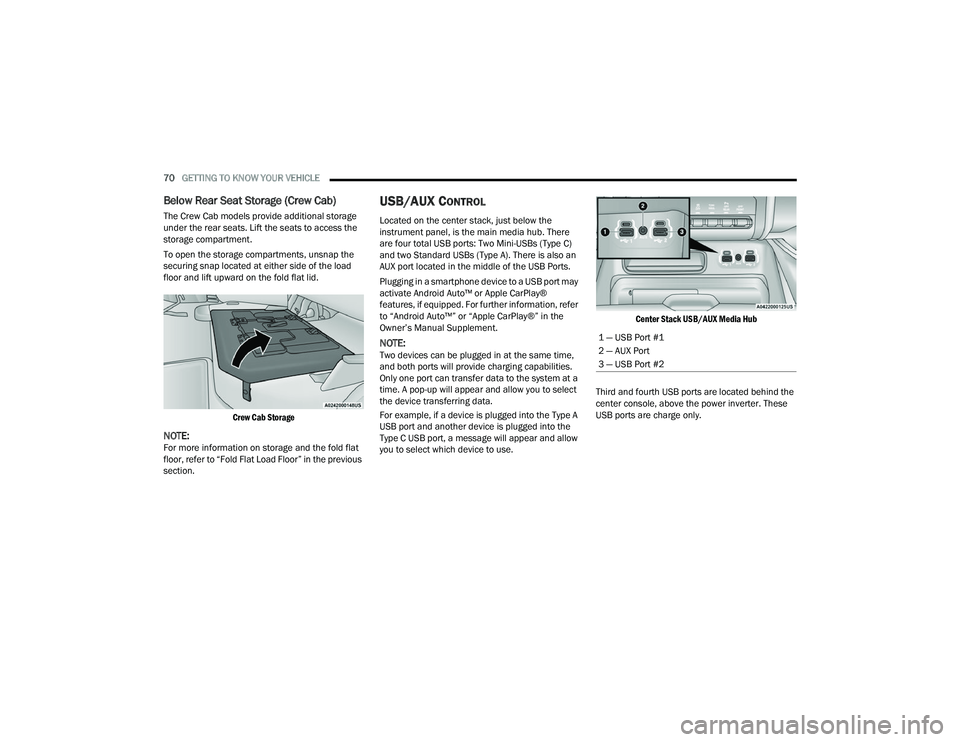
USB/AUX CONTROL
Located on the center stack, just below the
instrument panel, is the main media hub. There
are four total USB ports: Two Mini-USBs (Type C)
and two Standard USBs (Type A). There is also an
AUX port located in the middle of the USB Ports.
Plugging in a smartphone device to a USB port may
activate Android Auto™ or Apple CarPlay®
features, if equipped. For further information, refer
to “Android Auto™” or “Apple CarPlay®” in the
Owner’s Manual Supplement.
NOTE:Two devices can be plugged in at the same time,
and both ports will provide charging capabilities.
Only one port can transfer data to the system at a
time. A pop-up will appear and allow you to select
the device transferring data.
For example, if a device is plugged into the Type A
USB port and another device is plugged into the
Type C USB port, a message will appear and allow
you to select which device to use.
Center Stack USB/AUX Media Hub
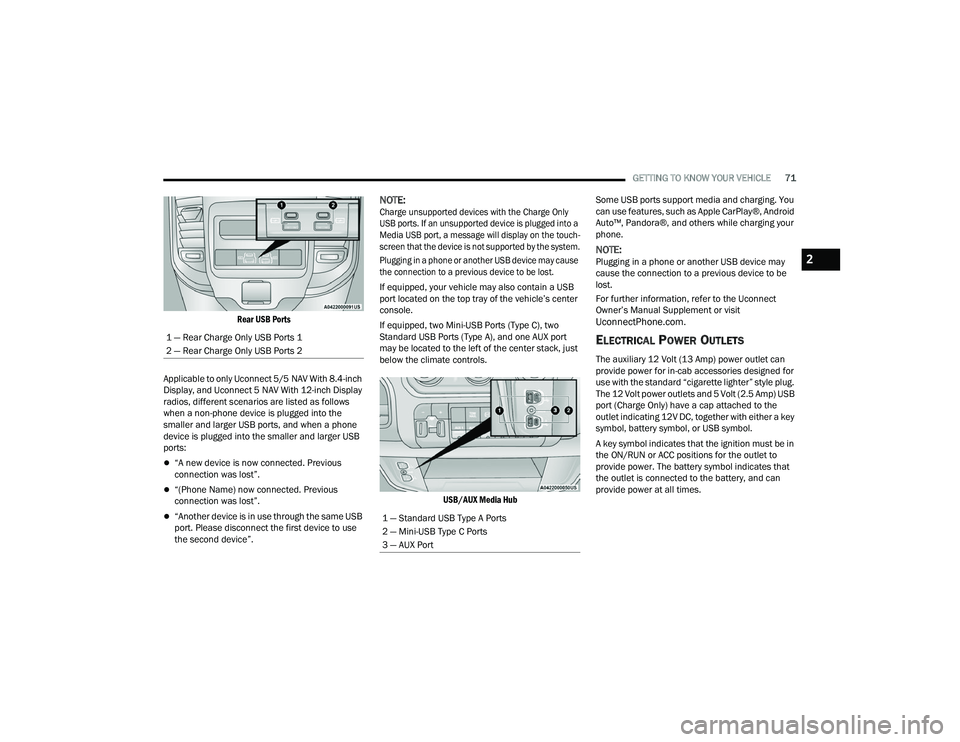
Third and fourth USB ports are located behind the
center console, above the power inverter. These
USB ports are charge only.
1 — USB Port #1
2 — AUX Port
3 — USB Port #2
23_DPF_OM_EN_USC_t.book Page 70
Page 73 of 444
GETTING TO KNOW YOUR VEHICLE71
Rear USB Ports
Applicable to only Uconnect 5/5 NAV With 8.4-inch
Display, and Uconnect 5 NAV With 12-inch Display
radios, different scenarios are listed as follows
when a non-phone device is plugged into the
smaller and larger USB ports, and when a phone
device is plugged into the smaller and larger USB
ports:
“A new device is now connected. Previous
connection was lost”.
“(Phone Name) now connected. Previous
connection was lost”.
“Another device is in use through the same USB
port. Please disconnect the first device to use
the second device”.
NOTE:
Charge unsupported devices with the Charge Only
USB ports. If an unsupported device is plugged into a
Media USB port, a message will display on the touch -
screen that the device is not supported by the system.
Plugging in a phone or another USB device may cause
the connection to a previous device to be lost.
If equipped, your vehicle may also contain a USB
port located on the top tray of the vehicle’s center
console.
If equipped, two Mini-USB Ports (Type C), two
Standard USB Ports (Type A), and one AUX port
may be located to the left of the center stack, just
below the climate controls.
USB/AUX Media Hub
Some USB ports support media and charging. You
can use features, such as Apple CarPlay®, Android
Auto™, Pandora®, and others while charging your
phone.
NOTE:Plugging in a phone or another USB device may
cause the connection to a previous device to be
lost.
For further information, refer to the Uconnect
Owner’s Manual Supplement or visit
UconnectPhone.com.
ELECTRICAL POWER OUTLETS
The auxiliary 12 Volt (13 Amp) power outlet can
provide power for in-cab accessories designed for
use with the standard “cigarette lighter” style plug.
The 12 Volt power outlets and 5 Volt (2.5 Amp) USB
port (Charge Only) have a cap attached to the
outlet indicating 12V DC, together with either a key
symbol, battery symbol, or USB symbol.
A key symbol indicates that the ignition must be in
the ON/RUN or ACC positions for the outlet to
provide power. The battery symbol indicates that
the outlet is connected to the battery, and can
provide power at all times.
1 — Rear Charge Only USB Ports 1
2 — Rear Charge Only USB Ports 2
1 — Standard USB Type A Ports
2 — Mini-USB Type C Ports
3 — AUX Port
2
23_DPF_OM_EN_USC_t.book Page 71
Page 74 of 444
72GETTING TO KNOW YOUR VEHICLE
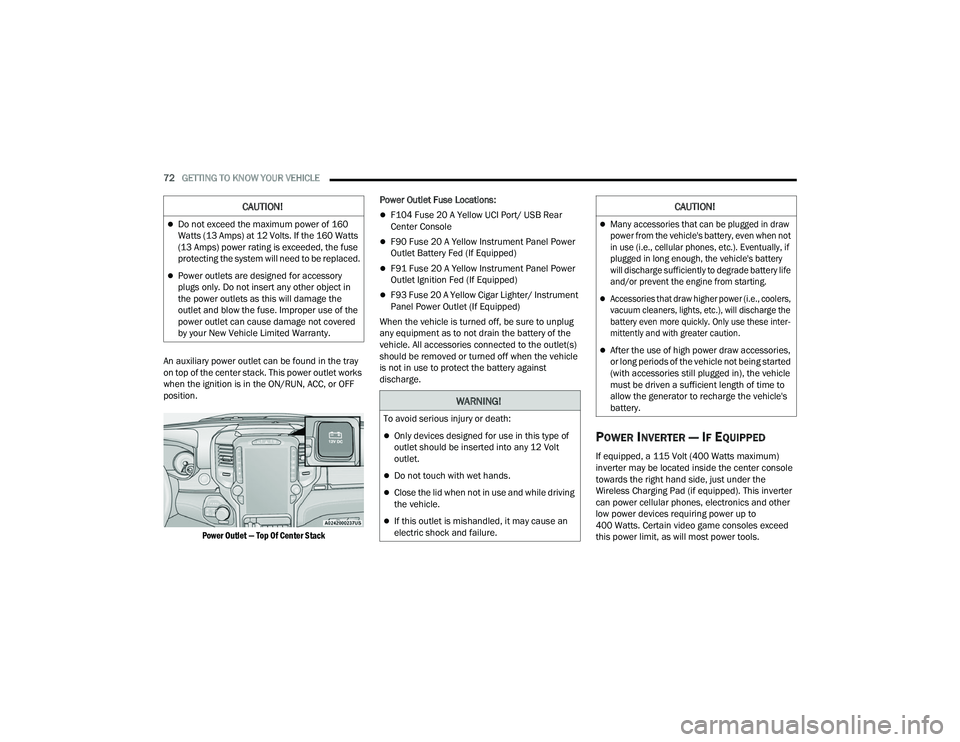
An auxiliary power outlet can be found in the tray
on top of the center stack. This power outlet works
when the ignition is in the ON/RUN, ACC, or OFF
position.
Power Outlet — Top Of Center Stack
Power Outlet Fuse Locations:
F104 Fuse 20 A Yellow UCI Port/ USB Rear
Center Console
F90 Fuse 20 A Yellow Instrument Panel Power
Outlet Battery Fed (If Equipped)
F91 Fuse 20 A Yellow Instrument Panel Power
Outlet Ignition Fed (If Equipped)
F93 Fuse 20 A Yellow Cigar Lighter/ Instrument
Panel Power Outlet (If Equipped)
When the vehicle is turned off, be sure to unplug
any equipment as to not drain the battery of the
vehicle. All accessories connected to the outlet(s)
should be removed or turned off when the vehicle
is not in use to protect the battery against
discharge.
POWER INVERTER — IF EQUIPPED
If equipped, a 115 Volt (400 Watts maximum)
inverter may be located inside the center console
towards the right hand side, just under the
Wireless Charging Pad (if equipped). This inverter
can power cellular phones, electronics and other
low power devices requiring power up to
400 Watts. Certain video game consoles exceed
this power limit, as will most power tools.
CAUTION!
Do not exceed the maximum power of 160
Watts (13 Amps) at 12 Volts. If the 160 Watts
(13 Amps) power rating is exceeded, the fuse
protecting the system will need to be replaced.
Power outlets are designed for accessory
plugs only. Do not insert any other object in
the power outlets as this will damage the
outlet and blow the fuse. Improper use of the
power outlet can cause damage not covered
by your New Vehicle Limited Warranty.
WARNING!
To avoid serious injury or death:
Only devices designed for use in this type of
outlet should be inserted into any 12 Volt
outlet.
Do not touch with wet hands.
Close the lid when not in use and while driving
the vehicle.
If this outlet is mishandled, it may cause an
electric shock and failure.
CAUTION!
Many accessories that can be plugged in draw
power from the vehicle's battery, even when not
in use (i.e., cellular phones, etc.). Eventually, if
plugged in long enough, the vehicle's battery
will discharge sufficiently to degrade battery life
and/or prevent the engine from starting.
Accessories that draw higher power (i.e., coolers,
vacuum cleaners, lights, etc.), will discharge the
battery even more quickly. Only use these inter -
mittently and with greater caution.
After the use of high power draw accessories,
or long periods of the vehicle not being started
(with accessories still plugged in), the vehicle
must be driven a sufficient length of time to
allow the generator to recharge the vehicle's
battery.
23_DPF_OM_EN_USC_t.book Page 72
Page 104 of 444
102GETTING TO KNOW YOUR INSTRUMENT PANEL
NOTE:
The charging system is independent from load
reduction. The charging system performs a diag-
nostic on the charging system continuously.
If the Battery Charge Warning Light is on it may
indicate a problem with the charging system
Ú page 104.
The electrical loads that may be switched off
(if equipped), and vehicle functions which can be
affected by load reduction:
Heated Seats/Vented Seats/Heated Wheel
Rear Defroster And Heated Mirrors
HVAC System
115 Volt AC Power Inverter System
Audio and Telematics System
Loss of the battery charge may indicate one or
more of the following conditions:
The charging system cannot deliver enough
electrical power to the vehicle system because
the electrical loads are larger than the capability
of charging system. The charging system is still
functioning properly.
Turning on all possible vehicle electrical loads
(e.g. HVAC to max settings, exterior and interior
lights, overloaded power outlets +12 Volts, 115
Volt AC, USB ports) during certain driving condi -
tions (city driving, towing, frequent stopping).
Installing options like additional lights, upfitter
electrical accessories, audio systems, alarms
and similar devices.
Unusual driving cycles (short trips separated by
long parking periods).
The vehicle was parked for an extended period
of time (weeks, months).
The battery was recently replaced and was not
charged completely.
The battery was discharged by an electrical load
left on when the vehicle was parked.
The battery was used for an extended period
with the engine not running to supply radio,
lights, chargers, +12 Volt portable appliances
like vacuum cleaners, game consoles and
similar devices.
What to do when an electrical load reduction
action message is present (“Battery Saver On” or
“Battery Saver Mode”)
During a trip:
Reduce power to unnecessary loads if possible:
Turn off redundant lights (interior or exte -
rior).
Check what may be plugged in to power
outlets +12 Volts, 115 Volt AC, USB ports.
Check HVAC settings (blower, temperature).
Check the audio settings (volume). After a trip:
Check if any aftermarket equipment was
installed (additional lights, upfitter electrical
accessories, audio systems, alarms) and review
specifications if any (load and Ignition Off Draw
currents).
Evaluate the latest driving cycles (distance,
driving time and parking time).
The vehicle should have service performed if
the message is still present during consecutive
trips and the evaluation of the vehicle and
driving pattern did not help to identify the cause.
WARNING LIGHTS AND MESSAGES
The warning/indicator lights will illuminate in the
instrument panel together with a dedicated
message and/or acoustic signal when applicable.
These indications are indicative and precautionary
and as such must not be considered as exhaustive.
Always refer to the information in this chapter in
the event of a failure indication. All active telltales
will display first if applicable. The system check
menu may appear different based upon
equipment options and current vehicle status.
Some telltales are optional and may not appear.
23_DPF_OM_EN_USC_t.book Page 102
Page 225 of 444
MULTIMEDIA223
SAFETY AND GENERAL INFORMATION
Safety Guidelines
Please read this manual carefully before using the
system. It contains instructions on how to use the
system in a safe and effective manner.
Do NOT attach any object to the touchscreen.
Doing so can result in damage to the touchscreen.
Please read and follow these safety precautions.
Failure to do so may result in injury or property
damage.
Become familiar with the Uconnect features and
applications in this vehicle before you drive on
the roadway so using Uconnect will be more
intuitive and will not require prolonged viewing
of the screen while you are driving.
When driving, looking at the touchscreen should
only be done by a glance when safe to do so. If
prolonged viewing of the screen is required,
choose a safe and secure location where you
can pull over and park safely to do so.
Stop use immediately if a problem occurs.
Failure to do so may cause injury or damage to
the product. See an authorized dealer for repair.
Ensure the volume level of the system is set to a
level that still allows you to hear outside traffic
and emergency vehicles.
Safe Usage Of The Uconnect System
The Uconnect system is a sophisticated elec -
tronic device. Do not let young children use the
system.
Permanent hearing loss may occur if you play
your music or sound system at loud volumes.
Exercise caution when setting the volume on the
system.
Keep drinks, rain and other sources of moisture
away from the system. Besides damage to the
system, moisture can cause electric shocks as
with any electronic device.
NOTE:Many features of this system are speed
dependent. For your own safety, it is not possible to
use some of the touchscreen features while the
vehicle is in motion.
Care And Maintenance
Do not press the touchscreen with any hard or
sharp objects (pen, USB stick, jewelry, etc.),
which could scratch the surface.
Do not spray any liquid or chemicals directly on
the screen! Use a clean and dry microfiber lens
cleaning cloth in order to clean the touchscreen.
If necessary, use a lint-free cloth dampened
with a cleaning solution, such as isopropyl
alcohol or an isopropyl alcohol and water solu -
tion ratio of 50:50. Be sure to follow the solvent
manufacturer's precautions and directions
Ú page 427.
WARNING!
ALWAYS obey traffic laws and pay attention to
the road. Your complete attention is always
required while driving to maintain safe control of
your vehicle. Only use and interact with the
features and applications when it is safe to do
so. Failure to follow these warnings can result in
a collision and death or serious personal injury.
5
23_DPF_OM_EN_USC_t.book Page 223
Page 226 of 444
224MULTIMEDIA
UCONNECT MODES
STEERING WHEEL AUDIO CONTROLS
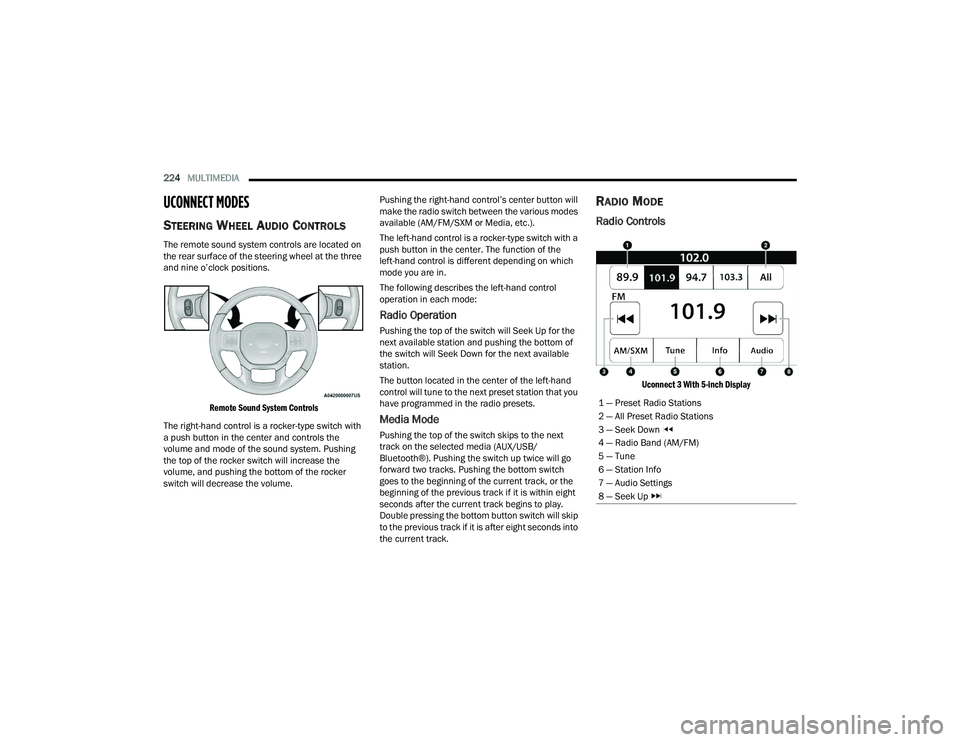
The remote sound system controls are located on
the rear surface of the steering wheel at the three
and nine o’clock positions.
Remote Sound System Controls
The right-hand control is a rocker-type switch with
a push button in the center and controls the
volume and mode of the sound system. Pushing
the top of the rocker switch will increase the
volume, and pushing the bottom of the rocker
switch will decrease the volume. Pushing the right-hand control’s center button will
make the radio switch between the various modes
available (AM/FM/SXM or Media, etc.).
The left-hand control is a rocker-type switch with a
push button in the center. The function of the
left-hand control is different depending on which
mode you are in.
The following describes the left-hand control
operation in each mode:
Radio Operation
Pushing the top of the switch will Seek Up for the
next available station and pushing the bottom of
the switch will Seek Down for the next available
station.
The button located in the center of the left-hand
control will tune to the next preset station that you
have programmed in the radio presets.
Media Mode
Pushing the top of the switch skips to the next
track on the selected media (AUX/USB/
Bluetooth®). Pushing the switch up twice will go
forward two tracks. Pushing the bottom switch
goes to the beginning of the current track, or the
beginning of the previous track if it is within eight
seconds after the current track begins to play.
Double pressing the bottom button switch will skip
to the previous track if it is after eight seconds into
the current track.
RADIO MODE
Radio Controls
Uconnect 3 With 5-inch Display
1 — Preset Radio Stations
2 — All Preset Radio Stations
3 — Seek Down
4 — Radio Band (AM/FM)
5 — Tune
6 — Station Info
7 — Audio Settings
8 — Seek Up
23_DPF_OM_EN_USC_t.book Page 224
Page 233 of 444
MULTIMEDIA231
Audio Setting Description
Balance/FadePress the Balance/Fade button on the touchscreen to balance audio between
the front speakers or fade the audio between the rear and front speakers.
Press the Front, Rear, Left or Right button or press and drag the red Speaker icon to adjust the Balance/Fade.
Equalizer Press the + or - button or press and drag the level bar to increase or decrease
each of the equalizer bands. The level value, which spans between plus or minus nine, is displayed at the top of each of the bands.
Speed Adjusted Volume The Speed Adjusted Volume is adjusted by selecting from “Off”, “1”, “2”, and
“3”. This alters the automatic adjustment of the audio volume with variation to vehicle speed. Volume increases automatically as speed increases to compensate for normal road noise.
Surround Sound When Surround Sound is on, you can hear audio coming from every direction
as in a movie theatre or home theatre system.
Loudness When Loudness is on, the sound quality at lower volumes improves.
AUX Volume Offset The AUX Volume Offset is adjusted by pressing + and - buttons. This alters the
AUX input audio volume. The level value, which spans between plus or minus three, is displayed above the adjustment bar.
Auto Play The Auto Play feature begins playing music as soon as a USB Media device is
connected to one of the vehicle’s Media USB ports, when it is turned on. Press “Off” to turn the setting off.
Radio Off With Door The Radio Off With Door feature, when activated, keeps the radio on until the
driver or passenger door is opened or until the “Radio Off Delay” selected time has expired.
5
23_DPF_OM_EN_USC_t.book Page 231
Page 234 of 444
232MULTIMEDIA
MEDIA MODE
Operating Media Mode
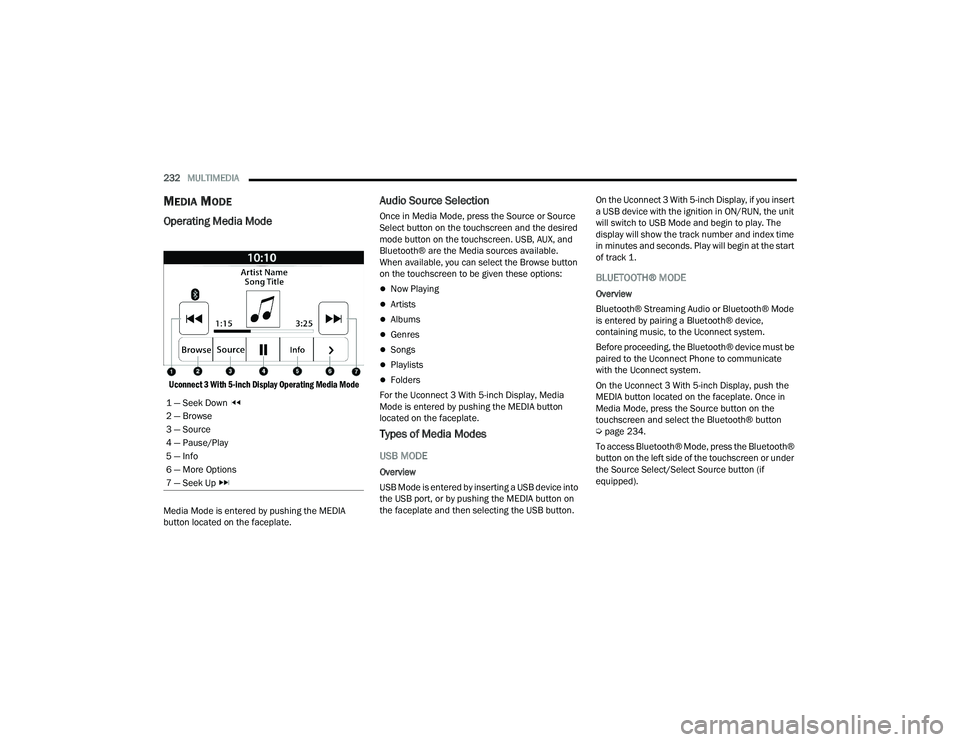
Uconnect 3 With 5-inch Display Operating Media Mode
Media Mode is entered by pushing the MEDIA
button located on the faceplate.
Audio Source Selection
Once in Media Mode, press the Source or Source
Select button on the touchscreen and the desired
mode button on the touchscreen. USB, AUX, and
Bluetooth® are the Media sources available.
When available, you can select the Browse button
on the touchscreen to be given these options:
Now Playing
Artists
Albums
Genres
Songs
Playlists
Folders
For the Uconnect 3 With 5-inch Display, Media
Mode is entered by pushing the MEDIA button
located on the faceplate.
Types of Media Modes
USB MODE
Overview
USB Mode is entered by inserting a USB device into
the USB port, or by pushing the MEDIA button on
the faceplate and then selecting the USB button. On the Uconnect 3 With 5-inch Display, if you insert
a USB device with the ignition in ON/RUN, the unit
will switch to USB Mode and begin to play. The
display will show the track number and index time
in minutes and seconds. Play will begin at the start
of track 1.
BLUETOOTH® MODE
Overview
Bluetooth® Streaming Audio or Bluetooth® Mode
is entered by pairing a Bluetooth® device,
containing music, to the Uconnect system.
Before proceeding, the Bluetooth® device must be
paired to the Uconnect Phone to communicate
with the Uconnect system.
On the Uconnect 3 With 5-inch Display, push the
MEDIA button located on the faceplate. Once in
Media Mode, press the Source button on the
touchscreen and select the Bluetooth® button
Ú
page 234.
To access Bluetooth® Mode, press the Bluetooth®
button on the left side of the touchscreen or under
the Source Select/Select Source button (if
equipped).
1 — Seek Down
2 — Browse
3 — Source
4 — Pause/Play
5 — Info
6 — More Options
7 — Seek Up
23_DPF_OM_EN_USC_t.book Page 232
Page 235 of 444
MULTIMEDIA233
AUX MODE
Overview
Auxiliary Mode (AUX) is entered by inserting an AUX
device using a cable with a 3.5 mm audio jack into
the AUX port, or by pushing the MEDIA button on
the faceplate, selecting the Source button and
then the AUX button.
To insert an Auxiliary device, gently insert the
Auxiliary device cable into the AUX port. If you
insert an Auxiliary device with the ignition and the
radio on, the unit will switch to AUX Mode and
begin to play.
Controlling The Auxiliary Device
Auxiliary Mode (AUX) is entered by inserting an AUX
device using a cable with a 3.5 mm audio jack into
the AUX port or by pushing the MEDIA button on the
faceplate, selecting the Source button, and then
the AUX button.
NOTE:The radio unit is acting as the amplifier for audio
output from the Auxiliary device. Therefore, if the
volume control on the Auxiliary device is set too
low, there will be insufficient audio signal for the
radio unit to play the music on the device. Seek Up
/Seek Down
In USB Mode, press the Seek Up button on the
touchscreen for the next selection on the USB
device. Press and release the Seek Down button
on the touchscreen to return to the beginning of
the current selection, or to return to the beginning
of the previous selection if the USB device is within
the first three seconds of the current selection.
In Bluetooth® Mode, press and release the Seek
Up button on the touchscreen for the next
selection on the Bluetooth® device. Press and
release the Seek Down button on the touchscreen
to return to the beginning of the current selection,
or return to the beginning of the previous selection
if the Bluetooth® device is within the first second
of the current selection.
Browse
In USB Mode, press the Browse button on the
touchscreen to display the browse window. In USB
Mode, the left side of the browse window displays
a list of ways you can browse through the contents
of the USB device. If supported by the device, you
can browse by Folder, Artist, Playlist, Album, Song,
etc. Press the desired button on the touchscreen
on the left side of the screen. The center of the
browse window shows items and their
sub-functions, which can be scrolled through by
pressing the Up and Down buttons to the right. The
TUNE/SCROLL knob can also be used to scroll. On the Uconnect 3 With 5-inch Display, rotate the
ENTER/BROWSE button on the faceplate or press
the Browse button on the touchscreen to scroll
through and select a desired track on the device.
Press the Exit button on the touchscreen if you
wish to cancel the Browse function.
Media Mode
In USB Mode, press the Media button on the
touchscreen to select the desired audio source:
USB.
In Bluetooth® Mode, press the Media button on
the touchscreen to select the desired audio
source: Bluetooth®.
In AUX Mode, press the Media button on the
touchscreen to select the desired audio source:
AUX.
Repeat
In USB Mode, press the Repeat button on the
touchscreen to toggle the repeat functionality. The
Repeat button on the touchscreen is highlighted
when active. The Radio will continue to play the
current track, repeatedly, as long as the repeat is
active. Press the Repeat button again to enter
Repeat All. The radio will continue to play all the
current tracks, repeatedly, as long as the repeat
function is active. To cancel Repeat, press the
Repeat button a third time.
5
23_DPF_OM_EN_USC_t.book Page 233