mirror controls RAM CHASSIS CAB 2023 Owners Manual
[x] Cancel search | Manufacturer: RAM, Model Year: 2023, Model line: CHASSIS CAB, Model: RAM CHASSIS CAB 2023Pages: 444, PDF Size: 20.51 MB
Page 5 of 444
3
Forward Utility Lights and Rear Guidance
Lights — If Equipped .........................................46
Heated Mirrors — If Equipped..........................46
Tilt Side Mirrors In Reverse —
If Equipped........................................................46
UNIVERSAL GARAGE DOOR OPENER
(HOMELINK®) — IF EQUIPPED ............................ 47
Before You Begin Programming HomeLink® ... 47
Erasing All The HomeLink® Channels ............47
Identifying Whether You Have A Rolling Code
Or Non-Rolling Code Device.............................47
Programming HomeLink® To A Garage Door
Opener ..............................................................48
Programming HomeLink® To A Miscellaneous
Device ...............................................................49
Reprogramming A Single HomeLink® Button .. 49
Canadian/Gate Operator Programming .........49
Security .............................................................50
Troubleshooting Tips ........................................50
EXTERIOR LIGHTS.................................................. 51
Headlight Switch...............................................51
Multifunction Lever ..........................................51
Daytime Running Lights (DRLs) ......................52
High/Low Beam Switch....................................52 Automatic High Beam Headlamp Control —
If Equipped........................................................52
Flash-To-Pass ...................................................52
Automatic Headlights — If Equipped ..............52
Directional LED Headlamp System —
If Equipped........................................................53
Parking Lights ...................................................53
Headlights On With Wipers ..............................53
Headlight Illumination On Approach ...............53
Headlight Delay ................................................53
Lights-On Reminder .........................................54
Front Fog Lights — If Equipped .......................54
Turn Signals ......................................................54
Lane Change Assist — If Equipped ..................54
Cargo Lights/Rear Guidance Lights —
If Equipped........................................................54
Battery Saver ....................................................55
INTERIOR LIGHTS ..................................................55
Courtesy Lights .................................................55
WINDSHIELD WIPERS AND WASHERS............... 57
Windshield Wiper Operation ...........................57
Rain Sensing Wipers — If Equipped ...............58
CLIMATE CONTROLS .............................................58
Automatic Climate Control Descriptions
And Functions ...................................................59
Manual Climate Control Descriptions
And Functions ...................................................62 Automatic Temperature Control (ATC) ............ 64
Climate Voice Recognition —If Equipped ........ 64
Operating Tips .................................................64
INTERIOR STORAGE AND EQUIPMENT ............... 65
Storage ............................................................. 65
USB/AUX Control ............................................. 70
Electrical Power Outlets................................... 71
Power Inverter — If Equipped ......................... 72
Wireless Charging Pad —If Equipped ............. 74
WINDOWS ............................................................. 74
Power Windows — If Equipped ........................ 74
Automatic Window Features —If Equipped..... 75
Reset Auto-Up .................................................. 75
Window Lockout Switch — If Equipped ........... 76
Power Sliding Rear Window —If Equipped ..... 76
Manual Sliding Rear Window —
If Equipped .......................................................76
Wind Buffeting .................................................76
HOOD....................................................................... 77
To Open The Hood ........................................... 77
To Close The Hood ........................................... 77
23_DPF_OM_EN_USC_t.book Page 3
Page 41 of 444
GETTING TO KNOW YOUR VEHICLE39
MIRRORS
INSIDE REARVIEW MIRROR
Manual Mirror — If Equipped
The mirror head can be adjusted up, down, left,
and right. The mirror should be adjusted to center
on the view through the rear window.
Headlight glare from vehicles behind you can be
reduced by moving the small control under the
mirror to the night position (toward the rear of the
vehicle). The mirror should be adjusted while set in
the day position (toward the windshield).
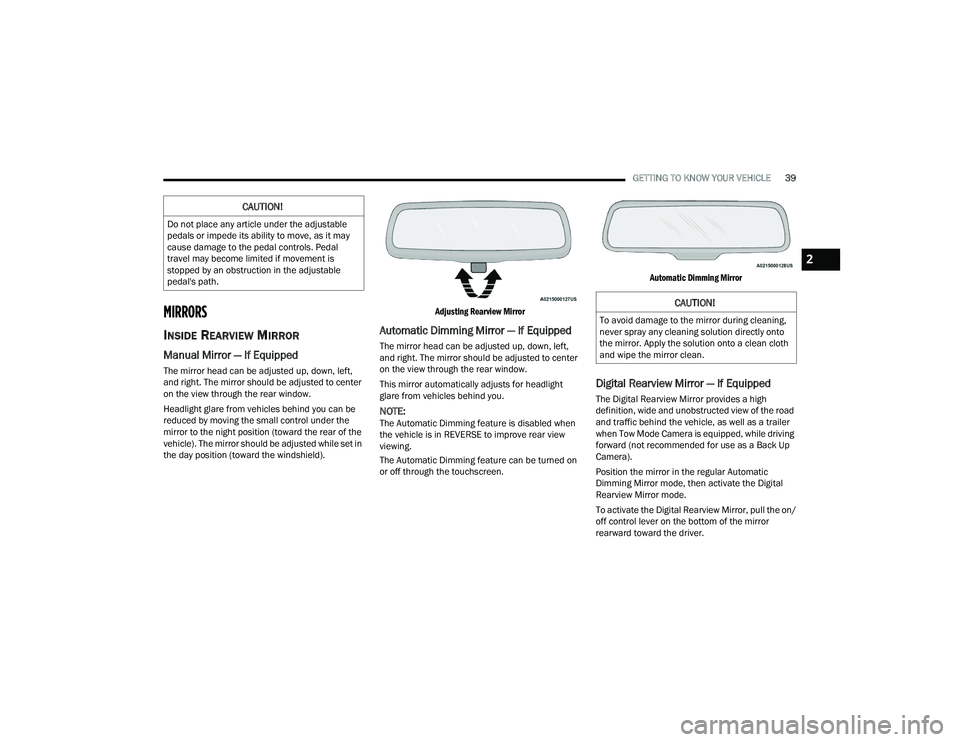
Adjusting Rearview Mirror
Automatic Dimming Mirror — If Equipped
The mirror head can be adjusted up, down, left,
and right. The mirror should be adjusted to center
on the view through the rear window.
This mirror automatically adjusts for headlight
glare from vehicles behind you.
NOTE:The Automatic Dimming feature is disabled when
the vehicle is in REVERSE to improve rear view
viewing.
The Automatic Dimming feature can be turned on
or off through the touchscreen.
Automatic Dimming Mirror
Digital Rearview Mirror — If Equipped
The Digital Rearview Mirror provides a high
definition, wide and unobstructed view of the road
and traffic behind the vehicle, as well as a trailer
when Tow Mode Camera is equipped, while driving
forward (not recommended for use as a Back Up
Camera).
Position the mirror in the regular Automatic
Dimming Mirror mode, then activate the Digital
Rearview Mirror mode.
To activate the Digital Rearview Mirror, pull the on/
off control lever on the bottom of the mirror
rearward toward the driver.
CAUTION!
Do not place any article under the adjustable
pedals or impede its ability to move, as it may
cause damage to the pedal controls. Pedal
travel may become limited if movement is
stopped by an obstruction in the adjustable
pedal's path.
CAUTION!
To avoid damage to the mirror during cleaning,
never spray any cleaning solution directly onto
the mirror. Apply the solution onto a clean cloth
and wipe the mirror clean.
2
23_DPF_OM_EN_USC_t.book Page 39
Page 44 of 444
42GETTING TO KNOW YOUR VEHICLE
Slide-On-Rod Extender
NOTE:The sun visor can also be extended while the sun
visor is against the windshield for additional sun
blockage through the front of the vehicle.
OUTSIDE MIRRORS
The outside mirror(s) can be adjusted to the center
of the adjacent lane of traffic to achieve the
optimal view.
NOTE:If your vehicle is equipped with puddle lamps
under the outside mirrors, they can be turned off
through the Uconnect system Ú page 199.
Trailer Tow Telescoping Mirrors
Your vehicle may be equipped with manual or
power trailer telescoping mirrors. These mirrors
are designed with an adjustable mirror head that
can be extended when trailering to provide a
greater vision range when towing extra-wide loads.
Power Telescoping Mirrors
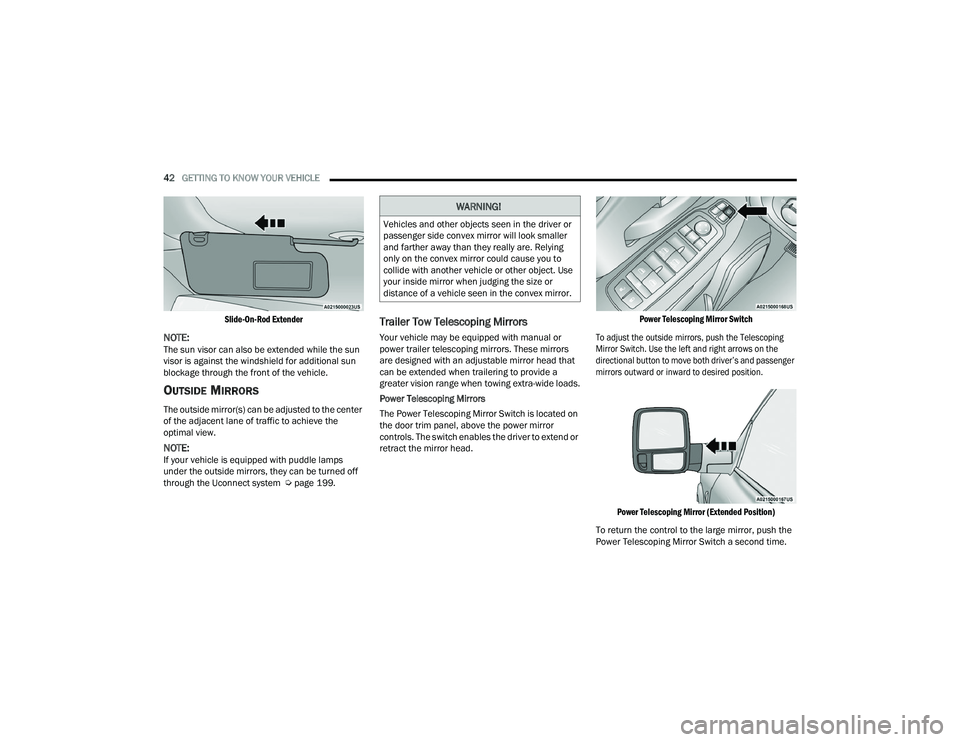
The Power Telescoping Mirror Switch is located on
the door trim panel, above the power mirror
controls. The switch enables the driver to extend or
retract the mirror head.
Power Telescoping Mirror Switch
To adjust the outside mirrors, push the Telescoping
Mirror Switch. Use the left and right arrows on the
directional button to move both driver’s and passenger
mirrors outward or inward to desired position.
Power Telescoping Mirror (Extended Position)
To return the control to the large mirror, push the
Power Telescoping Mirror Switch a second time.
WARNING!
Vehicles and other objects seen in the driver or
passenger side convex mirror will look smaller
and farther away than they really are. Relying
only on the convex mirror could cause you to
collide with another vehicle or other object. Use
your inside mirror when judging the size or
distance of a vehicle seen in the convex mirror.
23_DPF_OM_EN_USC_t.book Page 42
Page 45 of 444
GETTING TO KNOW YOUR VEHICLE43
Manual Telescoping Mirrors
To extend the Manual Telescoping Mirrors pull the
mirror outward to desired position. To return to
normal position, push the mirror inward all the way.
Manual Telescoping Mirror (Extended Position)
NOTE:Return the trailer towing mirrors to normal driving
position or fold the mirrors prior to entering an
automated car wash.
Outside Mirrors Folding Feature
All outside mirrors are designed to be able to be
manually folded both forward and rearward to
prevent damage.
Folding Mirror
Outside Mirrors With Turn Signal And
Approach Lighting — If Equipped
Driver and passenger outside mirrors with turn
signal lighting contain LEDs, which are located at
the back of the mirror.
The LEDs are turn signal indicators, which flash
with the corresponding turn signal lights in the
front and rear of the vehicle. Turning on the Hazard
Warning flashers will also activate these LEDs.
OUTSIDE AUTOMATIC DIMMING MIRROR —
I
F EQUIPPED
The exterior mirrors will automatically adjust for
glare from vehicles behind you. This feature is
controlled by the inside automatic dimming mirror.
The mirrors will automatically adjust for headlight
glare when the inside mirror adjusts.
POWER MIRRORS — IF EQUIPPED
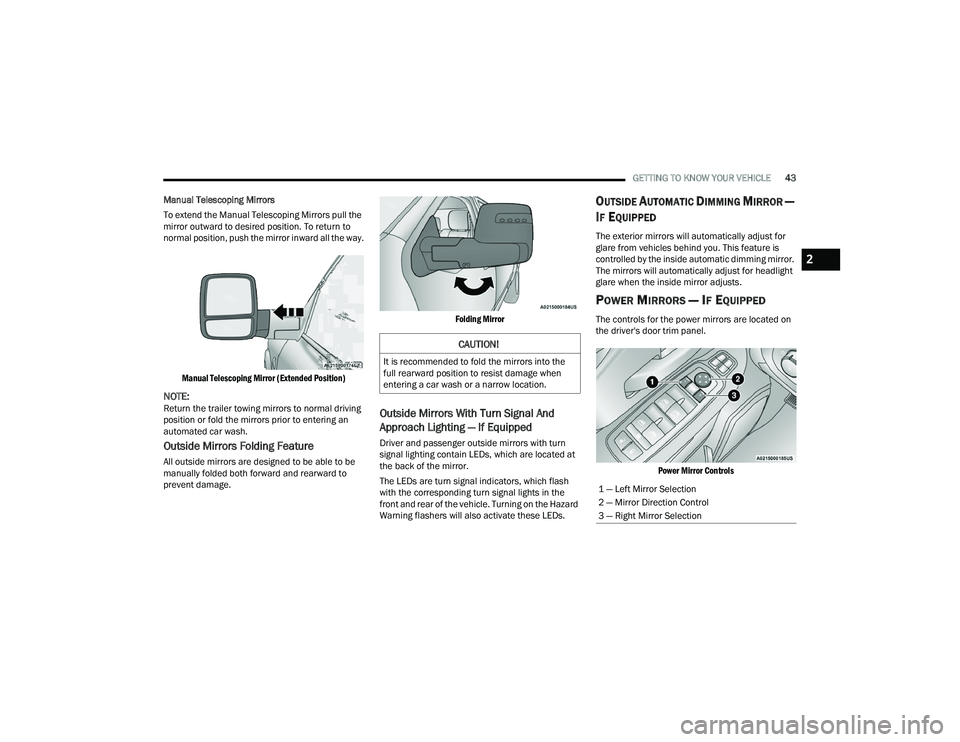
The controls for the power mirrors are located on
the driver's door trim panel.
Power Mirror Controls
CAUTION!
It is recommended to fold the mirrors into the
full rearward position to resist damage when
entering a car wash or a narrow location.
1 — Left Mirror Selection
2 — Mirror Direction Control
3 — Right Mirror Selection
2
23_DPF_OM_EN_USC_t.book Page 43
Page 46 of 444
44GETTING TO KNOW YOUR VEHICLE
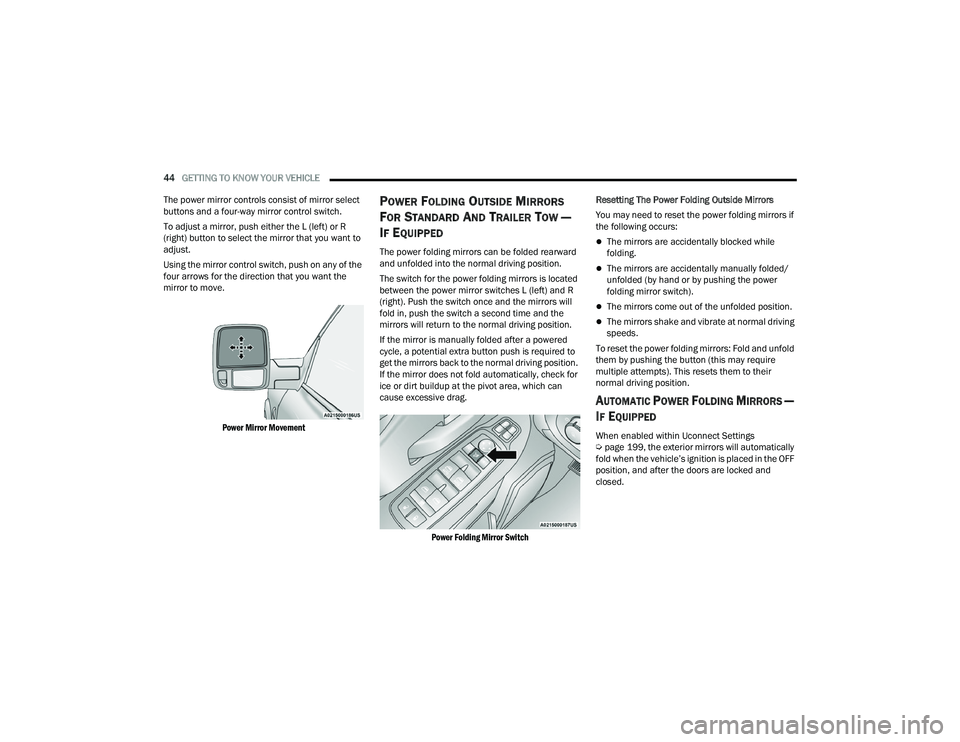
The power mirror controls consist of mirror select
buttons and a four-way mirror control switch.
To adjust a mirror, push either the L (left) or R
(right) button to select the mirror that you want to
adjust.
Using the mirror control switch, push on any of the
four arrows for the direction that you want the
mirror to move.
Power Mirror Movement
POWER FOLDING OUTSIDE MIRRORS
F
OR STANDARD AND TRAILER TOW —
I
F EQUIPPED
The power folding mirrors can be folded rearward
and unfolded into the normal driving position.
The switch for the power folding mirrors is located
between the power mirror switches L (left) and R
(right). Push the switch once and the mirrors will
fold in, push the switch a second time and the
mirrors will return to the normal driving position.
If the mirror is manually folded after a powered
cycle, a potential extra button push is required to
get the mirrors back to the normal driving position.
If the mirror does not fold automatically, check for
ice or dirt buildup at the pivot area, which can
cause excessive drag.
Power Folding Mirror Switch
Resetting The Power Folding Outside Mirrors
You may need to reset the power folding mirrors if
the following occurs:The mirrors are accidentally blocked while
folding.
The mirrors are accidentally manually folded/
unfolded (by hand or by pushing the power
folding mirror switch).
The mirrors come out of the unfolded position.
The mirrors shake and vibrate at normal driving
speeds.
To reset the power folding mirrors: Fold and unfold
them by pushing the button (this may require
multiple attempts). This resets them to their
normal driving position.
AUTOMATIC POWER FOLDING MIRRORS —
I
F EQUIPPED
When enabled within Uconnect Settings
Ú page 199, the exterior mirrors will automatically
fold when the vehicle’s ignition is placed in the OFF
position, and after the doors are locked and
closed.
23_DPF_OM_EN_USC_t.book Page 44
Page 47 of 444
GETTING TO KNOW YOUR VEHICLE45
The exterior mirrors will auto-fold in the following
situations after the ignition is placed in the OFF
position:
Pushing the lock button on the door panel
before the door is opened.
NOTE:If the doors are already locked, push the lock
button again.
Opening the door, then pushing the lock button
on the door panel, followed by closing the door.
After exiting the vehicle, close the doors then
push the lock button on the key fob.
After exiting the vehicle, close the doors then
touch the lock icon on the Passive Entry door
handle.
If the exterior mirrors were folded automatically,
they will unfold when the ignition is placed in the
ON/RUN position.
NOTE:If the mirrors were folded manually, by using the
power folding mirror switch on the driver’s door
panel, they will not automatically unfold.
POWER CONVEX MIRROR SWITCH —
I
F EQUIPPED
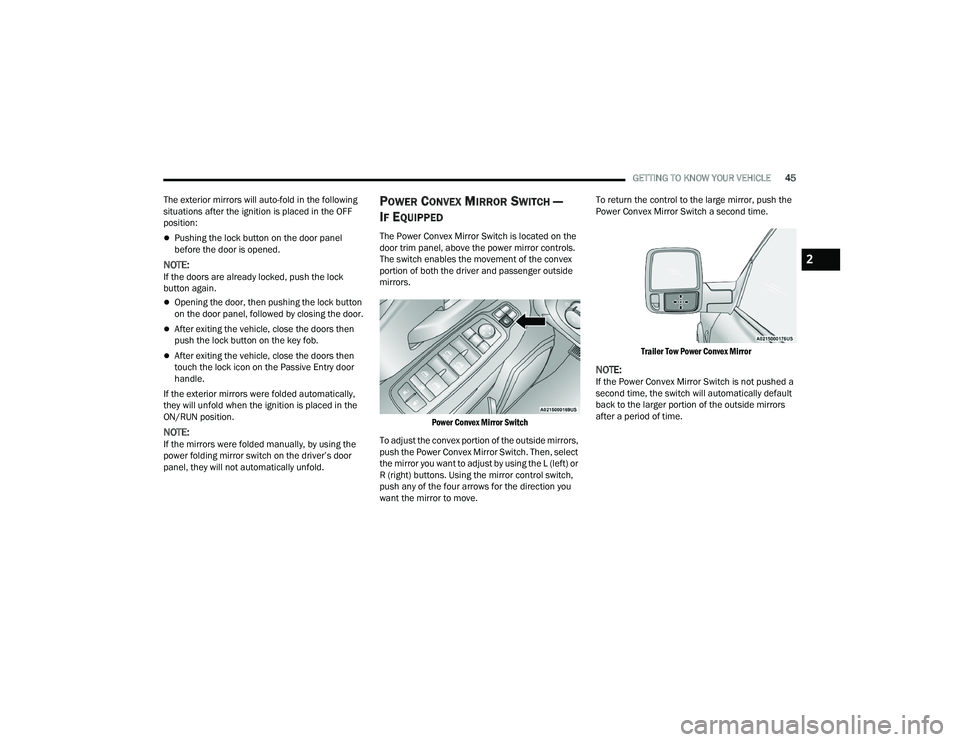
The Power Convex Mirror Switch is located on the
door trim panel, above the power mirror controls.
The switch enables the movement of the convex
portion of both the driver and passenger outside
mirrors.
Power Convex Mirror Switch
To adjust the convex portion of the outside mirrors,
push the Power Convex Mirror Switch. Then, select
the mirror you want to adjust by using the L (left) or
R (right) buttons. Using the mirror control switch,
push any of the four arrows for the direction you
want the mirror to move. To return the control to the large mirror, push the
Power Convex Mirror Switch a second time.
Trailer Tow Power Convex Mirror
NOTE:If the Power Convex Mirror Switch is not pushed a
second time, the switch will automatically default
back to the larger portion of the outside mirrors
after a period of time.
2
23_DPF_OM_EN_USC_t.book Page 45
Page 48 of 444

46GETTING TO KNOW YOUR VEHICLE
FORWARD UTILITY LIGHTS AND REAR
G
UIDANCE LIGHTS — IF EQUIPPED
The forward utility lights and reverse guidance
lights switches are located on the drivers door trim
panel, above the power mirror controls. These
switches enable the forward or reverse lights
located on the driver and passenger outside
mirrors.
Forward and Reverse Light Switches
When either button is pressed the corresponding
light on the outside mirror will remain on for ten
minutes. The vehicle must be in the ON/RUN or
ACC position. When the light is active, the switch on
the door panel will illuminate. Pushing the switch a
second time will turn the lights off.
Forward Utility Light
Reverse Guidance Light
When the lights are activated using the switch on
the door panel , the reverse guidance lights will
illuminate when the vehicle transmission is in
PARK, NEUTRAL, or REVERSE and the forward
utility lights will illuminate in all ignition positions.
The rear guidance lights will turn off when the
vehicle transmission is placed in DRIVE. The rear guidance lights will also illuminate when
the cargo light switch is pressed on the headlight
switch panel. This feature is programmable
through the Uconnect system Ú
page 199.
HEATED MIRRORS — IF EQUIPPED
These mirrors are heated to melt frost or
ice. This feature will be activated
whenever you turn on the rear window
defroster (if equipped) Úpage 58.
TILT SIDE MIRRORS IN REVERSE —
I
F EQUIPPED
This feature provides automatic outside mirror
positioning which will assist with the driver’s
ground visibility. The outside mirrors will move
slightly downward from the present position when
the vehicle is shifted into REVERSE. The outside
mirrors will then return to the original position
when the vehicle is shifted out of REVERSE. If the
vehicle is equipped with Driver Memory Settings,
this feature will be linked to the programmable
settings.
NOTE:The Tilt Side Mirrors In Reverse feature can be
turned on and off using the Uconnect system
Ú page 199.
23_DPF_OM_EN_USC_t.book Page 46
Page 115 of 444

113
(Continued)
(Continued)
STARTING AND OPERATING
STARTING THE ENGINE— GASOLINE
ENGINE
Before starting your vehicle, adjust your seat,
adjust both inside and outside mirrors, and fasten
your seat belt.
The starter should not be operated for more than
10-second intervals. Waiting a few seconds
between such intervals will protect the starter from
overheating.
AUTOMATIC TRANSMISSION
Start the engine with the transmission in the PARK
position. Apply the brake before shifting into any
driving range.
NOTE:
This vehicle is equipped with a transmission
shift interlocking system. The brake pedal must
be pressed to shift out of PARK.
If equipped with an 8-speed transmission,
starting the vehicle in NEUTRAL is not possible
unless the Manual Park Release has been acti -
vated. For the Manual Park Release operation
information Ú page 337.
AUTOPARK — ROTARY SHIFTER AND
8-S
PEED TRANSMISSION ONLY
AutoPark is a supplemental feature to assist in
placing the vehicle in PARK should the situations
on the following pages occur. It is a back up system
and should not be relied upon as the primary
method by which the driver shifts the vehicle into
PARK.
The conditions under which AutoPark will engage
are outlined on the following pages.
WARNING!
When leaving the vehicle, always make sure
the keyless ignition node is in the OFF posi -
tion, remove the key fob from the vehicle and
lock the vehicle.
Never leave children alone in a vehicle, or with
access to an unlocked vehicle. Allowing chil -
dren to be in a vehicle unattended is
dangerous for a number of reasons. A child or
others could be seriously or fatally injured.
Children should be warned not to touch the
parking brake, brake pedal or the gear
selector.
Do not leave the key fob in or near the vehicle,
or in a location accessible to children, and do
not leave the ignition of a vehicle equipped
with Keyless Enter ‘n Go™ in the ACC or ON/
RUN position. A child could operate power
windows, other controls, or move the vehicle.
Do not leave children or animals inside parked
vehicles in hot weather. Interior heat build-up
may cause serious injury or death.
WARNING!
WARNING!
Driver inattention could lead to failure to place
the vehicle in PARK. ALWAYS DO A VISUAL
CHECK that your vehicle is in PARK by verifying
that a solid (not blinking) “P” is indicated in
the instrument cluster display and near the
gear selector. If the "P" indicator is blinking,
your vehicle is not in PARK. As an added
precaution, always apply the parking brake
when exiting the vehicle.
4
23_DPF_OM_EN_USC_t.book Page 113
Page 119 of 444

STARTING AND OPERATING117
(Continued)
COLD WEATHER OPERATION
(B
ELOW –22°F OR −30°C)
To ensure reliable starting at these temperatures,
use of an externally powered electric engine block
heater (available from an authorized dealer) is
recommended.
AFTER STARTING
The idle speed is controlled automatically, and it
will decrease as the engine warms up.
STARTING THE ENGINE — DIESEL ENGINE
Before starting your vehicle, adjust your seat,
adjust both inside and outside mirrors, and fasten
your seat belts.
The starter should not be operated for more than
25-second intervals. Waiting two minutes between
such intervals will protect the starter from
overheating.
AUTOMATIC TRANSMISSION
Start the engine with the transmission in the
NEUTRAL or PARK position. Apply the brake before
shifting to any driving range.
Tip Start Feature
Do not press the accelerator. Place the ignition
switch briefly to the START position and release it.
The starter motor will continue to run and will
automatically disengage when the engine is
running.
KEYLESS ENTER ‘N GO™ — IGNITION
This feature allows the driver to operate the
ignition switch with the push of a button, as long as
the Remote Start/Keyless Enter ‘n Go™ key fob is
in the passenger compartment.
Normal Starting
USING THE ENGINE START/STOP BUTTON
1. The transmission must be in PARK or NEUTRAL.
2. Press and hold the brake pedal while pushing the ENGINE START/STOP button once.
3. The system takes over and attempts to start the vehicle. If the vehicle fails to start, the
starter will disengage automatically after 25
seconds.
4. If you wish to stop the cranking of the engine prior to the engine starting, remove your foot
from the brake pedal and push the ENGINE
START/STOP button again.
WARNING!
Do not leave children or animals inside parked
vehicles in hot weather. Interior heat build-up
may cause serious injury or death.
When leaving the vehicle, always remove the
key fob and lock your vehicle.
Never leave children alone in a vehicle, or with
access to an unlocked vehicle. Allowing chil -
dren to be in a vehicle unattended is
dangerous for a number of reasons. A child or
others could be seriously or fatally injured.
Children should be warned not to touch the
parking brake, brake pedal or the gear
selector. Do not leave the key fob in or near
the vehicle (or in a location accessible to chil -
dren), and do not leave the ignition of a
vehicle equipped with Keyless Enter ‘n Go™ in
the ACC or ON/RUN position. A child could
operate power windows, other controls, or
move the vehicle.
WARNING!
4
23_DPF_OM_EN_USC_t.book Page 117
Page 168 of 444
166STARTING AND OPERATING
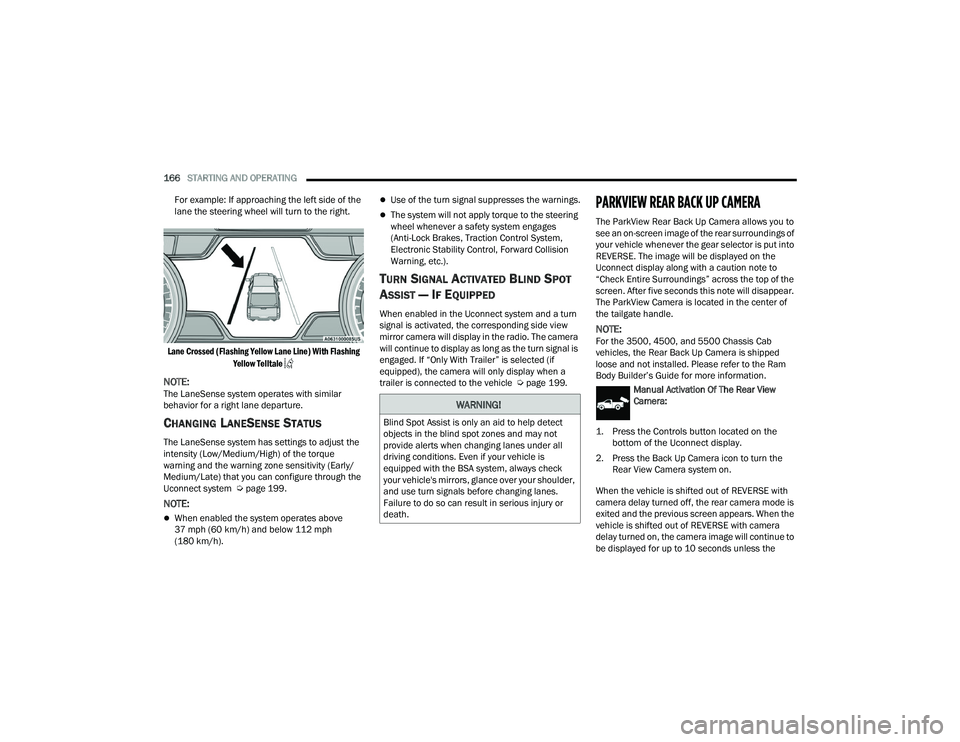
For example: If approaching the left side of the
lane the steering wheel will turn to the right.
Lane Crossed (Flashing Yellow Lane Line) With Flashing Yellow Telltale
NOTE:The LaneSense system operates with similar
behavior for a right lane departure.
CHANGING LANESENSE STATUS
The LaneSense system has settings to adjust the
intensity (Low/Medium/High) of the torque
warning and the warning zone sensitivity (Early/
Medium/Late) that you can configure through the
Uconnect system Ú page 199.
NOTE:
When enabled the system operates above
37 mph (60 km/h) and below 112 mph
(180 km/h).
Use of the turn signal suppresses the warnings.
The system will not apply torque to the steering
wheel whenever a safety system engages
(Anti-Lock Brakes, Traction Control System,
Electronic Stability Control, Forward Collision
Warning, etc.).
TURN SIGNAL ACTIVATED BLIND SPOT
A
SSIST — IF EQUIPPED
When enabled in the Uconnect system and a turn
signal is activated, the corresponding side view
mirror camera will display in the radio. The camera
will continue to display as long as the turn signal is
engaged. If “Only With Trailer” is selected (if
equipped), the camera will only display when a
trailer is connected to the vehicle Ú page 199.
PARKVIEW REAR BACK UP CAMERA
The ParkView Rear Back Up Camera allows you to
see an on-screen image of the rear surroundings of
your vehicle whenever the gear selector is put into
REVERSE. The image will be displayed on the
Uconnect display along with a caution note to
“Check Entire Surroundings” across the top of the
screen. After five seconds this note will disappear.
The ParkView Camera is located in the center of
the tailgate handle.
NOTE:For the 3500, 4500, and 5500 Chassis Cab
vehicles, the Rear Back Up Camera is shipped
loose and not installed. Please refer to the Ram
Body Builder’s Guide for more information.
Manual Activation Of The Rear View
Camera:
1. Press the Controls button located on the bottom of the Uconnect display.
2. Press the Back Up Camera icon to turn the Rear View Camera system on.
When the vehicle is shifted out of REVERSE with
camera delay turned off, the rear camera mode is
exited and the previous screen appears. When the
vehicle is shifted out of REVERSE with camera
delay turned on, the camera image will continue to
be displayed for up to 10 seconds unless the
WARNING!
Blind Spot Assist is only an aid to help detect
objects in the blind spot zones and may not
provide alerts when changing lanes under all
driving conditions. Even if your vehicle is
equipped with the BSA system, always check
your vehicle's mirrors, glance over your shoulder,
and use turn signals before changing lanes.
Failure to do so can result in serious injury or
death.
23_DPF_OM_EN_USC_t.book Page 166