Ram ProMaster 2014 Owner's Manual
ProMaster 2014
Ram
Ram
https://www.carmanualsonline.info/img/34/12515/w960_12515-0.png
Ram ProMaster 2014 Owner's Manual
Trending: flasher, jacking, key fob, service, child seat, trunk, diagram
Page 361 of 410
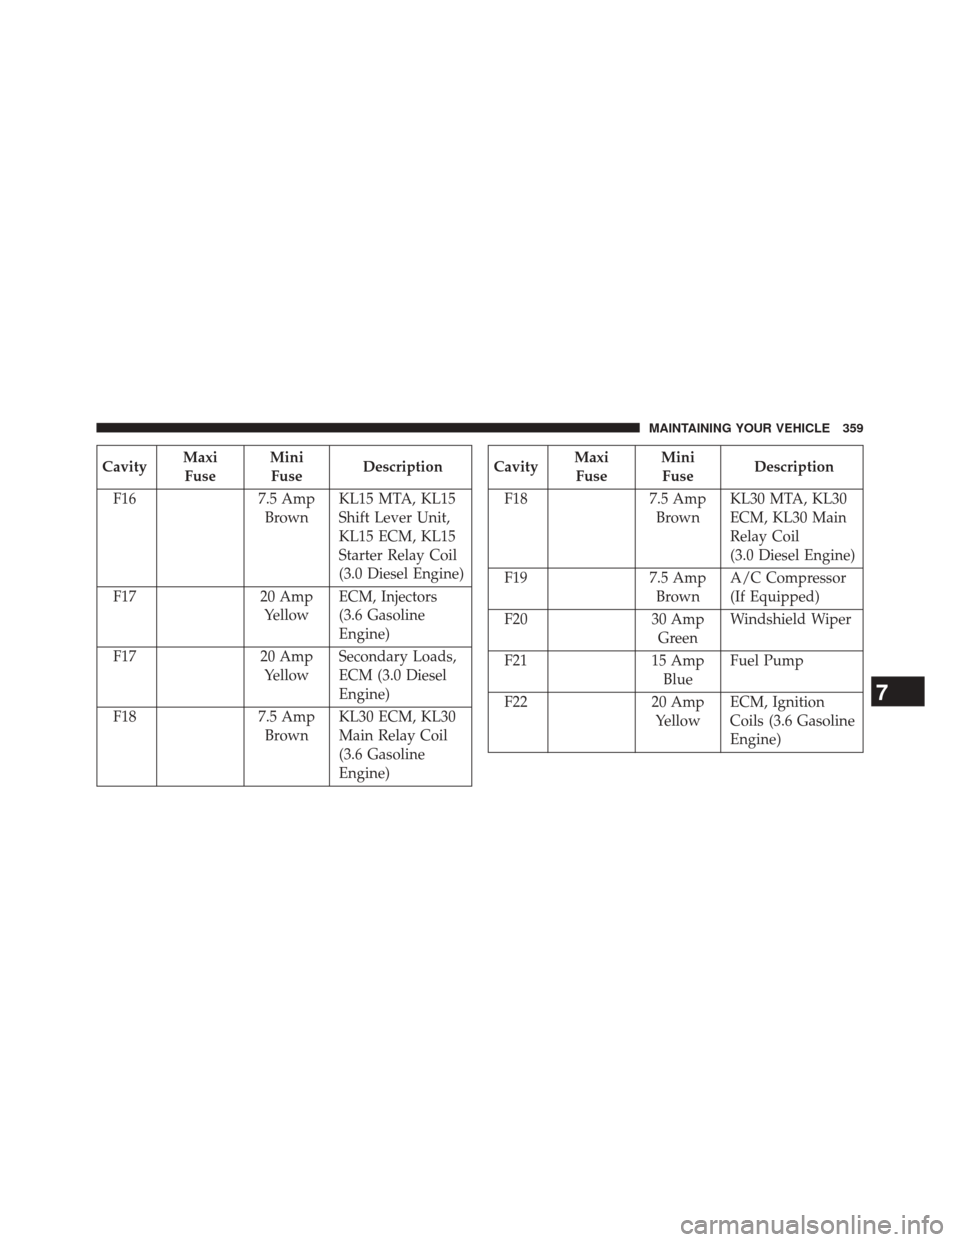
CavityMaxi
Fuse Mini
Fuse Description
F16 7.5 Amp BrownKL15 MTA, KL15
Shift Lever Unit,
KL15 ECM, KL15
Starter Relay Coil
(3.0 Diesel Engine)
F17 20 Amp YellowECM, Injectors
(3.6 Gasoline
Engine)
F17 20 Amp YellowSecondary Loads,
ECM (3.0 Diesel
Engine)
F18 7.5 Amp
Brown KL30 ECM, KL30
Main Relay Coil
(3.6 Gasoline
Engine)Cavity
Maxi
Fuse Mini
Fuse Description
F18 7.5 Amp BrownKL30 MTA, KL30
ECM, KL30 Main
Relay Coil
(3.0 Diesel Engine)
F19 7.5 Amp BrownA/C Compressor
(If Equipped)
F20 30 Amp GreenWindshield Wiper
F21 15 Amp BlueFuel Pump
F22 20 Amp YellowECM, Ignition
Coils (3.6 Gasoline
Engine)
7
MAINTAINING YOUR VEHICLE 359
Page 362 of 410
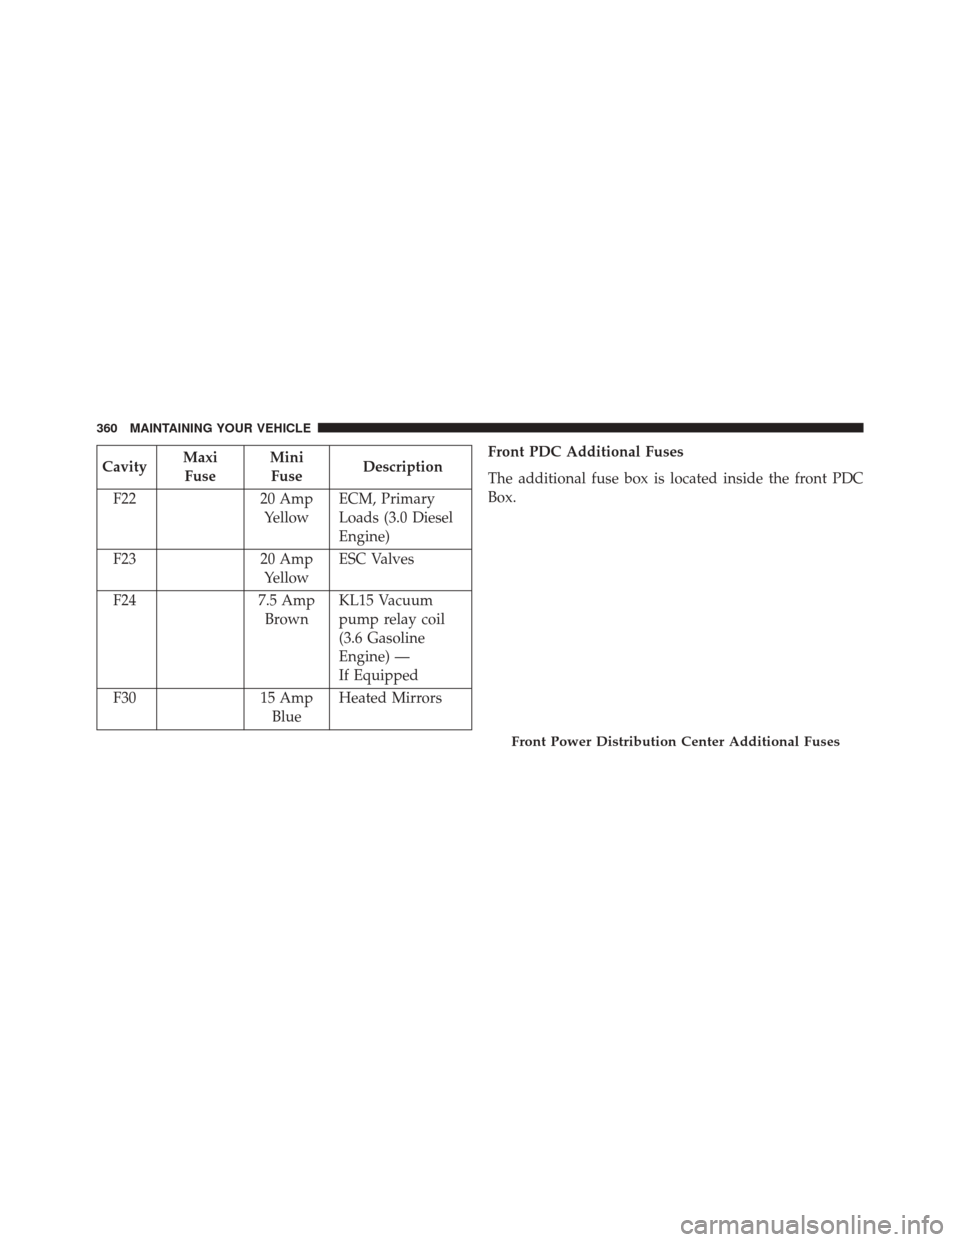
CavityMaxi
Fuse Mini
Fuse Description
F22 20 Amp YellowECM, Primary
Loads (3.0 Diesel
Engine)
F23 20 Amp
Yellow ESC Valves
F24 7.5 Amp
Brown KL15 Vacuum
pump relay coil
(3.6 Gasoline
Engine) —
If Equipped
F30 15 Amp
Blue Heated Mirrors Front PDC Additional Fuses
The additional fuse box is located inside the front PDC
Box.
Front Power Distribution Center Additional Fuses
360 MAINTAINING YOUR VEHICLE
Page 363 of 410
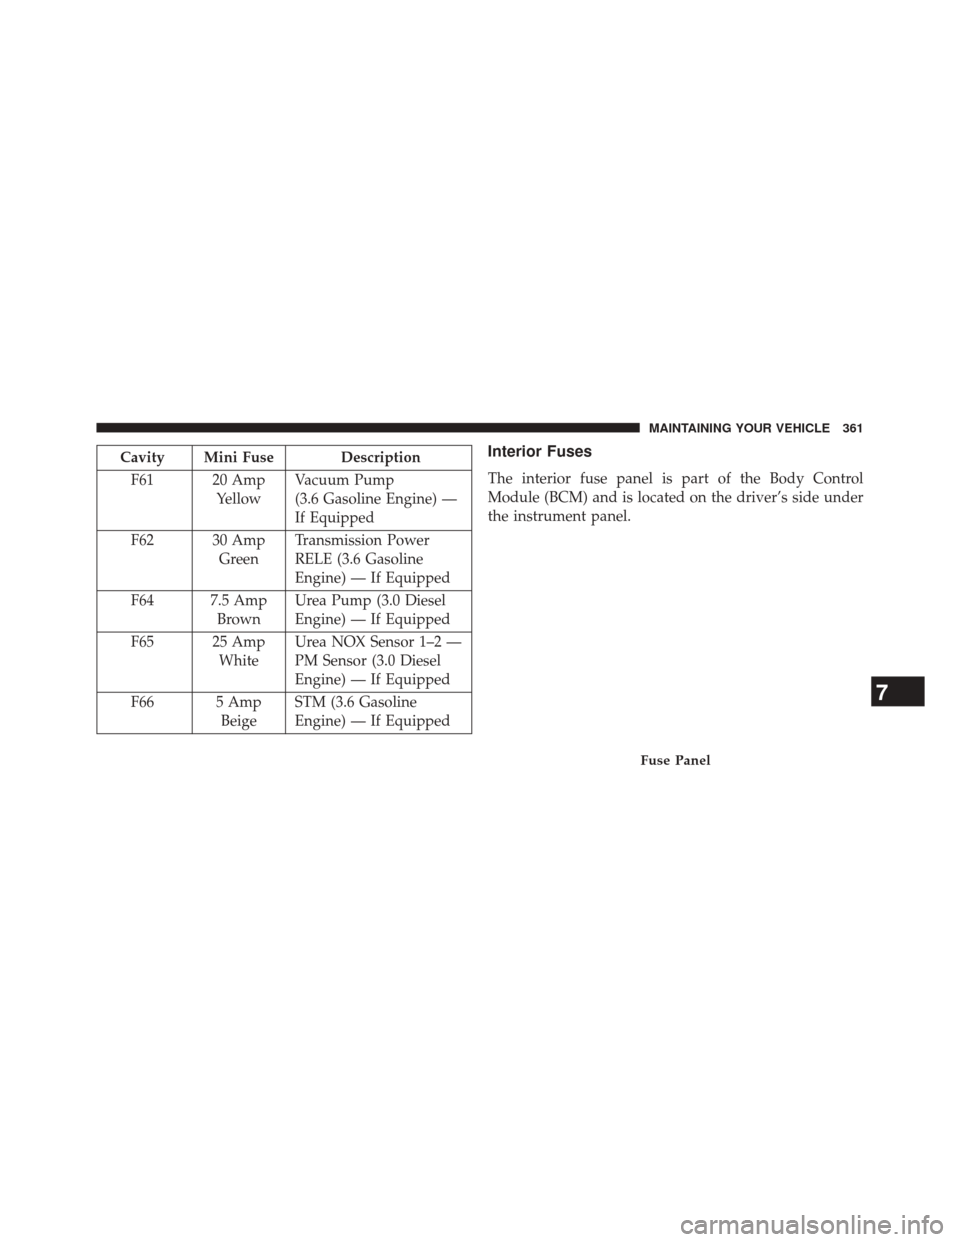
Cavity Mini Fuse DescriptionF61 20 Amp YellowVacuum Pump
(3.6 Gasoline Engine) —
If Equipped
F62 30 Amp GreenTransmission Power
RELE (3.6 Gasoline
Engine) — If Equipped
F64 7.5 Amp BrownUrea Pump (3.0 Diesel
Engine) — If Equipped
F65 25 Amp WhiteUrea NOX Sensor 1–2 —
PM Sensor (3.0 Diesel
Engine) — If Equipped
F66 5 Amp BeigeSTM (3.6 Gasoline
Engine) — If EquippedInterior Fuses
The interior fuse panel is part of the Body Control
Module (BCM) and is located on the driver’s side under
the instrument panel.
Fuse Panel
7
MAINTAINING YOUR VEHICLE 361
Page 364 of 410
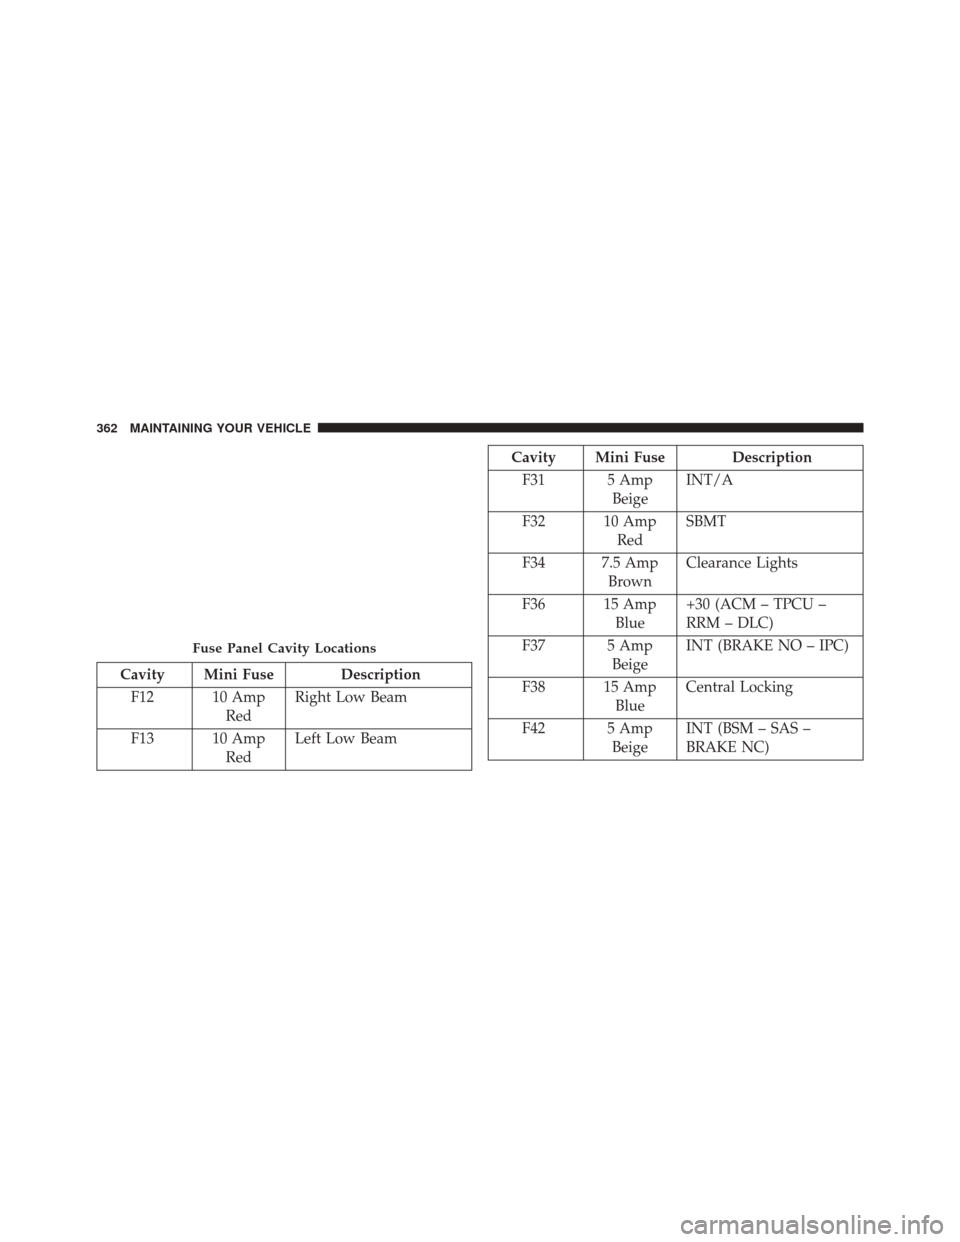
Cavity Mini Fuse DescriptionF12 10 Amp RedRight Low Beam
F13 10 Amp RedLeft Low Beam
Cavity Mini Fuse Description
F31 5 Amp BeigeINT/A
F32 10 Amp RedSBMT
F34 7.5 Amp BrownClearance Lights
F36 15 Amp Blue+30 (ACM – TPCU –
RRM – DLC)
F37 5 Amp BeigeINT (BRAKE NO – IPC)
F38 15 Amp BlueCentral Locking
F42 5 Amp BeigeINT (BSM – SAS –
BRAKE NC)
Fuse Panel Cavity Locations
362 MAINTAINING YOUR VEHICLE
Page 365 of 410
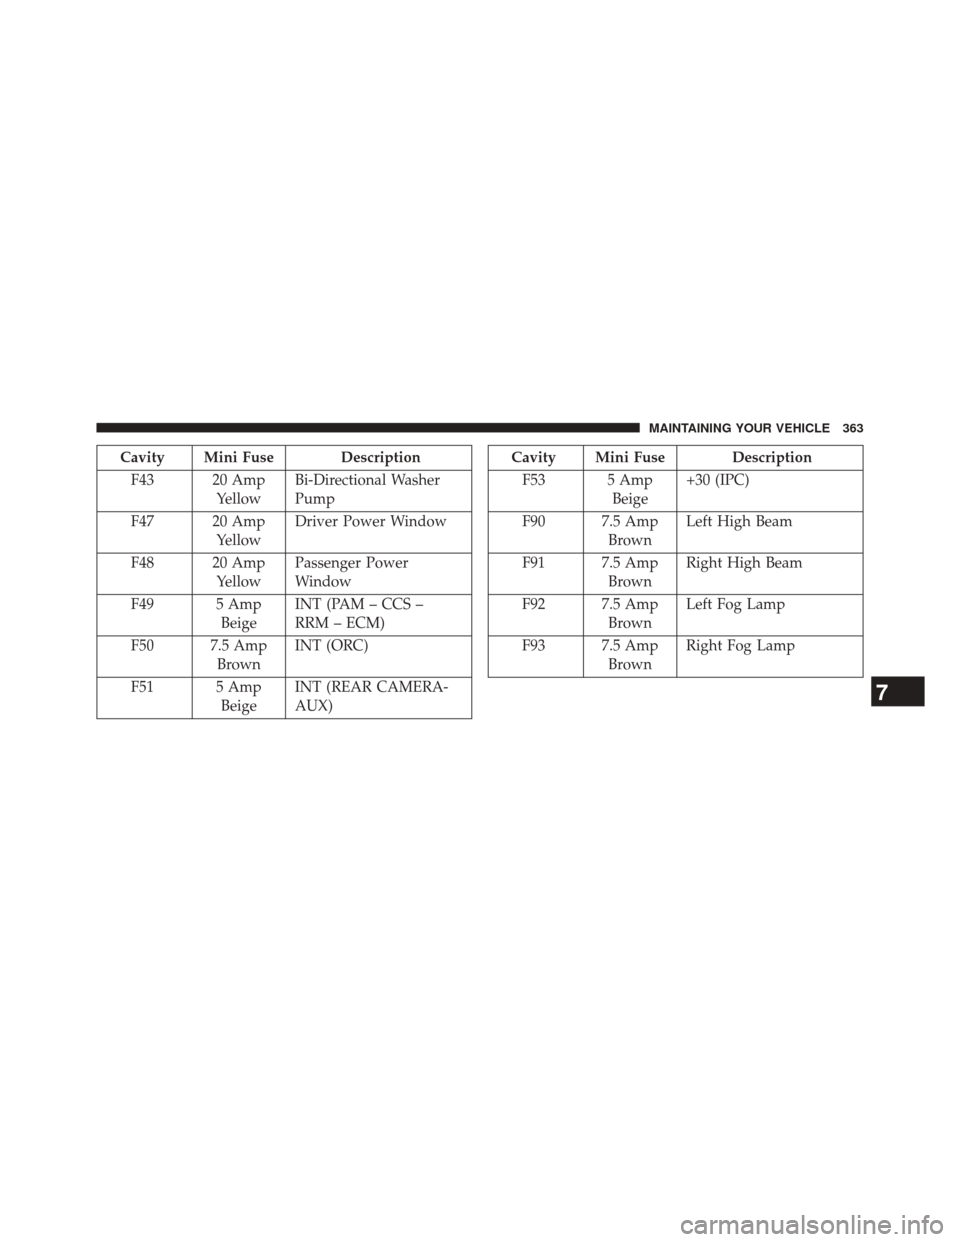
Cavity Mini Fuse DescriptionF43 20 Amp YellowBi-Directional Washer
Pump
F47 20 Amp YellowDriver Power Window
F48 20 Amp YellowPassenger Power
Window
F49 5 Amp BeigeINT (PAM – CCS –
RRM – ECM)
F50 7.5 Amp BrownINT (ORC)
F51 5 Amp BeigeINT (REAR CAMERA-
AUX)Cavity Mini Fuse Description
F53 5 Amp Beige+30 (IPC)
F90 7.5 Amp BrownLeft High Beam
F91 7.5 Amp BrownRight High Beam
F92 7.5 Amp BrownLeft Fog Lamp
F93 7.5 Amp BrownRight Fog Lamp
7
MAINTAINING YOUR VEHICLE 363
Page 366 of 410
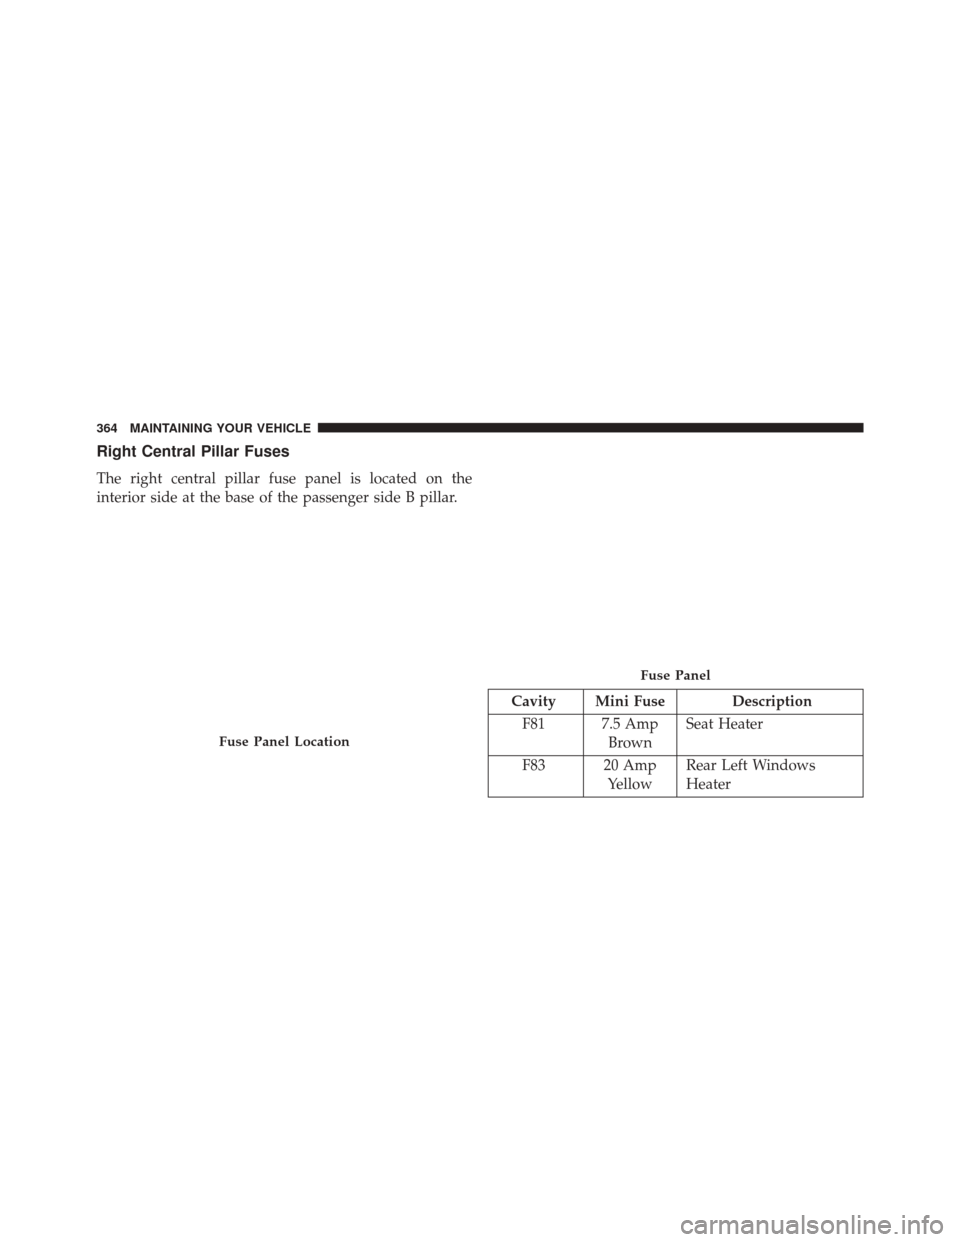
Right Central Pillar Fuses
The right central pillar fuse panel is located on the
interior side at the base of the passenger side B pillar.
Cavity Mini Fuse DescriptionF81 7.5 Amp BrownSeat Heater
F83 20 Amp YellowRear Left Windows
Heater
Fuse Panel Location
Fuse Panel
364 MAINTAINING YOUR VEHICLE
Page 367 of 410
Cavity Mini Fuse DescriptionF84 20 Amp YellowRear Right Windows
Heater
F85 10 Amp RedRear Heater Prep
VEHICLE STORAGE
If you are leaving your vehicle dormant for more than 21
days, you may want to take these steps to protect your
battery.
•
Disconnect the negative cable from the battery.
• Anytime you store your vehicle, or keep it out of
service (e.g., vacation) for two weeks or more, run the
air conditioning system at idle for about five minutes
in the fresh air and high blower setting. This will
ensure adequate system lubrication to minimize the
possibility of compressor damage when the system is
started again.
REPLACEMENT BULBS
Interior Bulbs
Bulb Number
Overhead Lamp C5W
Sun Visors C5W
Courtesy Lamp FF500
Glove Compartment C5W
Rear Courtesy Lamp C5W
Exterior Bulbs
Bulb Number
Front Low and High Beam
Headlamp H7LL
Front Park/Turn Signal Lamps 7444NA
Daytime Running Lamps
(if equipped) 74407
MAINTAINING YOUR VEHICLE 365
Page 368 of 410

Bulb Number
Front Side Marker Lamps WY5W
Rear Tail/Stop Lamps 7443
Rear Turn Signal Lamps 7440NA
Rear Backup Lamps 921
Rear Side Marker Lamps W3W
Front Fog Lamps H11
License Plate Lamps C5W
Front Roof Lamps WY5W
Rear Roof Lamps W3W
NOTE:
•Numbers refer to commercial bulb types that can
be purchased from your authorized dealer.
•If a bulb needs to be replaced, visit your autho-
rized dealer.
BULB REPLACEMENT
NOTE: Lens fogging can occur under certain atmo-
spheric conditions. This will usually clear as atmospheric
conditions change to allow the condensation to change
back into a vapor. Turning the lamps on will usually
accelerate the clearing process.
Headlamps Low beam and High beam
NOTE: Passenger side headlamp must be removed for
bulb replacement, for driver side headlamp go to step 6
through step 12.
1. Remove screw (1) on lower headlamp filler panel.
2. Remove screws (2) on upper headlamp filler panel.
3. Remove upper screw (1) from headlamp housing.
4. Remove lower screws (2) from headlamp housing.
366 MAINTAINING YOUR VEHICLE
Page 369 of 410

5. Pull Headlamp forward.
6. Remove appropriate plastic cap from the back of theheadlamp housing.
7. Push down on the upper portion of the socket.
8. Pull the socket outward from reflector.
9. Pull bulb outward from socket.
10. Install new bulb.
11. Push socket back into reflector until it locks back into place.
12. Install access cap.
13. Carefully re install headlamp in the same position on the vehicle, so as not to affect headlamp aiming.
14. Install upper screw (1) on headlamp housing. 15. Install lower screws (2) on headlamp housing.
16. Carefully re install screw (1) on lower headlamp filler
panel.
17. Carefully re install screws (2) on upper headlamp filler panel.
Front Turn Signal/Parking Lamps
NOTE: Passenger side headlamp must be removed for
bulb replacement, for driver side headlamp go to step 6
through step 7.
1. Remove screw (1) on lower headlamp filler panel.
2. Remove screws (2) on upper headlamp filler panel.
3. Remove upper screw (1) from headlamp housing.
7
MAINTAINING YOUR VEHICLE 367
Page 370 of 410

4. Remove lower screws (2) from headlamp housing.
5. Pull Headlamp forward.
6. Rotate the bulb counter clockwise and remove.
7. Install the bulb into socket, and rotate bulb/socketclockwise into lamp locking it in place.
8. Carefully re install headlamp in the same position on the vehicle, so as not to affect headlamp aiming.
9. Install upper screw (1) on headlamp housing.
10. Install lower screws (2) on headlamp housing.
11. Carefully re install screw (1) on lower headlamp filler panel.
12. Carefully re install screws (2) on upper headlamp filler panel.Daytime Running Lamp (DRL)/Front Side Marker
Lamp
NOTE: Passenger side headlamp must be removed for
bulb replacement, for driver side headlamp go to step 6
through step 8.
1. Remove screw (1) on lower headlamp filler panel.
2. Remove screws (2) on upper headlamp filler panel.
3. Remove upper screw (1) from headlamp housing.
4. Remove lower screws (2) from headlamp housing.
5. Pull Headlamp forward.
6. Remove the DRL, side marker bulb by pulling straight out.
7. Replace lamp as required and lock in place.
8. Reinstall plastic cap.
368 MAINTAINING YOUR VEHICLE
Trending: brakes, climate settings, width, length, windshield wipers, jump start terminals, automatic transmission fluid
