Ram ProMaster 2016 Owner's Manual
Manufacturer: RAM, Model Year: 2016, Model line: ProMaster, Model: Ram ProMaster 2016Pages: 448, PDF Size: 3.28 MB
Page 401 of 448
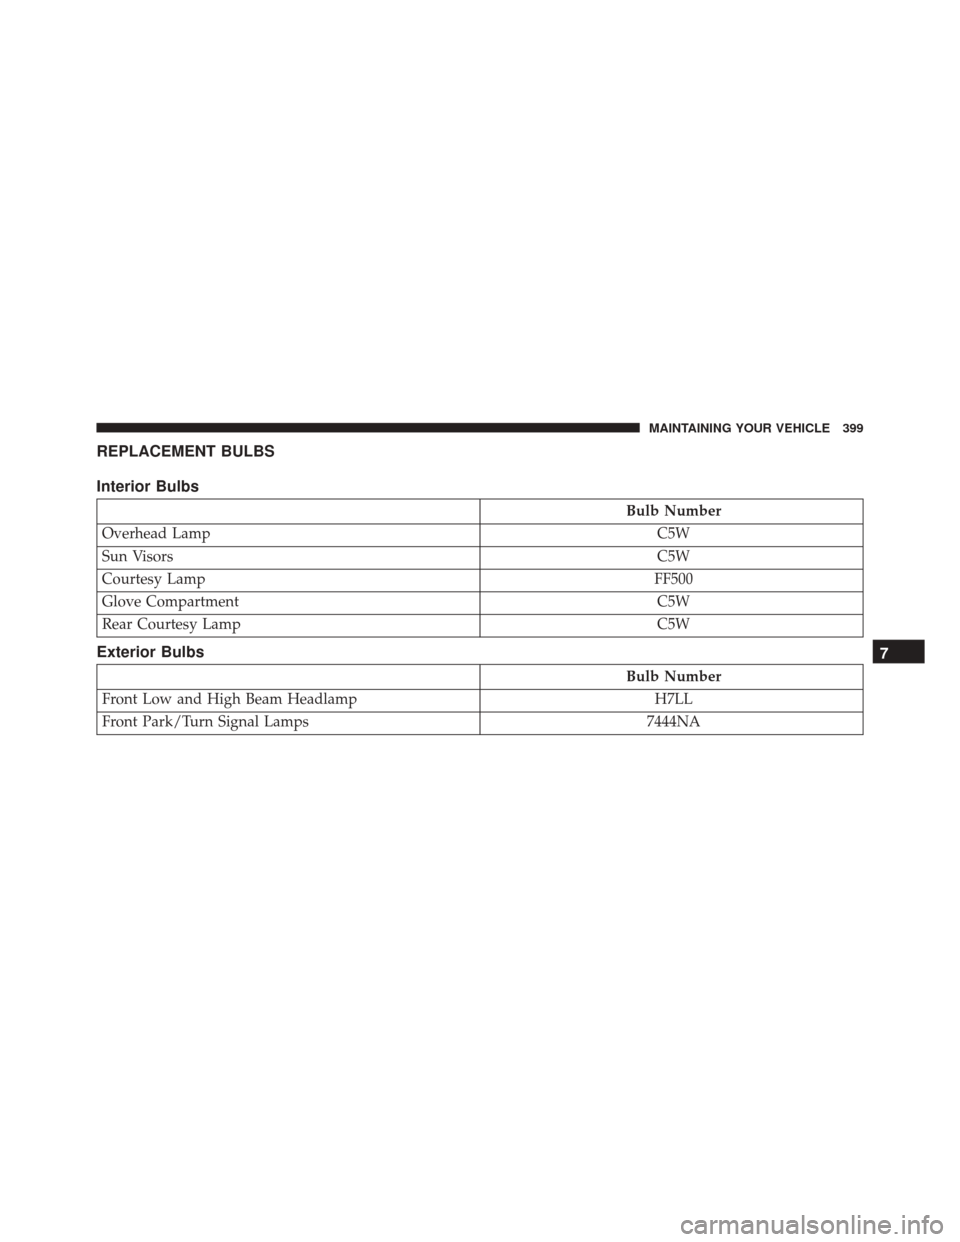
REPLACEMENT BULBS
Interior Bulbs
Bulb Number
Overhead Lamp C5W
Sun Visors C5W
Courtesy Lamp FF500
Glove Compartment C5W
Rear Courtesy Lamp C5W
Exterior Bulbs
Bulb Number
Front Low and High Beam Headlamp H7LL
Front Park/Turn Signal Lamps 7444NA
7
MAINTAINING YOUR VEHICLE 399
Page 402 of 448

Bulb Number
Daytime Running Lamps (If Equipped) 7440
Front Side Marker Lamps WY5W
Rear Tail/Stop Lamps 7443
Rear Turn Signal Lamps 7440NA
Rear Backup Lamps 921
Rear Side Marker Lamps W3W
Front Fog Lamps H11
License Plate Lamps C5W
Front Roof Lamps WY5W
Rear Roof Lamps W3W
NOTE:
•Numbers refer to commercial bulb types that can be purchased from your authorized dealer.
•If a bulb needs to be replaced, visit your authorized dealer.
400 MAINTAINING YOUR VEHICLE
Page 403 of 448
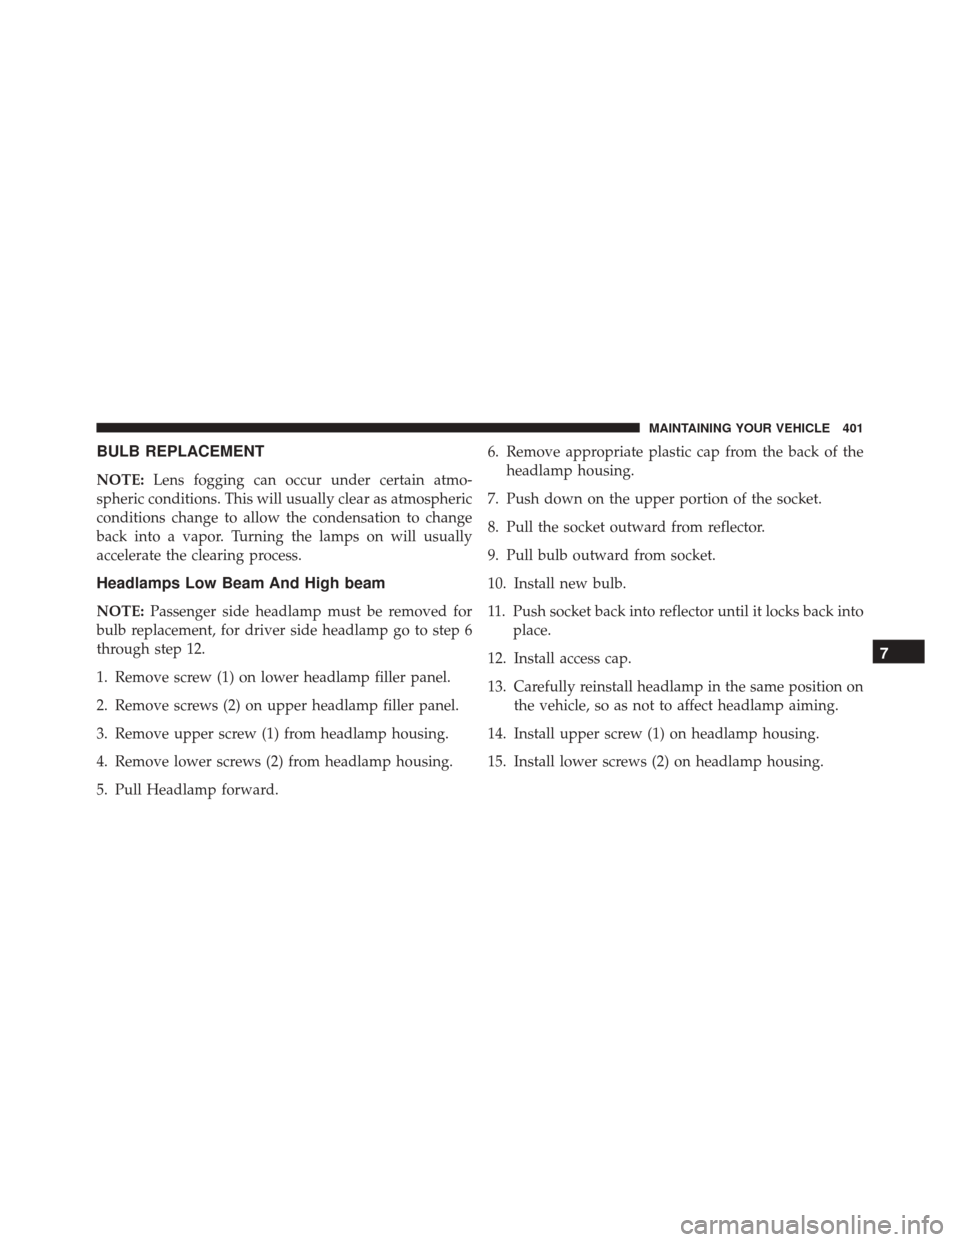
BULB REPLACEMENT
NOTE:Lens fogging can occur under certain atmo-
spheric conditions. This will usually clear as atmospheric
conditions change to allow the condensation to change
back into a vapor. Turning the lamps on will usually
accelerate the clearing process.
Headlamps Low Beam And High beam
NOTE: Passenger side headlamp must be removed for
bulb replacement, for driver side headlamp go to step 6
through step 12.
1. Remove screw (1) on lower headlamp filler panel.
2. Remove screws (2) on upper headlamp filler panel.
3. Remove upper screw (1) from headlamp housing.
4. Remove lower screws (2) from headlamp housing.
5. Pull Headlamp forward. 6. Remove appropriate plastic cap from the back of the
headlamp housing.
7. Push down on the upper portion of the socket.
8. Pull the socket outward from reflector.
9. Pull bulb outward from socket.
10. Install new bulb.
11. Push socket back into reflector until it locks back into place.
12. Install access cap.
13. Carefully reinstall headlamp in the same position on the vehicle, so as not to affect headlamp aiming.
14. Install upper screw (1) on headlamp housing.
15. Install lower screws (2) on headlamp housing.
7
MAINTAINING YOUR VEHICLE 401
Page 404 of 448
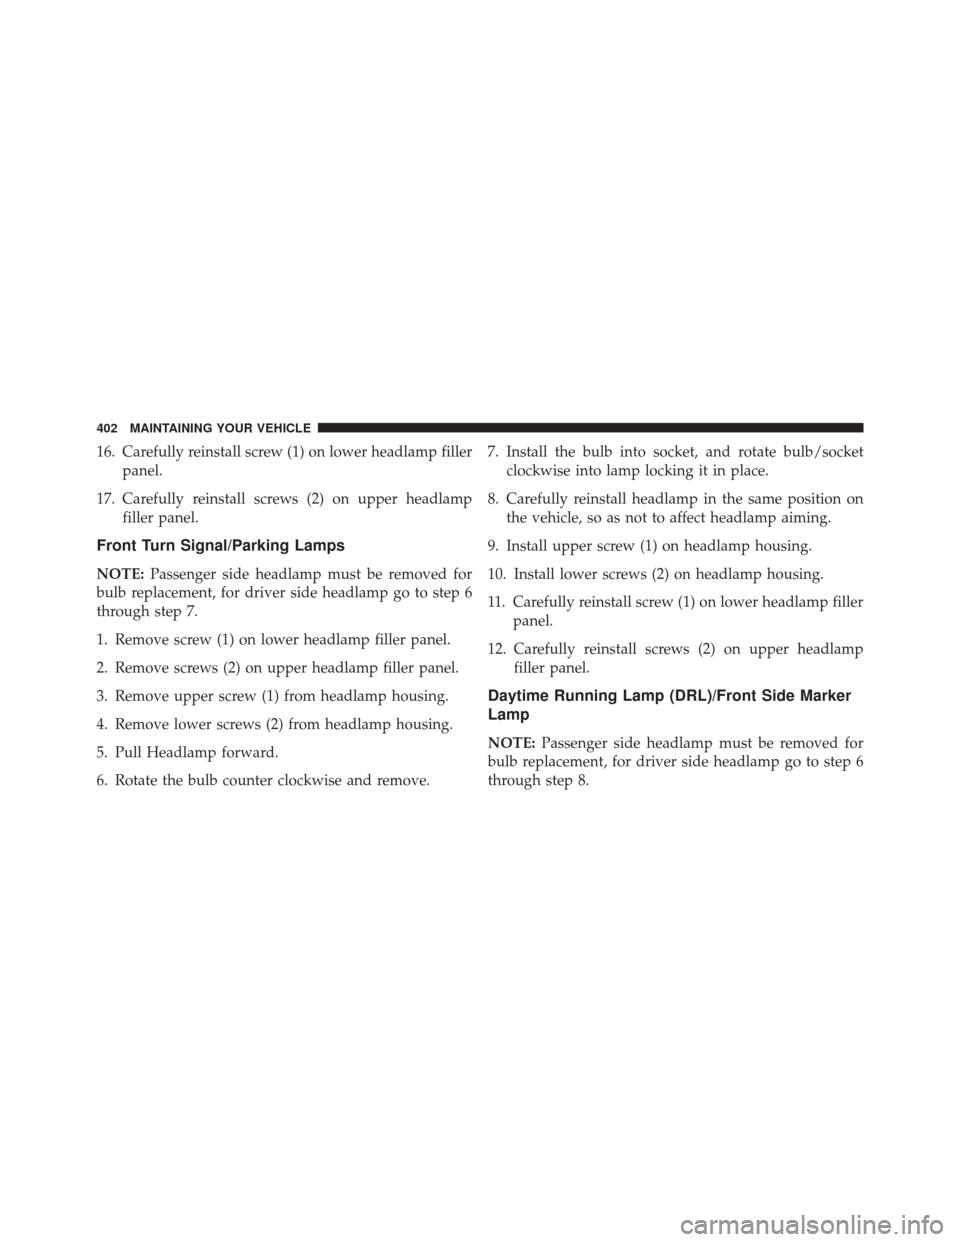
16. Carefully reinstall screw (1) on lower headlamp fillerpanel.
17. Carefully reinstall screws (2) on upper headlamp filler panel.
Front Turn Signal/Parking Lamps
NOTE: Passenger side headlamp must be removed for
bulb replacement, for driver side headlamp go to step 6
through step 7.
1. Remove screw (1) on lower headlamp filler panel.
2. Remove screws (2) on upper headlamp filler panel.
3. Remove upper screw (1) from headlamp housing.
4. Remove lower screws (2) from headlamp housing.
5. Pull Headlamp forward.
6. Rotate the bulb counter clockwise and remove. 7. Install the bulb into socket, and rotate bulb/socket
clockwise into lamp locking it in place.
8. Carefully reinstall headlamp in the same position on the vehicle, so as not to affect headlamp aiming.
9. Install upper screw (1) on headlamp housing.
10. Install lower screws (2) on headlamp housing.
11. Carefully reinstall screw (1) on lower headlamp filler panel.
12. Carefully reinstall screws (2) on upper headlamp filler panel.
Daytime Running Lamp (DRL)/Front Side Marker
Lamp
NOTE: Passenger side headlamp must be removed for
bulb replacement, for driver side headlamp go to step 6
through step 8.
402 MAINTAINING YOUR VEHICLE
Page 405 of 448
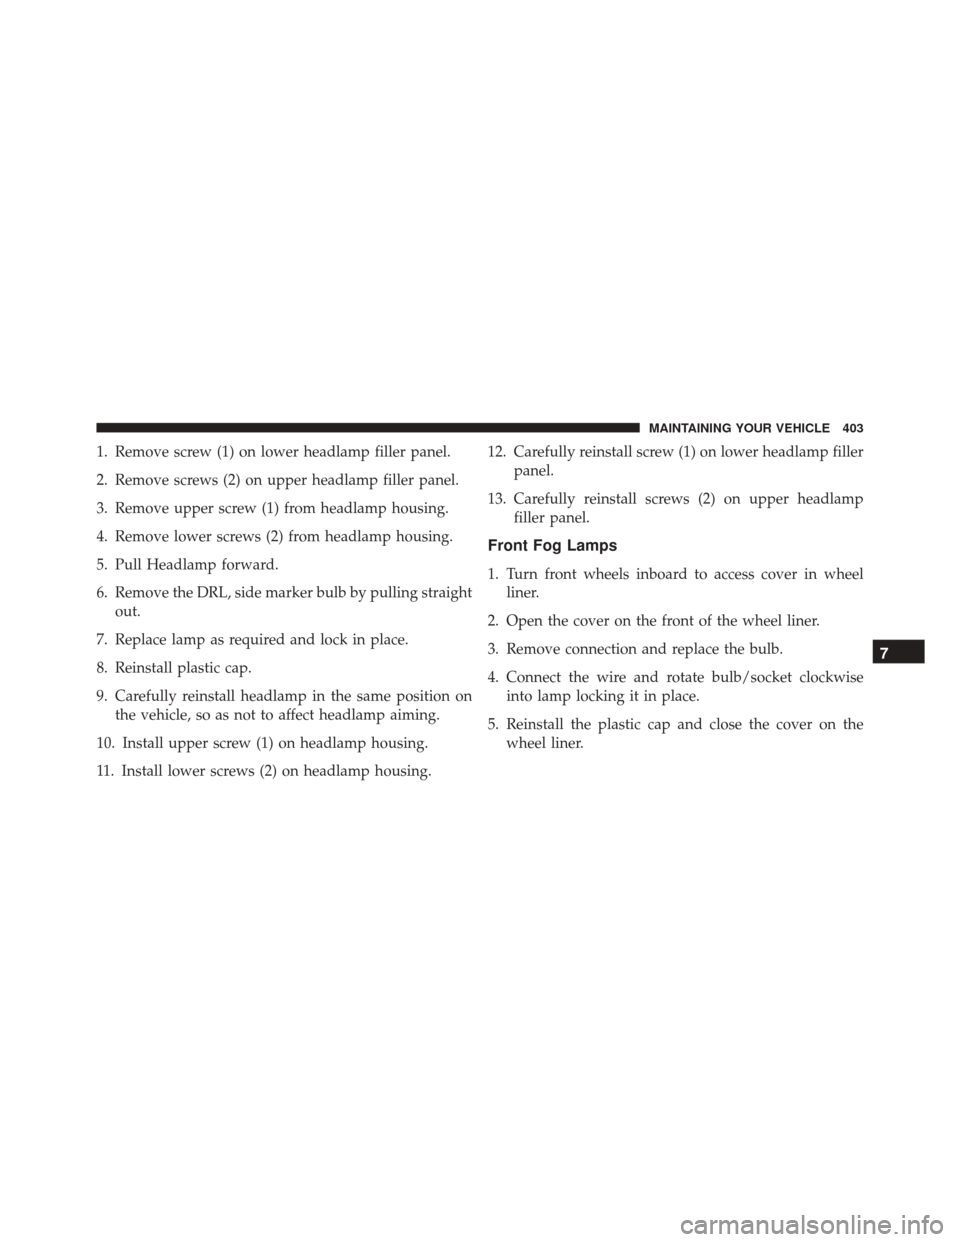
1. Remove screw (1) on lower headlamp filler panel.
2. Remove screws (2) on upper headlamp filler panel.
3. Remove upper screw (1) from headlamp housing.
4. Remove lower screws (2) from headlamp housing.
5. Pull Headlamp forward.
6. Remove the DRL, side marker bulb by pulling straightout.
7. Replace lamp as required and lock in place.
8. Reinstall plastic cap.
9. Carefully reinstall headlamp in the same position on the vehicle, so as not to affect headlamp aiming.
10. Install upper screw (1) on headlamp housing.
11. Install lower screws (2) on headlamp housing. 12. Carefully reinstall screw (1) on lower headlamp filler
panel.
13. Carefully reinstall screws (2) on upper headlamp filler panel.
Front Fog Lamps
1. Turn front wheels inboard to access cover in wheelliner.
2. Open the cover on the front of the wheel liner.
3. Remove connection and replace the bulb.
4. Connect the wire and rotate bulb/socket clockwise into lamp locking it in place.
5. Reinstall the plastic cap and close the cover on the wheel liner.
7
MAINTAINING YOUR VEHICLE 403
Page 406 of 448

Front, Rear Roof Lamps
1. Remove two screw and remove the lamp assembly.
2. Remove the socket bulb by turning counterclockwise.
3. Remove bulb and replace as needed.
4. Reinstall the bulb socket and rotate clockwise to lockin place.
5. Reinstall lamp.
Rear Tail, Stop, Backup, Turn Signal And Rear
Side Marker Lamps
1. Open rear doors.
2. Remove the two screws and remove the tail lamp.
3. Remove the tail/stop, turn signal, backup and rear side marker bulb/socket by rotating counter-
clockwise.
4. Remove the bulb and replace as needed.
5. Reinstall bulb/socket and rotate clockwise to lock in place.
6. Reinstall lamp.
404 MAINTAINING YOUR VEHICLE
Page 407 of 448
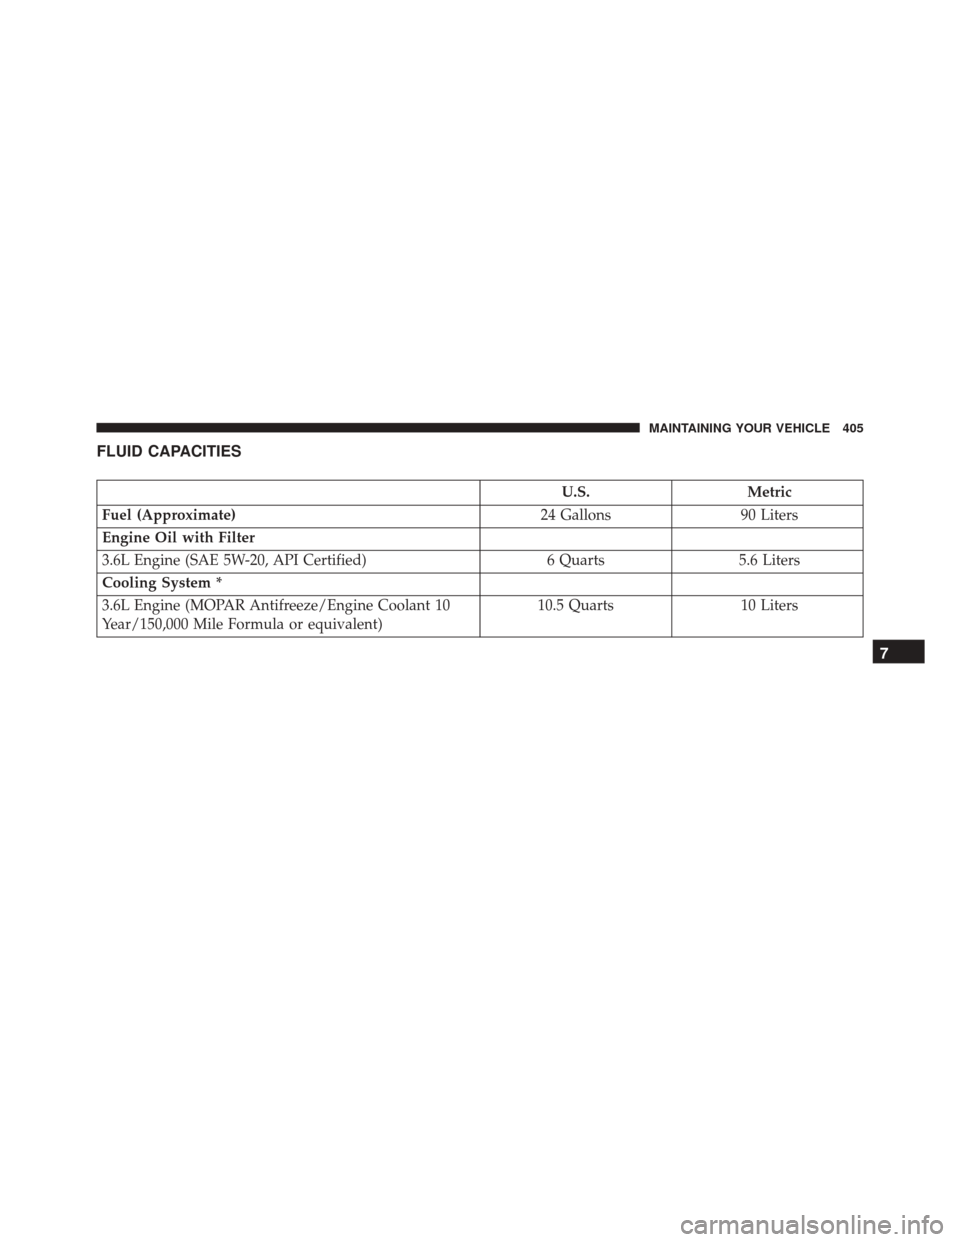
FLUID CAPACITIES
U.S.Metric
Fuel (Approximate) 24 Gallons90 Liters
Engine Oil with Filter
3.6L Engine (SAE 5W-20, API Certified) 6 Quarts5.6 Liters
Cooling System *
3.6L Engine (MOPAR Antifreeze/Engine Coolant 10
Year/150,000 Mile Formula or equivalent) 10.5 Quarts
10 Liters
7
MAINTAINING YOUR VEHICLE 405
Page 408 of 448
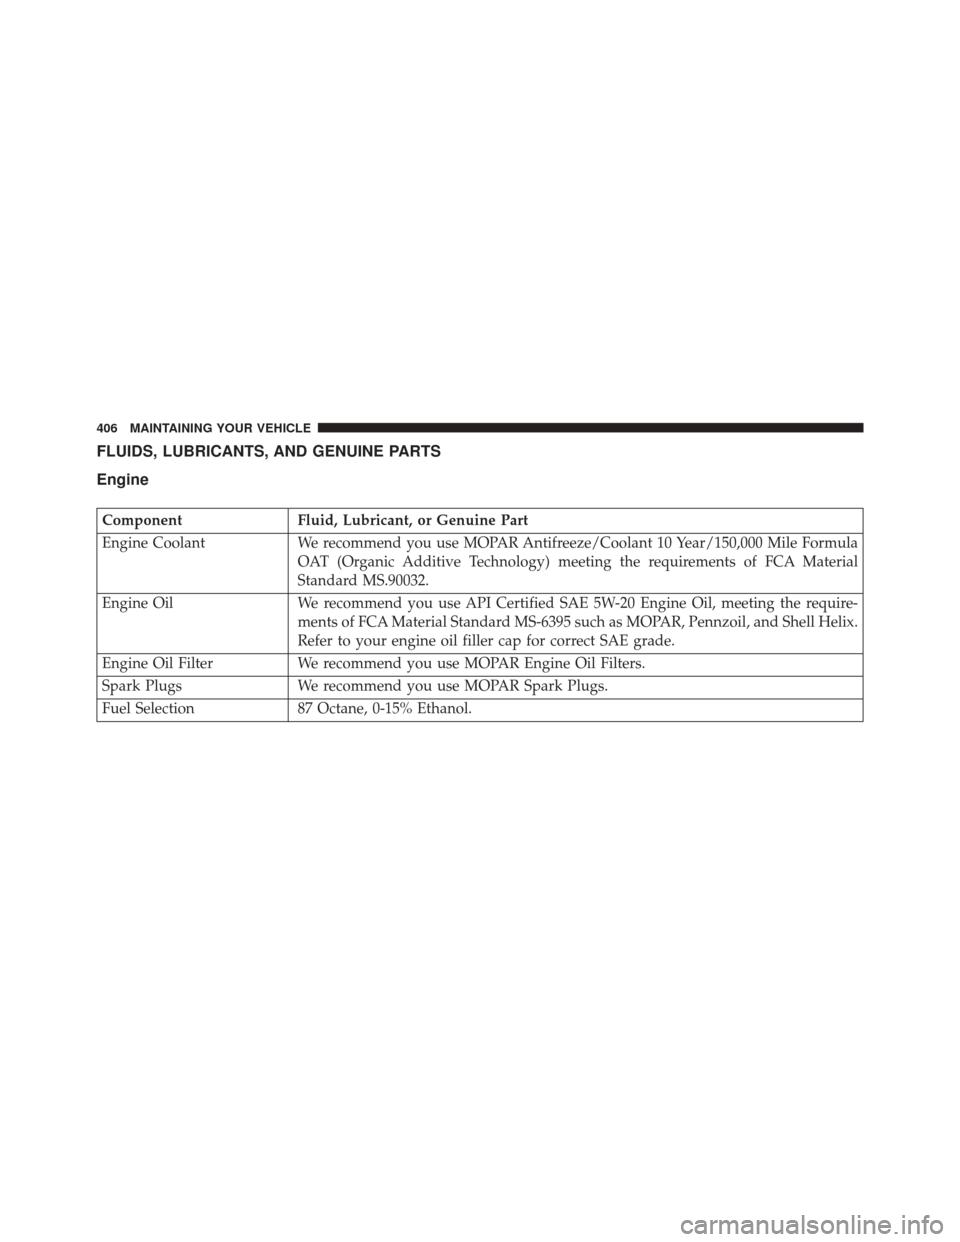
FLUIDS, LUBRICANTS, AND GENUINE PARTS
Engine
ComponentFluid, Lubricant, or Genuine Part
Engine Coolant We recommend you use MOPAR Antifreeze/Coolant 10 Year/150,000 Mile Formula
OAT (Organic Additive Technology) meeting the requirements of FCA Material
Standard MS.90032.
Engine Oil We recommend you use API Certified SAE 5W-20 Engine Oil, meeting the require-
ments of FCA Material Standard MS-6395 such as MOPAR, Pennzoil, and Shell Helix.
Refer to your engine oil filler cap for correct SAE grade.
Engine Oil Filter We recommend you use MOPAR Engine Oil Filters.
Spark Plugs We recommend you use MOPAR Spark Plugs.
Fuel Selection 87 Octane, 0-15% Ethanol.
406 MAINTAINING YOUR VEHICLE
Page 409 of 448

CAUTION!
•Mixing of engine coolant (antifreeze) other than
specified Organic Additive Technology (OAT) en-
gine coolant (antifreeze), may result in engine
damage and may decrease corrosion protection.
Organic Additive Technology (OAT) engine cool-
ant is different and should not be mixed with
Hybrid Organic Additive Technology (HOAT) en-
gine coolant (antifreeze) or any “globally compat-
ible” coolant (antifreeze). If a non-OAT engine
coolant (antifreeze) is introduced into the cooling
system in an emergency, the cooling system will
need to be drained, flushed, and refilled with fresh
OAT coolant (conforming to MS.90032), by an au-
thorized dealer as soon as possible.
(Continued)
CAUTION! (Continued)
•Do not use water alone or alcohol-based engine
coolant (antifreeze) products. Do not use additional
rust inhibitors or antirust products, as they may not
be compatible with the radiator engine coolant and
may plug the radiator.
• This vehicle has not been designed for use with
propylene glycol-based engine coolant (antifreeze).
Use of propylene glycol-based engine coolant (an-
tifreeze) is not recommended.
7
MAINTAINING YOUR VEHICLE 407
Page 410 of 448

Chassis
ComponentFluid, Lubricant, or Genuine Part
Automatic Transmission – 3.6L Gasoline Engine Only Use Only ATF+4 Automatic Transmission Fluid. Failure to use ATF+4 fluid may affect the function or perfor-
mance of your transmission. We recommend MOPAR
ATF+4 Fluid.
Brake Master Cylinder We recommend you use MOPAR DOT 4.
Power Steering Reservoir Use Pentosin CHF 11S power steering fluid meeting
FCA Material Standard MS-11655.
408 MAINTAINING YOUR VEHICLE