ignition Ram ProMaster 2020 Workshop Manual
[x] Cancel search | Manufacturer: RAM, Model Year: 2020, Model line: ProMaster, Model: Ram ProMaster 2020Pages: 264, PDF Size: 10.11 MB
Page 162 of 264
160SERVICING AND MAINTENANCE
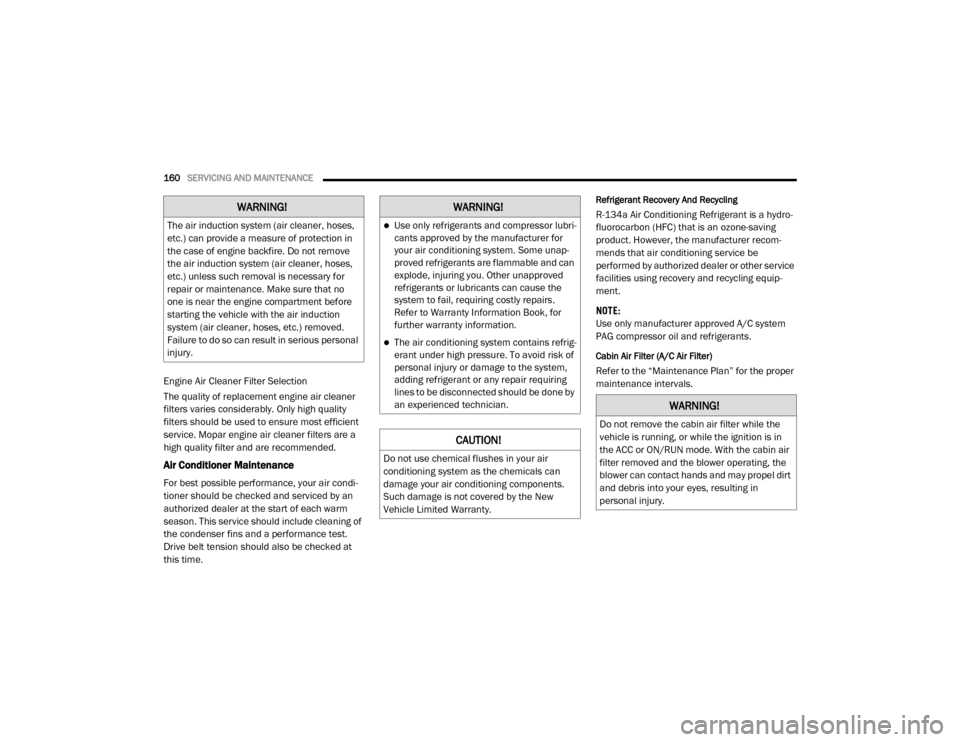
Engine Air Cleaner Filter Selection
The quality of replacement engine air cleaner
filters varies considerably. Only high quality
filters should be used to ensure most efficient
service. Mopar engine air cleaner filters are a
high quality filter and are recommended.
Air Conditioner Maintenance
For best possible performance, your air condi -
tioner should be checked and serviced by an
authorized dealer at the start of each warm
season. This service should include cleaning of
the condenser fins and a performance test.
Drive belt tension should also be checked at
this time.
Refrigerant Recovery And Recycling
R-134a Air Conditioning Refrigerant is a hydro -
fluorocarbon (HFC) that is an ozone-saving
product. However, the manufacturer recom -
mends that air conditioning service be
performed by authorized dealer or other service
facilities using recovery and recycling equip -
ment.
NOTE:
Use only manufacturer approved A/C system
PAG compressor oil and refrigerants.
Cabin Air Filter (A/C Air Filter)
Refer to the “Maintenance Plan” for the proper
maintenance intervals.
WARNING!
The air induction system (air cleaner, hoses,
etc.) can provide a measure of protection in
the case of engine backfire. Do not remove
the air induction system (air cleaner, hoses,
etc.) unless such removal is necessary for
repair or maintenance. Make sure that no
one is near the engine compartment before
starting the vehicle with the air induction
system (air cleaner, hoses, etc.) removed.
Failure to do so can result in serious personal
injury.
WARNING!
Use only refrigerants and compressor lubri -
cants approved by the manufacturer for
your air conditioning system. Some unap -
proved refrigerants are flammable and can
explode, injuring you. Other unapproved
refrigerants or lubricants can cause the
system to fail, requiring costly repairs.
Refer to Warranty Information Book, for
further warranty information.
The air conditioning system contains refrig -
erant under high pressure. To avoid risk of
personal injury or damage to the system,
adding refrigerant or any repair requiring
lines to be disconnected should be done by
an experienced technician.
CAUTION!
Do not use chemical flushes in your air
conditioning system as the chemicals can
damage your air conditioning components.
Such damage is not covered by the New
Vehicle Limited Warranty.
WARNING!
Do not remove the cabin air filter while the
vehicle is running, or while the ignition is in
the ACC or ON/RUN mode. With the cabin air
filter removed and the blower operating, the
blower can contact hands and may propel dirt
and debris into your eyes, resulting in
personal injury.
20_VF_OM_EN_US_t.book Page 160
Page 165 of 264
SERVICING AND MAINTENANCE163
Under normal operating conditions, the cata-
lytic converter will not require maintenance.
However, it is important to keep the engine
properly tuned to ensure proper catalyst opera -
tion and prevent possible catalyst damage.
NOTE:
Intentional tampering with emissions control
systems can result in civil penalties being
assessed against you.
In unusual situations involving grossly malfunc -
tioning engine operation, a scorching odor may
suggest severe and abnormal catalyst over -
heating. If this occurs, stop the vehicle, turn off
the engine and allow it to cool. Service,
including a tune-up to manufacturer's specifica-
tions, should be obtained immediately.
To minimize the possibility of catalytic converter
damage:
Do not interrupt the ignition when the trans -
mission is in gear and the vehicle is in
motion.
Do not try to start the vehicle by pushing or
towing the vehicle.
Do not idle the engine with any ignition
components disconnected or removed, such
as when diagnostic testing, or for prolonged
periods during very rough idle or malfunc -
tioning operating conditions.
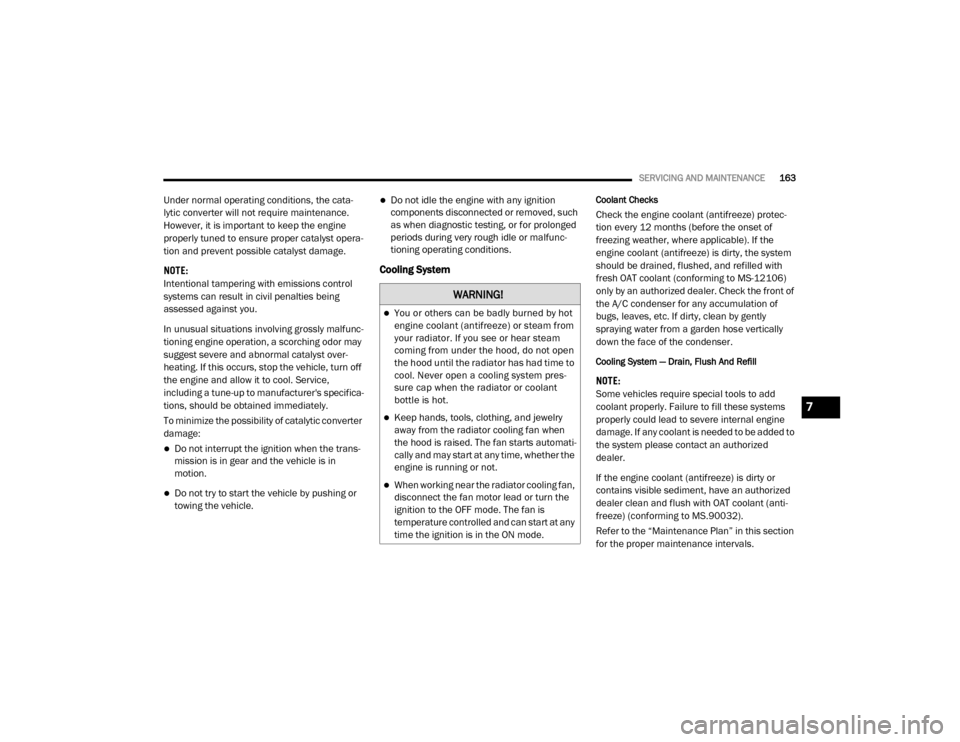
Cooling System
Coolant Checks
Check the engine coolant (antifreeze) protec-
tion every 12 months (before the onset of
freezing weather, where applicable). If the
engine coolant (antifreeze) is dirty, the system
should be drained, flushed, and refilled with
fresh OAT coolant (conforming to MS-12106)
only by an authorized dealer. Check the front of
the A/C condenser for any accumulation of
bugs, leaves, etc. If dirty, clean by gently
spraying water from a garden hose vertically
down the face of the condenser.
Cooling System — Drain, Flush And Refill
NOTE:
Some vehicles require special tools to add
coolant properly. Failure to fill these systems
properly could lead to severe internal engine
damage. If any coolant is needed to be added to
the system please contact an authorized
dealer.
If the engine coolant (antifreeze) is dirty or
contains visible sediment, have an authorized
dealer clean and flush with OAT coolant (anti -
freeze) (conforming to MS.90032).
Refer to the “Maintenance Plan” in this section
for the proper maintenance intervals.
WARNING!
You or others can be badly burned by hot
engine coolant (antifreeze) or steam from
your radiator. If you see or hear steam
coming from under the hood, do not open
the hood until the radiator has had time to
cool. Never open a cooling system pres -
sure cap when the radiator or coolant
bottle is hot.
Keep hands, tools, clothing, and jewelry
away from the radiator cooling fan when
the hood is raised. The fan starts automati -
cally and may start at any time, whether the
engine is running or not.
When working near the radiator cooling fan,
disconnect the fan motor lead or turn the
ignition to the OFF mode. The fan is
temperature controlled and can start at any
time the ignition is in the ON mode.
7
20_VF_OM_EN_US_t.book Page 163
Page 204 of 264
202MULTIMEDIA
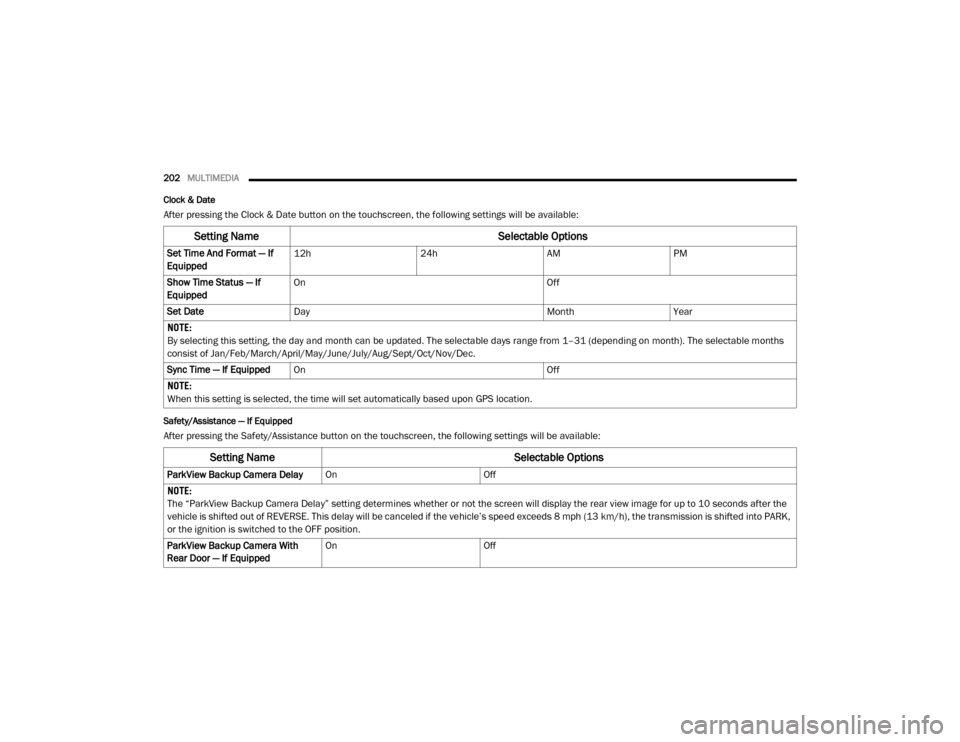
Clock & Date
After pressing the Clock & Date button on the touchscreen, the following settings will be available:
Safety/Assistance — If Equipped
After pressing the Safety/Assistance button on the touchscreen, the following settings will be available:
Setting Name Selectable Options
Set Time And Format — If
Equipped12h
24hAMPM
Show Time Status — If
Equipped On
Off
Set Date Day MonthYear
NOTE:
By selecting this setting, the day and month can be updated. The selectable days range from 1–31 (depending on month). The selectable months
consist of Jan/Feb/March/April/May/June/July/Aug/Sept/Oct/Nov/Dec.
Sync Time — If Equipped On Off
NOTE:
When this setting is selected, the time will set automatically based upon GPS location.
Setting Name Selectable Options
ParkView Backup Camera DelayOnOff
NOTE:
The “ParkView Backup Camera Delay” setting determines whether or not the screen will display the rear view image for up to 10 seconds after the
vehicle is shifted out of REVERSE. This delay will be canceled if the vehicle’s speed exceeds 8 mph (13 km/h), the transmission is shifted into PARK,
or the ignition is switched to the OFF position.
ParkView Backup Camera With
Rear Door — If Equipped On
Off
20_VF_OM_EN_US_t.book Page 202
Page 206 of 264
204MULTIMEDIA
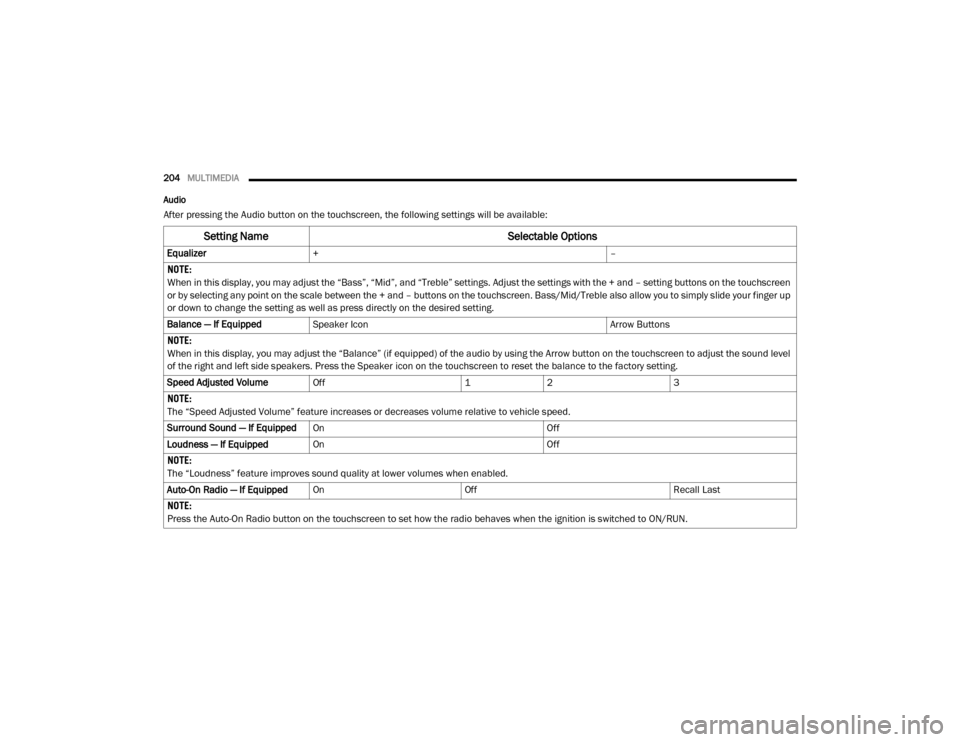
Audio
After pressing the Audio button on the touchscreen, the following settings will be available:
Setting Name Selectable Options
Equalizer+ –
NOTE:
When in this display, you may adjust the “Bass”, “Mid”, and “Treble” settings. Adjust the settings with the + and – setting buttons on the touchscreen
or by selecting any point on the scale between the + and – buttons on the touchscreen. Bass/Mid/Treble also allow you to simply slide your finger up
or down to change the setting as well as press directly on the desired setting.
Balance — If Equipped Speaker Icon Arrow Buttons
NOTE:
When in this display, you may adjust the “Balance” (if equipped) of the audio by using the Arrow button on the touchscreen to adjust the sound level
of the right and left side speakers. Press the Speaker icon on the touchscreen to reset the balance to the factory setting.
Speed Adjusted Volume Off 12 3
NOTE:
The “Speed Adjusted Volume” feature increases or decreases volume relative to vehicle speed.
Surround Sound — If Equipped On Off
Loudness — If Equipped On Off
NOTE:
The “Loudness” feature improves sound quality at lower volumes when enabled.
Auto-On Radio — If Equipped On Off Recall Last
NOTE:
Press the Auto-On Radio button on the touchscreen to set how the radio behaves when the ignition is switched to ON/RUN.
20_VF_OM_EN_US_t.book Page 204
Page 216 of 264
214MULTIMEDIA
Auto On Radio — If Equipped
Press the Auto On Radio button to set how the
radio behaves when the Ignition is switched to
ON. The options are: On, Off or Recall Last to the
last turned to stop condition. Press the back
arrow button when completed.
Radio Off Delay
Press the Radio Off Delay button to keep the
radio on for a preset amount of time after the
Ignition is switched OFF. Press the back arrow
button when completed.
AUX Volume Offset
Press the AUX Volume Offset button on the
touchscreen to activate the AUX Volume Offset
screen.
The AUX Volume Offset is adjusted by pressing
the + and - buttons. This alters the AUX input
audio volume. The level value, which spans
between plus or minus three, is displayed above
the adjustment bar.Media Mode
Operating Media Mode
Media Mode is entered by pushing the MEDIA
button located on the faceplate.
Audio Source Selection
Once in MEDIA mode, press the Source button
and the desired mode button. USB, AUX and
Bluetooth® are the Media sources available.
You can select the Browse button to be given
these options:
Now Playing
Artists
Albums
Genres
Songs
Playlists
Folders
You can select the Source button, Pause/Play
button or the Info button for artist information
on current song playing.
Seek Up/Seek Down
Seek Up /Seek Down
Press and release the Right Arrow button on
the touchscreen for the next selection. Press
and release the Left Arrow button on the
touchscreen to return to the beginning of the
current selection, or return to the beginning of
the previous selection if the track is within the
first few seconds of the current selection.
Fast Seek Up
Press and hold the Right Arrow button on the
touchscreen and the desired mode will begin to
fast forward through the current track until the
button on the touchscreen is released.
Fast Seek Down
Press and hold the Left Arrow button on the
touchscreen and the desired mode will begin to
rewind through the current track until the
button on the touchscreen is released.
Track Selection (Browse)
Rotate the Browse button on the touchscreen to
scroll through and select a desired track on the
iPod®, MP3 player, phone, or USB. Press the
Exit button on the touchscreen if you wish to
cancel the browse function.
20_VF_OM_EN_US_t.book Page 214
Page 217 of 264
MULTIMEDIA215
Repeat
Press the Repeat button on the touchscreen to
repeat the song selection. To cancel repeat,
press the Repeat button on the touchscreen a
second time.
Shuffle
Press the Shuffle button on the touchscreen to
play the selections on the USB/iPod® or Blue -
tooth® device in random order to provide an
interesting change of pace. Press the Shuffle
button on the touchscreen a second time to
turn this feature off.
Audio
Refer to “Operating Radio Mode” in this section
for the adjustable audio settings.
Info
Press the Info button to display the current
track information. Press the X button to cancel
this feature.
USB Mode
USB Mode is entered by either inserting a USB
Jump Drive cable into the USB port, or by
pushing the MEDIA button located on the face -
plate. Once in “Media Mode”, press the Source
button on the touchscreen and select “USB”. NOTE:
The system supports only FAT32 or ExFAT
formatted USB devices. The system does not
support devices with a capacity higher than
64GB. The system does not support USB hubs
connected to the USB port of the vehicle.
Connect your multimedia device directly to the
USB port, using the specific connection cable
for the device if necessary.
Inserting USB Device
Gently insert the USB/device into the USB Port.
If you insert a USB device with the ignition ON,
the unit will switch to USB mode and begin to
play when you insert the device. The display will
show the track number and index time in
minutes and seconds. Play will begin at the start
of track 1.
Browse
Press the Browse button on the touchscreen to
select Artist, Albums, Genres, Songs, Playlists or
Folders from the USB device. Once the desired
selection is made you can chose from the avail
-
able media by pressing the button on the touch -
screen. Press the Exit button on the
touchscreen if you wish to cancel the browse
function.
Bluetooth® Mode
Bluetooth® Streaming Audio (BTSA) or Blue -
tooth® Mode is entered by pairing a Bluetooth®
device containing music to the Uconnect
system.
Before proceeding, the Bluetooth® device must
be paired with the Uconnect Phone to communi -
cate with the Uconnect system.
See the pairing procedure within this manual.
Once the Bluetooth® device is paired to the
Uconnect system, push the MEDIA button
located on the faceplate. Once in Media Mode,
press the Source button on the touchscreen
and select Bluetooth®.
NOTE:
For mobile phone compatibility and pairing
instructions, please visit UconnectPhone.com.
9
20_VF_OM_EN_US_t.book Page 215
Page 218 of 264
216MULTIMEDIA
AUX Mode
AUX Mode is entered by inserting a AUX device
using a stereo cable with a 3.5 mm audio jack
into the AUX port, or by pushing the MEDIA
button located on the faceplate. Once in Media
Mode, press the Source button on the touch -
screen and select AUX.
Inserting Auxiliary Device
Gently insert the Auxiliary device cable into the
AUX Port. If you insert a Auxiliary device with the
ignition ON, the unit will switch to AUX mode and
begin to play when you insert the device cable.
Controlling The Auxiliary Device
The control of the Auxiliary device (e.g.,
selecting playlists, play, fast forward, etc.)
cannot be provided by the radio; use the device
controls instead. Adjust the volume with the
VOLUME rotary knob, or with the volume of the
attached device.
The radio unit is acting as the amplifier for audio
output from the Auxiliary device. Therefore if the
volume control on the Auxiliary device is set too
low, there will be insufficient audio signal for the
radio unit to play the music on the device.
Phone Mode
Operating Phone Mode
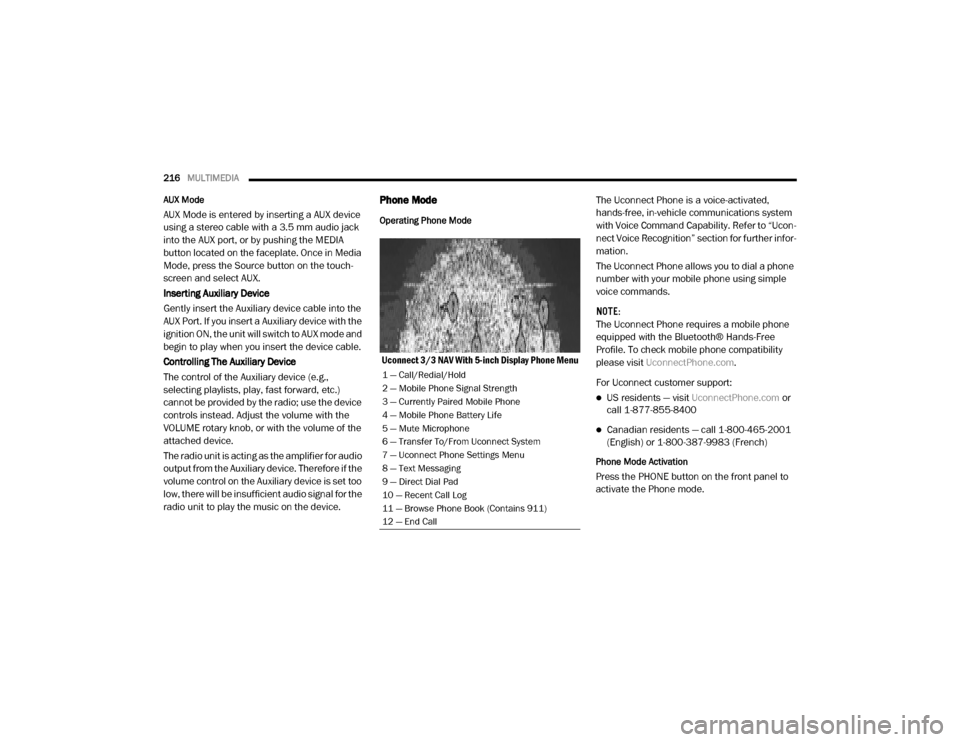
Uconnect 3/3 NAV With 5-inch Display Phone Menu The Uconnect Phone is a voice-activated,
hands-free, in-vehicle communications system
with Voice Command Capability. Refer to “Ucon
-
nect Voice Recognition” section for further infor -
mation.
The Uconnect Phone allows you to dial a phone
number with your mobile phone using simple
voice commands.
NOTE:
The Uconnect Phone requires a mobile phone
equipped with the Bluetooth® Hands-Free
Profile. To check mobile phone compatibility
please visit UconnectPhone.com .
For Uconnect customer support:
US residents — visit UconnectPhone.com or
call 1-877-855-8400
Canadian residents — call 1-800-465-2001
(English) or 1-800-387-9983 (French)
Phone Mode Activation
Press the PHONE button on the front panel to
activate the Phone mode.
1 — Call/Redial/Hold
2 — Mobile Phone Signal Strength
3 — Currently Paired Mobile Phone
4 — Mobile Phone Battery Life
5 — Mute Microphone
6 — Transfer To/From Uconnect System
7 — Uconnect Phone Settings Menu
8 — Text Messaging
9 — Direct Dial Pad
10 — Recent Call Log
11 — Browse Phone Book (Contains 911)
12 — End Call
20_VF_OM_EN_US_t.book Page 216
Page 255 of 264

253
H
Hazard
Driving Through Flowing, Rising,
Or Shallow Standing Water
................. 121
Hazard Warning Flashers
.......................... 123
Head Restraints
....................................... 20
Headlights
Cleaning......................................... 187High Beam........................................ 24High Beam/Low Beam Select Switch....... 24Passing............................................ 24Switch.............................................. 23
Heated Mirrors
........................................ 23
Heated Seats
.......................................... 18
Heater, Engine Block
................................. 93
High Beam/Low Beam Select (Dimmer) Switch
... 24
Hill Start Assist
........................................ 60
Hitches
Trailer Towing.................................. 114
Hood Prop
............................................. 36
Hood Release
......................................... 36
I
Ignition
.................................................11Key.............................................. 9, 11Switch.............................................. 11
Ignition Key Removal
.................................11
Illuminated Entry
......................................27
Immobilizer (Sentry Key)
............................. 12
Inside Rearview Mirror
................................21
Instrument Cluster
.............................. 41, 53Display............................................. 43
Instrument Panel Lens Cleaning
................... 189
Interior And Instrument Lights
.......................25
Interior Appearance Care
........................... 188
Interior Lights
..........................................25
Intermittent Wipers (Delay Wipers)
..................28
Introduction
..............................................7
iPod/USB/MP3 Control
............................. 238
J
Jack Location
........................................ 133
Jack Operation
.............................. 133, 168
Jacking And Tire Changing
......................... 133
Jacking And Tire Changing Instructions
...........135
Jump Starting
........................................ 145
K
Key Fob
Programming Additional Key Fobs
.......... 10
Key Fob Battery Service (Remote Keyless Entry)
.. 10
Key Fob Programming (Remote Keyless Entry)
.... 10
Key-In Reminder
...................................... 12
Keys
..................................................... 9Replacement.................................... 12Sentry (Immobilizer)............................ 12
L
Lane Change Assist
.................................. 25
Lap/Shoulder Belts
.................................. 67
Latches
................................................ 91Hood............................................... 36
Lead Free Gasoline
................................ 192
Leaks, Fluid
........................................... 91
Life Of Tires
......................................... 179
Light Bulbs
.....................................91, 123
Lights
.................................................. 91Air Bag................................. 47, 73, 90Brake Assist Warning.......................... 59Brake Warning.................................. 48Bulb Replacement............................ 123Cruise............................................. 53Daytime Running............................... 24Dimmer Switch, Headlight...............23, 2411
20_VF_OM_EN_US_t.book Page 253