Ram ProMaster City 2015 Owner's Manual
ProMaster City 2015
Ram
Ram
https://www.carmanualsonline.info/img/34/12524/w960_12524-0.png
Ram ProMaster City 2015 Owner's Manual
Trending: seats, child lock, coolant, check engine, maintenance reset, reset, rims
Page 371 of 414
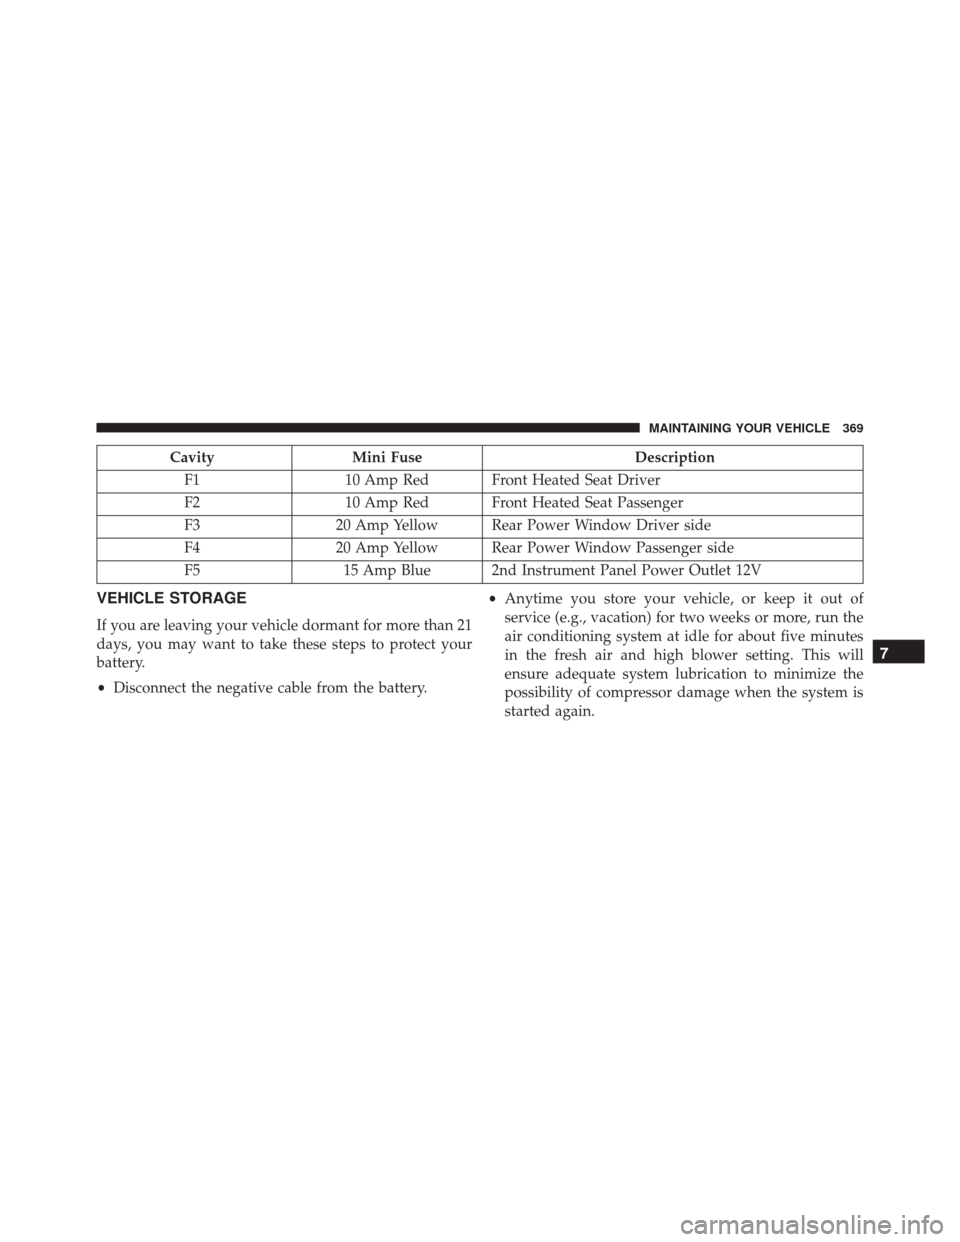
CavityMini Fuse Description
F1 10 Amp Red Front Heated Seat Driver
F2 10 Amp Red Front Heated Seat Passenger
F3 20 Amp Yellow Rear Power Window Driver side
F4 20 Amp Yellow Rear Power Window Passenger side
F5 15 Amp Blue 2nd Instrument Panel Power Outlet 12V
VEHICLE STORAGE
If you are leaving your vehicle dormant for more than 21
days, you may want to take these steps to protect your
battery.
•Disconnect the negative cable from the battery. •
Anytime you store your vehicle, or keep it out of
service (e.g., vacation) for two weeks or more, run the
air conditioning system at idle for about five minutes
in the fresh air and high blower setting. This will
ensure adequate system lubrication to minimize the
possibility of compressor damage when the system is
started again.
7
MAINTAINING YOUR VEHICLE 369
Page 372 of 414
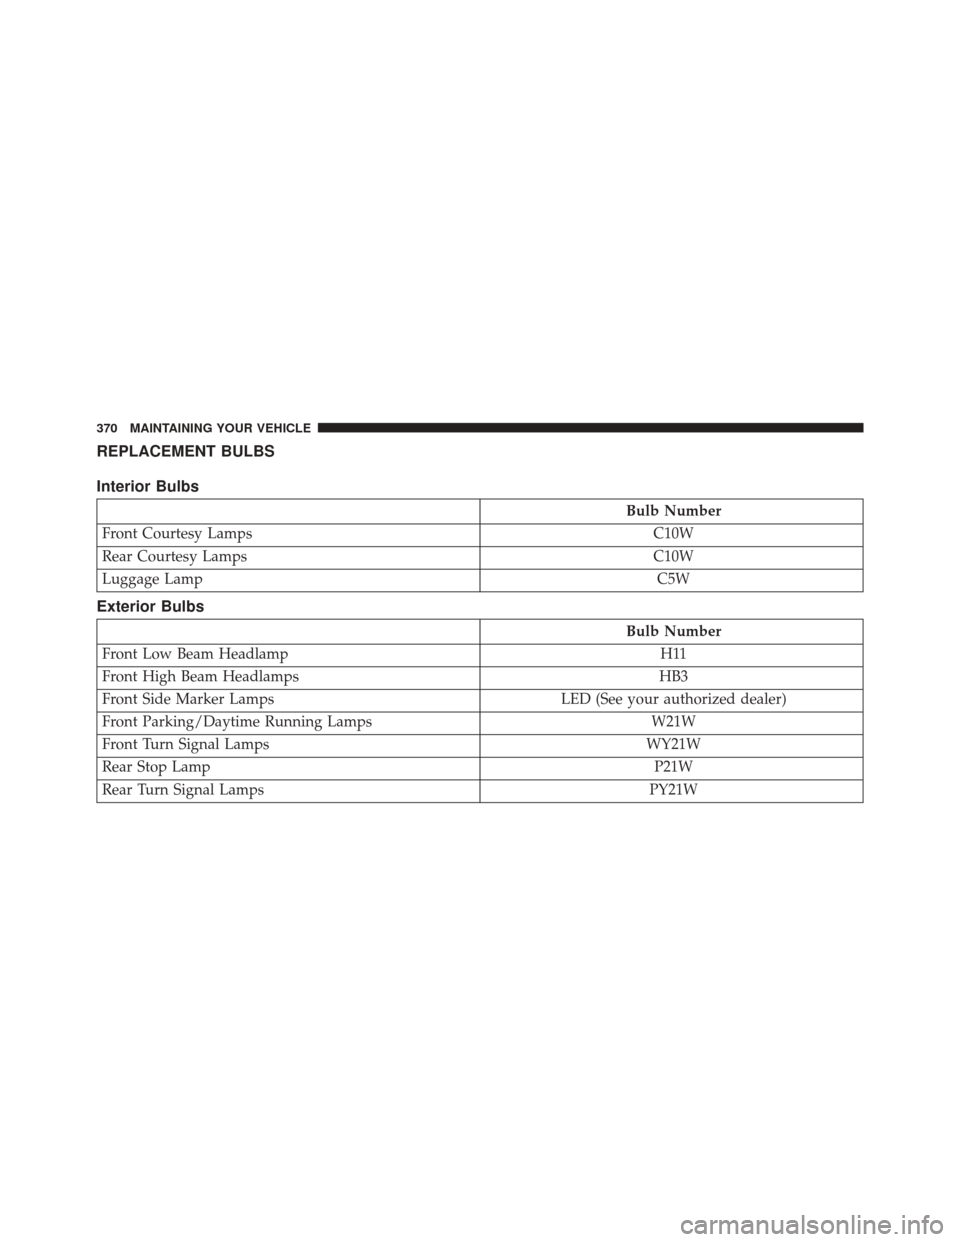
REPLACEMENT BULBS
Interior Bulbs
Bulb Number
Front Courtesy Lamps C10W
Rear Courtesy Lamps C10W
Luggage Lamp C5W
Exterior Bulbs
Bulb Number
Front Low Beam Headlamp H11
Front High Beam Headlamps HB3
Front Side Marker Lamps LED (See your authorized dealer)
Front Parking/Daytime Running Lamps W21W
Front Turn Signal Lamps WY21W
Rear Stop Lamp P21W
Rear Turn Signal Lamps PY21W
370 MAINTAINING YOUR VEHICLE
Page 373 of 414
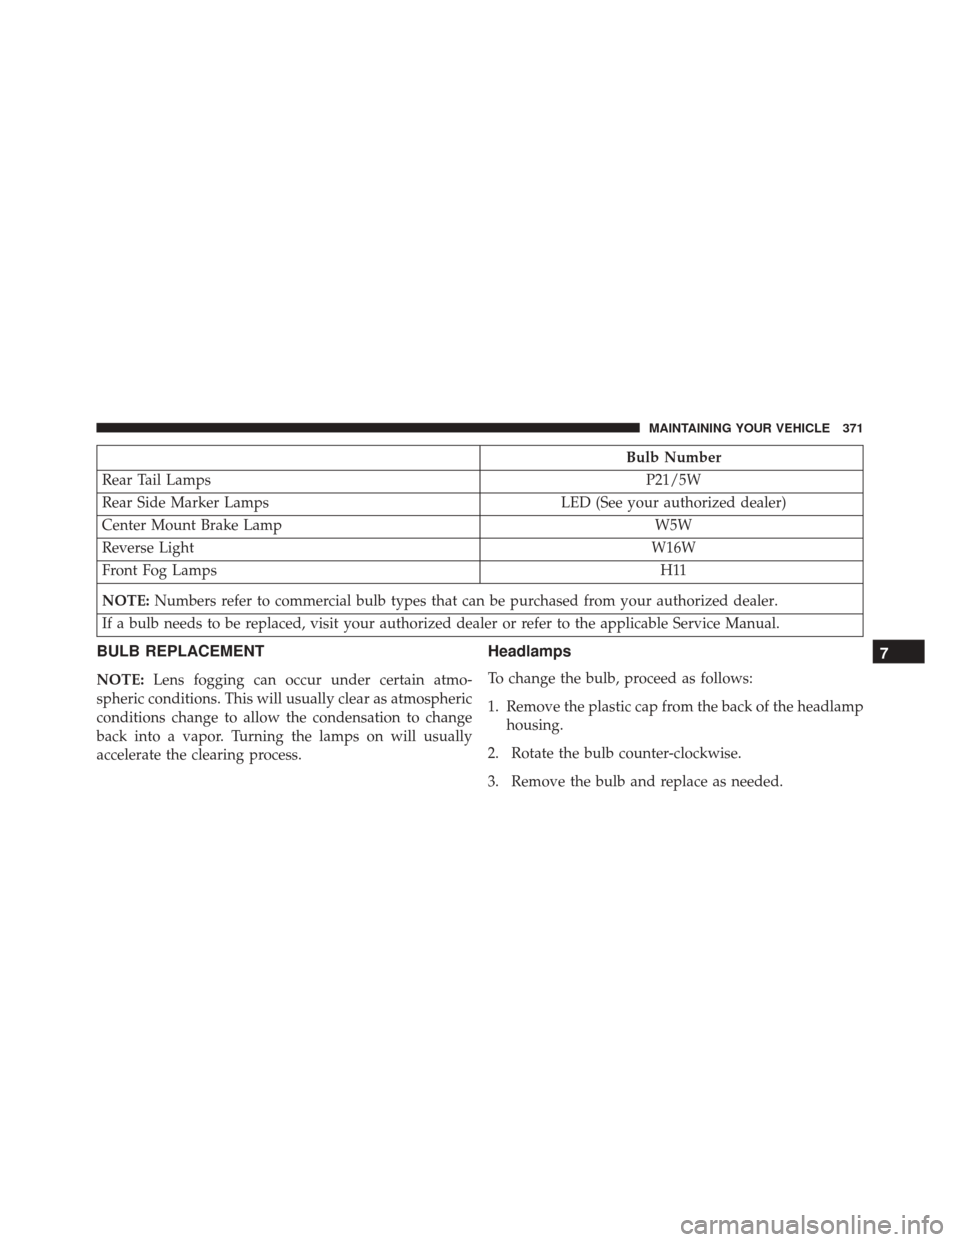
Bulb Number
Rear Tail Lamps P21/5W
Rear Side Marker Lamps LED (See your authorized dealer)
Center Mount Brake Lamp W5W
Reverse Light W16W
Front Fog Lamps H11
NOTE: Numbers refer to commercial bulb types that can be purchased from your authorized dealer.
If a bulb needs to be replaced, visit your authorized dealer or refer to the applicable Service Manual.
BULB REPLACEMENT
NOTE: Lens fogging can occur under certain atmo-
spheric conditions. This will usually clear as atmospheric
conditions change to allow the condensation to change
back into a vapor. Turning the lamps on will usually
accelerate the clearing process.
Headlamps
To change the bulb, proceed as follows:
1. Remove the plastic cap from the back of the headlamp housing.
2. Rotate the bulb counter-clockwise.
3. Remove the bulb and replace as needed.
7
MAINTAINING YOUR VEHICLE 371
Page 374 of 414
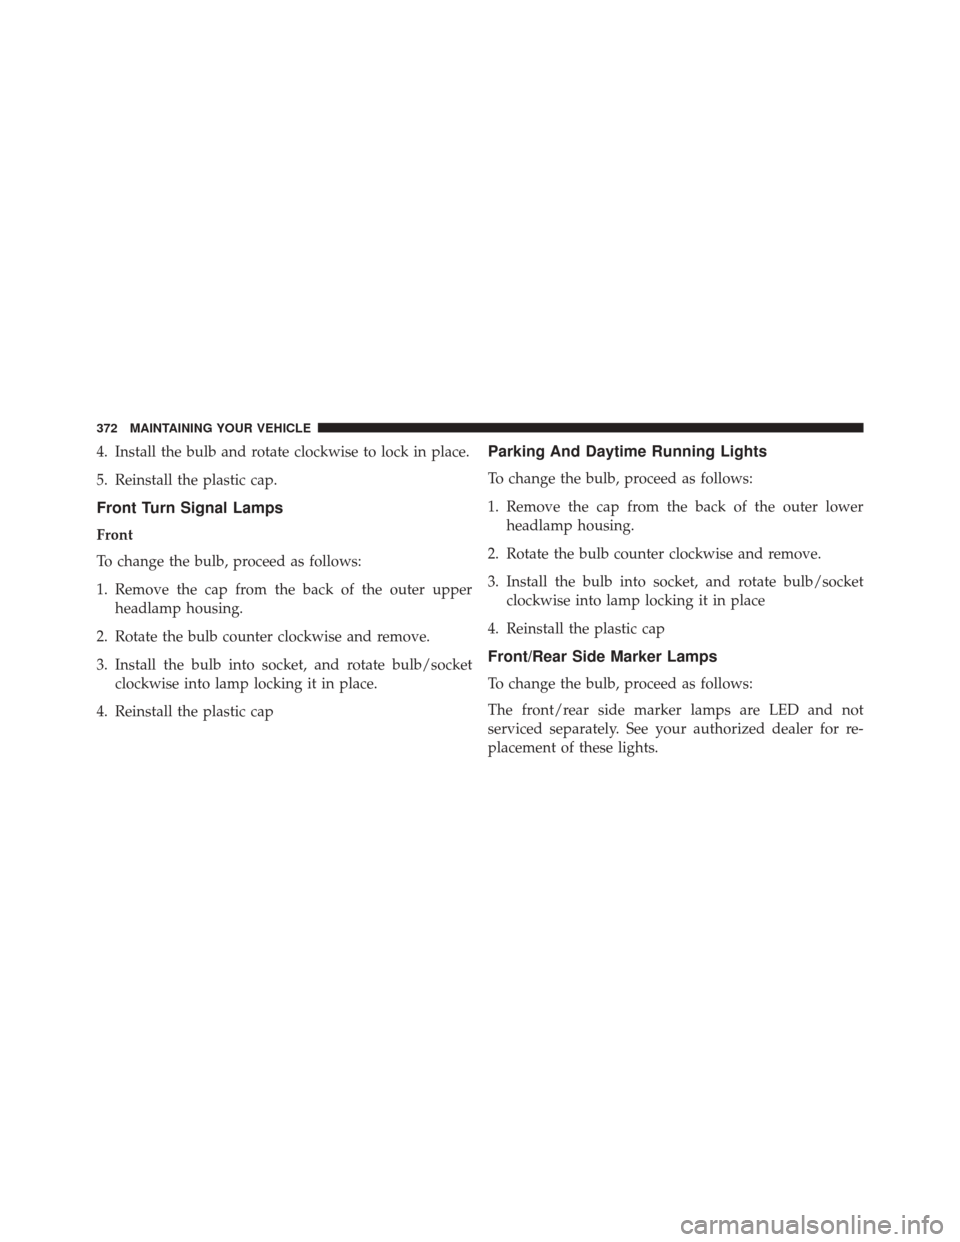
4. Install the bulb and rotate clockwise to lock in place.
5. Reinstall the plastic cap.
Front Turn Signal Lamps
Front
To change the bulb, proceed as follows:
1. Remove the cap from the back of the outer upperheadlamp housing.
2. Rotate the bulb counter clockwise and remove.
3. Install the bulb into socket, and rotate bulb/socket clockwise into lamp locking it in place.
4. Reinstall the plastic cap
Parking And Daytime Running Lights
To change the bulb, proceed as follows:
1. Remove the cap from the back of the outer lower headlamp housing.
2. Rotate the bulb counter clockwise and remove.
3. Install the bulb into socket, and rotate bulb/socket clockwise into lamp locking it in place
4. Reinstall the plastic cap
Front/Rear Side Marker Lamps
To change the bulb, proceed as follows:
The front/rear side marker lamps are LED and not
serviced separately. See your authorized dealer for re-
placement of these lights.
372 MAINTAINING YOUR VEHICLE
Page 375 of 414
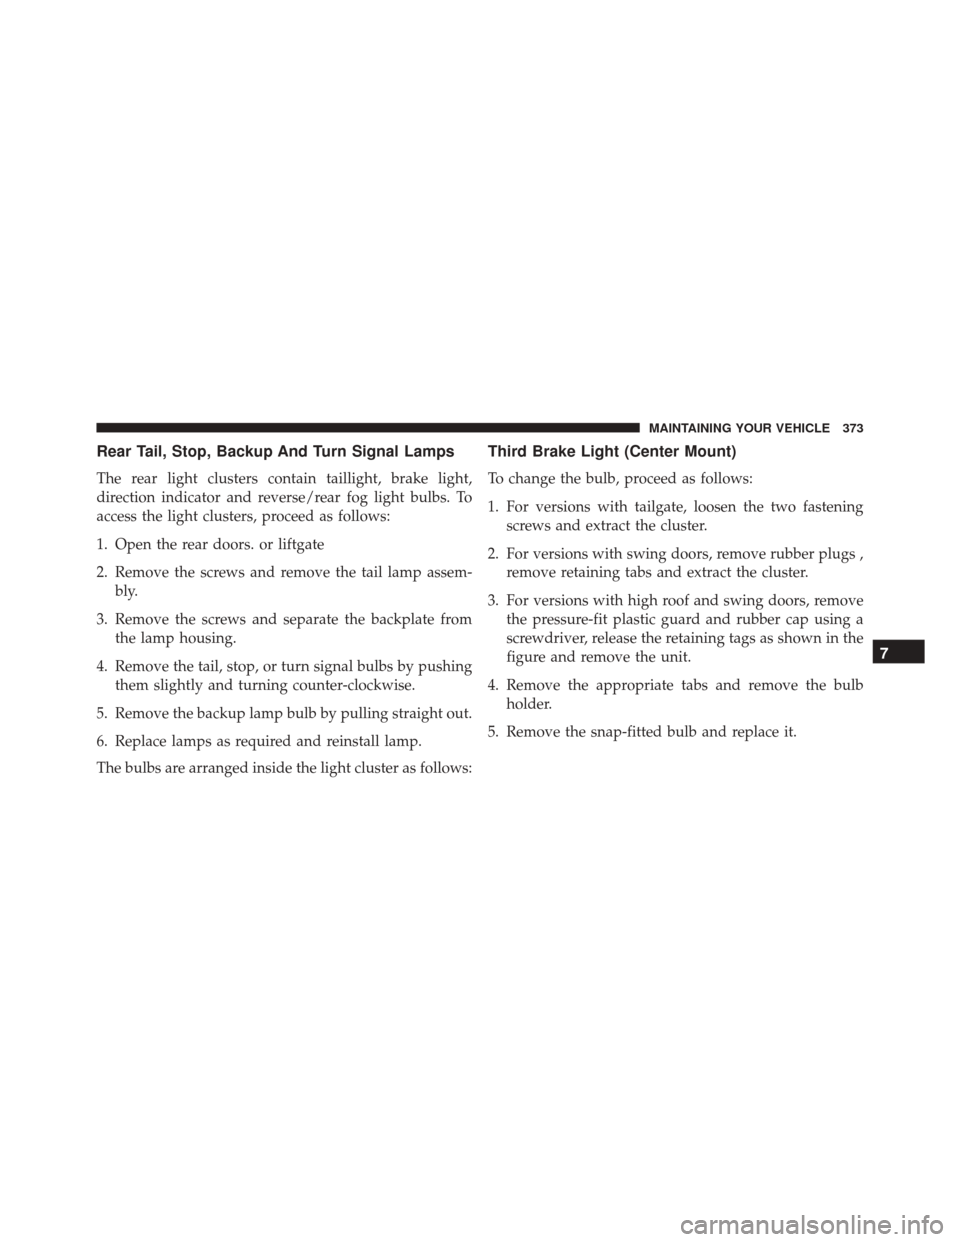
Rear Tail, Stop, Backup And Turn Signal Lamps
The rear light clusters contain taillight, brake light,
direction indicator and reverse/rear fog light bulbs. To
access the light clusters, proceed as follows:
1. Open the rear doors. or liftgate
2. Remove the screws and remove the tail lamp assem-bly.
3. Remove the screws and separate the backplate from the lamp housing.
4. Remove the tail, stop, or turn signal bulbs by pushing them slightly and turning counter-clockwise.
5. Remove the backup lamp bulb by pulling straight out.
6. Replace lamps as required and reinstall lamp.
The bulbs are arranged inside the light cluster as follows:
Third Brake Light (Center Mount)
To change the bulb, proceed as follows:
1. For versions with tailgate, loosen the two fastening screws and extract the cluster.
2. For versions with swing doors, remove rubber plugs , remove retaining tabs and extract the cluster.
3. For versions with high roof and swing doors, remove the pressure-fit plastic guard and rubber cap using a
screwdriver, release the retaining tags as shown in the
figure and remove the unit.
4. Remove the appropriate tabs and remove the bulb holder.
5. Remove the snap-fitted bulb and replace it.
7
MAINTAINING YOUR VEHICLE 373
Page 376 of 414
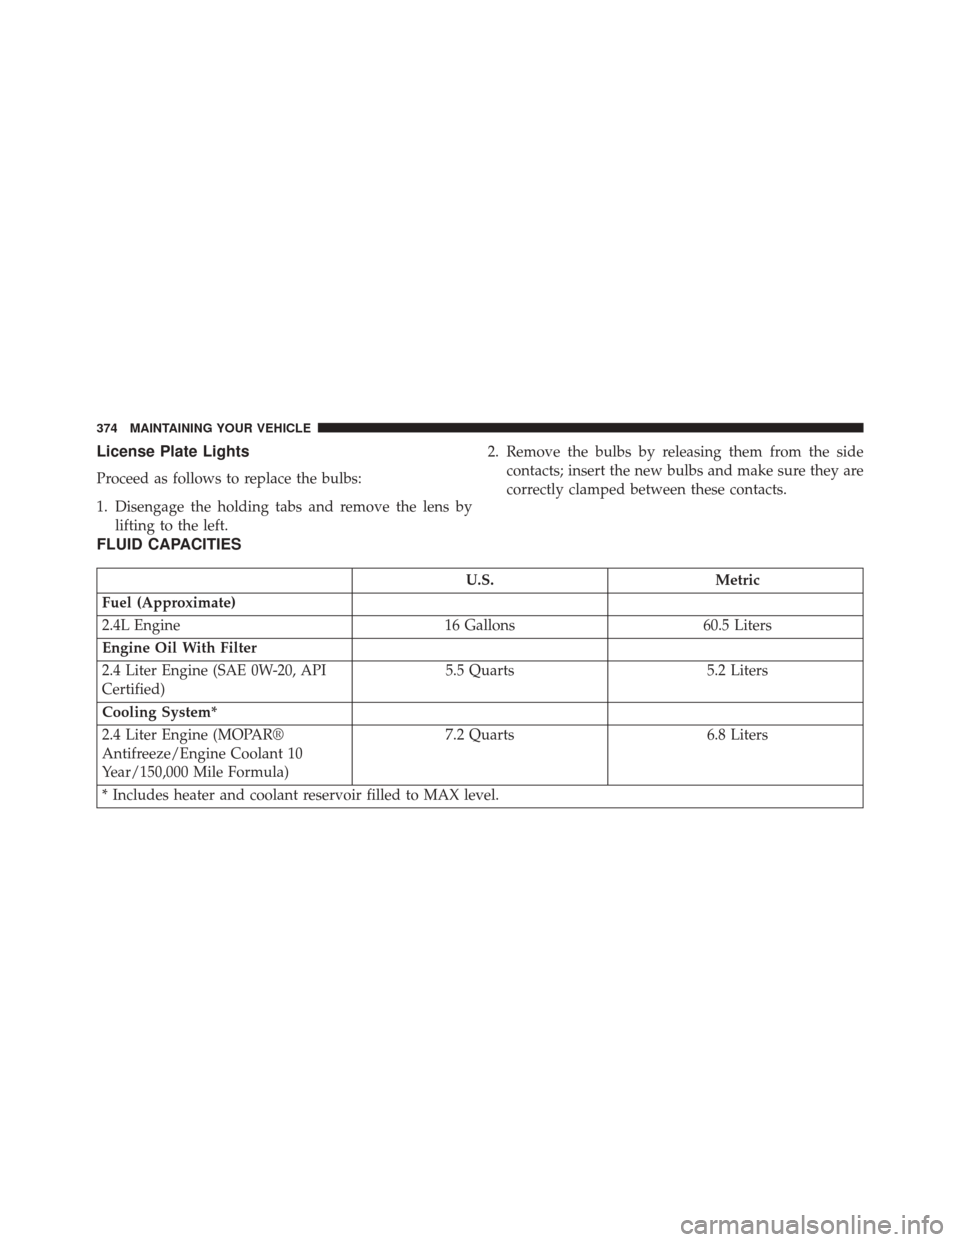
License Plate Lights
Proceed as follows to replace the bulbs:
1. Disengage the holding tabs and remove the lens bylifting to the left. 2. Remove the bulbs by releasing them from the side
contacts; insert the new bulbs and make sure they are
correctly clamped between these contacts.
FLUID CAPACITIES
U.S. Metric
Fuel (Approximate)
2.4L Engine 16 Gallons60.5 Liters
Engine Oil With Filter
2.4 Liter Engine (SAE 0W-20, API
Certified) 5.5 Quarts
5.2 Liters
Cooling System*
2.4 Liter Engine (MOPAR®
Antifreeze/Engine Coolant 10
Year/150,000 Mile Formula) 7.2 Quarts
6.8 Liters
* Includes heater and coolant reservoir filled to MAX level.
374 MAINTAINING YOUR VEHICLE
Page 377 of 414
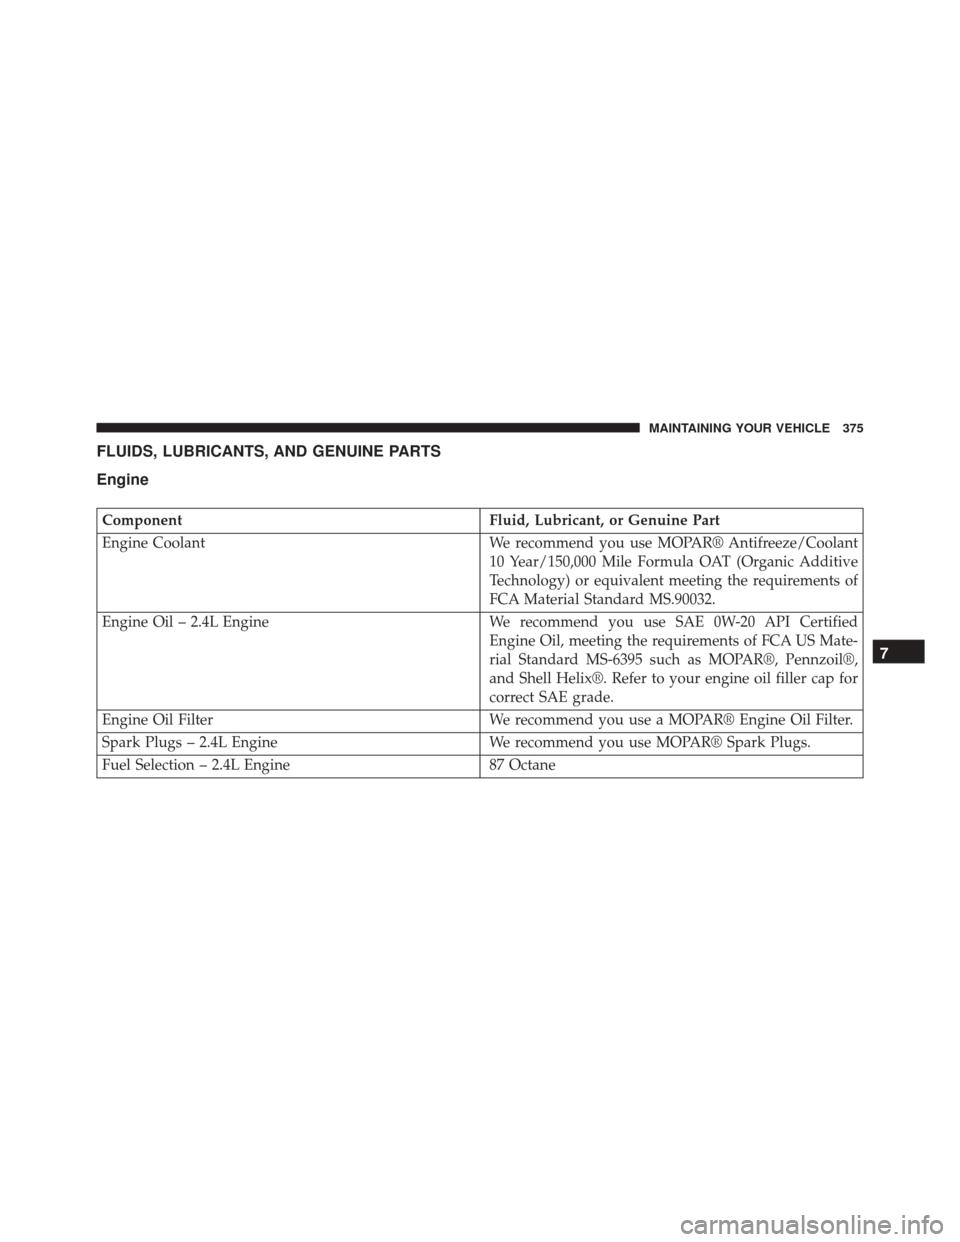
FLUIDS, LUBRICANTS, AND GENUINE PARTS
Engine
ComponentFluid, Lubricant, or Genuine Part
Engine Coolant We recommend you use MOPAR® Antifreeze/Coolant
10 Year/150,000 Mile Formula OAT (Organic Additive
Technology) or equivalent meeting the requirements of
FCA Material Standard MS.90032.
Engine Oil – 2.4L Engine We recommend you use SAE 0W-20 API Certified
Engine Oil, meeting the requirements of FCA US Mate-
rial Standard MS-6395 such as MOPAR®, Pennzoil®,
and Shell Helix®. Refer to your engine oil filler cap for
correct SAE grade.
Engine Oil Filter We recommend you use a MOPAR® Engine Oil Filter.
Spark Plugs – 2.4L Engine We recommend you use MOPAR® Spark Plugs.
Fuel Selection – 2.4L Engine 87 Octane
7
MAINTAINING YOUR VEHICLE 375
Page 378 of 414
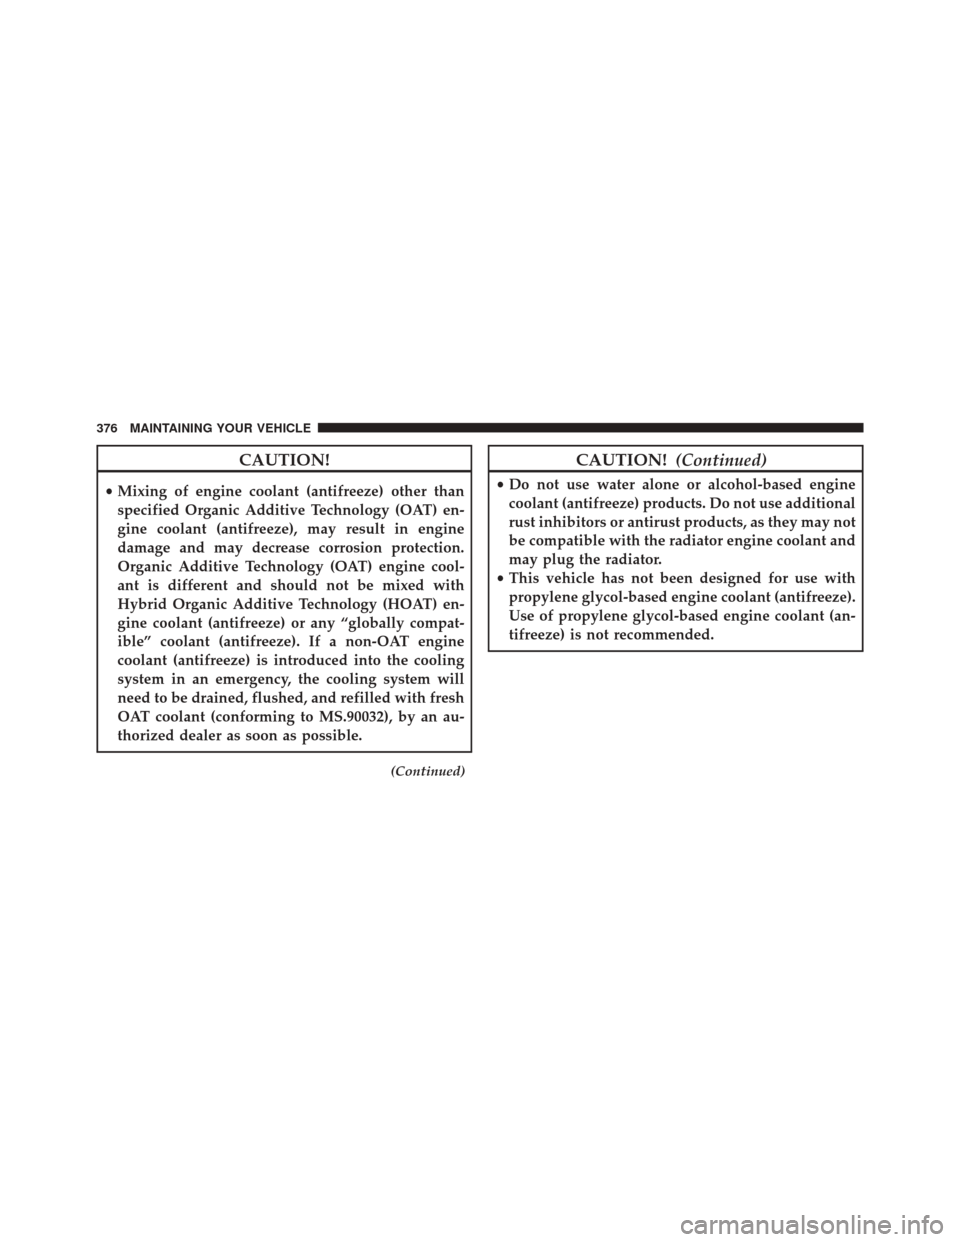
CAUTION!
•Mixing of engine coolant (antifreeze) other than
specified Organic Additive Technology (OAT) en-
gine coolant (antifreeze), may result in engine
damage and may decrease corrosion protection.
Organic Additive Technology (OAT) engine cool-
ant is different and should not be mixed with
Hybrid Organic Additive Technology (HOAT) en-
gine coolant (antifreeze) or any “globally compat-
ible” coolant (antifreeze). If a non-OAT engine
coolant (antifreeze) is introduced into the cooling
system in an emergency, the cooling system will
need to be drained, flushed, and refilled with fresh
OAT coolant (conforming to MS.90032), by an au-
thorized dealer as soon as possible.
(Continued)
CAUTION! (Continued)
•Do not use water alone or alcohol-based engine
coolant (antifreeze) products. Do not use additional
rust inhibitors or antirust products, as they may not
be compatible with the radiator engine coolant and
may plug the radiator.
• This vehicle has not been designed for use with
propylene glycol-based engine coolant (antifreeze).
Use of propylene glycol-based engine coolant (an-
tifreeze) is not recommended.
376 MAINTAINING YOUR VEHICLE
Page 379 of 414
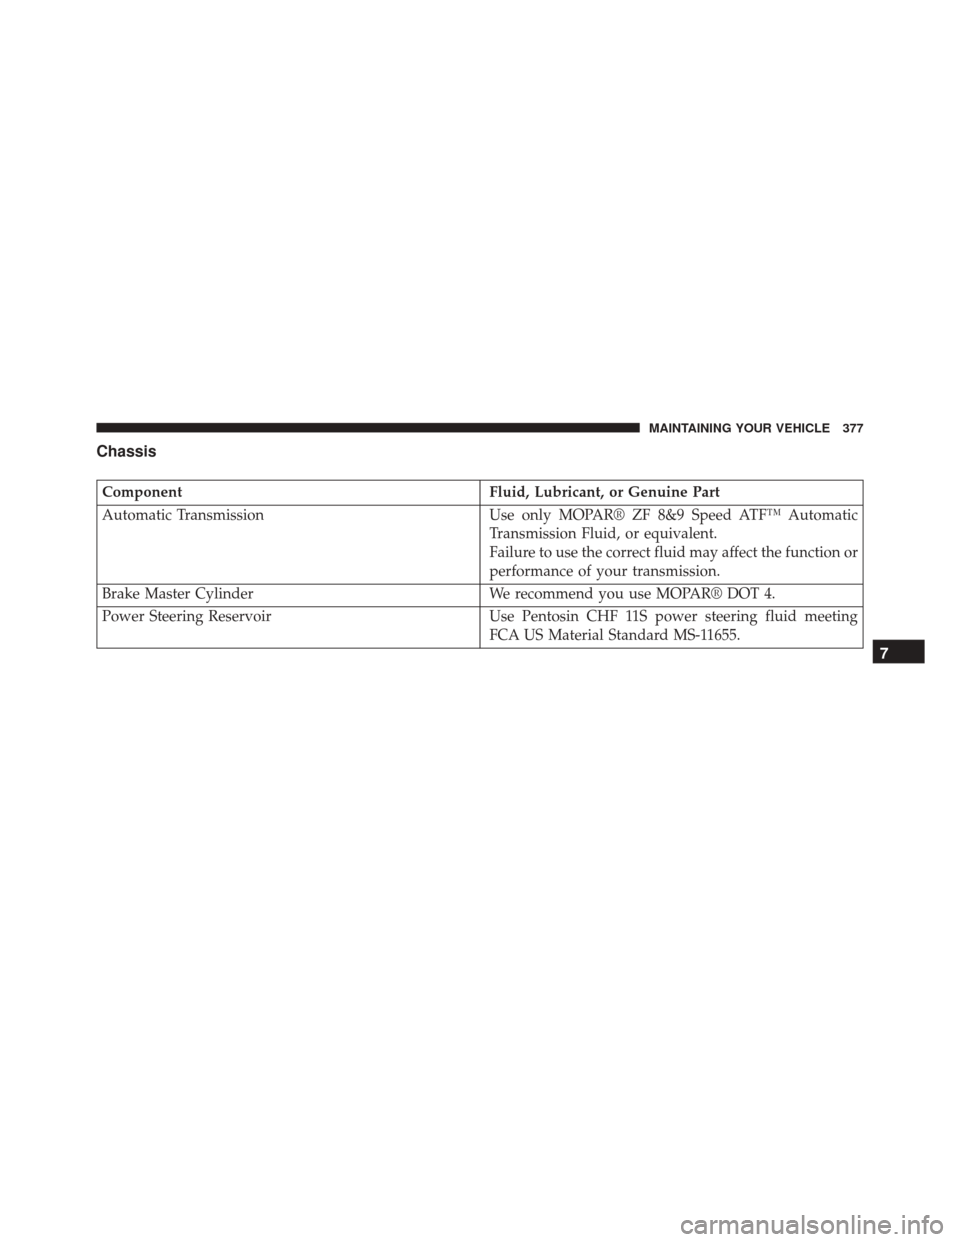
Chassis
ComponentFluid, Lubricant, or Genuine Part
Automatic Transmission Use only MOPAR® ZF 8&9 Speed ATF™ Automatic
Transmission Fluid, or equivalent.
Failure to use the correct fluid may affect the function or
performance of your transmission.
Brake Master Cylinder We recommend you use MOPAR® DOT 4.
Power Steering Reservoir Use Pentosin CHF 11S power steering fluid meeting
FCA US Material Standard MS-11655.
7
MAINTAINING YOUR VEHICLE 377
Page 380 of 414
Trending: charging, immobilizer, maintenance schedule, service schedule, fuel type, coolant reservoir, recommended oil
