stop start Ram ProMaster City 2020 User Guide
[x] Cancel search | Manufacturer: RAM, Model Year: 2020, Model line: ProMaster City, Model: Ram ProMaster City 2020Pages: 350, PDF Size: 13.27 MB
Page 161 of 350

158 STARTING AND OPERATING
Cold Weather Operation
To ensure reliable starting at low temperatures, use of an
externally powered electric engine block heater (available
from your authorized dealer) is recommended.
To prevent possible engine damage while starting at low
temperatures, this vehicle will inhibit engine cranking when
the ambient temperature is less than -31°F (-35° C) and the oil
temperature sensor reading indicates an engine block heater
has not been used. The message “plug in engine heater” will
be displayed in the instrument cluster when the ambient
temperature is below -25°F (-32° C) at the time the engine is
shut off as a reminder.
Extended Park Starting
NOTE:
Extended Park condition occurs when the vehicle has not
been started or driven for at least 30 days.
1. Install a battery charger or jumper cables to the battery toensure a full battery charge during the crank cycle.
2. Cycle the ignition to the AVV/”START” position and release it when the engine starts. 3. If the engine fails to start within ten seconds, cycle the
ignition to the STOP (OFF/LOCK) position, wait five
seconds to allow the starter to cool, then repeat the
Extended Park Starting procedure.
4. If the engine fails to start after eight attempts, allow the starter to cool for at least 10 minutes, then repeat the
procedure.
If Engine Fails To Start
If the engine fails to start after you have followed the "Normal
Starting" or "Extreme Cold Weather" procedure, and has not
experienced an extended park condition as identified in
"Extended Park Starting" procedure it may be flooded. Push
the accelerator pedal all the way to the floor and hold it there.
Crank the engine for no more than 15 seconds. This should
clear any excess fuel in case the engine is flooded. Leave the
ignition key in the MAR position, release the accelerator pedal
and repeat the “Normal Starting” procedure.
CAUTION!
To prevent damage to the starter, do not crank
continuously for more than 10 seconds at a time. Wait 10
to 15 seconds before trying again.
2020_RAM_PROMASTER_CITY_OM_USA=GUID-7B6A7FCA-79B0-423F-95C5-ED2A949C3D13=1=en=.book Page 158
Page 166 of 350
STARTING AND OPERATING 163
(Continued)
AUTOMATIC TRANSMISSION
NOTE:
You must press and hold the brake pedal while shifting out
of PARK.
WARNING!
• It is dangerous to shift out of PARK or NEUTRAL if the engine speed is higher than idle speed. If your foot is
not firmly pressing the brake pedal, the vehicle could
accelerate quickly forward or in reverse. You could lose
control of the vehicle and hit someone or something.
Only shift into gear when the engine is idling normally
and your foot is firmly pressing the brake pedal.
• Unintended movement of a vehicle could injure those in or near the vehicle. As with all vehicles, you should
never exit a vehicle while the engine is running. Before
exiting a vehicle always come to a complete stop, then
apply the parking brake, shift the transmission into
PARK, turn the engine OFF, and remove the ignition
key. Once the key is removed, the transmission is
locked in PARK, securing the vehicle against unwanted
movement.
• When leaving the vehicle, always remove the ignition key from the vehicle and lock the vehicle.• Never leave children alone in a vehicle, or with accessto an unlocked vehicle. Allowing children to be in a
vehicle unattended is dangerous for a number of
reasons. A child or others could be seriously or fatally
injured. Children should be warned not to touch the
parking brake, brake pedal or the transmission gear
selector.
• Do not leave the ignition key in or near the vehicle (or in a location accessible to children). A child could
operate power windows, other controls, or move the
vehicle.
CAUTION!
• Shift into or out of PARK or REVERSE only after the vehicle has come to a complete stop.
• Do not shift between PARK, REVERSE, NEUTRAL, or DRIVE when the engine is above idle speed.
• Before shifting into any gear, make sure your foot is firmly pressing the brake pedal.
WARNING! (Continued)
5
2020_RAM_PROMASTER_CITY_OM_USA=GUID-7B6A7FCA-79B0-423F-95C5-ED2A949C3D13=1=en=.book Page 163
Page 167 of 350

164 STARTING AND OPERATING
Key Ignition Park Interlock
This vehicle is equipped with a Key Ignition Park Interlock
which requires the transmission to be in PARK before the
ignition can be turned to the full STOP (OFF/LOCK) (key
removal) position. The key can only be removed from the
ignition when the ignition is in the STOP (OFF/LOCK) posi-
tion, and once removed, the transmission is locked in PARK.
Brake/Transmission Shift Interlock System
This vehicle is equipped with a Brake Transmission Shift
Interlock system (BTSI) that holds the transmission gear
selector in PARK unless the brakes are applied. To shift the
transmission out of PARK, the ignition must be in the MAR/
RUN mode (engine running or not) and the brake pedal
must be pressed.
The brake pedal must also be pressed to shift from
NEUTRAL into DRIVE or REVERSE when the vehicle is
stopped or moving at low speeds.
Nine-Speed Automatic Transmission
The transmission gear range (PRND) is displayed both
beside the gear selector and in the instrument cluster. To
select a gear range, press the lock button on the gear selector
and move the lever rearward or forward. You must also press the brake pedal to shift the transmission out of PARK
(or NEUTRAL, when the vehicle is stopped or moving at low
speeds). Select the DRIVE range for normal driving.
NOTE:
In the event of a mismatch between the gear selector position
and the actual transmission gear (for example, driver selects
REVERSE while driving forward), the position indicator will
blink continuously until the selector is returned to the proper
position, or the requested shift can be completed.
The electronically-controlled transmission adapts its shift
schedule based on driver inputs, along with environmental
and road conditions. The transmission electronics are
self-calibrating; therefore, the first few shifts on a new
vehicle may be somewhat abrupt. This is a normal condition,
and precision shifts will develop within a few hundred miles
or kilometers.
The nine-speed transmission has been developed to meet the
needs of current and future FWD/AWD vehicles. Software
and calibration is refined to optimize the customer’s driving
experience and fuel economy. By design, some vehicle and
driveline combinations utilize 9th gear only in very specific
driving situations and conditions.
2020_RAM_PROMASTER_CITY_OM_USA=GUID-7B6A7FCA-79B0-423F-95C5-ED2A949C3D13=1=en=.book Page 164
Page 168 of 350
STARTING AND OPERATING 165
Only shift from DRIVE to PARK or REVERSE when the
accelerator pedal is released and the vehicle is stopped. Be
sure to keep your foot on the brake pedal when shifting
between these gears.
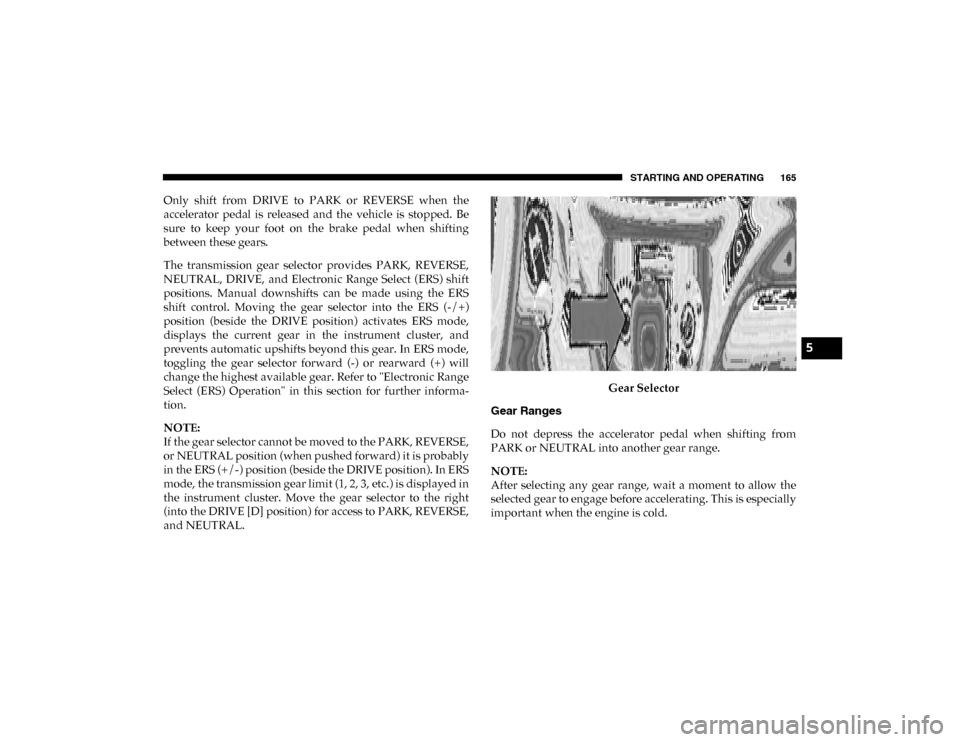
The transmission gear selector provides PARK, REVERSE,
NEUTRAL, DRIVE, and Electronic Range Select (ERS) shift
positions. Manual downshifts can be made using the ERS
shift control. Moving the gear selector into the ERS (-/+)
position (beside the DRIVE position) activates ERS mode,
displays the current gear in the instrument cluster, and
prevents automatic upshifts beyond this gear. In ERS mode,
toggling the gear selector forward (-) or rearward (+) will
change the highest available gear. Refer to "Electronic Range
Select (ERS) Operation" in this section for further informa-
tion.
NOTE:
If the gear selector cannot be moved to the PARK, REVERSE,
or NEUTRAL position (when pushed forward) it is probably
in the ERS (+/-) position (beside the DRIVE position). In ERS
mode, the transmission gear limit (1, 2, 3, etc.) is displayed in
the instrument cluster. Move the gear selector to the right
(into the DRIVE [D] position) for access to PARK, REVERSE,
and NEUTRAL. Gear Selector
Gear Ranges
Do not depress the accelerator pedal when shifting from
PARK or NEUTRAL into another gear range.
NOTE:
After selecting any gear range, wait a moment to allow the
selected gear to engage before accelerating. This is especially
important when the engine is cold.
5
2020_RAM_PROMASTER_CITY_OM_USA=GUID-7B6A7FCA-79B0-423F-95C5-ED2A949C3D13=1=en=.book Page 165
Page 170 of 350
STARTING AND OPERATING 167
The following indicators should be used to ensure that you
have properly engaged the transmission into the PARK posi-
tion:
• When shifting into PARK, push the lock button on the gear selector and firmly move the selector all the way forward
until it stops and is fully seated.
• Look at the transmission gear position display and verify that it indicates the PARK position.
• With brake pedal released, verify that the gear selector will not move out of PARK.
REVERSE (R)
This range is for moving the vehicle backward. Shift into
REVERSE only after the vehicle has come to a complete stop.
• Unintended movement of a vehicle could injure those
in or near the vehicle. As with all vehicles, you should
never exit a vehicle while the engine is running. Before
exiting a vehicle always come to a complete stop, then
apply the parking brake, shift the transmission into
PARK, turn the engine OFF, and remove the ignition
key. Once the key is removed, the transmission is
locked in PARK, securing the vehicle against unwanted
movement.
• When exiting the vehicle, always remove the ignition key from the vehicle and lock the vehicle.
• Never leave children alone in a vehicle, or with access to an unlocked vehicle. Allowing children to be in a
vehicle unattended is dangerous for a number of
reasons. A child or others could be seriously or fatally
injured. Children should be warned not to touch the
parking brake, brake pedal or the transmission gear
selector.
• Do not leave the ignition key in or near the vehicle (or in a location accessible to children). A child could
operate power windows, other controls, or move the
vehicle.
WARNING! (Continued)CAUTION!
• Before moving the transmission gear selector out of PARK, you must turn the ignition to the ON/RUN
mode, and also press the brake pedal. Otherwise,
damage to the gear selector could result.
• DO NOT race the engine when shifting from PARK or NEUTRAL into another gear range, as this can damage
the drivetrain.
5
2020_RAM_PROMASTER_CITY_OM_USA=GUID-7B6A7FCA-79B0-423F-95C5-ED2A949C3D13=1=en=.book Page 167
Page 172 of 350
STARTING AND OPERATING 169
If the transmission becomes extremely hot, the “Transmis-
sion Temperature Warning Light” may illuminate and the
transmission may operate differently until the transmission
cools down.
During cold temperatures, transmission operation may be
modified depending on engine and transmission tempera -
ture as well as vehicle speed. This feature improves warm up
time of the engine and transmission to achieve maximum
efficiency. Engagement of the torque converter clutch, and
shifts into 8th or 9th gear, are inhibited until the transmission
fluid is warm refer to the “Note” under “Torque Converter
Clutch” in this section. Normal operation will resume once
the transmission temperature has risen to a suitable level.
Transmission Limp Home Mode
Transmission function is monitored electronically for
abnormal conditions. If a condition is detected that could
result in transmission damage, Transmission Limp Home
Mode is activated. In this mode, the transmission may
operate only in a fixed gear, or may remain in NEUTRAL.
The Malfunction Indicator Light (MIL) may be illuminated.
Limp Home Mode may allow the vehicle to be driven to an
authorized dealer for service without damaging the trans -
mission. In the event of a momentary problem, the transmission can
be reset to regain all forward gears by performing the
following steps:
1. Stop the vehicle.
2. Shift the transmission into PARK.
3. Turn the ignition OFF.
4. Wait approximately 10 seconds.
5. Restart the engine.
6. Shift into the desired gear range. If the problem is no
longer detected, the transmission will return to normal
operation.
NOTE:
Even if the transmission can be reset, we recommend that
you visit your authorized dealer at your earliest possible
convenience. Your authorized dealer has diagnostic equip -
ment to assess the condition of your transmission. If the
transmission cannot be reset, authorized dealer service is
required.
5
2020_RAM_PROMASTER_CITY_OM_USA=GUID-7B6A7FCA-79B0-423F-95C5-ED2A949C3D13=1=en=.book Page 169
Page 180 of 350

STARTING AND OPERATING 177
While audible signals are emitted, the audio system is
muted.
The audible signal is turned off immediately if the distance
increases. The tone cycle remains constant if the distance
measured by the inner sensors is constant. If this condition occurs
for the external sensors, the signal is turned off after three seconds
(stopping warnings during maneuvers parallel to walls).
ParkSense Rear Park Assist Failure Indications
A malfunction of the ParkSense sensors or system is indi
-
cated, during REVERSE gear engagement, by the instrument
panel warning icon.
The warning icon is illuminated and a message is
displayed on the instrument cluster display (if
equipped). Refer to “Warning Lights And
Messages” in “Getting To Know Your Instrument Panel” for
further information.
The sensors and wiring are tested continuously when the
ignition is in the MAR (ACC/ON/RUN) position. Failures are
indicated immediately if they occur when the system is on.
Even if the system is able to identify that a specific sensor is
in failure condition, the instrument cluster display shall
indicate that the ParkSense system is unavailable, without
reference to the sensor in failure condition. If even a single
sensor fails, the entire system must be disabled. The system
is turned off automatically.
Audible And Visual Signals Supplied By The Park
Assist System
SIGNAL MEANING INDICATION
Obstacle
Distance An obstacle
is present
within the sensors' field of view Audible signal
(dashboard
loudspeaker)
• Sound pulses emitted at a rate
that increases as the distance
decreases
• Emits continuous tone at
12 inches (30 cm)
• Adjustable volume level
programmable through personal
settings in the instrument cluster
display. Refer to “Instrument
Cluster Display” in “Getting To
Know Your Instrument Panel” for
further information.
Failure Sensor or
system
failures Visual Signal
(instrument panel)
• Icon appears on display
• Message is displayed on
instrument cluster display (if
equipped)
5
2020_RAM_PROMASTER_CITY_OM_USA=GUID-7B6A7FCA-79B0-423F-95C5-ED2A949C3D13=1=en=.book Page 177
Page 182 of 350

STARTING AND OPERATING 179
If it’s necessary to keep the ball mount and hitch ball
assembly mounted for a long period, it is possible to filter out
the ball mount and hitch ball assembly presence in sensor
field of view. The filtering operation must be performed only
by an authorized dealer.
PARKVIEW REAR BACK UP CAMERA
Your vehicle is equipped with the ParkView Rear Back Up
Camera that allows you to see an on-screen image of the rear
surroundings of your vehicle whenever the gear selector is
put into REVERSE. The image will be displayed on the
touchscreen display along with a caution note to “check
entire surroundings” across the top of the screen. After five
seconds this note will disappear. The ParkView camera is
located on the rear of the vehicle above the rear license plate.
The Rear Back Up Camera can also be activated when the
vehicle is not in REVERSE through the Uconnect System. Refer
to “Uconnect Settings” in “Multimedia” for further information.
NOTE:
If one of the rear cargo doors is not completely closed, the
Back Up Camera cannot provide an accurate image of the
area behind the vehicle. A dedicated message will appear on
the Uconnect display indicating the camera is not in the
correct position.
• Before using ParkSense, it is strongly recommended
that the ball mount and hitch ball assembly is discon -
nected from the vehicle when the vehicle is not used for
towing. Failure to do so can result in injury or damage
to vehicles or obstacles because the hitch ball will be
much closer to the obstacle than the rear fascia when
the loudspeaker sounds the continuous tone. Also, the
sensors could detect the ball mount and hitch ball
assembly, depending on its size and shape, giving a
false indication that an obstacle is behind the vehicle.
CAUTION!
• ParkSense is only a parking aid and it is unable to recognize every obstacle, including small obstacles.
Parking curbs might be temporarily detected or not
detected at all. Obstacles located above or below the
sensors will not be detected when they are in close
proximity.
• The vehicle must be driven slowly when using Park -
Sense in order to be able to stop in time when an
obstacle is detected. It is recommended that the driver
looks over his/her shoulder when using ParkSense.
WARNING! (Continued)
5
2020_RAM_PROMASTER_CITY_OM_USA=GUID-7B6A7FCA-79B0-423F-95C5-ED2A949C3D13=1=en=.book Page 179
Page 183 of 350
180 STARTING AND OPERATING
The Camera Delay setting can be set to on/off in the rear
camera settings menu. When the vehicle is shifted out of
REVERSE and the Camera Delay is turned off, the rear
camera mode is exited and the navigation or audio screen
appears on display again.
When the transmission is shifted out of REVERSE, and
Camera Delay is activated in the menu screen, the camera
image will continue to be displayed for up to 10 seconds,
unless the speed of the vehicle is greater than 8 mph (13 km/h), the transmission is in PARK, or the ignition is placed in
the OFF position.
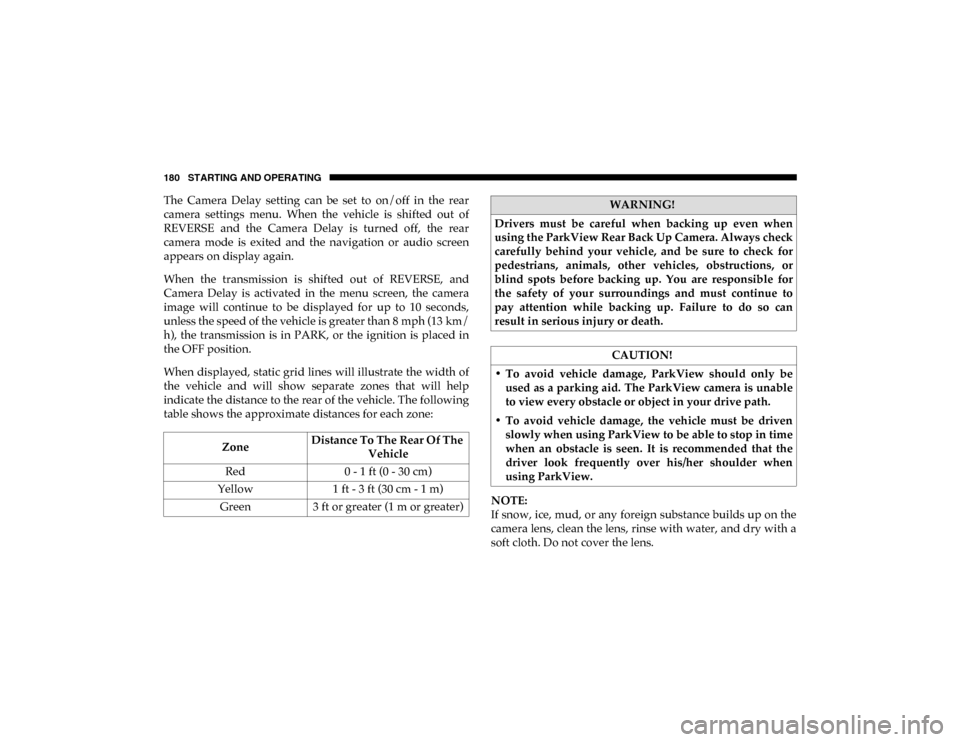
When displayed, static grid lines will illustrate the width of
the vehicle and will show separate zones that will help
indicate the distance to the rear of the vehicle. The following
table shows the approximate distances for each zone:
NOTE:
If snow, ice, mud, or any foreign substance builds up on the
camera lens, clean the lens, rinse with water, and dry with a
soft cloth. Do not cover the lens.
Zone
Distance To The Rear Of The
Vehicle
Red 0 - 1 ft (0 - 30 cm)
Yellow 1 ft - 3 ft (30 cm - 1 m)
Green 3 ft or greater (1 m or greater)WARNING!
Drivers must be careful when backing up even when
using the ParkView Rear Back Up Camera. Always check
carefully behind your vehicle, and be sure to check for
pedestrians, animals, other vehicles, obstructions, or
blind spots before backing up. You are responsible for
the safety of your surroundings and must continue to
pay attention while backing up. Failure to do so can
result in serious injury or death.
CAUTION!
• To avoid vehicle damage, ParkView should only be used as a parking aid. The ParkView camera is unable
to view every obstacle or object in your drive path.
• To avoid vehicle damage, the vehicle must be driven slowly when using ParkView to be able to stop in time
when an obstacle is seen. It is recommended that the
driver look frequently over his/her shoulder when
using ParkView.
2020_RAM_PROMASTER_CITY_OM_USA=GUID-7B6A7FCA-79B0-423F-95C5-ED2A949C3D13=1=en=.book Page 180
Page 194 of 350
STARTING AND OPERATING 191
Towing Requirements — Tires
• Do not attempt to tow a trailer while using a compact sparetire.
• Do not drive more than 50 mph (80 km/h) when towing while using a full size spare tire.
• Proper tire inflation pressures are essential to the safe and satisfactory operation of your vehicle. Refer to “Tires” in
“Servicing And Maintenance” for proper tire inflation
procedures.
• Check the trailer tires for proper tire inflation pressures before trailer usage.
• Check for signs of tire wear or visible tire damage before towing a trailer. Refer to “Tires” in “Servicing And Main -
tenance” for the proper inspection procedure.
• When replacing tires, refer to “Tires” in “Servicing And Maintenance” for the proper tire replacement procedures.
Replacing tires with a higher load carrying capacity will
not increase the vehicle's GVWR and GAWR limits. Towing Requirements — Trailer Brakes
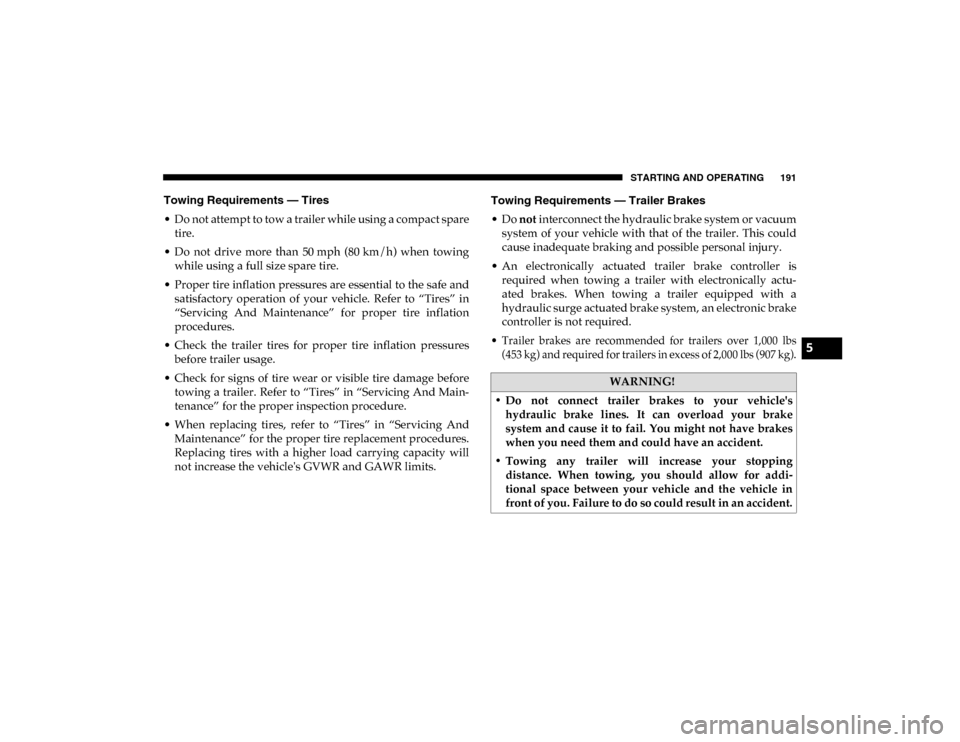
• Do
not interconnect the hydraulic brake system or vacuum
system of your vehicle with that of the trailer. This could
cause inadequate braking and possible personal injury.
• An electronically actuated trailer brake controller is required when towing a trailer with electronically actu -
ated brakes. When towing a trailer equipped with a
hydraulic surge actuated brake system, an electronic brake
controller is not required.
• Trailer brakes are recommended for trailers over 1,000 lbs (453 kg) and required for trailers in excess of 2,000 lbs (907 kg).
WARNING!
• Do not connect trailer brakes to your vehicle's hydraulic brake lines. It can overload your brake
system and cause it to fail. You might not have brakes
when you need them and could have an accident.
• Towing any trailer will increase your stopping distance. When towing, you should allow for addi -
tional space between your vehicle and the vehicle in
front of you. Failure to do so could result in an accident.
5
2020_RAM_PROMASTER_CITY_OM_USA=GUID-7B6A7FCA-79B0-423F-95C5-ED2A949C3D13=1=en=.book Page 191