RENAULT ALASKAN 2017 Owners Manual
Manufacturer: RENAULT, Model Year: 2017, Model line: ALASKAN, Model: RENAULT ALASKAN 2017Pages: 340, PDF Size: 6.93 MB
Page 261 of 340
•
Do not galvanise the emergency tyre punc-
ture repair kit.
• Do not use the emergency tyre puncture re-
pair kit under the following conditions. Con-
tact an approved dealer or qualified workshop
or professional road assistance.
–w
hen the sealant has passed its expiration
date (shown on the label attached to the
bottle)
–w hen the cut or the puncture is approxi-
mately 6mm(0.25 in) or longer
–w hen the side of the tyre is damaged
–w hen the vehicle has been driven with a
considerable loss of air from the tyre
–w hen the tyre is completely displaced in-
side or outside the rim
–w hen the tyre rim is damaged
–w hen two or more tyres are flat Getting emergency tyre puncture repair
kit
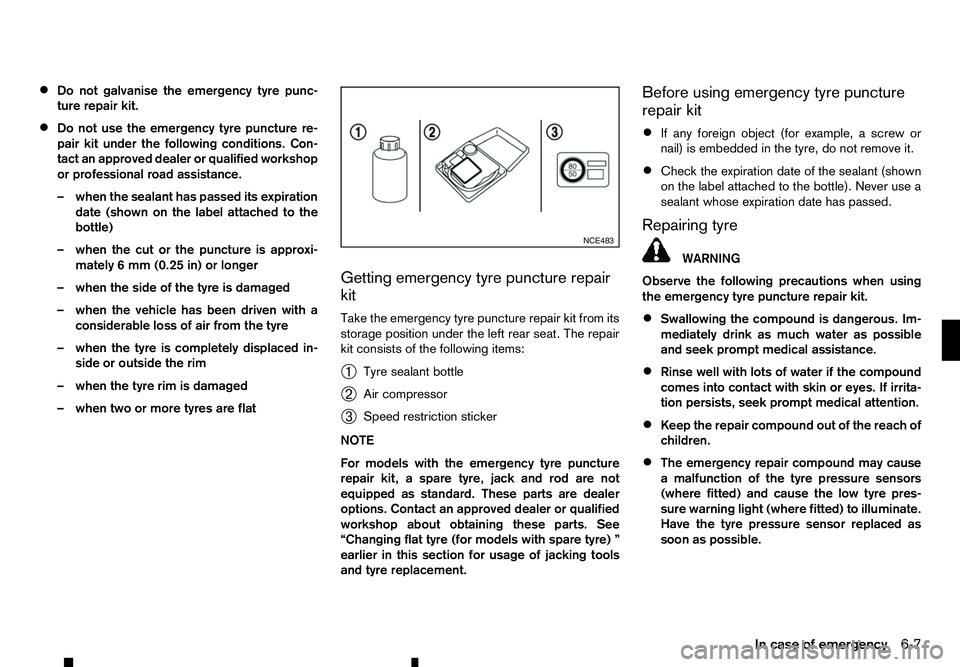
Take the emergency tyre puncture repair kit from its
storage position under the left rear seat. The repair
kit consists of the following items:
➀
Tyre sealant bottle
➁ Air compressor
➂ Speed restriction sticker
NOTE
For models with the emergency tyre puncture
repair kit, aspare tyre, jack and rod are not
equipped as standard. These parts are dealer
options. Contact an approved dealer or qualified
workshop about obtaining these parts. See
“Changing flat tyre (for models with spare tyre) ”
earlier in this section for usage of jacking tools
and tyre replacement. Before using emergency tyre puncture
repair kit
• If any foreign object (for example,
ascrew or
nail) is embedded in the tyre, do not remove it.
• Check the expiration date of the sealant (shown
on the label attached to the bottle). Never use a
sealant whose expiration date has passed.
Repairing tyre WARNING
Observe the following precautions when using
the emergency tyre puncture repair kit.
• Swallowing the compound is dangerous. Im-
mediately drink as much water as possible
and seek prompt medical assistance.
• Rinse well with lots of water if the compound
comes into contact with skin or eyes. If irrita-
tion persists, seek prompt medical attention.
• Keep the repair compound out of the reach of
children.
• The emergency repair compound may cause
am
alfunction of the tyre pressure sensors
(where fitted) and cause the low tyre pres-
sure warning light (where fitted) to illuminate.
Have the tyre pressure sensor replaced as
soon as possible. NCE483
In case of emergency
6-7
Page 262 of 340
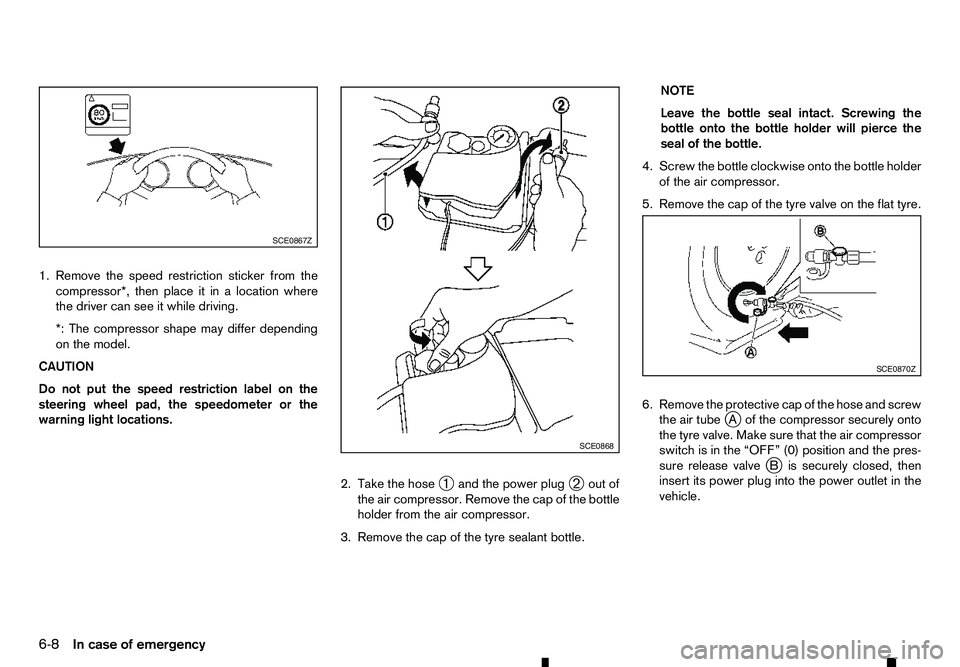
1. Remove the speed restriction sticker from the
compressor*, then place it in alocation where
the driver can see it while driving.
*: The compressor shape may differ depending
on the model.
CAUTION
Do not put the speed restriction label on the
steering wheel pad, the speedometer or the
warning light locations.
2. Take the hose➀and the power plug
➁out of
the air compressor. Remove the cap of the bottle holder from the air compressor.
3. Remove the cap of the tyre sealant bottle. NOTE
Leave the bottle seal intact. Screwing the
bottle onto the bottle holder will pierce the
seal of the bottle.
4. Screw the bottle clockwise onto the bottle holder of the air compressor.
5. Remove the cap of the tyre valve on the flat tyre.
6. Remove the protective cap of the hose and screw the air tube j
Ao fthe compressor securely onto
the tyre valve. Make sure that the air compressor
switch is in the “OFF” (0) position and the pres-
sure release valve j
Bi ssecurely closed, then
insert its power plug into the power outlet in the
vehicle. SCE0867Z
SCE0868 SCE0870Z
6-8 In case of emergency
Page 263 of 340
NOTE
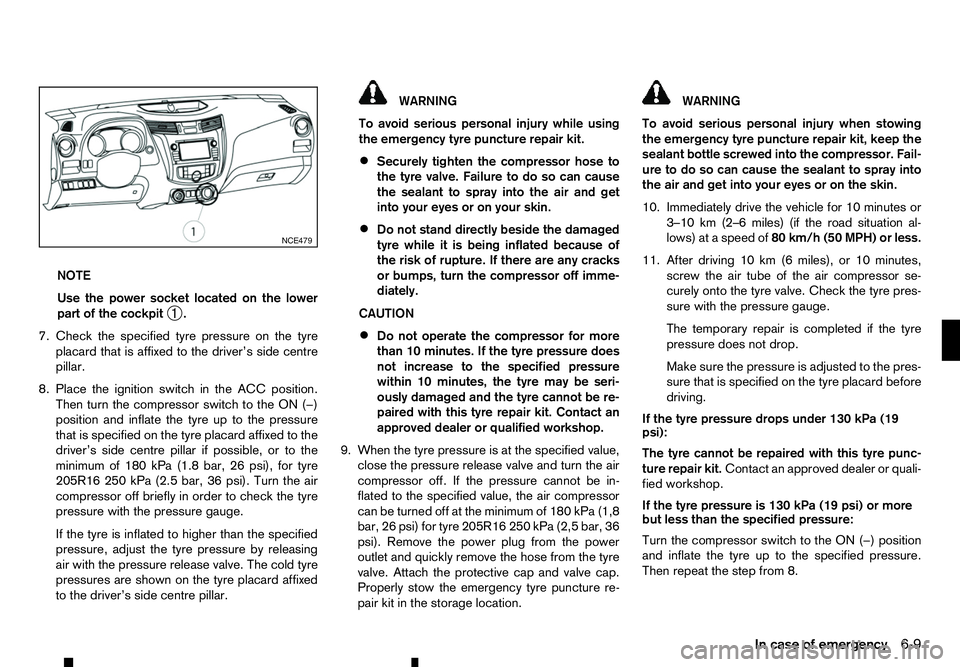
Use the power socket located on the lower
part of the cockpit ➀.
7. Check the specified tyre pressure on the tyre placard that is affixed to the driver’s side centre
pillar.
8. Place the ignition switch in the ACC position. Then turn the compressor switch to the ON (−)
position and inflate the tyre up to the pressure
that is specified on the tyre placard affixed to the
driver’s side centre pillar if possible, or to the
minimum of 180 kPa (1.8 bar, 26 psi), for tyre
205R16 250 kPa (2.5 bar, 36 psi). Turn the air
compressor off briefly in order to check the tyre
pressure with the pressure gauge.
If the tyre is inflated to higher than the specified
pressure, adjust the tyre pressure by releasing
air with the pressure release valve. The cold tyre
pressures are shown on the tyre placard affixed
to the driver’s side centre pillar. WARNING
To avoid serious personal injury while using
the emergency tyre puncture repair kit.
• Securely tighten the compressor hose to
the tyre valve. Failure to do so can cause
the sealant to spray into the air and get
into your eyes or on your skin.
• Do not stand directly beside the damaged
tyre while it is being inflated because of
the risk of rupture. If there are any cracks
or bumps, turn the compressor off imme-
diately.
CAUTION
• Do not operate the compressor for more
than 10 minutes. If the tyre pressure does
not increase to the specified pressure
within 10 minutes, the tyre may be seri-
ously damaged and the tyre cannot be re-
paired with this tyre repair kit. Contact an
approved dealer or qualified workshop.
9. When the tyre pressure is at the specified value, close the pressure release valve and turn the air
compressor off. If the pressure cannot be in-
flated to the specified value, the air compressor
can be turned off at the minimum of 180 kPa (1,8
bar, 26 psi) for tyre 205R16 250 kPa (2,5 bar, 36
psi). Remove the power plug from the power
outlet and quickly remove the hose from the tyre
valve. Attach the protective cap and valve cap.
Properly stow the emergency tyre puncture re-
pair kit in the storage location. WARNING
To avoid serious personal injury when stowing
the emergency tyre puncture repair kit, keep the
sealant bottle screwed into the compressor. Fail-
ure to do so can cause the sealant to spray into
the air and get into your eyes or on the skin.
10. Immediately drive the vehicle for 10 minutes or
3–10 km (2–6 miles) (if the road situation al-lows) at aspeed of 80 km/h (50 MPH) or less.
11. After driving 10 km (6 miles), or 10 minutes, screw the air tube of the air compressor se-
curely onto the tyre valve. Check the tyre pres-
sure with the pressure gauge.
The temporary repair is completed if the tyre
pressure does not drop.
Make sure the pressure is adjusted to the pres-
sure that is specified on the tyre placard before
driving.
If the tyre pressure drops under 130 kPa (19
psi):
The tyre cannot be repaired with this tyre punc-
ture repair kit. Contact an approved dealer or quali-
fied workshop.
If the tyre pressure is 130 kPa (19 psi) or more
but less than the specified pressure:
Turn the compressor switch to the ON (−) position
and inflate the tyre up to the specified pressure.
Then repeat the step from 8. NCE479
In case of emergency
6-9
Page 264 of 340
If the pressure drops again,
the tyre cannot be
repaired with this tyre puncture repair kit. Con-
tact an approved dealer or qualified workshop.
When the tyre pressure is the specified
pressure:
The temporary repair is completed.
See an approved dealer or qualified workshop for
the repair/replacement as soon as possible.
After repairing tyre
See an approved dealer or qualified workshop for
tyre repair or replacement and for anew tyre seal-
ant bottle and hose, as soon as possible.
CAUTION
• Before driving, ensure tyre is adjusted to rec-
ommended inflation pressure as indicated on
vehicle placard. Monitor tyre pressure until
sealed tyre is replaced.
• Do not drive the vehicle at speeds faster than
50 MPH (80 km/h), and the damaged tyre
must be replaced as quickly as possible
(within
amaximum driving distance of 200 km
(120 miles)). You must not continue to drive if
heavy vibrations, unsteady steering behaviour
or noises should occur while driving.
• Immediately after using Emergency Tyre Seal-
ant to repair
aminor tyre puncture, take your
vehicle to an approved dealer or qualified
workshop to inspect, and repair or replace
the tyre. The Emergency Tyre Sealant cannot
permanently seal apunctured tyre. Continu- ing operation of the vehicle without
aperma-
nent tyre repair can lead to acrash.
• If you used Emergency Tyre Sealant to repair
am
inor tyre puncture, your approved dealer
or qualified workshop will also need to re-
place the TPMS sensor in addition to repair-
ing or replacing the tyre.
• RENAULT recommends using only RENAULT
Genuine Emergency Tyre Sealant provided
with your vehicle. Other tyre sealants may
damage the valve stem seal which can cause
the tyre to lose air pressure. WARNING
• Incorrect jump starting can lead to
abattery
explosion. The battery explosion may result in
severe injury or death. It may also result in
damage to the vehicle. Be sure to follow the
instructions in this section.
• Explosive hydrogen gas is always present in
the vicinity of the battery. Keep all sparks and
flames away from the battery.
• Always wear suitable eye protection and re-
move rings, bracelets, and any other jewellery
whenever working on or near
abattery.
• Never lean over the battery while jump start-
ing.
• Never allow battery fluid to come into contact
with eyes, skin, clothes or the vehicle’s
painted surfaces. Battery fluid is
acorrosive
sulphuric acid which can cause severe burns.
If the fluid comes into contact with anything,
immediately flush the contacted area with
plenty of water.
• Keep the battery out of the reach of children.
• The booster battery must be rated at 12 volts.
Use of an incorrectly rated battery will dam-
age your vehicle.
• Never attempt to jump start
afrozen battery.
It could explode and cause serious injury.
JUMP STARTING
6-10 In case of emergency
Page 265 of 340
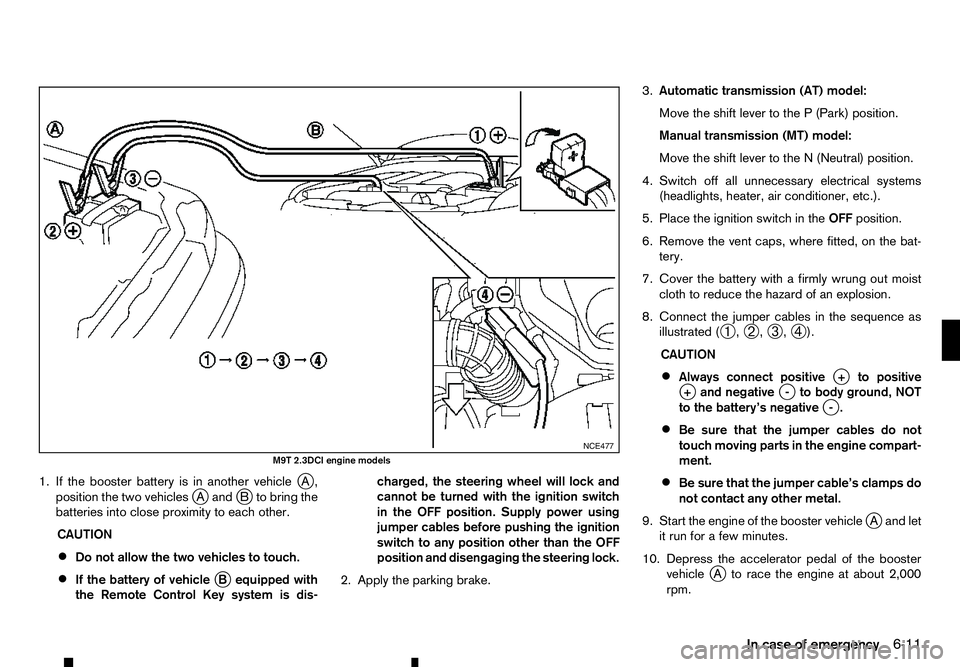
1. If the booster battery is in another vehicle
jA,
position the two vehicles j
Aa ndjBt obring the
batteries into close proximity to each other.
CAUTION
• Do not allow the two vehicles to touch.
• If the battery of vehicle
jBe quipped with
the Remote Control Key system is dis- charged, the steering wheel will lock and
cannot be turned with the ignition switch
in the OFF position. Supply power using
jumper cables before pushing the ignition
switch to any position other than the OFF
position and disengaging the steering lock.
2. Apply the parking brake. 3.
Automatic transmission (AT) model:
Move the shift lever to the P(Park) position.
Manual transmission (MT) model:
Move the shift lever to the N(Neutral) position.
4. Switch off all unnecessary electrical systems (headlights, heater, air conditioner, etc.).
5. Place the ignition switch in the OFFposition.
6. Remove the vent caps, where fitted, on the bat- tery.
7. Cover the battery with afirmly wrung out moist
cloth to reduce the hazard of an explosion.
8. Connect the jumper cables in the sequence as illustrated ( ➀,
➁ ,
➂ ,
➃ ).
CAUTION
• Always connect positive
j+t opositive
j +a nd negative j-t obody ground, NOT
to the battery’s negative j
-.
• Be sure that the jumper cables do not
touch moving parts in the engine compart-
ment.
• Be sure that the jumper cable’s clamps do
not contact any other metal.
9. Start the engine of the booster vehicle j
Aa nd let
it run for afew minutes.
10. Depress the accelerator pedal of the booster vehicle j
At orace the engine at about 2,000
rpm. NCE477
M9T 2.3DCI engine models
In case of emergency6-11
Page 266 of 340
11. Start the engine of the jumped vehicle
jBi nthe
normal manner.
CAUTION
Never keep the starter motor engaged for
more than 10 seconds. If the engine does not
start right away, place the ignition switch in
the “LOCK” position and wait at least 10 sec-
onds before trying again.
12. After the engine is started, carefully disconnect the jumper cables in the opposite sequence
from that illustrated ( ➃,
➂ ,
➁ ,
➀ ).
13. Remove and dispose of the cloth properly as it may be contaminated with corrosive acid.
14. Replace the vent caps, if removed. Do not attempt to start the engine by pushing the
vehicle.
CAUTION
• Automatic Transmission (AT) model cannot
be started by pushing. Attempting to do so
may cause damage to the transmission.
• Three-way catalyst equipped model should
not be started by pushing. Attempting to do
so may cause damage to the three-way cata-
lyst.
• Diesel Oxidation Catalyst equipped model
should not be started by pushing. Attempting
to do so may cause damage to the catalyst.
• Never try to start the engine by towing. When
the engine starts, the forward surge could
cause the vehicle to collide with the towing
vehicle. WARNING
• Never continue driving if your vehicle over-
heats. Doing so could cause engine damage
and/or avehicle fire.
• Never open the bonnet if steam is coming
out.
• Never remove the radiator or coolant reser-
voir cap while the engine is hot. If the radiator
or coolant reservoir cap is removed when the
engine is hot, pressurised hot water will spurt
out and possibly cause burning, scalding or
serious injury.
• If steam or coolant is coming from the engine,
stand clear of the vehicle to prevent getting
scalded.
• The engine cooling fan can start at any time
when the coolant temperature exceeds pre-
set degrees.
• Be careful not to allow your hands, hair, jewel-
lery or clothing to come into contact with, or
to get caught in the cooling fan or drive belts.
If your vehicle is overheating, or if you feel alack of
engine power, detect unusual noise, etc., take the
following steps:
1. Safely move the vehicle off the road away from traffic.
2. Turn on the hazard indicator flashers.
3. Apply the parking brake.
PUSH STARTING
IF YOUR VEHICLE OVERHEATS
6-12 In case of emergency
Page 267 of 340
4.
Automatic transmission model:
Move the shift lever to the P(Park) position.
Manual transmission model:
Move the shift lever to the N(Neutral) position.
DO NOT STOP THE ENGINE.
5. Open all the windows.
6. Turn off the air conditioner. Move the tempera- ture control to maximum hot and the fan control
to high speed.
7. Get out from the vehicle.
8. Visually inspect and listen for steam or coolant escaping from the radiator before opening the
bonnet. Wait until no steam or coolant can be
seen before proceeding.
9. Open the engine bonnet.
10. Visually inspect if the cooling fan is running.
11. Visually inspect the radiator and radiator hoses for leakage. If the cooling fan is not running or
the coolant is leaking, stop the engine.
12. After the engine cools down, check the coolant level in the reservoir with the engine running.
Do not open the radiator or coolant reservoir
cap.
13. Add coolant to the reservoir if necessary.
Have your vehicle inspected/repaired at an
approved dealer or qualified workshop. When towing your vehicle, local regulations for tow-
ing must be followed. Incorrect towing equipment
could damage your vehicle. To assure proper tow-
ing and to prevent accidental damage to your ve-
hicle, RENAULT recommends that you have profes-
sional road assistance personnel tow your vehicle. It
is advisable to have the professional road assistant
carefully read the following precautions.
TOWING PRECAUTIONS
• Be sure that the transmission, steering system
and powertrain are in working condition before
towing. If any units are damaged, the vehicle
must be towed using
adolly or flatbed tow truck.
(Two- Wheel Drive (2WD) model)
• RENAULT recommends that your vehicle be
towed with the driving wheels off the ground.
(Two- Wheel Drive (2WD) model)
• To tow
avehicle with automatic transmission,
and appropriate vehicle dolly MUSTbe placed
under the towed vehicles drive wheels. Always
follow the dolly manufacturer’s recommenda-
tions when using their product.
• Always attach safety chains before towing.
• Never tow Four-Wheel Drive (4WD) model with
any of the wheels on the ground as this may
cause serious and expensive damage to the driv-
etrain. TOWING RECOMMENDED BY
RENAULT
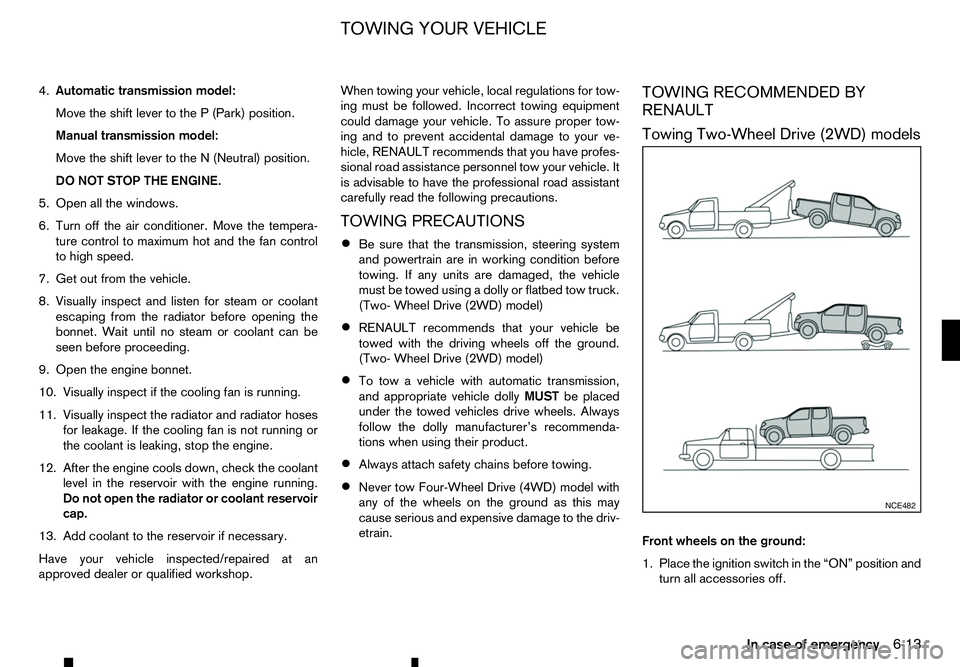
Towing Two-Wheel Drive (2WD) models
Front wheels on the ground:
1. Place the ignition switch in the “ON” position and
turn all accessories off. NCE482
TOWING YOUR VEHICLE
In case of emergency6-13
Page 268 of 340

2. Secure the steering wheel in
astraight ahead
position with rope or similar device.
3. Move the shift lever to the N(Neutral) position.
4. Release the parking brake.
5. Attach safety chains before towing.
Rear wheels on the ground:
RENAULT recommends that towing dollies be used
under the rear wheels when towing your vehicle or
the vehicle be placed on aflatbed tow truck as illus-
trated.
CAUTION
Never tow Automatic Transmission (AT) model
with the rear wheels on the ground. Doing so will
cause serious and expensive damage to the
transmission.
Manual Transmission (MT) model:
If you have to tow aMTvehicle with rear wheels on
the ground, perform the following procedures.
CAUTION
Observe the following restricted towing speeds
and distances.
• Speed: Below 50 km/h (30 MPH)
• Distance: Less than 65 km (40 miles)
1. Place the ignition switch in the “ON” position and turn all accessories off.
2. Move the shift lever to the N(Neutral) position.
3. Release the parking brake. 4. Attach safety chains whenever towing.
All four wheels on the ground:
RENAULT recommends that the vehicle be placed
on
aflatbed tow truck as illustrated.
CAUTION
Never tow Automatic Transmission (AT) model
with all four wheels on the ground. Doing so will
cause serious and expensive damage to the driv-
etrain.
Manual Transmission (MT) model:
If you have to tow aMTvehicle with all four wheels
on the ground, perform the following procedures.
CAUTION
• Never tow
aManual Transmission (MT) model
backward with all four wheels on the ground.
• Observe the following restricted towing
speeds and distances.
–S
peed: Below 50 km/h (30 MPH)
–D istance: Less than 65 km (40 miles)
1. Place the ignition switch in the “ON” position and turn all accessories off.
2. Move the shift lever to the N(Neutral) position.
3. Release the parking brake.
6-14 In case of emergency
Page 269 of 340
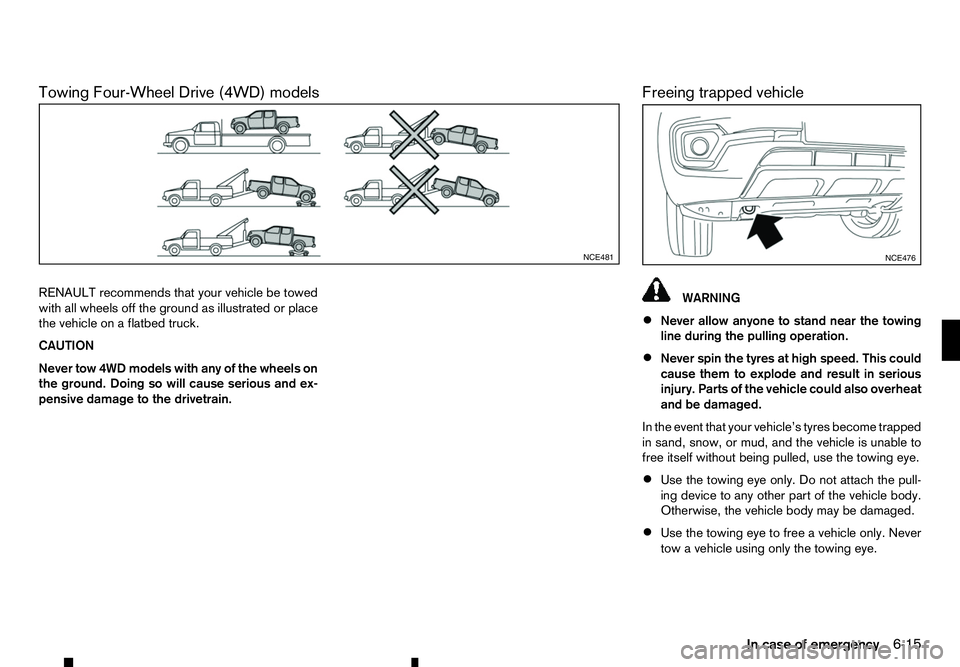
Towing Four-Wheel Drive (4WD) models
RENAULT recommends that your vehicle be towed
with all wheels off the ground as illustrated or place
the vehicle on aflatbed truck.
CAUTION
Never tow 4WD models with any of the wheels on
the ground. Doing so will cause serious and ex-
pensive damage to the drivetrain. Freeing trapped vehicle WARNING
• Never allow anyone to stand near the towing
line during the pulling operation.
• Never spin the tyres at high speed. This could
cause them to explode and result in serious
injury. Parts of the vehicle could also overheat
and be damaged.
In the event that your vehicle’s tyres become trapped
in sand, snow, or mud, and the vehicle is unable to
free itself without being pulled, use the towing eye.
• Use the towing eye only. Do not attach the pull-
ing device to any other part of the vehicle body.
Otherwise, the vehicle body may be damaged.
• Use the towing eye to free
avehicle only. Never
tow avehicle using only the towing eye. NCE481
NCE476
In case of emergency
6-15
Page 270 of 340
•
The towing eye is under tremendous stress when
used to free atrapped vehicle. Always pull the
pulling device straight out from the vehicle. Never
pull on the towing eye at an angle.
CAUTION
In order to not break the towing line, tension it
slowly.
6-16 In case of emergency