RENAULT ALASKAN 2017 Owners Manual
Manufacturer: RENAULT, Model Year: 2017, Model line: ALASKAN, Model: RENAULT ALASKAN 2017Pages: 340, PDF Size: 6.93 MB
Page 291 of 340
•
Recommended battery: CR2025 or equiva-
lent
• Do not touch the internal circuit and electric
terminals as doing so could cause
amalfunc-
tion.
• Make sure that the
%side faces the bottom
of the case.
4. Align the tips of the upper and lower parts ➀,
and then push them together until it is securely
closed ➁.
5. Operate the buttons to check its operation.
See an approved dealer or qualified workshop if you
need assistance for replacement. WARNING
• Operating the engine with the air cleaner filter
off can cause you or others to be burned. The
air cleaner filter not only cleans the intake air,
it also stops flame if the engine backfires. If
the air cleaner filter is not installed and the engine backfires, you could be burned. Never
drive with the air cleaner filter off. Be cautious
working on the engine when the air cleaner
filter is off.
• Never pour fuel into the throttle body or at-
tempt to start the engine with the air cleaner
removed. Doing so could result in serious in-
jury.
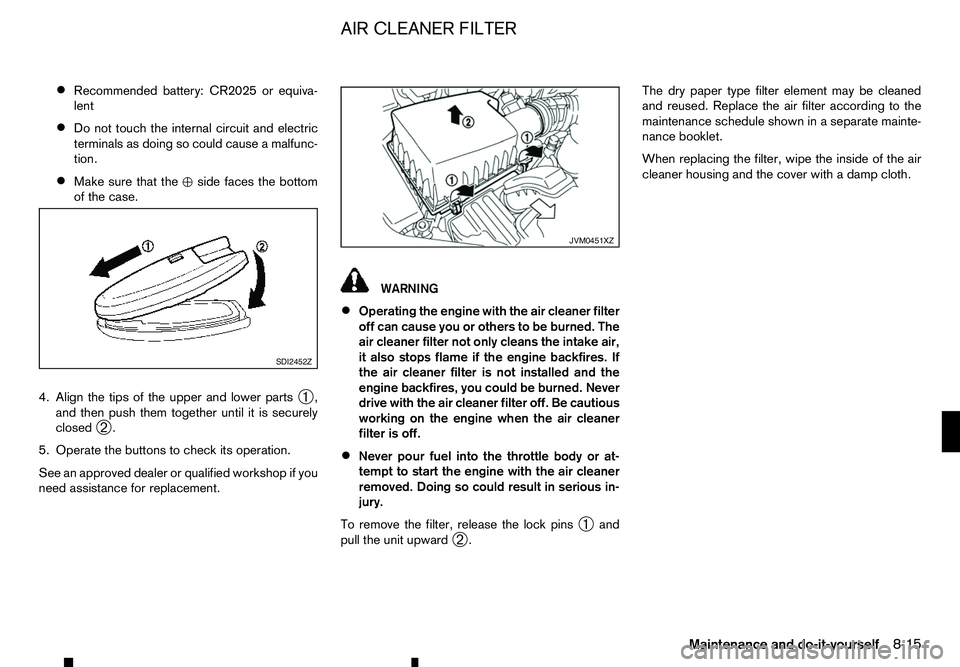
To remove the filter, release the lock pins ➀and
pull the unit upward ➁. The dry paper type filter element may be cleaned
and reused. Replace the air filter according to the
maintenance schedule shown in
aseparate mainte-
nance booklet.
When replacing the filter, wipe the inside of the air
cleaner housing and the cover with adamp cloth. SDI2452Z JVM0451XZ
AIR CLEANER FILTER
Maintenance and do-it-yourself8-15
Page 292 of 340
WINDSCREEN WIPER BLADES
Cleaning
If the windscreen does not become clear after using
the windscreen washer or if the wiper blades chat-
ter when operating the windscreen wipers, wax or
other materials may be on the windscreen and/or
wiper blades.
Clean the outside of the windscreen surface with a
washer solution or mild detergent. Your windscreen
is clean if beads do not form when rinsing with wa-
ter.
Clean the blade by wiping it with acloth soaked in a
washer solution or amild detergent. Rinse the blade
with water. If your windscreen is still not clear after cleaning the blades and using the wipers, replace
the blades.
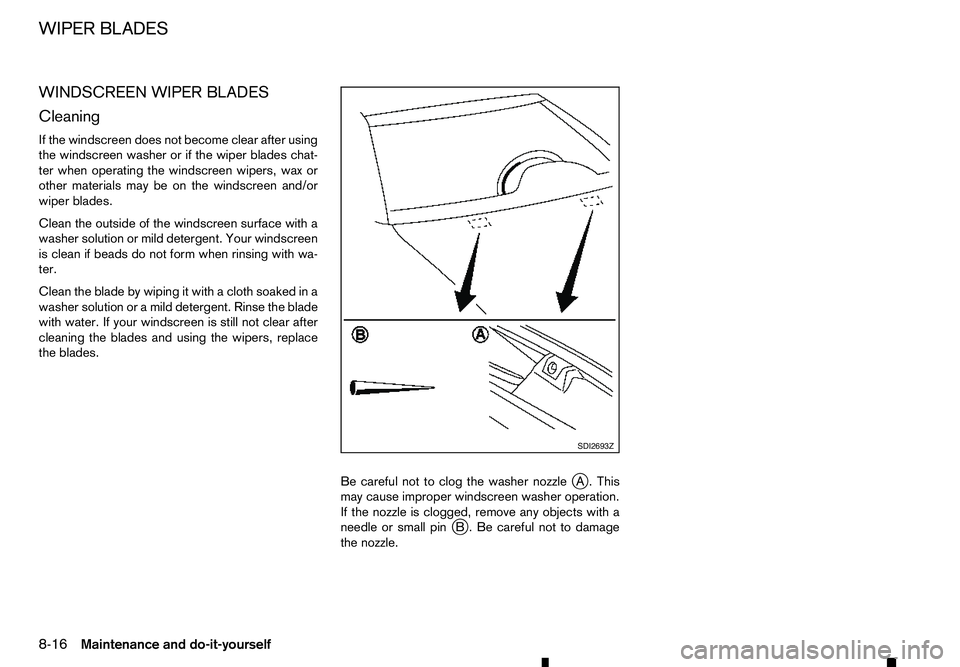
Be careful not to clog the washer nozzlej
A. This
may cause improper windscreen washer operation.
If the nozzle is clogged, remove any objects with a
needle or small pin j
B. Be careful not to damage
the nozzle. SDI2693Z
WIPER BLADES
8-16 Maintenance and do-it-yourself
Page 293 of 340
Replacing
Replace the wiper blades if they are worn.
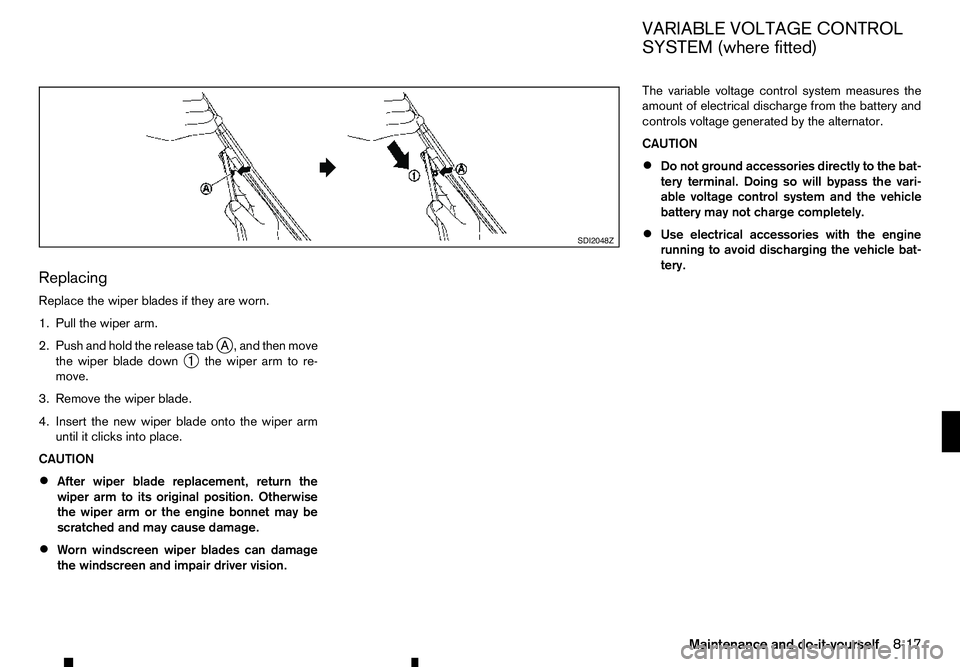
1. Pull the wiper arm.
2. Push and hold the release tab j
A, and then move
the wiper blade down ➀the wiper arm to re-
move.
3. Remove the wiper blade.
4. Insert the new wiper blade onto the wiper arm until it clicks into place.
CAUTION
• After wiper blade replacement, return the
wiper arm to its original position. Otherwise
the wiper arm or the engine bonnet may be
scratched and may cause damage.
• Worn windscreen wiper blades can damage
the windscreen and impair driver vision. The variable voltage control system measures the
amount of electrical discharge from the battery and
controls voltage generated by the alternator.
CAUTION
• Do not ground accessories directly to the bat-
tery terminal. Doing so will bypass the vari-
able voltage control system and the vehicle
battery may not charge completely.
• Use electrical accessories with the engine
running to avoid discharging the vehicle bat-
tery. SDI2048Z
VARIABLE VOLTAGE CONTROL
SYSTEM (where fitted)
Maintenance and do-it-yourself 8-17
Page 294 of 340
ENGINE COMPARTMENT
CAUTION
Never use afuse of ahigher or lower amperage
rating than that specified on the fuse box cover.
This could damage the electrical system or cause
af ire.
Never attempt to use other material (wire, alu-
minium foil. etc.) in place of afuse. This could
damage the electrical system or cause afire. The location and the amperage rating of fuses are
shown on the underside of the fuse box lid.
The number of fuses may vary depending on the
features equipped to the vehicle.
If any electrical equipment does not operate, check
for an open fuse.
1. Be sure the ignition switch is in the OFF or LOCK
position.
2. Be sure the headlight switch is in the OFF posi- tion.
3. Open the engine bonnet.
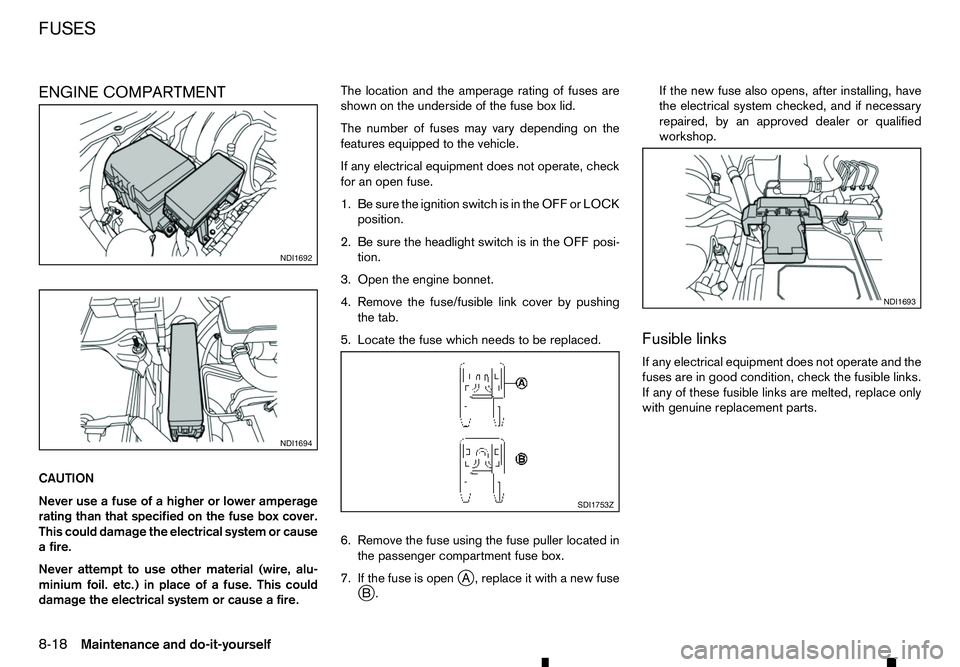
4. Remove the fuse/fusible link cover by pushing the tab.
5. Locate the fuse which needs to be replaced.
6. Remove the fuse using the fuse puller located in the passenger compartment fuse box.
7. If the fuse is open j
A, replace it with anew fuse
j B. If the new fuse also opens, after installing, have
the electrical system checked, and if necessary
repaired, by an approved dealer or qualified
workshop.
Fusible links
If any electrical equipment does not operate and the
fuses are in good condition, check the fusible links.
If any of these fusible links are melted, replace only
with genuine replacement parts. NDI1692
NDI1694
SDI1753Z NDI1693
FUSES
8-18
Maintenance and do-it-yourself
Page 295 of 340
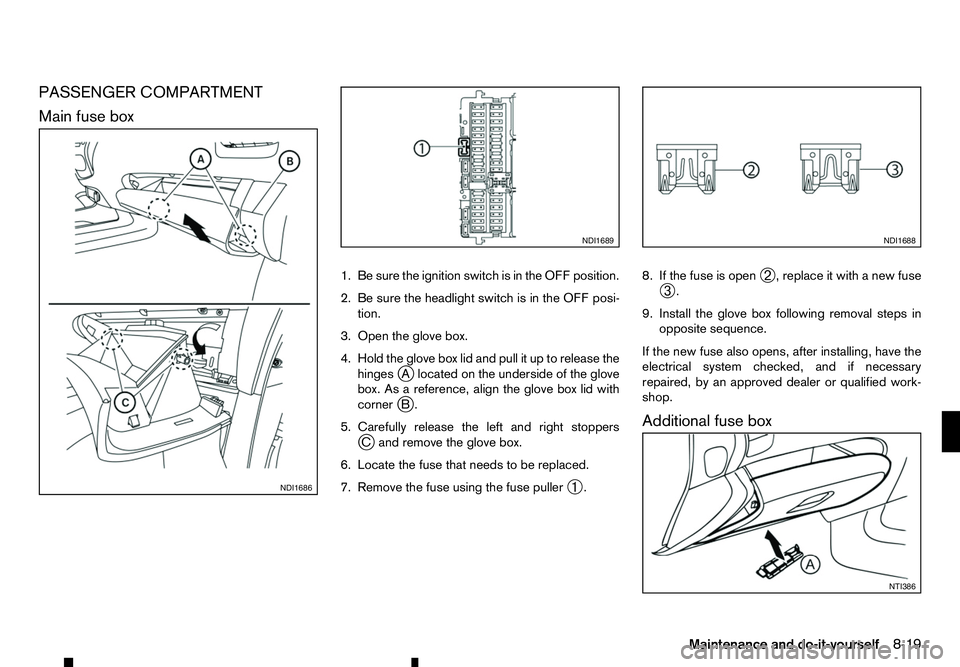
PASSENGER COMPARTMENT
Main fuse box
1. Be sure the ignition switch is in the OFF position.
2. Be sure the headlight switch is in the OFF posi-tion.
3. Open the glove box.
4. Hold the glove box lid and pull it up to release the hinges jAl ocated on the underside of the glove
box. As areference, align the glove box lid with
corner jB.
5. Carefully release the left and right stoppers jCa nd remove the glove box.
6. Locate the fuse that needs to be replaced.
7. Remove the fuse using the fuse puller ➀. 8. If the fuse is open
➁,r
eplace it with anew fuse
➂ .
9. Install the glove box following removal steps in opposite sequence.
If the new fuse also opens, after installing, have the
electrical system checked, and if necessary
repaired, by an approved dealer or qualified work-
shop.
Additional fuse box NDI1686 NDI1689 NDI1688
NTI386
Maintenance and do-it-yourself
8-19
Page 296 of 340
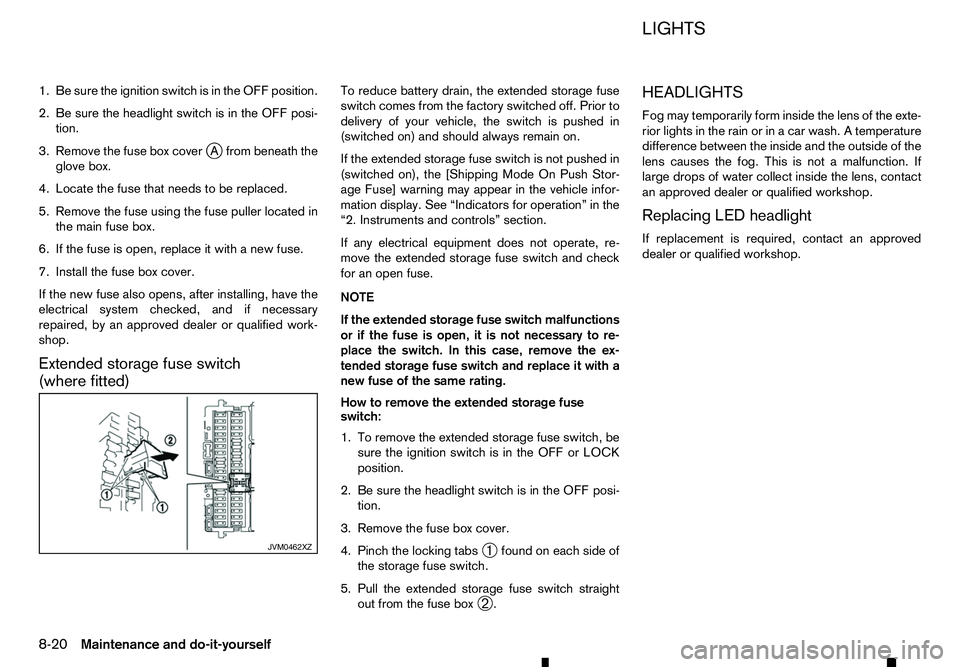
1. Be sure the ignition switch is in the OFF position.
2. Be sure the headlight switch is in the OFF posi- tion.
3. Remove the fuse box cover j
Af rom beneath the
glove box.
4. Locate the fuse that needs to be replaced.
5. Remove the fuse using the fuse puller located in the main fuse box.
6. If the fuse is open, replace it with anew fuse.
7. Install the fuse box cover.
If the new fuse also opens, after installing, have the
electrical system checked, and if necessary
repaired, by an approved dealer or qualified work-
shop.
Extended storage fuse switch
(where fitted) To reduce battery drain, the extended storage fuse
switch comes from the factory switched off. Prior to
delivery of your vehicle, the switch is pushed in
(switched on) and should always remain on.
If the extended storage fuse switch is not pushed in
(switched on), the [Shipping Mode On Push Stor-
age Fuse] warning may appear in the vehicle infor-
mation display. See “Indicators for operation” in the
“2. Instruments and controls” section.
If any electrical equipment does not operate, re-
move the extended storage fuse switch and check for an open fuse.
NOTE
If the extended storage fuse switch malfunctions
or if the fuse is open, it is not necessary to re-
place the switch. In this case, remove the ex- tended storage fuse switch and replace it with a
new fuse of the same rating.
How to remove the extended storage fuse
switch:
1. To remove the extended storage fuse switch, be sure the ignition switch is in the OFF or LOCK
position.
2. Be sure the headlight switch is in the OFF posi- tion.
3. Remove the fuse box cover.
4. Pinch the locking tabs ➀found on each side of
the storage fuse switch.
5. Pull the extended storage fuse switch straight out from the fuse box ➁. HEADLIGHTS
Fog may temporarily form inside the lens of the exte-
rior lights in the rain or in
acar wash. Atemperature
difference between the inside and the outside of the
lens causes the fog. This is not amalfunction. If
large drops of water collect inside the lens, contact
an approved dealer or qualified workshop.
Replacing LED headlight
If replacement is required, contact an approved
dealer or qualified workshop. JVM0462XZ LIGHTS
8-20 Maintenance and do-it-yourself
Page 297 of 340
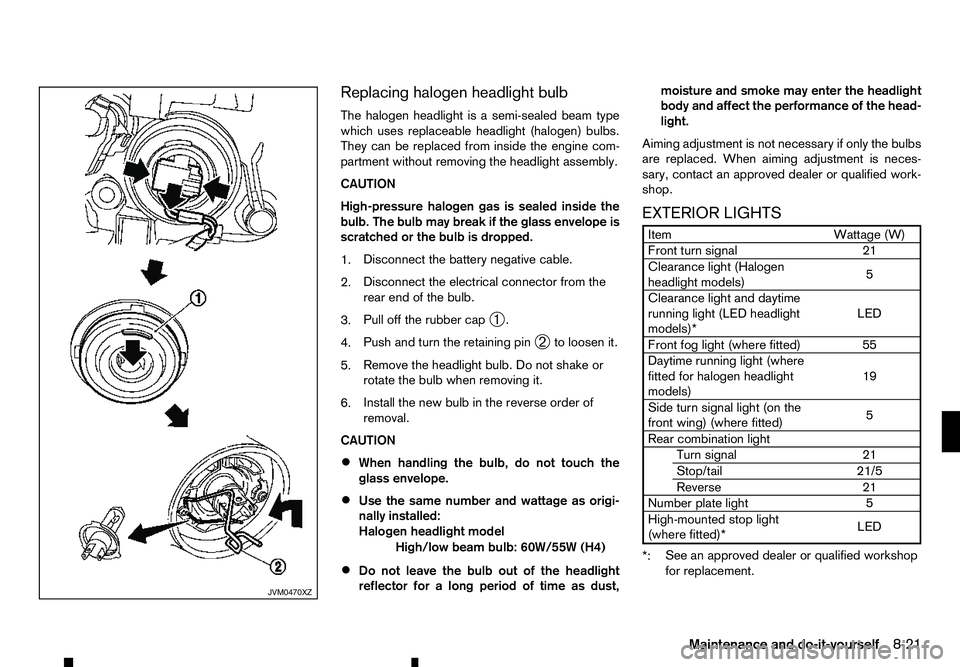
Replacing halogen headlight bulb
The halogen headlight is asemi-sealed beam type
which uses replaceable headlight (halogen) bulbs.
They can be replaced from inside the engine com-
partment without removing the headlight assembly.
CAUTION
High-pressure halogen gas is sealed inside the
bulb. The bulb may break if the glass envelope is
scratched or the bulb is dropped.
1. Disconnect the battery negative cable.
2. Disconnect the electrical connector from the
rear end of the bulb.
3. Pull off the rubber cap
➀.
4. Push and turn the retaining pin
➁to loosen it.
5. Remove the headlight bulb. Do not shake or
rotate the bulb when removing it.
6. Install the new bulb in the reverse order of
removal.
CAUTION
• When handling the bulb, do not touch the
glass envelope.
• Use the same number and wattage as origi-
nally installed:
Halogen headlight model
High/low beam bulb: 60W/55W (H4)
• Do not leave the bulb out of the headlight
reflector for
along period of time as dust, moisture and smoke may enter the headlight
body and affect the performance of the head-
light.
Aiming adjustment is not necessary if only the bulbs
are replaced. When aiming adjustment is neces-
sary, contact an approved dealer or qualified work-
shop.
EXTERIOR LIGHTS Item
Wattage (W)
Front turn signal 21
Clearance light (Halogen
headlight models) 5
Clearance light and daytime
running light (LED headlight
models)* LED
Front fog light (where fitted) 55
Daytime running light (where
fitted for halogen headlight
models) 19
Side turn signal light (on the
front wing) (where fitted) 5
Rear combination light Turn signal 21
Stop/tail 21/5
Reverse 21
Number plate light 5
High-mounted stop light (where fitted)* LED
*: See an approved dealer or qualified workshop
for replacement. JVM0470XZ
Maintenance and do-it-yourself
8-21
Page 298 of 340
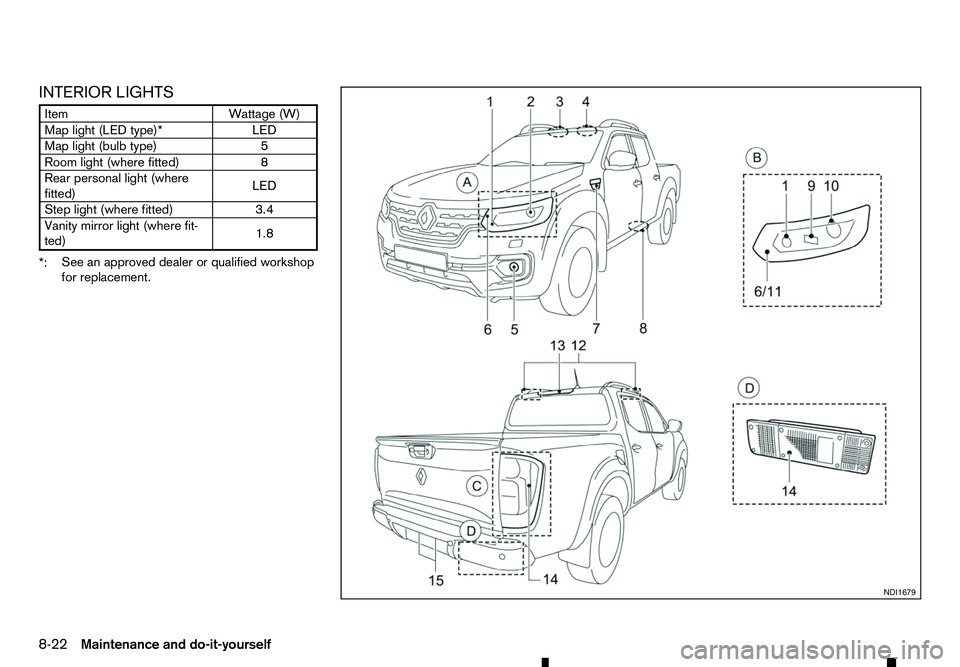
INTERIOR LIGHTS
Item
Wattage (W)
Map light (LED type)* LED
Map light (bulb type) 5
Room light (where fitted) 8
Rear personal light (where
fitted) LED
Step light (where fitted) 3.4
Vanity mirror light (where fit-
ted) 1.8
*: See an approved dealer or qualified workshop
for replacement. NDI1679
8-22 Maintenance and do-it-yourself
Page 299 of 340

LIGHT LOCATIONS
1. Front turn signal light
2. Headlight (halogen type)
3. Map light
4. Room light (where fitted)
5. Front fog light (where fitted) or Daytime run-
ning light (where fitted for halogen headlight
model)
6. Clearance light
7. Side turn signal light (where fitted)
8. Step light (where fitted)
9. Headlight (high beam) (LED type)
10. Headlight (low beam) (LED type)
11. Daytime running light (LED type)
12. Rear personal light (where fitted)
13. High-mounted stop light (where fitted)
14. Rear combination light (Turn signal/Stop/Tail/
Reverse)
15. Number plate light
j A: Halogen headlight model
j B: LED headlight model
j C: Models with cargo bed
j D: Models without cargo bed Replacement procedures
m
:
REMOVE
m :
INSTALL All
other lights are either type A, B, C,
DorE.When
replacing abulb, first remove the lens and/or cover. SDI2306 NDI1681
Front turn signal light
NDI1680
Clearance light (bulb type)
Maintenance and do-it-yourself 8-23
Page 300 of 340
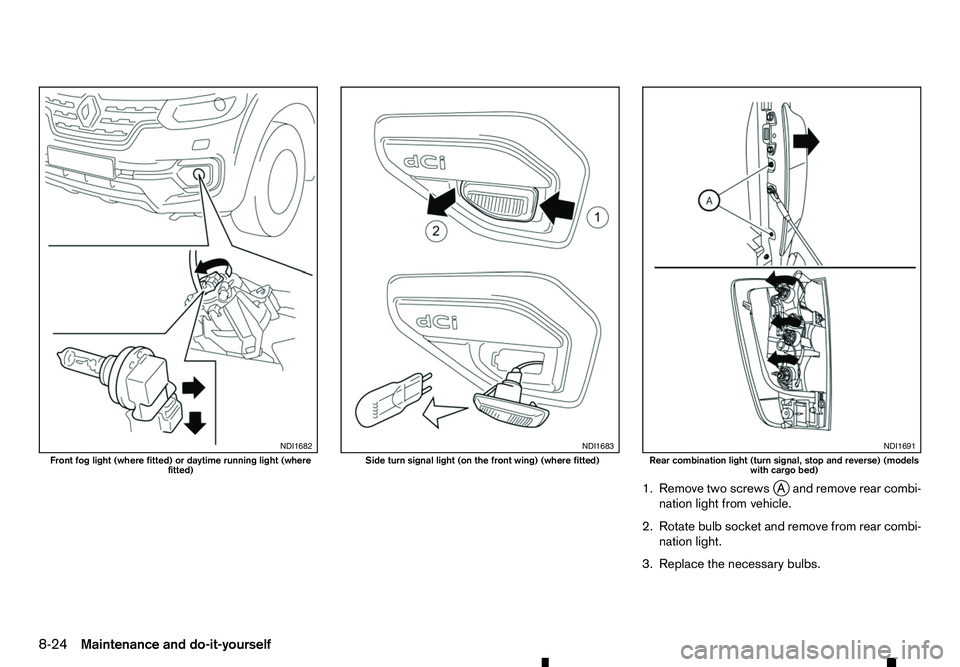
1. Remove two screws
jAa nd remove rear combi-
nation light from vehicle.
2. Rotate bulb socket and remove from rear combi- nation light.
3. Replace the necessary bulbs. NDI1682
Front fog light (where fitted) or daytime running light (where
fitted) NDI1683
Side turn signal light (on the front wing) (where fitted)
NDI1691
Rear combination light (turn signal, stop and reverse) (models
with cargo bed)
8-24 Maintenance and do-it-yourself