adblue RENAULT ALASKAN 2017 Owners Manual
[x] Cancel search | Manufacturer: RENAULT, Model Year: 2017, Model line: ALASKAN, Model: RENAULT ALASKAN 2017Pages: 340, PDF Size: 6.93 MB
Page 10 of 340
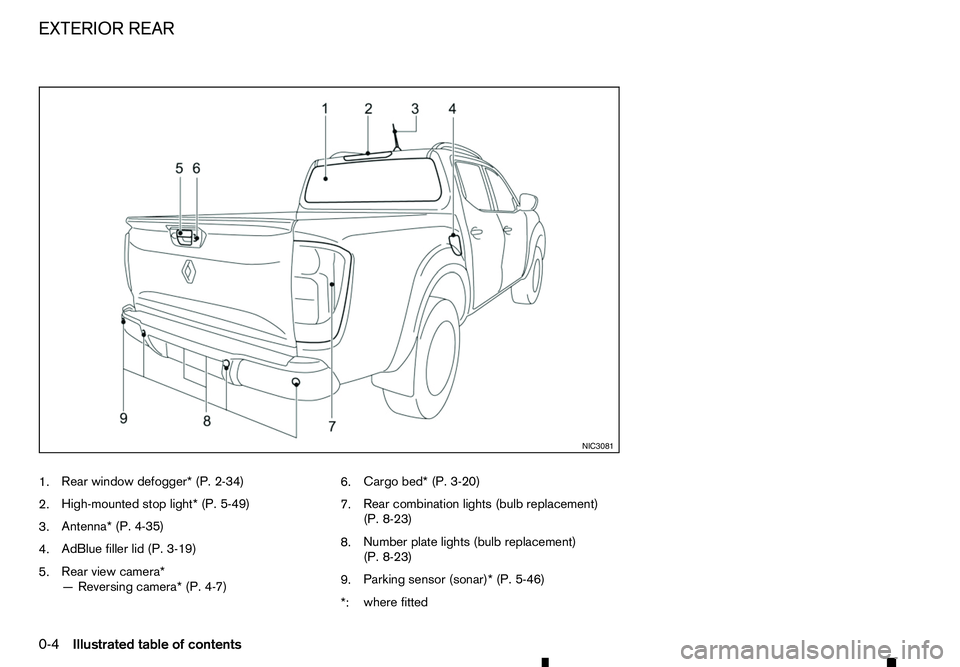
1.
Rear window defogger* (P. 2-34)
2. High-mounted stop light* (P. 5-49)
3. Antenna* (P. 4-35)
4. AdBlue filler lid (P. 3-19)
5. Rear view camera*
—R
eversing camera* (P. 4-7) 6.
Cargo bed* (P. 3-20)
7. Rear combination lights (bulb replacement)
(P. 8-23)
8. Number plate lights (bulb replacement)
(P. 8-23)
9. Parking sensor (sonar)* (P. 5-46)
*: where fitted NIC3081
EXTERIOR REAR
0-4 Illustrated table of contents
Page 69 of 340
•
When
aspare tyre is mounted or
awheel is
replaced, the TPMS will not function and the
low tyre pressure warning light will flash for
approximately 1minute. The light will remain
on after 1minute. Contact an approved dealer
or qualified workshop as soon as possible for
tyre replacement and/or system resetting.
• Replacing tyres with those not originally speci-
fied by RENAULT could affect the proper op-
eration of the TPMS.
CAUTION
• The TPMS is not
asubstitute for the regular
tyre pressure check. Be sure to check the tyre
pressure regularly.
• If the vehicle is being driven at speeds of less
than 25 km/h (16 MPH), the TPMS may not
operate correctly.
• Be sure to install the specified size of tyres to
all four wheels correctly. Low washer fluid warning light
(where fitted)
The low washer fluid warning light illuminates when
the washer fluid in the reservoir is at alow level. Add
washer fluid as necessary. (See “Window washer
fluid” in the “8. Maintenance and do-it-yourself” sec-
tion.) Malfunction warning light (red)
(where fitted)
When the ignition switch is placed in the ON posi-
tion, the malfunction warning light illuminates in red.
This means that the system is operational. After
starting the engine, the warning light turns off.
For the orange Malfunction Indicator Light (MIL),
see “Malfunction Indicator Light (MIL)” later in this
section for details.
If the malfunction warning light (red) illuminates con-
tinuously while the engine is running, it may indicate
an engine control system malfunction. Have your
vehicle inspected by an approved dealer or qualified
workshop. You do not need to have your vehicle
towed to the dealer.
CAUTION
Continuing vehicle operation without proper ser-
vicing of the engine control system could lead to
poor driveability, reduced fuel economy, and
damage to the engine control system, which may
affect the vehicle’s warranty coverage. Master warning light (where
fitted)
When the ignition switch is in the ON position, the
master warning light illuminates if any of the follow-
ing are displayed on the vehicle information display.
• No Key Detected warning (where fitted)
• Shift to Park warning (Automatic Transmission
(AT) models) •
Key ID Incorrect warning (where fitted)
• Release Parking Brake warning
• Low fuel warning
• Door open warning
• Low Washer warning (where fitted)
• Key System Error warning (where fitted)
• Low Oil Pressure warning (where fitted)
• AdBlue® warning (where fitted)
• 4WD Error (where fitted)
• Shipping Mode On Push Storage Fuse warning
(where fitted)
• Headlight System Error warning (where fitted)
• Automatic Transmission (AT) Error warning (Au-
tomatic Transmission (AT) models)
• Parking Sensor Error (where fitted)
See “Vehicle information display” later in this sec-
tion. Seat belt warning light
(where fitted)
Front seat belts:
When the ignition switch is in the ON position, the
seat belt warning light illuminates. The light will con-
tinue to illuminate until the driver’s seat belt is fas-
tened.
Instruments and controls 2-11
Page 105 of 340
3
Pre-driving checks and adjustments
Pre-driving checks and adjustments
Keys ........................................................................V
3-2 Key (where fitted) ............................................... 3-2
Anti-Theft System (ATS*) key (where fitted) ........ 3-2
Remote Control Key (where fitted) ...................... 3-2
Doors ...................................................................... 3-4 Locking with key ................................................. 3-4
Opening with inside door handle ......................... 3-4
Locking with power door lock switch .................. 3-4
Rear access doors (King Cab models)................ 3-5
Child safety rear door locks (Double Cab
models) .............................................................. 3-5
Remote keyless entry system (where fitted) .............. 3-6
Using remote keyless entry system ..................... 3-6
Remote Control Key system (where fitted) ............... 3-7
Remote Control Key operating range .................. 3-9
Using Remote Control Key system ...................... 3-9
Battery saver system........................................... 3-10
Warning and audible reminders .......................... 3-11
Troubleshooting guide ........................................ 3-12
Using remote keyless entry system ..................... 3-14
Hazard indicator and horn operation.................... 3-15
Security system (where fitted) .................................. 3-15
Theft warning system (where fitted)..................... 3-15 Anti-Theft System (ATS) ..................................... 3-16
Bonnet..................................................................V
... 3-17 Opening bonnet.................................................. 3-17
Closing bonnet ................................................... 3-17
Fuel filler lid and cap ................................................ 3-18
Opening fuel filler lid ........................................... 3-18
Fuel filler cap ...................................................... 3-18
AdBlue® filler lid and cap ........................................ 3-19 Opening AdBlue® filler lid .................................. 3-20
Locking AdBlue® filler lid ................................... 3-20
AdBlue® filler cap .............................................. 3-20
Cargo bed (where fitted).......................................... 3-20 Tailgate .............................................................. 3-20
Tie down hooks (where fitted) ............................. 3-21
C-Channel system (where fitted) ......................... 3-21
Steering wheel......................................................... 3-23 Steering wheel adjustment .................................. 3-23
Mirrors..................................................................... 3-23 Inside rearview mirror ......................................... 3-23
Outside rearview mirrors..................................... 3-25
Vanity mirror (where fitted) .................................. 3-26
Parking brake .......................................................... 3-26
Page 111 of 340
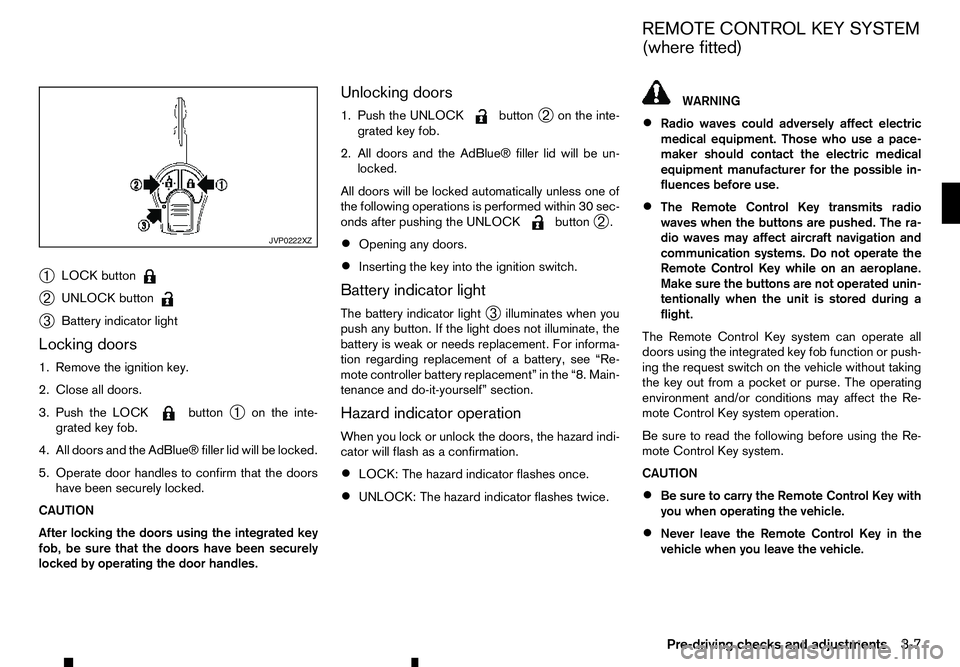
➀
LOCK button
➁
UNLOCK button
➂
Battery indicator light
Locking doors
1. Remove the ignition key.
2. Close all doors.
3. Push the LOCK button
➀on the inte-
grated key fob.
4. All doors and the AdBlue® filler lid will be locked.
5. Operate door handles to confirm that the doors have been securely locked.
CAUTION
After locking the doors using the integrated key
fob, be sure that the doors have been securely
locked by operating the door handles. Unlocking doors
1. Push the UNLOCK button
➁on the inte-
grated key fob.
2. All doors and the AdBlue® filler lid will be un- locked.
All doors will be locked automatically unless one of
the following operations is performed within 30 sec-
onds after pushing the UNLOCK button
➁.
• Opening any doors.
• Inserting the key into the ignition switch.
Battery indicator light
The battery indicator light ➂illuminates when you
push any button. If the light does not illuminate, the
battery is weak or needs replacement. For informa-
tion regarding replacement of abattery, see “Re-
mote controller battery replacement” in the “8. Main-
tenance and do-it-yourself” section.
Hazard indicator operation
When you lock or unlock the doors, the hazard indi-
cator will flash as aconfirmation.
• LOCK: The hazard indicator flashes once.
• UNLOCK: The hazard indicator flashes twice. WARNING
• Radio waves could adversely affect electric
medical equipment. Those who use apace-
maker should contact the electric medical
equipment manufacturer for the possible in-
fluences before use.
• The Remote Control Key transmits radio
waves when the buttons are pushed. The ra-
dio waves may affect aircraft navigation and
communication systems. Do not operate the
Remote Control Key while on an aeroplane.
Make sure the buttons are not operated unin-
tentionally when the unit is stored during a
flight.
The Remote Control Key system can operate all
doors using the integrated key fob function or push-
ing the request switch on the vehicle without taking
the key out from apocket or purse. The operating
environment and/or conditions may affect the Re-
mote Control Key system operation.
Be sure to read the following before using the Re-
mote Control Key system.
CAUTION
• Be sure to carry the Remote Control Key with
you when operating the vehicle.
• Never leave the Remote Control Key in the
vehicle when you leave the vehicle. JVP0222XZ
REMOTE CONTROL KEY SYSTEM
(where fitted)
Pre-driving checks and adjustments 3-7
Page 114 of 340
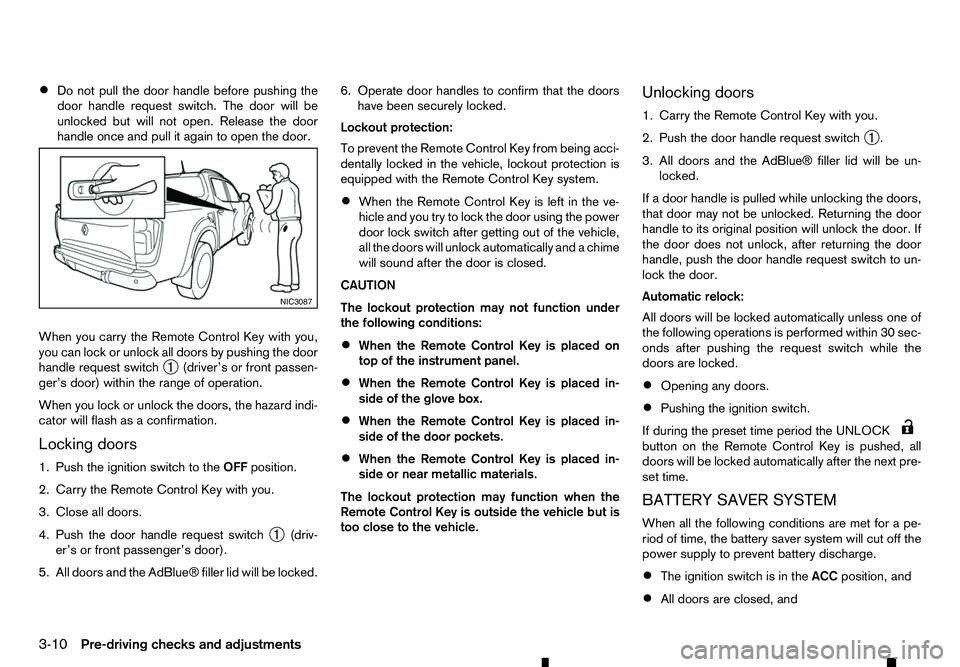
•
Do not pull the door handle before pushing the
door handle request switch. The door will be
unlocked but will not open. Release the door
handle once and pull it again to open the door.
When you carry the Remote Control Key with you,
you can lock or unlock all doors by pushing the door
handle request switch ➀(driver’s or front passen-
ger’s door) within the range of operation.
When you lock or unlock the doors, the hazard indi-
cator will flash as aconfirmation.
Locking doors
1. Push the ignition switch to the OFFposition.
2. Carry the Remote Control Key with you.
3. Close all doors.
4. Push the door handle request switch ➀(driv-
er’s or front passenger’s door).
5. All doors and the AdBlue® filler lid will be locked. 6. Operate door handles to confirm that the doors
have been securely locked.
Lockout protection:
To prevent the Remote Control Key from being acci-
dentally locked in the vehicle, lockout protection is
equipped with the Remote Control Key system.
• When the Remote Control Key is left in the ve-
hicle and you try to lock the door using the power
door lock switch after getting out of the vehicle,
all the doors will unlock automatically and
achime
will sound after the door is closed.
CAUTION
The lockout protection may not function under
the following conditions:
• When the Remote Control Key is placed on
top of the instrument panel.
• When the Remote Control Key is placed in-
side of the glove box.
• When the Remote Control Key is placed in-
side of the door pockets.
• When the Remote Control Key is placed in-
side or near metallic materials.
The lockout protection may function when the
Remote Control Key is outside the vehicle but is
too close to the vehicle. Unlocking doors
1. Carry the Remote Control Key with you.
2. Push the door handle request switch
➀.
3. All doors and the AdBlue® filler lid will be un- locked.
If ad oor handle is pulled while unlocking the doors,
that door may not be unlocked. Returning the door
handle to its original position will unlock the door. If
the door does not unlock, after returning the door
handle, push the door handle request switch to un-
lock the door.
Automatic relock:
All doors will be locked automatically unless one of
the following operations is performed within 30 sec-
onds after pushing the request switch while the
doors are locked.
• Opening any doors.
• Pushing the ignition switch.
If during the preset time period the UNLOCK button on the Remote Control Key is pushed, all
doors will be locked automatically after the next pre-
set time.
BATTERY SAVER SYSTEM
When all the following conditions are met for ape-
riod of time, the battery saver system will cut off the
power supply to prevent battery discharge.
• The ignition switch is in the
ACCposition, and
• All doors are closed, and NIC3087
3-10 Pre-driving checks and adjustments
Page 123 of 340
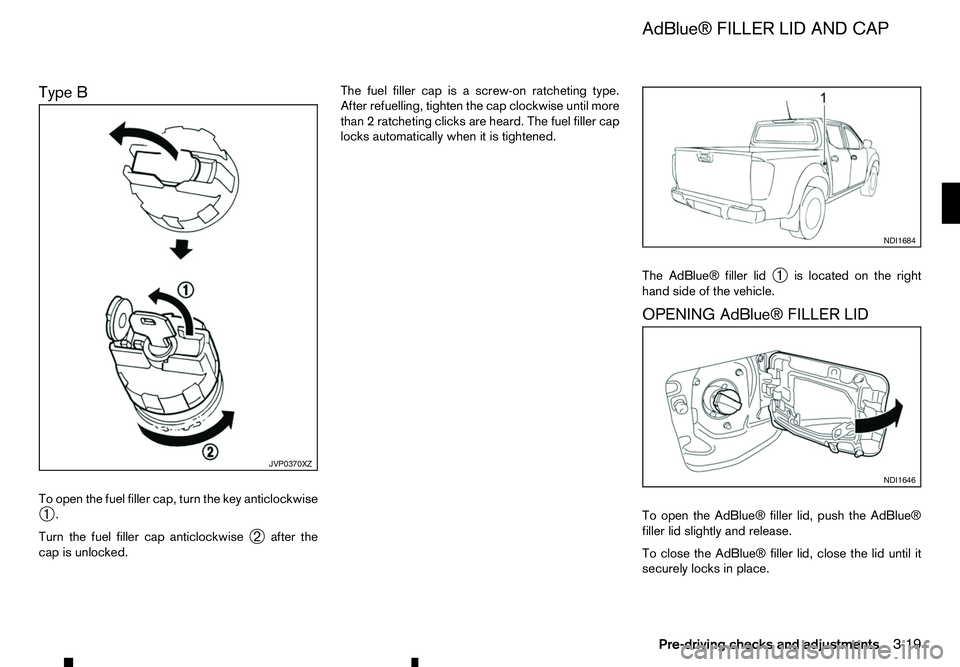
Type B
To open the fuel filler cap, turn the key anticlockwise
➀ .
Turn the fuel filler cap anticlockwise ➁after the
cap is unlocked. The fuel filler cap is
ascrew-on ratcheting type.
After refuelling, tighten the cap clockwise until more
than 2ratcheting clicks are heard. The fuel filler cap
locks automatically when it is tightened.
The AdBlue® filler lid➀is located on the right
hand side of the vehicle.
OPENING AdBlue® FILLER LID
To open the AdBlue® filler lid, push the AdBlue®
filler lid slightly and release.
To close the AdBlue® filler lid, close the lid until it
securely locks in place. JVP0370XZ NDI1684
NDI1646
AdBlue® FILLER LID AND CAP
Pre-driving checks and adjustments 3-19
Page 124 of 340
LOCKING AdBlue® FILLER LID
The AdBlue® filler lid is locked and unlocked using
the Keyless Entry System, see “Remote Control Key
system (where fitted)” earlier in this section for addi-
tional details.
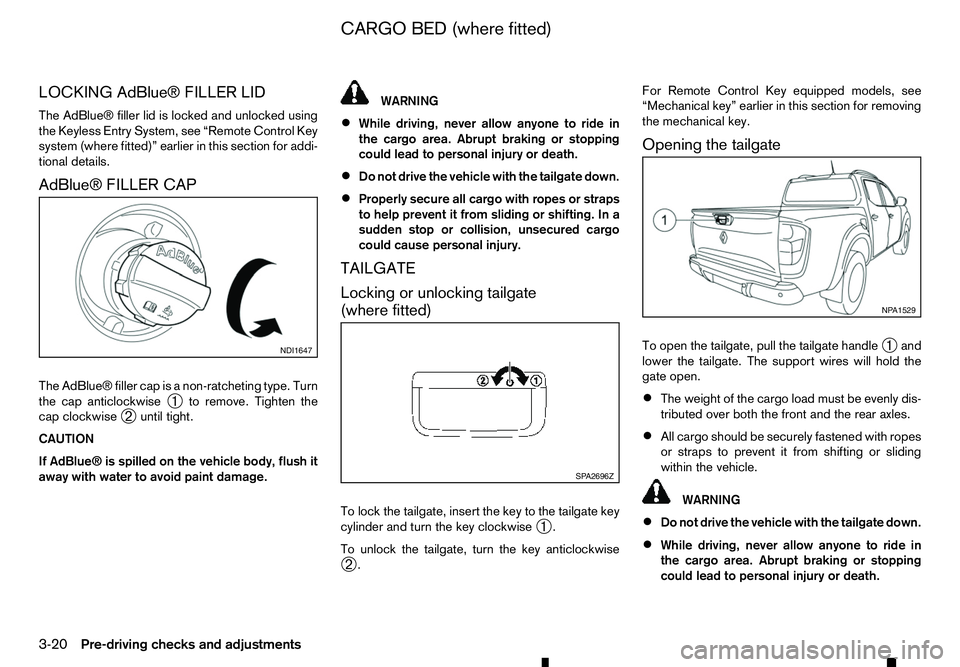
AdBlue® FILLER CAP
The AdBlue® filler cap is anon-ratcheting type. Turn
the cap anticlockwise ➀to remove. Tighten the
cap clockwise ➁until tight.
CAUTION
If AdBlue® is spilled on the vehicle body, flush it
away with water to avoid paint damage. WARNING
• While driving, never allow anyone to ride in
the cargo area. Abrupt braking or stopping
could lead to personal injury or death.
• Do not drive the vehicle with the tailgate down.
• Properly secure all cargo with ropes or straps
to help prevent it from sliding or shifting. In a
sudden stop or collision, unsecured cargo
could cause personal injury.
TAILGATE
Locking or unlocking tailgate
(where fitted)
To lock the tailgate, insert the key to the tailgate key
cylinder and turn the key clockwise ➀.
To unlock the tailgate, turn the key anticlockwise ➁ . For Remote Control Key equipped models, see
“Mechanical key” earlier in this section for removing
the mechanical key.
Opening the tailgate
To open the tailgate, pull the tailgate handle ➀and
lower the tailgate. The support wires will hold the
gate open.
• The weight of the cargo load must be evenly dis-
tributed over both the front and the rear axles.
• All cargo should be securely fastened with ropes
or straps to prevent it from shifting or sliding
within the vehicle. WARNING
• Do not drive the vehicle with the tailgate down.
• While driving, never allow anyone to ride in
the cargo area. Abrupt braking or stopping
could lead to personal injury or death. NDI1647
SP A2696Z NP A1529
CARGO BED (where fitted)
3-20 Pre-driving checks and adjustments
Page 202 of 340
5
Starting and driving
Starting and driving
Running-in schedule ................................................ 5-2
Before starting engine.............................................. 5-2
Precautions when starting and driving ...................... 5-3 Exhaust gas (carbon monoxide) .......................... 5-3
AdBlue® Selective Catalytic Reduction (SCR)
system (where fitted for diesel engine model) ...... 5-3
Diesel Particulate Filter (DPF) (where fitted) ............. 5-5 Automatic regeneration ....................................... 5-6
On-road and off-road driving precautions ................. 5-6 Driving safety precautions ................................... 5-6
Turbocharger system ............................................... 5-8
Care when driving ................................................... 5-8 Engine cold start period ...................................... 5-8
Loading luggage ................................................. 5-8
Driving in wet conditions ..................................... 5-8
Driving in winter conditions ................................. 5-8
Tyre Pressure Monitoring System (TPMS) (where
fitted) ....................................................................... 5-9 Meter information................................................ 5-12
Activation............................................................ 5-12
New and repositioned TPMS sensors
(including fitment of alternative wheels) ............... 5-12
Adjusting TPMS target pressure ......................... 5-13
Tyre pressure units ............................................. 5-13
[Check cold tyre] message ................................. 5-13
TPMS temperature calibration............................. 5-13
Ignition switch (models without Remote Control
Key system) ............................................................. 5-14
Manual Transmission (MT) .................................. 5-14
Key positions ...................................................... 5-14 Steering lock ...................................................... 5-14
Push-button ignition switch (models with Remote
Control Key system) ................................................ 5-15 Precautions on push-button ignition switch
operation ............................................................ 5-15
Remote Control Key system................................ 5-15
Automatic Transmission (AT) .............................. 5-16
Steering lock ...................................................... 5-16
Ignition switch positions ...................................... 5-16
Remote Control Key battery discharge ................ 5-17
Starting engine (models without Remote Control
Key system) ............................................................. 5-18
Starting engine (models with Remote Control Key
system).................................................................... 5-18
Driving the vehicle.................................................... 5-19 Driving with Automatic Transmission (AT) ........... 5-19
Driving with Manual Transmission (MT) ............... 5-22
Stop/Start System (where fitted) .............................. 5-23
Stop/Start System display................................... 5-24
Stop/Start OFF switch ....................................... 5-25
Four-Wheel Drive (4WD) (where fitted) .................... 5-26 Part time 4WD system ........................................ 5-26
4WD mode switch operation............................... 5-30
4WD mode indicator........................................... 5-30
4WD warning ..................................................... 5-31
Tyre recommendation for 4WD ........................... 5-32
Rear differential locking system (where fitted)........... 5-32
Electronic Stability Programme (ESP) system
(where fitted) ........................................................... 5-33
Page 205 of 340
WARNING
• Never leave children or adults who would nor-
mally require the support of others alone in
your vehicle. Pets should not be left alone
either. They could unknowingly activate
switches or controls, or move the vehicle, and
inadvertently become involved in aserious ac-
cident and injure themselves. On hot, sunny
days, temperatures in aclosed vehicle could
quickly become high enough to cause severe
or possibly fatal illness to people or animals.
• Properly secure all cargo to help prevent it
from sliding or shifting. Do not place cargo
higher than the seatbacks. In
asudden stop
or collision, unsecured cargo could cause per-
sonal injury.
NOTE
During the first few months after purchasing a
new vehicle, if you smell strong odours of Vola-
tile Organic Compounds (VOCs) inside the ve-
hicle, ventilate the passenger compartment thor-
oughly. Open all the windows before entering or
while in the vehicle. In addition, when the tem-
perature in the passenger compartment rises, or
when the vehicle is parked in direct sunlight for a
period of time, turn off the air recirculation mode
of the air conditioner and/or open the windows
to allow sufficient fresh air into the passenger
compartment. EXHAUST GAS (carbon monoxide) WARNING
• Do not breathe exhaust gas; it contains co-
lourless and odourless carbon monoxide. Car-
bon monoxide is dangerous. It can cause un-
consciousness or death.
• If you suspect that exhaust fumes are enter-
ing the vehicle, drive with all windows fully
open, and have the vehicle inspected imme-
diately.
• Do not run the engine in closed spaces such
as
ag arage.
• Do not park the vehicle with the engine run-
ning for an extended period of time.
• If electrical wiring or other cable connections
must pass to
atrailer through the seal of the
body, follow the manufacturer’s recommen-
dations to prevent carbon monoxide entry into
the vehicle.
• If
as pecial body or other equipment is added
for recreational or other usage, follow the
manufacturer’s recommendation to prevent
carbon monoxide entry into the vehicle.
(Some recreational vehicle appliances such
as stoves, refrigerators, heaters, etc. may also
generate carbon monoxide.)
• The exhaust system and body should be in-
spected by
aqualified mechanic whenever:
–Y our vehicle is raised while being serviced. –Y
ou suspect that exhaust fumes are enter-
ing into the passenger compartment.
–Y ou notice achange in the sound of the
exhaust system.
–Y ou have had an accident involving dam-
age to the exhaust system, underbody, or
rear of the vehicle.
AdBlue® SELECTIVE CATALYTIC
REDUCTION (SCR) SYSTEM (where
fitted for diesel engine model)
AdBlue® or Diesel Exhaust Fluid (DEF), is anon-
toxic solution of 32.5% urea in de-ionized water.
This fluid is sprayed into the exhaust system of die-
sel vehicles to cause achemical reaction that breaks
down potentially dangerous NOx (nitrogen oxides)
emissions into harmless nitrogen and water. This
system is called Selective Catalytic Reduction
(SCR). AdBlue® fluid is not afuel additive and is
never mixed with diesel fuel. It is always stored in a
separate tank on the vehicle.
AdBlue® will begin to freeze below -11°C (12°F). If
you often drive in areas where the temperature is
below -11°C (12°F), the AdBlue® tank should al-
ways be filled with AdBlue® at the beginning of the
cold season to ensure enough defrosting capacity with heating.
PRECAUTIONS WHEN STARTING
AND DRIVING
Starting and driving5-3
Page 206 of 340
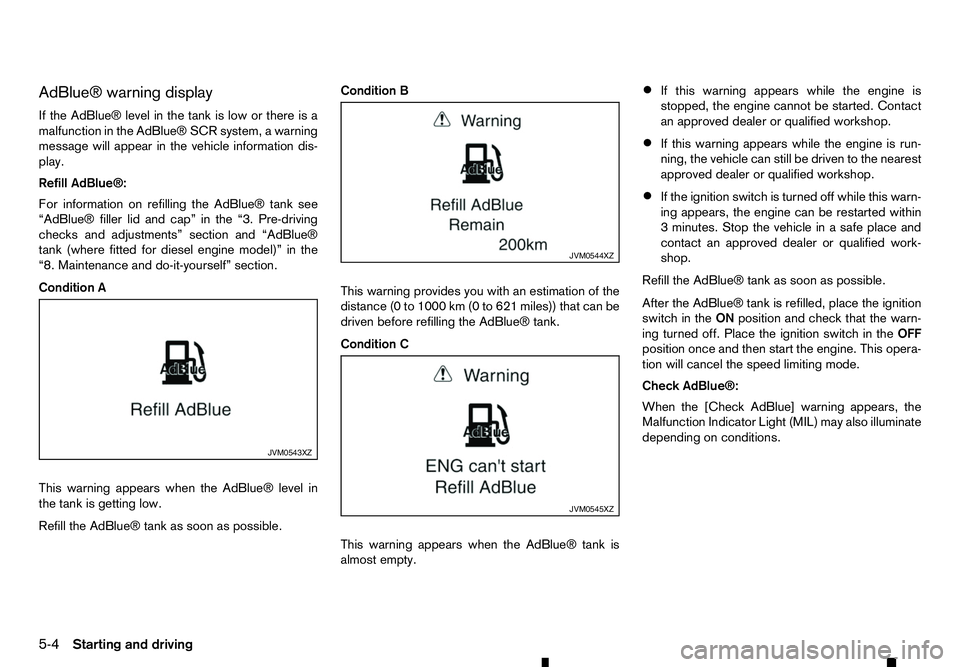
AdBlue® warning display
If the AdBlue® level in the tank is low or there is a malfunction in the AdBlue® SCR system, awarning
message will appear in the vehicle information dis- play.
Refill AdBlue®:
For information on refilling the AdBlue® tank see
“AdBlue® filler lid and cap” in the “3. Pre-driving
checks and adjustments” section and “AdBlue®
tank (where fitted for diesel engine model)” in the
“8. Maintenance and do-it-yourself” section.
Condition A
This warning appears when the AdBlue® level in
the tank is getting low.
Refill the AdBlue® tank as soon as possible. Condition B
This warning provides you with an estimation of the
distance (0 to 1000 km (0 to 621 miles)) that can be
driven before refilling the AdBlue® tank.
Condition C
This warning appears when the AdBlue® tank is
almost empty.•
If this warning appears while the engine is
stopped, the engine cannot be started. Contact
an approved dealer or qualified workshop.
• If this warning appears while the engine is run-
ning, the vehicle can still be driven to the nearest
approved dealer or qualified workshop.
• If the ignition switch is turned off while this warn-
ing appears, the engine can be restarted within
3m
inutes. Stop the vehicle in asafe place and
contact an approved dealer or qualified work-
shop.
Refill the AdBlue® tank as soon as possible.
After the AdBlue® tank is refilled, place the ignition
switch in the ONposition and check that the warn-
ing turned off. Place the ignition switch in the OFF
position once and then start the engine. This opera-
tion will cancel the speed limiting mode.
Check AdBlue®:
When the [Check AdBlue] warning appears, the
Malfunction Indicator Light (MIL) may also illuminate
depending on conditions. JVM0543XZ JVM0544XZ
JVM0545XZ
5-4 Starting and driving