fuel consumption RENAULT ALASKAN 2017 Owners Manual
[x] Cancel search | Manufacturer: RENAULT, Model Year: 2017, Model line: ALASKAN, Model: RENAULT ALASKAN 2017Pages: 340, PDF Size: 6.93 MB
Page 60 of 340
NOTE
For an overview see “Meters and gauges” in the
“0. Illustrated table of contents” section and see
“Instrument panel” in the “0. Illustrated table of
contents” section.
The needle indicators may move slightly after the
ignition switch is placed in the OFF position. This
is not amalfunction.
SPEEDOMETER AND FUEL GAUGE
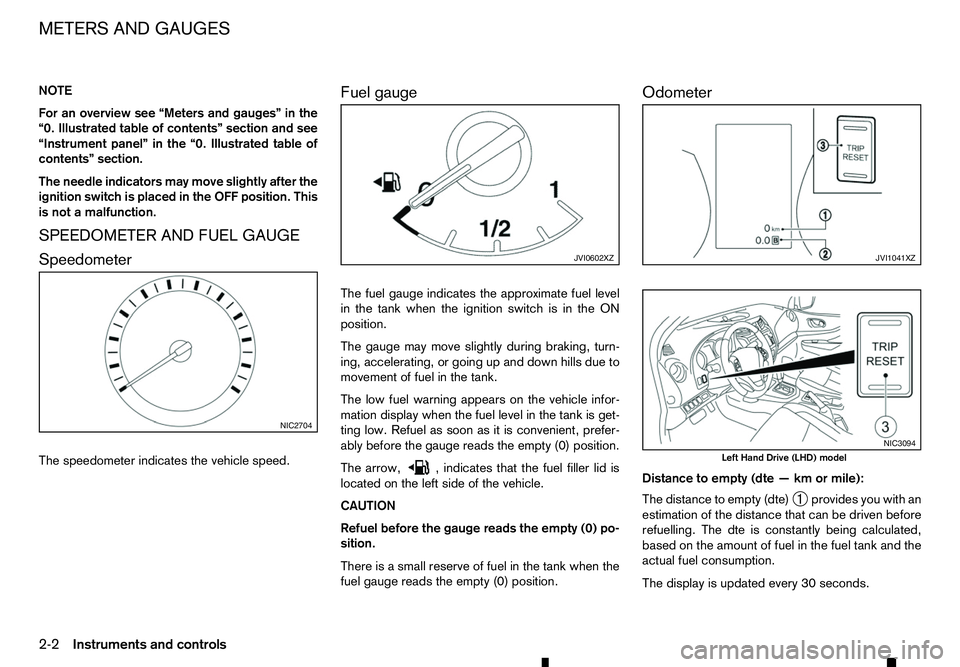
Speedometer
The speedometer indicates the vehicle speed. Fuel gauge
The fuel gauge indicates the approximate fuel level
in the tank when the ignition switch is in the ON
position.
The gauge may move slightly during braking, turn-
ing, accelerating, or going up and down hills due to
movement of fuel in the tank.
The low fuel warning appears on the vehicle infor-
mation display when the fuel level in the tank is get-
ting low. Refuel as soon as it is convenient, prefer-
ably before the gauge reads the empty (0) position.
The arrow, ,i
ndicates that the fuel filler lid is
located on the left side of the vehicle.
CAUTION
Refuel before the gauge reads the empty (0) po-
sition.
There is asmall reserve of fuel in the tank when the
fuel gauge reads the empty (0) position. Odometer
Distance to empty (dte
—kmormile):
The distance to empty (dte) ➀provides you with an
estimation of the distance that can be driven before
refuelling. The dte is constantly being calculated,
based on the amount of fuel in the fuel tank and the
actual fuel consumption.
The display is updated every 30 seconds. NIC2704 JVI0602XZ JVI1041XZ
NIC3094
Left Hand Drive (LHD) model
METERS AND GAUGES
2-2
Instruments and controls
Page 78 of 340
See “Tyre Pressure Monitoring System (TPMS)
(where fitted)” in the “5. Starting and driving” sec-
tion.
Use the or and the
or cancel the calibration process. While the calibra-
tion process is active, the message: [Resetting tyre
pressure system] will be displayed.
[Units]
The following items are available under the [Units]
menu.
• [Distance/Fuel]
• [Tyre Pressures] (where fitted)
• [Temperature]
[Distance/Fuel]:
The unit for the distance and fuel consumption that
displays in the vehicle information display can be
changed to:
• [km, l/100km]
• [km, km/l]
• [miles, MPG]
[Tyre Pressures] (where fitted):
The unit for tyre pressure that displays in the vehicle
information display can be changed to:
• psi
• bar
• kPa •
Kgf/cm
2
Use the or and
the
and change the unit.
[Temperature]:
The temperature that displays in the vehicle informa-
tion display can be changed from:
• °C (Celsius)
• °F (Fahrenheit)
[Language]
The language of the vehicle information display can
be changed to:
• English
• French
• German
• Italian
• Portuguese
• Dutch
• Spanish
• Turkish
• Russian
Use the or and the
and change the language of the vehicle information
display. [Factory Reset]
The settings in the vehicle information display can
be reset back to the factory default. To reset the
vehicle information display:
1. Use the or buttons to select [Settings], and
press the
2. Select [Factory Reset] using the or buttons
and press the
3. Select [Yes] to return all settings back to default by pressing the
To cancel the reset operation select [No] or press
the BACK button located on the left side of the
steering wheel.
2-20 Instruments and controls
Page 80 of 340
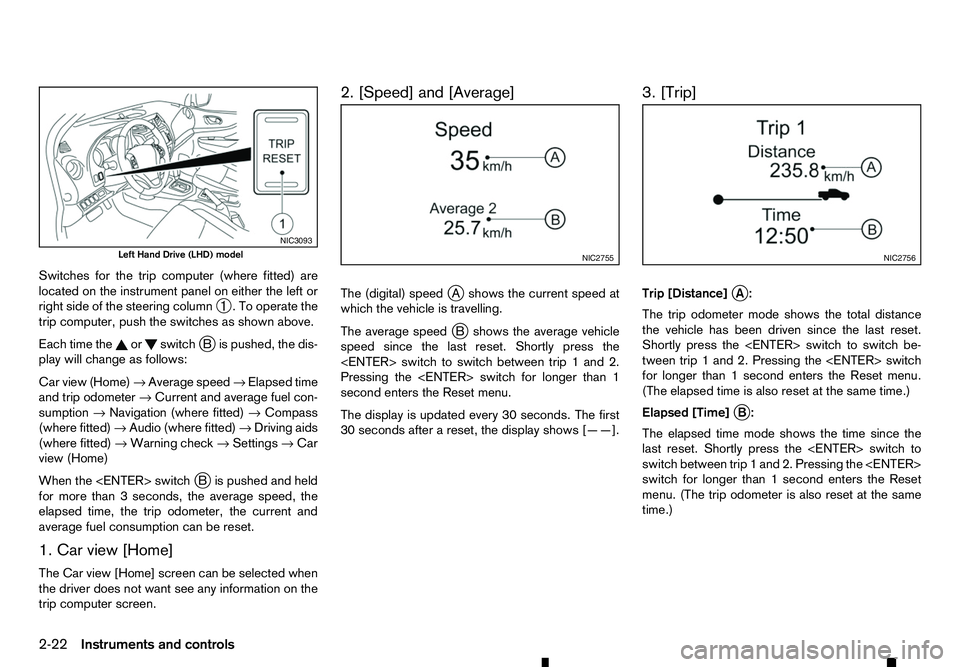
Switches for the trip computer (where fitted) are
located on the instrument panel on either the left or
right side of the steering column ➀.Too
perate the
trip computer, push the switches as shown above.
Each time the or switch
jBi spushed, the dis-
play will change as follows:
Car view (Home) →Average speed →Elapsed time
and trip odometer →Current and average fuel con-
sumption →Navigation (where fitted) →Compass
(where fitted) →Audio (where fitted) →Driving aids
(where fitted) →Warning check →Settings →Car
view (Home)
When the
Bi spushed and held
for more than 3seconds, the average speed, the
elapsed time, the trip odometer, the current and
average fuel consumption can be reset.
1. Car view [Home]
The Car view [Home] screen can be selected when
the driver does not want see any information on the
trip computer screen. 2. [Speed] and [Average]
The (digital) speed
jAs hows the current speed at
which the vehicle is travelling.
The average speed j
Bs hows the average vehicle
speed since the last reset. Shortly press the
Pressing the
second enters the Reset menu.
The display is updated every 30 seconds. The first
30 seconds after areset, the display shows [——]. 3. [Trip]
Trip [Distance]
jA:
The trip odometer mode shows the total distance
the vehicle has been driven since the last reset.
Shortly press the
tween trip 1and 2. Pressing the
for longer than 1second enters the Reset menu.
(The elapsed time is also reset at the same time.)
Elapsed [Time] j
B:
The elapsed time mode shows the time since the
last reset. Shortly press the
switch between trip 1and 2. Pressing the
switch for longer than 1second enters the Reset
menu. (The trip odometer is also reset at the same
time.) NIC3093
Left Hand Drive (LHD) model
NIC2755 NIC2756
2-22 Instruments and controls
Page 81 of 340
![RENAULT ALASKAN 2017 Owners Manual 4. [Fuel Economy]
[Average] fuel consumption jA:
The average fuel consumption mode shows the av-
erage fuel consumption since the last reset. Push
the <ENTER> switch for longer than 1second to
enter t RENAULT ALASKAN 2017 Owners Manual 4. [Fuel Economy]
[Average] fuel consumption jA:
The average fuel consumption mode shows the av-
erage fuel consumption since the last reset. Push
the <ENTER> switch for longer than 1second to
enter t](/img/7/58394/w960_58394-80.png)
4. [Fuel Economy]
[Average] fuel consumption jA:
The average fuel consumption mode shows the av-
erage fuel consumption since the last reset. Push
the
enter the Reset menu.
The display is updated every 30 seconds. For about
the first 500 m(1/3 mile) after areset, the display
shows [——].
Push
Economy page.
The unit of measurement (l/100km, km/l, or MPG)
can be set in the settings menu. See, “[Units]” in the
“2. Instruments and controls” section.
Current fuel consumption jB:
The scale shows the current fuel consumption. 5. [Navigation] (where fitted)
When the route guidance is set in the navigation
system, this item shows the navigation route infor-
mation.
6. Compass (where fitted)
This display indicates the heading direction of the
vehicle jAa swell as acompass rose jBa round
the vehicle representation.
7. [Audio] (where fitted) j
A Current source
j B Current frequency
j C Current radio station name
The audio mode shows the status of audio informa-
tion.
For more details, see “FM AM radio with compact
disc (CD) player (Type A)” in the “4. Display screen,
heater and air conditioner, and audio system” sec-
tion or the separately provided Touchscreen Navi-
gation Owner’s manual.
8. [Driving Aids] (where fitted)
The driving aids mode shows the operating condi-
tion for the driving aids.
• Active Emergency Braking
Push
menu. NIC2758
NIC2732
NIC3105 NIC2734
Instruments and controls
2-23
Page 82 of 340
For more details, see “Active Emergency Braking
system (where fitted)” in the “5. Starting and driving”
section.
9. Warnings
The present warnings are displayed. If no warnings
are present, [No Warnings] is displayed.
10. [Settings]
Push
For more details, see “Settings” earlier in this sec-
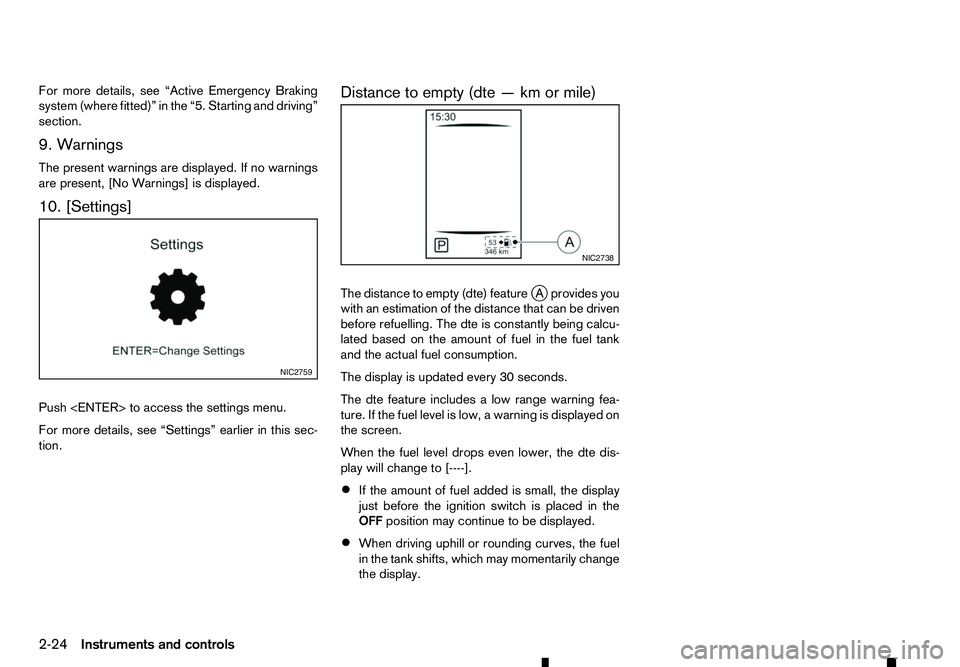
tion. Distance to empty (dte
—kmormile)
The distance to empty (dte) feature jAp rovides you
with an estimation of the distance that can be driven
before refuelling. The dte is constantly being calcu-
lated based on the amount of fuel in the fuel tank
and the actual fuel consumption.
The display is updated every 30 seconds.
The dte feature includes alow range warning fea-
ture. If the fuel level is low, awarning is displayed on
the screen.
When the fuel level drops even lower, the dte dis-
play will change to [----].
• If the amount of fuel added is small, the display
just before the ignition switch is placed in the
OFF position may continue to be displayed.
• When driving uphill or rounding curves, the fuel
in the tank shifts, which may momentarily change
the display. NIC2759 NIC2738
2-24 Instruments and controls
Page 225 of 340
The Stop/Start System is designed to prevent un-
necessary fuel consumption, exhaust emissions,
and noise during ajourney:
• When you stop the vehicle with the shift lever in
N(
Neutral) and clutch pedal released, the en-
gine is turned off automatically.
• When you push the clutch pedal, the engine is
automatically turned on.
CAUTION
At the end of the journey the engine must be
stopped and ignition turned off. Lock the vehicle
as normal. Turning the ignition switch OFF will
shut down all electrical systems. Failure to do
this may result in aflat battery.
NOTE
For model with Stop/Start System, use the spe-
cial battery that is enhanced in regard to the
charge-discharge capacity and life performance.
Avoid using anon-special battery for the Stop/
Start System, as this may cause early deteriora-
tion of the battery or amalfunction of the Stop/
Start System. For the battery, it is recommended
to use Genuine RENAULT parts. For more infor-
mation, contact an approved dealer or qualified
workshop.
NOTE
The Stop/Start System will not activate under
the following conditions:
• When the engine is kept idling without any
driving after the engine is turned on. •
When the engine coolant temperature is low.
• When the battery capacity is low.
• When the battery temperature is low.
• When the vehicle is moved.
• When the vacuum in the brake servo
decreases.
• When the engine bonnet is opened with the
engine running.
• When the engine is turned on with the engine
bonnet open.
• When the driver’s seat belt is not fastened.
• When the driver’s door is open.
• When the Stop/Start System indicator blinks
at
alow speed.
• When the fan speed control is in any position
other than OFF (0) while the air flow control is
in the front defogger position.
• When the front defogger switch is on.
• When the temperature inside the vehicle is
too high or low. (When the Auto air condition-
ing system is off, the Stop/Start System will
operate.)
• When the fan speed of the air conditioner is
set to the maximum speed.
• When the Stop/Start OFF switch is turned on.
• When the power consumption is large. •
When the vehicle is travelling at altitudes
higher than 2000
m(6562 ft) (MT model).
• For Manual Transmission (MT) models
• When the shift lever is in any position except
the
N(Neutral) position.
• When the clutch pedal is depressed.
• When the Remote Control Key is not in the
vehicle.
• When the steering wheel is turning or turned
more than 45 degrees.
NOTE
The engine will not restart even if the clutch pedal
is pressed while the Stop/Start System is acti-
vated under the following condition:
• When the engine bonnet is opened.
• When the driver seat belt is unfastened and
the driver’s door is opened.
• When the shift lever is not in the
N(Neutral)
position.
NOTE
It may take some time until the Stop/Start Sys-
tem activates under the following conditions:
• When the battery is discharged.
• When the outside temperature is low or high.
• When the battery is replaced or the battery
terminal is disconnected for extended peri-
ods and then reconnected.
STOP/START SYSTEM
(where fitted)
Starting and driving5-23
Page 226 of 340
NOTE
When the Stop/Start System indicator illumi-
nates, the engine starts running automatically
under at least one of the following conditions:
• The battery voltage becomes low (due to elec-
trical load from other vehicle systems like
headlights, heaters, etc., or auxiliary devices
connected to the 12 volt socket inside the
vehicle).
• The vehicle speed is above about
2km/h (1
MPH).
• The front defogger is operated.
• When the temperature inside the vehicle is
too high or low. (When the air conditioner is
off, the Stop/Start System will operate.)
• When the front defogger is turned on. (The
engine may not start depending on the out-
side temperature.)
• When the battery capacity is low.
• When the power consumption is high.
• When the clutch pedal is depressed.
CAUTION
Only engage gear when the clutch pedal is fully
depressed. NOTE
The following conditions will prevent the Stop/
Start System from automatically restarting the
engine. Starting the engine with the ignition
switch operation is then necessary:
• The driver’s seat belt is unfastened, and driv-
er’s door is open.
• The bonnet is open.
Use this system while waiting at stoplight, etc. When
the vehicle is stopped for long periods of time, turn
off the engine.
When the engine is stopped by the Stop/Start Sys-
tem, heating, cooling and dehumidifying functions
will be deactivated. To avoid the air conditioning
functions from being deactivated, turn off the Idling
Stop mode by pressing the Stop/Start OFF switch.
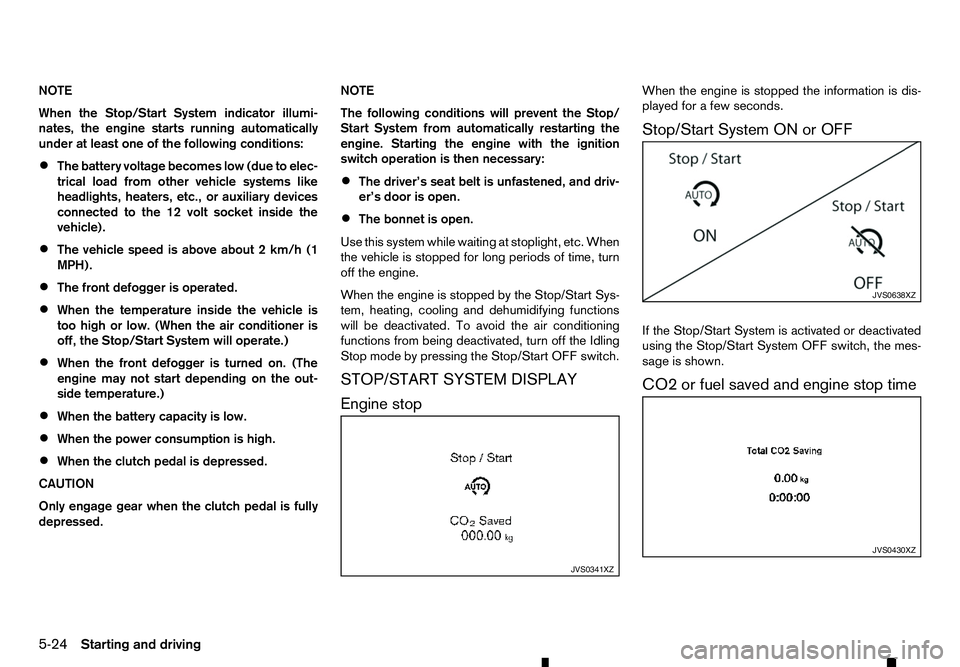
STOP/START SYSTEM DISPLAY
Engine stop When the engine is stopped the information is dis-
played for
afew seconds.
Stop/Start System ON or OFF
If the Stop/Start System is activated or deactivated
using the Stop/Start System OFF switch, the mes-
sage is shown.
CO2 or fuel saved and engine stop time JVS0341XZ JVS0638XZ
JVS0430XZ
5-24 Starting and driving
Page 228 of 340
•
Whenever the Stop/Start System is deactivated
the indicator light ➀on the Stop/Start OFF
switch illuminates. In this condition the Stop/
Start System cannot prevent unnecessary fuel
consumption, exhaust emissions, or noise dur-
ing your journey.
• If the Stop/Start System is malfunctioning, the
indicator light
➀on the Stop/Start OFF switch
illuminates.
NOTE
The Stop/Start System ON or OFF messages dis-
played for afew seconds in the vehicle informa-
tion display when the Stop/Start OFF switch is
pressed. See “Stop/Start System display” earlier
in this section. WARNING
• Do not attempt to raise two wheels off the
ground and shift the transmission to any drive
or reverse position with the engine running.
Doing so may result in drivetrain damage or
unexpected vehicle movement which could
result in serious vehicle damage or personal
injury.
• Do not attempt to test
a4WD equipped ve-
hicle on a2-wheel dynamometer or similar
equipment even if the other two wheels are
raised off the ground. Make sure you inform
test facility personnel that your vehicle is
equipped with 4WD before it is placed on a
dynamometer. Using the wrong test equip-
ment may result in drivetrain damage or unex-
pected vehicle movement which could result
in serious vehicle damage or personal injury.
CAUTION
• Do not drive the vehicle in the <4H> or <4LO>
position on dry hard surface roads. Driving on
dry, hard surfaces in <4H> or <4LO> may
cause unnecessary noise, tyre wear and in-
creased fuel consumption.
If the Four-Wheel Drive (4WD) warning light
turns on when driving on dry hard surface
roads:
–i
nthe <4H> position, shift the 4WD mode
switch to <2WD>. –i
nthe <4LO> position, stop the vehicle and
shift the transmission lever to the N(Neu-
tral) position with the brake pedal
depressed and shift the 4WD mode switch
to <2WD>.
If the 4WD warning light is still on after the
above operation, have your vehicle
checked by an approved dealer or quali-
fied workshop as soon as possible.
• The transfer case may be damaged if you con-
tinue driving with the 4WD warning light blink-
ing.
See “On-road and off-road driving precautions” ear-
lier in this section for other precautions.
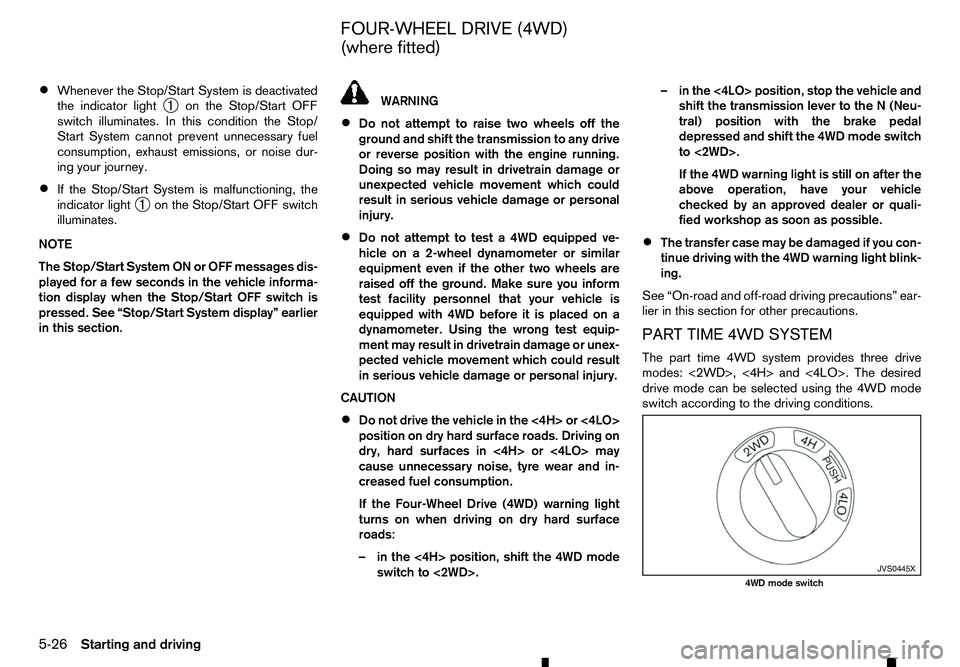
PART TIME 4WD SYSTEM
The part time 4WD system provides three drive
modes: <2WD>, <4H> and <4LO>. The desired
drive mode can be selected using the 4WD mode
switch according to the driving conditions. JVS0445X
4WD mode switch
FOUR-WHEEL DRIVE (4WD)
(where fitted)
5-26 Starting and driving
Page 231 of 340
WARNING
AT model: If the 4WD mode indicator is “OFF” or
the ATP warning light is “ON”, this indicates that
the automatic transmission P(Park) position will
not function and could result in the vehicle mov-
ing unexpectedly, causing serious personal in-
jury or property damage. Always set the parking
brake.
CAUTION
To avoid vehicle damage:
• Do not operate the 4WD mode switch when
cornering, reversing or if the rear wheels are
spinning freely. The vehicle must be moving
straight ahead.
• Do not move the shift lever (AT model) or
release the clutch pedal (MT model) when the
4LO indicator is blinking. Failure to do this
may cause the gears to grind and damaging
the powertrain.
• MT model: Do not accelerate rapidly from a
stopped position when the 4LO indicator is
blinking. Drive straight ahead at
alow speed
until the 4LO indicator is lit. The 4LO indicator
blinks when shifting between <4LO> and
<4H>.
• If the 4WD warning light comes on, perform
the following procedure:
1) Turn off the engine.
2) Start the engine. 3) Check if the 4WD warning light comes on.
If the 4WD warning light is still on after following
the above procedure, have the system checked
and serviced immediately by an approved dealer
or qualified workshop.
The transfer case 4WD mode switch is used to
select either Two-Wheel Drive (2WD) or
Four-Wheel Drive (4WD) depending on the driving
conditions. Turn the 4WD mode switch to select a drive mode (<2WD>, <4H> or <4LO>).
To change into or out of 4LO mode:
1. The vehicle MUST BE standing still.
2. Depress the clutch pedal (MT model) and the brake pedal and move the shift lever to N(Neu-
tral).
3. Depress and turn the 4WD mode switch to change into or out of <4LO>. WARNING
• When parking, apply the parking brake before
stopping the engine and make sure that the
4WD mode indicator is on and that the ATP
warning light or ATP warning message is off,
otherwise, the vehicle could unexpectedly
move even if the automatic transmission is in
the P(Park) position.
• The 4LO indicator must stop blinking and re-
main on or turn off before shifting the trans-
mission into gear. The vehicle may move un- expectedly if the shift lever is shifted from the
N(
Neutral) position to any other gear while
the 4LO indicator is blinking.
CAUTION
• Never turn the 4WD mode switch between
<4LO> and <4H> while driving.
• The <4H> drive mode provides greater power
and traction. Avoid excessive speed as it will
cause increased fuel consumption and higher
oil temperatures, and could damage power
train components. Speeds over 100 km/h (60
MPH) in <4H> are not recommended.
• The <4LO> drive mode provides maximum
power and traction. Avoid raising vehicle
speed excessively. The maximum speed is
approximately 50 km/h (30 MPH).
• The 4WD mode switch can be turned between
<2WD> and <4H> while driving straight ahead.
Do not turn the 4WD mode switch while mak-
ing
aturn or reversing.
• Do not turn the 4WD mode switch between
<2WD> and <4H> while driving on steep
downhill grades. Use the engine brake and
low transmission gears for engine braking.
• Do not turn the 4WD mode switch between
<2WD> and <4H> with the rear wheels spin-
ning.
Starting and driving 5-29
Page 233 of 340
hicle straight, accelerate or decelerate or
move the vehicle in reverse, then shift the
4WD mode switch.
• If the 4WD warning light comes on or 4WD Er-
ror warning (where fitted) appears, the 4WD
mode indicator turns off.
4WD WARNING
Warning light Warning light
Comes on or
blinks when:
m Illuminates
There
is a
malfunction in the
4WD system
m Blinks
The
difference in
wheel rotation is large
If the 4WD warning light comes on, the 4WD mode
indicator turns off.
Al arge difference between the diameters of front
and rear wheels will make the 4WD warning light
blink. Change the 4WD mode switch to <2WD>
and do not drive fast.
CAUTION
• If the 4WD warning light comes on or blinks
during operation for
awhile, have your ve-
hicle checked by an approved dealer or quali-
fied workshop as soon as possible. •
Shifting between <4H> and <4LO> is not rec-
ommended when the 4WD warning light turns
on.
• When the 4WD warning light comes on, the
2WD mode may be engaged even if the 4WD
mode switch is in <4H>. Be especially careful
when driving. If corresponding parts are mal-
functioning, the 4WD mode will not be en-
gaged even if the 4WD mode switch is shifted.
• Do not drive the vehicle in the <4H> or <4LO>
position on dry hard surface roads. Driving on
dry, hard surfaces in <4H> or <4LO> may
cause unnecessary noise, tyre wear and in-
creased fuel consumption.
If the Four-Wheel Drive (4WD) warning light
turns on when driving on dry hard surface
roads:
–i nthe <4H> position, shift the 4WD mode
switch to <2WD>.
–i nthe <4LO> position, stop the vehicle and
shift the transmission lever to the N(Neu-
tral) position with the brake pedal
depressed and shift the 4WD mode switch
to <2WD>.
If the 4WD warning light is still on after the
above operation, have your vehicle
checked by an approved dealer or quali-
fied workshop as soon as possible. •
The transfer case may be damaged if you con-
tinue driving with the warning light blinking.
Warning indicator
If any malfunction occurs in the Four-Wheel Drive
(4WD) system while the engine is running, awarn-
ing message appears in the vehicle information dis-
play.
If the [4WD system fault] warning appears, there
may be amalfunction in the 4WD system. Reduce
vehicle speed and have your vehicle checked by an
approved dealer or qualified workshop as soon as
possible.
CAUTION
• Do not operate the engine on
afree roller
when any of the wheels raised.
• If the [4WD system fault] warning appears
while driving, there may be
amalfunction in
the 4WD system. Reduce the vehicle speed
and have your vehicle checked by an
approved dealer or qualified workshop as
soon as possible. Be especially careful when
driving.
• The power train may be damaged if you con-
tinue driving with the [4WD system fault] warn-
ing on.
Starting and driving 5-31