heating RENAULT ALASKAN 2017 Owners Manual
[x] Cancel search | Manufacturer: RENAULT, Model Year: 2017, Model line: ALASKAN, Model: RENAULT ALASKAN 2017Pages: 340, PDF Size: 6.93 MB
Page 153 of 340
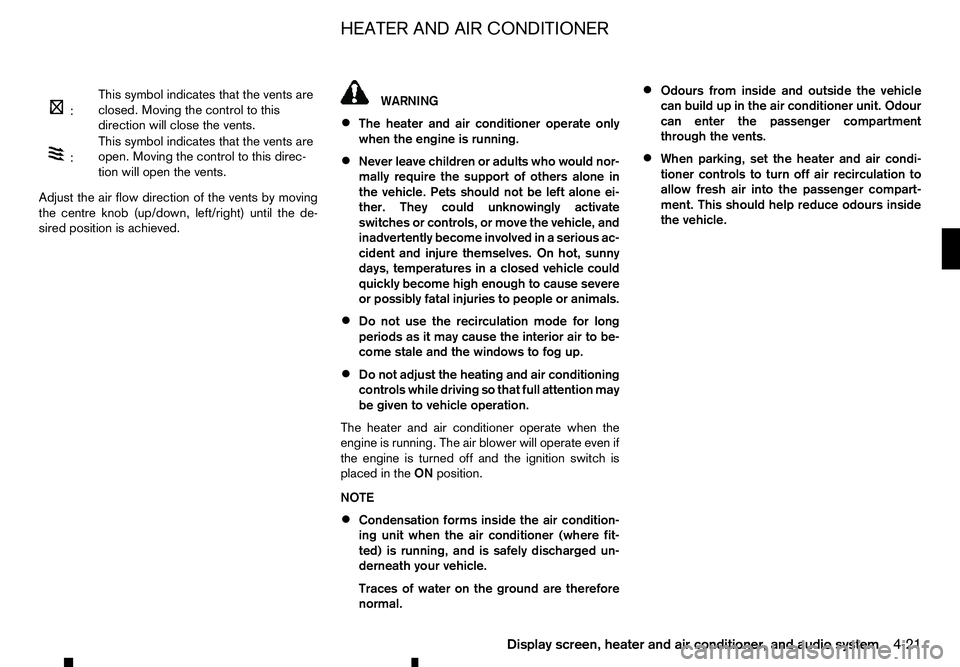
m:
This
symbol indicates that the vents are
closed. Moving the control to this
direction will close the vents.
m :
This
symbol indicates that the vents are
open. Moving the control to this direc-
tion will open the vents.
Adjust the air flow direction of the vents by moving
the centre knob (up/down, left/right) until the de-
sired position is achieved. WARNING
• The heater and air conditioner operate only
when the engine is running.
• Never leave children or adults who would nor-
mally require the support of others alone in
the vehicle. Pets should not be left alone ei-
ther. They could unknowingly activate
switches or controls, or move the vehicle, and
inadvertently become involved in
aserious ac-
cident and injure themselves. On hot, sunny
days, temperatures in aclosed vehicle could
quickly become high enough to cause severe
or possibly fatal injuries to people or animals.
• Do not use the recirculation mode for long
periods as it may cause the interior air to be-
come stale and the windows to fog up.
• Do not adjust the heating and air conditioning
controls while driving so that full attention may
be given to vehicle operation.
The heater and air conditioner operate when the
engine is running. The air blower will operate even if
the engine is turned off and the ignition switch is
placed in the ONposition.
NOTE
• Condensation forms inside the air condition-
ing unit when the air conditioner (where fit-
ted) is running, and is safely discharged un-
derneath your vehicle.
Traces of water on the ground are therefore
normal. •
Odours from inside and outside the vehicle
can build up in the air conditioner unit. Odour
can enter the passenger compartment
through the vents.
• When parking, set the heater and air condi-
tioner controls to turn off air recirculation to
allow fresh air into the passenger compart-
ment. This should help reduce odours inside
the vehicle.
HEATER AND AIR CONDITIONER
Display screen, heater and air conditioner, and audio system 4-21
Page 155 of 340
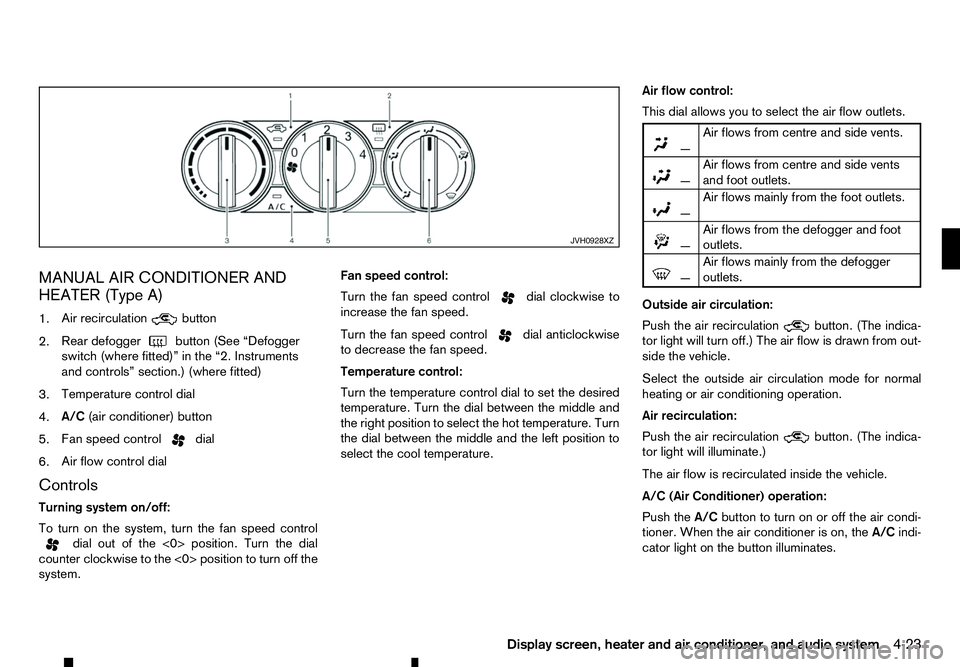
MANUAL AIR CONDITIONER AND
HEATER (Type A)
1. Air recirculation button
2. Rear defogger
button (See “Defogger
switch (where fitted)” in the “2. Instruments
and controls” section.) (where fitted)
3. Temperature control dial
4. A/C
(air conditioner) button
5. Fan speed control dial
6. Air flow control dial
Controls
Turning system on/off:
To turn on the system, turn the fan speed control dial out of the <0> position. Turn the dial
counter clockwise to the <0> position to turn off the
system. Fan speed control:
Turn the fan speed control dial clockwise to
increase the fan speed.
Turn the fan speed control dial anticlockwise
to decrease the fan speed.
Temperature control:
Turn the temperature control dial to set the desired
temperature. Turn the dial between the middle and
the right position to select the hot temperature. Turn
the dial between the middle and the left position to
select the cool temperature. Air flow control:
This dial allows you to select the air flow outlets.
m —
Air
flows from centre and side vents.
m
—
Air
flows from centre and side vents
and foot outlets.
m —
Air
flows mainly from the foot outlets.
m
—
Air
flows from the defogger and foot
outlets.
m —
Air
flows mainly from the defogger
outlets.
Outside air circulation:
Push the air recirculation button. (The indica-
tor light will turn off.) The air flow is drawn from out-
side the vehicle.
Select the outside air circulation mode for normal
heating or air conditioning operation.
Air recirculation:
Push the air recirculation button. (The indica-
tor light will illuminate.)
The air flow is recirculated inside the vehicle.
A/C (Air Conditioner) operation:
Push the A/Cbutton to turn on or off the air condi-
tioner. When the air conditioner is on, the A/Cindi-
cator light on the button illuminates. JVH0928XZ
Display screen, heater and air conditioner, and audio system
4-23
Page 156 of 340
Heater operation
Heating:
This mode is used to direct heated air from the foot
outlets.
1. Push the air recirculation button for normal
heating. (The indicator light will turn off.)
2. Turn the air flow control dial to the position.
3. Turn the fan speed control
dial to the de-
sired position.
4. Turn the temperature control dial to the desired position between the middle and the hot (right)
position.
Ventilation:
This mode directs outside air from the side and
centre vents.
1. Push the air recirculation button. (The indi-
cator light will turn off.)
2. Turn the air flow control dial to the position.
3. Turn the fan speed control
dial to the de-
sired position.
4. Turn the temperature control dial to the desired position.
Defrosting or defogging:
This mode directs the air to the defogger outlets to
defrost/defog the windows.
1. Turn the air flow control dial to the position.2. Push the air recirculation
button. (The indi-
cator light will turn off.)
3. Turn the fan speed control dial to the de-
sired position.
4. Turn the temperature control dial to the desired position between the middle and the hot (right)
position.
• To remove frost from the windscreen quickly,
turn the temperature control dial to the maximum
position and the fan speed control dial to
the maximum position.
• If it is difficult to defog the windscreen, turn the
A/C
button on.
Bi-level heating:
This mode directs cool air from the side and centre
vents and warm air from the foot outlets. When the
temperature control dial is turned to the maximum
hot or cool position, the air between the vents and
the foot outlets is the same temperature.
1. Push the air recirculation button. (The indi-
cator light will turn off.)
2. Turn the air flow control dial to the position.
3. Turn the fan speed control
dial to the de-
sired position.
4. Turn the temperature control dial to the desired position. Heating and defogging:
This mode heats the interior and defogs the win-
dows.
1. Push the air recirculation button. (The indi-
cator light will turn off.)
2. Turn the air flow control dial to the position.
3. Turn the fan speed control dial to the desired
position.
4. Turn the temperature control dial to the maximum hot (right) position.
Air conditioner operation
The air conditioner system should be operated for
approximately 10 minutes at least once amonth.
This helps prevent damage to the air conditioner
system due to the lack of lubrication.
Cooling:
This mode is used to cool and dehumidify the air.
1. Push the air recirculation button. (The indi-
cator light will turn off.)
2. Turn the air flow control dial to the position.
3. Turn the fan speed control dial to the desired
position.
4. Push the A/Cbutton on. (The A/Cindicator light
will illuminate.)
5. Turn the temperature control dial to the desired position between the middle and the cool (left)
position.
4-24 Display screen, heater and air conditioner, and audio system
Page 157 of 340
Av
isible mist may be seen coming from the vents in
hot, humid conditions as the air is cooled rapidly.
This does not indicate amalfunction.
• For quick cooling when the outside temperature
is high, push the air recirculation button.
(The indicator light will turn on.) Be sure to return
the air recirculation button to turn off for
normal cooling.
Dehumidified heating:
This mode is used to heat and dehumidify the air.
1. Push the air recirculation button. (The indi-
cator light will turn off.)
2. Turn the air flow control dial to the position.
3. Turn the fan speed control
dial to the de-
sired position.
4. Push the A/Cbutton on. (The A/Cindicator light
will illuminate.)
5. Turn the temperature control dial to the desired position between the middle and the hot (right)
position.
Dehumidified defogging:
This mode is used to defog the windows and dehu-
midify the air.
1. Push the air recirculation button. (The indi-
cator light will turn off.)
2. Turn the air flow control dial to the position.
3. Turn the fan speed control
dial to the de-
sired position. 4. Push the
A/Cbutton on. (The A/Cindicator light
will illuminate.)
5. Turn the temperature control dial to the desired position.
Display screen, heater and air conditioner, and audio system 4-25
Page 158 of 340
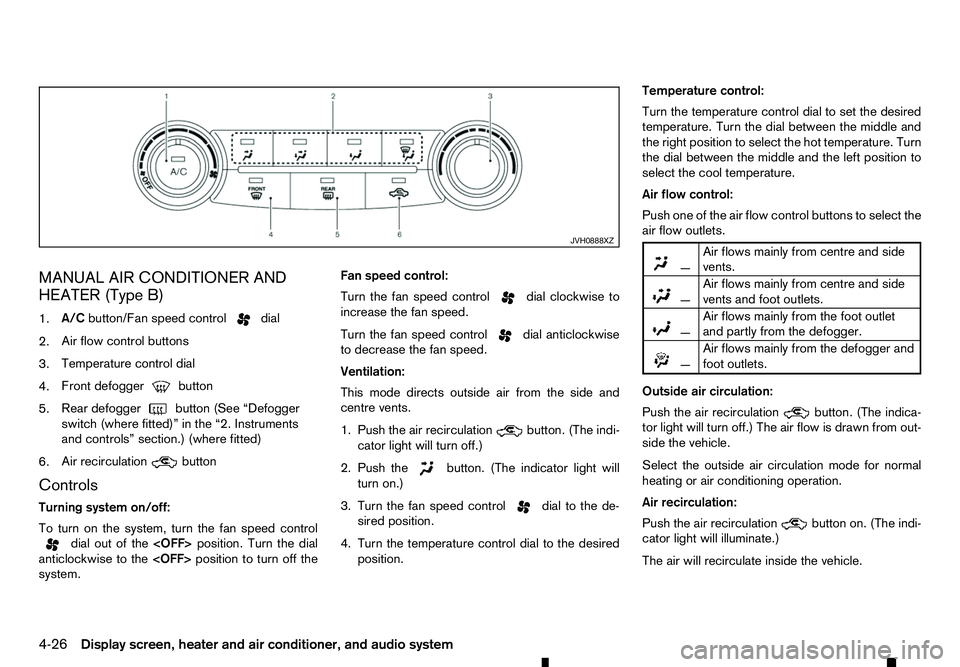
MANUAL AIR CONDITIONER AND
HEATER (Type B)
1. A/C
button/Fan speed control dial
2. Air flow control buttons
3. Temperature control dial
4. Front defogger button
5. Rear defogger
button (See “Defogger
switch (where fitted)” in the “2. Instruments
and controls” section.) (where fitted)
6. Air recirculation button
Controls
Turning system on/off:
To turn on the system, turn the fan speed control dial out of the
anticlockwise to the
system. Fan speed control:
Turn the fan speed control dial clockwise to
increase the fan speed.
Turn the fan speed control dial anticlockwise
to decrease the fan speed.
Ventilation:
This mode directs outside air from the side and
centre vents.
1. Push the air recirculation button. (The indi-
cator light will turn off.)
2. Push the button. (The indicator light will
turn on.)
3. Turn the fan speed control dial to the de-
sired position.
4. Turn the temperature control dial to the desired position. Temperature control:
Turn the temperature control dial to set the desired
temperature. Turn the dial between the middle and
the right position to select the hot temperature. Turn
the dial between the middle and the left position to
select the cool temperature.
Air flow control:
Push one of the air flow control buttons to select the
air flow outlets.
m
—
Air
flows mainly from centre and side
vents.
m —
Air
flows mainly from centre and side
vents and foot outlets.
m —
Air
flows mainly from the foot outlet
and partly from the defogger.
m —
Air
flows mainly from the defogger and
foot outlets.
Outside air circulation:
Push the air recirculation button. (The indica-
tor light will turn off.) The air flow is drawn from out-
side the vehicle.
Select the outside air circulation mode for normal
heating or air conditioning operation.
Air recirculation:
Push the air recirculation button on. (The indi-
cator light will illuminate.)
The air will recirculate inside the vehicle. JVH0888XZ
4-26 Display screen, heater and air conditioner, and audio system
Page 159 of 340
A/C (Air Conditioner) operation:
Push the A/Cbutton to turn on or off the air condi-
tioner. When the air conditioner is on, the A/Cindi-
cator light on the button illuminates.
Heater operation
Heating:
This mode is used to direct heated air from the foot
outlets.
1. Push the air recirculation button for normal
heating. (The indicator light will turn off.)
2. Push the button. (The indicator light will
turn on.)
3. Turn the fan speed control dial to the de-
sired position.
4. Turn the temperature control dial to the desired position between the middle and the hot (right)
position.
Defrosting or defogging:
This mode directs the air to the defogger outlets to
defrost/defog the windows.
1. Turn the fan speed control dial to the de-
sired position.
2. Push the front defogger button. (The indi-
cator lights on the front defogger button
and the
A/C button will turn on.) Then the air
recirculation indicator light will turn off. 3. Turn the temperature control dial to the desired
position between the middle and the hot (right)
position.
To remove frost from the windscreen quickly,
turn the temperature control dial to the maximum
hot (right) position and the fan speed control dial to the maximum position. For the best
bi-level heating performance, do not select the
air recirculation mode. For the best defogging
performance, do not select the air recirculation
mode.
Bi-level heating:
This mode directs cool air from the side/centre vents
and warm air from the foot outlets. (When the tem-
perature control dial is turned to the maximum hot
(right) or cool (left) position, the temperatures from
the side/centre vents and the foot outlets will be the
same.)
1. Push the air recirculation button. (The indi-
cator light will turn off.)
2. Push the button. (The indicator light will
turn on.)
3. Turn the fan speed control dial to the de-
sired position.
4. Turn the temperature control dial to the desired position. Heating and defogging:
This mode heats the interior and defogs the win-
dows.
1. Push the air recirculation button. (The indi-
cator light will turn off.)
2. Push the button. (The indicator light will
turn on.)
3. Turn the fan speed control dial to the de-
sired position.
4. Turn the temperature control dial to the maximum hot (right) position.
Air conditioner operation
The air conditioner system should be operated for
approximately 10 minutes at least once amonth.
This helps prevent damage to the air conditioner
system due to the lack of lubrication.
Cooling:
This mode is used to cool and dehumidify the air.
1. Push the air recirculation button. (The indi-
cator light will turn off.)
2. Push the button. (The indicator light will
turn on.)
3. Turn the fan speed control dial to the de-
sired position.
4. Push the A/Cbutton. (The indicator light will turn
on.)
Display screen, heater and air conditioner, and audio system 4-27
Page 160 of 340
5. Turn the temperature control dial to the desired
position between the middle and the cool (left)
position.
Av isible mist may be seen coming from the vents in
hot, humid conditions as the air is cooled rapidly.
This does not indicate amalfunction.
• For quick cooling when the outside temperature
is high, push the air recirculation button.
(The indicator light will turn on.) Be sure to return
the air recirculation button to turn off for
normal cooling.
Dehumidified heating:
This mode is used to heat and dehumidify the air.
1. Push the air recirculation button. (The indi-
cator light will turn off.)
2. Push the button. (The indicator light will
turn on.)
3. Turn the fan speed control dial to the de-
sired position.
4. Push the A/Cbutton. (The indicator light will turn
on.)
5. Turn the temperature control dial to the desired position between the middle and the hot (right)
position. Dehumidified defogging:
This mode is used to defog the windows and dehu-
midify the air.
1. Push the front defogger button. (The indi-
cator lights on the front defogger button
and the
A/C button will turn on.) Then the air
recirculation indicator light will turn off.
2. Turn the fan speed control dial to the de-
sired position.
3. Turn the temperature control dial to the desired position.
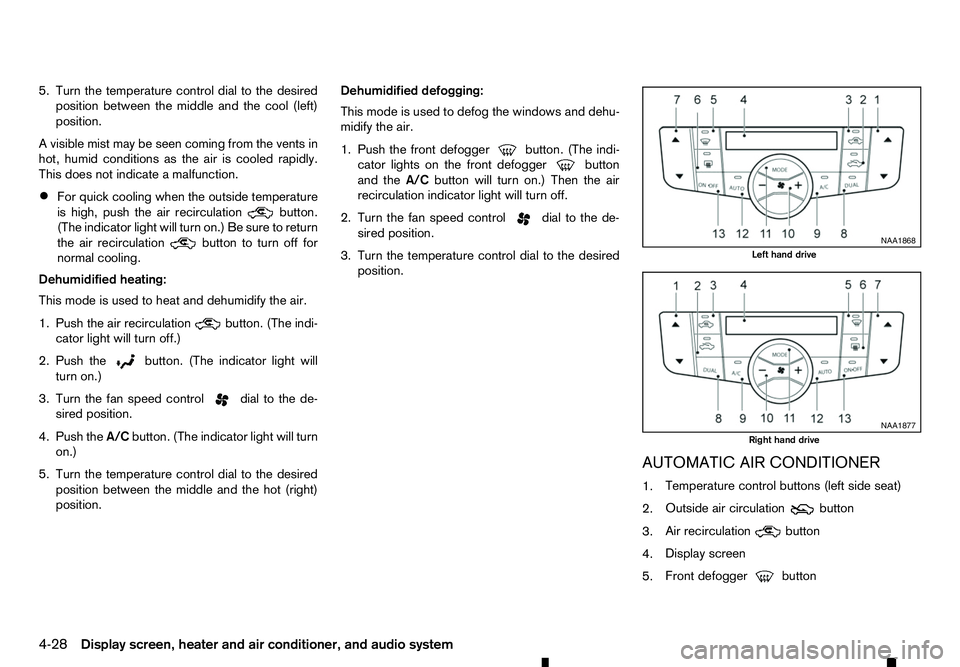
AUTOMATIC AIR CONDITIONER
1.Temperature control buttons (left side seat)
2. Outside air circulation button
3. Air recirculation
button
4. Display screen
5. Front defogger button NAA1868
Left hand drive
NAA1877
Right hand drive
4-28 Display screen, heater and air conditioner, and audio system
Page 161 of 340
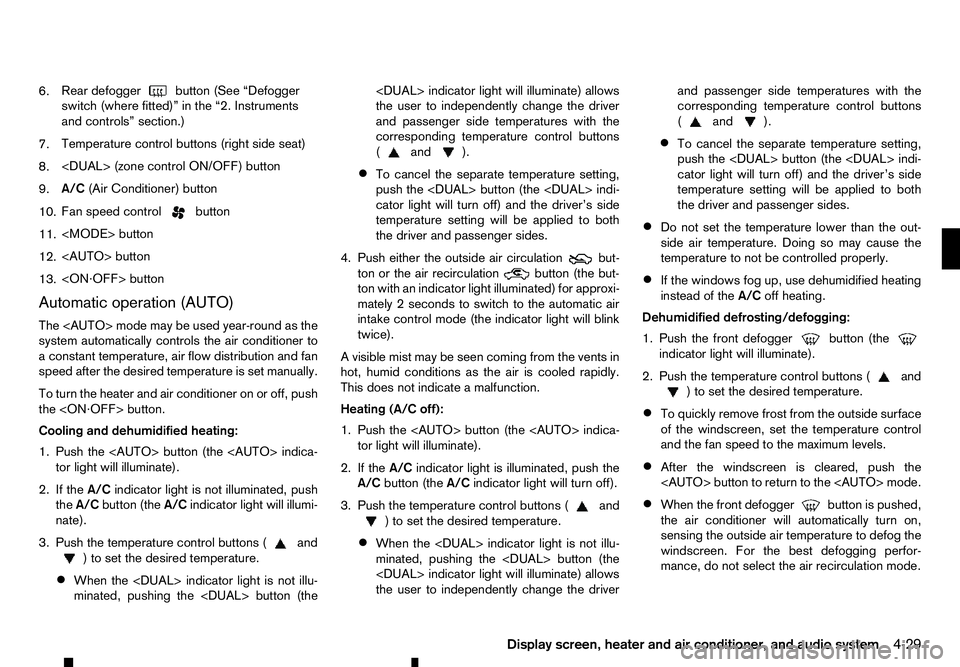
6.
Rear defogger
button (See “Defogger
switch (where fitted)” in the “2. Instruments
and controls” section.)
7. Temperature control buttons (right side seat)
8.
9. A/C
(Air Conditioner) button
10. Fan speed control button
11.
12.
13.
Automatic operation (AUTO)
The
system automatically controls the air conditioner to
ac onstant temperature, air flow distribution and fan
speed after the desired temperature is set manually.
To turn the heater and air conditioner on or off, push
the
Cooling and dehumidified heating:
1. Push the
2. If the A/Cindicator light is not illuminated, push
the A/C button (the A/Cindicator light will illumi-
nate).
3. Push the temperature control buttons ( and
)t os
et the desired temperature.
• When the
minated, pushing the
the user to independently change the driver
and passenger side temperatures with the
corresponding temperature control buttons
( and ).
• To cancel the separate temperature setting,
push the
cator light will turn off) and the driver’s side
temperature setting will be applied to both
the driver and passenger sides.
4. Push either the outside air circulation but-
ton or the air recirculation
button (the but-
ton with an indicator light illuminated) for approxi-
mately 2seconds to switch to the automatic air
intake control mode (the indicator light will blink
twice).
Av isible mist may be seen coming from the vents in
hot, humid conditions as the air is cooled rapidly.
This does not indicate amalfunction.
Heating (A/C off):
1. Push the
2. If the A/Cindicator light is illuminated, push the
A/C button (the A/Cindicator light will turn off).
3. Push the temperature control buttons ( and
)t os
et the desired temperature.
• When the
minated, pushing the
the user to independently change the driver and passenger side temperatures with the
corresponding temperature control buttons
( and ).
• To cancel the separate temperature setting,
push the
cator light will turn off) and the driver’s side
temperature setting will be applied to both
the driver and passenger sides.
• Do not set the temperature lower than the out-
side air temperature. Doing so may cause the
temperature to not be controlled properly.
• If the windows fog up, use dehumidified heating
instead of the
A/Coff heating.
Dehumidified defrosting/defogging:
1. Push the front defogger button (the
indicator light will illuminate).
2. Push the temperature control buttons ( and
)t os
et the desired temperature.
• To quickly remove frost from the outside surface
of the windscreen, set the temperature control
and the fan speed to the maximum levels.
• After the windscreen is cleared, push the
• When the front defogger button is pushed,
the air conditioner will automatically turn on,
sensing the outside air temperature to defog the windscreen. For the best defogging perfor-
mance, do not select the air recirculation mode.
Display screen, heater and air conditioner, and audio system 4-29
Page 205 of 340
WARNING
• Never leave children or adults who would nor-
mally require the support of others alone in
your vehicle. Pets should not be left alone
either. They could unknowingly activate
switches or controls, or move the vehicle, and
inadvertently become involved in aserious ac-
cident and injure themselves. On hot, sunny
days, temperatures in aclosed vehicle could
quickly become high enough to cause severe
or possibly fatal illness to people or animals.
• Properly secure all cargo to help prevent it
from sliding or shifting. Do not place cargo
higher than the seatbacks. In
asudden stop
or collision, unsecured cargo could cause per-
sonal injury.
NOTE
During the first few months after purchasing a
new vehicle, if you smell strong odours of Vola-
tile Organic Compounds (VOCs) inside the ve-
hicle, ventilate the passenger compartment thor-
oughly. Open all the windows before entering or
while in the vehicle. In addition, when the tem-
perature in the passenger compartment rises, or
when the vehicle is parked in direct sunlight for a
period of time, turn off the air recirculation mode
of the air conditioner and/or open the windows
to allow sufficient fresh air into the passenger
compartment. EXHAUST GAS (carbon monoxide) WARNING
• Do not breathe exhaust gas; it contains co-
lourless and odourless carbon monoxide. Car-
bon monoxide is dangerous. It can cause un-
consciousness or death.
• If you suspect that exhaust fumes are enter-
ing the vehicle, drive with all windows fully
open, and have the vehicle inspected imme-
diately.
• Do not run the engine in closed spaces such
as
ag arage.
• Do not park the vehicle with the engine run-
ning for an extended period of time.
• If electrical wiring or other cable connections
must pass to
atrailer through the seal of the
body, follow the manufacturer’s recommen-
dations to prevent carbon monoxide entry into
the vehicle.
• If
as pecial body or other equipment is added
for recreational or other usage, follow the
manufacturer’s recommendation to prevent
carbon monoxide entry into the vehicle.
(Some recreational vehicle appliances such
as stoves, refrigerators, heaters, etc. may also
generate carbon monoxide.)
• The exhaust system and body should be in-
spected by
aqualified mechanic whenever:
–Y our vehicle is raised while being serviced. –Y
ou suspect that exhaust fumes are enter-
ing into the passenger compartment.
–Y ou notice achange in the sound of the
exhaust system.
–Y ou have had an accident involving dam-
age to the exhaust system, underbody, or
rear of the vehicle.
AdBlue® SELECTIVE CATALYTIC
REDUCTION (SCR) SYSTEM (where
fitted for diesel engine model)
AdBlue® or Diesel Exhaust Fluid (DEF), is anon-
toxic solution of 32.5% urea in de-ionized water.
This fluid is sprayed into the exhaust system of die-
sel vehicles to cause achemical reaction that breaks
down potentially dangerous NOx (nitrogen oxides)
emissions into harmless nitrogen and water. This
system is called Selective Catalytic Reduction
(SCR). AdBlue® fluid is not afuel additive and is
never mixed with diesel fuel. It is always stored in a
separate tank on the vehicle.
AdBlue® will begin to freeze below -11°C (12°F). If
you often drive in areas where the temperature is
below -11°C (12°F), the AdBlue® tank should al-
ways be filled with AdBlue® at the beginning of the
cold season to ensure enough defrosting capacity with heating.
PRECAUTIONS WHEN STARTING
AND DRIVING
Starting and driving5-3
Page 226 of 340
NOTE
When the Stop/Start System indicator illumi-
nates, the engine starts running automatically
under at least one of the following conditions:
• The battery voltage becomes low (due to elec-
trical load from other vehicle systems like
headlights, heaters, etc., or auxiliary devices
connected to the 12 volt socket inside the
vehicle).
• The vehicle speed is above about
2km/h (1
MPH).
• The front defogger is operated.
• When the temperature inside the vehicle is
too high or low. (When the air conditioner is
off, the Stop/Start System will operate.)
• When the front defogger is turned on. (The
engine may not start depending on the out-
side temperature.)
• When the battery capacity is low.
• When the power consumption is high.
• When the clutch pedal is depressed.
CAUTION
Only engage gear when the clutch pedal is fully
depressed. NOTE
The following conditions will prevent the Stop/
Start System from automatically restarting the
engine. Starting the engine with the ignition
switch operation is then necessary:
• The driver’s seat belt is unfastened, and driv-
er’s door is open.
• The bonnet is open.
Use this system while waiting at stoplight, etc. When
the vehicle is stopped for long periods of time, turn
off the engine.
When the engine is stopped by the Stop/Start Sys-
tem, heating, cooling and dehumidifying functions
will be deactivated. To avoid the air conditioning
functions from being deactivated, turn off the Idling
Stop mode by pressing the Stop/Start OFF switch.
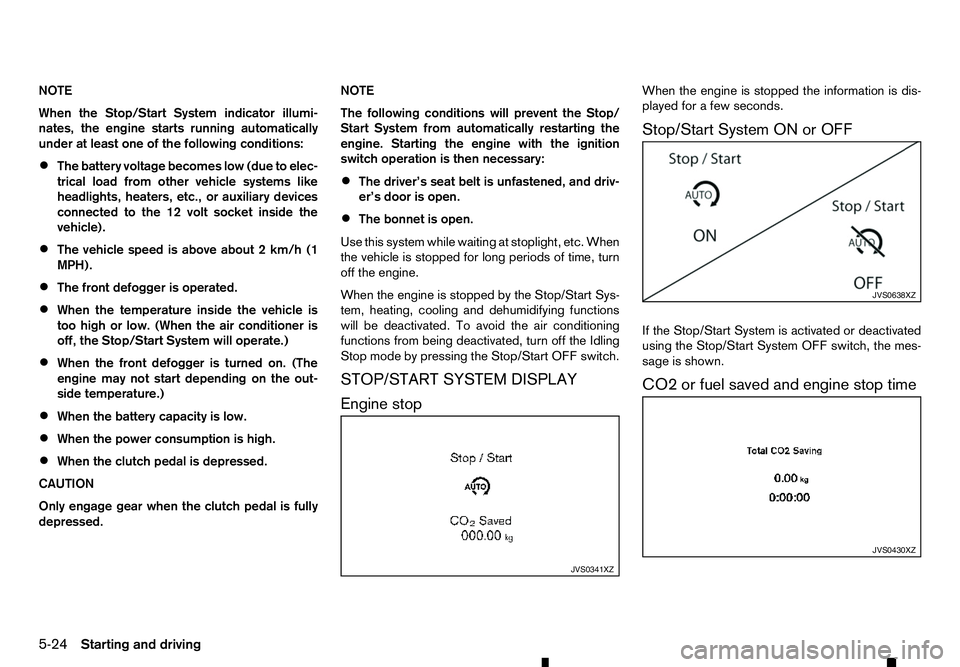
STOP/START SYSTEM DISPLAY
Engine stop When the engine is stopped the information is dis-
played for
afew seconds.
Stop/Start System ON or OFF
If the Stop/Start System is activated or deactivated
using the Stop/Start System OFF switch, the mes-
sage is shown.
CO2 or fuel saved and engine stop time JVS0341XZ JVS0638XZ
JVS0430XZ
5-24 Starting and driving