manual transmission RENAULT ALASKAN 2017 Owners Manual
[x] Cancel search | Manufacturer: RENAULT, Model Year: 2017, Model line: ALASKAN, Model: RENAULT ALASKAN 2017Pages: 340, PDF Size: 6.93 MB
Page 17 of 340
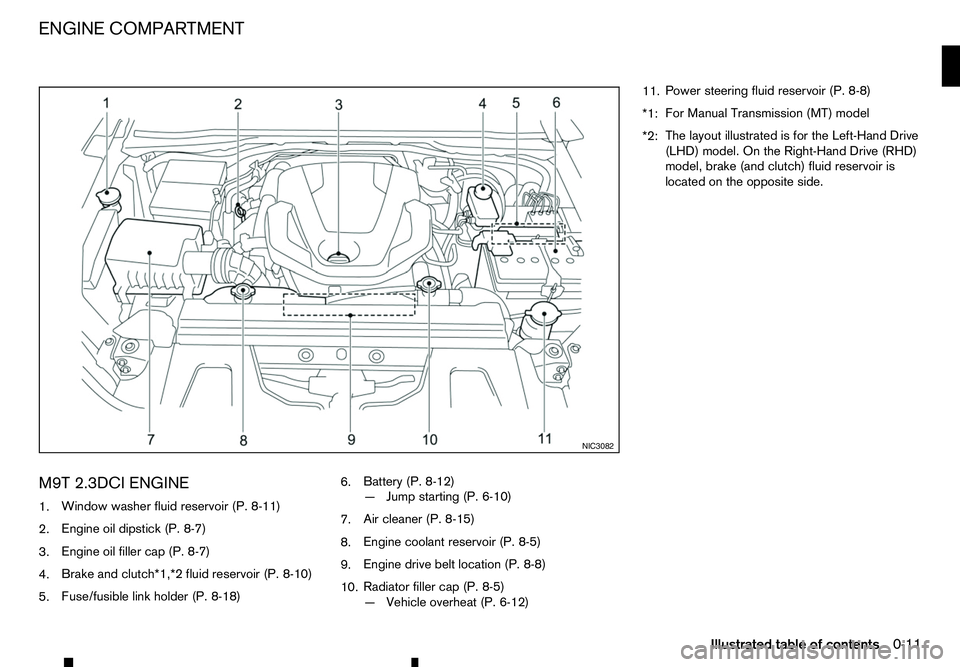
M9T 2.3DCI ENGINE
1. Window washer fluid reservoir (P. 8-11)
2. Engine oil dipstick (P. 8-7)
3. Engine oil filler cap (P. 8-7)
4. Brake and clutch*1,*2 fluid reservoir (P. 8-10)
5. Fuse/fusible link holder (P. 8-18) 6.
Battery (P. 8-12)
—J
ump starting (P. 6-10)
7. Air cleaner (P. 8-15)
8. Engine coolant reservoir (P. 8-5)
9. Engine drive belt location (P. 8-8)
10. Radiator filler cap (P. 8-5)
—V
ehicle overheat (P. 6-12) 11.
Power steering fluid reservoir (P. 8-8)
*1: For Manual Transmission (MT) model
*2: The layout illustrated is for the Left-Hand Drive
(LHD) model. On the Right-Hand Drive (RHD)
model, brake (and clutch) fluid reservoir is
located on the opposite side. NIC3082
ENGINE COMPARTMENT
Illustrated table of contents0-11
Page 83 of 340
INDICATORS FOR OPERATION
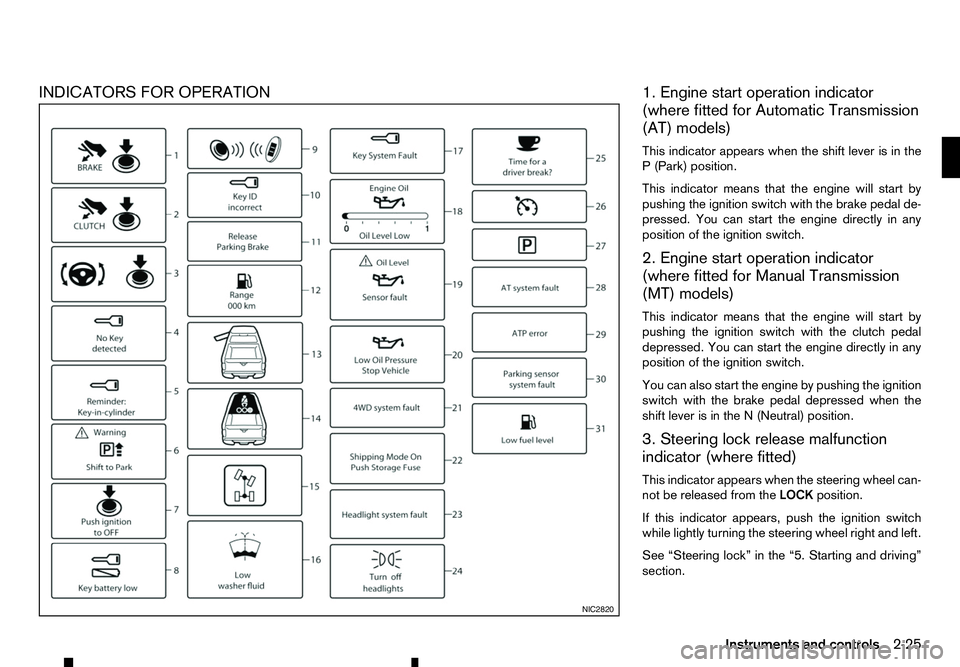
1. Engine start operation indicator
(where fitted for Automatic Transmission
(AT) models)
This indicator appears when the shift lever is in the P( Park) position.
This indicator means that the engine will start by
pushing the ignition switch with the brake pedal de-
pressed. You can start the engine directly in any
position of the ignition switch.
2. Engine start operation indicator
(where fitted for Manual Transmission
(MT) models)
This indicator means that the engine will start by
pushing the ignition switch with the clutch pedal depressed. You can start the engine directly in any
position of the ignition switch.
You can also start the engine by pushing the ignition
switch with the brake pedal depressed when the
shift lever is in the N(Neutral) position.
3. Steering lock release malfunction
indicator (where fitted)
This indicator appears when the steering wheel can-
not be released from the LOCKposition.
If this indicator appears, push the ignition switch
while lightly turning the steering wheel right and left.
See “Steering lock” in the “5. Starting and driving”
section. NIC2820
Instruments and controls
2-25
Page 86 of 340
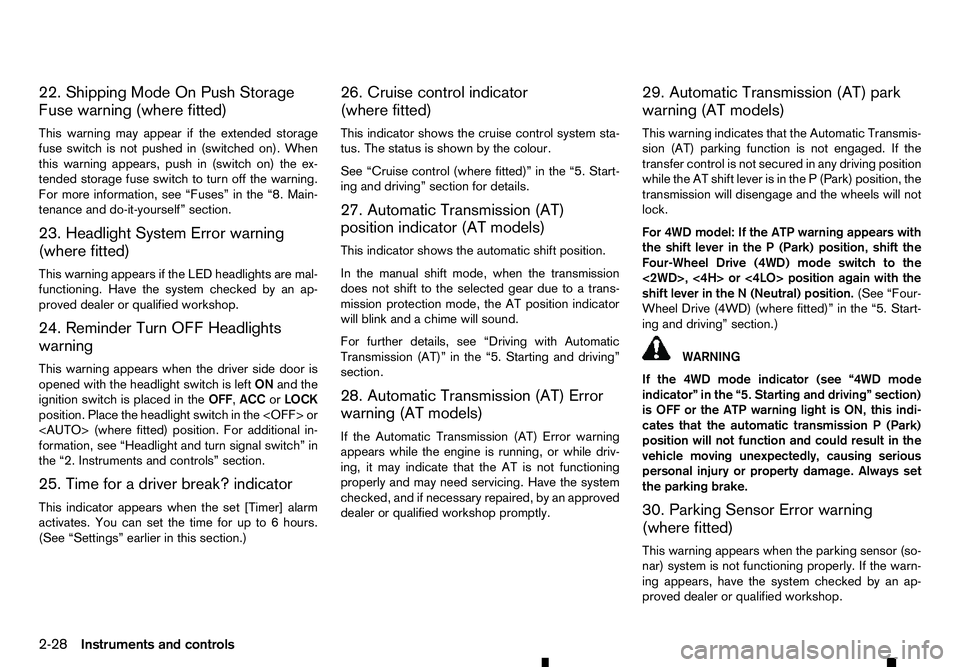
22. Shipping Mode On Push Storage
Fuse warning (where fitted)
This warning may appear if the extended storage
fuse switch is not pushed in (switched on). When
this warning appears, push in (switch on) the ex- tended storage fuse switch to turn off the warning.
For more information, see “Fuses” in the “8. Main-
tenance and do-it-yourself” section.
23. Headlight System Error warning
(where fitted)
This warning appears if the LED headlights are mal-
functioning. Have the system checked by an ap-
proved dealer or qualified workshop.
24. Reminder Turn OFF Headlights
warning
This warning appears when the driver side door is
opened with the headlight switch is left ONand the
ignition switch is placed in the OFF,ACCorLOCK
position. Place the headlight switch in the
formation, see “Headlight and turn signal switch” in
the “2. Instruments and controls” section.
25. Time for adriver break? indicator
This indicator appears when the set [Timer] alarm activates. You can set the time for up to 6hours.
(See “Settings” earlier in this section.) 26. Cruise control indicator
(where fitted)
This indicator shows the cruise control system sta-
tus. The status is shown by the colour.
See “Cruise control (where fitted)” in the “5. Start-
ing and driving” section for details.
27. Automatic Transmission (AT)
position indicator (AT models)
This indicator shows the automatic shift position.
In the manual shift mode, when the transmission
does not shift to the selected gear due to
atrans-
mission protection mode, the AT position indicator
will blink and achime will sound.
For further details, see “Driving with Automatic
Transmission (AT)” in the “5. Starting and driving”
section.
28. Automatic Transmission (AT) Error
warning (AT models)
If the Automatic Transmission (AT) Error warning
appears while the engine is running, or while driv-
ing, it may indicate that the AT is not functioning
properly and may need servicing. Have the system
checked, and if necessary repaired, by an approved
dealer or qualified workshop promptly. 29. Automatic Transmission (AT) park
warning (AT models)
This warning indicates that the Automatic Transmis-
sion (AT) parking function is not engaged. If the
transfer control is not secured in any driving position
while the AT shift lever is in the
P(Park) position, the
transmission will disengage and the wheels will not
lock.
For 4WD model: If the ATP warning appears with
the shift lever in the P(Park) position, shift the
Four-Wheel Drive (4WD) mode switch to the
<2WD>, <4H> or <4LO> position again with the
shift lever in the N(Neutral) position. (See “Four-
Wheel Drive (4WD) (where fitted)” in the “5. Start-
ing and driving” section.) WARNING
If the 4WD mode indicator (see “4WD mode
indicator” in the “5. Starting and driving” section)
is OFF or the ATP warning light is ON, this indi-
cates that the automatic transmission P(Park)
position will not function and could result in the
vehicle moving unexpectedly, causing serious
personal injury or property damage. Always set
the parking brake.
30. Parking Sensor Error warning
(where fitted)
This warning appears when the parking sensor (so-
nar) system is not functioning properly. If the warn-
ing appears, have the system checked by an ap-
proved dealer or qualified workshop.
2-28 Instruments and controls
Page 170 of 340
AUDIO MAIN OPERATION
The audio unit operates when the ignition switch is
in ACC or ON position.
m Power
ON/OFF button
Press the button to switch on the audio unit. If
the audio unit was switched off using the ignition
switch, it can also be switched on with the ignition
switch. The source that was playing immediately
before the unit was switched off will resume playing
and the volume will be set to the previous volume
level.
The audio unit can be switched off by pressing ,
or by turning the ignition switch to the “OFF” or
LOCK position. Volume (VOL) level control
Turn the
adjust the volume level.
The audio unit is equipped with aspeed control vol-
ume function, this means that the audio system au-
tomatically adjusts the volume level in relation to
vehicle speed. For details, see “[Speed Volume]
menu” later in this section.
RADIO OPERATION
When the (power ON/OFF) button is pressed,
the audio unit will switch on with the last received
radio station, if the audio unit was previously
switched off in radio mode. The radio is able to receive multiple kinds of audio
transmissions:
–FM
–D
AB (Digital Audio Broadcasting) indicated as
DR (where fitted)
–AM
Radio band select buttons
Press the
transmission source as follows:
FM1 →FM2 →DR1 →DR2 →AM →FM1
When
come on at the last received radio station. If audio is
already playing using one of the other input sources
(iPod, Bluetooth, CD, USB, AUX-in) pressing the
mode and the last received radio station will be se-
lected.
Setting preset stations
Auto populating the [FM List]: When the
1.5 seconds the six stations with the strongest sig-
nals are stored in the preset (1 to 6) buttons of the
band. During the search, anotification message
[Updating FM List] appears in the display and the
sound is muted until the operation is complete. Once
completed, the radio reverts to the previously se-
lected radio station. Manual tuning
When adjusting the broadcasting station frequency
manually access the [FM List] and turn the
Page 202 of 340
5
Starting and driving
Starting and driving
Running-in schedule ................................................ 5-2
Before starting engine.............................................. 5-2
Precautions when starting and driving ...................... 5-3 Exhaust gas (carbon monoxide) .......................... 5-3
AdBlue® Selective Catalytic Reduction (SCR)
system (where fitted for diesel engine model) ...... 5-3
Diesel Particulate Filter (DPF) (where fitted) ............. 5-5 Automatic regeneration ....................................... 5-6
On-road and off-road driving precautions ................. 5-6 Driving safety precautions ................................... 5-6
Turbocharger system ............................................... 5-8
Care when driving ................................................... 5-8 Engine cold start period ...................................... 5-8
Loading luggage ................................................. 5-8
Driving in wet conditions ..................................... 5-8
Driving in winter conditions ................................. 5-8
Tyre Pressure Monitoring System (TPMS) (where
fitted) ....................................................................... 5-9 Meter information................................................ 5-12
Activation............................................................ 5-12
New and repositioned TPMS sensors
(including fitment of alternative wheels) ............... 5-12
Adjusting TPMS target pressure ......................... 5-13
Tyre pressure units ............................................. 5-13
[Check cold tyre] message ................................. 5-13
TPMS temperature calibration............................. 5-13
Ignition switch (models without Remote Control
Key system) ............................................................. 5-14
Manual Transmission (MT) .................................. 5-14
Key positions ...................................................... 5-14 Steering lock ...................................................... 5-14
Push-button ignition switch (models with Remote
Control Key system) ................................................ 5-15 Precautions on push-button ignition switch
operation ............................................................ 5-15
Remote Control Key system................................ 5-15
Automatic Transmission (AT) .............................. 5-16
Steering lock ...................................................... 5-16
Ignition switch positions ...................................... 5-16
Remote Control Key battery discharge ................ 5-17
Starting engine (models without Remote Control
Key system) ............................................................. 5-18
Starting engine (models with Remote Control Key
system).................................................................... 5-18
Driving the vehicle.................................................... 5-19 Driving with Automatic Transmission (AT) ........... 5-19
Driving with Manual Transmission (MT) ............... 5-22
Stop/Start System (where fitted) .............................. 5-23
Stop/Start System display................................... 5-24
Stop/Start OFF switch ....................................... 5-25
Four-Wheel Drive (4WD) (where fitted) .................... 5-26 Part time 4WD system ........................................ 5-26
4WD mode switch operation............................... 5-30
4WD mode indicator........................................... 5-30
4WD warning ..................................................... 5-31
Tyre recommendation for 4WD ........................... 5-32
Rear differential locking system (where fitted)........... 5-32
Electronic Stability Programme (ESP) system
(where fitted) ........................................................... 5-33
Page 209 of 340
•
Do not drive across steep slopes. Instead
drive either straight up or straight down the
slopes. Off-road vehicles can tip over side-
ways much more easily than they can forward
or backward.
• Many hills are too steep for any vehicle. If you
drive up them, you may stall. If you drive down
them, you may not be able to control your
speed. If you drive across them, you may roll
over.
• Do not shift ranges while driving on downhill
grades as this could cause loss of control of
the vehicle.
• Stay alert when driving to the top of
ahill. At
the top there could be adrop-off or other haz-
ard that could cause an accident.
• If your engine stalls or you cannot make it to
the top of
asteep hill, never attempt to turn
around. Your vehicle could tip or roll over.
Always back straight down in R(Reverse)
range. Never back down in N(Neutral) or with
the clutch pedal depressed (MT model) using
only the brake, as this could cause loss of
control.
• Heavy braking going down
ahill could cause
your brakes to overheat and fade, resulting in
loss of control and an accident. Apply brakes
lightly and use alow range to control your
speed.
• Unsecured cargo can be thrown around when
driving over rough terrain. Properly secure all cargo so it will not be thrown forward and
cause injury to you or your passengers.
• To avoid raising the centre of gravity exces-
sively, do not exceed the rated capacity of the
roof rail (where fitted) and evenly distribute
the load. Secure heavy loads in the cargo area
as far forward and as low as possible. Do not
equip the vehicle with tyres larger than speci-
fied in this manual. This could cause your ve-
hicle to roll over.
• Do not grip the inside or spokes of the steer-
ing wheel when driving off-road. The steering
wheel could move suddenly and injure your
hands. Instead drive with your fingers and
thumbs on the outside of the rim.
• Before operating the vehicle, ensure that the
driver and all passengers have their seat belts
fastened.
• Always drive with the floor mats in place as
the floor may became hot.
• Lower your speed when encountering strong
crosswinds. With
ahigher centre of gravity,
your vehicle is more affected by strong side
winds. Slower speeds ensure better vehicle
control.
• Do not drive beyond the performance capabil-
ity of the tyres, even with 4WD engaged.
• Do not attempt to raise two wheels off the
ground and shift the transmission to any drive
or reverse position with the engine running.
Doing so may result in drivetrain damage or unexpected vehicle movement which could
result in serious vehicle damage or personal
injury.
• Do not attempt to test
a4WD equipped ve-
hicle on a2-wheel dynamometer or similar
equipment even if the other two wheels are
raised off the ground. Make sure you inform
test facility personnel that your vehicle is
equipped with 4WD before it is placed on a dynamometer. Using the wrong test equip-
ment may result in drivetrain damage or unex-
pected vehicle movement which could result
in serious vehicle damage or personal injury.
• When
awheel is off the ground due to an
unlevel surface, do not spin the wheel exces-
sively.
• Accelerating quickly, sharp steering manoeu-
vres or sudden braking may cause loss of con-
trol.
• If at all possible, avoid sharp turning manoeu-
vres, particularly at high speeds. Your vehicle
has
ahigher centre of gravity than aconven-
tional passenger car. The vehicle is not de-
signed for cornering at the same speeds as
conventional passenger cars. Failure to oper- ate this vehicle correctly could result in loss
of control and/or arollover accident.
• Always use tyres of the same type, size, brand,
construction (bias, bias-belted or radial), and
tread pattern on all four wheels. Install tyre
chains on the rear wheels when driving on
slippery roads and drive carefully.
Starting and driving 5-7
Page 216 of 340
![RENAULT ALASKAN 2017 Owners Manual To initiate TPMS temperature calibration use the
steering wheel switches to select the [Settings]
menu, followed by [Tyre Pressures]. Select [Cali-
brate] followed by [Start]. While the calibration pr RENAULT ALASKAN 2017 Owners Manual To initiate TPMS temperature calibration use the
steering wheel switches to select the [Settings]
menu, followed by [Tyre Pressures]. Select [Cali-
brate] followed by [Start]. While the calibration pr](/img/7/58394/w960_58394-215.png)
To initiate TPMS temperature calibration use the
steering wheel switches to select the [Settings]
menu, followed by [Tyre Pressures]. Select [Cali-
brate] followed by [Start]. While the calibration pro-
cess is active, the message: [Resetting tyre pres-
sure system] will be displayed in the vehicle informa-
tion display. WARNING
Never remove the key or turn the ignition switch
to the
ing wheel will lock. This will cause the driver to
lose control of the vehicle and could result in
serious vehicle damage or personal injury.
MANUAL TRANSMISSION (MT)
The switch includes an anti-theft steering lock de-
vice.
The ignition key can only be removed when theswitch is in the
(0).
There is an “OFF” position ➀in between
and
cylinder.
To lock the steering wheel, remove the key. To
unlock the steering wheel, insert the key and turn
it gently while rotating the steering wheel slightly
right and left. KEY POSITIONS
LOCK (Normal parking position) (0):
The ignition key can only be removed at this posi-
tion.
OFF (1):
The engine can be turned off without locking the
steering wheel.
ACC (Accessories) (2):
This position activates electrical accessories such
as the radio when the engine is not running.
ON (Normal operating position) (3):
This position turns on the ignition system and elec-
trical accessories.
START (4):
This position starts the engine. As soon as the en-
gine has started, release the key immediately. It will
automatically return to the
STEERING LOCK
Locking the steering wheel
1) Place the ignition switch in the
tion.
2) Remove the key from the ignition switch.
3) Turn the steering wheel 1/6 of aturn clockwise
from the straight up position. SSD0392Z
IGNITION SWITCH (models without
Remote Control Key system)
5-14 Starting and driving
Page 219 of 340
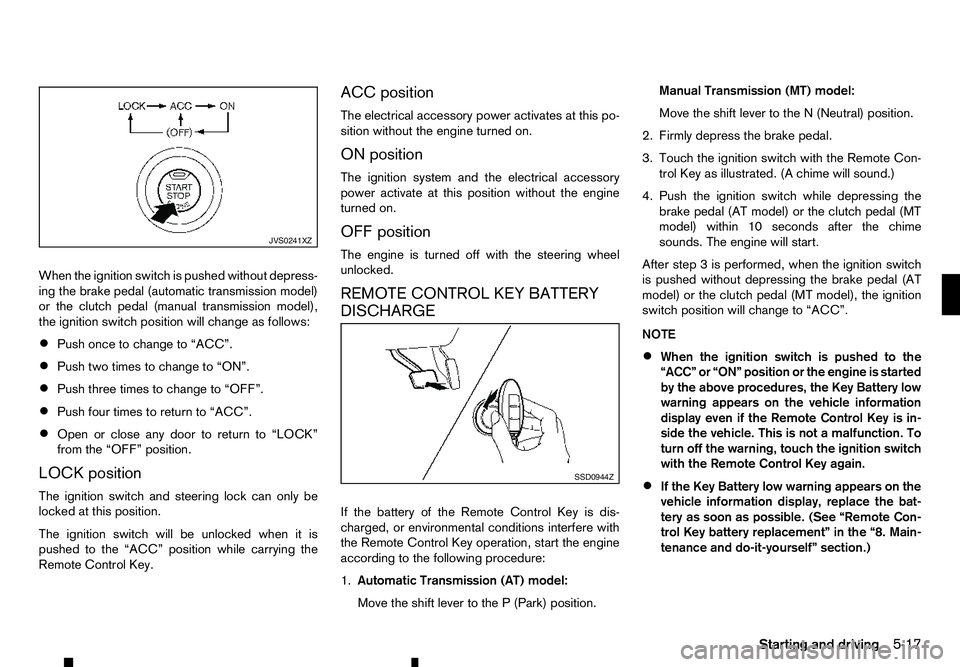
When the ignition switch is pushed without depress-
ing the brake pedal (automatic transmission model)
or the clutch pedal (manual transmission model),
the ignition switch position will change as follows:
• Push once to change to “ACC”.
• Push two times to change to “ON”.
• Push three times to change to “OFF”.
• Push four times to return to “ACC”.
• Open or close any door to return to “LOCK”
from the “OFF” position.
LOCK position
The ignition switch and steering lock can only be
locked at this position.
The ignition switch will be unlocked when it is
pushed to the “ACC” position while carrying the
Remote Control Key. ACC position
The electrical accessory power activates at this po-
sition without the engine turned on.
ON position
The ignition system and the electrical accessory
power activate at this position without the engine
turned on.
OFF position
The engine is turned off with the steering wheel
unlocked.
REMOTE CONTROL KEY BATTERY
DISCHARGE
If the battery of the Remote Control Key is dis-
charged, or environmental conditions interfere with
the Remote Control Key operation, start the engine
according to the following procedure:
1.
Automatic Transmission (AT) model:
Move the shift lever to the P(Park) position. Manual Transmission (MT) model:
Move the shift lever to the
N(Neutral) position.
2. Firmly depress the brake pedal.
3. Touch the ignition switch with the Remote Con- trol Key as illustrated. (A chime will sound.)
4. Push the ignition switch while depressing the brake pedal (AT model) or the clutch pedal (MT
model) within 10 seconds after the chime
sounds. The engine will start.
After step 3isperformed, when the ignition switch
is pushed without depressing the brake pedal (AT
model) or the clutch pedal (MT model), the ignition
switch position will change to “ACC”.
NOTE
• When the ignition switch is pushed to the
“ACC” or “ON” position or the engine is started
by the above procedures, the Key Battery low
warning appears on the vehicle information
display even if the Remote Control Key is in-
side the vehicle. This is not
amalfunction. To
turn off the warning, touch the ignition switch
with the Remote Control Key again.
• If the Key Battery low warning appears on the
vehicle information display, replace the bat-
tery as soon as possible. (See “Remote Con-
trol Key battery replacement” in the “8. Main-
tenance and do-it-yourself” section.) JVS0241XZ
SSD0944Z
Starting and driving
5-17
Page 220 of 340
1. Apply the parking brake.
2. Depress the footbrake pedal.
3. Automatic Transmission (AT) model:
Move the shift lever to the P(Park) or the N(Neu-
tral) position.
The starter is designed to operate only when
the shift lever is in the proper position.
Manual Transmission (MT) model:
Move the shift lever to the N(Neutral) position
and depress the clutch pedal to the floor while
starting the engine.
4. Crank the engine with your foot off the accelera- tor pedal by turning the ignition switch to the
For diesel engine models: Turn the ignition
switch to the
glow plug indicator light turns off.
5. Immediately release the ignition switch when the engine starts. If the engine starts, but fails to run,
repeat the above procedures.
6. Allow the engine to idle for at least 30 seconds after starting the engine to warm-up. Drive at
moderate speeds for ashort distance first, espe-
cially in cold weather.
CAUTION
Do not leave the vehicle unattended while the
engine is warming up. 1. Apply the parking brake.
2.
Automatic Transmission (AT) model:
Move the shift lever to the P(Park) or the N(Neu-
tral) position.
The starter is designed to operate only when
the shift lever is in the proper position.
Manual Transmission (MT) model:
Move the shift lever to the N(Neutral) position.
The Remote Control Key must be carried when operating the ignition switch.
3. Place the ignition switch in the “ON” position. Depress the brake pedal (AT model) or the clutch
pedal (MT model) and push the ignition switch to
start the engine.
For diesel engine models: Wait until the glow
plug indicator light goes out.
To start the engine immediately, push and re-
lease the ignition switch while depressing the
brake pedal or clutch pedal with the ignition
switch in any position.
4. Immediately release the ignition switch when the engine starts. If the engine starts, but fails to run,
repeat the above procedures.
5. Allow the engine to idle for at least 30 seconds after starting the engine to warm-up. Drive at
moderate speeds for ashort distance first, espe-
cially in cold weather. CAUTION
Do not leave the vehicle unattended while the
engine is warming up.
6. To stop the engine, move the shift lever to the P (Park) (AT model) or N(Neutral) (MT model) po-
sition, apply the parking brake, and push the igni-
tion switch to the “OFF” position.
STARTING ENGINE (models
without Remote Control Key system)
STARTING ENGINE (models with
Remote Control Key system)
5-18 Starting and driving
Page 221 of 340
DRIVING WITH AUTOMATIC
TRANSMISSION (AT)
The Automatic Transmission (AT) in your vehicle is
electronically controlled to produce maximum power
and smooth operation.
The recommended operating procedures for this
transmission are shown on the following pages. Fol-
low these procedures for maximum vehicle perfor-
mance and driving enjoyment. WARNING
Do not downshift abruptly on slippery roads. This
may cause aloss of control.
CAUTION
• The cold engine idle speed is high, so use
caution when shifting into aforward or re-
verse gear before the engine has warmed up.
• Avoid revving up the engine while the vehicle
is stopped. This could cause unexpected ve-
hicle movement.
• Never shift to either the
P(Park) or R(Re-
verse) position while the vehicle is moving
forward and P(Park) or D(Drive) position
while the vehicle is reversing. This could cause an accident or damage the transmis-
sion. •
Except in an emergency, do not shift to the N
(Neutral) position while driving. Coasting with
the transmission in the
N(Neutral) position
may cause serious damage to the transmis-
sion.
• Start the engine in either the
P(Park) or N
(Neutral) position. The engine will not start in
any other gear position. If it does, have your
vehicle checked by an approved dealer or
qualified workshop.
• Shift into the
P(Park) position and apply the
parking brake when at astandstill for longer
than ashort waiting period.
• Keep the engine at idling speed while shifting
from the
N(Neutral) position to any driving
position.
• To avoid possible damage to your vehicle;
when stopping the vehicle on an uphill grade,
do not hold the vehicle by depressing the ac-
celerator pedal. The footbrake should be used
for this purpose.
Starting vehicle
1. After starting the engine, fully depress the foot- brake pedal before attempting to move the shift
lever out of the P(Park) position.
2. Keep the footbrake pedal depressed and move the shift lever into adriving position.
3. Release the parking brake, the footbrake pedal, and then gradually start the vehicle in motion. The AT is designed so the footbrake pedal MUST
be depressed before shifting from the
P(Park)
position to any driving position while the ignition
switch is in the “ON” position.
The shift lever cannot be moved out of the P
(Park) position and into any of the other gear
positions if the ignition switch is placed in the
“LOCK”, “OFF” or “ACC” position.
CAUTION
• DEPRESS THE FOOTBRAKE PEDAL
-Shifting
the shift lever to D(Drive), R(Reverse), or
manual shift mode without depressing the
footbrake pedal causes the vehicle to move
slowly when the engine is running. Make sure
the footbrake pedal is depressed fully and the
vehicle is stopped before shifting the shift le-
ver.
• MAKE SURE OF THE SHIFT LEVER POSITION
-M
ake sure the shift lever is in the desired
position. D(Drive) and manual shift mode are
used to move forward and R(Reverse) to re-
verse. Depress the accelerator pedal to start
the vehicle and merge with traffic (avoid
abrupt starting and spinning the wheels).
• WARM UP THE ENGINE
-Due to the higher
idle speeds when the engine is cold, extra
caution must be exercised when shifting the
shift lever into the driving position immedi-
ately after starting the engine.
DRIVING THE VEHICLE
Starting and driving5-19