Button 2 RENAULT CAPTUR 2017 1.G Workshop Manual
[x] Cancel search | Manufacturer: RENAULT, Model Year: 2017, Model line: CAPTUR, Model: RENAULT CAPTUR 2017 1.GPages: 248, PDF Size: 6.56 MB
Page 172 of 248
4.12
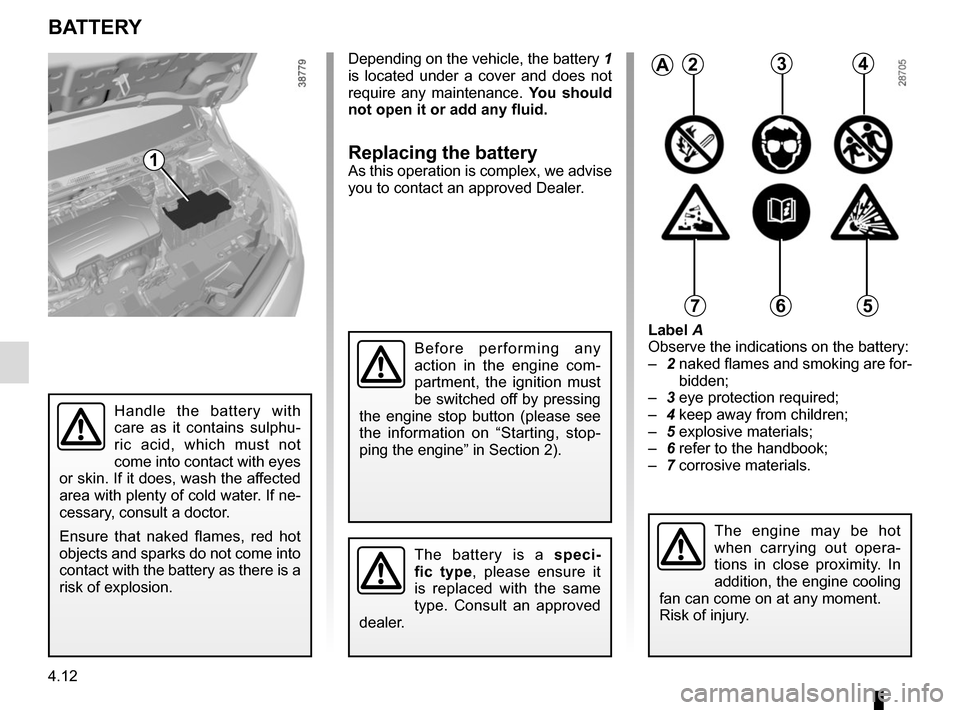
Label A
Observe the indications on the battery:
– 2 naked flames and smoking are for-
bidden;
– 3 eye protection required;
– 4 keep away from children;
– 5 explosive materials;
– 6 refer to the handbook;
– 7 corrosive materials.
BATTERY
1
2
Handle the battery with
care as it contains sulphu-
ric acid, which must not
come into contact with eyes
or skin. If it does, wash the affected
area with plenty of cold water. If ne-
cessary, consult a doctor.
Ensure that naked flames, red hot
objects and sparks do not come into
contact with the battery as there is a
risk of explosion.
The battery is a speci-
fic type, please ensure it
is replaced with the same
type. Consult an approved
dealer.
A234
567
The engine may be hot
when carrying out opera-
tions in close proximity. In
addition, the engine cooling
fan can come on at any moment.
Risk of injury.
Depending on the vehicle, the battery 1
is located under a cover and does not
require any maintenance. You should
not open it or add any fluid.
Replacing the battery
As this operation is complex, we advise
you to contact an approved Dealer.
Before performing any
action in the engine com-
partment, the ignition must
be switched off by pressing
the engine stop button (please see
the information on “Starting, stop-
ping the engine” in Section 2).
Page 187 of 248
5.5
TYRE PRESSURE KIT (2/3)
Depending on the vehicle, in the event
of a puncture, use the kit located in the
boot or underneath the luggage com-
partment carpet.
Vehicle fitted with a tyre pressure
loss warning system
If under-inflated (puncture, low pres-
sure, etc.), the warning light
lights up on the instrument panel. See
“Tyre pressure loss warning” in
Section 2.
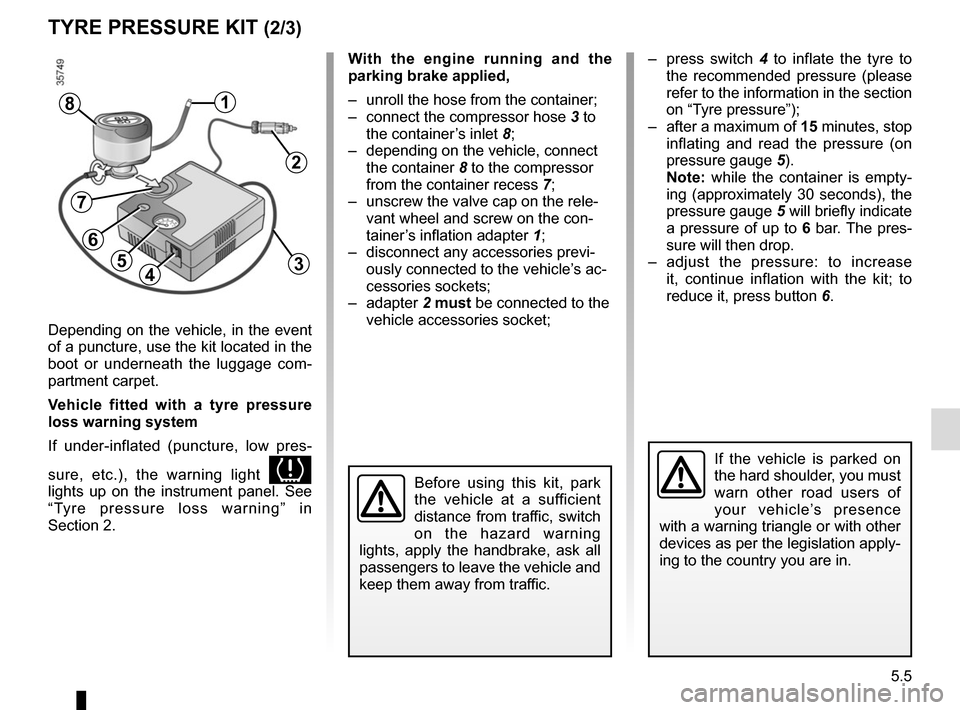
With the engine running and the
parking brake applied,
– unroll the hose from the container;
– connect the compressor hose 3 to
the container’s inlet 8;
– depending on the vehicle, connect the container 8 to the compressor
from the container recess 7;
– unscrew the valve cap on the rele- vant wheel and screw on the con-
tainer’s inflation adapter 1;
– disconnect any accessories previ- ously connected to the vehicle’s ac-
cessories sockets;
– adapter 2 must be connected to the
vehicle accessories socket;
45
1
Before using this kit, park
the vehicle at a sufficient
distance from traffic, switch
on the hazard warning
lights, apply the handbrake, ask all
passengers to leave the vehicle and
keep them away from traffic.
8
If the vehicle is parked on
the hard shoulder, you must
warn other road users of
your vehicle’s presence
with a warning triangle or with other
devices as per the legislation apply-
ing to the country you are in.
– press switch 4 to inflate the tyre to
the recommended pressure (please
refer to the information in the section
on “Tyre pressure”);
– after a maximum of 15 minutes, stop inflating and read the pressure (on
pressure gauge 5).
Note: while the container is empty-
ing (approximately 30 seconds), the
pressure gauge 5 will briefly indicate
a pressure of up to 6 bar. The pres-
sure will then drop.
– adjust the pressure: to increase it, continue inflation with the kit; to
reduce it, press button 6.
2
3
7
6
Page 196 of 248
5.14
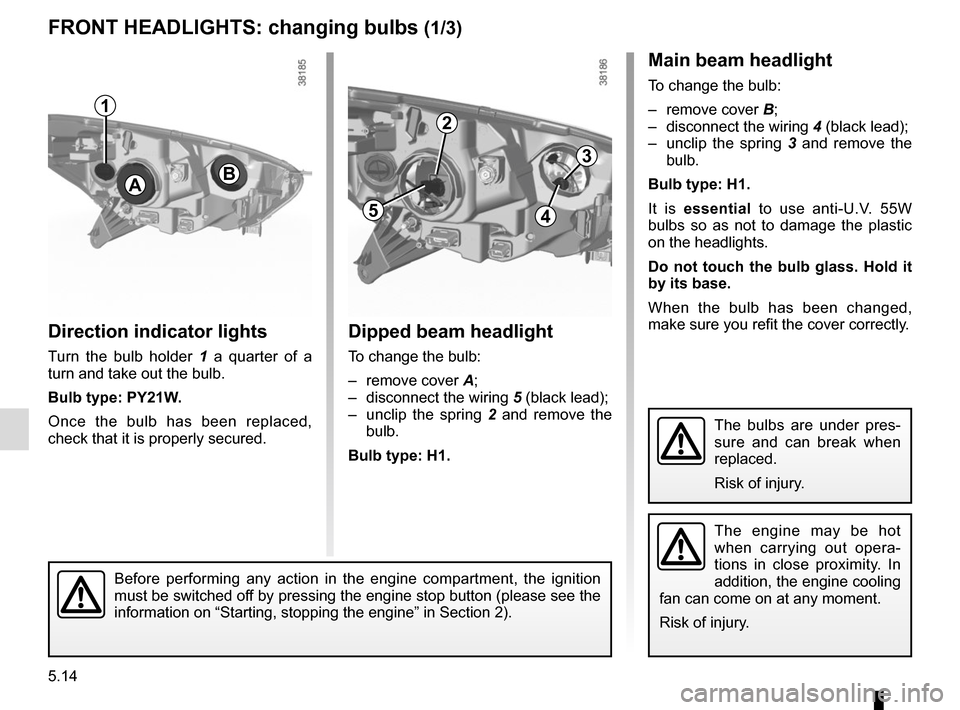
Direction indicator lights
Turn the bulb holder 1 a quarter of a
turn and take out the bulb.
Bulb type: PY21W.
Once the bulb has been replaced,
check that it is properly secured.
Dipped beam headlight
To change the bulb:
– remove cover A;
– disconnect the wiring 5 (black lead);
– unclip the spring 2 and remove the
bulb.
Bulb type: H1.
FRONT HEADLIGHTS: changing bulbs (1/3)
The engine may be hot
when carrying out opera-
tions in close proximity. In
addition, the engine cooling
fan can come on at any moment.
Risk of injury.
B
Main beam headlight
To change the bulb:
– remove cover B;
– disconnect the wiring 4 (black lead);
– unclip the spring 3 and remove the
bulb.
Bulb type: H1.
It is essential to use anti-U.V. 55W
bulbs so as not to damage the plastic
on the headlights.
Do not touch the bulb glass. Hold it
by its base.
When the bulb has been changed,
make sure you refit the cover correctly.
A
1
2
54
3
The bulbs are under pres-
sure and can break when
replaced.
Risk of injury.
Before performing any action in the engine compartment, the ignition
must be switched off by pressing the engine stop button (please see the
information on “Starting, stopping the engine” in Section 2).
Page 197 of 248
5.15
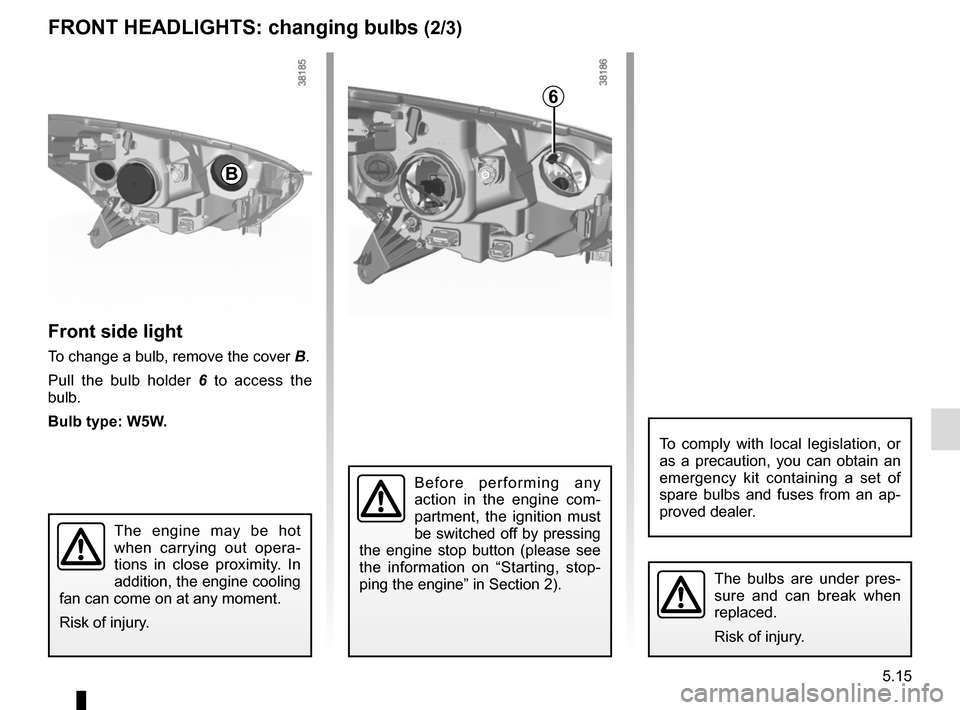
Front side light
To change a bulb, remove the cover B.
Pull the bulb holder 6 to access the
bulb.
Bulb type: W5W.
The bulbs are under pres-
sure and can break when
replaced.
Risk of injury.
FRONT HEADLIGHTS: changing bulbs (2/3)
The engine may be hot
when carrying out opera-
tions in close proximity. In
addition, the engine cooling
fan can come on at any moment.
Risk of injury.
To comply with local legislation, or
as a precaution, you can obtain an
emergency kit containing a set of
spare bulbs and fuses from an ap-
proved dealer.
6
B
Before performing any
action in the engine com-
partment, the ignition must
be switched off by pressing
the engine stop button (please see
the information on “Starting, stop-
ping the engine” in Section 2).
Page 203 of 248
5.21
Operating faultsIf the battery is too weak to ensure cor-
rect operation, you can still start (insert
the RENAULT card in the card reader)
and lock/unlock the vehicle (refer to the
information on "Locking/unlocking the
doors" in Section 1).
RENAULT CARD: battery
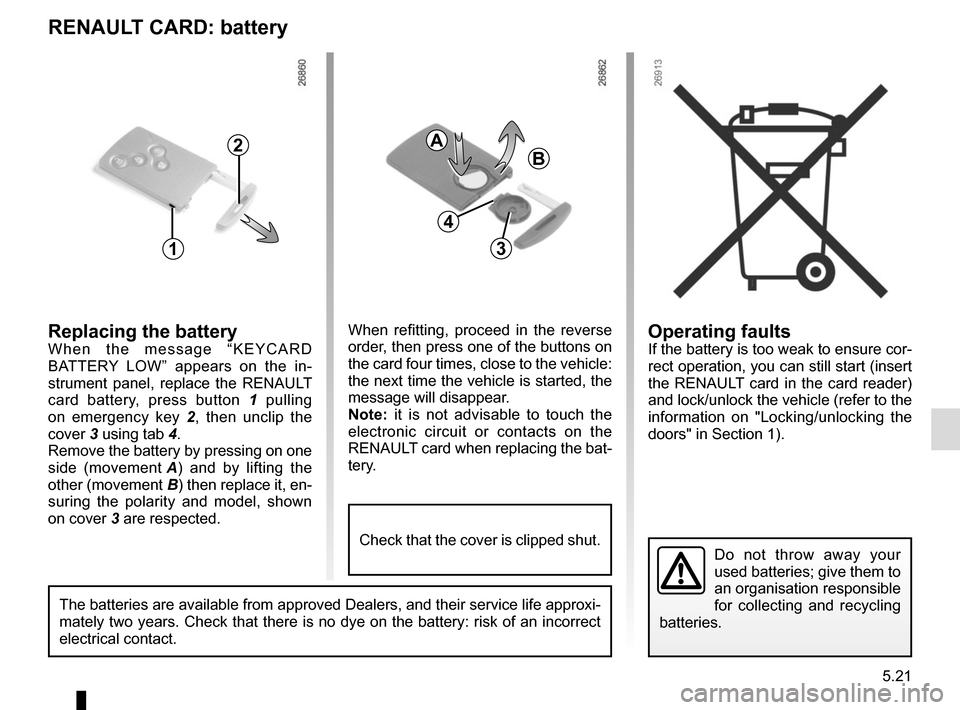
Replacing the batteryWhen the message “KEYCARD
BATTERY LOW” appears on the in-
strument panel, replace the RENAULT
card battery, press button 1 pulling
on emergency key 2 , then unclip the
cover 3 using tab 4.
Remove the battery by pressing on one
side (movement A) and by lifting the
other (movement B) then replace it, en-
suring the polarity and model, shown
on cover 3 are respected.
Do not throw away your
used batteries; give them to
an organisation responsible
for collecting and recycling
batteries.
1
2
When refitting, proceed in the reverse
order, then press one of the buttons on
the card four times, close to the vehicle:
the next time the vehicle is started, the
message will disappear.
Note: it is not advisable to touch the
electronic circuit or contacts on the
RENAULT card when replacing the bat-
tery.
A
B
3
The batteries are available from approved Dealers, and their service lif\
e approxi-
mately two years. Check that there is no dye on the battery: risk of an \
incorrect
electrical contact.
4
Check that the cover is clipped shut.
Page 209 of 248
5.27
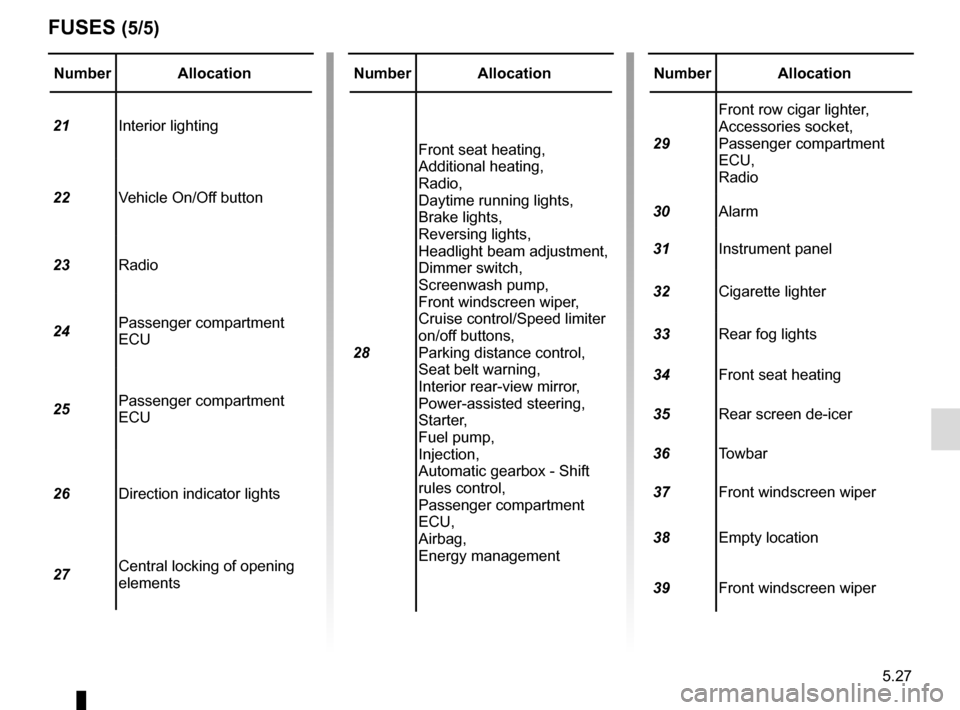
Number Allocation
21 Interior lighting
22 Vehicle On/Off button
23 Radio
24 Passenger compartment
ECU
25 Passenger compartment
ECU
26 Direction indicator lights
27 Central locking of opening
elements
FUSES (5/5)
Number Allocation
28 Front seat heating,
Additional heating,
Radio,
Daytime running lights,
Brake lights,
Reversing lights,
Headlight beam adjustment,
Dimmer switch,
Screenwash pump,
Front windscreen wiper,
Cruise control/Speed limiter
on/off buttons,
Parking distance control,
Seat belt warning,
Interior rear-view mirror,
Power-assisted steering,
Starter,
Fuel pump,
Injection,
Automatic gearbox - Shift
rules control,
Passenger compartment
ECU,
Airbag,
Energy managementNumber Allocation
29 Front row cigar lighter,
Accessories socket,
Passenger compartment
ECU,
Radio
30 Alarm
31 Instrument panel
32 Cigarette lighter
33 Rear fog lights
34 Front seat heating
35 Rear screen de-icer
36 Towbar
37 Front windscreen wiper
38 Empty location
39 Front windscreen wiper
Page 210 of 248
5.28
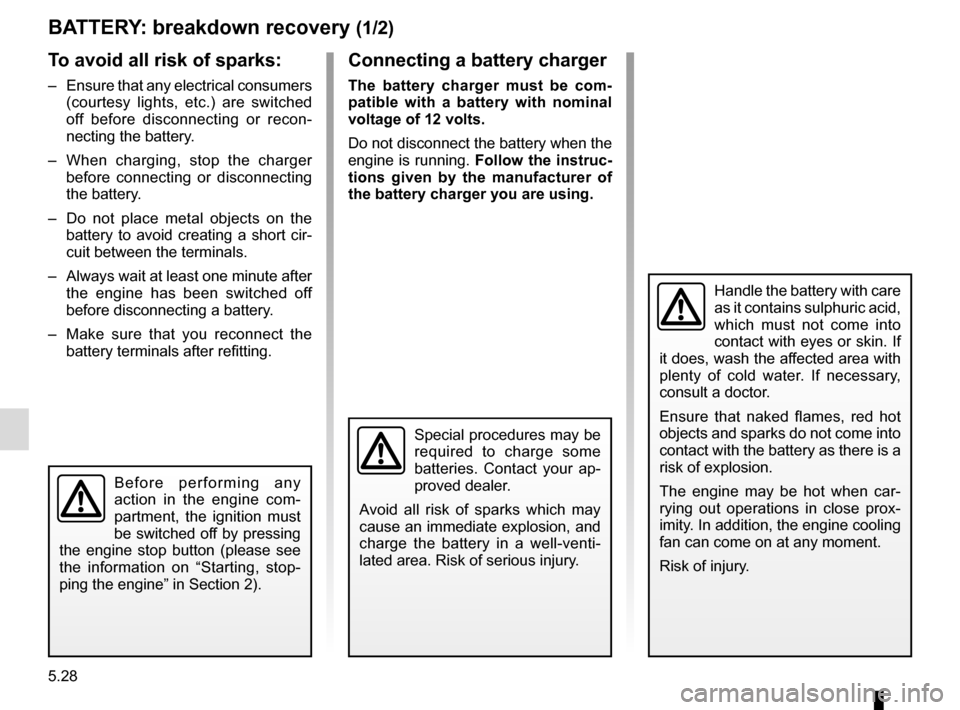
BATTERY: breakdown recovery (1/2)
To avoid all risk of sparks:
– Ensure that any electrical consumers (courtesy lights, etc.) are switched
off before disconnecting or recon-
necting the battery.
– When charging, stop the charger before connecting or disconnecting
the battery.
– Do not place metal objects on the battery to avoid creating a short cir-
cuit between the terminals.
– Always wait at least one minute after the engine has been switched off
before disconnecting a battery.
– Make sure that you reconnect the battery terminals after refitting.
Connecting a battery charger
The battery charger must be com-
patible with a battery with nominal
voltage of 12 volts.
Do not disconnect the battery when the
engine is running. Follow the instruc-
tions given by the manufacturer of
the battery charger you are using.
Special procedures may be
required to charge some
batteries. Contact your ap-
proved dealer.
Avoid all risk of sparks which may
cause an immediate explosion, and
charge the battery in a well-venti-
lated area. Risk of serious injury.
Handle the battery with care
as it contains sulphuric acid,
which must not come into
contact with eyes or skin. If
it does, wash the affected area with
plenty of cold water. If necessary,
consult a doctor.
Ensure that naked flames, red hot
objects and sparks do not come into
contact with the battery as there is a
risk of explosion.
The engine may be hot when car-
rying out operations in close prox-
imity. In addition, the engine cooling
fan can come on at any moment.
Risk of injury.
Before performing any
action in the engine com-
partment, the ignition must
be switched off by pressing
the engine stop button (please see
the information on “Starting, stop-
ping the engine” in Section 2).
Page 213 of 248
5.31
WINDSCREEN WIPER BLADES (1/2)
Check the condition of the wiper
blades. You are responsible for their
service life:
– clean the blades, windscreen and rear screen regularly with soapy
water;
– do not use them when the wind- screen or rear screen are dry;
– free them from the windscreen or rear screen when they have not
been used for a long time.
– In frosty weather, make
sure that the wiper blades
are not stuck by ice (to
avoid the risk of the motor
overheating).
– Check the condition of the wiper
blades.
They should be replaced as soon
as they become less efficient: ap-
proximately once a year.
When changing the blade, when it
has been removed, do not let the
wiper arm fall against the window:
risk of breaking the window.
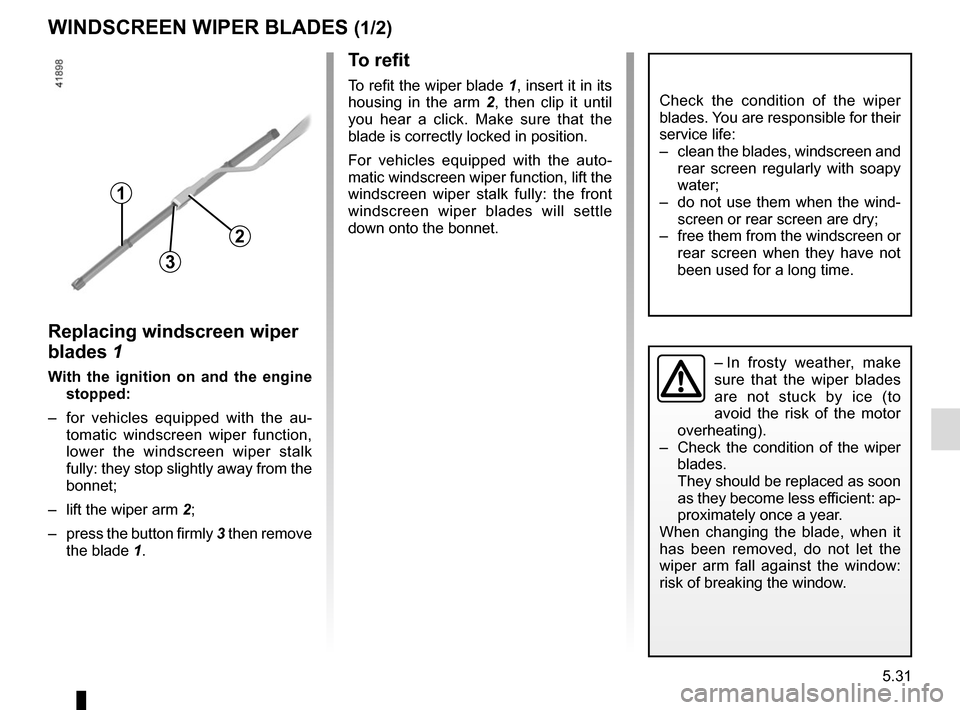
To refit
To refit the wiper blade 1, insert it in its
housing in the arm 2, then clip it until
you hear a click. Make sure that the
blade is correctly locked in position.
For vehicles equipped with the auto-
matic windscreen wiper function, lift the
windscreen wiper stalk fully: the front
windscreen wiper blades will settle
down onto the bonnet.
Replacing windscreen wiper
blades 1
With the ignition on and the engine stopped:
– for vehicles equipped with the au- tomatic windscreen wiper function,
lower the windscreen wiper stalk
fully: they stop slightly away from the
bonnet;
– lift the wiper arm 2;
– press the button firmly 3 then remove the blade 1.
2
1
3
Page 215 of 248
5.33
TOWING: breakdown recovery (1/2)
Before towing, unlock the steering
column: with the clutch depressed,
engage first gear (lever in position N
or R for vehicles with automatic gear-
boxes), insert the RENAULT card in the
card reader, then press the engine start
button for two seconds.
Reposition the lever to neutral (posi-
tion N for vehicles fitted with an auto-
matic gearbox).
The column is unlocked, the acces-
sory functions are supplied: the vehi-
cle lights can be used (indicators, brake
lights etc.). At night the vehicle must
have its lights on.
Once you have finished towing, press
the engine start button twice (risk of
running down the battery). The speed specified by current legis-
lation for towing must always be ob-
served. If your vehicle is the towing
vehicle, do not exceed the maximum
towing weight for your vehicle (refer to
the information on “Weights” in Section
6).
Towing a vehicle with an
automatic gearbox
With the engine switched off, the trans-
mission is no longer lubricated. It is
preferable to tow this type of vehicle on
a trailer or tow it with the front wheels
off the ground.
Under
exceptional circumstances, you
may tow the vehicle with all four wheels
on the ground, only going forward, with
the gear lever in the neutral N position,
and for a distance not exceeding
30 miles (50 km).
Do not remove the
RENAULT card from the
reader when the vehicle is
being towed.
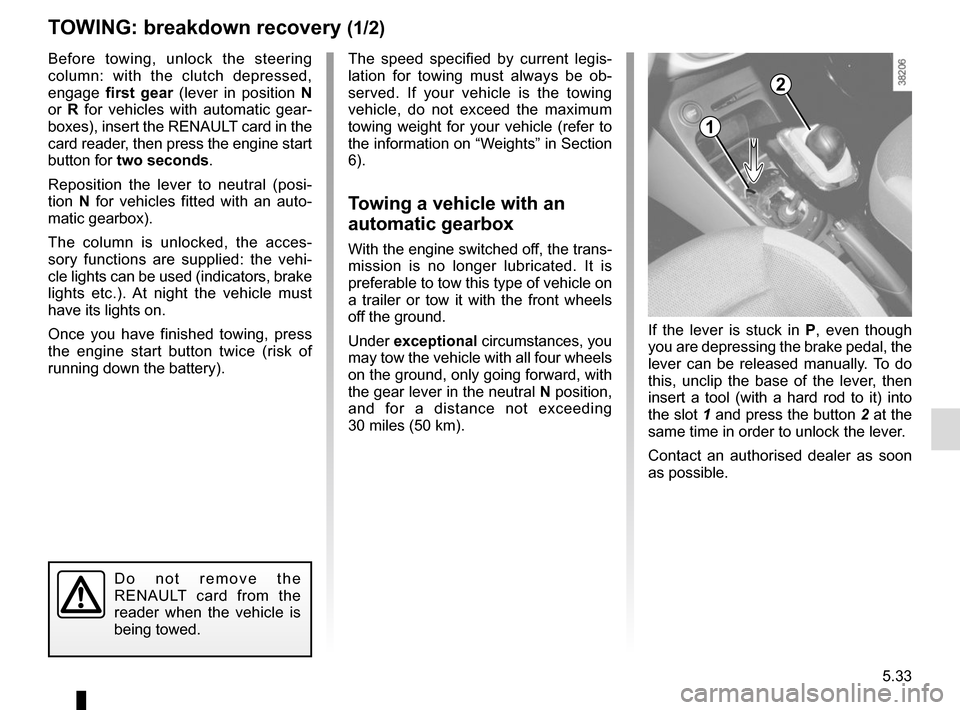
1
2
If the lever is stuck in P , even though
you are depressing the brake pedal, the
lever can be released manually. To do
this, unclip the base of the lever, then
insert a tool (with a hard rod to it) into
the slot 1 and press the button 2 at the
same time in order to unlock the lever.
Contact an authorised dealer as soon
as possible.
Page 218 of 248
5.36
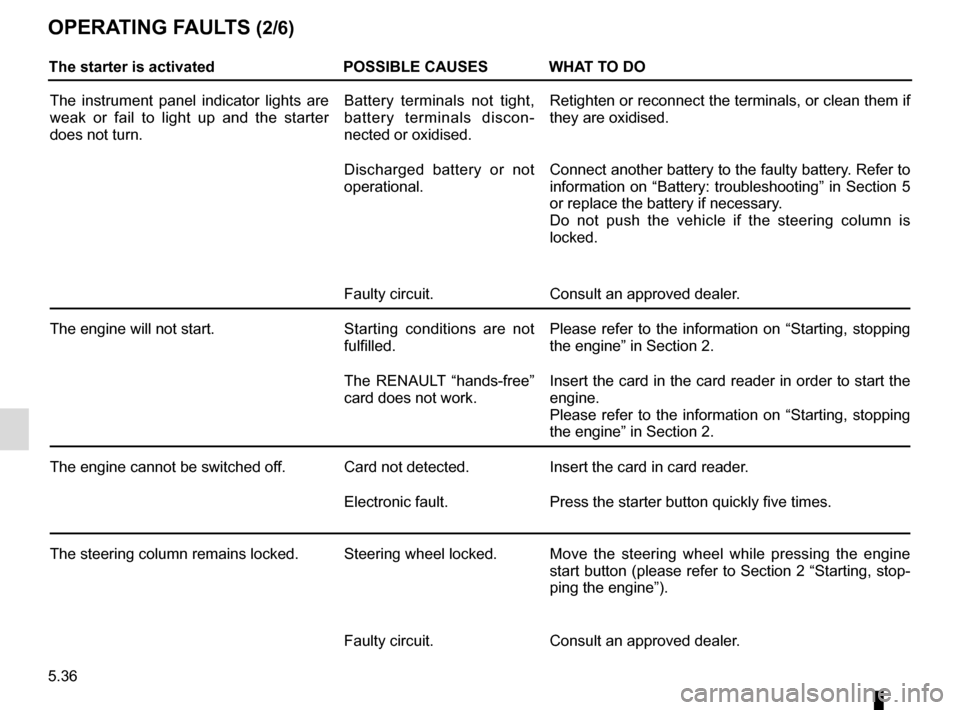
OPERATING FAULTS (2/6)
The starter is activatedPOSSIBLE CAUSES WHAT TO DO
The instrument panel indicator lights are
weak or fail to light up and the starter
does not turn. Battery terminals not tight,
battery terminals discon-
nected or oxidised.Retighten or reconnect the terminals, or clean them if
they are oxidised.
Discharged battery or not
operational. Connect another battery to the faulty battery. Refer to
information on “Battery: troubleshooting” in Section 5
or replace the battery if necessary.
Do not push the vehicle if the steering column is
locked.
Faulty circuit. Consult an approved dealer.
The engine will not start. Starting conditions are not
fulfilled.Please refer to the information on “Starting, stopping
the engine” in Section 2.
The RENAULT “hands-free”
card does not work. Insert the card in the card reader in order to start the
engine.
Please refer to the information on “Starting, stopping
the engine” in Section 2.
The engine cannot be switched off. Card not detected. Insert the card in card reader.
Electronic fault. Press the starter button quickly five times.
The steering column remains locked. Steering wheel locked. Move the steering wheel while pressing the engine
start button (please refer to Section 2 “Starting, stop-
ping the engine”).
Faulty circuit. Consult an approved dealer.