spare wheel RENAULT CLIO 2009 X85 / 3.G Owners Manual
[x] Cancel search | Manufacturer: RENAULT, Model Year: 2009, Model line: CLIO, Model: RENAULT CLIO 2009 X85 / 3.GPages: 264, PDF Size: 15.68 MB
Page 184 of 264
Downloaded from www.Manualslib.com manuals search engine
4.10
ENG_UD12587_2Pression de gonflage des pneumatiques (X85 - B85 - C85 - S85 - K85 - Re\
nault)ENG_NU_853-3_BCSK85_Renault_4
Tyre pressure
TyRE pRESSURE
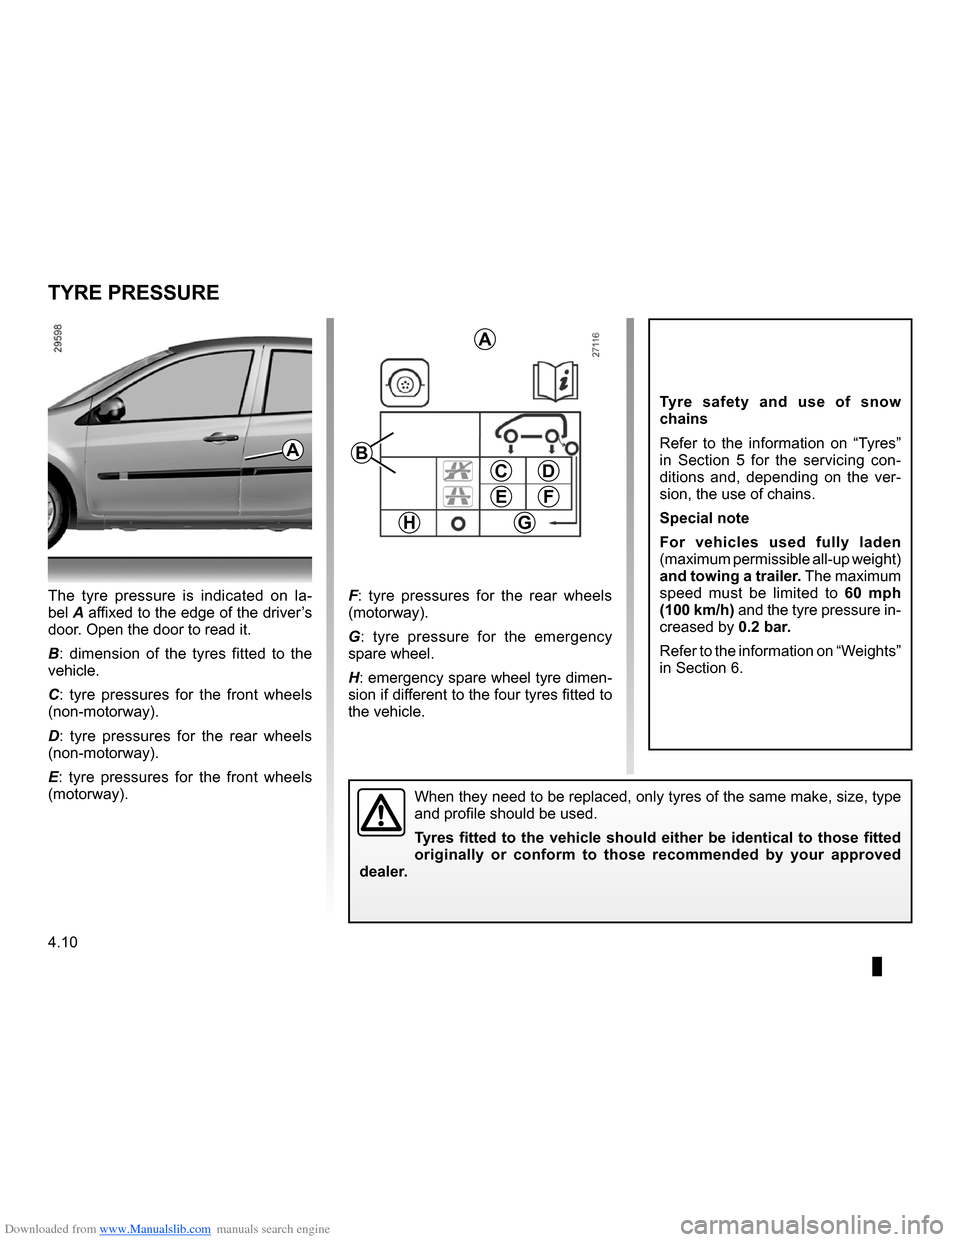
The tyre pressure is indicated on la-
bel A affixed to the edge of the driver’s door. Open the door to read it.
B: dimension of the tyres fitted to the vehicle.
C: tyre pressures for the front wheels (non-motorway).
D: tyre pressures for the rear wheels (non-motorway).
E: tyre pressures for the front wheels (motorway).
F: tyre pressures for the rear wheels (motorway).
G: tyre pressure for the emergency spare wheel.
H: emergency spare wheel tyre dimen- sion if different to the four tyres fitted to the vehicle.
Tyre safety and use of snow chains
Refer to the information on “Tyres” in Section 5 for the servicing con- ditions and, depending on the ver- sion, the use of chains.
Special note
For vehicles used fully laden (maximum permissible all-up weight) and towing a trailer. The maximum speed must be limited to 60 mph (100 km/h) and the tyre pressure in- creased by 0.2 bar.
Refer to the information on “Weights” in Section 6.
When they need to be replaced, only tyres of the same make, size, type and profile should be used.
Tyres fitted to the vehicle should either be identical to those fitted originally or conform to those recommended by your approved dealer.
A
B
CD
FE
GH
A
Page 189 of 264
Downloaded from www.Manualslib.com manuals search engine
5.1
ENG_UD14715_4Sommaire 5 (X85 - B85 - C85 - S85 - K85 - Renault)ENG_NU_853-3_BCSK85_Renault_5
Section 5: Practical advice
Emergency spare wheel . . . . . . . . . . . . . . . . . . . . . . . . . . . . . . . . . . . .\
. . . . . . . . . . . . . . . . . . . . . . 5.2
Tyre inflation kit . . . . . . . . . . . . . . . . . . . . . . . . . . . . . . . . . . . .\
. . . . . . . . . . . . . . . . . . . . . . . . . . . . . 5.6
Tool kit (jack, wheelbrace, etc.) . . . . . . . . . . . . . . . . . . . . . . . . . . . . . . . . . . . . \
. . . . . . . . . . . . . . . . . 5.9
Hubcap - wheel . . . . . . . . . . . . . . . . . . . . . . . . . . . . . . . . . . . .\
. . . . . . . . . . . . . . . . . . . . . . . . . . . . . 5.10
Changing a wheel . . . . . . . . . . . . . . . . . . . . . . . . . . . . . . . . . . . .\
. . . . . . . . . . . . . . . . . . . . . . . . . . . 5.11
Tyres (tyre and wheel safety, use in winter) . . . . . . . . . . . . . . . . . . . . . . . . . . . . . . . . . . . .\
. . . . . . . 5.12
Headlights (changing bulbs) . . . . . . . . . . . . . . . . . . . . . . . . . . . . . . . . . . . .\
. . . . . . . . . . . . . . . . . . . 5.15
Rear lights (changing bulbs) . . . . . . . . . . . . . . . . . . . . . . . . . . . . . . . . . . . .\
. . . . . . . . . . . . . . . . . . . 5.19
Indicator lights (changing bulbs) . . . . . . . . . . . . . . . . . . . . . . . . . . . . . . . . . . . .\
. . . . . . . . . . . . . . . . 5.22
Interior lighting (changing bulbs) . . . . . . . . . . . . . . . . . . . . . . . . . . . . . . . . . . . . \
. . . . . . . . . . . . . . . . 5.23
Fuses . . . . . . . . . . . . . . . . . . . . . . . . . . . . . . . . . . . . \
. . . . . . . . . . . . . . . . . . . . . . . . . . . . . . . . . . . . \
. 5.25
Battery . . . . . . . . . . . . . . . . . . . . . . . . . . . . . . . . . . . . \
. . . . . . . . . . . . . . . . . . . . . . . . . . . . . . . . . . . . 5.27
Radio frequency remote control: battery . . . . . . . . . . . . . . . . . . . . . . . . . . . . . . . . . . . . \
. . . . . . . . . . 5.31
RENAULT card: battery . . . . . . . . . . . . . . . . . . . . . . . . . . . . . . . . . . . . \
. . . . . . . . . . . . . . . . . . . . . . . 5.32
Fitting a radio . . . . . . . . . . . . . . . . . . . . . . . . . . . . . . . . . . . . \
. . . . . . . . . . . . . . . . . . . . . . . . . . . . . . . 5.33
Accessories . . . . . . . . . . . . . . . . . . . . . . . . . . . . . . . . . . . . \
. . . . . . . . . . . . . . . . . . . . . . . . . . . . . . . . 5.34
Wipers (replacing blades) . . . . . . . . . . . . . . . . . . . . . . . . . . . . . . . . . . . .\
. . . . . . . . . . . . . . . . . . . . . 5.35
Towing . . . . . . . . . . . . . . . . . . . . . . . . . . . . . . . . . . . . \
. . . . . . . . . . . . . . . . . . . . . . . . . . . . . . . . . . . . 5.37
Operating faults . . . . . . . . . . . . . . . . . . . . . . . . . . . . . . . . . . . . \
. . . . . . . . . . . . . . . . . . . . . . . . . . . . . 5.40
Page 190 of 264
Downloaded from www.Manualslib.com manuals search engine
puncture................................................(up to the end of the DU)emergency spare wheel .......................(up to the end of the DU)
5.2
ENG_UD10596_1Roue de secours (X85 - B85 - C85 - S85 - K85 - Renault)ENG_NU_853-3_BCSK85_Renault_5
JauneNoirNoir texte
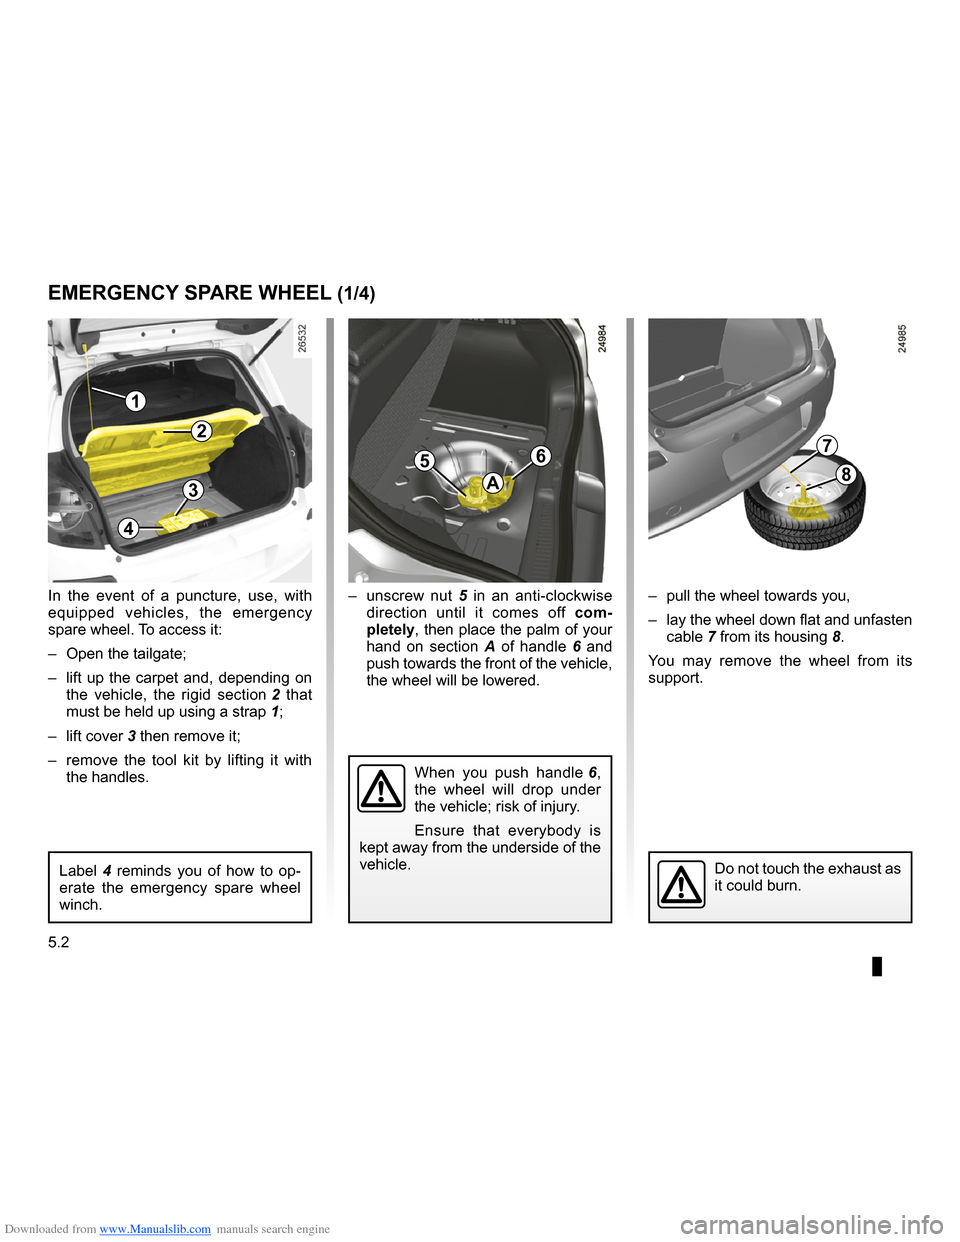
– unscrew nut 5 in an anti-clockwise direction until it comes off com- pletely, then place the palm of your hand on section A of handle 6 and push towards the front of the vehicle, the wheel will be lowered.
Emergency spare wheel
Label 4 reminds you of how to op- erate the emergency spare wheel winch.
Do not touch the exhaust as it could burn.
– pull the wheel towards you,
– lay the wheel down flat and unfasten
cable 7 from its housing 8.
You may remove the wheel from its support.
In the event of a puncture, use, with equipped vehicles, the emergency spare wheel. To access it:
– Open the tailgate;
– lift up the carpet and, depending on
the vehicle, the rigid section 2 that
must be held up using a strap 1;
– lift cover
3 then remove it;
– remove the tool kit by lifting it with
the handles.
EMERGENCY SPARE WHEEL (1/4)
1
2
3
4
56
A
7
8
When you push handle 6, the wheel will drop under the vehicle; risk of injury.
Ensure that everybody is kept away from the underside of the vehicle.
Page 191 of 264

Downloaded from www.Manualslib.com manuals search engine
JauneNoirNoir texte
5.3
ENG_UD10596_1Roue de secours (X85 - B85 - C85 - S85 - K85 - Renault)ENG_NU_853-3_BCSK85_Renault_5
Make sure that no-one has their fingers close to the cable when you move the handle: risk of injury.
EMERGENCY SPARE WHEEL (2/4)
To refit a wheel
To carry out this operation, the cable must be unwound.
If the cable has been wound back up on its own, unwind it again as follows:
– pull the handle to unwind the cable;
– press the button located under
handle 6 to hold the unwound cable, then guide it down;
– recover the cable from underneath
the vehicle.
You may refit the wheel.
Position yourself behind the vehicle and
pull handle 6 to raise the wheel until it is anchored under the vehicle.
After changing a wheel, position the replaced wheel on support 9, with the valve facing the ground. Clip cable 7 in its housing 8 then push the wheel under the luggage compartment.
Ensure that tab 10 is positioned to- wards the rear of the vehicle.
678
9
10
Page 192 of 264
Downloaded from www.Manualslib.com manuals search engine
5.4
ENG_UD10596_1Roue de secours (X85 - B85 - C85 - S85 - K85 - Renault)ENG_NU_853-3_BCSK85_Renault_5
JauneNoirNoir texte
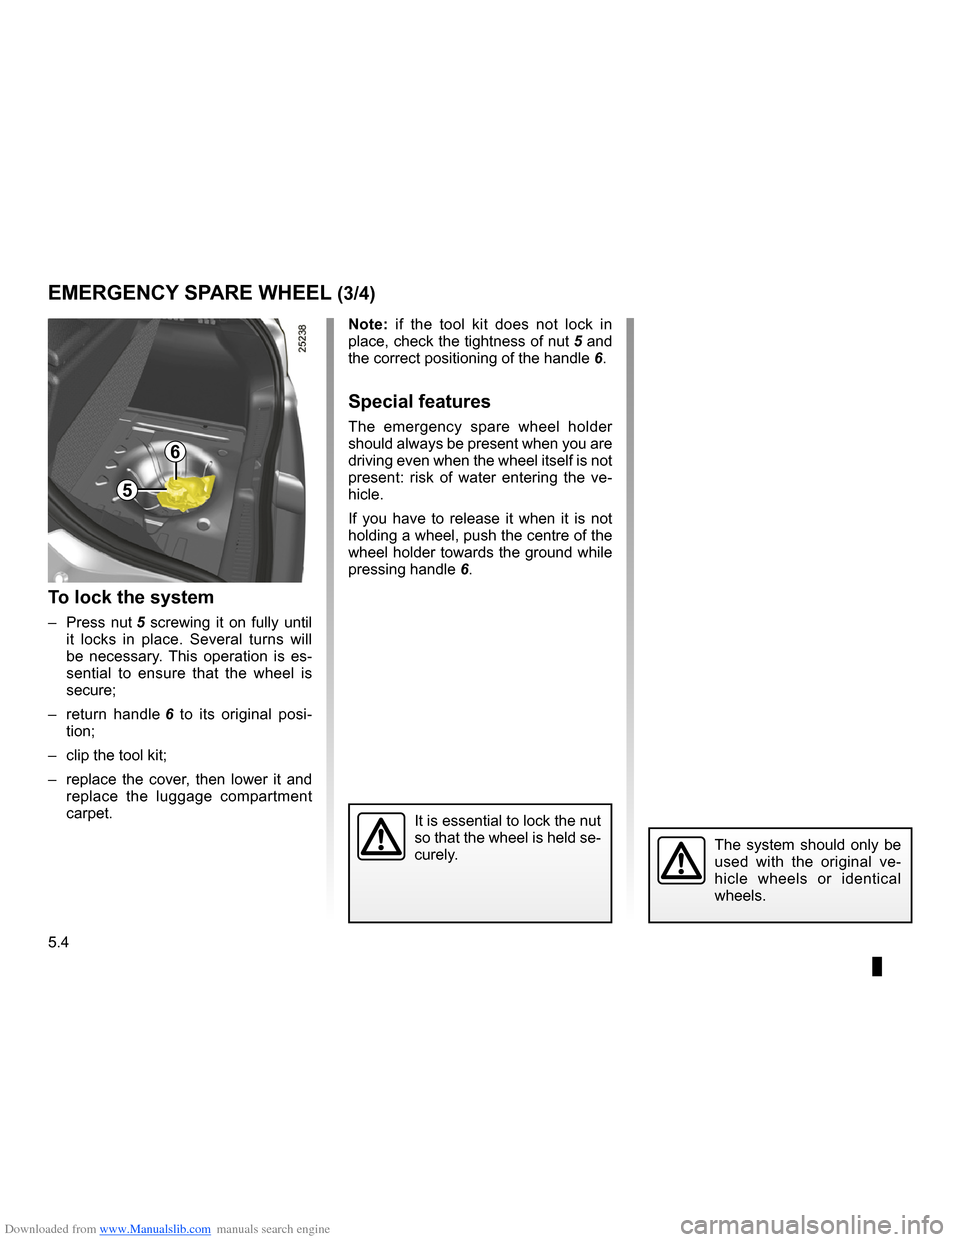
Note: if the tool kit does not lock in
place, check the tightness of nut 5 and
the correct positioning of the handle 6.
Special features
The emergency spare wheel holder should always be present when you are driving even when the wheel itself is not present: risk of water entering the ve- hicle.
If you have to release it when it is not holding a wheel, push the centre of the wheel holder towards the ground while pressing handle 6.
To lock the system
– Press nut 5 screwing it on fully until it locks in place. Several turns will be necessary. This operation is es- sential to ensure that the wheel is secure;
– return handle
6 to its original posi- tion;
– clip the tool kit;
– replace the cover, then lower it and
replace the luggage compartment carpet.
EMERGENCY SPARE WHEEL (3/4)
The system should only be used with the original ve- hicle wheels or identical wheels.
It is essential to lock the nut so that the wheel is held se- curely.
6
5
Page 193 of 264
Downloaded from www.Manualslib.com manuals search engine
JauneNoirNoir texte
5.5
ENG_UD10596_1Roue de secours (X85 - B85 - C85 - S85 - K85 - Renault)ENG_NU_853-3_BCSK85_Renault_5
If the emergency spare wheel has been stored for several years, have it checked by your Dealer to ensure that it is safe to use.
Vehicle fitted with an emergency spare wheel that is smaller than the oth\
er wheels.
– Never fit more than one emergency spare wheel to the same vehicle.
– When this is fitted to the vehicle, which must only be a temporary measure, the driving speed must not exceed the speed
indicated on the label on the wheel.
– Replace the emergency spare wheel as soon as possible with a wheel with the same dimensions as the original.
– Fitting an emergency spare wheel may alter the way the vehicle usually runs. Avoid sudden acceleration or deceleration and
reduce your speed when cornering.
– Fitting the damaged wheel into the emergency spare wheel housing will reduce the vehicle’s ground clearance: avoid driv
- ing over any obstacles.
– If you need to use snow chains, fit the emergency spare wheel to the rear axle and check the tyre pressure.
EMERGENCY SPARE WHEEL (4/4)
Page 197 of 264
Downloaded from www.Manualslib.com manuals search engine
tool kit ...................................................(up to the end of the DU)hubcap tool ...........................................(up to the end of the DU)jack .......................................................(up to the end of the DU)wheelbrace ...........................................(up to the end of the DU)towing hitch...........................................(up to the end of the DU)wheelbrace ...........................................(up to the end of the DU)puncture................................................(up to the end of the DU)
5.9
ENG_UD12590_2Bloc-outils (X85 - B85 - C85 - S85 - K85 - Renault)ENG_NU_853-3_BCSK85_Renault_5
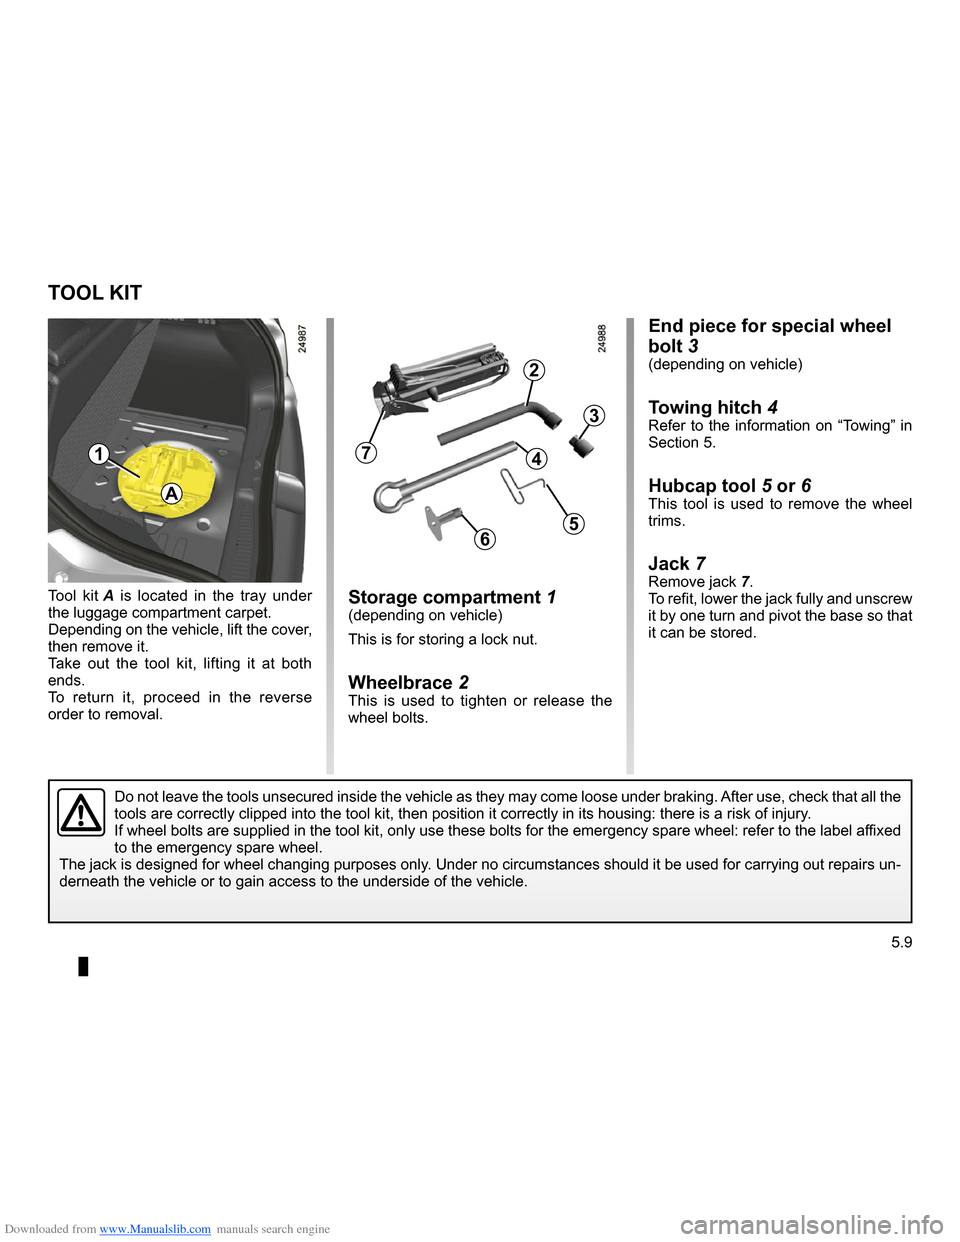
End piece for special wheel
bolt
3(depending on vehicle)
Towing hitch 4Refer to the information on “Towing” in Section 5.
Hubcap tool 5 or 6This tool is used to remove the wheel trims.
Jack 7Remove jack 7.To refit, lower the jack fully and unscrew it by one turn and pivot the base so that it can be stored.
Storage compartment 1(depending on vehicle)
This is for storing a lock nut.
Wheelbrace 2This is used to tighten or release the wheel bolts.
Tool kit
A is located in the tray under the luggage compartment carpet.Depending on the vehicle, lift the cover, then remove it.Take out the tool kit, lifting it at both ends.To return it, proceed in the reverse order to removal.
TOOL KIT
Tool kit (jack, wheelbrace, etc.)
1
A
7
2
3
4
56
Do not leave the tools unsecured inside the vehicle as they may come loose under braking. After use, check that all the tools are correctly clipped into the tool kit, then position it correctl\
y in its housing: there is a risk of injury.If wheel bolts are supplied in the tool kit, only use these bolts for the emergency spare wheel: refer to the label affixed to the emergency spare wheel.
The jack is designed for wheel changing purposes only. Under no circumstances should it be used for carrying out repairs un- derneath the vehicle or to gain access to the underside of the vehicle.
Page 198 of 264

Downloaded from www.Manualslib.com manuals search engine
hubcap tool ...........................................(up to the end of the DU)trims ......................................................(up to the end of the DU)
5.10
ENG_UD10599_1Enjoliveur - Roue (X85 - B85 - C85 - S85 - K85 - Renault)ENG_NU_853-3_BCSK85_Renault_5
Wheel trims - wheel
We would advise you to note down the number engraved on the tool so that you can replace it if it is lost.
Central wheel hubcap
(example: hubcap 4)
To remove it, insert the hubcap tool 6 (located in the tool kit) into recess 5.
To refit it, position it in line with recess 5 and tighten it with tool 6.
Hubcap (example hubcap 1)
Remove the wheel trim using hubcap
tool 2 (located in the tool kit) by en- gaging the hook in the opening near
valve 3.
To refit it, align it with valve 3. Push the retaining hooks in fully, starting with side A near the valve, followed by B and C, finishing at D opposite the
valve.
WHEEL TRIMS - WHEEL
1
4
5
6
2
3
D
C
A
B
Do not leave the tools un- secured inside the vehicle as they may come loose under braking. After use, check that all the tools are correctly clipped into the tool kit, then position it correctly in its housing: there is a risk of injury.If wheel bolts are supplied in the tool kit, only use these bolts for the emergency spare wheel: refer to the label affixed to the emergency spare wheel.The jack is designed for wheel changing purposes only. Under no circumstances should it be used for carrying out repairs underneath the vehicle or to gain access to the un- derside of the vehicle.
Page 199 of 264
Downloaded from www.Manualslib.com manuals search engine
changing a wheel..................................(up to the end of the DU)lifting the vehiclechanging a wheel ............................(up to the end of the DU)
5.11
ENG_UD10600_1Changement de roue (X85 - B85 - C85 - S85 - K85 - Renault)ENG_NU_853-3_BCSK85_Renault_5
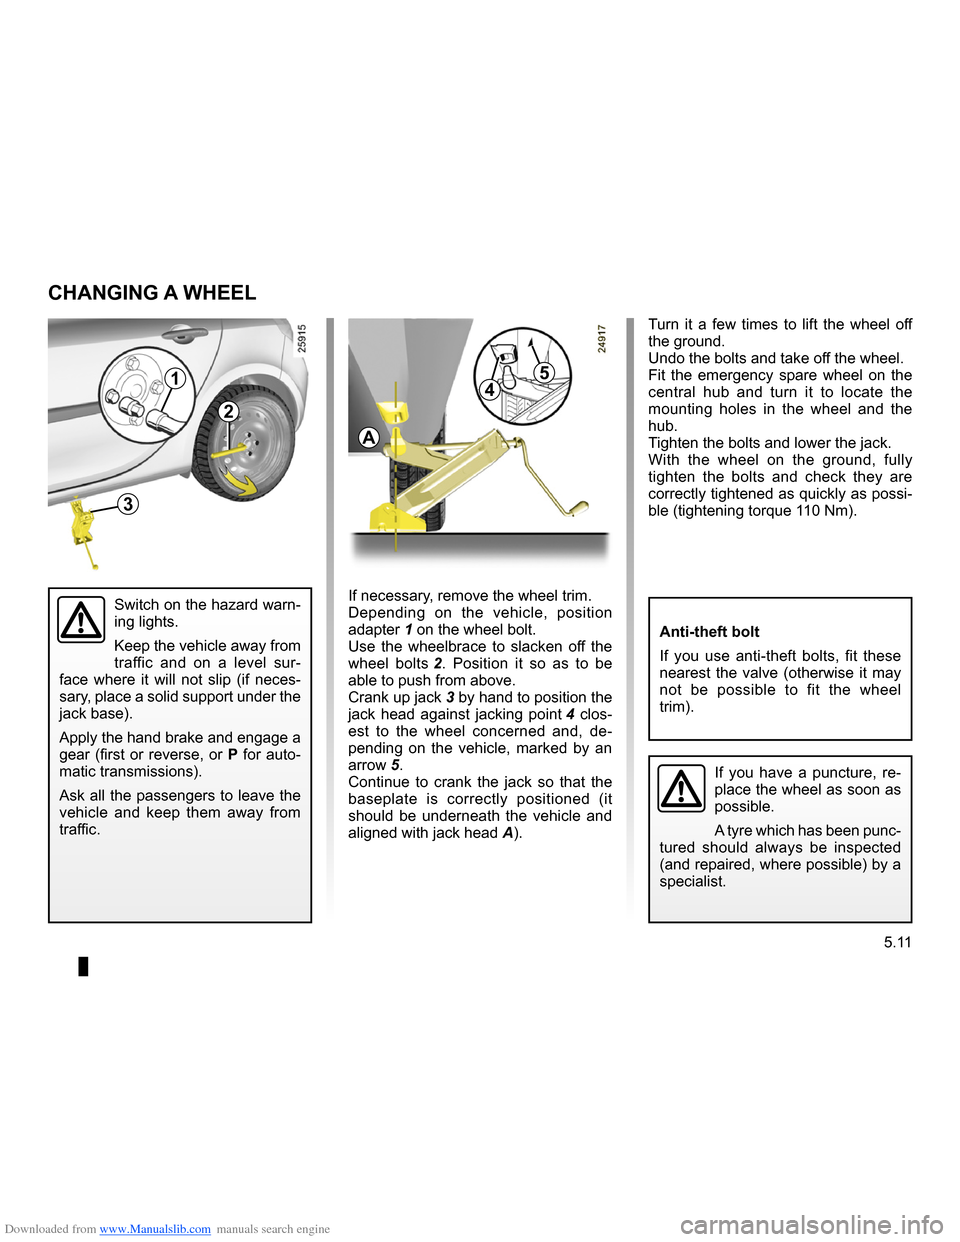
Turn it a few times to lift the wheel off the ground.Undo the bolts and take off the wheel.Fit the emergency spare wheel on the central hub and turn it to locate the mounting holes in the wheel and the hub.Tighten the bolts and lower the jack.With the wheel on the ground, fully tighten the bolts and check they are correctly tightened as quickly as possi- ble (tightening torque 110 Nm).
Changing a wheel
If you have a puncture, re- place the wheel as soon as possible.
A tyre which has been punc- tured should always be inspected (and repaired, where possible) by a specialist.
Switch on the hazard warn- ing lights.
Keep the vehicle away from traffic and on a level sur- face where it will not slip (if neces- sary, place a solid support under the jack base).
Apply the hand brake and engage a gear (first or reverse, or P for auto- matic transmissions).
Ask all the passengers to leave the vehicle and keep them away from traffic.
CHANGING A WHEEL
A
5
4
3
2
1
Anti-theft bolt
If you use anti-theft bolts, fit these nearest the valve (otherwise it may not be possible to fit the wheel trim).
If necessary, remove the wheel trim.Depending on the vehicle, position adapter 1 on the wheel bolt.Use the wheelbrace to slacken off the
wheel bolts 2. Position it so as to be able to push from above.
Crank up jack 3 by hand to position the
jack head against jacking point 4 clos- est to the wheel concerned and, de- pending on the vehicle, marked by an
arrow 5.Continue to crank the jack so that the baseplate is correctly positioned (it should be underneath the vehicle and
aligned with jack head A).
Page 201 of 264
Downloaded from www.Manualslib.com manuals search engine
tyre pressure..........................................................(current page)
JauneNoirNoir texte
5.13
ENG_UD10601_1Pneumatiques (X85 - B85 - C85 - S85 - K85 - Renault)ENG_NU_853-3_BCSK85_Renault_5
Emergency spare wheel
Refer to the information on the “Emergency spare wheel” and instruc- tions on “Changing a wheel” in
Section 5.
Changing wheels around
This practice is not recommended.
Fitting new tyres
For safety reasons, this op- eration must be carried out by a specialist.
Fitting different tyres may change your vehicle as follows:
– it may mean that your vehicle no
longer conforms to current regu- lations;
– it may change the way it handles
when cornering;
– it may cause the steering to be
heavy;
– it may affect the use of snow
chains.
Pressures should be checked when the tyres are cold; ignore higher pressures which may be reached in hot weather or following a fast journey.
If tyre pressures cannot be checked when the tyres are cold, assume an in- crease of 0.2 to 0.3 bar (or 3 PSI).
Never deflate a hot tyre.
TYRES (2/3)
Please be aware that a
poorly tightened or miss- ing valve cap can make the tyres less airtight and lead to pressure loss. Always use valve caps identical to the originals and screw them down fully.
Incorrect tyre pressures lead to abnormal tyre wear and unusually hot running. These are factors which may seriously affect safety and lead to:
– poor road holding,
– risk of bursting or tread separa
- tion.
The pressure depends on the load and the speed of use. Adjust the pressure according to the condi- tions of use (refer to the label affixed to the edge of the driver’s door).
Tyre pressuresAdhere to the tyre pressures (including the emergency spare wheel). The tyre pressures should be checked at least once a month and additionally before any long journey (refer to the label af- fixed to the edge of the driver’s door).