warning light RENAULT KANGOO 2012 X61 / 2.G Service Manual
[x] Cancel search | Manufacturer: RENAULT, Model Year: 2012, Model line: KANGOO, Model: RENAULT KANGOO 2012 X61 / 2.GPages: 237, PDF Size: 8.62 MB
Page 156 of 237
maintenance:mechanical ...................................... (up to the end of the DU)
engine oil .............................................. (up to the end of the DU)
dipstick.................................................. (up to the end of the DU)
engine oil level ...................................... (up to the end of the DU)
4.4
ENG_UD25824_5
Niveau huile moteur : généralités (X61 - F61 - K61 - Renault)\
ENG_NU_813-11_FK61_Renault_4
Jaune NoirNoir texte
Engine oil level:
general description
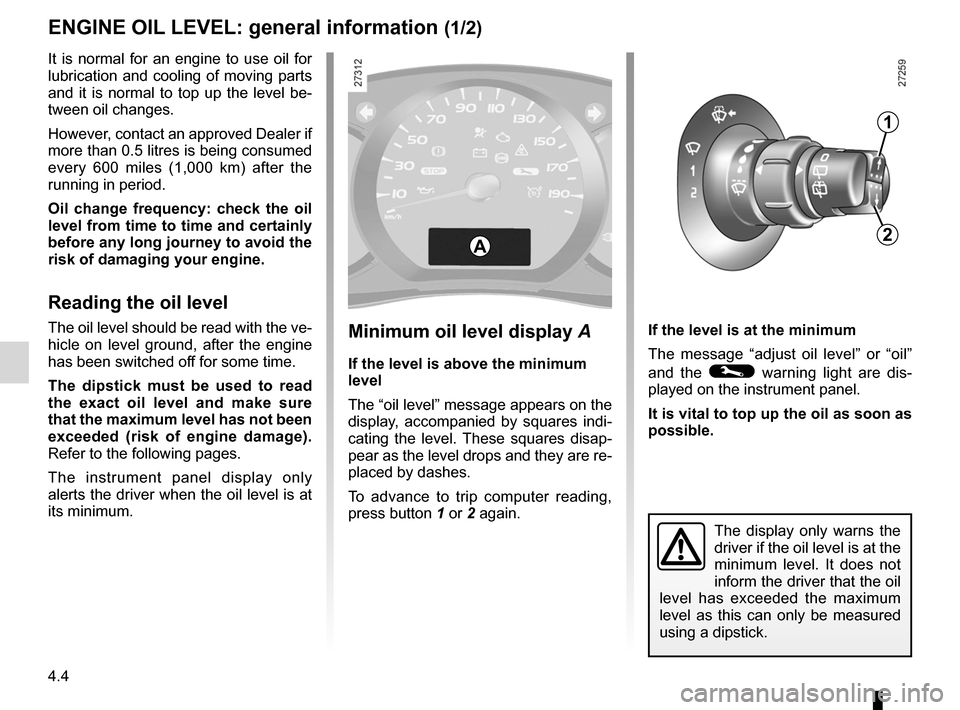
Minimum oil level display A
If the level is above the minimum
level
The “oil level” message appears on the
display, accompanied by squares indi -
cating the level. These squares disap -
pear as the level drops and they are re-
placed by dashes.
To advance to trip computer reading,
press button 1 or 2 again. If the level is at the minimum
The message “adjust oil level” or “oil”
and the © warning light are dis
-
played on the instrument panel.
It is vital to top up the oil as soon as
possible.
The display only warns the
driver if the oil level is at the
minimum level. It does not
inform the driver that the oil
level has exceeded the maximum
level as this can only be measured
using a dipstick.
It is normal for an engine to use oil for
lubrication and cooling of moving parts
and it is normal to top up the level be-
tween oil changes.
However, contact an approved Dealer if
more than 0.5 litres is being consumed
every 600 miles (1,000 km) after the
running in period.
o il change frequency: check the oil
level from time to time and certainly
before any long journey to avoid the
risk of damaging your engine.
Reading the oil level
The oil level should be read with the ve-
hicle on level ground, after the engine
has been switched off for some time.
t he dipstick must be used to read
the exact oil level and make sure
that the maximum level has not been
exceeded (risk of engine damage).
Refer to the following pages.
The instrument panel display only
alerts the driver when the oil level is at
its minimum.
1
2A
engIne oIl level: general information (1/2)
Page 174 of 237
5.4
ENG_UD29751_1
Kit de gonflage des pneumatiques (2 kits) (X61 - F61 - K61 - Renault)\
ENG_NU_813-11_FK61_Renault_5
Jaune NoirNoir texte
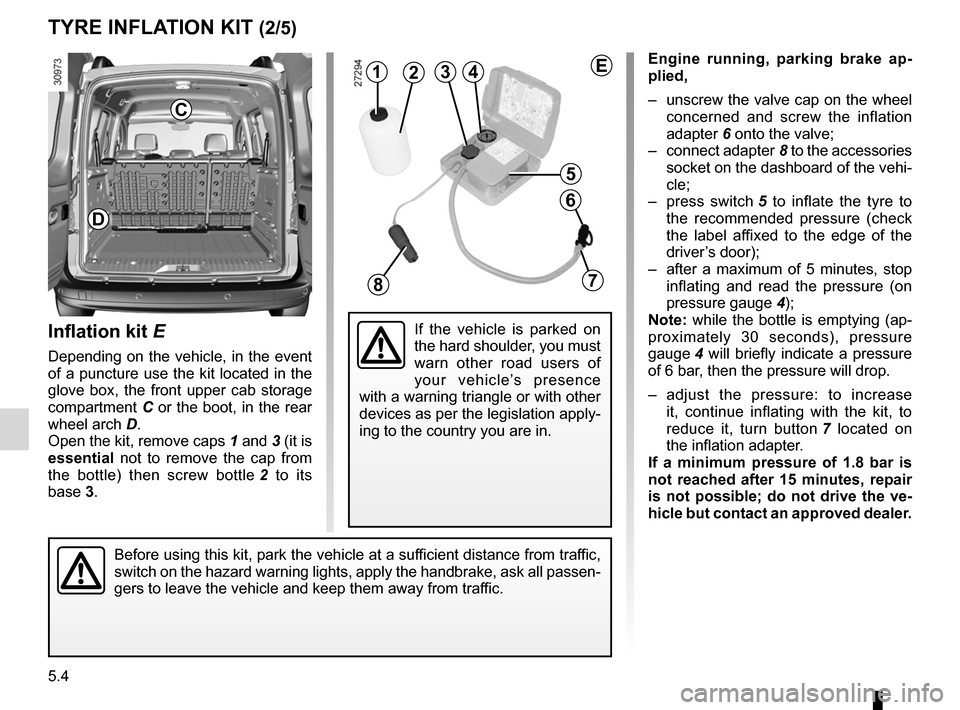
engine running, parking brake ap -
plied,
– unscrew the valve cap on the wheel
concerned and screw the inflation
adapter 6 onto the valve;
– connect adapter 8 to the accessories
socket on the dashboard of the vehi-
cle;
– press switch 5 to inflate the tyre to
the recommended pressure (check
the label affixed to the edge of the
driver’s door);
– after a maximum of 5 minutes, stop
inflating and read the pressure (on
pressure gauge 4);
note: while the bottle is emptying (ap-
proximately 30 seconds), pressure
gauge 4 will briefly indicate a pressure
of 6 bar, then the pressure will drop.
– adjust the pressure: to increase
it, continue inflating with the kit, to
reduce it, turn button 7 located on
the inflation adapter.
If a minimum pressure of 1.8 bar is
not reached after 15 minutes, repair
is not possible; do not drive the ve-
hicle but contact an approved dealer.
Inflation kit E
Depending on the vehicle, in the event
of a puncture use the kit located in the
glove box, the front upper cab storage
compartment C or the boot, in the rear
wheel arch D.
Open the kit, remove caps 1 and 3 (it is
essential not to remove the cap from
the bottle) then screw bottle 2 to its
base 3.
tyre InFlatIOn KIt (2/5)
143
5
6
78
2
Before using this kit, park the vehicle at a sufficient distance from traffic,
switch on the hazard warning lights, apply the handbrake, ask all passen-
gers to leave the vehicle and keep them away from traffic.
D
If the vehicle is parked on
the hard shoulder, you must
warn other road users of
your vehicle’s presence
with a warning triangle or with other
devices as per the legislation apply-
ing to the country you are in.
c
e
Page 176 of 237
5.6
ENG_UD29751_1
Kit de gonflage des pneumatiques (2 kits) (X61 - F61 - K61 - Renault)\
ENG_NU_813-11_FK61_Renault_5
Jaune NoirNoir texte
tyre InFlatIOn KIt (4/5)
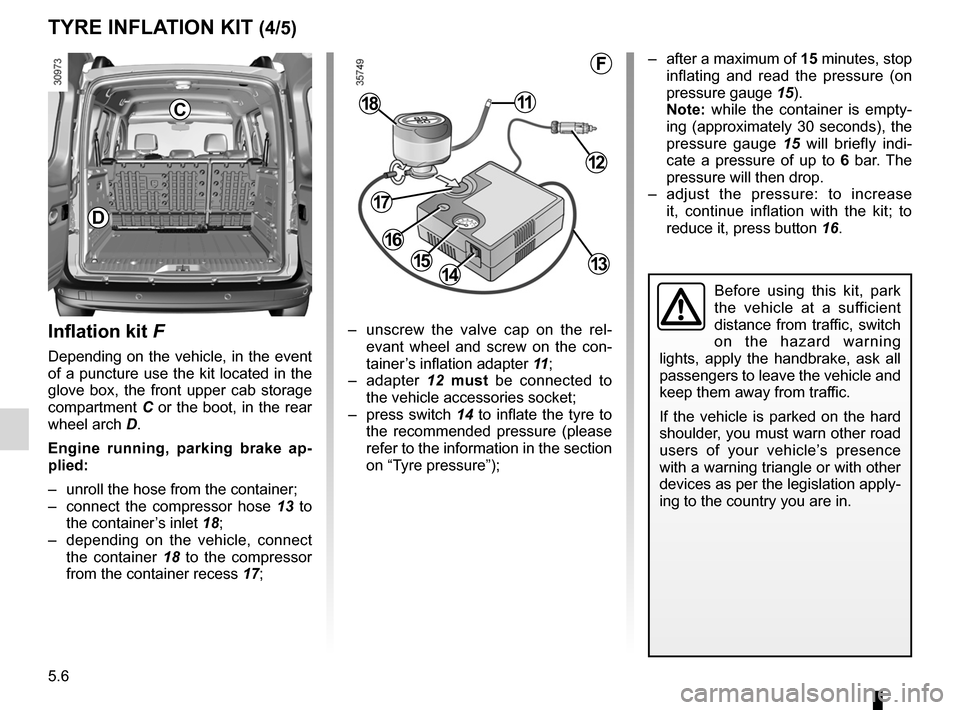
Inflation kit F
Depending on the vehicle, in the event
of a puncture use the kit located in the
glove box, the front upper cab storage
compartment C or the boot, in the rear
wheel arch D.
e ngine running, parking brake ap -
plied:
– unroll the hose from the container;
– connect the compressor hose 13 to
the container’s inlet 18;
– depending on the vehicle, connect
the container 18 to the compressor
from the container recess 17; –
unscrew the valve cap on the rel -
evant wheel and screw on the con -
tainer’s inflation adapter 11;
– adapter 12 must be connected to
the vehicle accessories socket;
– press switch 14 to inflate the tyre to
the recommended pressure (please
refer to the information in the section
on “Tyre pressure”);
1415
1118
12
13
17
16
F
Before using this kit, park
the vehicle at a sufficient
distance from traffic, switch
on the hazard warning
lights, apply the handbrake, ask all
passengers to leave the vehicle and
keep them away from traffic.
If the vehicle is parked on the hard
shoulder, you must warn other road
users of your vehicle’s presence
with a warning triangle or with other
devices as per the legislation apply-
ing to the country you are in.
– after a maximum of 15 minutes, stop
inflating and read the pressure (on
pressure gauge 15).
n ote: while the container is empty -
ing (approximately 30 seconds), the
pressure gauge 15 will briefly indi -
cate a pressure of up to 6 bar. The
pressure will then drop.
– adjust the pressure: to increase
it, continue inflation with the kit; to
reduce it, press button 16.
D
c
Page 180 of 237
changing a wheel................................................... (current page)
puncture ................................................................. (current page)
jack ........................................................................\
(current page)
lifting the vehicle changing a wheel ............................ (up to the end of the DU)
5.10
ENG_UD21491_4
Changement de roue (X61 - F61 - K61 - Renault)
ENG_NU_813-11_FK61_Renault_5
Jaune NoirNoir texte
Changing a wheel
2
4
1
3
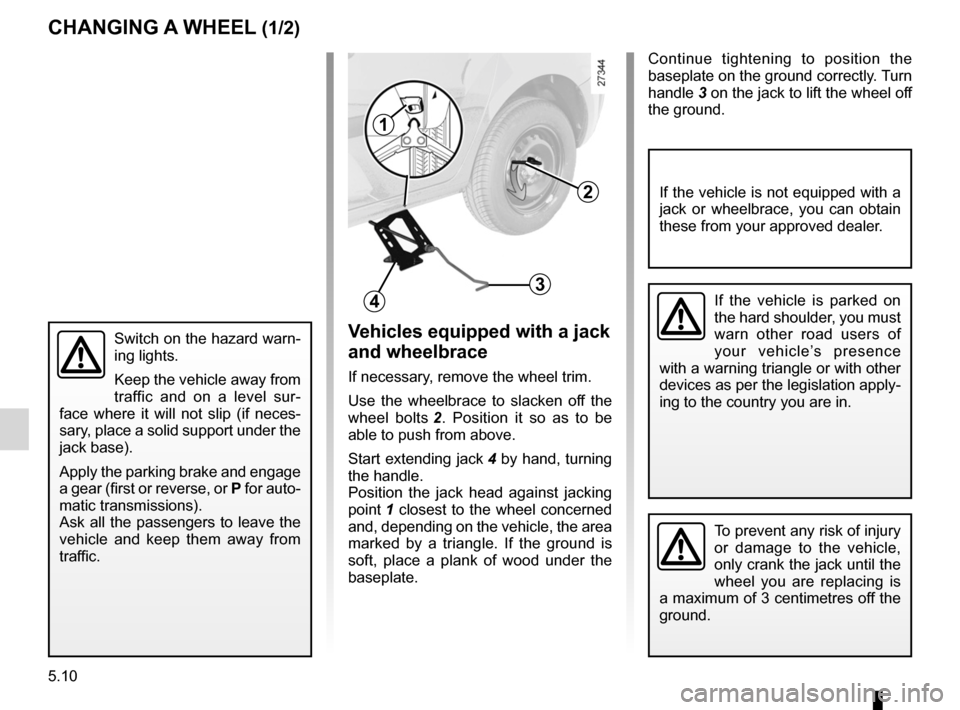
Vehicles equipped with a jack
and wheelbrace
If necessary, remove the wheel trim.
Use the wheelbrace to slacken off the
wheel bolts 2 . Position it so as to be
able to push from above.
Start extending jack 4 by hand, turning
the handle.
Position the jack head against jacking
point 1 closest to the wheel concerned
and, depending on the vehicle, the area
marked by a triangle. If the ground is
soft, place a plank of wood under the
baseplate.
Switch on the hazard warn-
ing lights.
Keep the vehicle away from
traffic and on a level sur -
face where it will not slip (if neces -
sary, place a solid support under the
jack base).
Apply the parking brake and engage
a gear (first or reverse, or P for auto-
matic transmissions).
Ask all the passengers to leave the
vehicle and keep them away from
traffic.
changIng a wheel (1/2)
Continue tightening to position the
baseplate on the ground correctly. Turn
handle 3 on the jack to lift the wheel off
the ground.
To prevent any risk of injury
or damage to the vehicle,
only crank the jack until the
wheel you are replacing is
a maximum of 3 centimetres off the
ground.
If the vehicle is parked on
the hard shoulder, you must
warn other road users of
your vehicle’s presence
with a warning triangle or with other
devices as per the legislation apply-
ing to the country you are in.
If the vehicle is not equipped with a
jack or wheelbrace, you can obtain
these from your approved dealer.
Page 197 of 237
JauneNoirNoir texte
5.27
ENG_UD23043_4
Fusibles (X61 - F61 - K61 - Renault)
ENG_NU_813-11_FK61_Renault_5
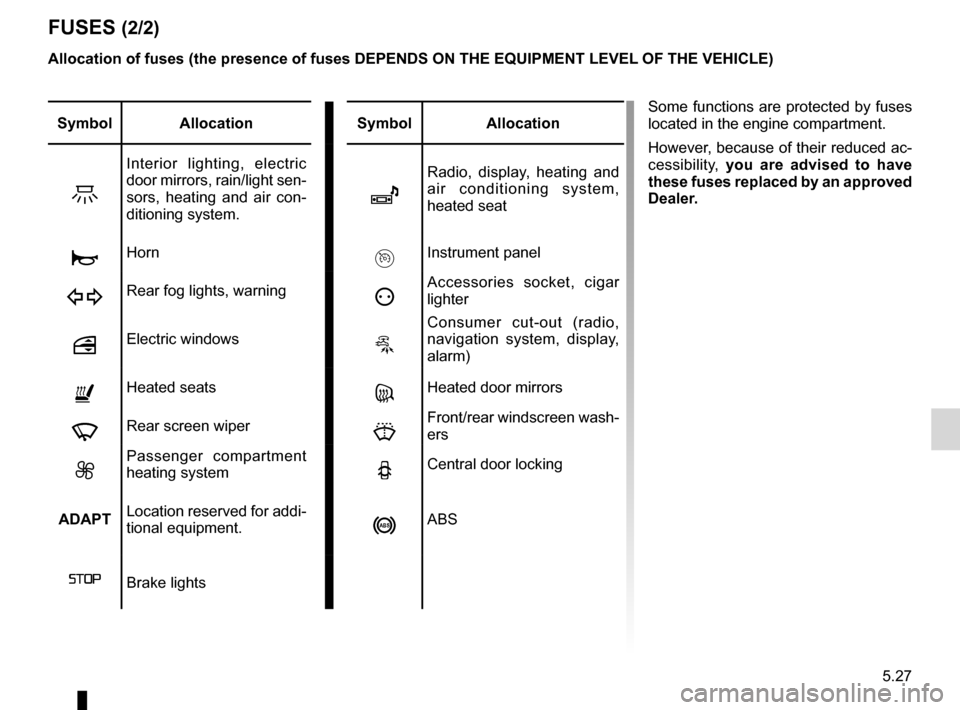
Fuses (2/2)
Some functions are protected by fuses
located in the engine compartment.
However, because of their reduced ac-
cessibility, you are advised to have
these fuses replaced by an approved
Dealer.symbol allocation symbolallocation
Z
Interior lighting, electric
door mirrors, rain/light sen-
sors, heating and air con -
ditioning system.
î
Radio, display, heating and
air conditioning system,
heated seat
ÌHornInstrument panel
DRear fog lights, warningëAccessories socket, cigar
lighter
Electric windowsö
Consumer cut-out (radio,
navigation system, display,
alarm)
ñHeated seatsgHeated door mirrors
fRear screen wiperHFront/rear windscreen wash-
ers
xPassenger compartment
heating systemNCentral door locking
aDaPt Location reserved for addi
-
tional equipment.
nABS
ßBrake lights
allocation of fuses (the presence of fuses DePenDs On the eQuIPment leVel
OF the VehIcle)
Page 206 of 237
operating faults ..................................... (up to the end of the DU)
faults operating faults ............................... (up to the end of the DU)
5.36
ENG_UD14563_2
Anomalies de fonctionnement (X61 - F61 - K61 - Renault)
ENG_NU_813-11_FK61_Renault_5
Jaune NoirNoir texte
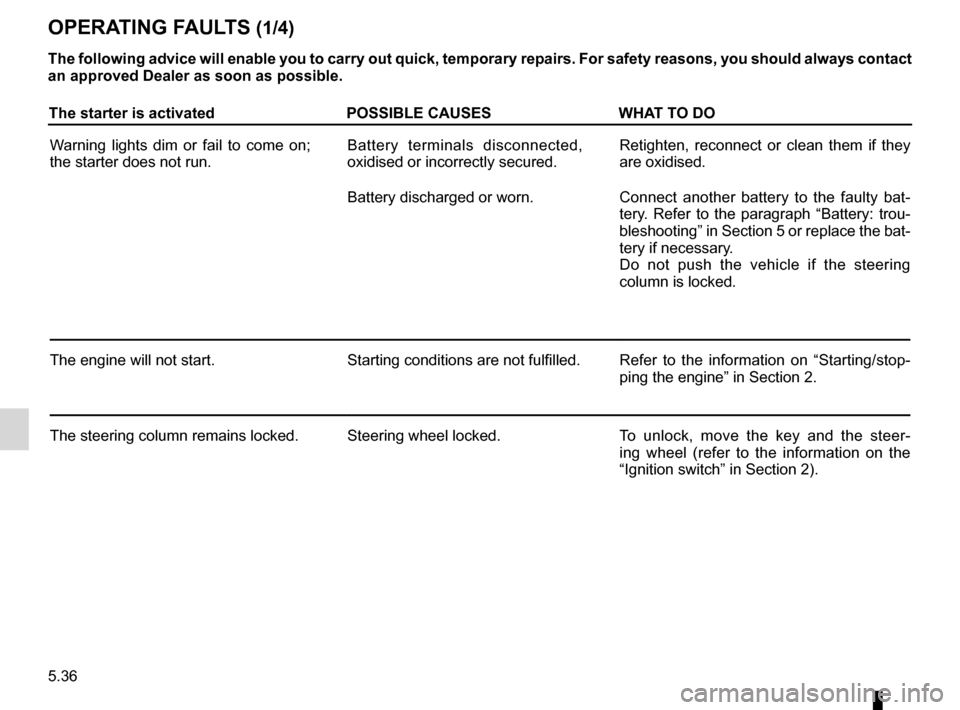
Operating faults
the starter is activated POssIBle causeswhat tO DO
Warning lights dim or fail to come on;
the starter does not run. Battery terminals disconnected,
oxidised or incorrectly secured.Retighten, reconnect or clean them if they
are oxidised.
Battery discharged or worn. Connect another battery to the faulty bat -
tery. Refer to the paragraph “Battery: trou-
bleshooting” in Section 5 or replace the bat-
tery if necessary.
Do not push the vehicle if the steering
column is locked.
The engine will not start. Starting conditions are not fulfilled.Refer to the information on “Starting/stop -
ping the engine” in Section 2.
The steering column remains locked. Steering wheel locked.To unlock, move the key and the steer -
ing wheel (refer to the information on the
“Ignition switch” in Section 2).
OPeratIng F aults (1/4)
the following advice will enable you to carry out quick, temporary repairs. For safety reasons, you should always contact
an approved Dealer as soon as possible.
Page 207 of 237
JauneNoirNoir texte
5.37
ENG_UD14563_2
Anomalies de fonctionnement (X61 - F61 - K61 - Renault)
ENG_NU_813-11_FK61_Renault_5
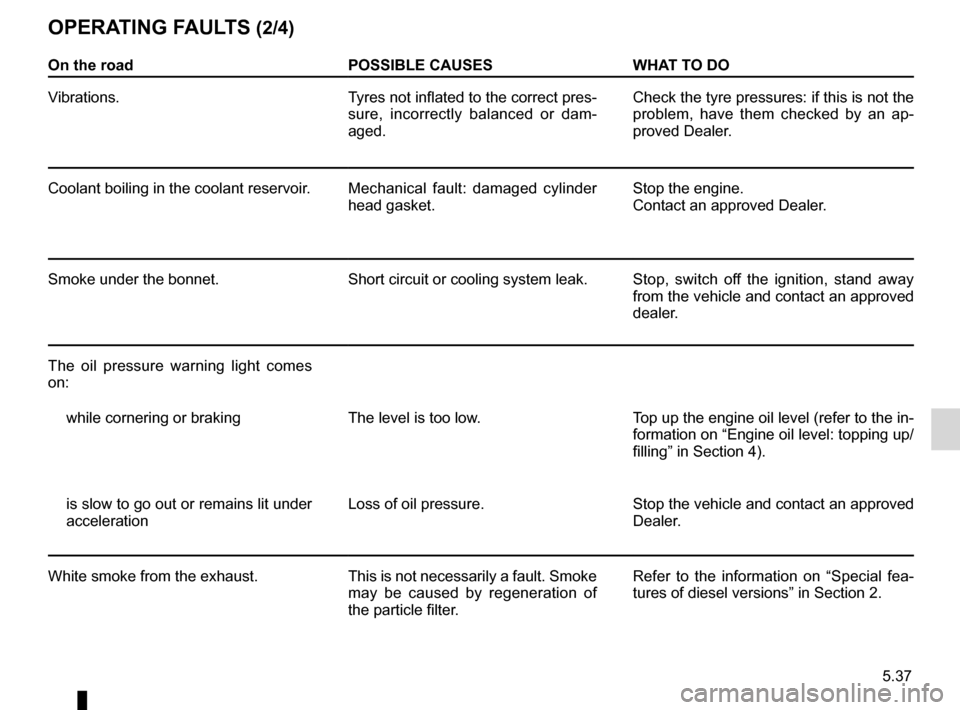
On the road POssIBle causeswhat tO DO
Vibrations. Tyres not inflated to the correct pres-
sure, incorrectly balanced or dam-
aged. Check the tyre pressures: if this is not the
problem, have them checked by an ap
-
proved Dealer.
Coolant boiling in the coolant reservoir. Mechanical fault: damaged cylinder
head gasket.Stop the engine.
Contact an approved Dealer.
Smoke under the bonnet. Short circuit or cooling system leak.Stop, switch off the ignition, stand away
from the vehicle and contact an approved
dealer.
The oil pressure warning light comes
on: while cornering or braking The level is too low. Top up the engine oil level (refer to the in-
formation on “Engine oil level: topping up/
filling” in Section 4).
is slow to go out or remains lit under
acceleration Loss of oil pressure.
Stop the vehicle and contact an approved
Dealer.
White smoke from the exhaust. This is not necessarily a fault. Smoke
may be caused by regeneration of
the particle filter.Refer to the information on “Special fea
-
tures of diesel versions” in Section 2.
OPeratIng F aults (2/4)
Page 208 of 237
5.38
ENG_UD14563_2
Anomalies de fonctionnement (X61 - F61 - K61 - Renault)
ENG_NU_813-11_FK61_Renault_5
Jaune NoirNoir texte
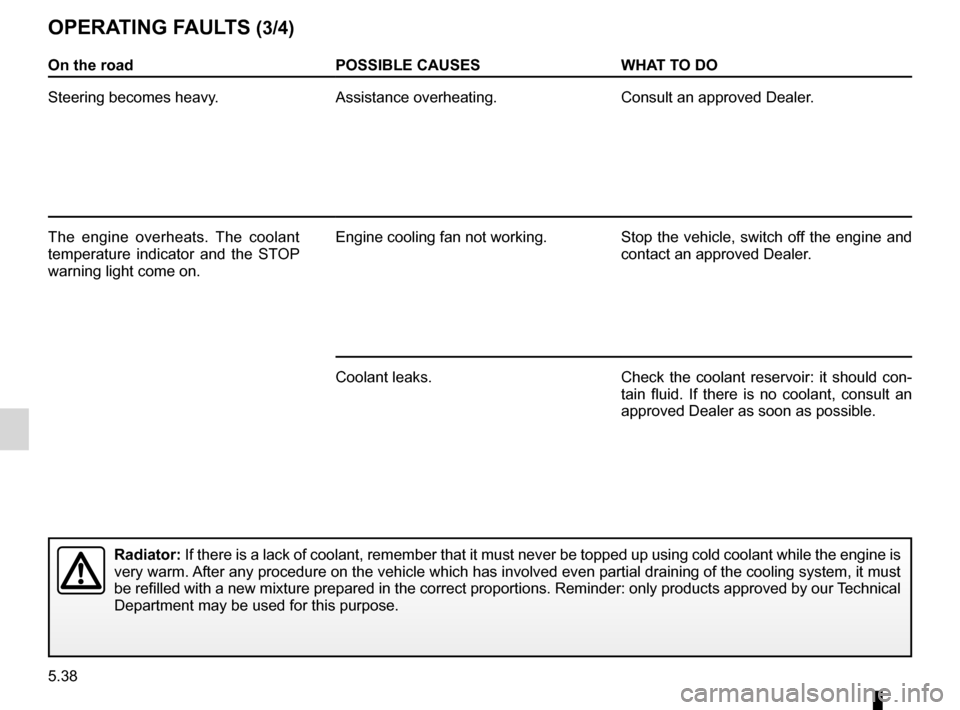
On the road POssIBle causeswhat tO DO
Steering becomes heavy. Assistance overheating.Consult an approved Dealer.
The engine overheats. The coolant
temperature indicator and the STOP
warning light come on. Engine cooling fan not working.
Stop the vehicle, switch off the engine and
contact an approved Dealer.
Coolant leaks. Check the coolant reservoir: it should con-
tain fluid. If there is no coolant, consult an
approved Dealer as soon as possible.
OPeratIng Faults (3/4)
radiator: If there is a lack of coolant, remember that it must never be topped up using cold coolant while the engine is
very warm. After any procedure on the vehicle which has involved even partial draining of the cooling system, it must
be refilled with a new mixture prepared in the correct proportions. Reminder: only products approved by our Technical
Department may be used for this purpose.
Page 232 of 237
7.2
FRA_UD29767_11
Index (X61 - F61 - K61 - Renault)
ENG_NU_813-11_FK61_Renault_7
Jaune NoirNoir texte
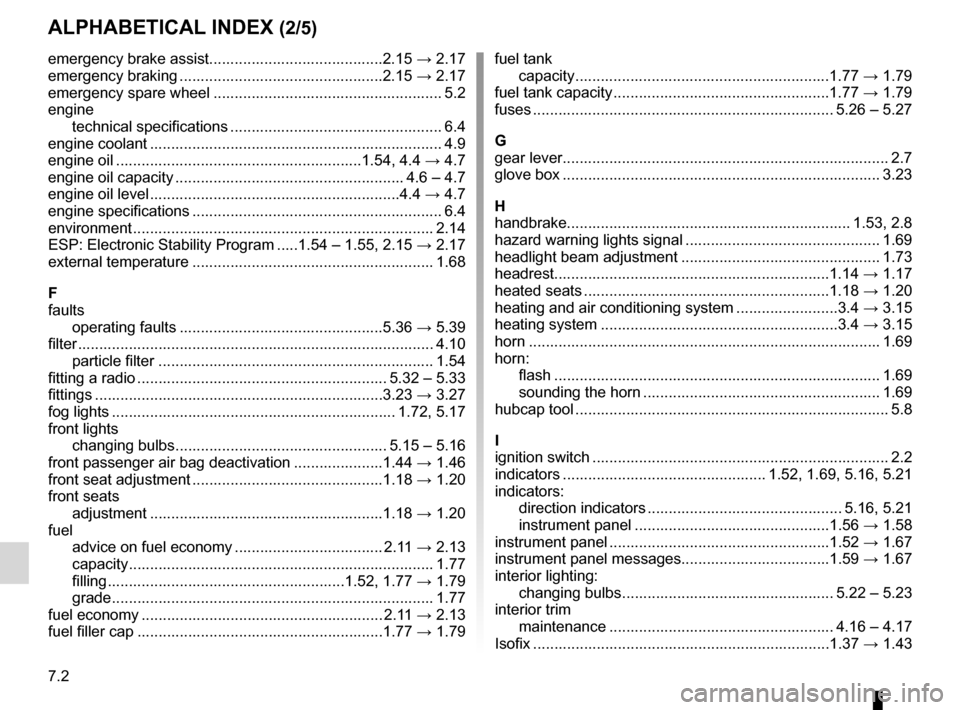
AlphAbeticAl index (2/5)
emergency brake assist ......................................... 2.15 → 2.17
emergency braking ................................................ 2.15 → 2.17
emergency spare wheel ...................................................... 5.2
engine technical specifications .................................................. 6.4
engine coolant ..................................................................... 4.9
engine oil .......................................................... 1.54, 4.4 → 4.7
engine oil capacity ...................................................... 4.6 – 4.7
engine oil level ........................................................... 4.4 → 4.7
engine specifications ........................................................... 6.4
environment ....................................................................... 2.14
ESP: Electronic Stability Program .....1.54 – 1.55, 2.15 → 2.17
external temperature ......................................................... 1.68
F
faults operating faults ................................................ 5.36 → 5.39
filter .................................................................................... 4.10
particle filter ................................................................. 1.54
fitting a radio ........................................................... 5.32 – 5.33
fittings .................................................................... 3.23 → 3.27
fog lights ................................................................... 1.72, 5.17
front lights changing bulbs .................................................. 5.15 – 5.16
front passenger air bag deactivation ..................... 1.44 → 1.46
front seat adjustment ............................................. 1.18 → 1.20
front seats adjustment .......................................................1.18 → 1.20
fuel advice on fuel economy ................................... 2.11 → 2.13
capacity ........................................................................ 1.77
filling ........................................................ 1.52, 1.77 → 1.79
grade ............................................................................ 1.77
fuel economy ......................................................... 2.11 → 2.13
fuel filler cap .......................................................... 1.77 → 1.79fuel tank
capacity ............................................................ 1.77 → 1.79
fuel tank capacity ................................................... 1.77 → 1.79
fuses ....................................................................... 5.26 – 5.27
G
gear lever ............................................................................. 2.7
glove box ........................................................................... 3.23
h
handbrake ................................................................... 1.53, 2.8
hazard warning lights signal .............................................. 1.69
headlight beam adjustment ............................................... 1.73
headrest ................................................................. 1.14 → 1.17
heated seats .......................................................... 1.18 → 1.20
heating and air conditioning system ........................ 3.4 → 3.15
heating system ........................................................ 3.4 → 3.15
horn ................................................................................... 1.69
horn: flash ............................................................................. 1.69
sounding the horn ........................................................ 1.69
hubcap tool .......................................................................... 5.8
i
ignition switch ...................................................................... 2.2
indicators ................................................ 1.52, 1.69, 5.16, 5.21
indicators: direction indicators .............................................. 5.16, 5.21
instrument panel .............................................. 1.56 → 1.58
instrument panel .................................................... 1.52 → 1.67
instrument panel messages ...................................1.59 → 1.67
interior lighting: changing bulbs .................................................. 5.22 – 5.23
interior trim maintenance ..................................................... 4.16 – 4.17
Isofix ...................................................................... 1.37 → 1.43
Page 233 of 237
JauneNoirNoir texte
7.3
FRA_UD29767_11
Index (X61 - F61 - K61 - Renault)
ENG_NU_813-11_FK61_Renault_7
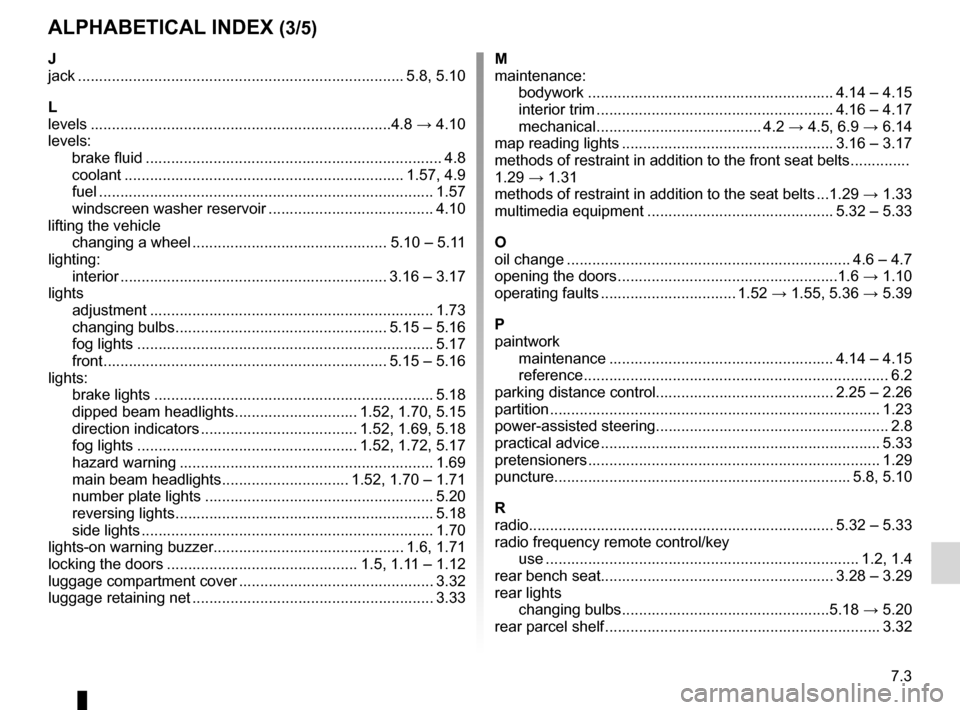
AlphAbeticAl index (3/5)
J
jack ............................................................................. 5.8, 5.10
l
levels ....................................................................... 4.8 → 4.10
levels: brake fluid ...................................................................... 4.8
coolant .................................................................. 1.57, 4.9
fuel ............................................................................... 1.57
windscreen washer reservoir ....................................... 4.10
lifting the vehicle changing a wheel .............................................. 5.10 – 5.11
lighting: interior ............................................................... 3.16 – 3.17
lights adjustment ................................................................... 1.73
changing bulbs .................................................. 5.15 – 5.16
fog lights ...................................................................... 5.17
front ................................................................... 5.15 – 5.16
lights: brake lights .................................................................. 5.18
dipped beam headlights ............................. 1.52, 1.70, 5.15
direction indicators ..................................... 1.52, 1.69, 5.18
fog lights .................................................... 1.52, 1.72, 5.17
hazard warning ............................................................ 1.69
main beam headlights .............................. 1.52, 1.70 – 1.71
number plate lights ...................................................... 5.20
reversing lights ............................................................. 5.18
side lights ..................................................................... 1.70
lights-on warning buzzer ............................................. 1.6, 1.71
locking the doors ............................................. 1.5, 1.11 – 1.12
luggage compartment cover .............................................. 3.32
luggage retaining net ......................................................... 3.33M
maintenance:
bodywork .......................................................... 4.14 – 4.15
interior trim ........................................................ 4.16 – 4.17
mechanical ....................................... 4.2 → 4.5, 6.9 → 6.14
map reading lights .................................................. 3.16 – 3.17
methods of restraint in addition to the front seat belts ..............
1.29 → 1.31
methods of restraint in addition to the seat belts ... 1.29 → 1.33
multimedia equipment ............................................ 5.32 – 5.33
O
oil change ................................................................... 4.6 – 4.7
opening the doors .................................................... 1.6 → 1.10
operating faults ................................ 1.52 → 1.55, 5.36 → 5.39
p
paintwork maintenance ..................................................... 4.14 – 4.15
reference ........................................................................ 6.2
parking distance control .......................................... 2.25 – 2.26
partition .............................................................................. 1.23
power-assisted steering ....................................................... 2.8
practical advice .................................................................. 5.33
pretensioners ..................................................................... 1.29
puncture ...................................................................... 5.8, 5.10
R
radio........................................................................ 5.32 – 5.33
radio frequency remote control/key use .......................................................................... 1.2, 1.4
rear bench seat ....................................................... 3.28 – 3.29
rear lights changing bulbs ................................................. 5.18 → 5.20
rear parcel shelf ................................................................. 3.32