warning light RENAULT KANGOO 2012 X61 / 2.G Owners Manual
[x] Cancel search | Manufacturer: RENAULT, Model Year: 2012, Model line: KANGOO, Model: RENAULT KANGOO 2012 X61 / 2.GPages: 237, PDF Size: 8.62 MB
Page 7 of 237
1.1
ENG_UD29618_11
Sommaire 1 (X61 - F61 - K61 - Renault)
ENG_NU_813-11_FK61_Renault_1
Section 1: Getting to know your vehicle
Key, radio frequency remote control: general information, use, deadlocking . . . . . . . . . . . . . . . . . . 1.2
Doors . . . . . . . . . . . . . . . . . . . . . . . . . . . . . . . . . . . . . . . . . . . . . . . . . . . . . . . . . . . . . . . . . . . . . . . . . 1.6
Locking and unlocking the doors . . . . . . . . . . . . . . . . . . . . . . . . . . . . . . . . . . . . . . . . . . . . . . . . . . . . 1.11
Automatic locking when driving . . . . . . . . . . . . . . . . . . . . . . . . . . . . . . . . . . . . . . . . . . . . . . . . . . . . . 1.13
Headrests/Front seats . . . . . . . . . . . . . . . . . . . . . . . . . . . . . . . . . . . . . . . . . . . . . . . . . . . . . . . . . . . . 1.14
Front seats . . . . . . . . . . . . . . . . . . . . . . . . . . . . . . . . . . . . . . . . . . . . . . . . . . . . . . . . . . . . . . . . . . . . . 1.18
Roof flap . . . . . . . . . . . . . . . . . . . . . . . . . . . . . . . . . . . . . . . . . . . . . . . . . . . . . . . . . . . . . . . . . . . . . . 1.21
Swivelling partition . . . . . . . . . . . . . . . . . . . . . . . . . . . . . . . . . . . . . . . . . . . . . . . . . . . . . . . . . . . . . . . 1.23
Steering wheel . . . . . . . . . . . . . . . . . . . . . . . . . . . . . . . . . . . . . . . . . . . . . . . . . . . . . . . . . . . . . . . . . . 1.24
Seat belts . . . . . . . . . . . . . . . . . . . . . . . . . . . . . . . . . . . . . . . . . . . . . . . . . . . . . . . . . . . . . . . . . . . . . . 1.25
Methods of restraint in addition to the front seat belts . . . . . . . . . . . . . . . . . . . . . . . . . . . . . . . . . . . . 1.29
Side protection devices . . . . . . . . . . . . . . . . . . . . . . . . . . . . . . . . . . . . . . . . . . . . . . . . . . . . . . . . . . . 1.32
Additional methods of restraint . . . . . . . . . . . . . . . . . . . . . . . . . . . . . . . . . . . . . . . . . . . . . . . . . . . . . 1.33
Child safety: general information . . . . . . . . . . . . . . . . . . . . . . . . . . . . . . . . . . . . . . . . . . . . . . . . . . . . 1.34
Choosing a child seat mounting . . . . . . . . . . . . . . . . . . . . . . . . . . . . . . . . . . . . . . . . . . . . . . . 1.37
Fitting a child seat . . . . . . . . . . . . . . . . . . . . . . . . . . . . . . . . . . . . . . . . . . . . . . . . . . . . . . . . . 1.39
Deactivating/activating the front passenger airbag . . . . . . . . . . . . . . . . . . . . . . . . . . . . . . . . 1.44
Door mirrors . . . . . . . . . . . . . . . . . . . . . . . . . . . . . . . . . . . . . . . . . . . . . . . . . . . . . . . . . . . . . . . . . . . . 1.47
Driving position . . . . . . . . . . . . . . . . . . . . . . . . . . . . . . . . . . . . . . . . . . . . . . . . . . . . . . . . . . . . . . . . . 1.48
Warning lights . . . . . . . . . . . . . . . . . . . . . . . . . . . . . . . . . . . . . . . . . . . . . . . . . . . . . . . . . . . . . . . . . . 1.52
Displays and indicators . . . . . . . . . . . . . . . . . . . . . . . . . . . . . . . . . . . . . . . . . . . . . . . . . . . . . . . . . . . 1.56
On-board computer . . . . . . . . . . . . . . . . . . . . . . . . . . . . . . . . . . . . . . . . . . . . . . . . . . . . . . . . . . . . . . 1.59
Clock and exterior temperature . . . . . . . . . . . . . . . . . . . . . . . . . . . . . . . . . . . . . . . . . . . . . . . . . . . . . 1.68
Audible and visual signals . . . . . . . . . . . . . . . . . . . . . . . . . . . . . . . . . . . . . . . . . . . . . . . . . . . . . . . . . 1.69
External lighting and signals . . . . . . . . . . . . . . . . . . . . . . . . . . . . . . . . . . . . . . . . . . . . . . . . . . . . . . . 1.70
Electric beam height adjustment . . . . . . . . . . . . . . . . . . . . . . . . . . . . . . . . . . . . . . . . . . . . . . . . . . . . 1.73
Windscreen wipers/washers . . . . . . . . . . . . . . . . . . . . . . . . . . . . . . . . . . . . . . . . . . . . . . . . . . . . . . . 1.74
Fuel tank . . . . . . . . . . . . . . . . . . . . . . . . . . . . . . . . . . . . . . . . . . . . . . . . . . . . . . . . . . . . . . . . . . . . . . 1.77
Page 10 of 237
radio frequency remote control/keyuse ................................................................... (current page)
remote control electric door locking ....................... (current page)
child safety ............................................................. (current page)
deadlocking the doors ........................................... (current page)
1.4
ENG_UD21395_4
Télécommandes à radiofréquence : utilisation (X61 - F61 - K61 - Renault)
ENG_NU_813-11_FK61_Renault_1
RADIO FReQUeNCy ReMOTe CONTROL/Key : use
The doors are locked and unlocked
using the remote control unit.
It is powered by a battery which must
be replaced (refer to the information on
the “Key, radio frequency remote con -
trol: batteries” in Section 5).
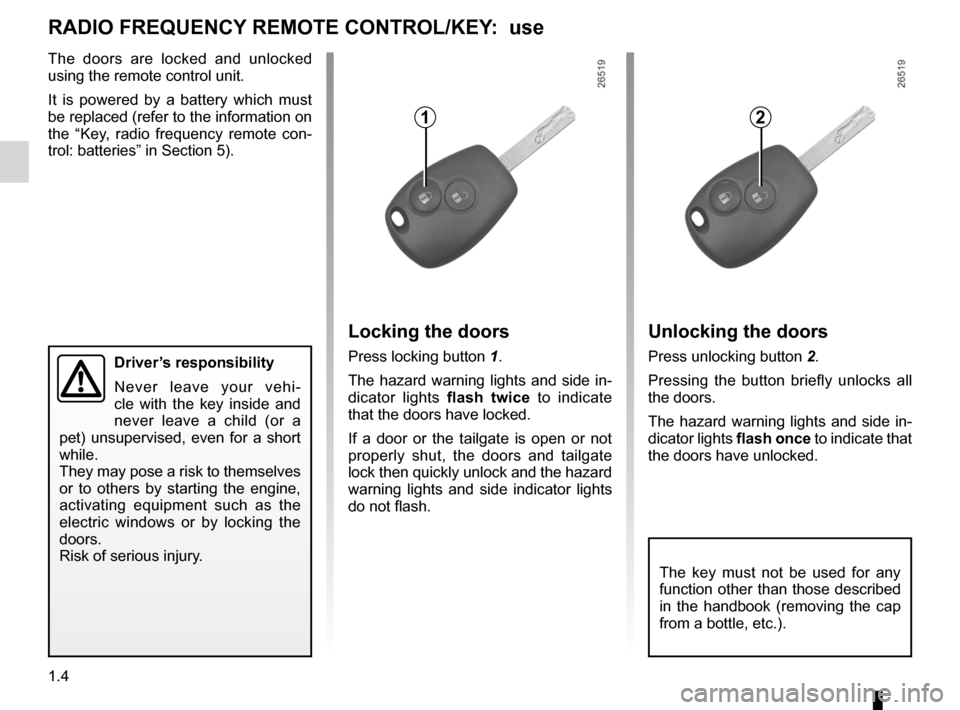
Locking the doors
Press locking button 1.
The hazard warning lights and side in-
dicator lights flash twice to indicate
that the doors have locked.
If a door or the tailgate is open or not
properly shut, the doors and tailgate
lock then quickly unlock and the hazard
warning lights and side indicator lights
do not flash.
Unlocking the doors
Press unlocking button 2.
Pressing the button briefly unlocks all
the doors.
The hazard warning lights and side in-
dicator lights flash once to indicate that
the doors have unlocked.
12
Driver’s responsibility
Never leave your vehi -
cle with the key inside and
never leave a child (or a
pet) unsupervised, even for a short
while.
They may pose a risk to themselves
or to others by starting the engine,
activating equipment such as the
electric windows or by locking the
doors.
Risk of serious injury.
The key must not be used for any
function other than those described
in the handbook (removing the cap
from a bottle, etc.).
Page 11 of 237
central door locking .............................. (up to the end of the DU)
locking the doors .................................. (up to the end of the DU)
1.5
ENG_UD25772_1
Super condamnation (X61 - Renault)
ENG_NU_813-11_FK61_Renault_1
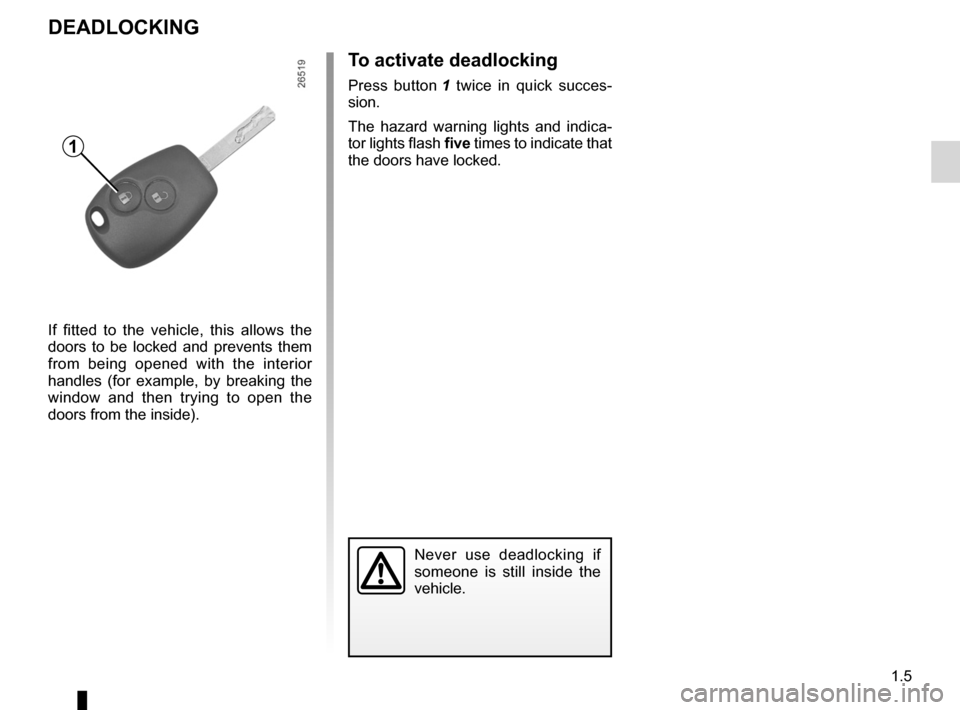
To activate deadlocking
Press button 1 twice in quick succes -
sion.
The hazard warning lights and indica -
tor lights flash five times to indicate that
the doors have locked.
DeADLOCKING
Never use deadlocking if
someone is still inside the
vehicle.
1
If fitted to the vehicle, this allows the
doors to be locked and prevents them
from being opened with the interior
handles (for example, by breaking the
window and then trying to open the
doors from the inside).
Page 12 of 237
doors..................................................... (up to the end of the DU)
lights-on warning buzzer ........................................ (current page)
closing the doors .................................. (up to the end of the DU)
opening the doors ................................. (up to the end of the DU)
child safety ............................................................. (current page)
1.6
ENG_UD25775_5
Portes (X61 - F61 - K61 - Renault)
ENG_NU_813-11_FK61_Renault_1
Jaune NoirNoir texte
Doors
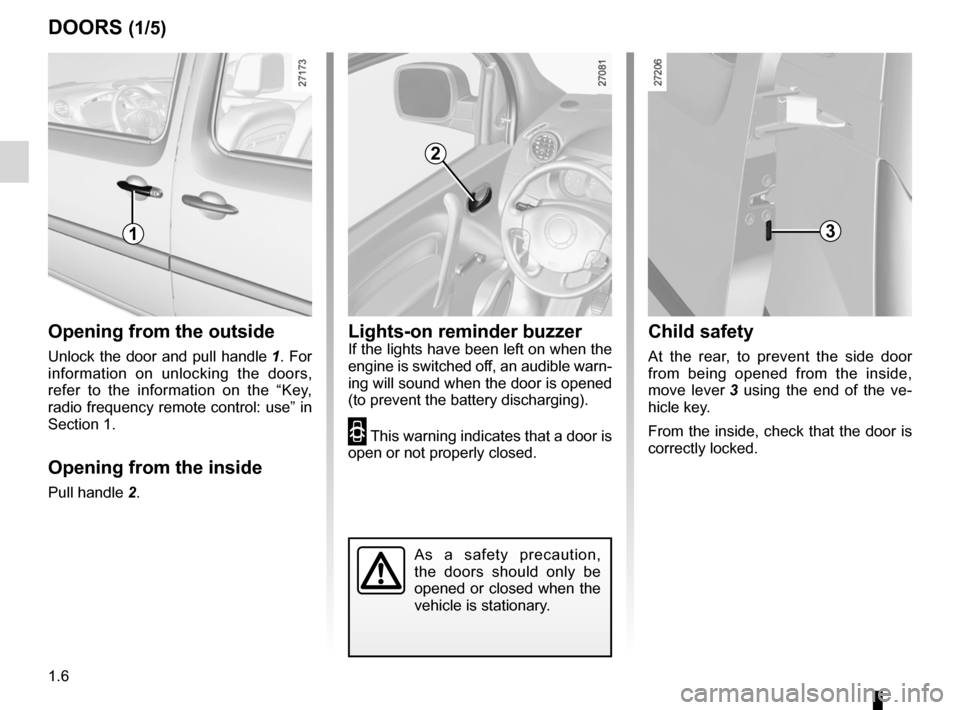
Opening from the outside
Unlock the door and pull handle 1. For
information on unlocking the doors,
refer to the information on the “Key,
radio frequency remote control: use” in
Section 1.
Opening from the inside
Pull handle 2.
DOORS (1/5)
1
2
Child safety
At the rear, to prevent the side door
from being opened from the inside,
move lever 3 using the end of the ve -
hicle key.
From the inside, check that the door is
correctly locked.
3
Lights-on reminder buzzerIf the lights have been left on when the
engine is switched off, an audible warn-
ing will sound when the door is opened
(to prevent the battery discharging).
2 This warning indicates that a door is
open or not properly closed.
As a safety precaution,
the doors should only be
opened or closed when the
vehicle is stationary.
Page 14 of 237
tailgate .................................................. (up to the end of the DU)
1.8
ENG_UD25775_5
Portes (X61 - F61 - K61 - Renault)
ENG_NU_813-11_FK61_Renault_1
Jaune NoirNoir texte
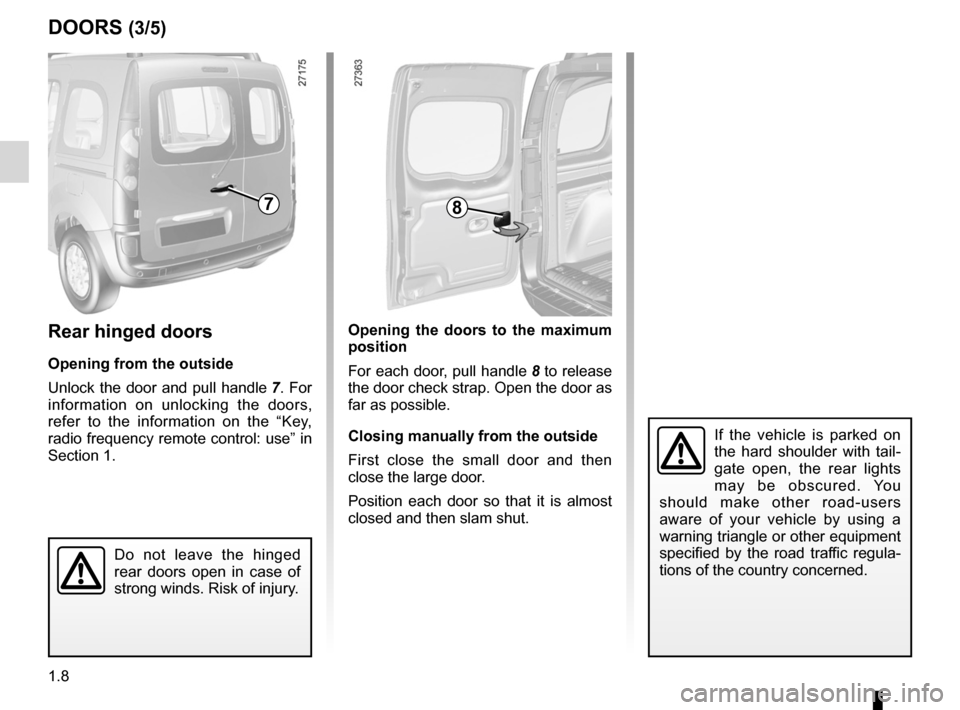
Opening the doors to the maximum
position
For each door, pull handle 8 to release
the door check strap. Open the door as
far as possible.
Closing manually from the outside
First close the small door and then
close the large door.
Position each door so that it is almost
closed and then slam shut.Rear hinged doors
Opening from the outside
Unlock the door and pull handle 7. For
information on unlocking the doors,
refer to the information on the “Key,
radio frequency remote control: use” in
Section 1.
DOORS (3/5)
If the vehicle is parked on
the hard shoulder with tail -
gate open, the rear lights
may be obscured. You
should make other road-users
aware of your vehicle by using a
warning triangle or other equipment
specified by the road traffic regula -
tions of the country concerned.
Do not leave the hinged
rear doors open in case of
strong winds. Risk of injury.
78
Page 24 of 237
front seatsadjustment ...................................... (up to the end of the DU)
heated seats ......................................... (up to the end of the DU)
front seat adjustment ............................(up to the end of the DU)
1.18
ENG_UD21409_6
Sièges avant (X61 - F61 - K61 - Renault)
ENG_NU_813-11_FK61_Renault_1
Jaune NoirNoir texte
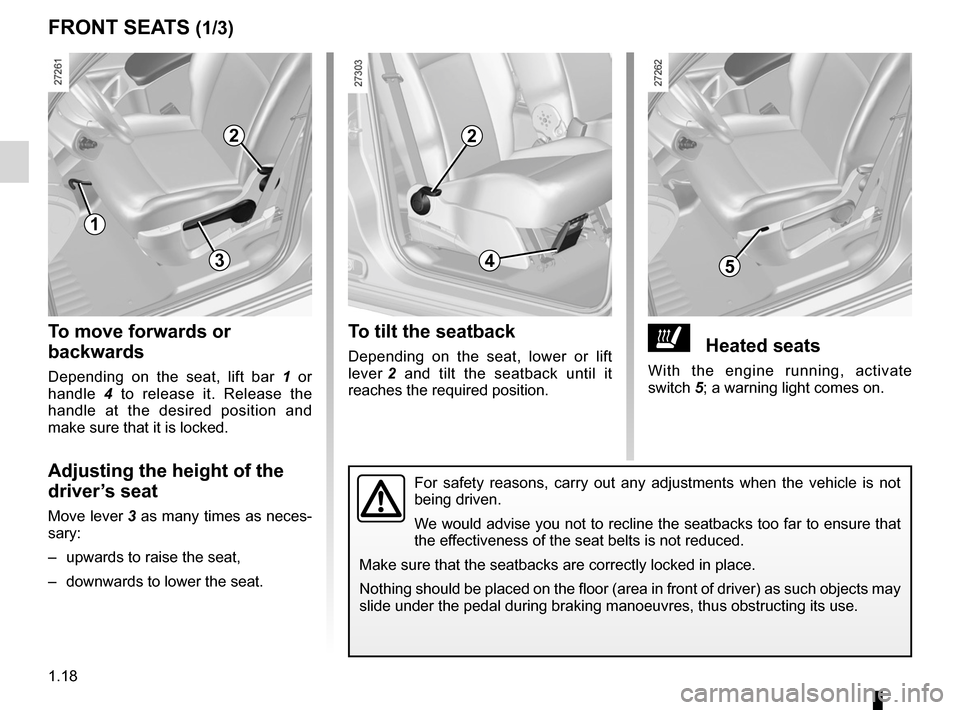
Front seats
ðHeated seats
With the engine running, activate
switch 5; a warning light comes on.
To tilt the seatback
Depending on the seat, lower or lift
lever 2 and tilt the seatback until it
reaches the required position.
To move forwards or
backwards
Depending on the seat, lift bar 1 or
handle 4 to release it. Release the
handle at the desired position and
make sure that it is locked.
Adjusting the height of the
driver’s seat
Move lever 3 as many times as neces-
sary:
– upwards to raise the seat,
– downwards to lower the seat.
FRONT SeATS (1/3)
1
2
534
2
For safety reasons, carry out any adjustments when the vehicle is not
being driven.
We would advise you not to recline the seatbacks too far to ensure that
the effectiveness of the seat belts is not reduced.
Make sure that the seatbacks are correctly locked in place.
Nothing should be placed on the floor (area in front of driver) as such objects may
slide under the pedal during braking manoeuvres, thus obstructing its use.
Page 32 of 237
1.26
ENG_UD25776_6
Ceintures de sécurité (X61 - F61 - K61 - Renault)
ENG_NU_813-11_FK61_Renault_1
Jaune NoirNoir texte
SeAT BeLTS (2/4)
tened. An audible warning sounds at a
low volume for 30 seconds, then at a
high volume for 90 seconds.
Unfastening
Press button 4 and the seat belt will be
rewound by the inertia reel. Guide the
belt.
Note: an object placed on the passen-
ger seat base may activate the warning
light in some cases.6
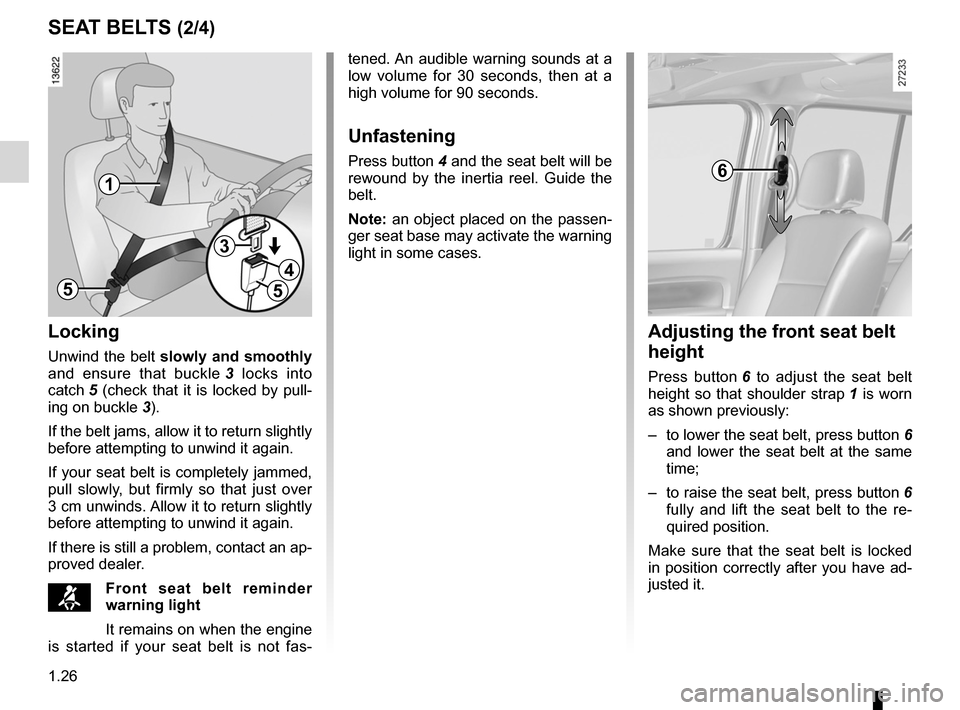
Adjusting the front seat belt
height
Press button 6 to adjust the seat belt
height so that shoulder strap 1 is worn
as shown previously:
– to lower the seat belt, press button 6
and lower the seat belt at the same
time;
– to raise the seat belt, press button 6
fully and lift the seat belt to the re -
quired position.
Make sure that the seat belt is locked
in position correctly after you have ad-
justed it.
Locking
Unwind the belt slowly and smoothly
and ensure that buckle 3 locks into
catch 5 (check that it is locked by pull -
ing on buckle 3).
If the belt jams, allow it to return slightly
before attempting to unwind it again.
If your seat belt is completely jammed,
pull slowly, but firmly so that just over
3 cm unwinds. Allow it to return slightly
before attempting to unwind it again.
If there is still a problem, contact an ap-
proved dealer.
™Front seat belt reminder
warning light
It remains on when the engine
is started if your seat belt is not fas -
1
5
3
4
5
Page 37 of 237
JauneNoirNoir texte
1.31
ENG_UD21590_3
Dispositifs complémentaires à la ceinture avant (X61 - F61 - K61 - Renault)
ENG_NU_813-11_FK61_Renault_1
MeTHODS OF ReSTRAINT IN ADDITION TO THe FRONT SeAT BeLTS (3/3)
Warnings concerning the driver’s air bag
– Do not modify the steering wheel or the steering wheel boss.
– Do not cover the steering wheel boss under any circumstances.
– Do not attach any objects (badge, logo, clock, telephone cradle, etc.) to the steering wheel boss.
– The steering wheel must not be removed (except by qualified personnel from our Network).
– Do not sit too close to the steering wheel when driving: sit with your arms slightly bent (see Section 1 “Adjusting your driving
position”). This will allow sufficient space for the air bag to deploy correctly and be fully effective.
Warnings concerning the passenger air bag
– Do not attach or glue any objects (badge, logo, clock, telephone cradle, etc.) to the dashboard in the air bag zone.
– Do not place anything between the dashboard and the passenger (animal, umbrella, walking stick, parcels, etc.).
– The passenger must not put his or her feet on the dashboard or seat as there is a risk that serious injuries may occur. As a
general rule, keep all body parts (knees, hands, head, etc.) away from the dashboard.
– The devices in addition to the front passenger seat belt should be reactivated as soon as a child seat is removed, to ensure
the protection of the passenger in the event of an impact.
A ReAR-FACING CHILD SeAT MUST NOT Be FITTeD TO THe FRONT p ASSeNGeR SeAT UNLeSS
THe ADDITIONAL ReSTRAINT SySTeMS, I.e. THe p ASSeNGeR AIR BAG, ARe DeACTIvATeD.
(Refer to the information on “Child safety: deactivating/activating the front passenger air bag” in Section 1).
All of the warnings below are given so that the air bag is not obstructed in any way when it is inflated and also to prevent
the risk of serious injuries caused by items which may be dislodged when the air bag inflates.
Page 39 of 237
air bag................................................... (up to the end of the DU)
seat belts .............................................. (up to the end of the DU)
air bag ................................................... (up to the end of the DU)
additional methods of restraint ............. (up to the end of the DU)
methods of restraint in addition to the seat belts
(up to the end of the DU)
1.33
ENG_UD21591_2
Dispositifs de retenue complémentaires (X61 - F61 - K61 - Renault)
ENG_NU_813-11_FK61_Renault_1
Additional methods of restraint
The air bag is designed to complement the action of the seat belt. Both
the air bags and seat belts are integral parts of the same protection
system. It is therefore essential to wear seat belts at all times. If seat belts
are not worn, the occupants are exposed to the risk of serious injury in
the event of an accident. It may also increase the risk of minor superficial injuries
occurring when the air bag is deployed, although such minor injuries are always
possible with air bags.
If the vehicle should overturn or suffer a rear impact, however severe, the pre-
tensioners and air bags are not always triggered. Impacts to the underside of the
vehicle, eg. from pavements, potholes or stones, can all trigger these systems.
– No work or modification whatsoever may be carried out on any part of the air
bag system (air bags, pretensioners, computer, wiring harness, etc.), except
by qualified personnel from an approved Dealer.
– To ensure that the system is in good working order and to avoid accidental trig-
gering of the system which may cause injury, only qualified Network personnel
may work on the air bag system.
– As a safety precaution, have the air bag system checked if your vehicle has
been involved in an accident, or is stolen or broken into.
– When selling or lending the vehicle, inform the user of these points and hand
over this handbook with the vehicle.
– When scrapping your vehicle, contact your approved Dealer for disposal of the
gas generator(s).
ADDITIONAL MeTHODS OF ReSTRAINT
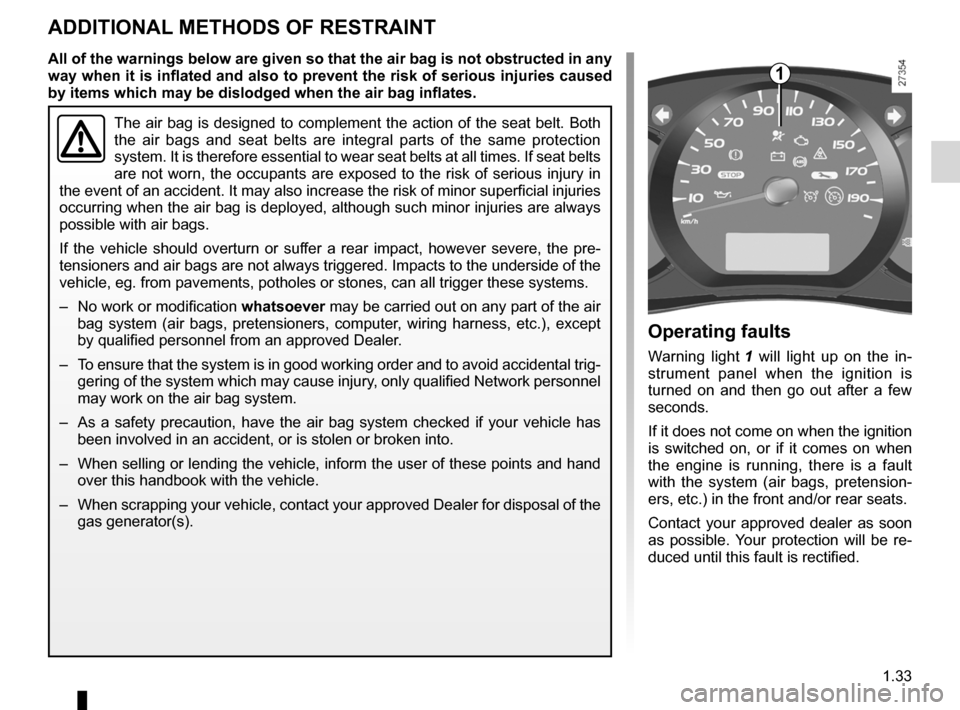
Operating faults
Warning light 1 will light up on the in -
strument panel when the ignition is
turned on and then go out after a few
seconds.
If it does not come on when the ignition
is switched on, or if it comes on when
the engine is running, there is a fault
with the system (air bags, pretension -
ers, etc.) in the front and/or rear seats.
Contact your approved dealer as soon
as possible. Your protection will be re-
duced until this fault is rectified.
1All of the warnings below are given so that the air bag is not obstructed in any
way when it is inflated and also to prevent the risk of serious injuries caused
by items which may be dislodged when the air bag inflates.
Page 50 of 237
air bagdeactivating the front passenger air bags
(up to the end of the DU)
air bag activating the front passenger air bags
(up to the end of the DU)
child safety ............................................ (up to the end of the DU)
child restraint/seat ................................ (up to the end of the DU)
transporting children ............................. (up to the end of the DU)
front passenger air bag deactivation .... (up to the end of the DU)
child restraint/seat ................................ (up to the end of the DU)
1.44
ENG_UD29619_5
Sécurité enfants : désactivation/activation airbag passager avant (X61 - F61 - K61 - Renault)
ENG_NU_813-11_FK61_Renault_1
Jaune NoirNoir texte
Deactivating/activating the front passenger airbag
Deactivating the front
passenger air bags
(on equipped vehicles)
You must deactivate the devices in ad-
dition to the front passenger seat belt
before fitting a child seat in the front
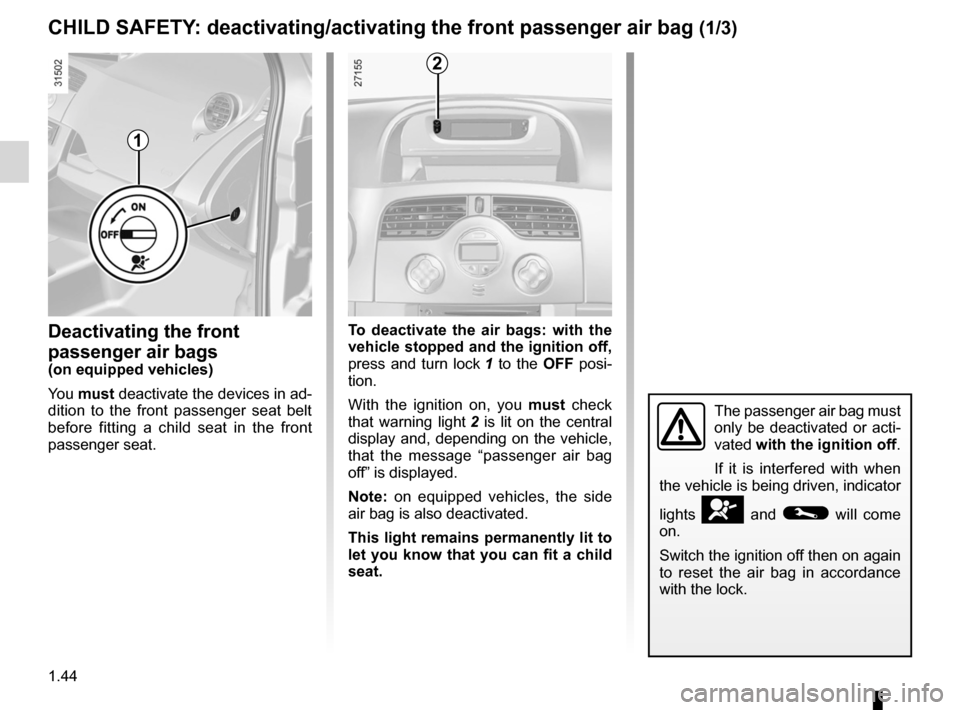
passenger seat. To deactivate the air bags: with the
vehicle stopped and the ignition off,
press and turn lock 1 to the
OFF posi-
tion.
With the ignition on, you must check
that warning light 2 is lit on the central
display and, depending on the vehicle,
that the message “passenger air bag
off” is displayed.
Note: on equipped vehicles, the side
air bag is also deactivated.
This light remains permanently lit to
let you know that you can fit a child
seat.
CHILD SAFeTy: deactivating/activating the front passenger air bag (1/3)
The passenger air bag must
only be deactivated or acti-
vated with the ignition off.
If it is interfered with when
the vehicle is being driven, indicator
lights
å and © will come
on.
Switch the ignition off then on again
to reset the air bag in accordance
with the lock.
1
2