warning RENAULT MASTER 2018 Owners Manual
[x] Cancel search | Manufacturer: RENAULT, Model Year: 2018, Model line: MASTER, Model: RENAULT MASTER 2018Pages: 290, PDF Size: 7.1 MB
Page 7 of 290
1.1
Section 1: Getting to know your vehicle
Key, remote control . . . . . . . . . . . . . . . . . . . . . . . . . . . . . . . . . . . .\
. . . . . . . . . . . . . . . . . . . . . . . . . . 1.2
Deadlocking . . . . . . . . . . . . . . . . . . . . . . . . . . . . . . . . . . . . \
. . . . . . . . . . . . . . . . . . . . . . . . . . . . . . . . 1.7
Hands-free access transmitter/receiver . . . . . . . . . . . . . . . . . . . . . . . . . . . . . . . . . . . . \
. . . . . . . . . . . 1.8
Locking/unlocking the doors . . . . . . . . . . . . . . . . . . . . . . . . . . . . . . . . . . . .\
. . . . . . . . . . . . . . . . . . . 1.10
Doors . . . . . . . . . . . . . . . . . . . . . . . . . . . . . . . . . . . . \
. . . . . . . . . . . . . . . . . . . . . . . . . . . . . . . . . . . . . 1.13
Steering wheel/power-assisted steering . . . . . . . . . . . . . . . . . . . . . . . . . . . . . . . . . . . .\
. . . . . . . . . . 1.19
Headrests . . . . . . . . . . . . . . . . . . . . . . . . . . . . . . . . . . . .\
. . . . . . . . . . . . . . . . . . . . . . . . . . . . . . . . . 1.20
Front seats. . . . . . . . . . . . . . . . . . . . . . . . . . . . . . . . . . . . \
. . . . . . . . . . . . . . . . . . . . . . . . . . . . . . . . . 1.21
Seat belts. . . . . . . . . . . . . . . . . . . . . . . . . . . . . . . . . . . . \
. . . . . . . . . . . . . . . . . . . . . . . . . . . . . . . . . . 1.24
Methods of restraint in addition to the front seat belts . . . . . . . . . . . . . . . . . . . . . . . . . . . . . . . . . . . . 1.28
Side protection devices . . . . . . . . . . . . . . . . . . . . . . . . . . . . . . . . . . . . \
. . . . . . . . . . . . . . . . . . . . . . . 1.31
Child safety: general information . . . . . . . . . . . . . . . . . . . . . . . . . . . . . . . . . . . . \
. . . . . . . . . . . . . . . . 1.33 choosing a child seat mounting . . . . . . . . . . . . . . . . . . . . . . . . . . . . . . . . . . . .\
. . . . . . . . . . . 1.36
fitting a child seat, general information . . . . . . . . . . . . . . . . . . . . . . . . . . . . . . . . . . . . \
. . . . . . 1.38
Child seats: attachment by seat belt or by Isofix system . . . . . . . . . . . . . . . . . . . . . . . . . . . . . . . . . . 1.40 deactivating/activating the front passenger airbag . . . . . . . . . . . . . . . . . . . . . . . . . . . . . . . . . 1.70
Rear view mirrors . . . . . . . . . . . . . . . . . . . . . . . . . . . . . . . . . . . .\
. . . . . . . . . . . . . . . . . . . . . . . . . . . 1.73
Driving position: left-hand drive . . . . . . . . . . . . . . . . . . . . . . . . . . . . . . . . . . . . \
. . . . . . . . . . . . . . . . . 1.74
Driver’s position, right-hand drive . . . . . . . . . . . . . . . . . . . . . . . . . . . . . . . . . . . .\
. . . . . . . . . . . . . . . 1.76
Warning lights . . . . . . . . . . . . . . . . . . . . . . . . . . . . . . . . . . . .\
. . . . . . . . . . . . . . . . . . . . . . . . . . . . . . 1.78
Trip computer . . . . . . . . . . . . . . . . . . . . . . . . . . . . . . . . . . . .\
. . . . . . . . . . . . . . . . . . . . . . . . . . . . . . 1.84
Clock . . . . . . . . . . . . . . . . . . . . . . . . . . . . . . . . . \
. . . . . . . . . . . . . . . . . . . . . . . . . . . . . . . . . . . . . . . . 1.93
Exterior temperature . . . . . . . . . . . . . . . . . . . . . . . . . . . . . . . . . . . .\
. . . . . . . . . . . . . . . . . . . . . . . . . 1.93
Windscreen washer/wiper . . . . . . . . . . . . . . . . . . . . . . . . . . . . . . . . . . . . \
. . . . . . . . . . . . . . . . . . . . . 1.94
Exterior lighting and signals. . . . . . . . . . . . . . . . . . . . . . . . . . . . . . . . . . . . \
. . . . . . . . . . . . . . . . . . . . 1.96
Electrical adjustment of the dipped beam headlights . . . . . . . . . . . . . . . . . . . . . . . . . . . . . . . . . . . .\
1.100
Audible and visual signals . . . . . . . . . . . . . . . . . . . . . . . . . . . . . . . . . . . . \
. . . . . . . . . . . . . . . . . . . . . 1.101
Fuel tank . . . . . . . . . . . . . . . . . . . . . . . . . . . . . . . . . . . .\
. . . . . . . . . . . . . . . . . . . . . . . . . . . . . . . . . . 1.102
Additive tank . . . . . . . . . . . . . . . . . . . . . . . . . . . . . . . . . . . .\
. . . . . . . . . . . . . . . . . . . . . . . . . . . . . . . 1.104
Page 11 of 290
1.5
KEY, RADIO FREQUENCY REMOTE CONTROL: use (1/2)
1
A
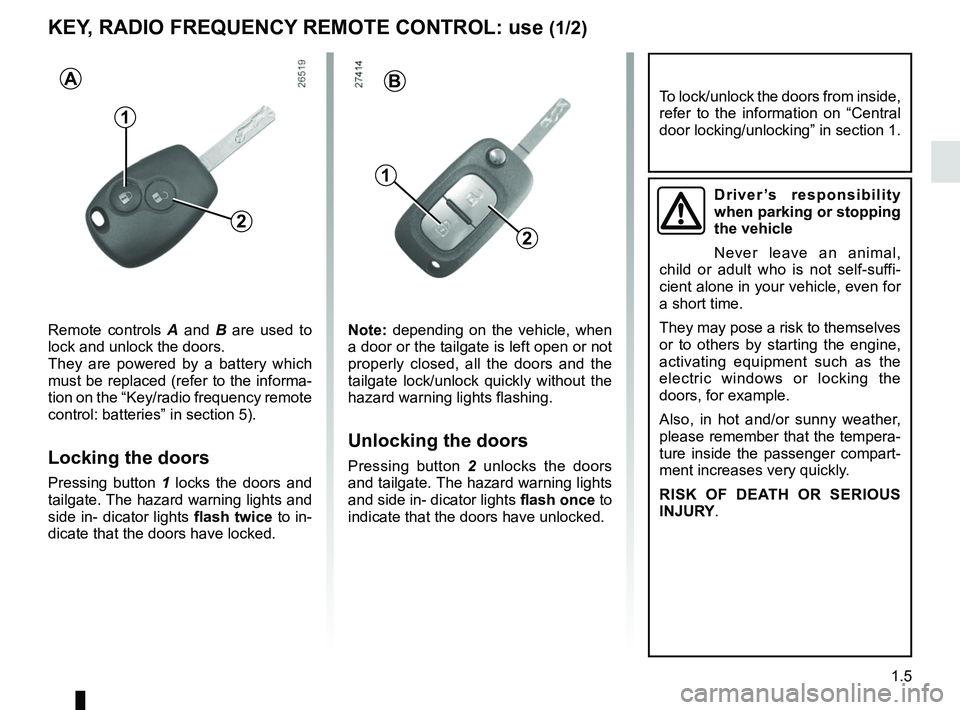
Remote controls A and B are used to
lock and unlock the doors.
They are powered by a battery which
must be replaced (refer to the informa-
tion on the “Key/radio frequency remote
control: batteries” in section 5).
Locking the doors
Pressing button 1 locks the doors and
tailgate. The hazard warning lights and
side in- dicator lights flash twice to in-
dicate that the doors have locked. Note: depending on the vehicle, when
a door or the tailgate is left open or not
properly closed, all the doors and the
tailgate lock/unlock quickly without the
hazard warning lights flashing.
Unlocking the doors
Pressing button 2
unlocks the doors
and tailgate. The hazard warning lights
and side in- dicator lights flash once to
indicate that the doors have unlocked.
2
B
1
2
Driver’s responsibility
when parking or stopping
the vehicle
Never leave an animal,
child or adult who is not self-suffi-
cient alone in your vehicle, even for
a short time.
They may pose a risk to themselves
or to others by starting the engine,
activating equipment such as the
electric windows or locking the
doors, for example.
Also, in hot and/or sunny weather,
please remember that the tempera-
ture inside the passenger compart-
ment increases very quickly.
RISK OF DEATH OR SERIOUS
INJURY.
To lock/unlock the doors from inside,
refer to the information on “Central
door locking/unlocking” in section 1.
Page 12 of 290
1.6
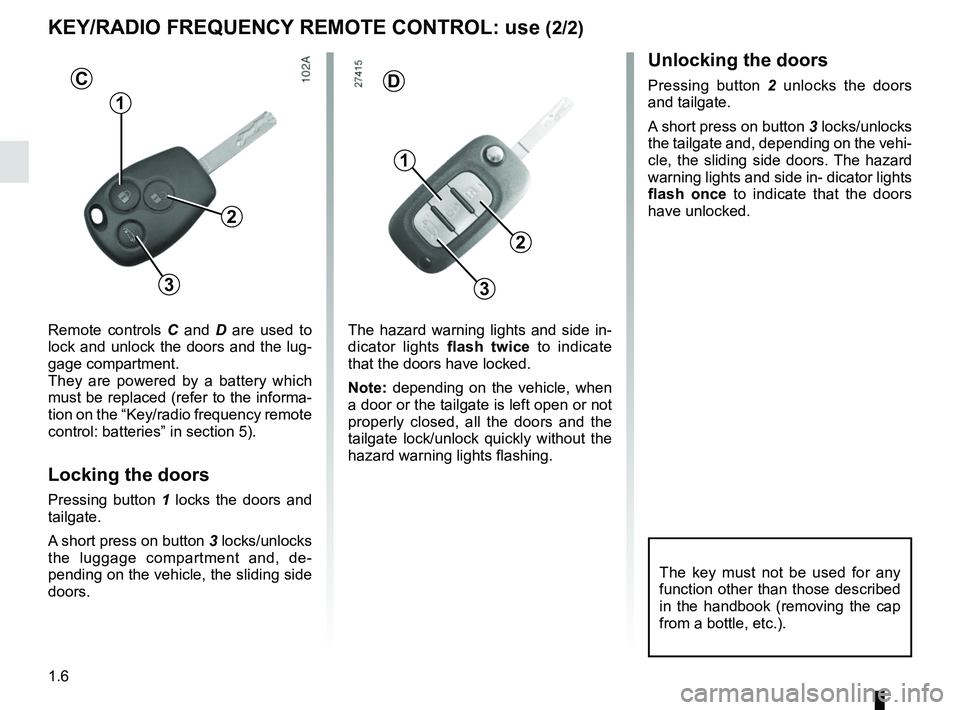
Remote controls C and D are used to
lock and unlock the doors and the lug-
gage compartment.
They are powered by a battery which
must be replaced (refer to the informa-
tion on the “Key/radio frequency remote
control: batteries” in section 5).
Locking the doors
Pressing button 1 locks the doors and
tailgate.
A short press on button 3 locks/unlocks
the luggage compartment and, de-
pending on the vehicle, the sliding side
doors.
KEY/RADIO FREQUENCY REMOTE CONTROL: use (2/2)
D
The hazard warning lights and side in-
dicator lights flash twice to indicate
that the doors have locked.
Note: depending on the vehicle, when
a door or the tailgate is left open or not
properly closed, all the doors and the
tailgate lock/unlock quickly without the
hazard warning lights flashing.
1
2
3
C
1
2
3
The key must not be used for any
function other than those described
in the handbook (removing the cap
from a bottle, etc.).
Unlocking the doors
Pressing button 2 unlocks the doors
and tailgate.
A short press on button 3 locks/unlocks
the tailgate and, depending on the vehi-
cle, the sliding side doors. The hazard
warning lights and side in- dicator lights
flash once to indicate that the doors
have unlocked.
Page 13 of 290
1.7
DEADLOCKING
Never use deadlocking if
someone is still inside the
vehicle.
1
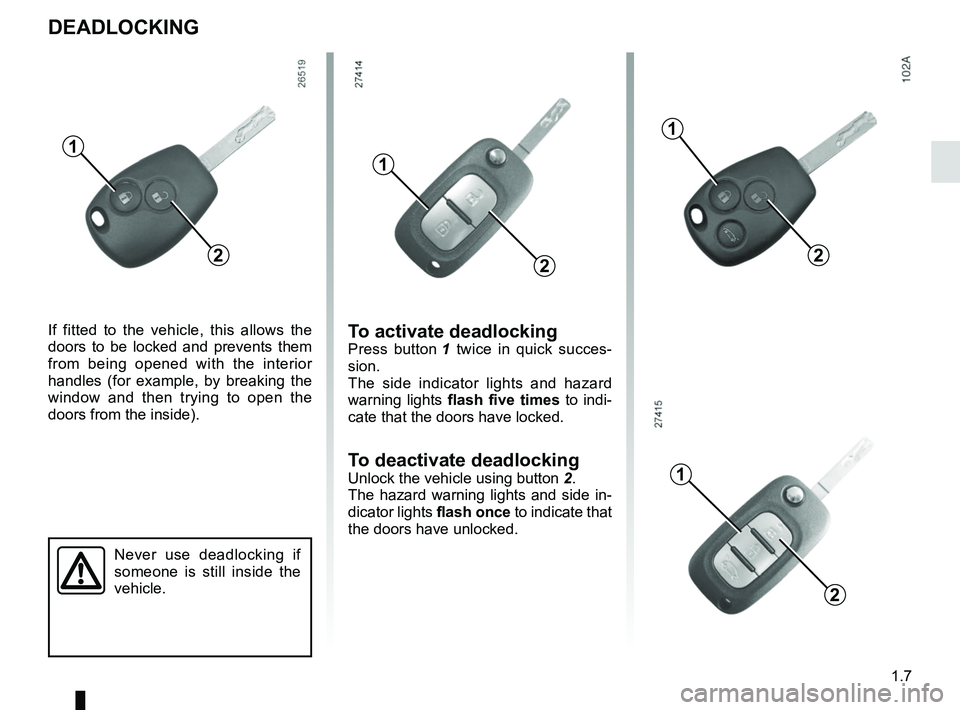
If fitted to the vehicle, this allows the
doors to be locked and prevents them
from being opened with the interior
handles (for example, by breaking the
window and then trying to open the
doors from the inside).
2
To activate deadlockingPress button 1 twice in quick succes-
sion.
The side indicator lights and hazard
warning lights flash five times to indi-
cate that the doors have locked.
To deactivate deadlocking
Unlock the vehicle using button 2.
The hazard warning lights and side in-
dicator lights flash once to indicate that
the doors have unlocked.
1
2
1
2
1
2
Page 15 of 290
1.9
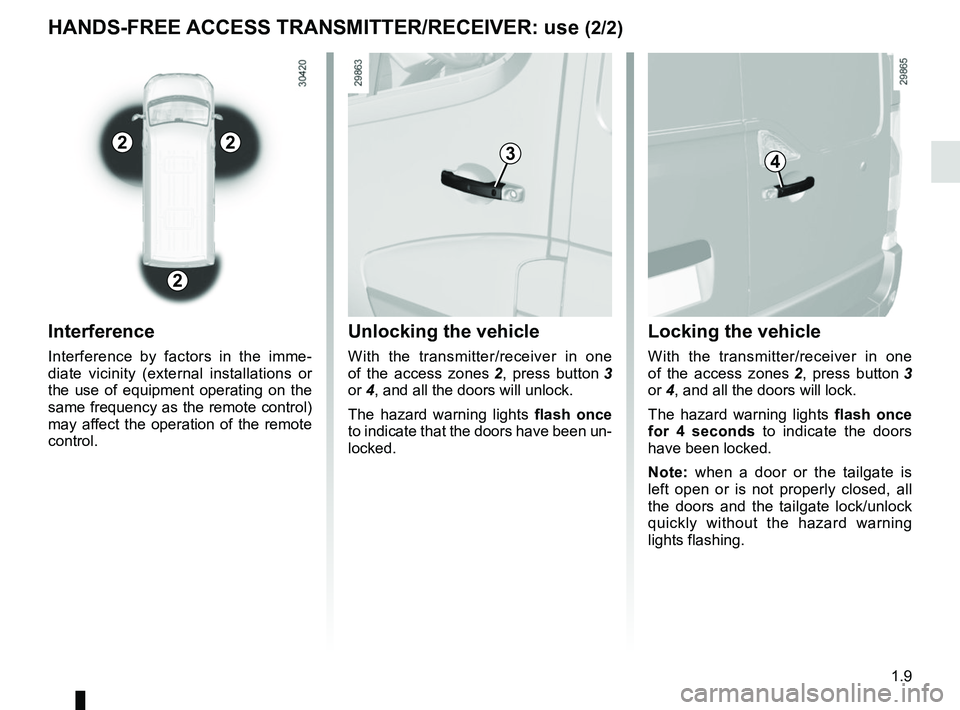
Unlocking the vehicle
With the transmitter/receiver in one
of the access zones 2, press button 3
or 4, and all the doors will unlock.
The hazard warning lights flash once
to indicate that the doors have been un-
locked.
34
HANDS-FREE ACCESS TRANSMITTER/RECEIVER: use (2/2)
Interference
Interference by factors in the imme-
diate vicinity (external installations or
the use of equipment operating on the
same frequency as the remote control)
may affect the operation of the remote
control.
Locking the vehicle
With the transmitter/receiver in one
of the access zones 2, press button 3
or 4, and all the doors will lock.
The hazard warning lights flash once
for 4 seconds to indicate the doors
have been locked.
Note: when a door or the tailgate is
left open or is not properly closed, all
the doors and the tailgate lock/unlock
quickly without the hazard warning
lights flashing.
22
2
Page 23 of 290
1.17
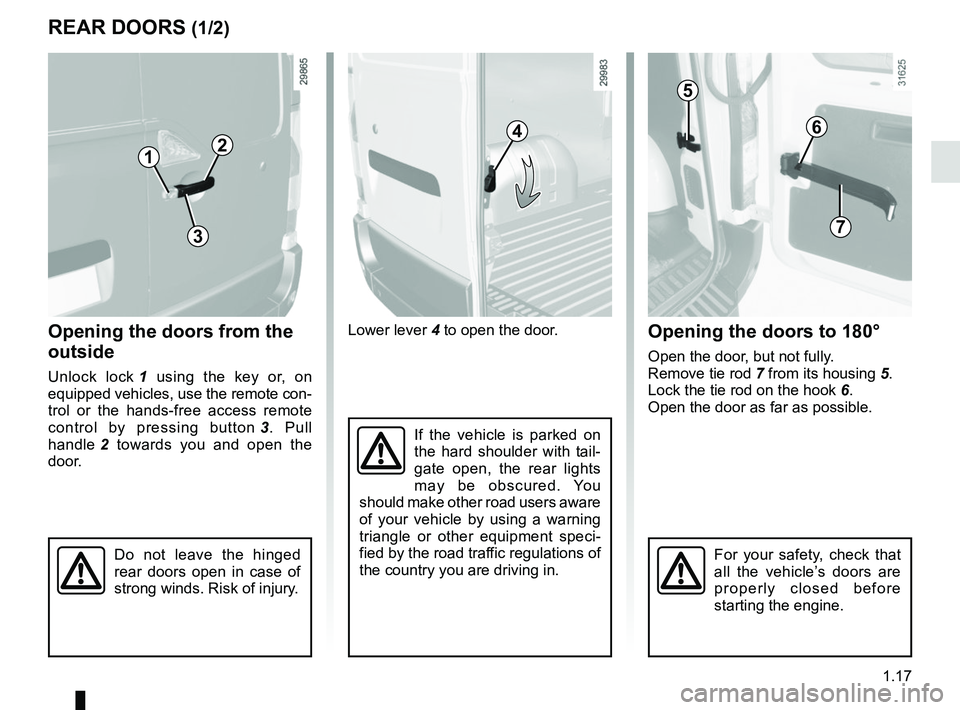
Lower lever 4 to open the door.
If the vehicle is parked on
the hard shoulder with tail-
gate open, the rear lights
may be obscured. You
should make other road users aware
of your vehicle by using a warning
triangle or other equipment speci-
fied by the road traffic regulations of
the country you are driving in.
REAR DOORS (1/2)
Opening the doors from the
outside
Unlock lock 1 using the key or, on
equipped vehicles, use the remote con-
trol or the hands-free access remote
control by pressing button 3. Pull
handle 2 towards you and open the
door.
Opening the doors to 180°
Open the door, but not fully.
Remove tie rod 7 from its housing 5.
Lock the tie rod on the hook 6.
Open the door as far as possible.
1
24
1
Do not leave the hinged
rear doors open in case of
strong winds. Risk of injury.For your safety, check that
all the vehicle’s doors are
properly closed before
starting the engine.
3
5
6
7
Page 31 of 290
1.25
SEAT BELTS (2/3)
5
34
5
1
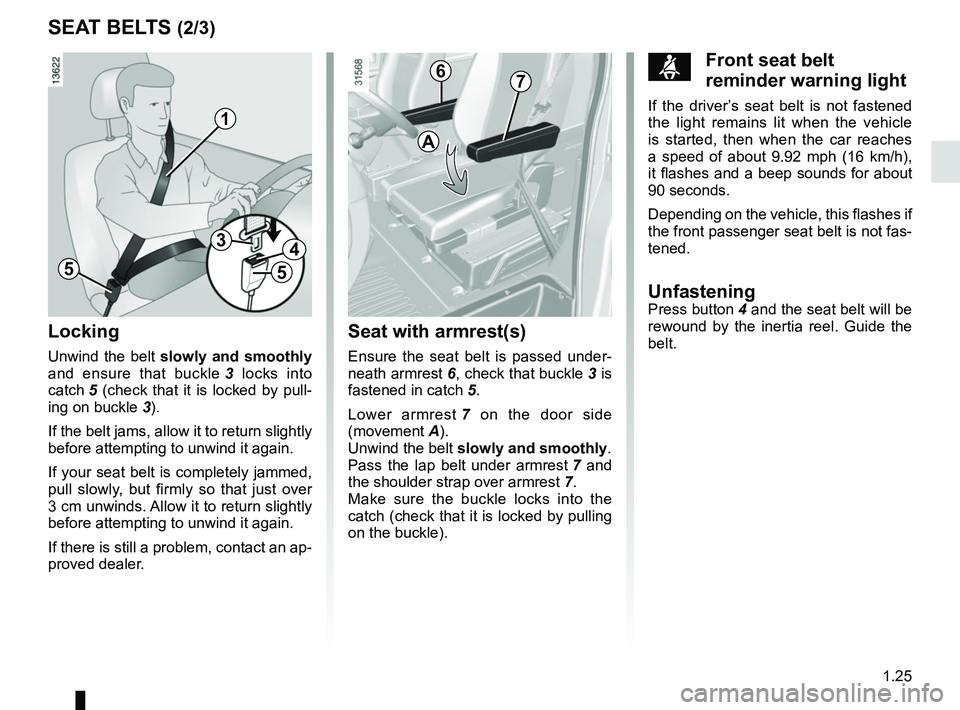
Locking
Unwind the belt slowly and smoothly
and ensure that buckle 3 locks into
catch 5 (check that it is locked by pull- ing on buckle 3).
If the belt jams, allow it to return slightly
before attempting to unwind it again.
If your seat belt is completely jammed,
pull slowly, but firmly so that just over
3 cm unwinds. Allow it to return slightly
before attempting to unwind it again.
If there is still a problem, contact an ap-
proved dealer.
Seat with armrest(s)
Ensure the seat belt is passed under-
neath armrest 6, check that buckle 3 is
fastened in catch 5.
Lower armrest 7 on the door side
(movement A).
Unwind the belt slowly and smoothly .
Pass the lap belt under armrest 7 and
the shoulder strap over armrest 7.
Make sure the buckle locks into the
catch (check that it is locked by pulling
on the buckle).
ßFront seat belt
reminder warning light
If the driver’s seat belt is not fastened
the light remains lit when the vehicle
is started, then when the car reaches
a speed of about 9.92 mph (16 km/h),
it flashes and a beep sounds for about
90 seconds.
Depending on the vehicle, this flashes if
the front passenger seat belt is not fas-
tened.
UnfasteningPress button 4 and the seat belt will be
rewound by the inertia reel. Guide the
belt.
A
76
Page 36 of 290
1.30
METHODS OF RESTRAINT IN ADDITION TO THE FRONT SEAT BELTS (3/3)
All of the warnings below are given so that the air bag is not obstructe\
d in any way when it is deployed and also to pre-
vent the risk of serious injuries caused by items which may be dislodged\
when the air bag deploys.
Warnings concerning the driver’s air bag
– Do not modify the steering wheel or the steering wheel boss.
– Do not cover the steering wheel boss under any circumstances.
– Do not attach any objects (badge, logo, clock, telephone holder, etc.) to the steering wheel boss.
– The steering wheel must not be removed (except by qualified personnel f\
rom our Network).
– When driving, do not sit too close to the steering wheel. Sit with your \
arms slightly bent (see the information on “Adjusting
your driving position” in Section 1). This will allow sufficient space for the air bag to deploy correctly and be fully effective.
Warnings concerning the passenger air bag
– Do not attach or glue any objects (badge, logo, clock, telephone holder\
, etc.) to the dashboard on or near the air bag.
– Do not place anything between the dashboard and the passenger (pet, umb\
rella, walking stick, parcels, etc.).
– The passenger must not put his or her feet on the dashboard or seat as t\
here is a risk that serious injuries may occur. In general, parts of the body should be kept away from the dashboard (knee\
s, hands, head, etc.).
– The devices in addition to the front passenger seat belt should be react\
ivated as soon as a child seat is removed, to ensure the protection of the passenger in the event of an impact.
A CHILD SEAT MUST NOT BE FITTED TO THE FRONT PASSENGER SEAT UNLESS THE
ADDITIONAL RESTRAINT SYSTEMS, I.E. THE PASSENGER AIR BAG, ARE DEACTIVATED.
(refer to the information on “Child safety: deactivating/activating \
the front passenger air bag” in Section 1)
Page 37 of 290
1.31
SIDE PROTECTION DEVICES
Side air bags
These air bags may be fitted to the front
seats and are deployed at the sides of
the seats (door side) to protect the oc-
cupants in the event of a severe side
impact.
These air bags operate
through slits in the front
seatbacks (door side):
never insert any objects in
these slits.
Warnings concerning the side air bag
– Fitting seat covers: seats equipped with an air bag require covers
specifically designed for your vehicle. Contact an approved Dealer to fi\
nd
out if these covers are available. The use of any covers other than those
designed for your vehicle (and including those designed for another veh\
icle)
may affect the operation of the air bags and reduce your protection.
– Do not place any accessories, objects or even pets between the seatback,\
the door and the internal fittings. Do not cover the seatback with any items\
such as
clothes or accessories. This may prevent the air bag from operating correctly
or cause injury when the air bag is deployed.
– No work or modification whatsoever may be carried out on the seat or int\
ernal fittings, except by qualified personnel from an approved Dealer.
Page 38 of 290
1.32
ADDITIONAL METHODS OF RESTRAINT
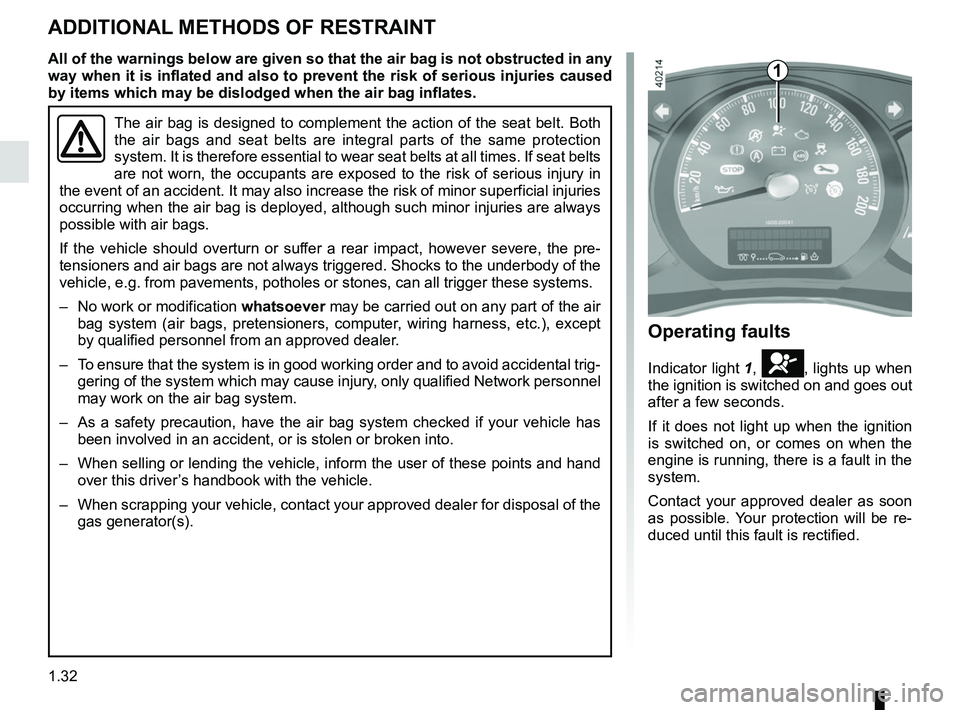
Operating faults
Indicator light 1, å, lights up when
the ignition is switched on and goes out
after a few seconds.
If it does not light up when the ignition
is switched on, or comes on when the
engine is running, there is a fault in the
system.
Contact your approved dealer as soon
as possible. Your protection will be re-
duced until this fault is rectified.
1
The air bag is designed to complement the action of the seat belt. Both \
the air bags and seat belts are integral parts of the same protection
system. It is therefore essential to wear seat belts at all times. If se\
at belts
are not worn, the occupants are exposed to the risk of serious injury in\
the event of an accident. It may also increase the risk of minor superfi\
cial injuries
occurring when the air bag is deployed, although such minor injuries are\
always
possible with air bags.
If the vehicle should overturn or suffer a rear impact, however severe, the pre-
tensioners and air bags are not always triggered. Shocks to the underbod\
y of the
vehicle, e.g. from pavements, potholes or stones, can all trigger these \
systems.
– No work or modification whatsoever may be carried out on any part of the air
bag system (air bags, pretensioners, computer, wiring harness, etc.), except
by qualified personnel from an approved dealer.
– To ensure that the system is in good working order and to avoid accidenta\
l trig- gering of the system which may cause injury, only qualified Network personnel
may work on the air bag system.
– As a safety precaution, have the air bag system checked if your vehicle \
has been involved in an accident, or is stolen or broken into.
– When selling or lending the vehicle, inform the user of these points and\
hand over this driver’s handbook with the vehicle.
– When scrapping your vehicle, contact your approved dealer for disposal o\
f the gas generator(s).
All of the warnings below are given so that the air bag is not obstructed in any
way when it is inflated and also to prevent the risk of serious injuries caused
by items which may be dislodged when the air bag inflates.