RENAULT MEGANE 2005 X84 / 2.G Owner's Manual
Manufacturer: RENAULT, Model Year: 2005, Model line: MEGANE, Model: RENAULT MEGANE 2005 X84 / 2.GPages: 250, PDF Size: 5.72 MB
Page 21 of 250
Downloaded from www.Manualslib.com manuals search engine
A
2
1
NU761_2_G1-FRA.qxd 10/11/05 15:53 Page 1.11
1.11
LOCKING/UNLOCKING THE DOORS
Locking/unlocking the doors
from the outside
This is done using the RENAULT
card; see RENAULT card in Section 1.
In certain cases, the RENAULT card
may not work:
- if the vehicle is located in a zone of high electromagnetic radiation,
- if appliances operating on the same frequency as the card (mobile
phone, etc.) are used;
- drain on the RENAULT Card battery, flat battery, etc.
It is then possible:
- to use the emergency key (depending on vehicle, either built
into the card or separate) for the
front left-hand door;
- to manually lock each of the doors (see the following page);
- to use the door locking and unlocking control inside the vehicle
(refer to the information on Locking
and unlocking from the inside in
Section 1).
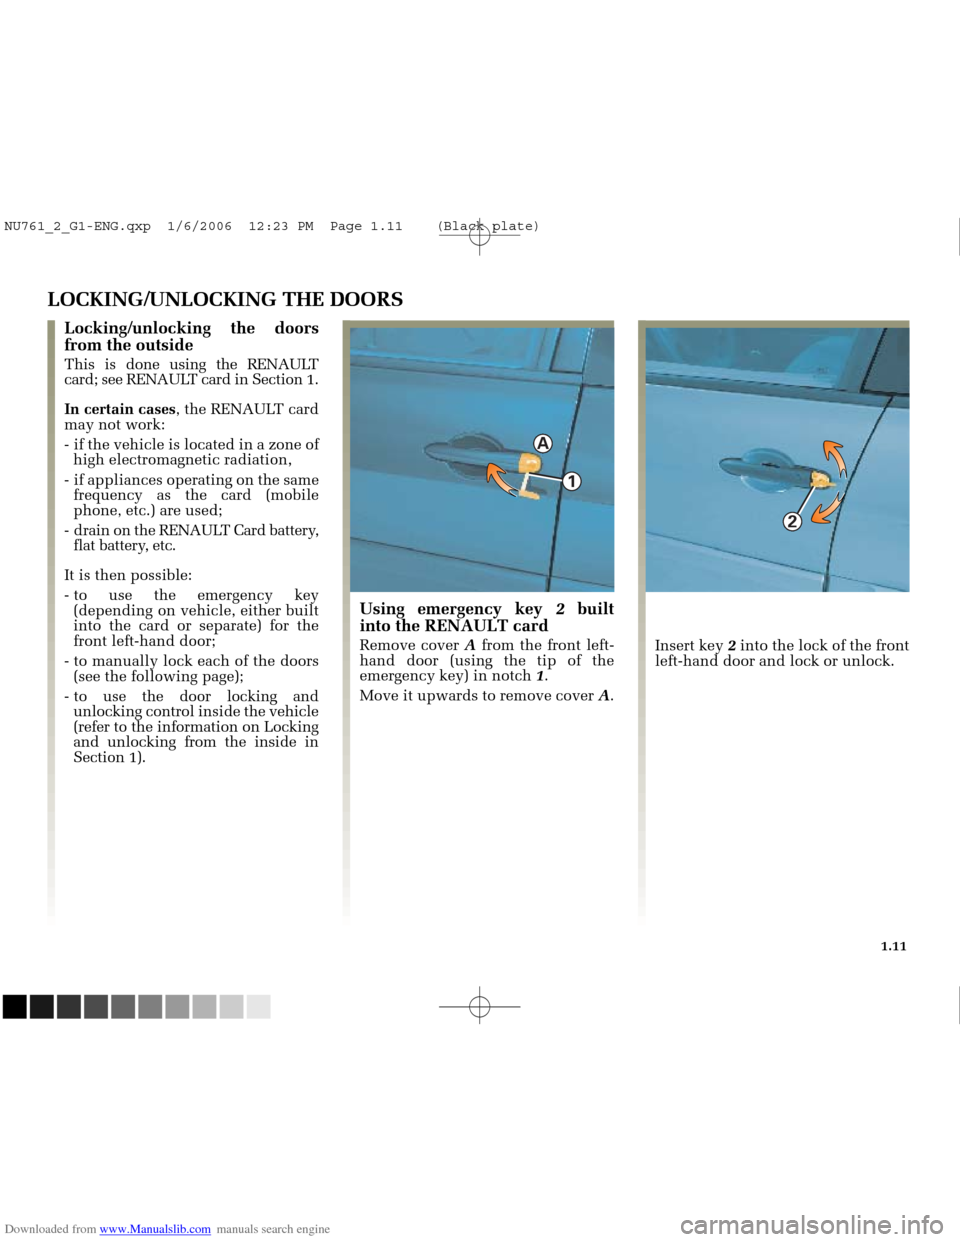
Using emergency key 2built
into the RENAULT card
Remove cover Afrom the front left-
hand door (using the tip of the
emergency key) in notch 1.
Move it upwards to remove cover A. Insert key
2into the lock of the front
left-hand door and lock or unlock.
NU761_2_G1-ENG.qxp 1/6/2006 12:23 PM Page 1.11 (Black plate)
Page 22 of 250
Downloaded from www.Manualslib.com manuals search engine
4
3
NU761_2_G1-FRA.qxd 10/11/05 15:53 Page 1.12
1.12
LOCKING/UNLOCKING THE DOORS (continued)
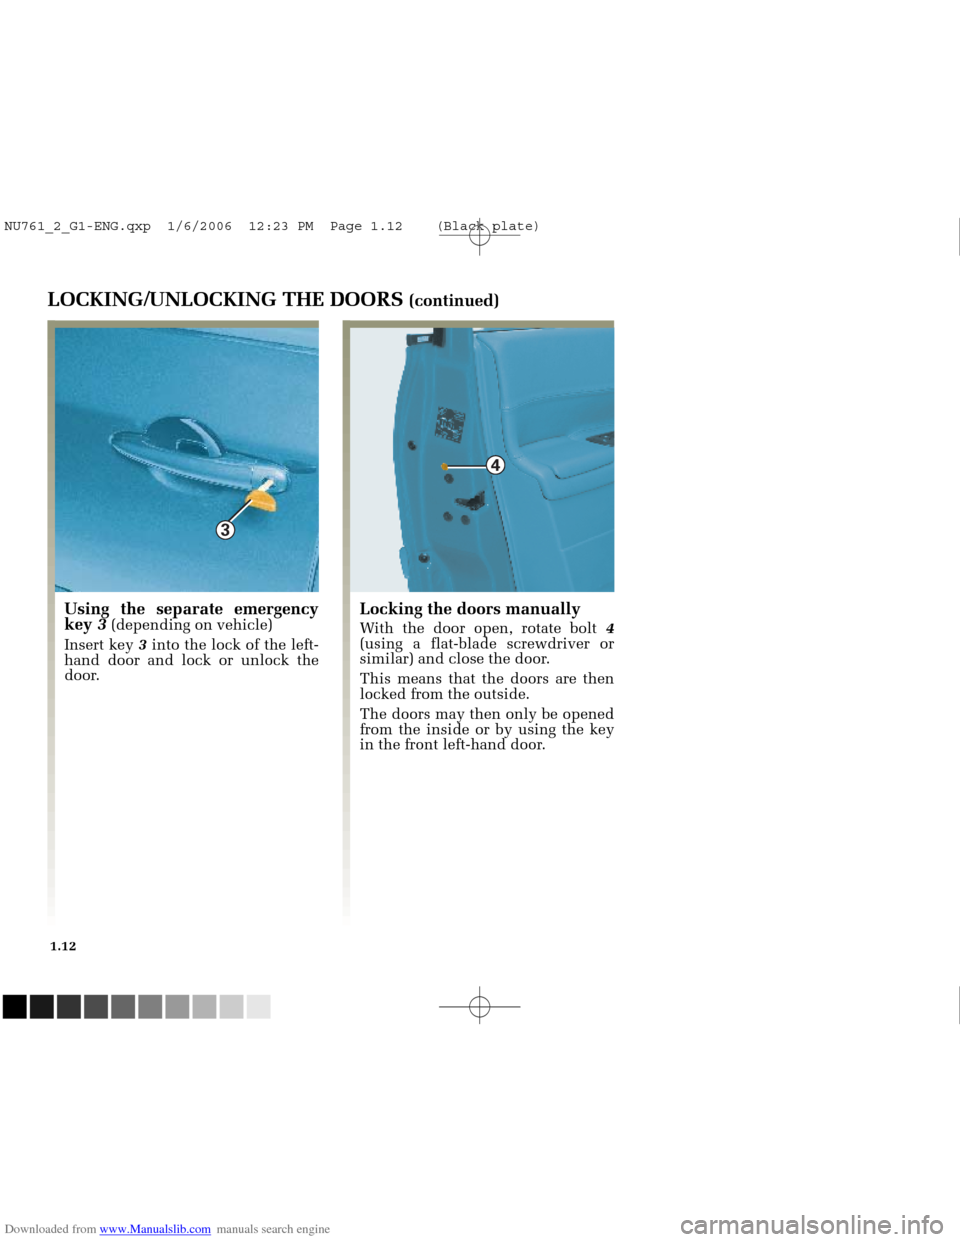
Locking the doors manually
With the door open, rotate bolt 4
(using a flat-blade screwdriver or
similar) and close the door.
This means that the doors are then
locked from the outside.
The doors may then only be opened
from the inside or by using the key
in the front left-hand door.
Using the separate emergency
key 3(depending on vehicle)
Insert key 3into the lock of the left-
hand door and lock or unlock the
door.
NU761_2_G1-ENG.qxp 1/6/2006 12:23 PM Page 1.12 (Black plate)
Page 23 of 250
Downloaded from www.Manualslib.com manuals search engine
5
NU761_2_G1-FRA.qxd 10/11/05 15:53 Page 1.13
1.13
If you decide to keep the
doors locked when you are
driving, remember that it
may be more difficult for
those assisting you to gain access
to the passenger compartment in
the event of an emergency.
Never leave your vehicle
with the RENAULT card
inside.
LOCKING/UNLOCKING THE DOORS (continued)
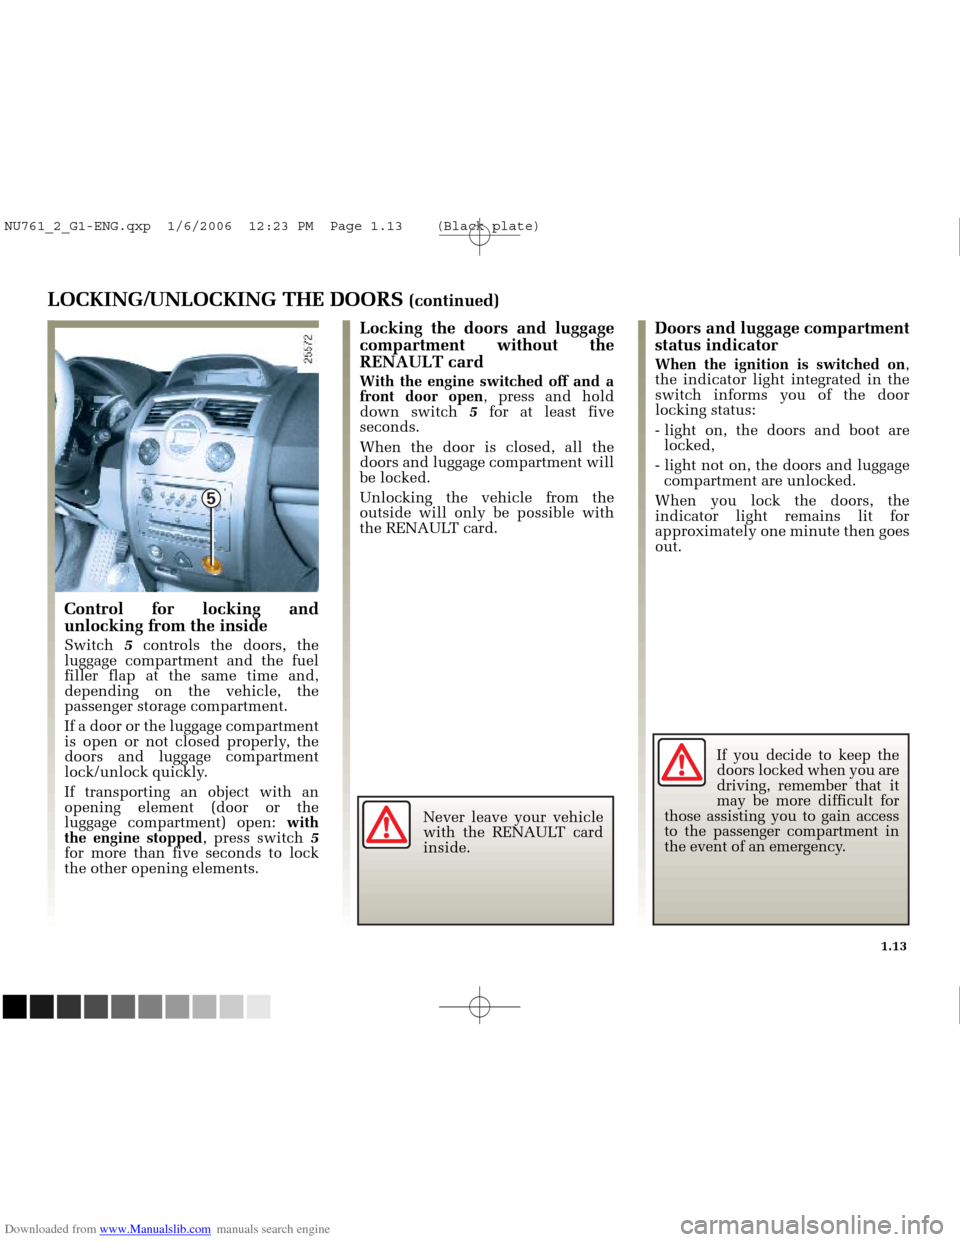
Control for locking and
unlocking from the inside
Switch 5controls the doors, the
luggage compartment and the fuel
filler flap at the same time and,
depending on the vehicle, the
passenger storage compartment.
If a door or the luggage compartment
is open or not closed properly, the
doors and luggage compartment
lock/unlock quickly.
If transporting an object with an
opening element (door or the
luggage compartment) open: with
the engine stopped , press switch 5
for more than five seconds to lock
the other opening elements.
Locking the doors and luggage
compartment without the
RENAULT card
With the engine switched off and a
front door open , press and hold
down switch 5for at least five
seconds.
When the door is closed, all the
doors and luggage compartment will
be locked.
Unlocking the vehicle from the
outside will only be possible with
the RENAULT card.
Doors and luggage compartment
status indicator
When the ignition is switched on ,
the indicator light integrated in the
switch informs you of the door
locking status:
- light on, the doors and boot are locked,
- light not on, the doors and luggage compartment are unlocked.
When you lock the doors, the
indicator light remains lit for
approximately one minute then goes
out.
NU761_2_G1-ENG.qxp 1/6/2006 12:23 PM Page 1.13 (Black plate)
Page 24 of 250
Downloaded from www.Manualslib.com manuals search engine
1
NU761_2_G1-FRA.qxd 10/11/05 15:53 Page 1.14
1.14
If you decide to keep the
doors locked when you
are driving, remember
that it may be more
difficult for those assisting you to
gain access to your vehicle in the
event of an emergency.
RENAULT ANTI-INTRUDER DEVICE (RAID)
You must first decide if you want to
activate this function.
To activate
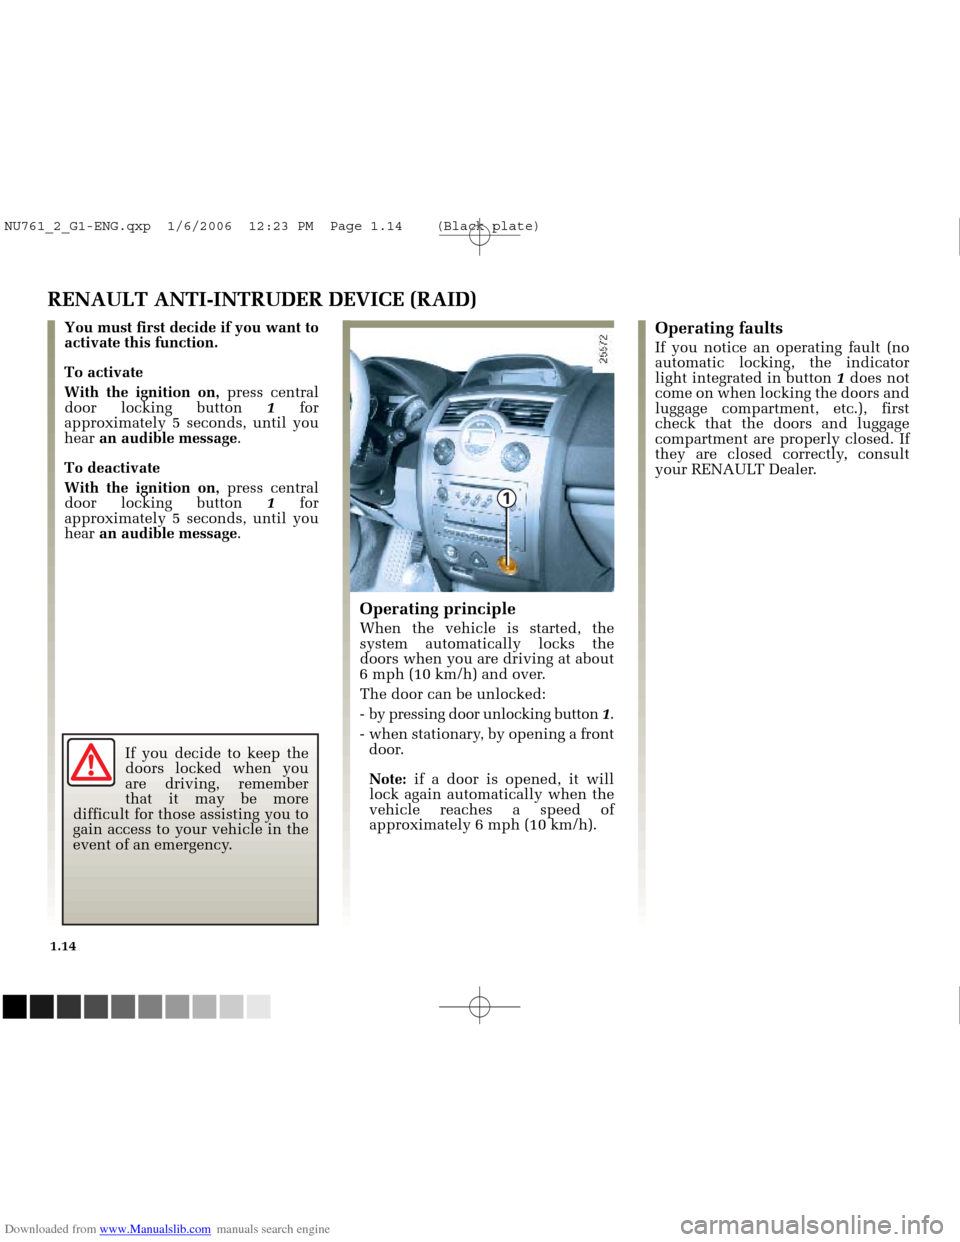
With the ignition on, press central
door locking button 1for
approximately 5 seconds, until you
hear an audible message .
To deactivate
With the ignition on, press central
door locking button 1for
approximately 5 seconds, until you
hear an audible message .
Operating principle
When the vehicle is started, the
system automatically locks the
doors when you are driving at about
6 mph (10 km/h) and over.
The door can be unlocked:
- by pressing door unlocking button 1.
- when stationary, by opening a front door.
Note: if a door is opened, it will
lock again automatically when the
vehicle reaches a speed of
approximately 6 mph (10 km/h).
Operating faults
If you notice an operating fault (no
automatic locking, the indicator
light integrated in button 1does not
come on when locking the doors and
luggage compartment, etc.), first
check that the doors and luggage
compartment are properly closed. If
they are closed correctly, consult
your RENAULT Dealer.
NU761_2_G1-ENG.qxp 1/6/2006 12:23 PM Page 1.14 (Black plate)
Page 25 of 250
Downloaded from www.Manualslib.com manuals search engine
1
1
NU761_2_G1-FRA.qxd 10/11/05 15:53 Page 1.15
1.15
Any work or modification
to the engine immobiliser
(electronic units, wiring,
etc.) may be dangerous. It
must be carried out by a qualified
RENAULT technician.
ENGINE IMMOBILISER
This prevents the vehicle being
driven by anyone not in possession
of the vehicle’s RENAULT card.
The vehicle is automatically
protected a few seconds after the
engine is switched off.
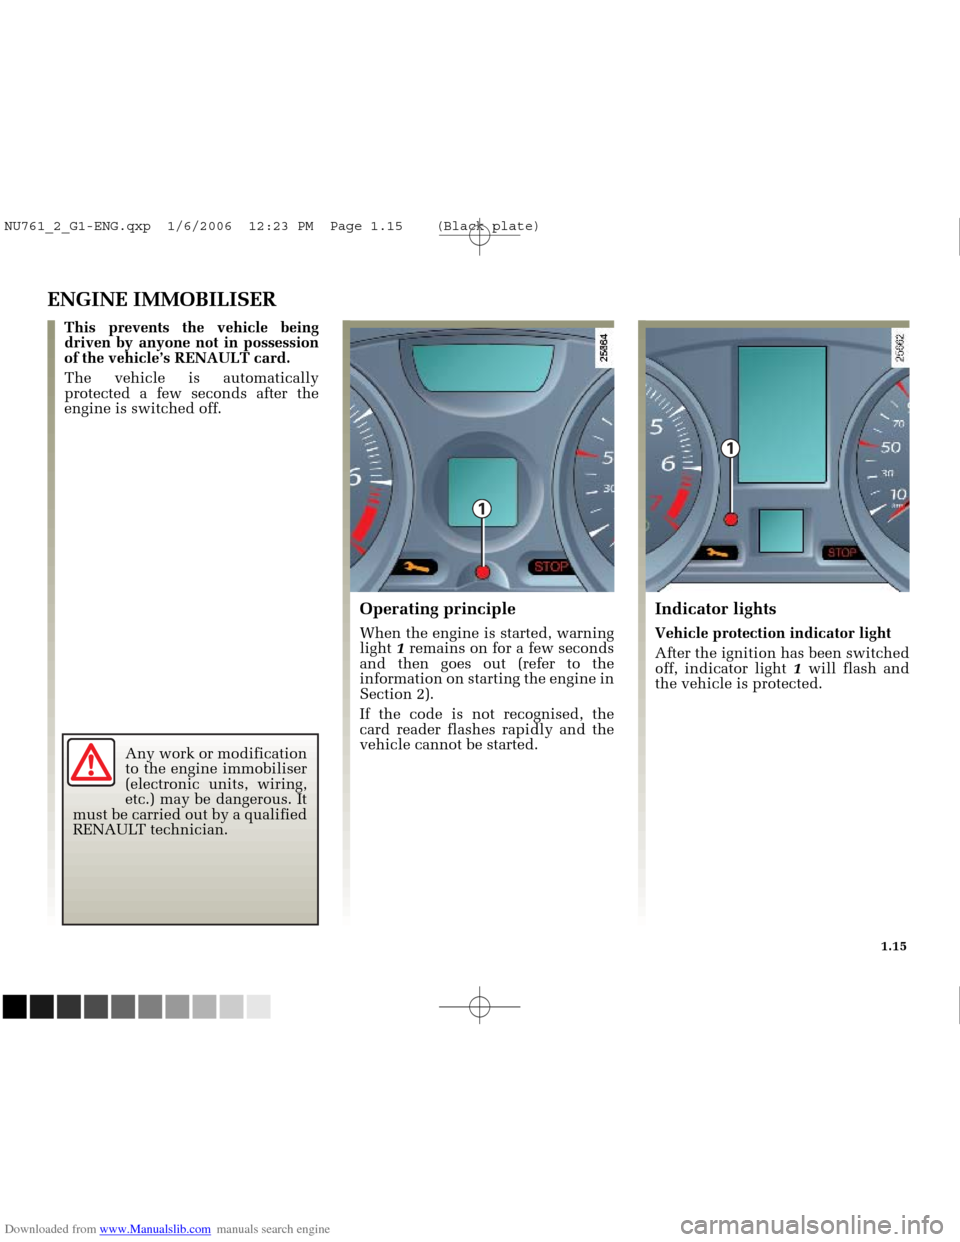
Operating principle
When the engine is started, warning
light 1remains on for a few seconds
and then goes out (refer to the
information on starting the engine in
Section 2).
If the code is not recognised, the
card reader flashes rapidly and the
vehicle cannot be started.
Indicator lights
Vehicle protection indicator light
After the ignition has been switched
off, indicator light 1will flash and
the vehicle is protected.
NU761_2_G1-ENG.qxp 1/6/2006 12:23 PM Page 1.15 (Black plate)
Page 26 of 250
Downloaded from www.Manualslib.com manuals search engine
2
1
NU761_2_G1-FRA.qxd 10/11/05 15:53 Page 1.16
1.16
ENGINE IMMOBILISER (continued)
If the RENAULT card is faulty (card
reader flashing rapidly), if possible
use the second RENAULT card
(supplied with the vehicle).
In this situation, it is essential to
contact a RENAULT Dealer who is
the only one qualified to repair the
engine immobiliser system.
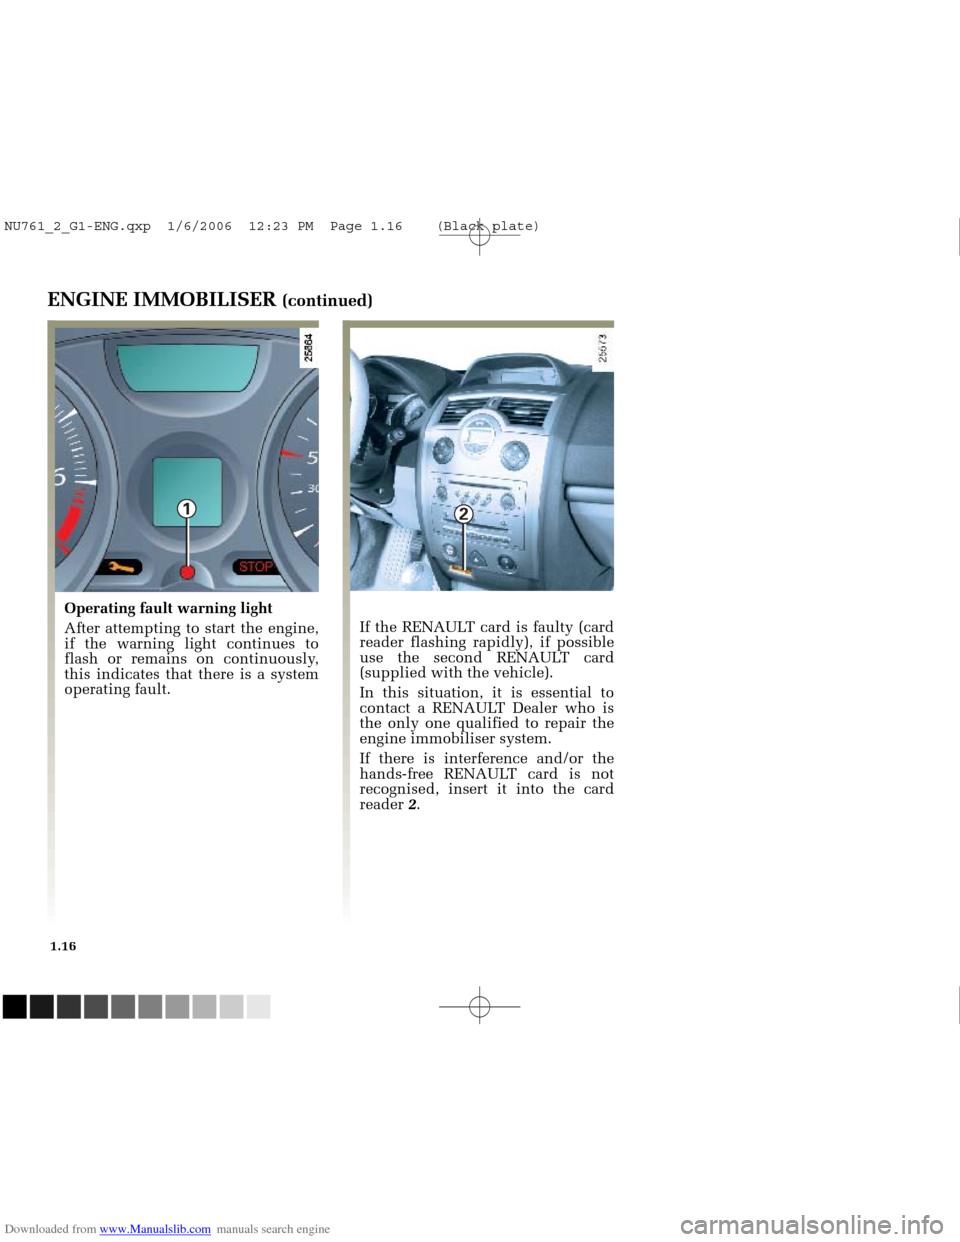
If there is interference and/or the
hands-free RENAULT card is not
recognised, insert it into the card
reader 2.
Operating fault warning light
After attempting to start the engine,
if the warning light continues to
flash or remains on continuously,
this indicates that there is a system
operating fault.
NU761_2_G1-ENG.qxp 1/6/2006 12:23 PM Page 1.16 (Black plate)
Page 27 of 250
Downloaded from www.Manualslib.com manuals search engine
A
2
1
NU761_2_G1-FRA.qxd 10/11/05 15:53 Page 1.17
1.17
The head restraint is
important for safety. Ensure
that it is in place and in the
correct position. The
distance between your head and
the head restraint should be as
small as possible. The top of your
head should be in line with the top
of the head restraint.
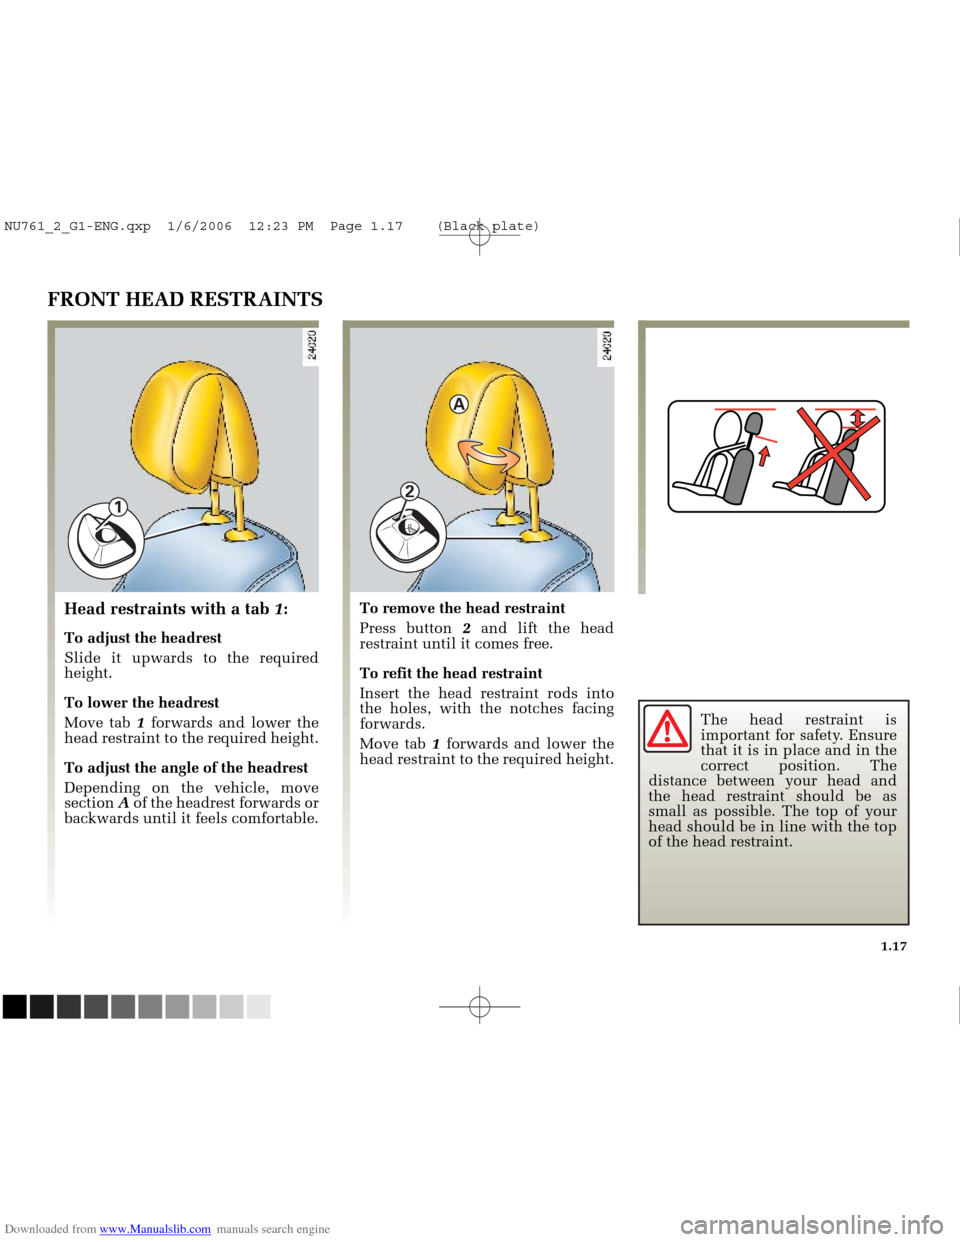
FRONT HEAD RESTRAINTS
To remove the head restraint
Press button 2and lift the head
restraint until it comes free.
To refit the head restraint
Insert the head restraint rods into
the holes, with the notches facing
forwards.
Move tab 1 forwards and lower the
head restraint to the required height.Head restraints with a tab 1:
To adjust the headrest
Slide it upwards to the required
height.
To lower the headrest
Move tab 1 forwards and lower the
head restraint to the required height.
To adjust the angle of the headrest
Depending on the vehicle, move
section Aof the headrest forwards or
backwards until it feels comfortable.
NU761_2_G1-ENG.qxp 1/6/2006 12:23 PM Page 1.17 (Black plate)
Page 28 of 250
Downloaded from www.Manualslib.com manuals search engine
1
NU761_2_G1-FRA.qxd 10/11/05 15:53 Page 1.18
1.18
The head restraint is a
safety component, check
that it is fitted and in the
correct position.
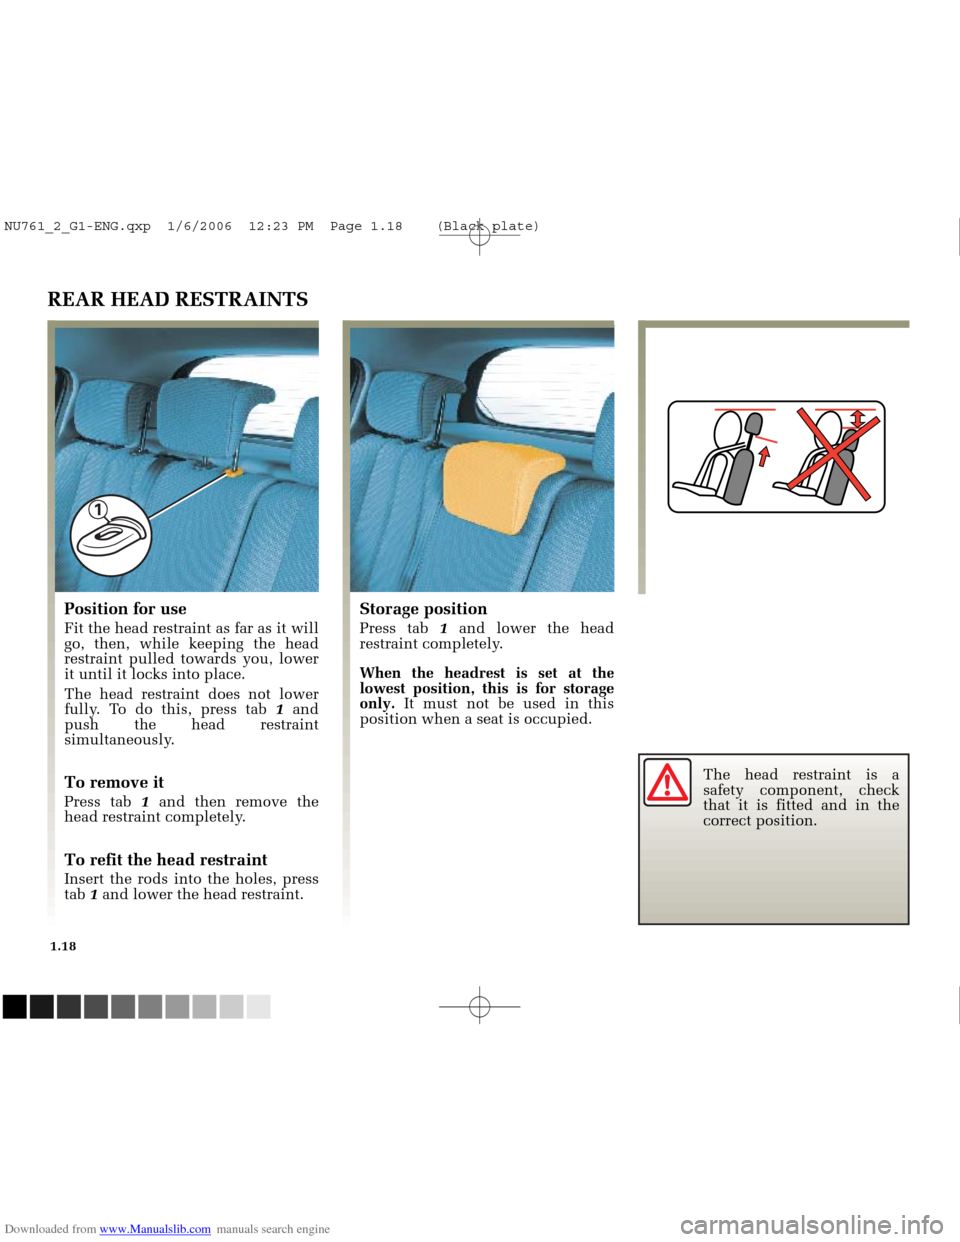
REAR HEAD RESTRAINTS
Position for use
Fit the head restraint as far as it will
go, then, while keeping the head
restraint pulled towards you, lower
it until it locks into place.
The head restraint does not lower
fully. To do this, press tab 1 and
push the head restraint
simultaneously.
To remove it
Press tab 1and then remove the
head restraint completely.
To refit the head restraint
Insert the rods into the holes, press
tab 1and lower the head restraint.
Storage position
Press tab 1and lower the head
restraint completely.
When the headrest is set at the
lowest position, this is for storage
only. It must not be used in this
position when a seat is occupied.
NU761_2_G1-ENG.qxp 1/6/2006 12:23 PM Page 1.18 (Black plate)
Page 29 of 250
Downloaded from www.Manualslib.com manuals search engine
1
3
4
2
NU761_2_G1-FRA.qxd 10/11/05 15:53 Page 1.19
1.19
To avoid hindering the
efficient operation of the
seat belts, you are advised
to keep the seat belt on your
shoulder.
Make sure that the seatback is
locked in place correctly.
No objects should be placed on the
floor (area in front of driver) as
these objects could slide under the
pedal during braking manoeuvres,
thus obstructing its use.
For safety reasons, make
these adjustments only
when the vehicle is
stationary.
FRONT SEATS
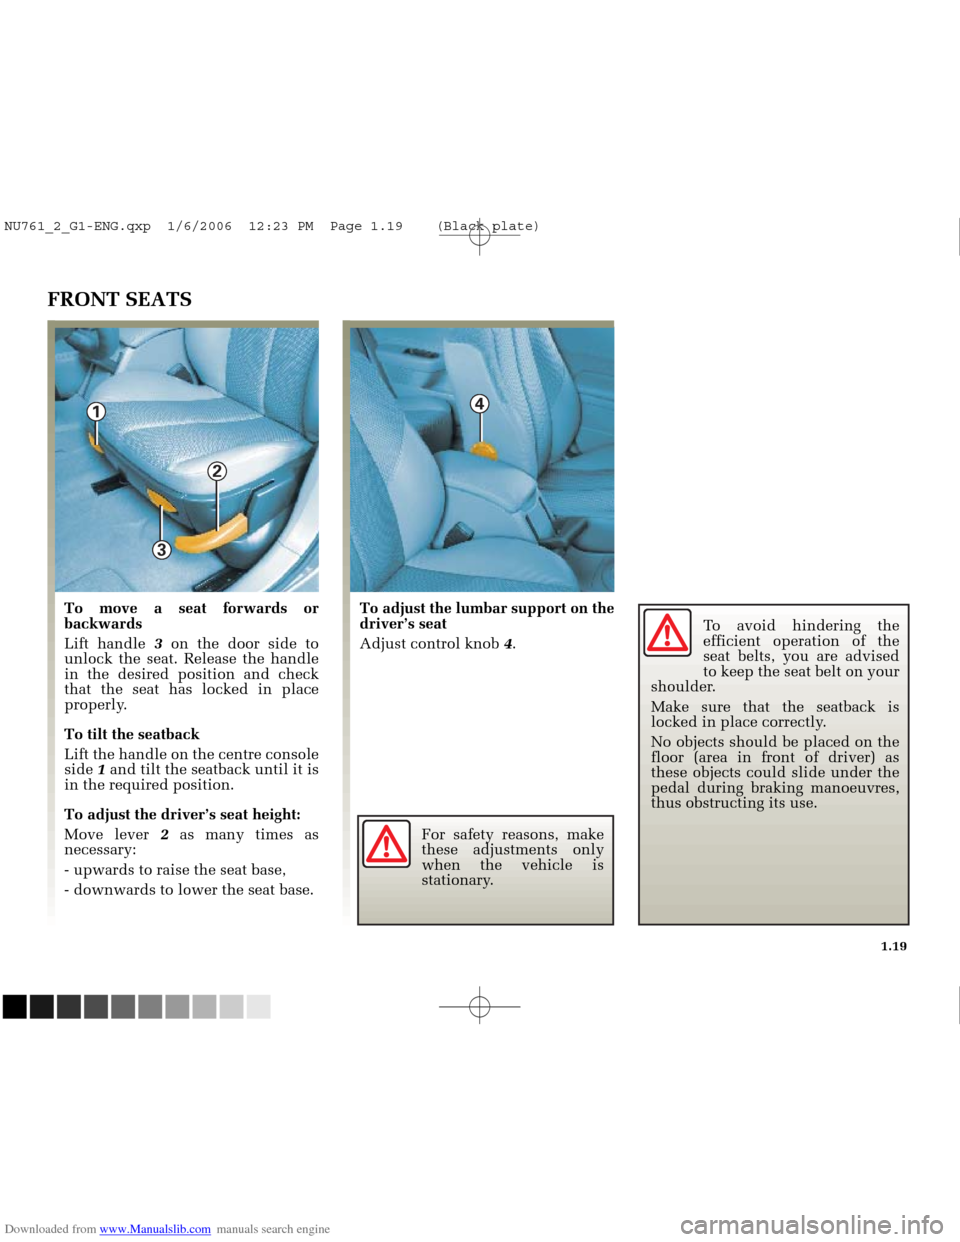
To move a seat forwards or
backwards
Lift handle 3on the door side to
unlock the seat. Release the handle
in the desired position and check
that the seat has locked in place
properly.
To tilt the seatback
Lift the handle on the centre console
side 1and tilt the seatback until it is
in the required position.
To adjust the driver’s seat height:
Move lever 2as many times as
necessary:
- upwards to raise the seat base,
- downwards to lower the seat base. To adjust the lumbar support on the
driver’s seat
Adjust control knob
4.
NU761_2_G1-ENG.qxp 1/6/2006 12:23 PM Page 1.19 (Black plate)
Page 30 of 250
Downloaded from www.Manualslib.com manuals search engine
5
6
NU761_2_G1-FRA.qxd 10/11/05 15:53 Page 1.20
1.20
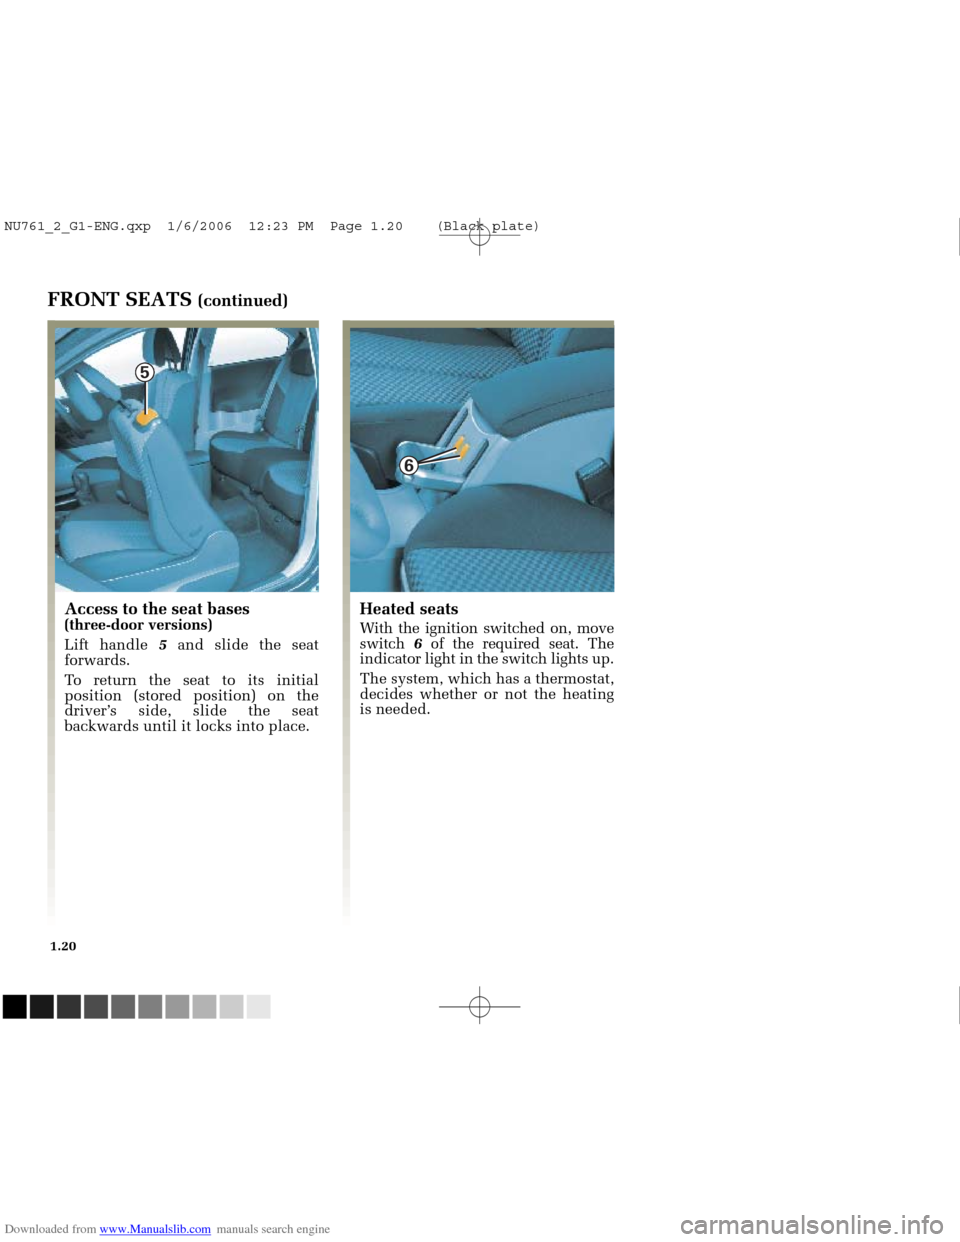
FRONT SEATS (continued)Heated seats
With the ignition switched on, move
switch 6of the required seat. The
indicator light in the switch lights up.
The system, which has a thermostat,
decides whether or not the heating
is needed.
Access to the seat bases(three-door versions)
Lift handle 5and slide the seat
forwards.
To return the seat to its initial
position (stored position) on the
driver’s side, slide the seat
backwards until it locks into place.
NU761_2_G1-ENG.qxp 1/6/2006 12:23 PM Page 1.20 (Black plate)